6 Shipments and Receipts
In Merchandising, shipments and receipts are recorded for purchase orders, transfers, and allocations, to manage their progress through the supply chain. In most cases, this activity occurs in another solution, so in Merchandising the shipment and receipt information is provided for visibility and reconciliation, as needed. However, in certain cases there may also be a reason for certain users in Merchandising to be able to ship or receive a purchase order, transfer, or allocation. These functions are available when the system options Allow Shipping / Receiving at Stores (for store sourced transfers) and/or Allow Shipping / Receiving at Warehouses (for warehouse sourced transfers) are set to Yes.
Ship a Purchase Order
The Order Shipment page allows the manual creation of shipment records for a purchase order at item location level.
To create a shipment for the purchase order:
-
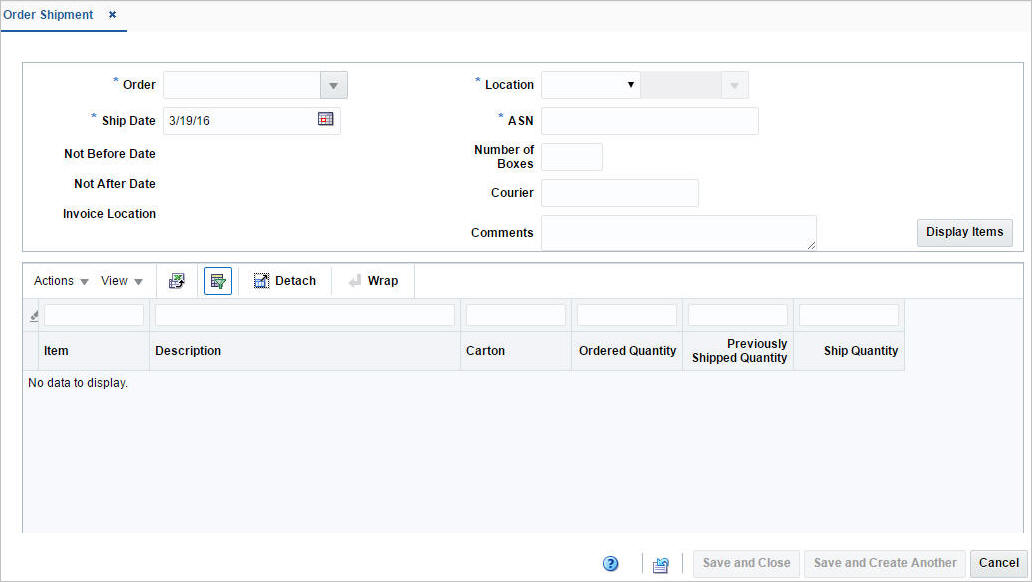
From the Tasks menu, select Inventory > Shipments and Receipts > Ship Purchase Order. The Order Shipment page appears.
Figure 6-1 Order Shipment Page
-
In the Order field, enter the order number or select or search the order number. This field is a required field.
-
In the Ship Date field, enter a date or use the Calendar icon to select a date.
-
In the Not Before Date field, the Not Before Date for the Purchase Order will be displayed.
-
In the Not After Date field, the Not After Date of the Purchase Order will be displayed.
-
In the Invoice Location field, the invoice location for the purchase order will be displayed.
-
In the Location field, select the location type from the list. The options are: Store and Warehouse. Then enter, select or search for the location. This field is a required field.
-
In the ASN field, enter an ASN number. This field is a required field.
-
In the Number of Boxes field, enter the number of boxes.
-
In the Courier field, enter the courier name, if applicable.
-
In the Comments field, enter any additional comments as necessary.
-
Click Display Items to populate the table below with the items associated to the selected order/location.
-
In the Ship Quantity columns, enter the quantity you want to ship for each item.
Note:
If a ship quantity is entered the item will be shipped, upon saving the data. If no ship quantity is entered the item will not be shipped.
-
In the Carton columns, enter the cartons for each item.
-
To process the entered data, save your entries.
Ship a Transfer
Transfers are normally shipped using a warehouse management system or a store inventory management system, not in Merchandising; however in some cases, there may be a reason to do so. This can be done in two ways:
-
The Transfers page allows you to ship the transfer as a single shipment with all quantity being shipped at once. See Ship a Transfer in Transfers for additional information.
-
By creating a Bill of Lading (BOL), which allows you to create shipment that includes multiple transfers and allocations that are all shipping from the same location, to the same location.
Note:
The option to ship transfers and allocations is available only when the system options Allow Shipping / Receiving at Stores (for store sourced transfers) and/or Allow Shipping / Receiving at Warehouses (for warehouse sourced transfers) are set to Yes.
Create a Bill of Lading
To create a bill of lading (BOL):
-
From the Tasks menu, select Inventory > Shipments and Receipts > Create Bill of Lading. The Bill of Lading page appears.
Figure 6-2 Bill of Lading Page
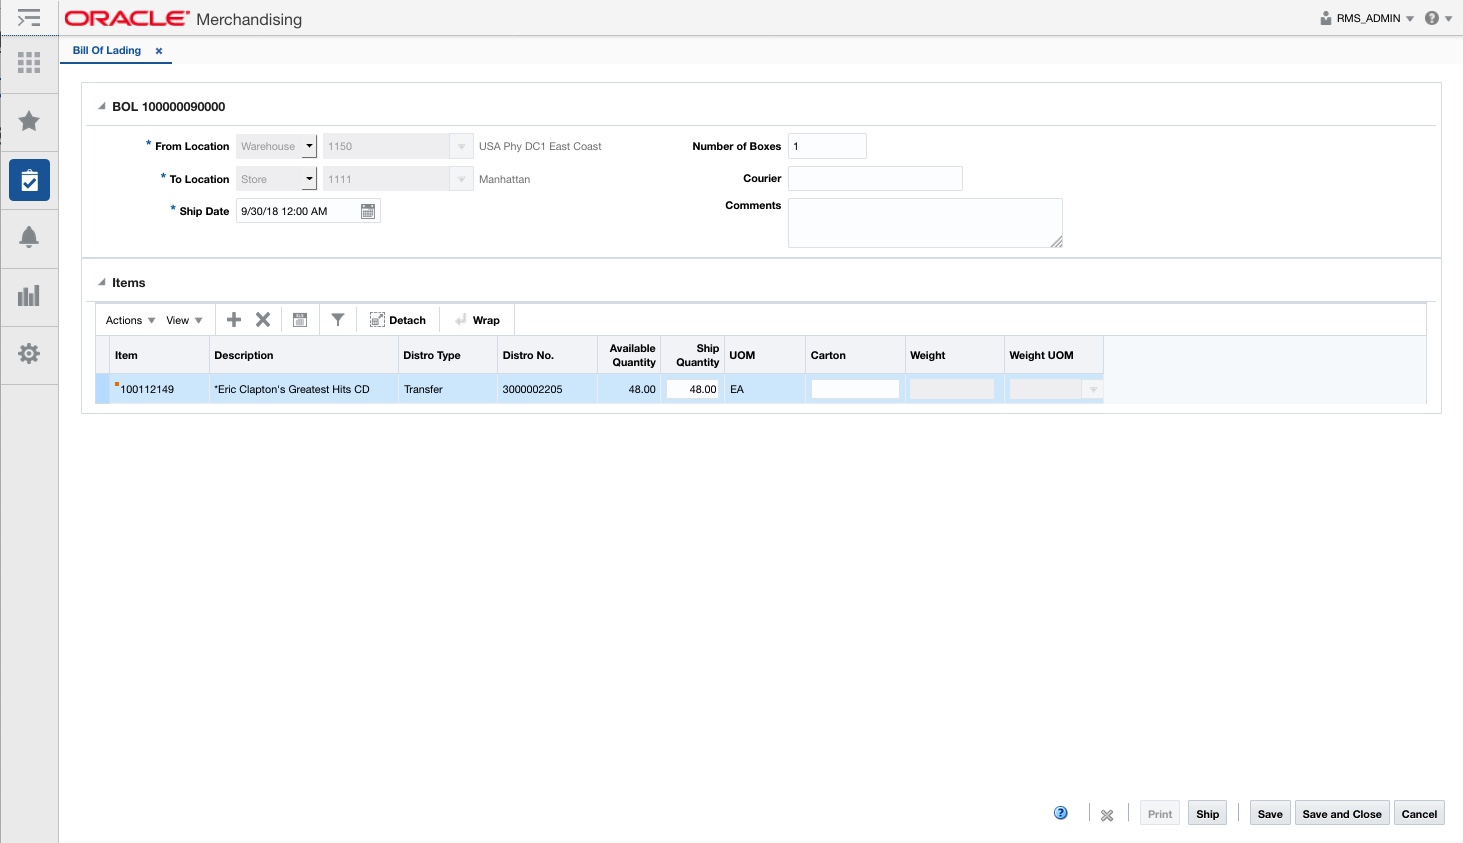
The top of the page displays the following fields:
Table 6-1 Bill of Lading Header - Fields and Description
Fields Description Title
The title displays the Bill of Lading ID to the top left of the header.
This field contains the MRT number by default.
From Location
Select the location type, either Store or Warehouse from the list. Then enter, select or search for the location.
To Location
Select the location type, either Store or the Warehouse from the list. Enter, select or search for the location.
Ship Date
Enter the ship date and time, or use the Calendar icon to select a date and a time.
If you do not enter a time, the time defaults to midnight (00:00:00).
Courier
Enter the courier name, if applicable.
Comments
Enter any additional comments as necessary.
Items
In items section you can add or delete information for the items on the BOL.
Once you have added items, you can edit Ship Quantity and Carton column directly in the table.
Add Items
To add items:
-
In the Bill of Lading page, go to the Items section.
-
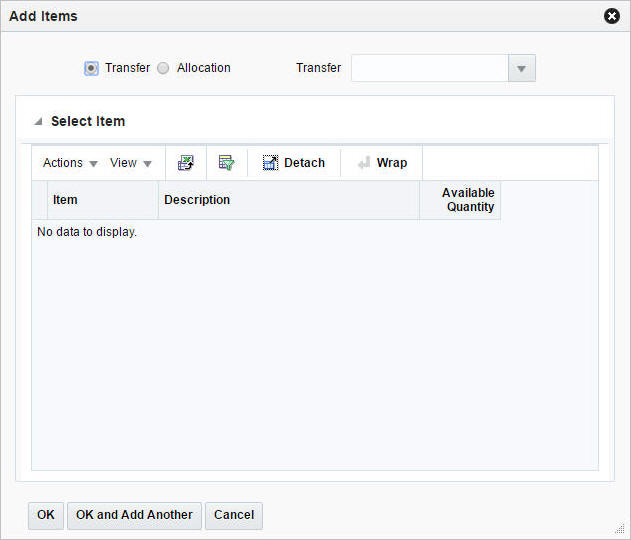
From the Actions menu, select Add Items or click the Add Items icon
 . The Add Items pop-up appears.
Figure 6-3 Add Items Pop-up
-
Select any one of the following options: Transfer, Allocation.
-
In the Transfer/Allocation field, enter, select or search for transfer/allocation. The items of the transfer/allocation are displayed in the table below.
-
Then choose one of the following options.
-
Click OK to add the items to the Items section and close the pop-up.
-
Click OK and Add Another to add additional items.
-
Click Cancel to reject all entries and close the pop-up.
-
Manage Bills of Lading
Managing bills of lading involves performing one or more of the following tasks:
-
Searching for BOL
-
Editing BOL
-
Viewing BOL
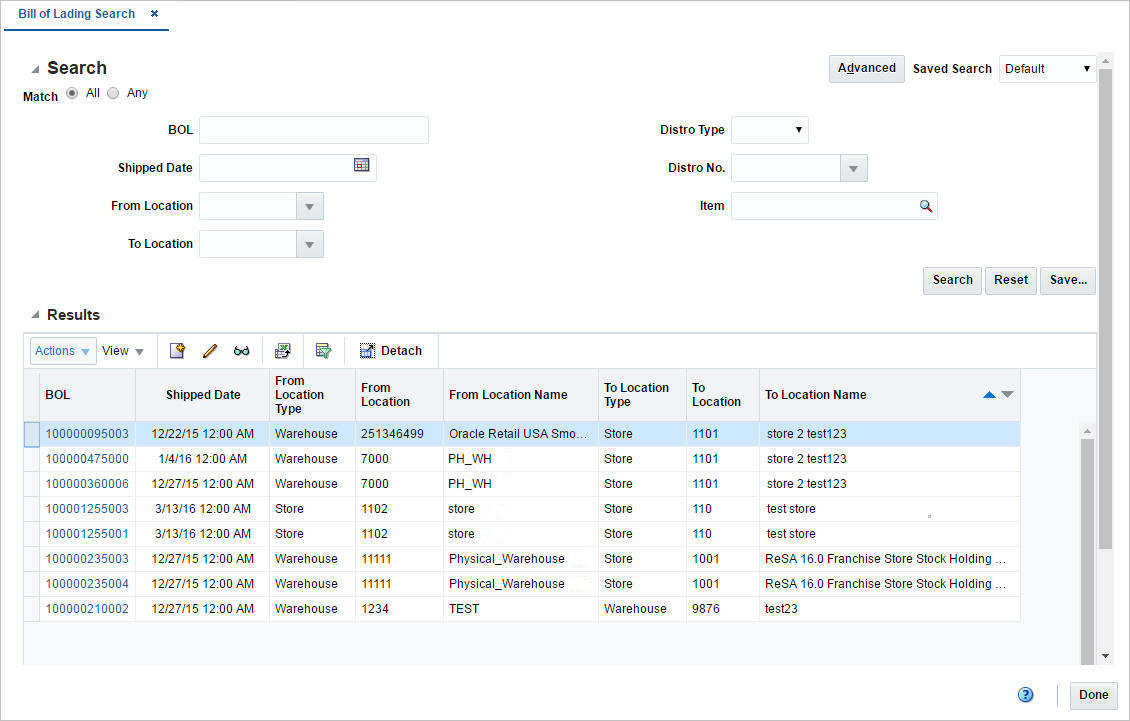
You can access the Bill of Lading Search page from the Task menu, select Inventory > Shipments and Receipts > Manage Bills of Lading. The Bill of Lading Search page appears.
In the Bill of Lading Search page you can search for bill of lading by specifying various search criteria. You can choose to access BOL in the search results in edit or view mode depending on security privileges. There are also options for creating a new bill of lading.
Figure 6-4 Bill of Lading Search Page
Searching for Bill of Lading
To search for a Bill of Lading:
-
From the Tasks menu, select Inventory > Shipments and Receipts > Manage Bills of Lading. The Bill of Lading Search page appears.
-
You can search for a BOL by providing search criteria in the search section. The criteria can be provided either in Basic or Advanced mode, depending on the requirement. Basic is the default mode when the search page is entered. Click Advanced to access the search panel in advanced mode. You can return to Basic mode by clicking Basic.
Search for a Bill of Lading Through the Basic Search Criteria
To search for a BOL through the basic search criteria:
-
Enter or select one or all of the following basic search criteria.
Table 6-2 Bill of Lading Search - Basic Search Criteria
Fields Description Match option
Check radio button All or Any.
All - only BOLs matching all entered search criteria are shown.
Any - BOLs matching each entered search criteria are shown.
BOL
Enter the BOL description.
Shipped Date
Enter the date or click the calendar icon and select the date.
From Location
Enter the location or select and search the location and the ID.
To Location
Enter the location or select and search the location and the ID.
Distro Type
Select the distro type from the list. The options are: Transfer, Location.
Distro No.
Enter the distro number, select or search the distro number.
Item
Enter the item number of the item or search the item.
Note:
For more information about searches, see Search Screens in the Oracle® Retail Merchandising Do the Basics User Guide.
-
Click Search. The bills of lading that match the search criteria are displayed in the Results section.
-
Click Reset to execute the saved search.
-
Click Done to close the page.
Search for a BOL Through the Advanced Search Criteria
To search for a BOL through the advanced search criteria:
-
Enter or select one or all of the following advanced search criteria.
Table 6-3 Bill of Lading Search - Advanced Search Criteria
Search Field Description BOL
Enter the BOL description.
Shipped Date
Enter the date or click the calendar icon and select the date.
From Location
Enter the location or select and search the location and the ID.
To Location
Enter the location or select and search the location and the ID.
Distro Type
Select the distro type from the list. The options are: Transfer, Location.
Distro No.
Enter the distro number, select or search the distro number.
Item
Enter the item number of the item or search the item.
Item Description
Enter the item description of the item.
Note:
For more information about searches, see Search Screens in the Oracle® Retail Merchandising Do the Basics User Guide.
-
To narrow down the search, use the list next to the search fields. For example, determine if the entered value should equal or not equal the search result.
-
Click Search. The bills of lading that match the search criteria are displayed in the Results section.
-
Click Reset to clear the search section and results.
-
Click Add Fields to add more fields for the advanced search. To remove the field from the search, click the x right next to the field.
-
Click Done to close the page.
Edit a BOL
To edit a BOL:
-
From the Tasks menu, select Inventory > Shipments and Receipts > Manage Bills of Lading. The Bill of Lading Search page appears.
-
Select the BOL you want to edit.
-
From the Actions menu, select Edit or click the Edit icon.
 . The Bill of Lading page appears.
You can edit the Ship Quantity and Carton column directly in the table.
For more information on about the Bill of Lading page, see the Create a Bill of Lading section.
-
Make the necessary changes and save your changes.
Receive a Shipment
Receipts for purchase orders, transfers, and allocations are normally done using a warehouse management system or a store inventory management system, not in Merchandising; however in some cases, there may be a reason to do so. When this is required, Merchandising provides screens where you can.
-
Receive by Item
-
Receive by Carton
-
Adjust Receipts, for purchase orders only
Note:
The option to receive POs, transfers, and allocations is available only when the system options Allow Shipping / Receiving at Stores (for store sourced transfers) and/or Allow Shipping / Receiving at Warehouses (for warehouse sourced transfers) are set to Yes.
Search for a Shipment
The Shipment Search page allow you to enter criteria in order to search for shipments and view the results of the search. Additionally you can receive and adjust shipments in this page.
You can access the Shipment Search page from the Task menu, select Inventory > Shipments and Receipts > Shipments. The Shipment Search page appears.
Figure 6-5 Shipment Search Page
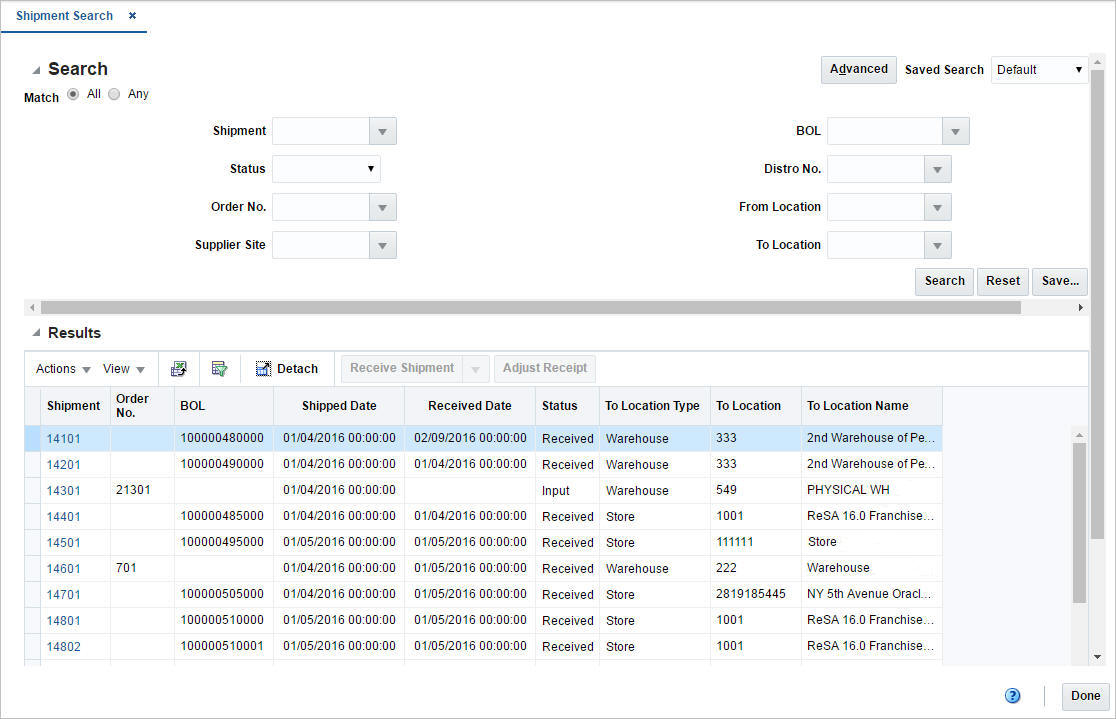
To search for a shipment:
-
From the Task menu, select Inventory > Shipments and Receipts > Shipments. The Shipment Search page appears.
-
You can search for a shipment using basic or advanced search criteria, depending on the requirement. The basic mode is the default search mode.
-
Click Advanced to access the search section in advanced mode.
-
Click Basic to return to the basic mode.
-
Search for a Shipment Through the Basic Search Criteria
To search for a shipment using basic search criteria:
-
Enter, select or search for one or all of the following basic search criteria.
Table 6-4 Shipment Search - Basic Search Criteria and Description
Fields Description Match option
Check radio button All or Any.
All - only shipments matching all entered search criteria are shown.
Any - shipments matching any of the entered search criteria are shown.
Shipment
Enter, select or search for the shipment.
Status
Select the status from the list.
Order No.
Enter, select or search for the order number.
Supplier Site
Enter, select or search for the supplier site.
BLO
Enter, select or search for the bill of lading.
Distro No.
Enter, select or search for the distro number.
From Location
Enter, select or search for the from location.
To Location
Enter, select or search for the to location.
Note:
For more information about searches, see Search Screens in the Oracle® Retail Merchandising Do the Basics User Guide.
-
Click Search. The shipments that match the search criteria are displayed in the Results section.
-
Click Reset to clear the search section and results.
-
Click Done to close the page.
Search for a Shipment Through Advanced Search Criteria
To search for a shipment using advanced search criteria:
-
To search using advanced search criteria, enter or select one or all of the advanced search criteria.
Note:
For more information about searches, see Search Screens in the Oracle® Retail Merchandising Do the Basics User Guide.
-
To narrow down the search, use the list next to the search fields. For example, determine if the entered value should equal or not equal the search result.
-
Click Search. The shipments that match the search criteria are displayed in the Results section.
-
Click Reset to clear the search section and results.
-
Click Add Fields to add more fields for the advanced search. To remove the field from the search, click the x right next to the field.
-
Click Done to close the page.
Shipment
The Shipment page allows you to view the details of a shipment for a purchase order, a transfer or allocation. You can navigate to additional pages to view details regarding a selected item and details regarding the purchase order, appointments and transfers associated with the shipment. Receipt adjustment details are also be displayed in the Shipment page.
You can cancel shipments in this page, but this option is only available for purchase order (PO) shipments. The option to cancel a shipment is not available for transfer or allocation (BOL) shipments.
You can access the page:
-
From the Tasks menu, select Inventory > Shipments and Receipts > Shipments. The Shipment Search page appears.
-
Enter or select search criteria as desired to make the search more restrictive.
-
Click Search. The shipments that match the search criteria are displayed in the Results section.
-
In the Shipment column, click the shipment ID link, or mark a record and select Actions > Edit, or use the Edit icon
 . The Shipment page appears.
Figure 6-6 Shipment Page
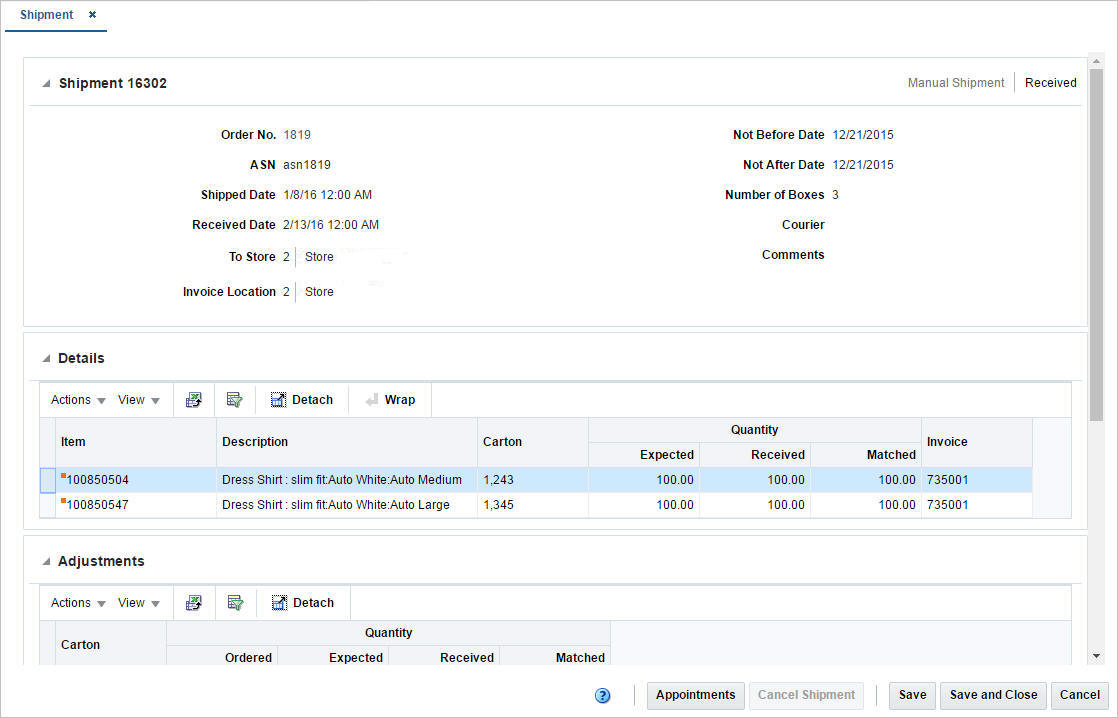
Shipment
The Shipment section displays the shipment ID. In addition the origin and the status of the shipment are displayed in the top right corner of the section. The section varies, depending on whether you view a shipment for a purchase order (PO) or allocation (BOL).
When you view a PO shipment, this section displays the following fields.
-
Order No.
The Order No. contains a link that opens the Order page in view mode. For more information about the Order page, see Define/Enter a Purchase Order in the Oracle® Retail Merchandising Purchase Orders and Contracts User Guide.
-
ASN
-
Shipped Date
-
Received Date
The Received Date field is only visible if the shipment has already been received.
-
To Store/To Warehouse
The label for the To Store/To Warehouse field is set, depending on whether the destination location is a store or warehouse.
-
Invoice Location
-
Not Before/Not After Date
-
Number of Boxes
-
Courier
-
Comments
When you view an allocation (BOL) shipment, this section displays the following fields.
-
BOL
-
Shipped Date
-
Received Date
The Received Date field is only visible if the shipment has already been received.
-
To Store/To Warehouse
The label for the To Store/To Warehouse field is set, depending on whether the destination location is a store or warehouse.
-
From Store/From Warehouse
The label for the From Store/From Warehouse field is set, depending on whether the destination location is a store or warehouse.
-
Number of Boxes
-
Courier
-
Comments
Details
The Details section displays receipt details. The fields displayed in this section vary, depending whether you view a purchase order or allocation shipment.
When you view a PO shipment, the following are displayed by default:
-
Item
-
Description
-
Carton
-
Invoice
-
Quantity - Expected, Received, Matched
The Shipment page only allows users to view parent shipments online. It is expected that the shipment quantities displayed for the parent shipment are an aggregate of the parent shipment and child shipment quantities.
When you view an allocation (BOL) shipment, the following fields are displayed by default:
-
Item
-
Description
-
Distro No.
-
Carton
-
Tampered
-
Quantity - Expected, Received
-
Inventory Status
The Distro No. column can contain either an Allocation or Transfer ID.
If the column contains a Transfer ID you can open the Transfer page in view mode by clicking on the Transfer ID link. For more information about the Transfer page, see the Transfers section.
If the column contains an Allocation ID, the link is disabled.
Receive a Shipment by Item
The Receive by Item page allows you to receive items within a shipment. The receipt of the shipment can be for a purchase order, transfer or allocation.
Figure 6-7 Receive By Item Page
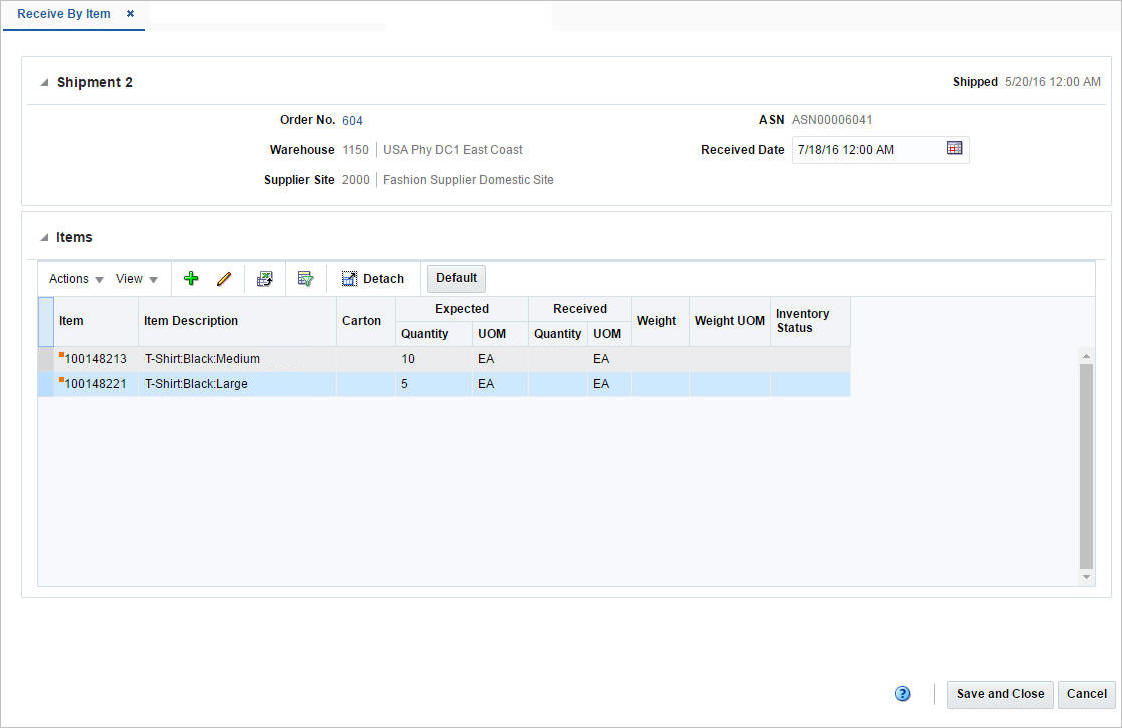
Shipment
This section contains the shipment details. The title of section displays the shipment number and the shipped date. The shipped date and time is displayed at the top right corner of the section.
The section varies based on the type of shipment receipt.
When you receive a purchase order shipment, the section displays the following fields.
-
Order No.
The Order No. field contains a link that opens the Order page in view mode. For more information about the Order page, see Define/Enter a Purchase Order in the Oracle® Retail Merchandising Purchase Orders and Contracts User Guide.
-
Warehouse/Store
-
Supplier Site
-
ASN
-
Received Date
Enter the date and time of receipt or use the Calendar icon to select a date and time.
When you receive a transfer shipment, the section displays the following fields.
-
Transfer
The Transfer field contains link that opens the Transfer page in view mode. For more information about the Transfer page, see the Transfer Details section.
-
Warehouse/Store
-
BOL
-
Received Date
Enter the date and time of receipt or use the Calendar icon to select a date and time.
When you receive a allocation (BOL) shipment, the section displays the following fields.
-
Allocation
-
Warehouse/Store
-
BOL
-
Received Date
Enter the date and time of receipt or use the Calendar icon to select a date and time.
Receiving Shipments by Item
To receive shipments by item, follow the steps below.
-
From the Tasks menu, select Inventory > Shipments and Receipts > Shipments. The Shipment Search page appears.
-
Enter or select search criteria as desired to make the search more restrictive.
-
Click Search. The shipments that match the search criteria are displayed in the Results section.
-
Select a record in the Results table.
-
Then select Actions > Receive Shipment > by Item, or click the Receive Shipment button > by Item. The Receive By Item page appears.
-
In the Shipment section, enter the receive date and time or use the Calendar icon to select a date and time.
-
Then select an item in the table.
-
Select Actions > Edit, or use the Edit icon
 . The Receive Item page appears. The item, the expected quantity and standard UOM are displayed.
-
In the Receipt Quantity field, enter the quantity. This field is a required field.
Then enter, select or search for the unit of measure in which the receipt quantity has been entered.
-
For catch weight items, enter the receipt weight.
-
In the Inventory Status field, select the inventory status from the list.
-
Then choose one of the following options.
-
Click OK to receive the current item and close the page.
-
Click OK and Receive Another to receive additional items.
-
Click Cancel to reject all entries and close the page.
-
-
In the Receive By Item page, save your entries.
Note:
If you want to default the expected quantity as received for all items in the table, select the Default button.
Add Items to a Shipment to Receive
You can add items to a shipment you want to receive.
-
In the Items section, select Actions > Add, or use the Add icon
 . The Add Item page appears.
-
In the Item field, enter or search for an item. This field is a required field.
-
In the Receipt Quantity field, enter the received quantity. Then select the unit of measure for the item.
-
For catch weight items, enter the received weight.
-
In the Inventory Status field, select the inventory status from the list.
-
Then choose one of the following options.
-
Click OK to add the current item and close the page.
-
Click OK and Add Another to add additional items.
-
Click Cancel to reject all entries and close the page.
-
Receive a Shipment by Carton
The Receive By Carton page allows you to receive shipments by carton with in a shipment. The receipt of the shipment can be from a purchase order, transfer or allocation
Figure 6-8 Receive By Carton Page
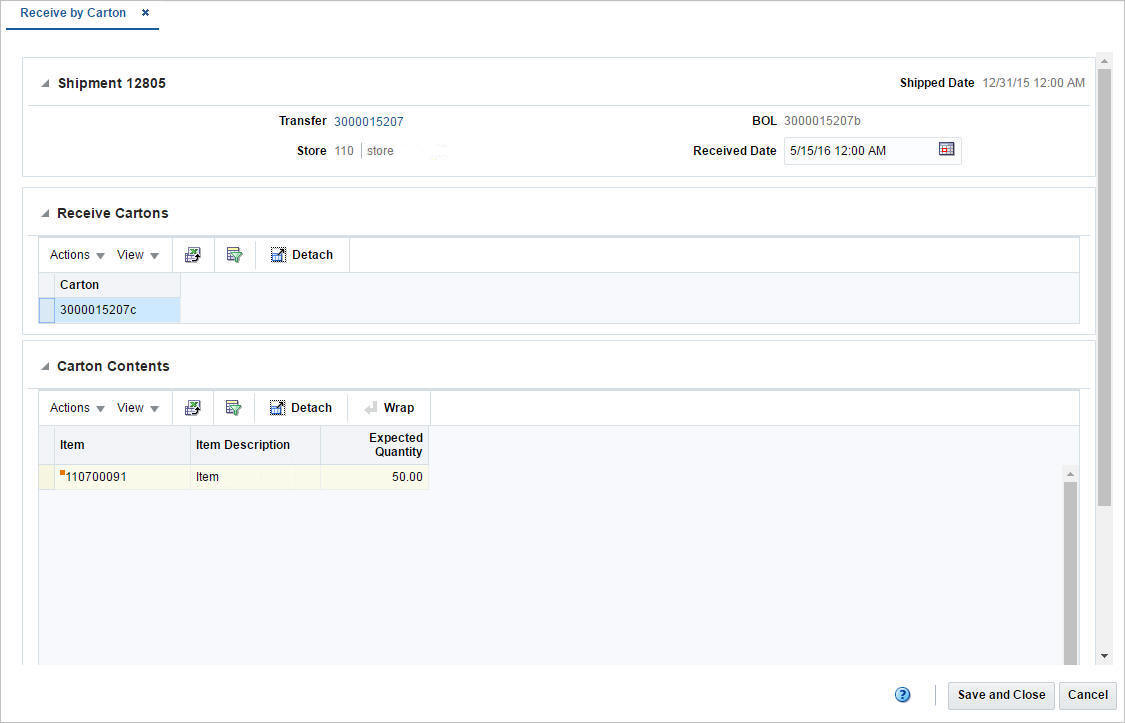
Shipment
This section contains the shipment details. The title of section displays the shipment number and the shipped date. The shipped date and time is displayed at the top right corner of the section.
The section varies based on the type of shipment receipt.
When you receive a purchase order shipment, the section displays the following fields.
-
Order No.
The Order No. field contains a link that opens the Order page in view mode. For more information about the Order page, see Define/Enter a Purchase Order in the Oracle® Retail Merchandising Purchase Orders and Contracts User Guide.
-
Warehouse/Store
-
Supplier Site
-
ASN
-
Received Date
Enter the date and time of receipt or use the Calendar icon to select a date and time.
When you receive a transfer shipment, the section displays the following fields.
-
Transfer
The Transfer field contains link that opens the Transfer page in view mode. For more information about the Transfer page, see the Transfer Details section.
-
Warehouse/Store
-
BOL
-
Received Date
Enter the date and time of receipt or use the Calendar icon to select a date and time.
When you receive a allocation (BOL) shipment, the section displays the following fields.
-
Allocation
-
Warehouse/Store
-
BOL
-
Received Date
Enter the date and time of receipt or use the Calendar icon to select a date and time.
Receive Shipments by Carton
To receive shipments by carton, follow the steps below.
-
From the Tasks menu, select Inventory > Shipments and Receipts > Shipments. The Shipment Search page appears.
-
Enter or select search criteria as desired to make the search more restrictive.
-
Click Search. The shipments that match the search criteria are displayed in the Results section.
-
Select a record in the Results table.
-
Then select Actions > Receive Shipment > by Carton, or click the Receive Shipment button > by Carton. The Receive By Carton page appears.
-
In the Shipment section, enter the receive date and time or use the Calendar icon to select a date and time.
-
In the Receive Carton section, select the cartons you want to receive.
-
Then click Save and Close.
Receipt Adjustment by Units
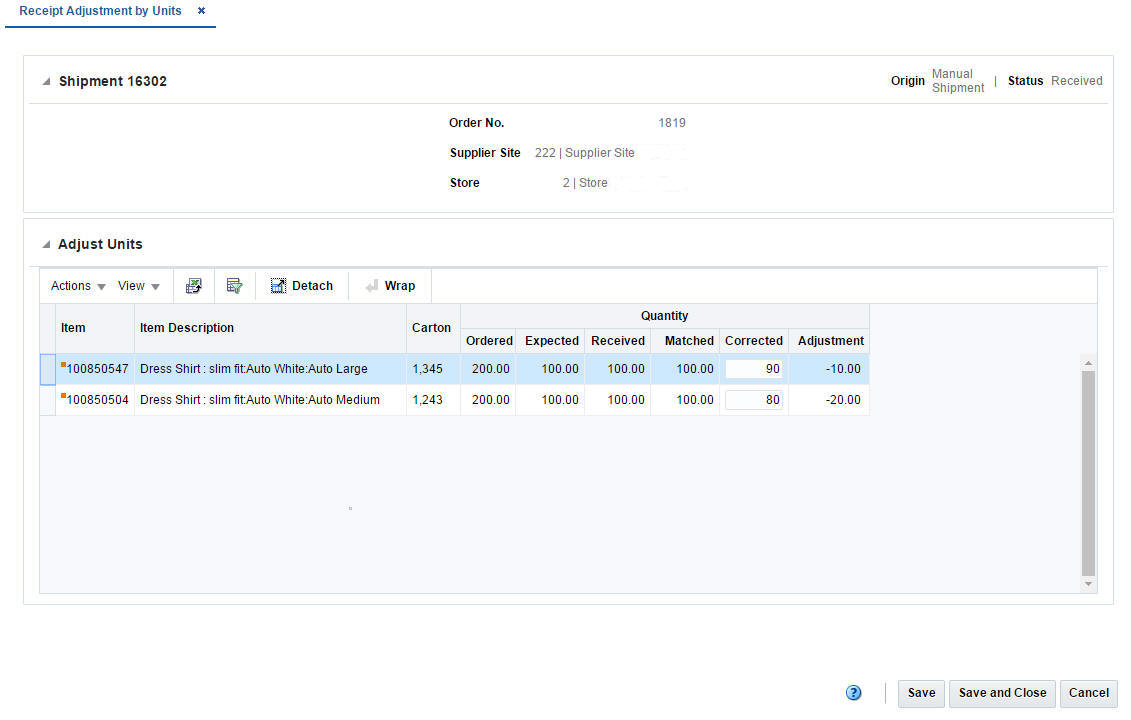
The Receiver Unit Adjustment page allows you to adjust the number of units already received by shipment or order.
The unit adjustment is performed at item level that exists in a shipment.
Figure 6-9 Receipt Adjustments by Unit Page
Shipment
The title of section displays the shipment number. The origin and status of the shipment are displayed at the top right corner of the section. Additionally the Shipment section displays shipment details such as order number, supplier site, location type.
Adjust Units
The Adjust Units section displays the item, item description, carton and quantity information.
You can update the quantity for an item directly in the table. Enter the new quantity in the Corrected column.
Adjust Units Received
To adjust the units of a shipment you have already received, follow the steps below.
-
From the Tasks menu, select Inventory > Shipments and Receipts > Shipments. The Shipment Search page appears.
-
Enter or select search criteria as desired to make the search more restrictive.
-
Click Search. The shipments that match the search criteria are displayed in the Results section.
-
Select a record in the Results table.
-
Then select Actions > Adjust Receipt, or click the Adjust Receipt button. The Receipt Adjustment by Units page appears. The shipment details and received items are displayed.
-
In the Corrected column, enter the revised number of units received for each item. The Adjustment column displays the adjusted quantity.
-
Then save your adjustments.
Reconcile Transfers and Allocations
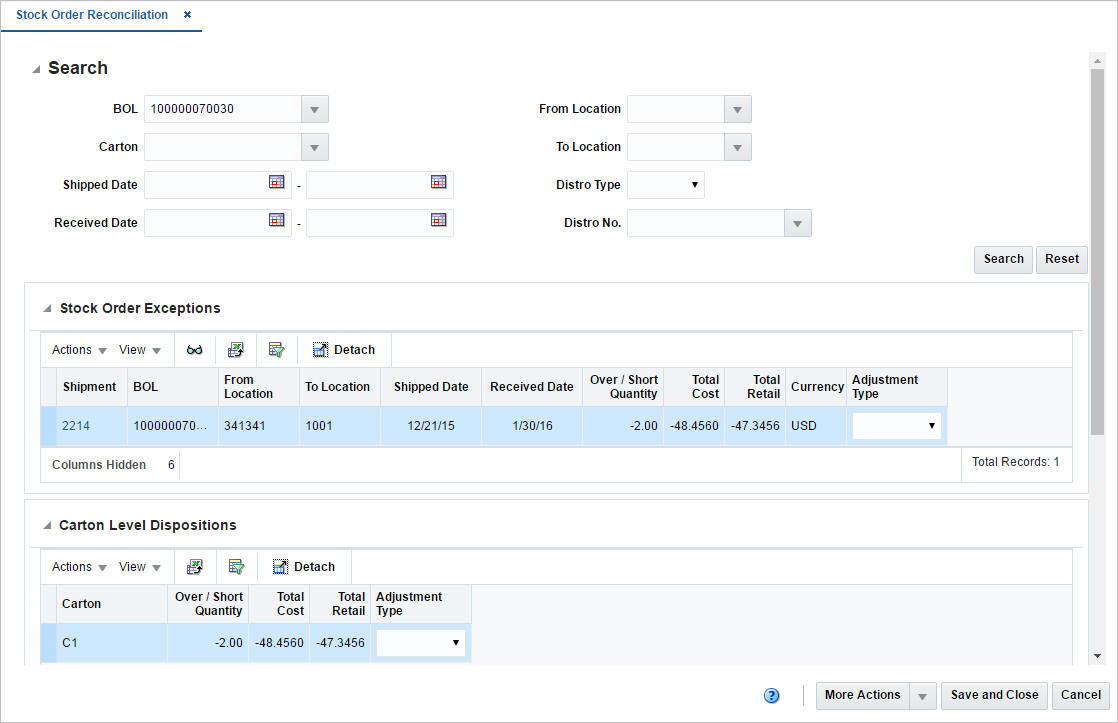
The Stock Order Reconciliation page allows you to edit and view shipment receipts where the item quantity does not match the actual quantity received or the shipments that are yet to be received. All open stock orders where the shipped quantity could not be reconciled to the received quantity appear in the results. Once you have searched for receipts you can create adjustments to account for the differences.
Figure 6-10 Stock Order Reconciliation
Searching for a Shipment
To search for a shipment to reconcile:
-
From the Task menu, select Inventory > Transfers > Stock Order Reconciliation. The Stock Order Reconciliation page appears.
-
Enter, select or search for one or all of the following search criteria.
Table 6-5 Stock Order Reconciliation Search - Basic Search Criteria and Description
Fields Description BOL
Enter, select or search for the BOL.
Carton
Enter, select or search for the carton.
Shipped Date
Enter the shipped date or use the Calendar icon to select a date..
Received Date
Enter a received date or use the Calendar icon to select a date.
From Location
Enter, select or search for the from location.
To Location
Enter, select or search for the to location.
Distro Type
Select the distro type from the list.
Distro No.
Enter, select or search for the Distro No.
-
Click Search. The shipment that match the search criteria are displayed in the Stock Order Exceptions and Carton Level Dispositions section.
-
Click Reset to clear the search section and results.
Stock Order Exceptions
All open stock orders where the shipped quantity could not be reconciled to the received quantity appear in this section. The over/short quantity and the cost information are displayed.
The Shipment column contains a link which opens the Shipments page, where can view the Shipment Details. For more information about this page, see the Shipment section.
In the Adjustment Type column, select an adjustment type from the list.
Upload Stock Order Reconciliation
If you have several shipments that need reconciliation, these can be mass updated through a spreadsheet upload. To do this, you'll first need to download the template to use for this process. This can be accessed in the task list under Data Loading > Blank Template. Select the template type of Stock Order Reconciliation and the template Stock Order Reconciliation and then click Download. When prompted, choose to either open the file or save it locally and open in the spreadsheet application of your choice.
Note:
This template cannot be configured.Then, in the blank spreadsheet, enter the shipment ID to be reconciled, select a type (Allocation, BOL, or Transfer) and enter an ID that corresponds to the type. The ID will be validated against the type selected. Finally, select an adjustment type. Valid values are Forced Receipt, Freight Claim, Receiving Location, or Shipping Location. Repeat for all the shipments that require reconciliation.
If the intent is to perform carton-level reconciliation on the shipment ID to be reconciled, the carton number and the adjustment type can be entered into the worksheet for carton-level reconciliation.
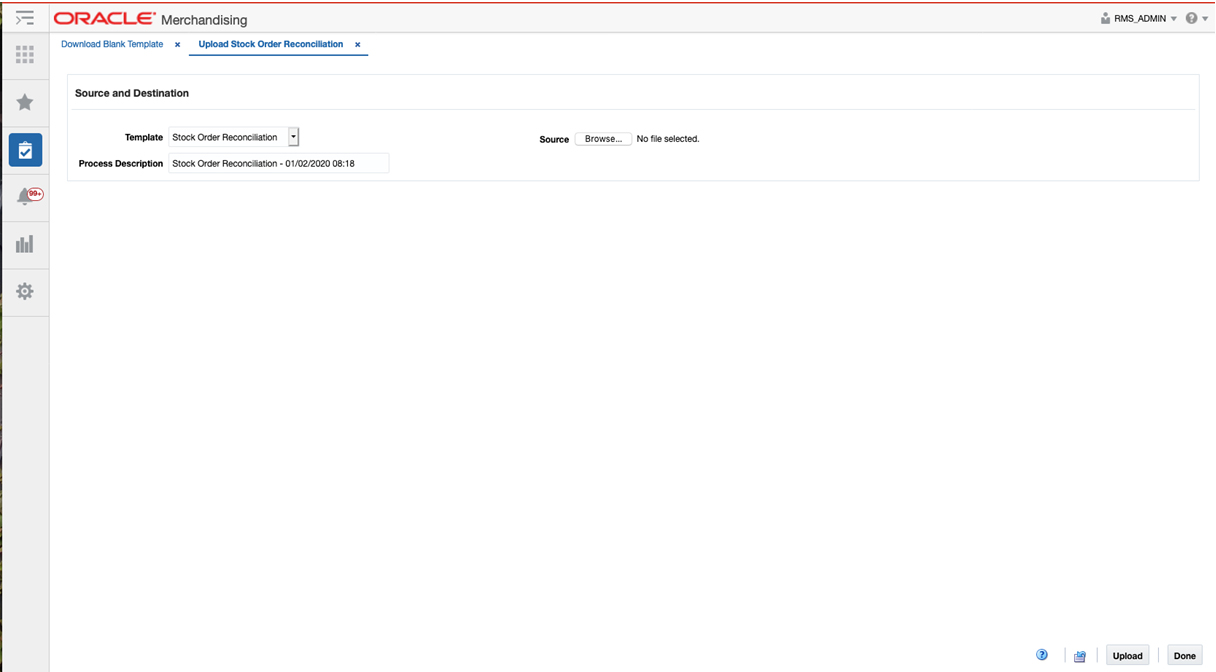
When all the details have been added, save the spreadsheet and then select the Upload Stock Order Reconciliation option under Inventory > Transfers. Select the Stock Order Reconciliation Template, then click the Browse… button to select the file you saved with the shipment details. Finally, click Upload to process the shipment details.
Figure 6-11 Upload User Interface
If there are any errors that are encountered during the processing of the updates, you will receive a notification. You can also view the status of the updates in the Review Status page, which can be accessed under the Data Loading in the task list.