8 Stock Counts
Inventory accuracy is a critical and highly sensitive area affecting retailers. Inventory record accuracy has a significant impact on increasing levels of customer service, reducing costs, and increasing productivity. Stock counts verify the inventory figures kept within Merchandising, which makes reporting, planning, and ordering more accurate.
In order to reconcile inventory levels in the system with actual inventory on-hand, retailers perform physical inventory stock counts, which also serve to make stock ledger adjustments. These stock counts assist retailers in budgeting and accounting for shrinkage.
Merchandising system plays an active role in freezing inventory in a manner that allows counts to be accurate by considering activities that take place while the count is under way, such as receipts in the back room while stock is being counted in the display areas. Physical stock counts are integrated with the stock ledger to bring book stock into agreement with actual stock. You can request stock counts as needed by creating a stock count request or create a series of count request using the stock count schedule functionality.
There are two types of stock counts supported in Merchandising:
-
Unit
-
Unit and Value
Unit
A Unit type stock count is performed when the retailer wants to keep the stock on hand in line with the actual on hand. It can be ad hoc or a scheduled process. The unit type of stock count can be set up in Merchandising using an item list or by selecting one or more departments, classes or subclasses. Unit only counts can also be created for all departments. The ensuing adjustments affect inventory similar to an inventory adjustment - stock on hand quantities are updated and stock adjustments are written to the stock ledger.
Unit and Value
A Unit and Value stock count is often an annual count that can be used to adjust the stock ledger, in addition to updating inventory positions. Unit & Value type stock counts are done either for an entire location or by product hierarchy (such as department, class or subclass level). Unlike Unit counts, Unit & Value counts have a two-step approval process whereby first stock on hand is adjusted based on the count results and then shrinkage is calculated based on the difference between the expected value of inventory in the stock ledger and the value of the count.
For both types of counts, Merchandising assumes that the stock count date is as of the close of business of the location. Therefore the physical count can be done anytime between the last transactions for the stock count date until the next day's transactions start.
One or more locations can be added to both types of stock counts, but a stock count can only contain stores or warehouses, not both. Additionally, for warehouses, counting is done at a physical warehouse level, so all stockholding virtual warehouses within a physical warehouse, including internal finishers, must be added to a count together.
All counts are assumed to occur when a location is closed for all inventory transactions on the end of the business day on which the count is scheduled. That night, a snapshot of inventory positions is captured that will be compared to the actual count results once the count is complete. After the count results are received, you will have several options available to review the count results, adjust as needed, and accept the results.
-
Unit Variance and Adjustment – this page allows you to view by location the count variances for each item. Only items that are outside the variance tolerance defined in system option will displayed. This is also the screen where you can accept the results sent from the store or warehouse so that the inventory adjustments are applied in Merchandising.
-
Stock Count Results – this page allows you to adjust the unit results from the count, if errors in the data are identified based on the variances seen in the Unit Variance and Adjustment page.
-
Virtual Warehouse Distribution – if the count is for a warehouse, then this page allows for adjustments to be made to how the results were distributed to virtual warehouses.
-
Value Variance and Adjustment – this page allows you to view the calculated value of the count results (cost or retail) by subclass/location and apply adjustments, as needed. The calculated value will be displayed only after the unit variances have been applied, however adjustments can be made and accepted in this page prior to that calculation occurring.
See the Oracle® Retail Merchandising System Stock Counts Overview Release 16.0 white paper in the Oracle Retail Merchandising Functional Library (Doc ID 1585843.1)
Schedule a Stock Count
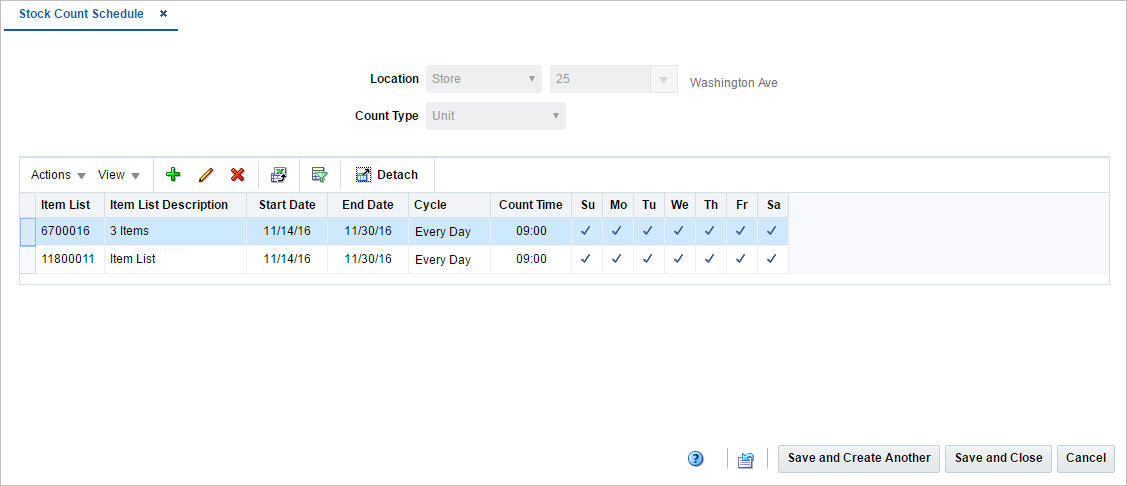
The Stock Count Schedule page allows you to maintain schedules for stock counts. You can schedule stock counts for a stockholding store, a warehouse, or all locations on a location list. The stock can be counted in units or in units and monetary value. Depending on system options, the monetary value may be either retail or cost. You can schedule stock counts for every day, every week, or every two or more weeks. You can also designate the dates on which a schedule becomes effective and expires.
To access the Stock Count Schedule page:
-
From the Tasks menu, select Inventory > Stock Counts > Stock Count Schedule. The Stock Count Schedule page appears.
Figure 8-1 Stock Count Schedule
-
In the Location field, select the location type from the list. Then enter, select or search for the location.
-
In the Count Type field, select the type of count. The options are: Unit, Unit & Value.
Once you have selected a location and count type, the table will display all currently scheduled stock counts for that combination. If no stock counts have been scheduled, the table will be blank. You can add, edit or delete stock counts in this table.
Add Stock Count Schedules
To add a stock count schedule, follow the steps below.
-
Select Actions > Add, or click the Add icon
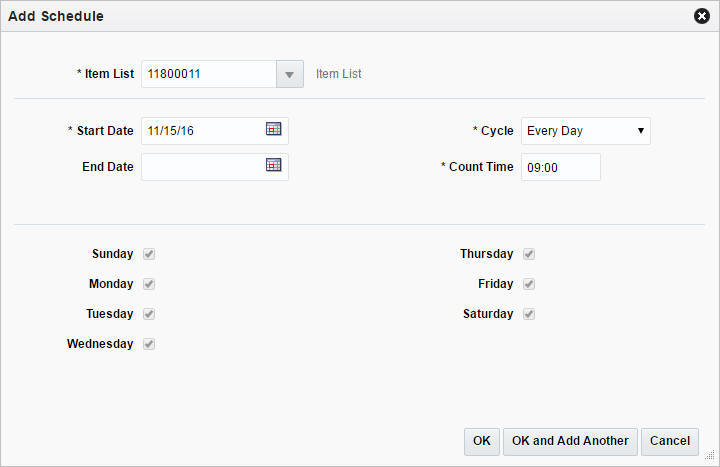
 . The Add Schedule pop-up appears.
-
Based on the selected count type you need to enter, select or search for either an Item List or a Department/Class/Subclass. The fields Item List and Department are required fields.
Figure 8-2 Add Schedule Pop-up
-
In the Start Date field, enter the date on which the schedule becomes effective, or click the Calendar icon to select a date.
-
In the End Date field, enter the date on which the schedule expires, or click the Calendar icon and select a date.
-
In the Cycle field, select the frequency of the stock counts. This is a required field.
-
In the Count Time field, select the day of the week for the stock count. This is a required field.
-
Select the days for the stock count below.
Note:
If the cycle is every day, all of the days are automatically selected. If the frequency is every week, you can select more than one day.
-
Then choose one of the following options.
-
Click OK to add the stock count schedule to the table and close the pop-up.
-
Click OK and Add Another to add additional stock count schedules.
-
Click Cancel to reject all entries and close the pop-up.
-
Edit Stock Count Schedule
To edit a stock count schedule, follow the steps below.
-
Select the stock count schedule you want to edit.
-
From the Actions menu, click Edit or click the Edit icon
 . The Edit Schedule pop-up appears.
-
Edit the enabled fields as necessary.
-
Then choose one of the following options.
-
Click OK to add your changes to the table and close the pop-up.
-
Click Cancel to reject all entries and close the pop-up.
-
Request a Stock Count
The Create Stock Count Request option opens the Stock Count Request page. In the Stock Count Request page you can request stock counts. You can create unit counts by item list level or product group level (all departments, department, class, or subclass) and unit & value counts by product group level. If a department, class or subclass is selected for either of the count types, one or more departments, classes or subclasses can be added to the count.
Note:
For unit counts, you can only select the option All Departments for the product group level for warehouse.
Locations are added to the count individually or by selecting a group of locations, such as a location list or all stores. A count can be for either stores or warehouses, but not both. Any stockholding store can be added to a count, including both company and franchise stores. If multiple locations are added to the count, then the count will only be able to be finalized once the counts for all locations are completed.
To request a stock count:
-
From the Task menu, select Inventory > Stock Counts > Create Stock Count Request. The Stock Count Request page appears.
-
In the Description field, enter a description for the stock count. This field is a required field.
-
In the Date field, enter the scheduled date for the stock count, or use the Calendar icon to select a date.
-
In the Type field, select the stock count type from the list. Possible options are Unit and Unit & Value.
-
In the Select Item By section, select either the Item List or Merchandise Hierarchy option.
-
If you select Unit > Item List:
The Item List field appears. Enter, select or search for the item list for the count.
-
If you select Unit > Merchandise Hierarchy:
The Hierarchy Level field appears. Select the hierarchy level from the list.
-
If you select Unit and Value:
The Select Item By section defaults to Merchandise Hierarchy. In the Hierarchy Level field, select the hierarchy level from the list.
Note:
If you select All Departments in the list, the Merchandise Hierarchy section is not available. If you select Department, Class or Subclass, the Merchandise Hierarchy section is displayed so that you can then add items to the count through the department, the class and the subclass.
-
Figure 8-3 Stock Count Request Page
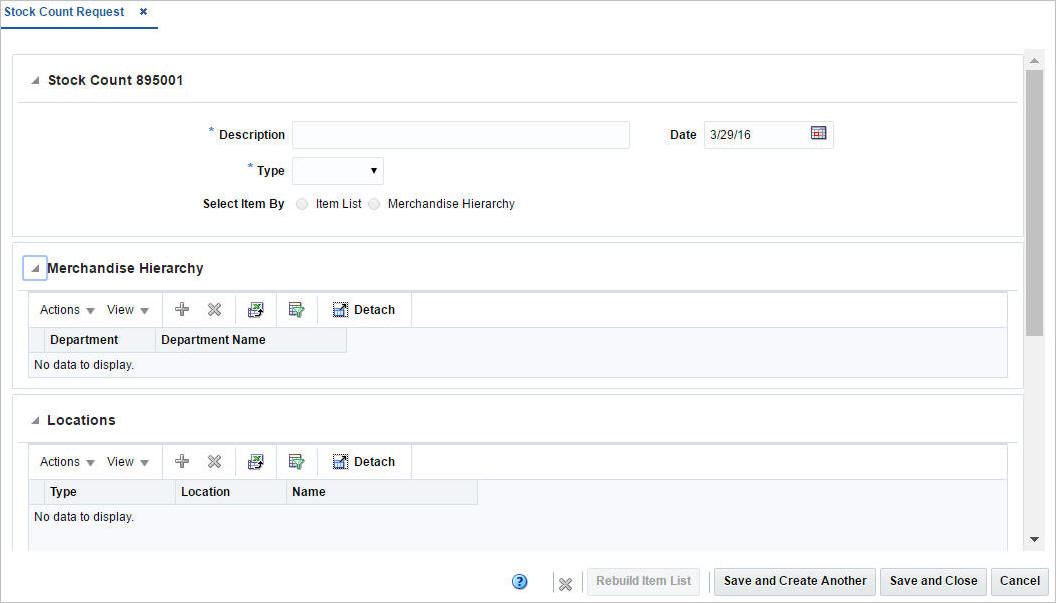
The top of the Stock Count page contains the following fields.
Table 8-1 Stock Count Header - Fields and Description
| Fields | Description |
|---|---|
|
Description |
Enter the description for the stock count request. |
|
Type |
Select a stock count type from the list. The options are: Unit, Unit & Value. |
|
Select Item By |
Select the item by either one of the following options: Item List, Merchandise Hierarchy. |
|
Date |
Enter the beginning date for the stock count, or use the Calendar icon to select a date. |
Add a Merchandise Hierarchy
To add a merchandise hierarchy to the stock count request, follow the steps below.
-
In the Merchandise Hierarchy section, select Actions > Add, or use the Add icon
 . The Add Merchandise Hierarchy pop-up appears.
-
In the Department field, enter, select or search for the department. If you select the hierarchy level Department, Class, or Subclass, this field is a required field.
-
In the Class field, enter, select or search for the class. If you select the hierarchy level Class, or Subclass, this field is a required field.
-
In the Subclass field, enter, select or search for the subclass. If you select the hierarchy level Subclass, this field is a required field.
-
Then choose one of the following sections.
-
Click OK to add the merchandise hierarchy and close the pop-up.
-
Click OK and Add Another to add additional merchandise hierarchy levels.
-
Click Cancel to reject all entries and close the pop-up.
-
Add Locations
To add locations to the stock count request, follow the steps listed below.
-
In the Locations section, select Actions > Add, or use the Add icon
 . The Add Locations pop-up appears.
-
In the Location field, select a location type from the list. Then enter, select or search for the location. This field is a required field.
-
Then choose one of the following sections.
-
Click OK to add the location to the table and close the pop-up.
-
Click OK and Add Another to add additional locations to the stock count request.
Note:
Stores, Warehouses and External Finishers cannot be added to the same Count.
-
Click Cancel to reject all entries and close the pop-up.
-
Rebuild Item List
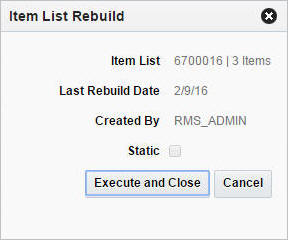
You can also request to rebuild an item list. The Rebuild Item List button enables when you enter the description, select the stock count type, and enter the item list.
To rebuild an item list, follow the steps listed below.
-
Click Rebuild Item List. The Item List Rebuild page appears.
Figure 8-4 Item List Rebuild Page
-
Click Execute and Close to rebuild the item list based on the criteria for the item list. This button is not available for static item lists.
-
Click Cancel to close the pop-up.
Manage Stock Counts
The Manage Stock Counts option opens the Stock Count Search page. Managing stock counts involves performing one or more of the following tasks:
-
Searching for a stock count
-
Editing a stock count
-
Viewing a stock count
-
Results
-
Unit Variance and Adjustment
-
Virtual WH Adjustment
-
Value Variance and Adjustment
Search for a Stock Count
You can access the Stock Count Search page from the Task menu, select Inventory > Stock Counts > Manage Stock Count. The Stock Count Search page appears.
In the Stock Count Search page you can search for a stock count by specifying various search criteria. You can choose to access a stock count in the search results in edit or view mode depending on security privileges.
Figure 8-5 Stock Count Search Page
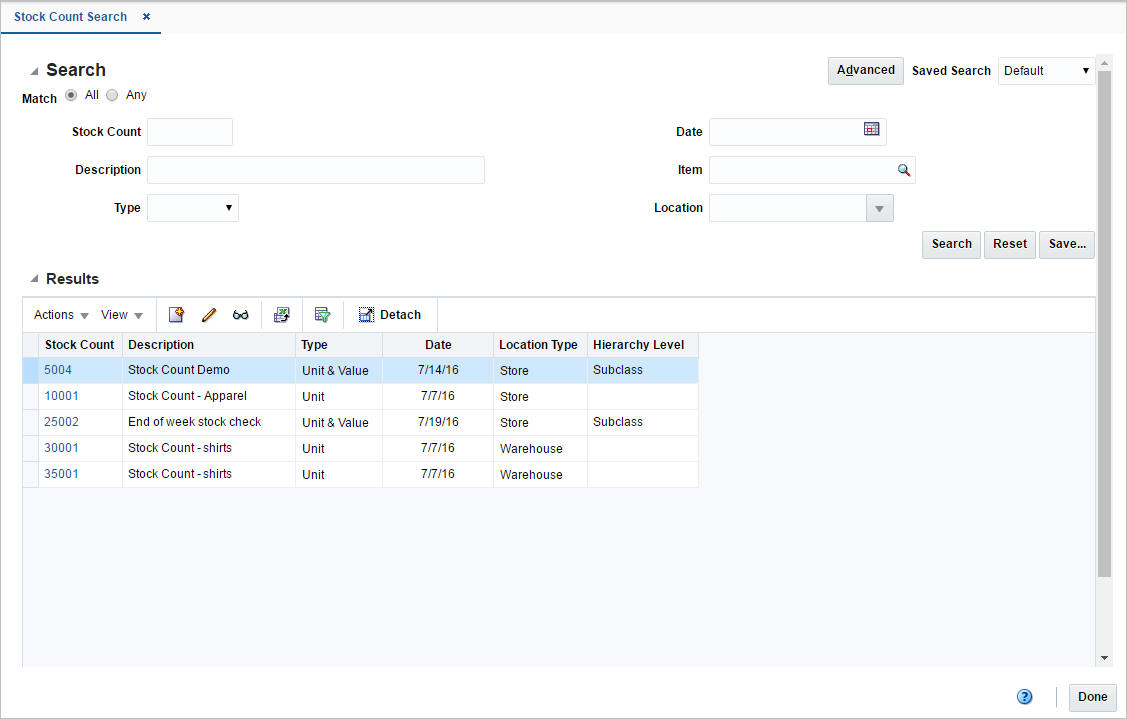
To search for a stock count:
-
From the Tasks menu, select Inventory > Stock Counts > Manage Stock Counts. The Stock Count Search page appears.
-
You can search for a stock count by providing search criteria in the search section. The criteria can be provided either in Basic or Advanced mode, depending on the requirement. Basic is the default mode when the search page is entered. Click Advanced to access the search panel in advanced mode. You can return to Basic mode by clicking Basic.
Search for a Stock Count Through the Basic Search Criteria
To search for a stock count through the basic search criteria:
-
Enter or select one or all of the following basic search criteria.
Table 8-2 Stock Count Search - Basic Search Criteria
Fields Description Match option
Check radio button All or Any.
All - only stock counts matching all entered search criteria are shown.
Any - stock counts matching each entered search criteria are shown.
Stock Count
Enter the ID of the unprocessed stock count.
Description
Enter the description of the unprocessed stock count.
Type
Select the type of the stock count. The options are: Unit, Unit & Value.
Date
Enter the date or click the Calendar icon to select a date.
Item
Enter the item number or search for the item.
Location
Enter, select or search for the location.
Note:
For more information about searches, see Search Screens in the Oracle® Retail Merchandising Do the Basics User Guide.
-
Click Search. The stock counts that match the search criteria are displayed in the Results section.
-
Click Reset to execute the saved search.
-
Click Done to close the page.
Search for a Stock Through Advanced Search Criteria
To search for a stock count using advanced search criteria:
-
To search using advanced search criteria, enter or select one or all of the advanced search criteria.
Note:
For more information about searches, see Search Screens in the Oracle® Retail Merchandising Do the Basics User Guide.
-
To narrow down the search, use the list next to the search fields. For example, determine if the entered value should equal or not equal the search result.
-
Click Search. The stock counts that match the search criteria are displayed in the Results section.
-
Click Reset to clear the search section and results.
-
Click Add Fields to add more fields for the advanced search. To remove the field from the search, click the x right next to the field.
-
Click Reorder to change the order of the available search fields. The Reorder Search Fields page appears.
-
Select the desired search field and use the up and down arrows to rearrange the order of the fields.
-
Click OK to confirm the new order of the fields and close the page.
-
Click Cancel to reject any changes and close the page.
-
-
Click Done to close the page.
Review and Update Stock Count Results
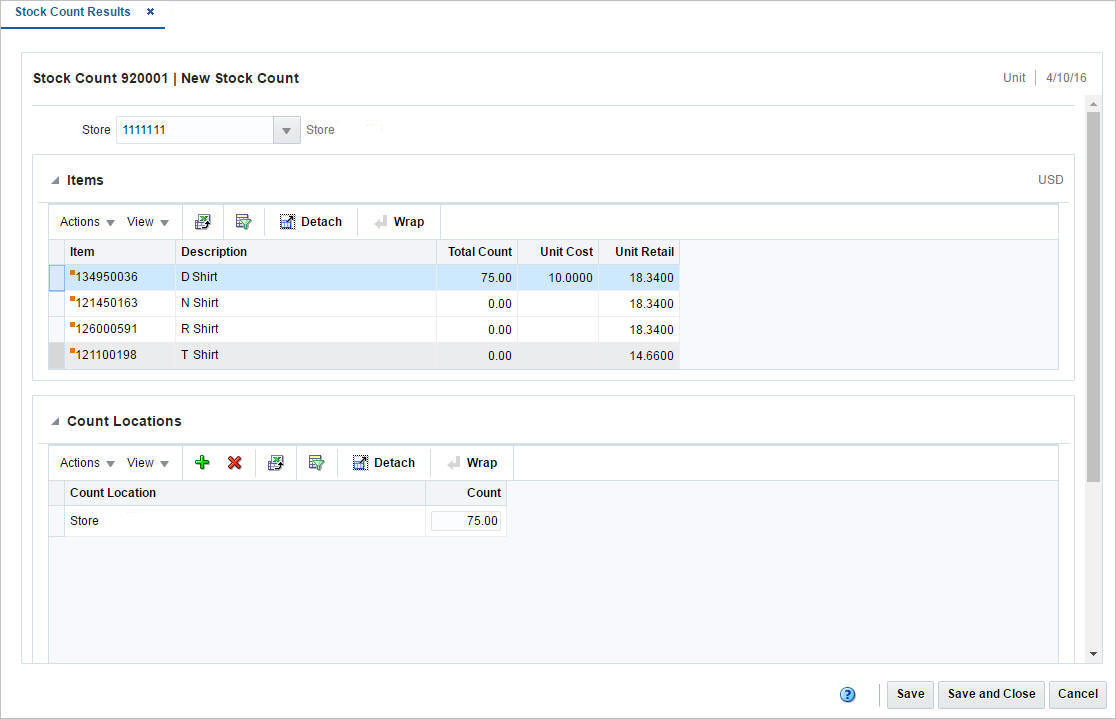
The Stock Count Results page allows you to manually enter the results of a stock count. You can also view and edit unprocessed stock counts at a location.
Corrections can be made to the physical count quantities received from the store or warehouse in this page. However, to actually adjust the quantities, you must go to the Unit Variance and Adjustment page.
The Stock Count Result page contains the following sections.
-
The top of the Stock Count Results page displays the stock count and the stock count name. In addition the type and the date of the stock count are displayed in the top right corner of the section.
Below the location type, the location and the location name are displayed, once you select the location. Other sections on the screen include:
Figure 8-6 Stock Count Results Page
Items
The Items section displays the items in the count and the total count quantity for the item at the location, as well as the basic item information such as item description, unit cost and unit retail.
Count Locations
The Count Locations section displays the location inside the store or warehouse where the item was counted and the quantity counted at this location.
You can edit the Count column directly in the table to update the count quantity for a count location. If the count quantity for a location is updated, the Total Count column in the first table is updated to reflect the new total.
Count by Inventory Identifier
The Count by Inventory Identifier displays a count of items for a location by inventory identifier. The sum of all Inventory Identifier lines for a particular item should not be more than the ‘Inventory Quantity’ for the item. This can be added from the below popup.

Edit the Result of a Stock Count
To edit the result of a stock count, follow the steps below.
-
From the Tasks menu, select Inventory > Stock Counts > Manage Stock Counts. The Stock Count Search page appears.
-
Enter or select search criteria as desired to make the search more restrictive.
-
Click Search. The stock counts that match the search criteria are displayed in the Results section.
-
Select a stock count in the table.
-
Then select Actions > Results. The Stock Count Results page appears.
Note:
You can also access the Stock Count Results page through the Unit Variance and Adjustment page.
The stock count ID, description, type, date, location type and location of the selected stock count are displayed. In addition all of the items at the location appear in the tables by default.
For more information about this page, see the Review Unit Variances and Accepting Unit Counts section.
-
The stock count ID, description, type and date are displayed. The location type defaults to either Store or Warehouse. Enter, select or search for the location.
-
In the items section select an item. The count locations and counts for the selected item are displayed in the Count Locations section.
-
In the Count column, update the count quantity as necessary.
-
Save your changes.
Add Count Locations
To add count locations for an item, follow the steps below.
-
In the Count Locations section, select Actions > Add, or use the Add icon
 . The Add Count Location pop-up appears.
-
In the Count Location field, enter the location. This is a required field.
-
In the Quantity field, enter the quantity. This field is a required field.
-
Then choose one of the following options.
-
Click OK to add the count location to the table and close the pop-up.
-
Click OK and Add Another to add additional count locations.
-
Click Cancel to reject your entries and close the pop-up.
-
-
In the Stock Count Results pop-up, save your entries.
Review Unit Variances and Accepting Unit Counts
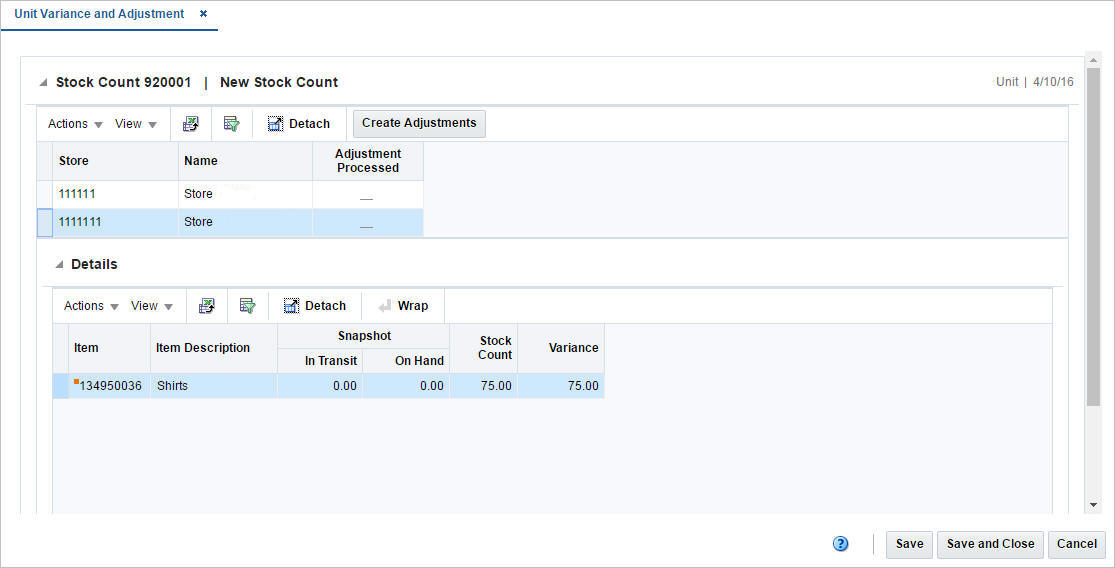
The Stock Count Variance page will allow you to view variances between the stock on hand and the stock count, and allows you to create stock Adjustments.
Figure 8-7 Unit Variance and Adjustment Page
Stock Count
The label of the Stock Count section displays the stock count and the stock count name. In addition the type and the date of the stock count are displayed in the top right corner of the section.
The table displays the location, the location name and the Adjustment Processed checkbox. The checkbox is selected once the stock adjustment has been submitted for the location by clicking the Create Adjustments button.
Details
The Details sections displays item details, such as the item number, the item description, in transit and on hand quantities as well as the stock count and the variance quantities. Not all items on the count will be displayed here - only those that have a variance that exceeds the variance thresholds defined in the Merchandising system options for quantity, cost, and/or retail. This allows you to focus on reviewing only the largest variances before accepting the count results.
Adjust the Stock on Hand after a Stock Count
To adjust the stock on hand after a stock count, follow the steps below.
-
From the Tasks menu, select Inventory > Stock Counts > Manage Stock Counts. The Stock Count Search page appears.
-
Enter or select search criteria as desired to make the search more restrictive.
-
Click Search. The stock counts that match the search criteria are displayed in the Results section.
-
Select a stock count in the table.
-
Then select Actions > Unit Variance and Adjustment. The Unit Variance and Adjustment page appears.
-
In the Stock Count section select a location. The item information is displayed in the Details section.
-
Select Actions > Create Adjustment, or use the Create Adjustment button.
-
You are prompted, if you want to create a stock adjustment for the selected location. Confirm with Yes.
-
The adjustment are made during the nightly batch process.
-
Save your entries.
Redistribute Count Results within a Physical Warehouse
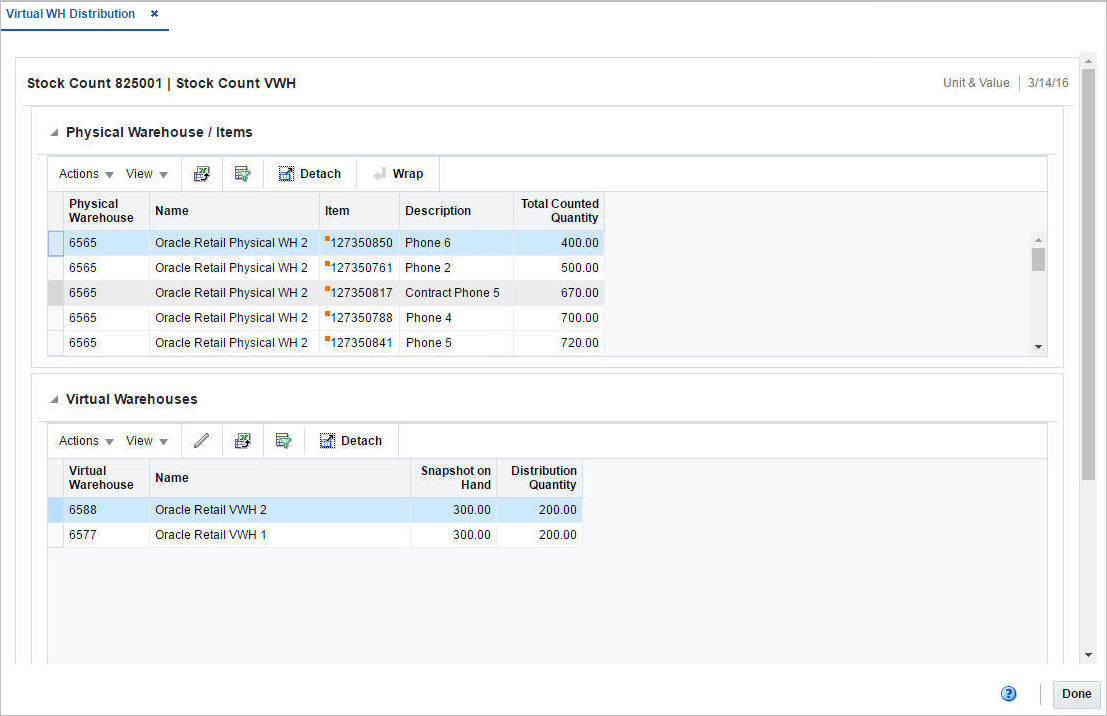
When a stock count is performed for a warehouse, an adjustment can be made if the distribution of inventory to the virtual warehouse performed during the upload of the count to Merchandising was incorrect. You can carry out this adjustment in the Virtual WH Distribution page.
The Virtual WH Distribution page displays the stock count ID and description at the top of the page, along with the type of count and the count date. It also includes the following sections:
Figure 8-8 Virtual WH Distribution Page
Physical Warehouse/Item
The Physical Warehouse/ Item section displays all the physical warehouse/items pertaining to the selected stock count on entering the page.
Virtual Warehouses
The Virtual Warehouses section displays all virtual warehouses associated to the physical warehouse that is selected in the Physical Warehouse/Items section, and displays a snapshot of the inventory when the count occurred.
You can distribute the on-hand inventory at the physical warehouse into the virtual warehouse inventory.
Redistributing Stock within a Physical Warehouse
To adjust the distribution, follow the steps below.
-
From the Tasks menu, select Inventory > Stock Counts > Manage Stock Counts. The Stock Count Search page appears.
-
Restrict your search to stock counts for warehouse.
-
Click Search. The stock counts that match the search criteria are displayed in the Results section.
-
Select a stock count in the table.
-
Then select Actions > Virtual WH Distribution. The Virtual WH Distribution page appears.
-
In the Physical Warehouse/Item section, select a physical warehouse. All virtual warehouses associated with the selected physical warehouse are displayed in the Virtual Warehouses section.
-
In the Virtual Warehouses section select Actions > Edit, or use the Edit icon
 . The Edit Distribution pop-up appears.
-
The table displays all of the virtual warehouses for the selected physical warehouse. The snapshot on hand and current distribution quantity are displayed for each virtual warehouse. The new distribution quantity column defaults to the current distribution quantities.
-
In the New column, update the new distribution quantity, if necessary.
-
Then choose one of the following options.
-
Click OK to add your changes to the table and close the pop-up.
-
Click Cancel to reject all entries and close the pop-up.
-
-
In the Virtual WH Distribution pop-up, save your entries.
Review Value Variances and Accept Value Counts
A Unit & Value stock count is often an annual count that can be used to adjust the financial systems in a corporate merchandising system, in addition to updating inventory positions. Unit & Value stock counts are carried out either for an entire location or by product hierarchy, that is department, class or subclass level.
Once the units have been accepted for Unit & Value counts, the value of the count must also be reviewed and accepted.
The page displays the total cost and total retail as calculated in the stock count and the total adjusted cost and retail, if any adjustments have been made, for each department/class/subclass at a location.
Figure 8-9 Value Variance and Adjustment
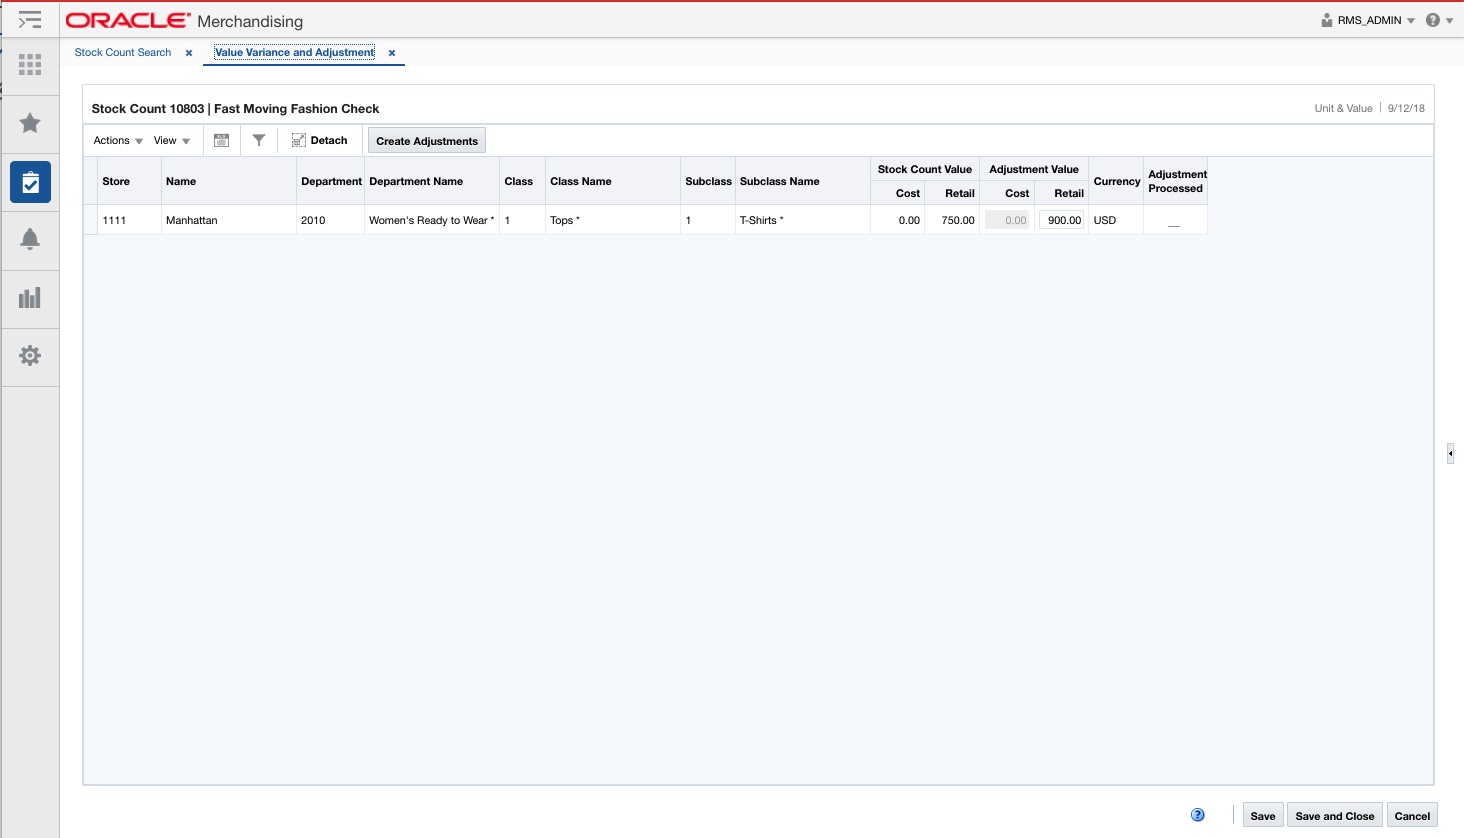
If adjustments need to be made, you can make adjustments to the total cost or retail value of the count, based on the accounting method for the department, for each subclass/location. You can also accept the value of the count.
The label at the top of the page displays the stock count and the stock count name. In addition the type and the date of the stock count are displayed in the top right corner of the section.
The table displays the location and stock count value information. The table contains each location and department/class/ subclass combination of the stock count.
Based on the used accounting method for the Department, you can either edit the Cost or Retail column directly in the table.
To save the adjustments, click the Save/Save and Close button. This will check the Adjustment Processed checkbox for all selected locations and disable the Adjustment Value – Cost or Retail field.
Adjust the Cost or Retail Value after a Stock Count
To adjust the cost or retail after a stock count, follow the steps below.
-
From the Tasks menu, select Inventory > Stock Counts > Manage Stock Counts. The Stock Count Search page appears.
-
Enter or select search criteria as desired to make the search more restrictive.
-
Click Search. The stock counts that match the search criteria are displayed in the Results section.
-
Select a stock count in the table.
-
Then select Actions > Value Variance and Adjustment. The Value Variance and Adjustment page appears.
-
In Cost or Retial column update the values of the locations as necessary.
-
Select one or more records in the table.
-
Then select Actions > Create Adjustment, or use the Create Adjustment button.
-
You are prompted, if you want to create adjustments for the selected location(s). Confirm with Yes.
-
The adjustment are made during the nightly batch process.
-
Save your entries.