1 Item Overview
Merchandising is usually the master of all items for a retail organization. It manages the creation and maintenance of items, as well as the communication of these items to other dependent solutions. The Merchandising item structure is very flexible in order to support items from all retail verticals, including soft-lines, hard-lines, grocery, and so on. The item hierarchy can support up to three levels, with one level being designated as the level at which transactions and inventory occur. For example, a fashion item may use all three levels to represent style, SKU, and barcode; whereas a grocery item may use only two - one to represent the SKU and one to represent the barcode. In addition, ownership type of an item can also be specified as owned, consignment or concession based on the terms with a supplier at the location level.
Merchandising also supports the creation of multiple types of items, which are described below:
Regular Items: this is the most common type of item as it can be used to represent sellable and orderable items across verticals. For soft-lines, regular items are associated with differentiators to represent the colors and sizes that styles are available in. Differentiators can be associated with items in other retail verticals as well to represent other item characteristics such as flavor or scent.
Pack Items: A pack is a way of tracking multiple component items under one item number. Merchandising supports two types of packs - simple and complex. A simple pack contains multiples of one component item, whereas a complex pack can contain many different component items. Simple packs are always orderable and may also be created as sellable. Complex packs can be sellable, orderable, or both.
Deposit Items: a deposit item is an item that has a portion which is returnable by the customer after it has been sold to the customer. A deposit is taken from the customer for the returnable portion. In Merchandising, deposit items are tracked under multiple component items representing the containers, the contents, the returned item, and optionally a crate item. Usually a pack items is created to manage the combination of products together through the supply chain.
Transformable Items: a transformable item is an item that can be ordered as one item and then transformed into multiple sellable components. For example, a cheese wheel may be purchased from the supplier, but cut up into smaller pieces to be sold to customers. There are two types of transformable items that can be created - the orderable component and the sellable component.
This guide includes the following topics to help you understand and manage items:
Item Types
Items can be grouped into a one, two, or three level hierarchy. The naming conventions for the three item levels may vary by organization, but they are referred to here as item levels 1, 2, and 3. All item hierarchies begin at item level 1. The item level names in the System Options screen can be customized. Refer to the ADF Customization Whitepaper for more information.
Note:
Throughout this guide you will see these levels referred to with the names, Style, SKU, and Reference Item respectively.
After creating a level 1 item, you can create level 2 as child for level 1 item. If a third level is desired, you can create level 3 item as child for level 2 item.
Regular Item
This section describes the regular item.
Item Groups
An item group is an item hierarchy in which an item is broken into levels. The entire set of items (level 1 - 3) is an item group. The item is broken down in to factors which allow it to be distinguished from the more generic item.
After you have defined the item structure, you must add a supplier to the item, determine item cost, and assign the item to a location.
Diffs
A differentiator (diff) is a characteristic that can be used to make items distinct from one another. You can add levels to an item group if you identify a set of diffs or diff groups. Each unique diff or combination of diffs creates a new level in the item group. If you choose not to use diffs, you can manually create item levels.
Once you have selected the diffs, you can create all of the items for that item level, through Merchandising.
Packs
A pack is a way of tracking multiple items under one item number. The Pack Item Overview contains additional information on simple and complex packs.
Deposit Items
A deposit item is an item that has a portion which is returnable by the customer after it has been sold to the customer. A deposit is taken from the customer for the returnable portion. A deposit item is broken into the components of the item, and each item is tracked separately in Merchandising.
-
Deposit Contents Item: The item that is sold to the customer.
-
Deposit Container Item: The item for which the deposit is taken. The deposit container item holds the deposit contents item.
-
Deposit Crate Item: The item which holds the container and contents items.
-
Deposit Returned Item: The item that is returned to the retailer by the customer and for which the deposit is returned to the customer.
Deposit items can be maintained as a complex pack or a single item. Maintaining the deposit items as a complex pack ensures the appropriate components are grouped together and facilitates ordering. If you maintain the deposit items individually, you must associate the item with the appropriate container item.
Transformable Items
A transformable item is an item that can be ordered as one item and broken into smaller items. The smaller items can then be resold in the store. There are two types of transformable items:
-
Transformed Orderable: The item is ordered from the supplier in one form, but changed by the retailer and sold to the customer in a different form.
-
Transformed Sellable: The item that is sold to the customer. A transformed sellable item is different from the item ordered from the supplier, it is then broken or modified before selling.
Create an Item
To create an item:
-
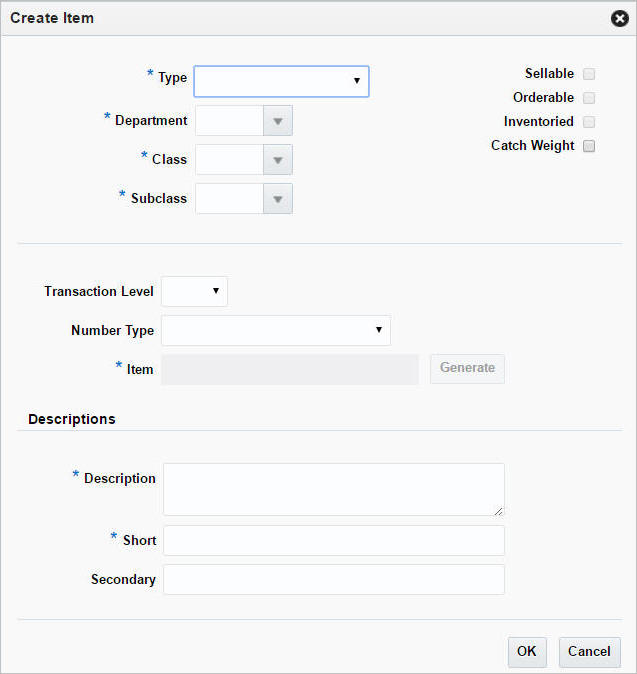
From the Tasks menu, select Items > Create Item. The Create Item page appears.
Figure 1-1 Create Item Page
-
In the Type field, select the following type of items you can create:
-
Regular Item
-
Simple Pack
-
Complex Pack
-
Deposit Contents
-
Deposit Container
-
Deposit Crate
-
Deposit Returned Item
-
Transformed Orderable
-
Transformed Sellable
-
-
In the Department field, enter the ID of the department for the new item, select the department, or search and select the department.
-
In the Class field, enter the ID of the class for the new item, select the class, or search and select the class. You must select a department before you can select a class.
-
In the Subclass field, enter the ID of the subclass for the new item, select the subclass, or search and select the subclass. You must select a department and class before you can select a subclass.
-
Select the item type indicators:
-
Sellable: Select this check box to indicate the item is sellable and will be sent to the selling systems (e.g. POS, OMS).
-
Orderable: Select this check box to indicate the item can be ordered, set up, set up on replenishment, and to set up HTS and expenses.
-
Inventoried: Select this check box to track inventory and to have stock on hold in Merchandising.
-
Catch Weight: The Catch Weight functionality allows items that may be purchased and sold in varying weights to be better managed within Merchandising. The Catch Weight items are weighed at the receiving location.
Note:
The indicators that you select for the Level 1 item will be applied to all items in the item group and cannot be changed.
-
-
In the Transactional Level field, select the transaction level for the item.
-
In the Item Number Type field, select the type of item number that you want to associate with the item.
-
The Item field is the unique number used to identify the product.
-
In the Descriptions area:
-
In the Description field, enter the description of the item.
-
In the Short field, populates with the item description.
-
In the Secondary field, enter alternate description of an item. This field can be used to enter the item description used by the supplier.
-
-
Then choose one of the following options.
-
Click OK. The Item page appears.
For more information about this page, see the Item Page section.
-
Click Cancel to reject all entries close the page.
-
Creating a One Level Item
To create a one level item, follow the steps below.
-
From the Tasks menu, select Items > Create Item. The Create Item page appears.
-
In the Type field, select Regular Item.
-
Select the item type indicators:
-
Sellable: Select this check box to indicate the item is sellable and will be sent to the selling systems (e.g. POS, OMS).
-
Orderable: Select this check box to indicate the item can be ordered, set up, set up on replenishment, and to set up HTS and expenses.
-
Inventoried: Select this check box to track inventory and to have stock on hold in Merchandising.
Note:
Items that are sellable and non-orderable can also be set as inventoried. For example, food items produced in the store.
-
Catch Weight: The Catch Weight functionality allows items that may be purchased and sold in varying weights to be better managed within Merchandising. The Catch Weight items are weighed at the receiving location.
Note:
The indicators that you select for the Level 1 item will be applied to all items in the item group and cannot be changed.
-
-
In the Department, Class, and Subclass fields, enter, select or search for the IDs of the merchandise hierarchy.
-
In the Transaction Level field, select transaction level 1.
-
In the Number Type field, select the type of item number that you want to associate with the item.
Note:
If you select Oracle Retail Item Number or UPC-A in the Type field, the item number is automatically added. If you select EAN/UCC-13, you can automatically generate the EAN number by clicking Generate. If you select Manual, the description field accepts alphabetic text and does not validate digit, length, or characters. It is a 12-digit number starting with 3 that includes check digit validation.
-
In the Description and Short field, enter a description for the item.
-
Click OK. The Item page appears.
For more information about the Item page, see the Item Page section.
-
Add the cost zone group.
Go to the Cost and Price section. In the Cost Zone Group field, enter, select or search for the cost zone group.
-
Add the attributes for the item.
In the Attributes section, enter, select or search for the attributes as necessary. For more information about attributes, see the Attributes section.
-
Add a supplier and a sourcing country for the item.
Select More Actions > Suppliers. The Item Supplier page appears. For more information about this page, see the Add Suppliers section.
-
Add a supplier by selecting Actions > Add, or using the Add icon
 .
.
-
Add a sourcing country for the supplier of the item by select Actions > Countries of Souring, or by clicking the Country of Sourcing button.
-
-
Edit the retail price of the item.
Select More Actions > Retail by Zone. The Retail by Zone page appears. For more information about this page, see the Define Initial Prices section.
-
Save you entries.
Creating a Two Level Item without Diffs
To create a two level item without diffs, follow the steps below.
-
From the Tasks menu, select Items > Create Item. The Create Item page appears.
-
In the Type field, select Regular Item.
-
Select the item type indicators:
-
Sellable: Select this check box to indicate the item is sellable and will be sent to the selling systems (e.g. POS, OMS).
-
Orderable: Select this check box to indicate the item can be ordered, set up, set up on replenishment, and to set up HTS and expenses.
-
Inventoried: Select this check box to track inventory and to have stock on hold in Merchandising.
Note:
Items that are sellable and non-orderable can also be set as inventoried. For example, food items produced in the store.
-
Catch Weight: The Catch Weight functionality allows items that may be purchased and sold in varying weights to be better managed within Merchandising. The Catch Weight items are weighed at the receiving location.
Note:
The indicators that you select for the Level 1 item will be applied to all items in the item group and cannot be changed.
-
-
In the Department, Class, and Subclass fields, enter, select or search for the IDs of the merchandise hierarchy.
-
In the Transaction Level field, select transaction level 2.
-
In the Number Type field, select the type of item number that you want to associate with the item.
Note:
If you select Oracle Retail Item Number or UPC-A in the Type field, the item number is automatically added. If you select EAN/UCC-13, you can automatically generate the EAN number by clicking Generate. If you select Manual, the description field accepts alphabetic text and does not validate digit, length, or characters. It is a 12-digit number starting with 3 that includes check digit validation.
-
In the Description and Short field, enter a description for the item.
-
Click OK. The Item page appears.
For more information about the Item page, see the Item Page section.
-
Add the cost zone group.
Go to the Cost and Price section. In the Cost Zone Group field, enter, select or search for the cost zone group.
-
In the Attributes section, enter, select or search for the attributes as necessary. For more information about attributes, see the Attributes section.
-
Add a supplier and a sourcing country for the item.
In the Item page, select More Actions > Suppliers. The Item Supplier page appears. For more information about this page, see the Add Suppliers section
-
Add a supplier by selecting Actions > Add, or using the Add icon
 .
.
-
Add a sourcing country for the supplier of the item by select Actions > Countries of Souring, or by clicking the Country of Sourcing button.
-
-
Edit the retail price of the item.
In the Item page, select More Actions > Retail by Zone. The Retail by Zone page appears. For more information about this page, see the Define Initial Prices section.
-
Add child items to the item.
In the Item page, click Create Children. The Item Children page appears. For more information about this option, see the Item Children section.
-
Save you entries.
Creating a Two Level Item with Diffs
To create a tow level item with diffs, follow the steps below.
-
From the Tasks menu, select Items > Create Item. The Create Item page appears.
-
In the Type field, select Regular Item.
-
Select the item type indicators:
-
Sellable: Select this check box to sell the item and send the item to POS.
-
Orderable: Select this check box to order an item, set up on replenishment, and to set up HTS and expenses.
-
Inventoried: Select this check box to track inventory and to have stock on hold in Merchandising.
Note:
Items that are sellable and non-orderable can also be set as inventoried. For example, food items produced in the store.
-
Catch Weight: The Catch Weight functionality allows items that may be purchased and sold in varying weights to be better managed within Merchandising. The Catch Weight items are weighed at the receiving location.
Note:
The indicators that you select for the Level 1 item will be applied to all items in the item group and cannot be changed.
-
-
In the Department, Class, and Subclass fields, enter, select or search for the IDs of the merchandise hierarchy.
-
In the Transaction Level field, select transaction level 2.
-
In the Number Type field, select the type of item number that you want to associate with the item.
Note:
If you select Oracle Retail Item Number or UPC-A in the Type field, the item number is automatically added. If you select EAN/UCC-13, you can automatically generate the EAN number by clicking Generate. If you select Manual, the description field accepts alphabetic text and does not validate digit, length, or characters. It is a 12-digit number starting with 3 that includes check digit validation.
-
In the Description and Short field, enter a description for the item.
-
Click OK. The Item page appears.
For more information about the Item page, see the Item Page section.
-
Add the cost zone group.
Go to the Cost and Price section. In the Cost Zone Group field, enter, select or search for the cost zone group.
-
In the Attributes section, enter, select or search for the attributes as necessary. For more information about attributes, see the Attributes section.
-
Add the differentiators for the item.
In the Differentiators section, add the diffs for the item. For more information about this section, see the Differentiators section.
-
Add a supplier and a sourcing country for the item.
In the Item page, select More Actions > Suppliers. The Item Supplier page appears. For more information about this page, see the Add Suppliers section
-
Add a supplier by selecting Actions > Add, or using the Add icon
 .
.
-
Add a sourcing country for the supplier of the item by select Actions > Countries of Souring, or by clicking the Country of Sourcing button.
-
-
Edit the retail price of the item.
In the Item page, select More Actions > Retail by Zone. The Retail by Zone page appears. For more information about this page, see the Define Initial Prices section.
-
Add child items to the item.
In the Item page, click Create Children. The Create Children page appears. For more information about this option, see the Create Children Page section.
-
Save you entries.
Item Page
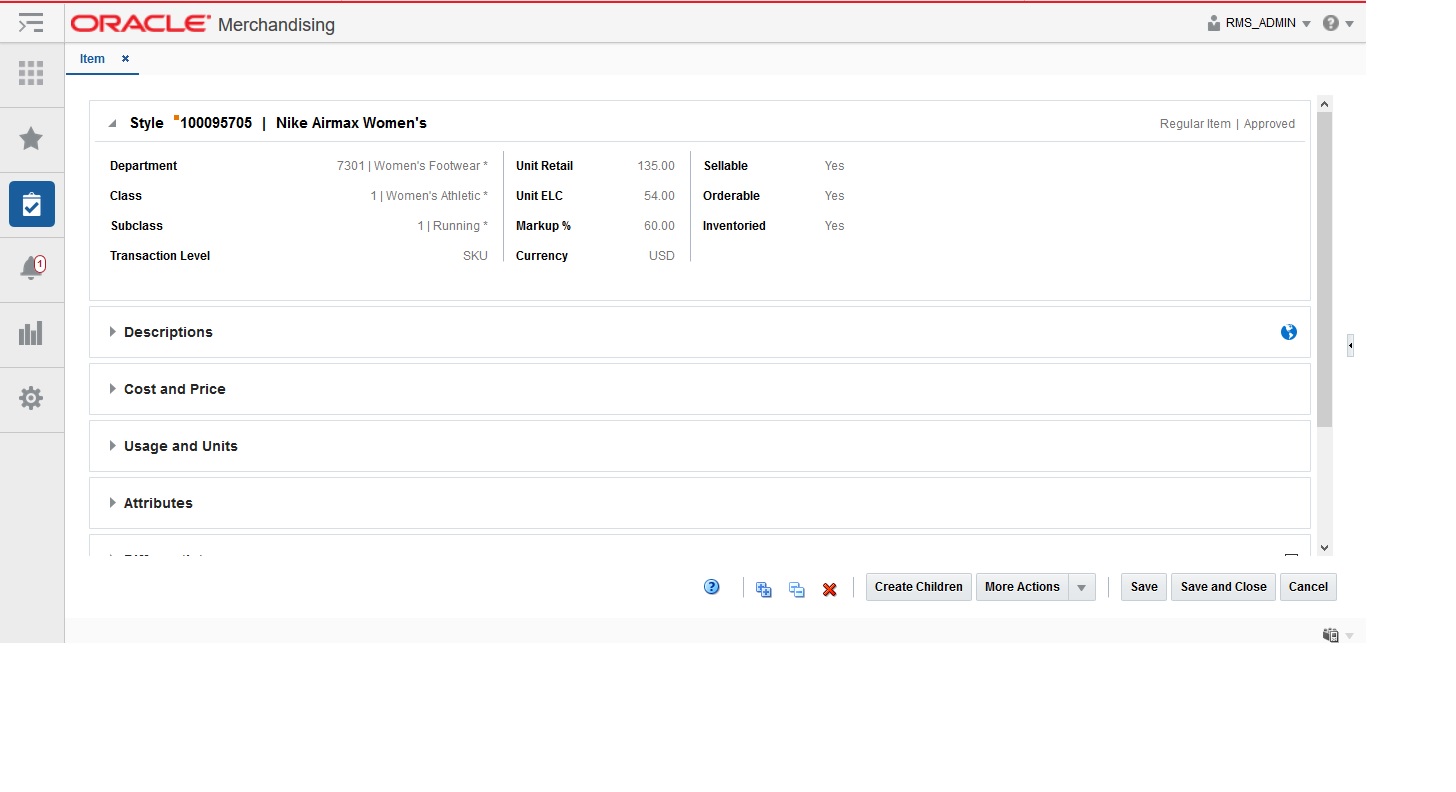
Once you fill in all the details in the Create Item page and click OK, the Item page appears.
The Item page includes the following sections:
Figure 1-2 Item Page
Item Header
The Item Header includes the following fields:
Table 1-1 Item Header - Fields and Description
| Fields | Description |
|---|---|
|
Title |
The title displays the Item level (SKU/Style/Reference Item), Item ID, and Item Description with a separator between them to the extreme left of the Item page. The type of item and item status is displayed with a separator between them to the extreme right of the Item page. The item number is populated by default. |
|
Item Status |
The description of the item status is displayed as text. When you create an item, the status is Worksheet. |
The following fields are populated by default: Style, SKU, Department, Class, Subclass, Transaction Level, Unit Retail, Unit ELC, Markup %, Currency, Sellable, Orderable, Inventoried.
Descriptions
Figure 1-3 Descriptions

This section contains a Translate icon in the top right corner. You can create a translation by using the Translate icon ![]() .
.
The Descriptions section includes the following fields:
Table 1-2 Descriptions - Fields and Description
| Fields | Description |
|---|---|
|
Description |
Enter the description of the item. This field is a required field. |
|
Short |
Enter the short description of the item. This field is a required field. |
|
Secondary |
Enter the alternate description of an item. This field can be used to enter the item description used by the supplier. |
|
Number Type |
This field is displayed by default. |
Pack
Figure 1-4 Pack

The label of the Pack section varies, depending on whether you create a Simple Pack or a Complex Pack.
The top right corner of the section contains the Pack Details icon. If you click the icon, the Pack Item Details page appears. For more information about this page, see the Pack Item Detail section.
The pack section includes the following fields:
Table 1-3 Pack - Fields and Description
| Fields | Description |
|---|---|
|
Type |
For complex packs, select the pack type from the list. Possible types are Buyer Pack or Vendor Pack. For simple pack the field defaults to Vendor Pack. |
|
Order As Type |
Only enabled if you select Buyer Pack as Pack Type. Select pack or eaches to indicate how the item should be ordered. |
|
Contains Inner |
The Contains Inner checkbox indicates if the pack contains inner containers. |
|
Store Pack Inventory |
The Store Pack Inventory checkbox indicates whether inventory is tracked at the pack level in SIM for stores. |
|
SOH Inquiry at Pack Level |
The SOH Inquiry at Pack Level is used by SIM to determine how to reflect SOH for pack items in the store. |
Cost and Price
Figure 1-5 Cost and Price

The Cost and Price section includes the following fields:
Table 1-4 Cost and Price - Fields and Description
| Fields | Description |
|---|---|
|
Cost Zone Groups |
Enter the cost zone group ID, or search for and select the cost zone group. |
|
Suggested Retail |
Enter the suggested retail price. |
|
Selling Unit Retail |
Enter the new retail price. |
|
Selling UOM |
Enter the Selling UOM as necessary. |
Usage and Units
Figure 1-6 Usage and Units

The Usage and Units section includes the following fields:
Table 1-5 Usage and Units - Fields and Description
| Fields | Description |
|---|---|
|
Store Order Multiple |
The unit of measure by which items are shipped to stores. The store order multiple may be each, inner, or case. The default store order multiple is set up at the item level. Store order multiples for specific locations are set up at the item/location level. Select the Store Order Multiple from the list. This field is a required field. |
|
Standard UOM |
Enter the standard UOM, or search for and select the standard UOM. |
|
UOM Conversion Factor |
This factor will be used to convert sales and stock data when an item is retailed in eaches and does not have eaches as its standard unit of measure. |
|
Merchandise |
If the item is merchandised, select the Merchandise check box. |
|
Forecastable |
If the item is forecasted, select the Forecastable check box. |
|
On Replenishment |
This indicates if the item is put on replenishment. |
Attributes
Figure 1-7 Attributes

The Attributes section includes the following fields:
Table 1-6 Attributes - Fields and Description
| Fields | Description |
|---|---|
|
Service Level |
Select the service level from the list. |
|
Product Classification |
Select the Product Classification from the list. |
|
Brand |
Enter the Brand or select from the list. |
|
Gift Wrap |
Select Gift Wrap, if this item is available with gift wrap. |
|
Ship Alone |
Select Ship Alone if this item is shipped alone and not grouped for shipment. |
Differentiators
A differentiator (diff) is a characteristic that can be used to make items distinct from one another. You can add levels to an item group if you identify a set of diffs or diff groups. Each unique diff or unique combination of diffs creates a new level in the item group. If you choose not to use diffs, you can manually create item levels.
Once you have selected the diffs, you can create all of the items for that item level through Merchandising.
Figure 1-8 Differentiators

The Differentiators section includes the following fields.
Table 1-7 Differentiators - Fields and Description
| Fields | Description |
|---|---|
|
Diff 1-4 |
Select the Diff 1 from the list. You can select up to four diffs by clicking the Add icon |
|
Group/ID |
Select the group or ID from the list. |
|
Diff Value |
Select the diff value, or enter, search and select. |
|
Item Aggregate checkbox |
This checkbox is only enabled for diff groups.
|
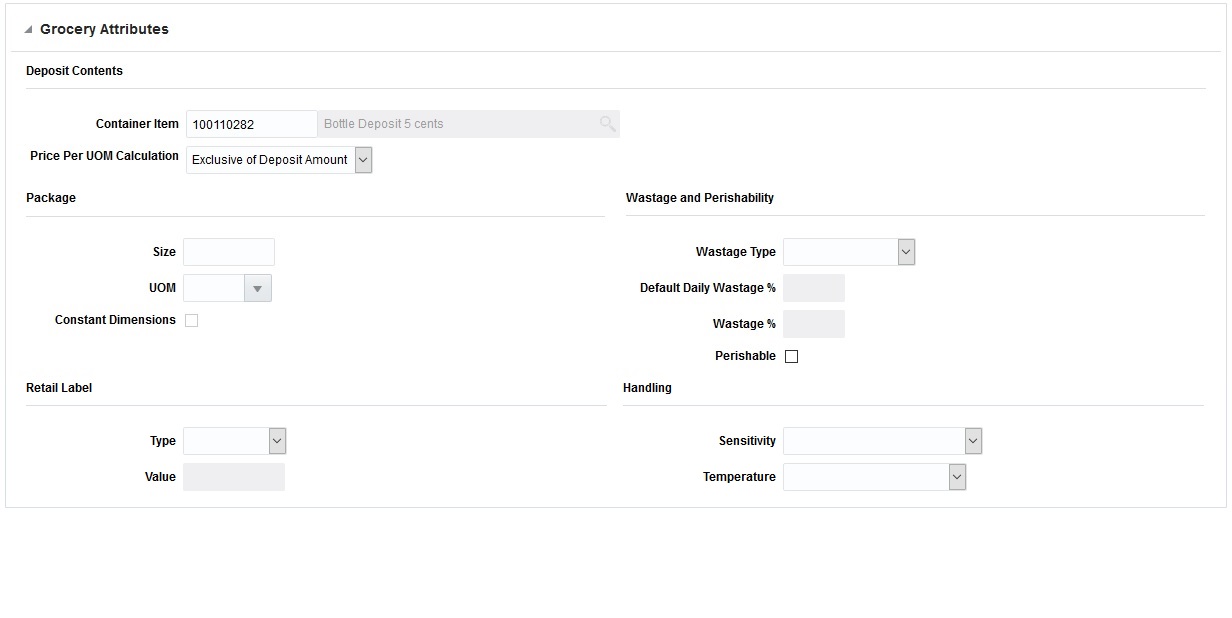
Grocery Attributes
Figure 1-9 Grocery Attributes
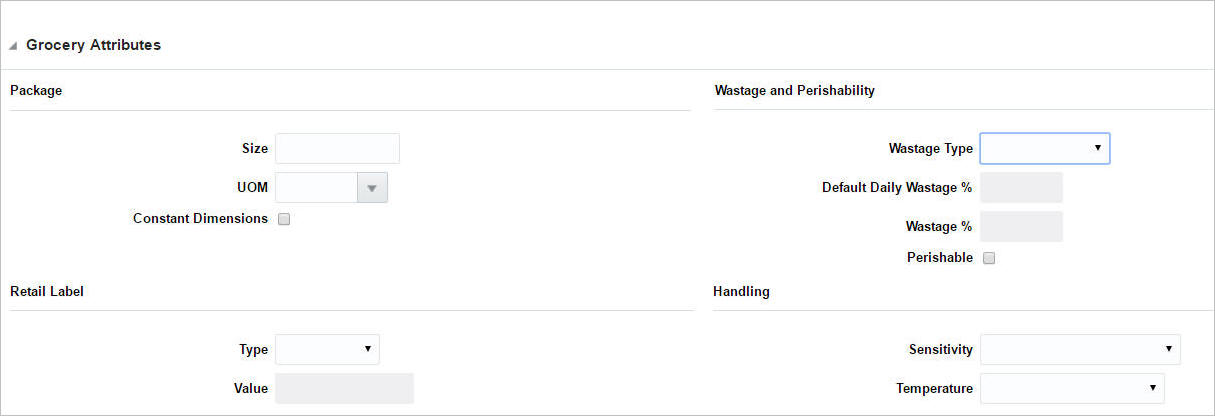
This section is only displayed, if you have the required privilege. The Grocery Attributes section includes the following fields:
Table 1-8 Grocery Attributes - Sections and Description
| Sections | Description |
|---|---|
|
Deposit Contents area |
Only available, if you create a deposit content item. You have to associate a container item to the deposit content item, in this area.
|
|
Package area |
|
|
Wastage and Perishability area |
|
|
Retail Label area |
|
|
Handling area |
|
|
Deposit Container area |
Only available, if you create a deposit container item. The table lists the content items associated to the deposit container item. |
Comments
In the Comments field, enter any additional comments as necessary. The entered comments can be refined by clicking the Refine Comments button, which allows you to use generative AI to refine the comments entered through the Refine comments pop up shown below. This option is available only if use of AI is opted for through the AI Assist system option in Merchandising.
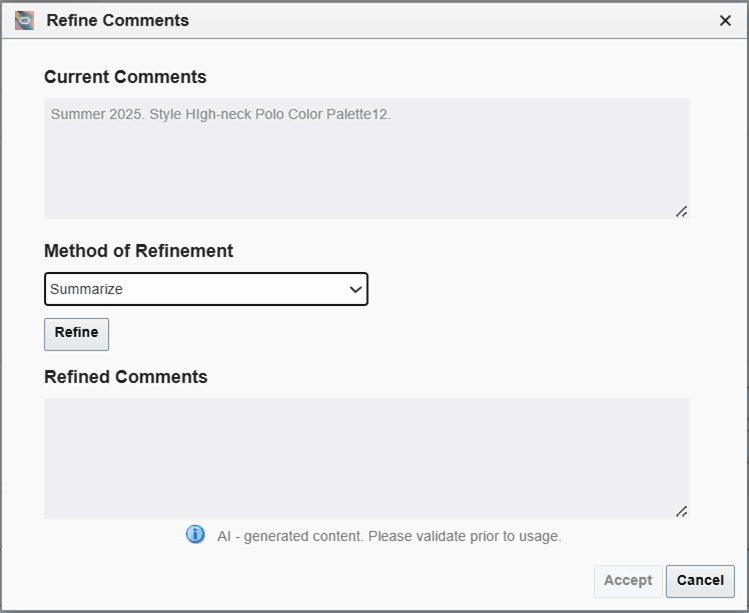
You can specify a refinement method and click Refine to refine the comment text. The refined version proposed can be reviewed. If found satisfactory, the refined comment can be accepted by clicking Accept or discarded by opting to Cancel.
Item - More Actions Menu
The More Actions menu contains the options listed in the table below.
Figure 1-10 More Actions Menu of Item Page
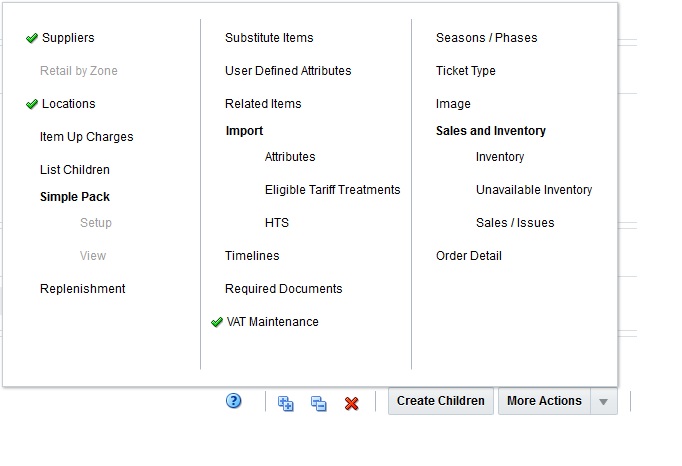
Table 1-9 More Actions Menu - Buttons and Description
| Action Buttons | Description |
|---|---|
|
Checkmark icon |
The checkmark icon indicates that data has already been entered for this option. |
|
Required icon |
This icon indicates that data is required, but has not been entered. |
|
Suppliers |
Opens the Item Supplier page. For more information about this page, see the Add Suppliers section. |
|
Retails by Zone |
Opens the Retail by Zones page. For more information about this page, see the Define Initial Prices section. |
|
Locations |
Opens the Item Locations page. For more information about this page, see the Item Locations section. |
|
Item Up Charges |
Opens the Item Up Charges page. For more information about this page, see the Add Up Charges section. |
|
List Children |
Opens the Item Children/Item Children by Diff page. For more information about this page, see the Item Children and With Diffs sections. |
|
Simple Pack |
Select one of the following options from the Simple Pack submenu:
|
|
Transformation |
Opens the Item Transformation page. For more information about this page, see the Item Transformation section. |
|
Replenishment |
Opens the Manage Replenishment Attributes page. For more information about this page, see Managing Attributes at the Item Level in the Oracle® Retail Merchandising Replenishment User Guide. |
|
Substitute Items |
Opens the Substitute Items page. For more information about this page, see the Define Substitute Items section. |
|
User Defined Attributes |
Opens the Item UDAs page. For more information about this page, see the Manage Item Lists chapter, section "Update User Defined Attributes". |
|
Related Items |
Opens the Related Items page. For more information about this page, see the Add Related Selling Items section. |
|
Import |
Select one of the following options from the Import submenu:
|
|
Timelines |
Opens the Timelines page. |
|
Required Documents |
Opens the Required Documents page. For more information about this page, see the Required Documents section in the Oracle® Retail Merchandising Purchase Orders and Contracts User Guide. |
|
VAT Maintenance |
Opens the Item VAT page. For more information about this page, see the Define VAT Rates section. |
|
Season/Phases |
Opens the Item Seasons page. For more information about this page, see the Add Seasons and Phases section. |
|
Ticket Type |
Opens the Item Tickets page. For more information about this page, see the Add Tickets section. |
|
Image |
Opens the Item Images page. For more information about this page, see the Add Images section. |
Deposit Items
To create a deposit item, follow the steps below.
-
From the Tasks menu, select Items > Create Item. The Create Item page appears.
-
In the Type field, select the deposit item you want to create from the list. Possible options are:
-
Deposit Container: The item for which the deposit is taken. The deposit container item holds the deposit contents item.
-
Deposit Contents: The item that is sold to the customer.
-
Deposit Crate: The item which holds the container and contents items.
-
Deposit Returned Item: The item that is returned to the retailer by the customer and for which the deposit is returned to the customer.
-
-
The necessary item type indicators for the selected deposit item are selected by default.
-
Sellable: When selected, indicates that the item is sold and is sent to the POS.
-
Orderable: When selected, the item can be ordered, set up on replenishment, and can have HTS and expenses set up.
-
Inventoried: When selected, indicates that the inventory is tracked and held in Merchandising.
Note:
The indicators that you select for the Level 1 item will be applied to all items in the item group and cannot be changed.
-
-
In the Department, Class, and Subclass fields, enter, select or search for the IDs of the merchandise hierarchy.
-
In the Transaction Level field, select transaction level 1, 2 or 3.
-
In the Number Type field, select the type of item number that you want to associate with the item.
Note:
If you select Oracle Retail Item Number or UPC-A in the Type field, the item number is automatically added. If you select EAN/UCC-13, you can automatically generate the EAN number by clicking Generate. If you select Manual, the description field accepts alphabetic text and does not validate digit, length, or characters. It is a 12-digit number starting with 3 that includes check digit validation.
-
In the Description and Short field, enter a description for the item.
-
Click OK. The Item page appears.
For more information about the Item page, see the Item Page section.
-
Add the cost zone group.
Go to the Cost and Price section. In the Cost Zone Group field, enter, select or search for the cost zone group.
-
In the Grocery Attributes section add the attributes as necessary.
Figure 1-11 Grocery Attributes
-
If you create a deposit content item, you have to associate a deposit container item to the deposit content item.
-
Once associated, the deposit container item lists all associated deposit content items in the Deposit Container table.
For more information about this section, see the Grocery Attributes section.
-
-
Add a supplier and a sourcing country for the item.
In the Item page, select More Actions > Suppliers. The Item Supplier page appears. For more information about this page, see the Add Suppliers section
-
Add a supplier by selecting Actions > Add, or using the Add icon
 .
.
-
Add a sourcing country for the supplier of the item by select Actions > Countries of Souring, or by clicking the Country of Sourcing button.
-
-
Edit the retail price of the item.
In the Item page, select More Actions > Retail by Zone. The Retail by Zone page appears. For more information about this page, see the Define Initial Prices section.
-
Save you entries.
Transformable Items
To create a transformable item, follow the steps below.
-
From the Tasks menu, select Items > Create Item. The Create Item page appears.
-
In the Type field, select the type of the transformable item you are creating from the list.
-
Transformed Orderable: The item is ordered from the supplier in one form, but is changed by the retailer and sold to the customer in a different form.
-
Transformed Sellable: The item that is sold to the customer. A transformed sellable item is ordered from the supplier in a different form that it is sold.
-
-
The necessary item type indicators for the selected transformable items are selected by default. If necessary, select the Catch Weight checkbox.
-
Sellable: When selected, indicates that the item is sold and is sent to the POS.
-
Orderable: When selected, the item can be ordered, set up on replenishment, and can have HTS and expenses set up.
-
Inventoried: When selected, indicates that the inventory is tracked and held in Merchandising.
-
Catch Weight: The Catch Weight functionality allows items that may be purchased and sold in varying weights to be better managed within Merchandising. The Catch Weight items are weighed at the receiving location.
Note:
The indicators that you select for the Level 1 item will be applied to all items in the item group and cannot be changed.
-
-
In the Department, Class, and Subclass fields, enter, select or search for the IDs of the merchandise hierarchy.
-
In the Transaction Level field, select transaction level 1, 2 or 3.
-
In the Number Type field, select the type of item number that you want to associate with the item.
Note:
If you select Oracle Retail Item Number or UPC-A in the Type field, the item number is automatically added. If you select EAN/UCC-13, you can automatically generate the EAN number by clicking Generate. If you select Manual, the description field accepts alphabetic text and does not validate digit, length, or characters. It is a 12-digit number starting with 3 that includes check digit validation.
-
In the Description and Short field, enter a description for the item.
-
Click OK. The Item page appears.
For more information about the Item page, see the Item Page section.
-
Add the cost zone group.
Go to the Cost and Price section. In the Cost Zone Group field, enter, select or search for the cost zone group.
-
In the Attributes section, enter, select or search for the attributes as necessary. For more information about attributes, see the Attributes section.
-
In the Grocery Attributes section add the attributes as necessary. For more information about this section, see the Grocery Attributes section.
-
Add a supplier and a sourcing country for the item.
Note:
If you are creating a transformed sellable item, you will not be able to select the Supplier option from the More Actions menu.
In the Item page, select More Actions > Suppliers. The Item Supplier page appears. For more information about this page, see the Add Suppliers section
-
Add a supplier by selecting Actions > Add, or using the Add icon
 .
.
-
Add a sourcing country for the supplier of the item by select Actions > Countries of Souring, or by clicking the Country of Sourcing button.
-
-
Edit the retail price of the item.
Note:
If you are creating a transformed orderable item, you will not be able to select the Retail by Zone option from the More Actions menu.
In the Item page, select More Actions > Retail by Zone. The Retail by Zone page appears. For more information about this page, see the Define Initial Prices section.
-
Add child items to the item if necessary.
In the Item page, click Create Children. For more information about this option, see the Create Children Page section or the Item Children section.
-
For transformed orderable item, enter the item transformation details. In the Item page select More Actions > Transformation. The Item Transformation page appears.
-
In the Description field, enter the description of the item transformation.
-
In the Production Loss field, enter the percentage of the orderable item which is wasted in producing the sellable items.
-
Then add sellable items by selecting Actions > Add, or by using the Add icon
 in the Sellable Items section.
-
If the Multiple Parent checkbox in the Sellable Items section is selected, the The Yield from Orderable section is displayed. Define the yield details for any sellable items that are associated with multiple orderable items.
For more detailed information about how to transform an item, see the Item Transformation section.
-
-
Save you entries.
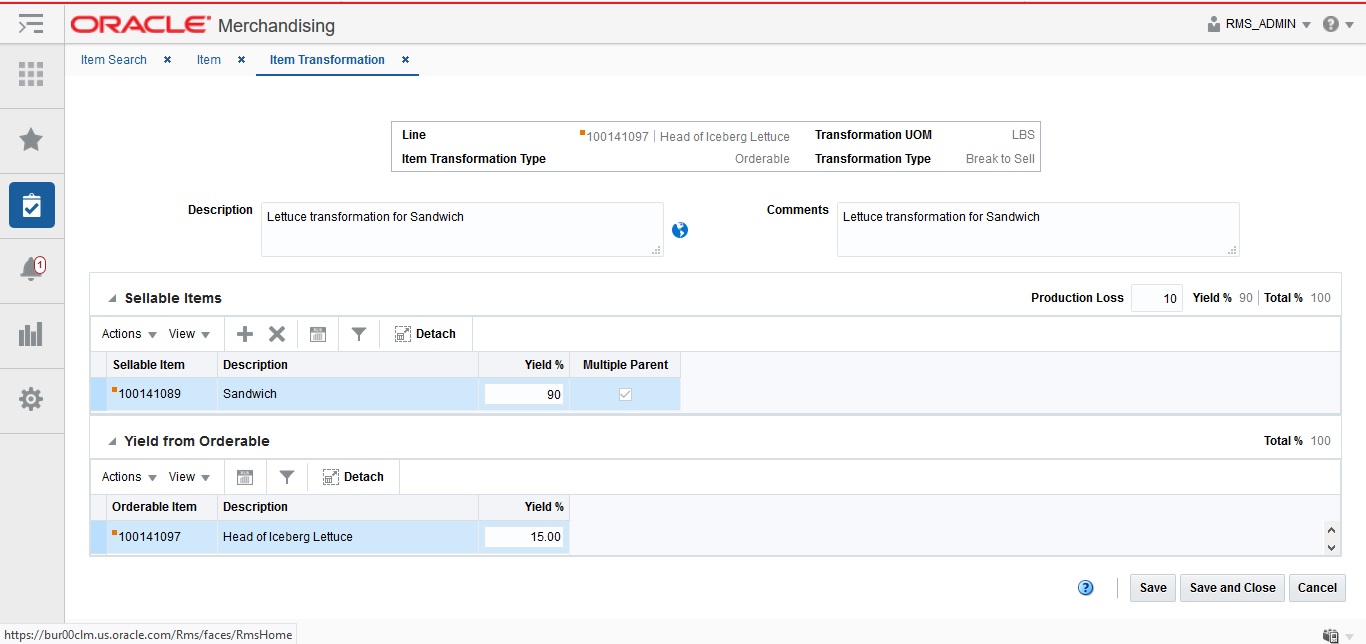
Item Transformation
The Item Transformation page is only available for items with the item type Transformable Orderable.
The Item Transformation page contains the following sections.
-
Header
The header contains transformable orderable item, unit of measure information, the item transformation type as well as the transformation type.
In addition the section contains a Description field, for the description for the transformation template and Comments field. You can create a translation for the transformation template by using the Translate icon
 .
.
Figure 1-12 Item Transformation Page
Sellable Items
In the Sellable Items section you can map transformation sellable item(s) to a transformation orderable item and define the percentage of each sellable item that results from the transformation.
The Production Loss Yield % and the Total Yield % are displayed in right corner of the section. The Production Loss Yield % and the Total Yield % values must add up to 100%.
The table displays the sellable item, the item description, the yield % for each item as well as Multiple Parent checkbox.
The Multiple Parent checkbox indicates whether or not the sellable item is derived from multiple orderable items. If the checkbox is selected the Yield from Orderable section enables and is populated.
Yield from Orderable
The Yield From Orderable section is used to distribute yield percentages between multiple transformation orderable items for any transformable sellable items derived from multiple orderable items.
This section is available only for items that have the Multiple Parent checkbox selected, meaning the sellable item is derived from multiple orderable items and therefore the distribution yield percentages must be defined.
The table lists all of the transform orderable items from which the header level item is derived and allows you to enter a Yield % for each row. The Total Yield % values must add up to 100%.
Transforming an Item
To transform an item, follow the steps listed below.
-
From the Tasks menu, select Items > Manage Items. The Item Search page appears.
-
Restrict your search to the item type Transformed Orderable.
For more information about how to create a transformable item, see the Transformable Items section.
-
Click Search. The items that match the search criteria are displayed in the Results section.
-
In the item column, click the item link, or mark a record and select Actions > Edit, or use the Edit icon
 . The Item page appears.
-
Select More Actions > Transformation. The Item Transformation page appears.
-
In the Description field, enter the description of the item transformation.
-
In the Production Loss field, enter the percentage of the orderable item which is wasted in producing the sellable items. Then add the sellable items.
-
Then add the sellable items. For more information about how to add sellable items, see the Adding Sellable Items section.
Adding Sellable Items
To add sellable items, follow the steps listed below.
-
In the Sellable Items section, select Actions > Add, or use the Add icon
 . The Add Sellable Item
page appears.
Figure 1-13 Add Sellable Item Page

-
In the Item field, enter or search for the sellable item that is created from the orderable item.
-
In the Yield % field, enter percentage of the orderable item used to create the sellable item.
Note:
The Total Yield % field must equal 100% for the orderable item. The Total Yield % field is calculated by adding the Yield % and the Production Loss % field.
-
Then choose one of the following options.
-
Click OK to add the current sellable item to the table.
-
Click OK and Add Another to add additional sellable items.
-
Click Cancel to reject all entries and close the page.
-
-
In the Yield from Orderable section, define the yield details for any sellable items that are associated with multiple orderable items.
Note:
This section is only available, if the Multiple Parent checkbox is selected.
-
Save the entered records.
Simple Packs
To create a simple pack, follow the steps below.
-
From the Tasks menu, select Items > Create Item. The Create Item page appears.
-
In the Type field, select simple pack from the list.
-
The necessary item type indicators Orderable and Inventorable are selected by default. If necessary, select the Sellable and/or the Catch Weight checkbox.
-
Sellable: When selected, indicates that the item is sold and is sent to the POS.
-
Orderable: When selected, the item can be ordered, set up on replenishment, and can have HTS and expenses set up.
-
Inventoried: When selected, indicates that the inventory is tracked and held in Merchandising.
-
Catch Weight: The Catch Weight functionality allows items that may be purchased and sold in varying weights to be better managed within Merchandising. The Catch Weight items are weighed at the receiving location.
-
-
In the Department, Class, and Subclass fields, enter, select or search for the IDs of the merchandise hierarchy.
-
The Transaction Level field, defaults to level 1.
-
In the Number Type field, select the type of item number that you want to associate with the item.
Note:
If you select Oracle Retail Item Number or UPC-A in the Type field, the item number is automatically added. If you select EAN/UCC-13, you can automatically generate the EAN number by clicking Generate. If you select Manual, the description field accepts alphabetic text and does not validate digit, length, or characters. It is a 12-digit number starting with 3 that includes check digit validation.
-
In the Description and Short field, enter a description for the item.
-
Click OK. The Item page appears.
For more information about the Item page, see the Item Page section.
-
Add the cost zone group.
Go to the Cost and Price section. In the Cost Zone Group field, enter, select or search for the cost zone group.
-
In the Attributes section, enter, select or search for the attributes as necessary. For more information about attributes, see the Attributes section.
-
Add a supplier and a sourcing country for the item.
In the Item page, select More Actions > Suppliers. The Item Supplier page appears. For more information about this page, see the Add Suppliers section
-
Add a supplier by selecting Actions > Add, or using the Add icon
 .
.
-
Add a sourcing country for the supplier of the item by select Actions > Countries of Souring, or by clicking the Country of Sourcing button.
-
-
Add the component item for the simple pack.
In the Simple Pack section, click the Pack Details icon. The Pack Item Detail page appears. For more information about the Pack Item Detail page, see the Pack Item Detail section.
-
Edit the retail price of the item.
In the Item page, select More Actions > Retail by Zone. The Retail by Zone page appears. For more information about this page, see the Define Initial Prices section.
-
Save you entries.
Note:
To create a simple pack from an existing item, see the Creating a Simple Pack from an Existing Item section.
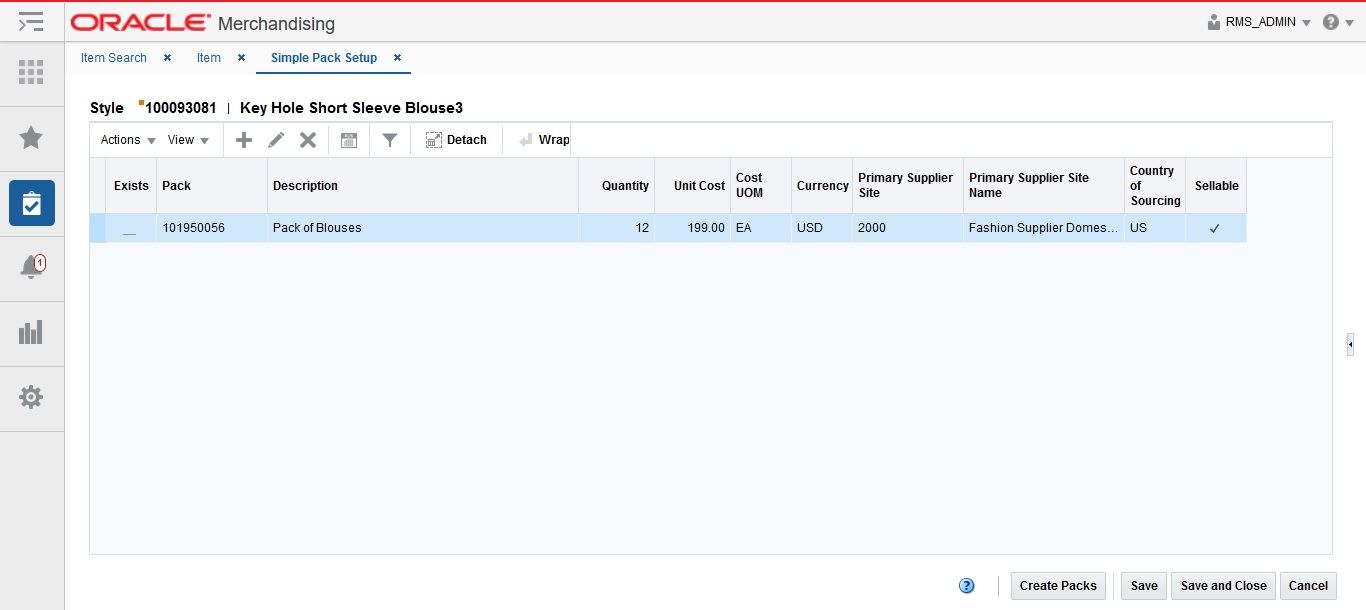
Simple Pack Set Up
In the Simple Pack Set Up page you can create and view simple packs that contain the selected component item. A simple pack is a sellable and/or orderable vendor pack with multiples of only one item number as the component item.
When creating a simple pack for a component item, the following information needs to be provided:
-
Type of number, pack number, and pack description
-
Number of units of the component item that make up the pack
-
Primary supplier and country of sourcing for the pack
-
Unit cost of the pack
-
Number of packs in a case, cases on a tier, and tiers on a pallet
-
Base retail price of the pack if it is sellable as a pack
In addition you can define the dimensions, weights, and volumes of cases and pallets. After defining the attributes of the pack, you can choose to copy other details from the component item. The details may include suppliers, stores, warehouses, seasons, user defined attributes, ticketing, required documents, sales taxes, HTS numbers, and expenses.
Figure 1-14 Simple Pack Setup Page
Table
In the table you can create and maintain the packs for the component item.
Creating a Simple Pack from an Existing Item
To create a simple pack from an existing item, follow the steps below.
-
From the Tasks menu, select Items > Manage Items. The Item Search page appears.
-
Search for the item that will be the component of the simple pack.
-
Click Search. The item is displayed in the Results section.
-
In the Item column, click the item link, or mark a record and select Actions > Edit, or use the Edit icon
 . The Item page appears.
-
Then select More Actions > Simple Pack > Setup. The Simple Pack Setup page appears.
Adding Pack Information
To add pack information for the selected item, follow the steps below.
-
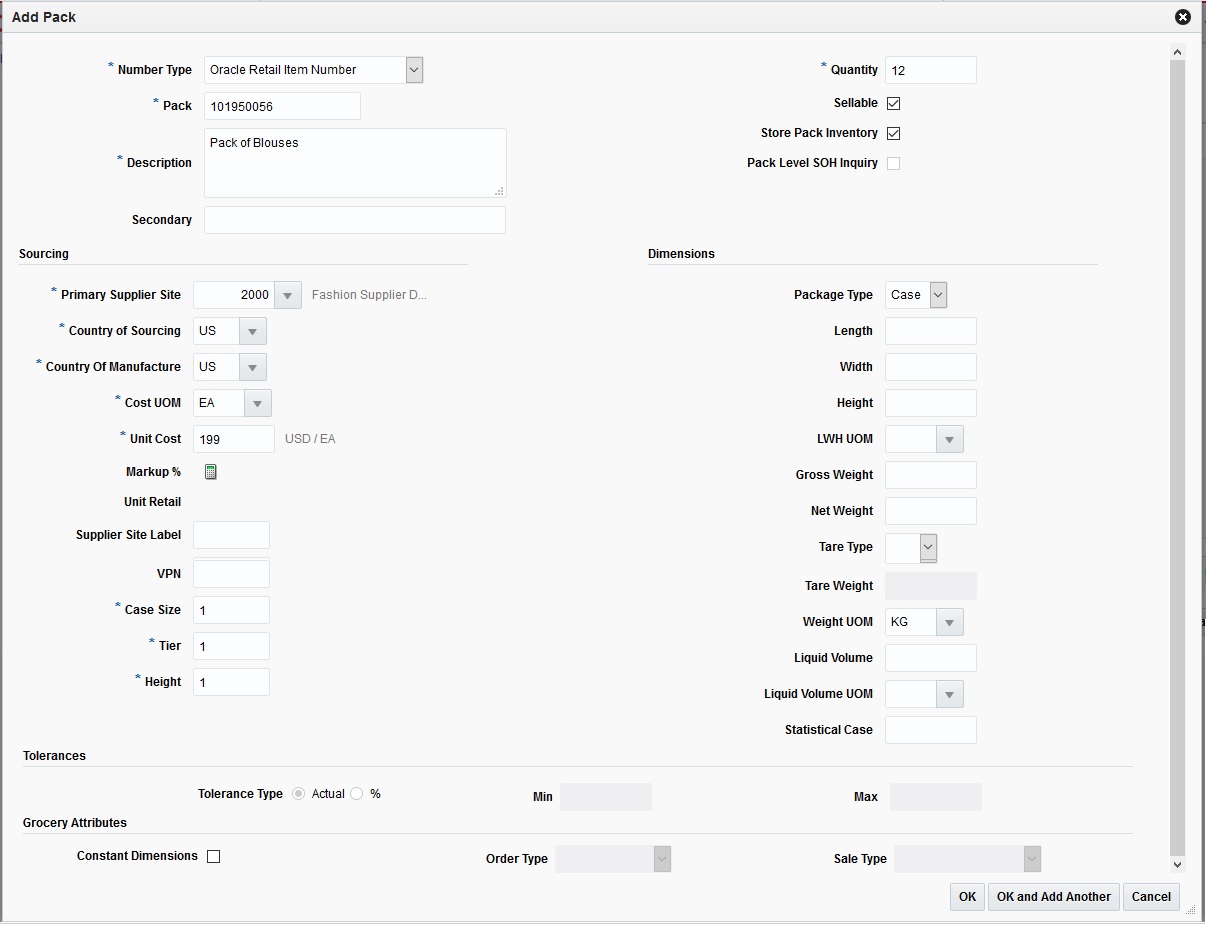
In the table, select Actions > Add, or use the Add icon. The Add Pack page appears.
Figure 1-15 Add Pack Page
-
In the Number Type field, select the type of item number that you want to associate with the pack item. This field is a required field.
-
In the Pack field, enter the pack number of the pack item. This field is a required field.
Note:
If you select Oracle Retail Item Number or UPC-A in the Item Type field, the item number is automatically added. It is a 12-digit number starting with 3 that includes check digit validation.
-
In the Description field, enter a description for the pack item. This field is a required field.
-
In the Secondary field, specify the alternate name of the item.
-
In the Quantity field, specify the number of component items of the pack. This field is a required field.
-
If you select the Sellable checkbox, the item can be sold and sent to the POS.
-
The Store Pack Inventory checkbox indicates whether inventory will be tracked at the pack level in SIM for stores.
-
The Pack Level SOH Inquiry is used by SIM to determine how to reflect SOH for pack items in the store.
-
The NIC is static checkbox indicates if the Negotiated Item Cost (NIC) is static or not.
-
In the Sourcing section enter the following information:
-
In the Primary Supplier Site field, enter, select or search for the primary supplier site. This field is a required field.
-
In the Country of Sourcing field, enter, select or search for the code for the country. This field is a required field.
-
In the Country of Manufacture field, enter, select or search for the country. this field is a required field.
-
In the Cost UOM field, enter, select or search for the unit of measure. This field is a required field.
-
In the Unit Cost field, enter the cost of the item in the indicated currency. This field is a required field.
-
The Markup % field displays the percentage the price marked up, based on the supplier's cost.
-
The Unit Retail field is displayed by default.
-
The Supplier Site Label field is defined to describe the label or brand for the item supplied by the supplier.
-
In the VPN field, specify the vendor product number.
-
In the Case Size field, enter the case size. This field is a required field.
-
In the Tier field, enter the tier. This field is a required field.
-
In the Height field, enter the height. This field is a required field.
-
-
In the Dimensions section, enter the necessary information about the simple pack.
-
In the Tolerance section, the following fields are available.
-
Tolerance Type: This is the unit of the tolerances for catch weight simple packs. The valid values are A (actual) and % (percentage).
-
Min: This is the minimum tolerance value for the Catch Weight simple pack.
-
Max: This is the maximum tolerance value for the Catch Weight simple pack.
-
-
In the Grocery Attributes section, the following fields are available.
Note:
The Catch Weight and Tolerance areas are enabled only if you select Catch Weight in the Attributes area of the Item page.
-
Select the Constant Dimensions checkbox, if the pack dimensions are fixed.
-
The Order Type field gets enabled only for Catch Weight pack.
-
The Sale Type field gets enabled only for Catch Weight pack.
-
-
Then choose one of the following options.
-
Click OK to add the current pack to the table
-
Click OK and Add Another to add additional packs.
-
Click Cancel to reject all entries and close the page.
-
Creating Packs
To create packs follow, follow the steps listed below.
-
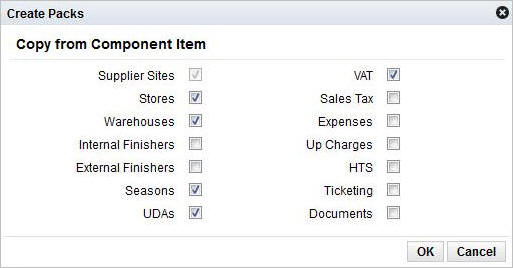
In the toolbar, select Create Packs. The Create Packs page appears.
Figure 1-16 Create Packs Page
-
Select which details you want to copy from the component item to the simple pack.
-
Then choose one of the following options.
-
Click OK to add the simple pack to the table. The Exists checkbox is automatically selected and the selected component details are copied to the simple pack.
Note:
When you click Create Packs, component details are copied to the new simple packs. If simple packs already exist, their details are not updated.
-
Click Cancel to reject all entries and close the page.
-
Editing Pack Items
To edit a simple pack, follow the steps below.
-
From the Tasks menu, select Items > Manage Items. The Item Search page appears.
-
Search for and retrieve a simple pack item.
-
Click Search. The item is displayed in the Results section.
-
In the Item column, click the item link, or mark a record and select Actions > Edit, or use the Edit icon
 . The Item page appears.
-
Then select More Actions > Simple Pack > Setup. The Simple Pack Setup page appears.
-
In the table, select a record.
-
Then select Actions > Edit, or use the Edit icon
 . The Edit Pack page appears. The pack information
of the selected item is displayed.
-
Edit the fields as necessary.
-
Then choose one of the following options.
-
Click OK to save your changes.
-
Click Cancel to reject your entries and close the page.
-
Viewing Pack Items
To view pack item, follow the steps below.
-
From the Tasks menu, select Items > Manage Items. The Item Search page appears.
-
Search for and retrieve a simple pack item.
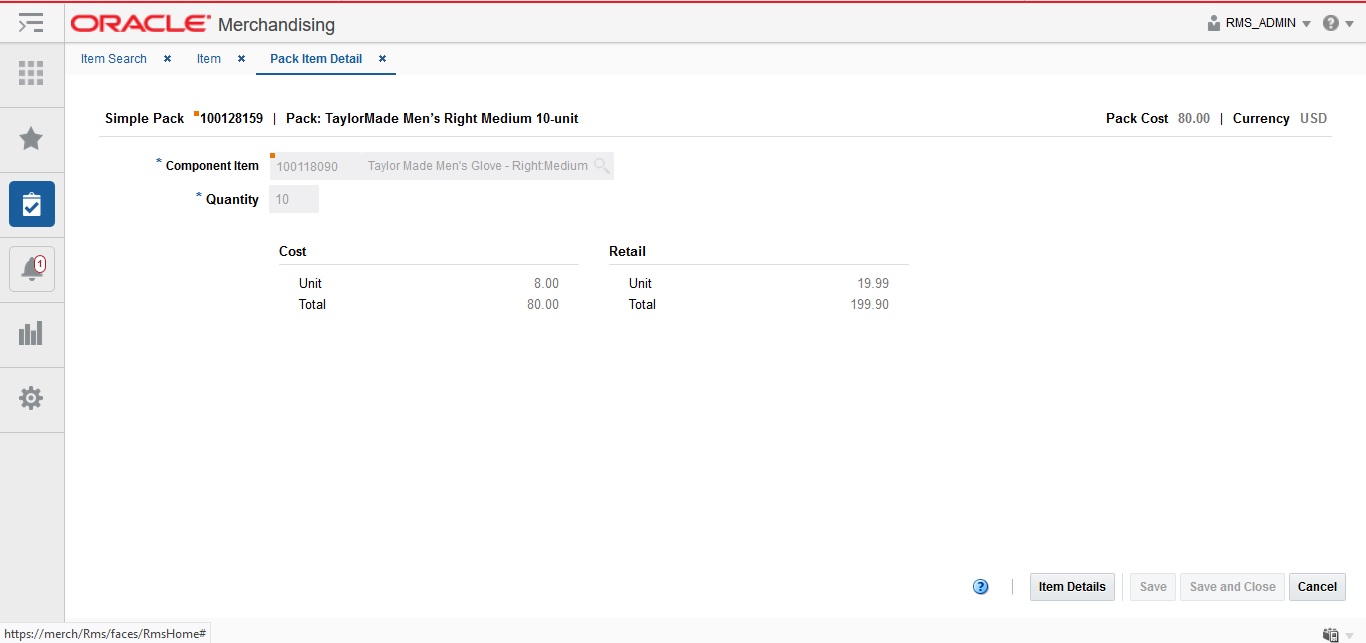
Figure 1-17 Pack Item Detail - Simple Pack
-
Click Search. The item is displayed in the Results section.
-
In the Item column, click the item link, or mark a record and select Actions > Edit/View or use the corresponding items. The Item page appears.
-
Then select More Actions > Simple Pack > View. The Simple Pack page appears.
-
Click Done to close the page.
Complex Packs
To create a complex pack, follow the steps below.
-
From the Tasks menu, select Items > Create Item. The Create Item page appears.
-
In the Type field, select simple pack from the list.
-
The necessary item type indicators are selected by default. If necessary, select the Catch Weight checkbox.
-
Sellable: When selected, indicates that the item is sold and is sent to the POS.
-
Orderable: When selected, the item can be ordered, set up on replenishment, and can have HTS and expenses set up.
-
Inventoried: When selected, indicates that the inventory is tracked and held in Merchandising.
-
Catch Weight: The Catch Weight functionality allows items that may be purchased and sold in varying weights to be better managed within Merchandising. The Catch Weight items are weighed at the receiving location.
-
-
In the Department, Class, and Subclass fields, enter, select or search for the IDs of the merchandise hierarchy.
-
The Transaction Level field, defaults to level 1.
-
In the Number Type field, select the type of item number that you want to associate with the item.
Note:
If you select Oracle Retail Item Number or UPC-A in the Type field, the item number is automatically added. If you select EAN/UCC-13, you can automatically generate the EAN number by clicking Generate. If you select Manual, the description field accepts alphabetic text and does not validate digit, length, or characters. It is a 12-digit number starting with 3 that includes check digit validation.
-
In the Description and Short field, enter a description for the item.
-
Click OK. The Item page appears.
For more information about the Item page, see the Item Page section.
-
Add the cost zone group.
Go to the Cost and Price section. In the Cost Zone Group field, enter, select or search for the cost zone group.
-
In the Complex Pack section, select the pack type from the list and select the necessary checkboxes.
For more information about this Complex Pack section, see the Pack section.
-
In the Attributes section, enter, select or search for the attributes as necessary. For more information about attributes, see the Attributes section.
-
Add a supplier and a sourcing country for the item.
In the Item page, select More Actions > Suppliers. The Item Supplier page appears. For more information about this page, see the Add Suppliers section
-
Add a supplier by selecting Actions > Add, or using the Add icon
 .
.
-
Add a sourcing country for the supplier of the item by select Actions > Countries of Souring, or by clicking the Country of Sourcing button.
-
-
Add the component items for the complex pack.
In the Complex Pack section, click the Pack Details icon. The Pack Item Detail page appears. For more information about the Pack Item Detail page, see the Pack Item Detail section.
-
Edit the retail price of the item.
In the Item page, select More Actions > Retail by Zone. The Retail by Zone page appears. For more information about this page, see the Define Initial Prices section.
-
Save you entries.
Pack Item Detail
In the Pack Item Detail page you can add, edit, delete and view the component items of a pack item. A complex pack may be composed of multiple units of multiple items. A simple pack may be composed of multiple units of one item.
There are some restrictions depending on the how you define the purpose of the pack:
Orderable pack: You cannot add, delete, or edit the component items if the pack is already on order or stocked at any location.
Sellable pack: You cannot add, delete, or edit the component items after the pack item is priced.
The Pack Item Details page varies depending whether you maintain a complex or simple pack.
Simple Pack:
-
Header
The header displays the label Simple Pack, the pack number and description. The right hand side displays the Pack Cost and Currency.
-
Component
In this section you can search for a component item. You can add only component item in case of simple packs.
-
In the Component Item field, enter, select or search for the component item.
-
In the Quantity field, enter the quantity for the component item.
-
The Cost and Retail section displays the Unit and Total fields. These fields are populated when you enter the item.
-
Complex Pack:
-
Header
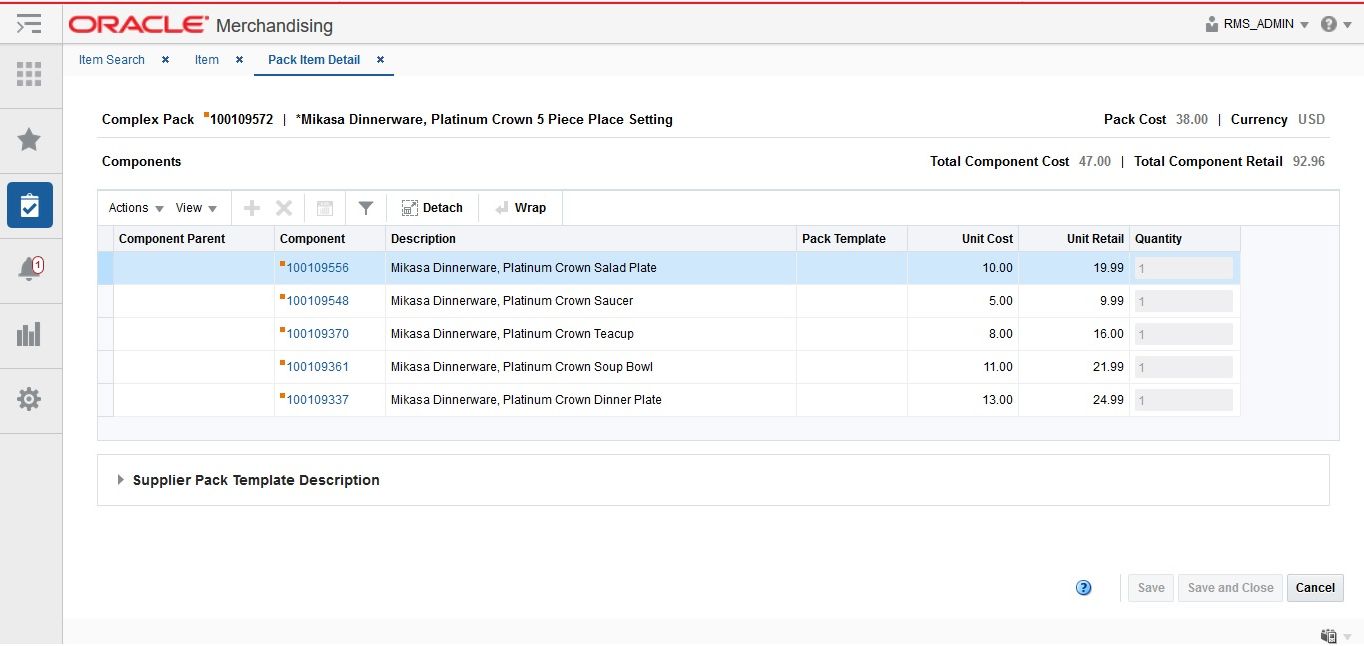
The header displays the label Complex Pack, the pack number and description. The right hand side displays the Pack Cost and the Currency.
Figure 1-18 Pack Item Detail - Complex Pack
Components
The Components section displays a table which contains all the component items that are part of the complex pack. The title displays the Total Component Cost and Total Component Retail in the in right hand corner.
You can edit the Quantity column of the component item directly in the table.
Supplier Pack Template Description
If the pack item is associated with a pack template the table in the Supplier Pack Template Description expands. You can add more suppliers and descriptions in addition to the pack supplier in this section.
You can edit the Pack Template Description column directly in the table.
Maintaining Pack Item Details
To maintain pack item details, follow the steps below.
-
From the Tasks menu, select Items > Manage Items. The Item Search page appears.
-
Enter or select search criteria as desired to make the search more restrictive.
-
Restrict your search to the item type Simple Pack or Complex Pack in Worksheet status.
-
Click Search. The items that match the search criteria are displayed in the Results section.
-
In the item column, click the item link, or mark a record and select Actions > Edit, or use the Edit icon
 . The Item page appears.
-
In the Simple/Complex Pack section, select the Pack Item Details icon
 . The Pack Item Details page appears.
Simple Packs
For simple packs, enter the following details.
-
In the Component Item field, enter, select or search for the component item.
-
In the Quantity field, enter the quantity for the component item.
-
The Cost and Retail section displays the Unit and Total fields. These fields are populated when you enter the item.
-
Save your changes.
Complex Packs
For complex packs, add component items and supplier pack templates.
Adding Components for Complex Packs
To add components for complex packs, follow the steps below.
-
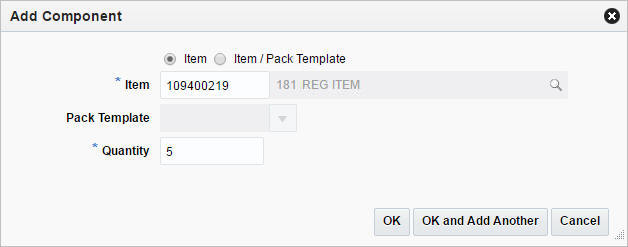
In the Components section, select Actions > Add, or use the Add icon
 . The Add Component page appears.
Figure 1-19 Add Component Page
-
Select if you want to add an item or an item/pack template.
-
In the Item field, enter or search for an item. This field is a required field.
-
In the Pack Template field, enter, select or search for the template. Only enabled if you select item/pack template.
-
In the Quantity field, enter the quantity for the component item.
-
Then choose one of the following options.
-
Click OK to add the component to the table.
-
Click OK and Add Another to add additional components.
-
Click Cancel to reject all entries and close the page.
-
-
Save your entries.
Adding Supplier Pack Templates
To add supplier pack templates for complex packs, follow the steps below.
-
In the Supplier Pack Templates Description section, select Actions > Add, or use the Add icon
 . The Add Supplier Pack Template Description page appears.
-
In the Supplier Site field, enter or search for the supplier site.
-
In the Pack Description field, enter the description for the pack.
-
Then choose one of the following options.
-
Click OK to add the supplier pack template to the table.
-
Click OK and Add Another to add additional supplier pack templates.
-
Click Cancel to reject all entries and close the page.
-
-
Save your entries.
Add Suppliers
In the Item Supplier page you can add, edit, delete and view the suppliers for an item. By default, the first supplier is marked as the primary supplier for the item. After additional suppliers are added, the primary supplier can be redefined.
The Item Supplier page contains the following sections.
-
Header
The header displays the Item Level (SKU/Style/ Reference Item), the item number and item description.
Figure 1-20 Item Suppliers Page
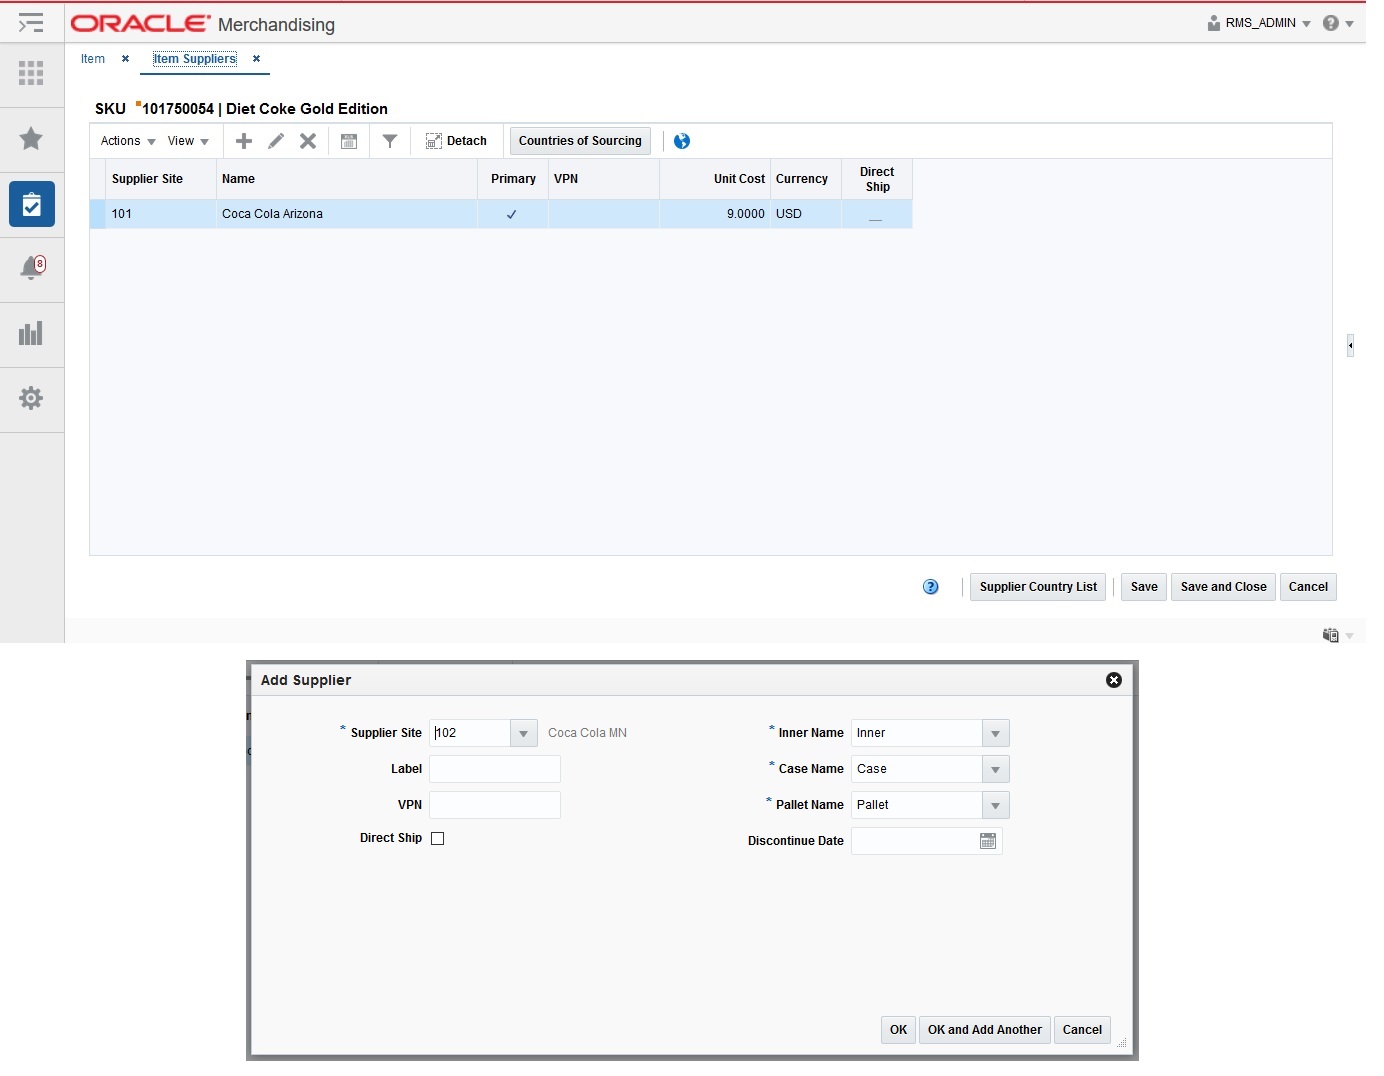
The table header contains the item number and item description. The table displays the supplier site, the supplier site name, the vendor product number (VPN), the unit cost as well as the currency. Additionally the table displays whether or not a direct shipment from the supplier to the customer is eligible.
Maintaining Item Suppliers
To maintain item suppliers, follow the steps below.
-
From the Tasks menu, select Items > Manage Items. The Item Search page appears.
-
Restrict the search to items in Worksheet status.
-
Click Search. The items that match the search criteria are displayed in the Results section.
-
In the Item column, click the item link, or mark a record and select Actions > Edit, or use the Edit icon
 . The Item page appears.
-
Select More Actions > Suppliers. The Item Suppliers page appears.
Adding Item Suppliers
To add item suppliers, follow the steps below.
-
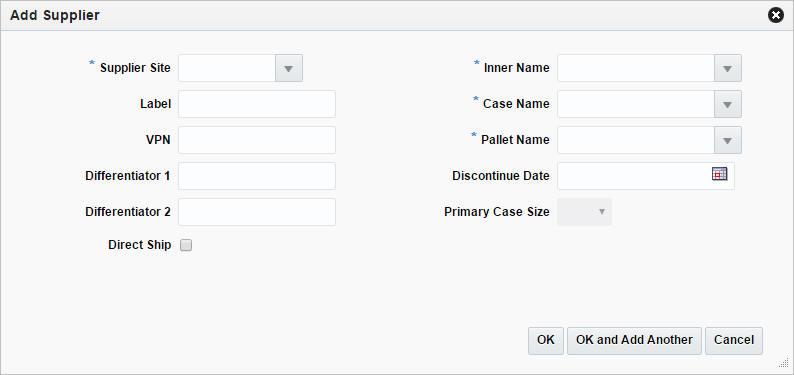
In the Item Suppliers page, select Actions > Add, or use the Add icon
 . The Add Supplier page
appears.
Figure 1-21 Add Supplier Page
-
In the Supplier Site field, enter, select or search for the supplier site. This field is a required field.
-
In the Label field, enter the supplier label for the item.
-
In the VPN field, enter the vendor product number.
-
In the Differentiator fields, enter the diff values, if applicable.
-
Select the Direct Ship checkbox, if direct shipments from the supplier to the customer are permitted.
-
The Inner Name, Case Name and Pallet Name fields, are defaulted to the name used by the supplier to refer to the inner, the case and the pallet. These fields are required fields.
-
In the Discontinue Date field, enter the date at which the supplier discontinues the item or use the Calendar icon to select the discontinue date.
-
In the Primary Case Size field, select the primary case size from the list.
Note:
This field is only enabled, if the Advanced Inventory Planning application is used.
-
Select the Apply Modifications to Child Items checkbox, to update the child items.
-
Then choose one of the following options.
Note:
The first supplier added to the item, is marked as the primary supplier by default. You can change the primary supplier for the item, after you have added additional suppliers.
For more information about how to change the primary supplier for an item, see the Editing Item Suppliers section.
-
Click OK to save the supplier for the item and close the page.
-
Click OK and Add Another to add additional suppliers for the item.
-
Click Cancel to reject all entries and close the page.
-
-
Editing Item Suppliers
To edit item suppliers, follow the steps below.
-
In the Items Supplier page, select a record in the table.
-
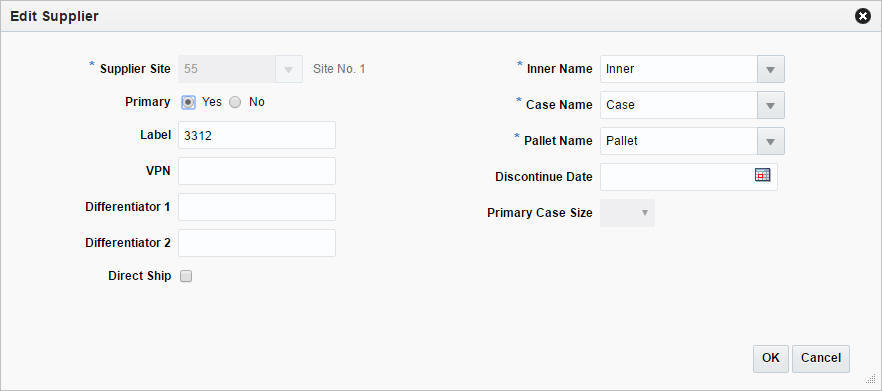
Then select Actions > Edit, or use the Edit icon
 . The Edit Supplier page appears.
Figure 1-22 Edit Supplier Page
-
Edit the fields, as necessary.
Note:
If you want to define the current supplier as the primary supplier for the item, select the Primary option.
-
Then choose one of the following options.
-
Click OK to save your changes and close the page.
-
Click Cancel to reject all entries and close the page.
-
Item Supplier Countries
The Item Supplier Countries page allows you to add, edit, and view the sourcing countries that are associated with an item supplier combination. You can define a Purchase type that captures the Ownership model agreed upon with the supplier for the specific Item-sourcing country combination. Three types of Ownership models are supported namely Owned Merchandise, Consignment and Concession. Consignment and Concession ownership models can be selectively enabled through system option configuration. Based on the ownership model you can enter the costs or costing method negotiated with the supplier. If supplier controlled pricing is enabled for Consignment and Concession ownership models through system option configuration, you can define a pricing control for the item-sourcing country combination. The valid values for this field are Retailer and Supplier. The default value for the pricing control is set up at the Supplier Site level. If provided, the default pricing control will be inherited at item-supplier-country level when supplier-sourcing country is initially added to an item. For Owned merchandise, Pricing Control is not required. Additionally, you can maintain location defaults, ordering, case, and packaging information.
You can view all countries associated to the item in the table of the Country of Sourcing section. For each country up to four dimension records can be created.
The Item Supplier Countries page contains the following sections.
-
Header
Depending on the item you have selected, the label of the header varies. The label displays Item Level (SKU/Style/ Reference Item), the item number and item description. Additionally, the header contains the supplier site number and name and indicates whether or not the selected supplier is the primary supplier for the item.
Figure 1-23 Item Supplier Countries Page
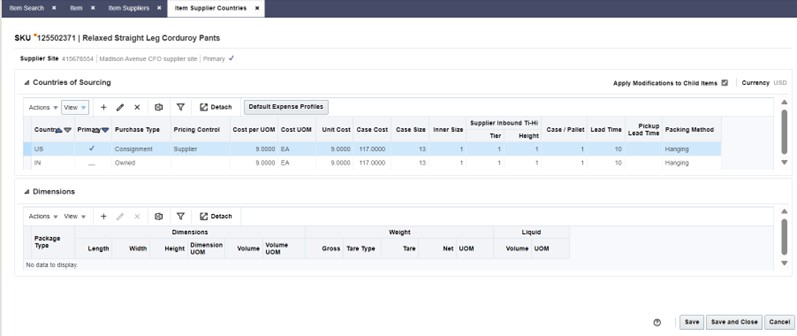
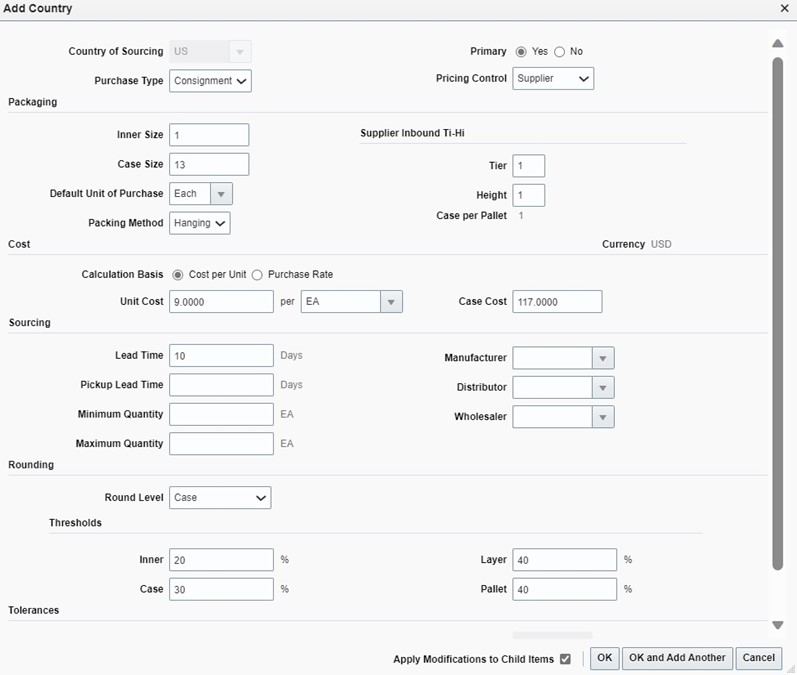
Figure 1-24 Item Supplier - Add Country
Country of Sourcing
The Country of Sourcing section displays the following columns by default.
-
Country
-
Primary
-
Purchase Type
-
Pricing Control
-
Unit Cost
-
Cost UOM (Unit of Measure)
-
Case Cost
-
Case Size
-
Supplier Inbound Tier - Height
-
Case/Pallet
-
Lead Time
-
Pickup Lead Time
-
Round Level
-
Thresholds
-
Packing Method
Note:
If the selected item is a parent item, the Apply Modifications to Child Item checkbox is displayed in the right hand corner of this section. Select to checkbox to indicate that the changes are also applied for the child items.
Maintaining Countries of Sourcing for a Supplier
To maintain countries of sourcing for a supplier, follow the steps below.
-
From the Tasks menu, select Items > Manage Items. The Item Search page appears.
-
Enter or select search criteria as desired to make the search more restrictive.
Note:
The item should be in Worksheet, Submitted, or Approved Status.
-
Click Search. The items that match the search criteria are displayed in the Results section.
-
In the Item column, click the item link, or mark a record and select Actions > Edit, or use the Edit icon
 . The Item page appears.
-
Select More Actions > Suppliers. The Item Suppliers page appears.
-
In the Item Suppliers page, select Actions > Countries of Sourcing, or use the Countries of Sourcing button. The Item Supplier Countries page appears.
Adding a Country of Sourcing for a Supplier of an Item
To add a new country of sourcing for an supplier of an item, follow the steps below.
-
In the Countries of Sourcing section select Actions > Add, or use the Add icon
 . The Add Country page
appears.
-
In the Country of Sourcing field, enter, select or search for the country.
-
If you want to define the current supplier as the primary supplier for the item, select the Primary option.
-
Select the Purchase Type to be associated with the item supplier country combination.
Note:
Valid values of Purchase type are Owned, Consignment and Concession. Consignment and Concession purchase types will be available for selection only if the functionality is selected in system options.
-
Select the Pricing Control to be associated with the item supplier country combination.
Note:
Valid values of Pricing Control are Retailer and Supplier. Pricing Control for Consignment and Concession purchase types will be displayed for selection only if the Consignment and Concession ownership models and Supplier-Controlled Pricing functionality are enabled in system options. For Owned merchandise, Pricing Control is not required.
-
Several fields in the Packaging, Sourcing, Rounding and Tolerances sections default to the suppliers default information. Edit the information as necessary.
-
Enter the Unit Cost and Case Cost of the Item.
Note:
If the Purchase type is Consignment or Concession item costing can be entered based on either Cost per Unit or Purchase Rate %.
-
If the selected item is a parent item, the Apply Modifications to Child Item checkbox is displayed. Select to checkbox to indicate that the changes are also applied for the child items.
-
Then choose one of the following options.
-
Click OK to add the country of sourcing for the supplier and close the page.
-
Click OK and Add Another to add additional countries of sourcing for suppliers.
-
Click Cancel to reject all entries and close the page.
Note:
The Purchase Type and Costing details captured on an Item Supplier Country record will be used as a default unless location specific exceptions are defined in Item Supplier Country Location.
-
-
Editing Countries of Sourcing for a Supplier of an Item
To edit a country of sourcing for a supplier of an item, follow the steps below.
-
In the Countries of Sourcing section, select a record in the table.
-
Then select Actions > Edit, or use the Edit icon
 . The Edit Supplier page appears.
-
Edit the fields, as necessary.
Note:
If you want to define the current supplier as the primary supplier for the item, select the Primary option.
-
Then choose one of the following options.
-
Click OK to save your changes and close the page.
-
Click Cancel to reject all entries and close the page.
-
Dimensions
The Dimensions section displays the package type, as well as dimension, weight, and liquid information.
Adding Dimensions for a Country of Sourcing
To add dimensions for a country of sourcing, follow the steps below.
-
In the Countries of Sourcing section, select a country for which you want to add dimensions.
-
In the Dimensions section, select Actions > Add, or use the Add icon
 . The Add Dimensions page appears.
-
In the Package Type field, select a package type from the list.
-
The Dimensions, Weight and Liquid sections default to the suppliers default information. Edit the information as necessary.
-
If the selected item is a parent item, the Apply Modifications to Child Item checkbox is displayed. Select to checkbox to indicate that the changes are also applied for the child items.
-
Then choose one of the following options.
-
Click OK to add the dimensions for the country of sourcing and close the page.
-
Click OK and Add Another to add additional dimensions for the country of sourcing.
Note:
You can add up to four dimensions for one country.
-
Click Cancel to reject all entries and close the page.
-
-
Editing Dimensions for a Country of Sourcing
To edit dimensions for a country of sourcing, follow the steps below.
-
In the Countries of Sourcing section, select a country for which you want to edit the dimension information.
-
In the Dimensions section, select a record in the table.
-
Then select Actions > Edit, or use the Edit icon
 . The Edit Dimensions page appears.
-
Edit the fields, as necessary.
-
Then choose one of the following options.
-
Click OK to save your changes and close the page.
-
Click Cancel to reject all entries and close the page.
-
Viewing an Item Supplier Country List
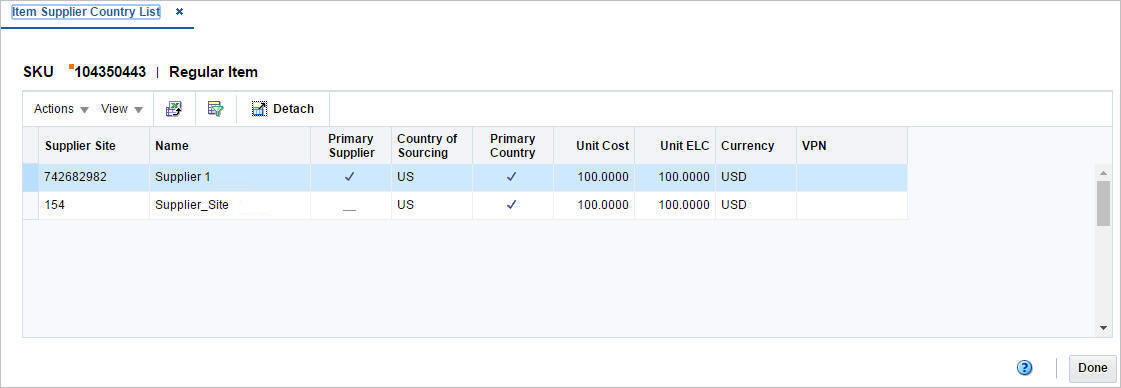
The Item Supplier Country List page allows you o view the supplier and sourcing country relationships for an item.
To view an item supplier country list, follow the steps below.
-
From the Tasks menu, select Items > Manage Items. The Item Search page appears.
-
Enter or select search criteria as desired to make the search more restrictive.
-
Click Search. The items that match the search criteria are displayed in the Results section.
-
In the Item column, click the item link, or mark a record and select Actions > Edit or View or use the corresponding icons. The Item page appears.
-
Select More Actions > Suppliers. The Item Suppliers page appears.
-
In the toolbar, click Supplier Country List. The Item Supplier Country List page appears.
The Item Supplier Country List page contains the following sections.
-
Header
The header of the page displays Item Level (SKU/Style/ Reference Item), the item number and item description.
Figure 1-25 Item Supplier Country List
-
Table
The table displays supplier site and country of sourcing information.
Item Supplier Country Locations
The Item Supplier Country Locations page allows you to create and maintain Location specific exceptions to the values defined on Item Supplier Country. These could be exceptions based on Purchase Type, Pricing Control, Costing, dimensions, packing information etc. You can view all location specific exceptions to an item supplier country record in the table on the Item Supplier Country Locations page.
The Item Supplier Country Locations page contains the following sections.
-
Header
Depending on the item you have selected, the label of the header varies. The label displays Item Level (SKU/Style/ Reference Item), the item number and item description. The header also contains the supplier site number and name and indicates whether or not the selected supplier is the primary supplier for the item. Additionally the header also includes the country of sourcing and whether it is primary or not.
-
Table
Figure 1-26 Item Supplier Country Locations Page
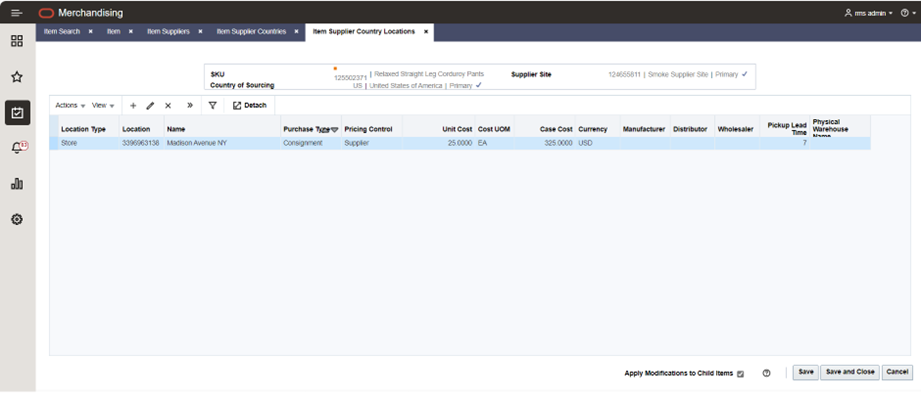
The Locations displays the following columns by default.
-
Location type
-
Location
-
Name
-
Purchase type
-
Pricing Control
-
Unit Cost
-
Cost UOM (Unit of Measure)
-
Case Cost
-
Currency
-
Manufacturer
-
Distributor
-
Wholesaler
-
Pickup Lead Time
Note:
If the selected item is a parent item, the Apply Modifications to Child Item checkbox is displayed in the right-hand corner of this section. Select to checkbox to indicate that the changes are also applied for the child items.
Maintaining Item Supplier Country Locations
To maintain countries of sourcing for a supplier, follow the steps below.
-
From the Tasks menu, select Items > Manage Items. The Item Search page appears.
-
Enter or select search criteria as desired to make the search more restrictive.
Note:
The item should be in Worksheet, Submitted, or Approved Status.
-
Click Search. The items that match the search criteria are displayed in the Results section.
-
In the Item column, click the item link, or mark a record and select Actions > Edit, or use the Edit icon
 . The Item page appears.
-
Select More Actions > Suppliers. The Item Suppliers page appears.
-
In the Item Suppliers page, select Actions > Countries of Sourcing, or use the Countries of Sourcing button. The Item Supplier Countries page appears.
-
Select Actions> Locations. The Item Supplier Country Locations page appears
Adding an Item Supplier Country Location Record
To add a new Item supplier Country location exception, follow the steps below.
-
In the Locations section select Actions > Add, or use the Add icon
 . The Add Locations page appears.
Figure 1-27 Add Locations Pop-up
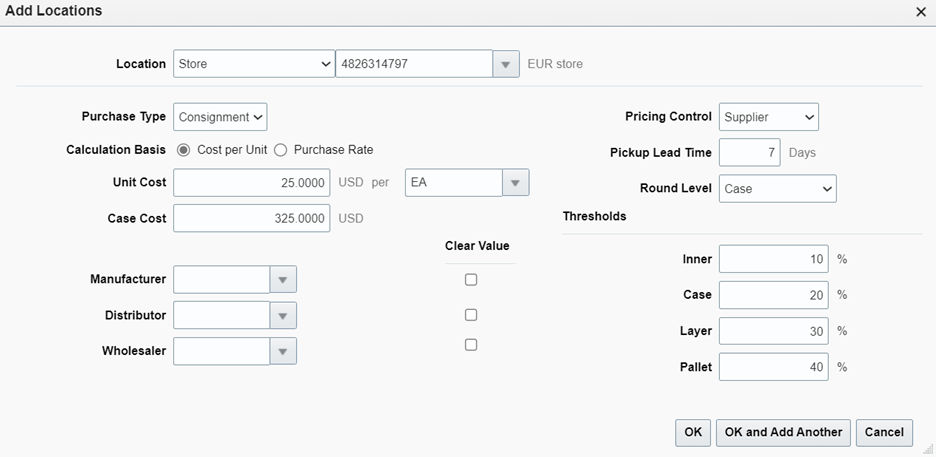
-
In the Location field, select the Location Type and select or enter the location.
-
The Purchase Type is defaulted from the item/supplier/country of sourcing. Edit this information as necessary. A SKUlevel item in the Worksheet status will have this field enabled to let you define a value at this level which could be different from the related Style level item.
-
The Pricing Control defaults from the item/supplier/country of sourcing. Edit this information as necessary. A SKU level item in the Worksheet status will have this field enabled to let you define a value at this level which could be different from the related Style level item.
-
The Cost defaults from the item/supplier/country of sourcing. Edit this information as necessary.
Note:
If the Purchase Type is consignment /concession, then the Calculation basis and the cost or Purchase Rate needs to be specified
-
The Rounding Thresholds and Lead times default to the values from the item/supplier/country of sourcing. Edit the information as necessary.
-
Then choose one of the following options.
-
Click OK to add the country of sourcing for the supplier and close the page.
-
Click OK and Add Another to add additional countries of sourcing for suppliers.
-
Click Cancel to reject all entries and close the page.
-
Editing an Item Supplier Country Location Record
To edit an item supplier country location record, follow the steps below.
-
In the Locations section, select a record in the table.
-
Then select Actions > Edit, or use the Edit icon
 . The Edit Item Supplier Country Location page appears.
-
Edit the fields, as necessary.
-
Then choose one of the following options.
-
Click OK to save your changes and close the page.
-
Click Cancel to reject all entries and close the page.
-
Deleting an Item Supplier Country Location Record
To delete an item supplier country location record, follow the steps below.
-
In the Locations section, select a record in the table.
-
Then select Actions > Delete, or use the Delete icon
 . The record is deleted from the table
Item Bracket Costing
The Item Bracket Costing page allows you to view the brackets for the item/supplier/country/location combination and edit unit and case bracket costs for items in worksheet status. Brackets are used by the suppliers to provide different costs based on the quantity ordered.
When a country-level bracket is modified, costs default down to all location brackets. When items above the transaction level are modified, costs are default down to children for all brackets. If a default bracket cost is changed, the cost is modified at the item-supplier-country-location level.
The Item Bracket Costing page contains the following sections.
-
Header
The header of the page displays the Item Level (SKU/Style/ Reference Item) and the item number. Additionally, the header displays the supplier site and name, the country as well as the location and location name.
Select the Primary checkbox for the supplier site, country and/or location to indicate if they are the primary supplier site, country or location.
-
Detail
The table displays the brackets for the item-supplier-country-location combination. You can edit the Unit Cost and Case Cost columns directly in the table.
Editing Bracket Costs for Worksheet Items
To edit bracket costs for items, follow the steps listed below.
-
From the Tasks menu, select Items > Manage Items. The Item Search page appears.
-
Restrict your search to items with the status Worksheet.
-
Click Search. The items that match the search criteria are displayed in the Results section.
-
In the Item column, click the item link, or mark a record and select Actions > Edit, or use the Edit icon
 . The Item page appears.
-
Select More Actions > Suppliers. The Item Suppliers page appears.
-
In the Item Suppliers page, select Actions > Countries of Sourcing, or use the Countries of Sourcing button. The Item Supplier Countries page appears.
-
In Countries of Sourcing section, select Actions > Bracket Costing. The Item Bracket Costing page appears.
-
Update the unit cost or the case cost.
-
In the Unit Cost field, enter the new unit cost. The case cost is calculated automatically.
-
In the Case Cost field, enter the new case cost. The unit cost is calculated automatically.
-
-
Save the entered records.
Add Countries of Manufacture
In the Item Supplier Countries of Manufacture page, you can manage manufacturing countries for item suppliers. One of the countries can be indicated as primary.
The Item Supplier Countries of Manufacture page contains the following sections.
-
Header
The header of the page displays Item Level (SKU/Style/ Reference Item), the item number and item description.
Figure 1-28 Item Supplier Countries of Manufacture
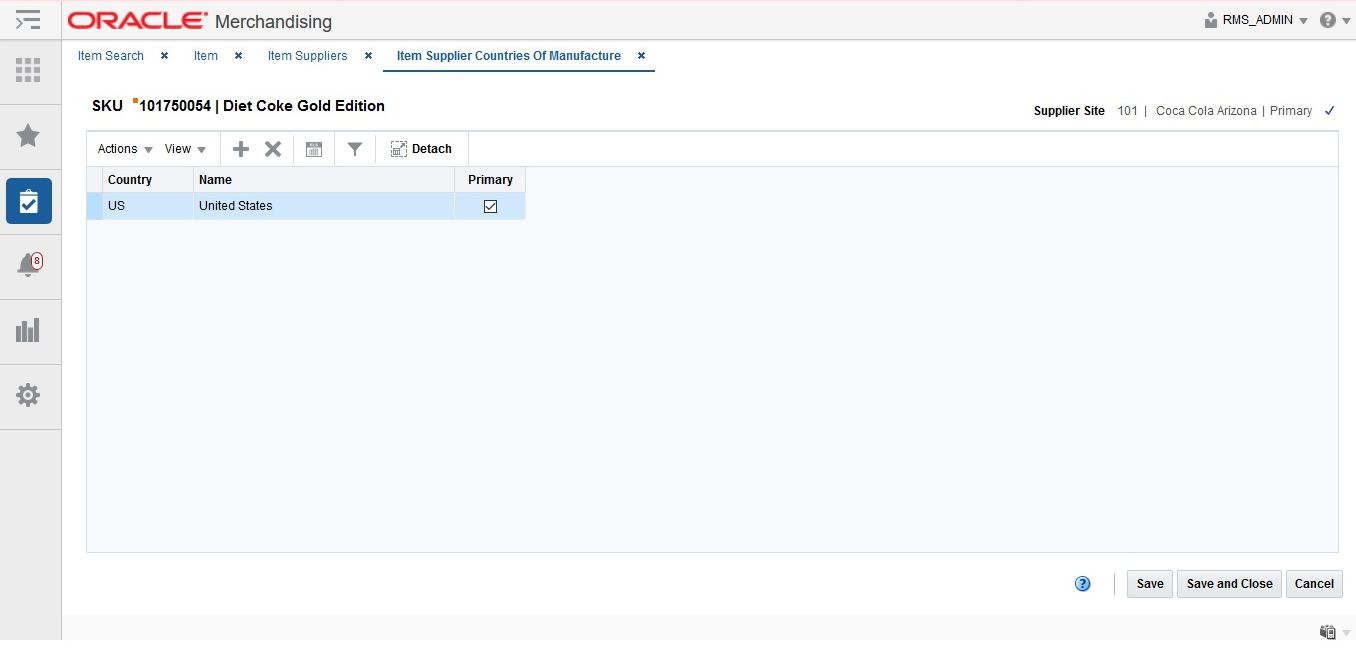
Detail
Depending on the selected item the label of the header either displays the item description, or indicates if the selected item is a pack or reference item.
On the right hand side the supplier site information is displayed. Additionally Primary checkbox shows if the current supplier is the primary supplier for the item.
The table displays the following columns by default.
-
Country
-
Country Name
-
Primary
Maintaining Manufacturing Countries for a Supplier
To maintain countries of manufacture for a supplier, follow the steps below.
-
From the Tasks menu, select Items > Manage Items. The Item Search page appears.
-
Enter or select search criteria as desired to make the search more restrictive.
Note:
The item should be in Worksheet, Submitted, or Approved Status.
-
Click Search. The items that match the search criteria are displayed in the Results section.
-
In the Item column, click the item link, or mark a record and select Actions > Edit, or use the Edit icon
 . The Item page appears.
-
Select More Actions > Suppliers. The Item Suppliers page appears.
-
In the Item Suppliers page, select Actions > Countries of Manufacture. The Item Supplier Countries of Manufacture page appears.
Adding a Country of Manufacture for a Supplier of an Item
To add a new manufacturing country for an supplier, follow the steps below.
-
In table, select Actions > Add, or use the Add icon
 . The Add Country of Manufacture page appears.
-
In the Country field, enter, select or search for the country.
-
If you want to define the current country as the primary manufacturing country for the supplier, select the Primary option.
-
If the selected item is a parent item, the Apply Modifications to Child Item checkbox is displayed. Select to checkbox to indicate that the changes are also applied for the child items.
-
Then choose one of the following options.
-
Click OK to add the country of manufacture for the supplier and close the page.
-
Click OK and Add Another to add additional countries of manufacture for suppliers.
-
Click Cancel to reject all entries and close the page.
-
-
Add Supplier Units of Measure
In the Item Supplier UOM page you can add, delete, and view miscellaneous units of measure (UOM) for an item/supplier combination. You must enter a factor that can be used to convert the unit of measure to the standard unit of measure. In this page you can overwrite the unit of measure for all subordinate level items that are supplied by the supplier of the selected item.
The Item Supplier UOM page contains the following sections.
-
Header
The header displays the item, the supplier site as well as the standard unit of measure.
Figure 1-29 Item Supplier UOM
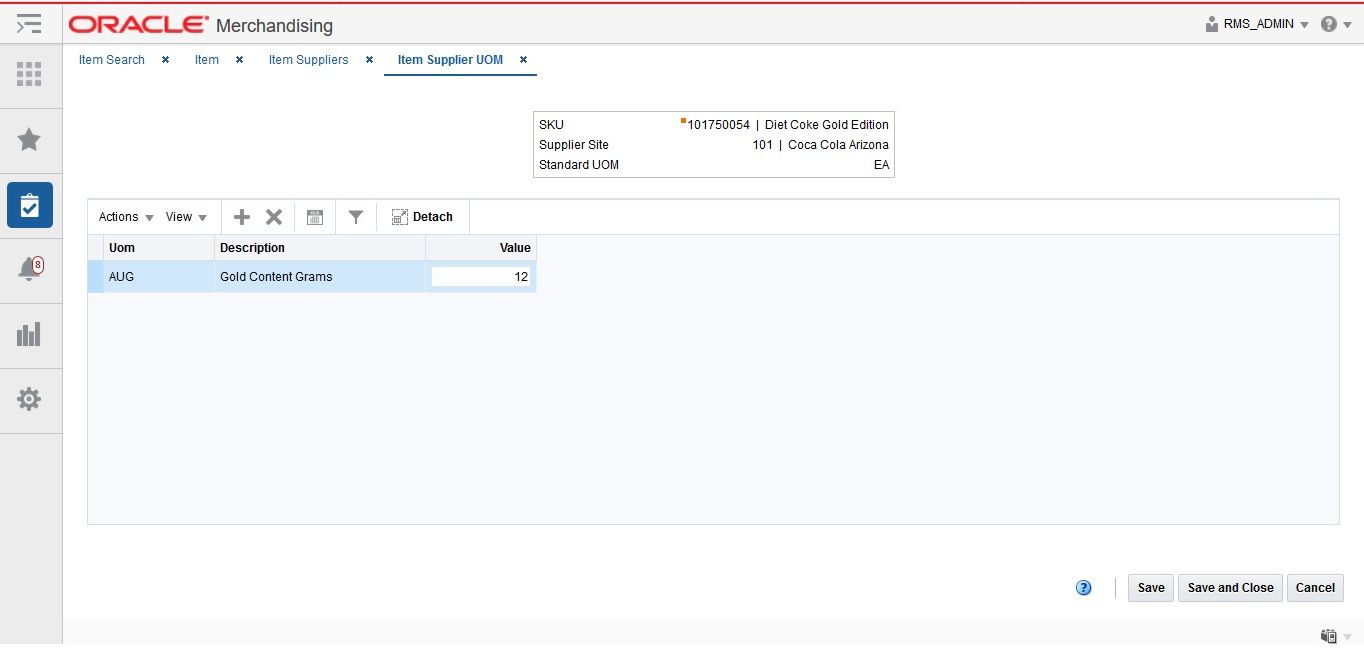
Detail
The table displays the following columns by default.
-
Unit of measure (UOM)
-
Description
-
Value
You can enter the value of the unit of measure directly in the table.
Maintaining Units of Measure for a Supplier
To maintain units of measure for a supplier, follow the steps below.
-
From the Tasks menu, select Items > Manage Items. The Item Search page appears.
-
Enter or select search criteria as desired to make the search more restrictive.
Note:
The item should be in Worksheet, Submitted, or Approved Status.
-
Click Search. The items that match the search criteria are displayed in the Results section.
-
In the Item column, click the item link, or mark a record and select Actions > Edit, or use the Edit icon
 . The Item page appears.
-
Select More Actions > Suppliers. The Item Suppliers page appears.
-
In the Item Suppliers page, select Actions > UOM. The Item Supplier UOM page appears.
Adding a Unit of Measure for a Supplier of an Item
To add a new unit of measure for an supplier, follow the steps below.
-
In table, select Actions > Add, or use the Add icon
 . The Add UOM appears.
-
In the UOM field, enter, select or search for the unit of measure.
-
In the Value field, enter a value of the UOM.
-
Then choose one of the following options.
-
Click OK to add the unit of measure and close the page.
-
Click OK and Add Another to add additional UOMs for the supplier.
-
Click Cancel to reject all entries and close the page.
-
-
Add Country and Zone Expenses
The Item Expense page allows you to view and maintain shipping routes and importing and exporting expenses associated with an item and shipping route. Expenses are tracked at the following two levels:
-
Country:
Country-level expenses track the costs of importing merchandise from the country of sourcing, through the lading port, to the discharge port.
-
Zone:
Zone-level expenses track the costs of sending merchandise from the discharge port to the final destination. This screen can be accessed from Item Suppliers and Item Supplier Country screen.
The Item Expenses page contains the following sections.
-
Header
When you access the Item Expenses page from Item Supplier page, the header displays the item, supplier site and cost zone group.
When you access the Item Expense page from Item Supplier Country page, the header displays the item, the supplier site and the country of sourcing.
Figure 1-30 Item Expenses Page
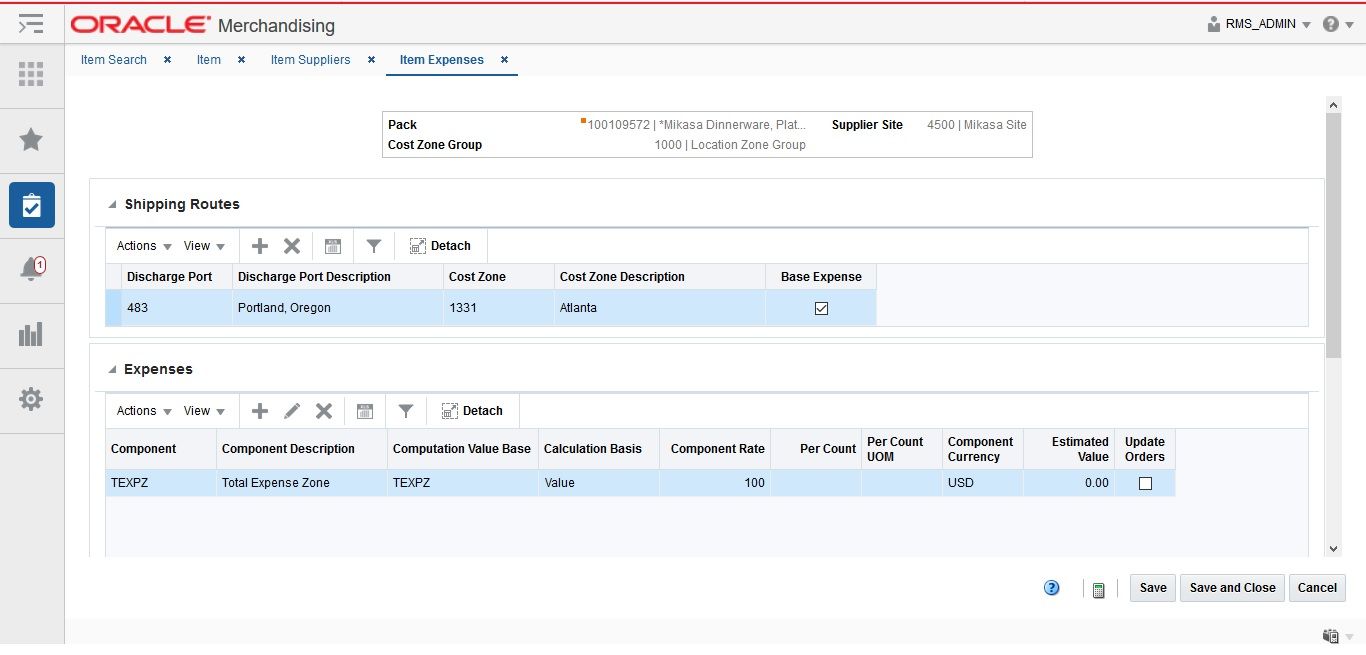
Shipping Routes
When you access the Item Expenses page from Item Supplier page, the Shipping ping Rout table displays the following columns by default: Discharge Port, Discharge Port Description, Cost Zone, Cost Zone Description and Base Expense.
Whereas when access the Item Expenses page from Item Supplier Country page, the Shipping Route table displays the following columns by default: Lading Port, Lading Port Description, Discharge Port, Discharge Port Description and Base Expense.
Base Expense:
The Base Expense option indicates whether or not this set of expenses is also the base set of expenses. You can select the Base Expense option directly in the table.
Expenses
The Expenses section displays the following columns by default:
-
Component
-
Component Description
-
Computation Value Base
-
Calculation Basis
-
Component Rate
-
Per Count
-
Per Count Unit of Measure
-
Component Currency
-
Estimated Value
-
Update Orders
Maintaining Item Expenses
To maintain item expenses, follow the steps below.
-
From the Tasks menu, select Items > Manage Items. The Item Search page appears.
-
Enter or select search criteria as desired to make the search more restrictive.
-
Click Search. The items that match the search criteria are displayed in the Results section.
-
In the Item column, click the item link, or mark a record and select Actions > Edit, or use the Edit icon
 . The Item page appears.
-
Select More Actions > Suppliers. The Item Suppliers page appears.
Access from the Item Supplier page.
-
In the Item Suppliers page, select Actions > Expenses. The Item Expenses page appears.
Access from the Item Supplier Countries page:
-
In the Item Suppliers page, select Actions > Countries of Sourcing, or use the Countries of Sourcing button. The Item Supplier Countries page appears.
-
In the Countries of Sourcing section, select Actions > Expenses. The Item Expenses page appears.
Adding a Shipping Route
To add a new shipping route for an item, follow the steps below.
-
In the Shipping Route section select Actions > Add, or use the Add icon
 . The Add Shipping Route page appears.
-
When accessed from the Item Supplier page:
-
In the Discharge Port field, enter, select or search for the discharge port.
-
In the Cost Zone field, enter, select or search for the cost zone.
-
The Base Expense option indicates whether or not this set of expenses is also the base set of expenses. Select the Base Expense option, if necessary.
-
-
When accessed from the Item Supplier Countries page.
-
In the Lading Port field, enter, select or search for the lading port.
-
In the Discharge Port field, enter, select or search for the discharge port.
-
The Base Expense option indicates whether or not this set of expenses is also the base set of expenses. Select the Base Expense option, if necessary.
-
-
Then choose one of the following options.
-
Click OK to add the shipping route for the item and close the page.
-
Click OK and Add Another to add additional shipping routes for item.
-
Click Cancel to reject all entries and close the page.
-
Adding Expenses
To associated expenses with an item and shipping route, follow the steps below.
-
In the Expenses section, select Actions > Add, or use the Add icon
 . The Add Expense page appears.
Figure 1-31 Add Expense Page
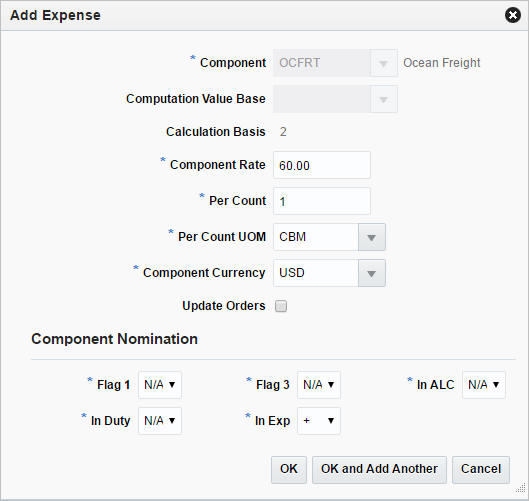
-
In the Component field, enter, select or search for the expense component.
-
The following fields default to the expense defaults. Edit the information as necessary.
-
Computation Value Base
-
Calculation Basis
-
Component Rate
-
Per Count
-
Per Count Unit of Measure
-
Component Currency
-
Update Orders
Note:
Required fields are marked with an asterisk.
-
-
In the Component Nomination section, edit the fields, if necessary.
-
Then choose one of the following options.
-
Click OK to add the expense for the item/shipping route and close the page.
-
Click OK and Add Another to add additional expenses for the item/ shipping route.
-
Click Cancel to reject all entries and close the page.
-
-
Editing Expenses
To edit expenses for an item/shipping route, follow the steps below.
-
In the Expenses section, select a record in the table.
-
Then select Actions > Edit, or use the Edit icon
 . The Edit Expense page appears.
-
Edit the fields, as necessary.
-
Then choose one of the following options.
-
Click OK to save your changes and close the page.
-
Click Cancel to reject all entries and close the page.
-
Define Initial Prices
In the Retail by Zone page, you can view and/or edit the initial retail price that is calculated by zone during the creation of a new item(s). The price zone retail is calculated based on the markup percent defined for the departments primary zone group. Retail values are calculated and displayed for all zones within a departments primary zone group. Locations tied to a zone are displayed in the Price Zone Locations section. You can edit the retail value as necessary prior to submitting or approving the item. Once an item is approved this screen is disabled, future retail price changes are done via the RPM system.
The Retail by Cost Zone page contains the following sections.
-
Header
The header of the page displays Item Level (SKU/Style/ Reference Item), the item number and item description.
Figure 1-32 Retail by Zone Page
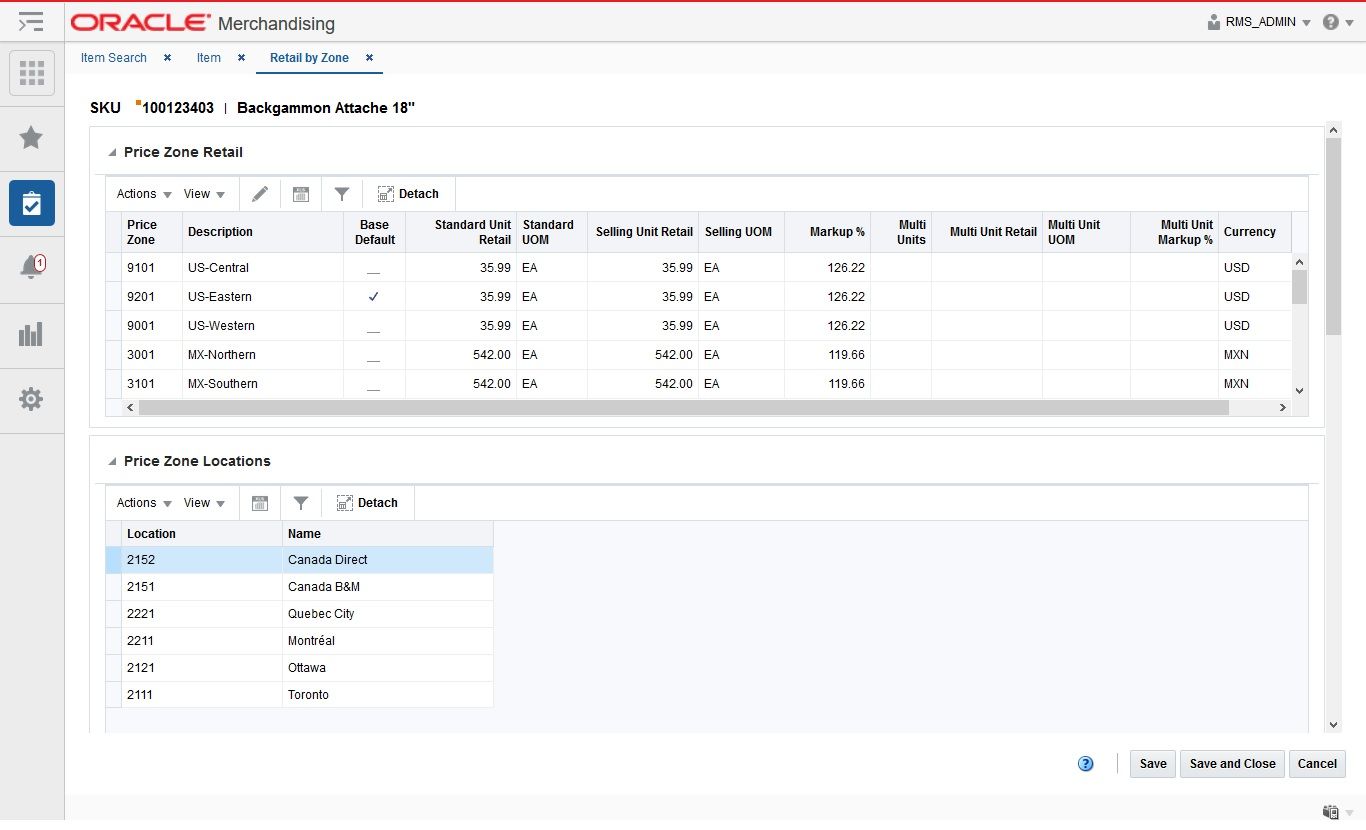
Price Zone Retail
The Price Zone Retail section displays all zones tied to the primary zone group designated for the merchandise hierarchy of the created item(s).
Price Zone Locations
The Price Zone Locations section displays all of the locations tied to a zone that is highlighted in the Price Zone Retail section.
Editing a Retail Price of an Item by Zones
To edit a retail price of an item by zone(s), follow the steps below.
-
From the Tasks menu, select Items > Manage Items. The Item Search page appears.
-
Restrict your search to items in Worksheet status.
-
Click Search. The items that match the search criteria are displayed in the Results section.
-
In the Item column, click the item link, or mark a record and select Actions > Edit, or use the Edit icon
 . The Item page appears.
-
Select More Actions > Retail by Zone. The Retail by Zone page appears.
-
In the Price Zone Retail section, select one or more records in the table.
-
Then select Actions > Edit, or use the Edit icon
 . The Edit Zone Retail page appears.
-
The price zone information of the selected record is displayed. Edit the fields, as necessary.
Note:
If you have selected more than one price zone. The Price Zone field shows Multiple. Update the Markup % and the multi-units fields as necessary.
-
In the Selling Unit Retail field, enter the new retail price. Then select the selling unit of measure.
-
In the Markup % field, enter the percentage the price is marked up, based on the supplier's cost.
-
Update the appropriate multi-units field as necessary.
-
-
Then choose one of the following options.
-
Click OK to save your changes and close the page.
-
Click OK and Edit Another to edit additional price zones.
-
Click Cancel to reject all entries and close the page.
-
Item Locations
In the Item Locations page, you can view and maintain the locations at which an item is stocked. Locations for items at or above the transaction level can be maintained. If the item is above the transaction level, an option to automatically apply changes to child items down to the transaction level can be selected.
Additional information can be added at the item location level that is different at the location than it is for the item.
You can add the following additional information:
-
Item's active status
-
Costing information, for the pack and the unit
-
Tier - Height information
-
Units of measure and the appropriate measure
-
Type of the Unique Identification Number (UIN)
-
Additional attributes, including wastage and inbound handling days
The Item Locations page contains the following sections.
-
Header
The header of the page displays Item Level (SKU/Style/ Reference Item), the item number and item description.
Figure 1-33 Item Locations Page
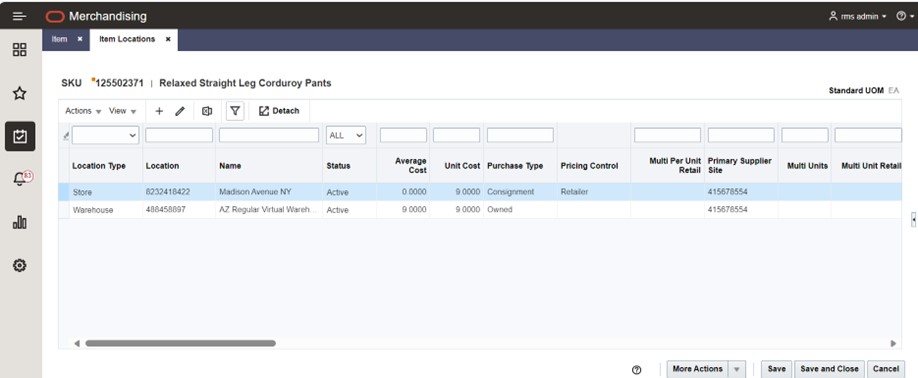
Table
The table label displays the item number and either the item description or indicates whether the selected item is a pack or reference item. Additionally, the standard unit of measure is displayed in the top right corner. The table displays the locations information for the selected item.
Maintaining Item Locations
To maintain item locations, follow the steps below.
-
From the Tasks menu, select Items > Manage Items. The Item Search page appears.
-
Enter or select search criteria as desired to make the search more restrictive.
-
Click Search. The items that match the search criteria are displayed in the Results section.
-
In the Item column, click the item link, or mark a record and select Actions > Edit, or use the Edit icon
 . The Item page appears.
Access from the Item page:
-
Select More Actions > Locations. The Item Locations page appears.
Adding Locations
To add a new location for an item, follow the steps below.
-
In the Item Locations page, select Actions > Add, or use the Add icon
 . The Add Locations
page appears.
Figure 1-34 Add Locations Page
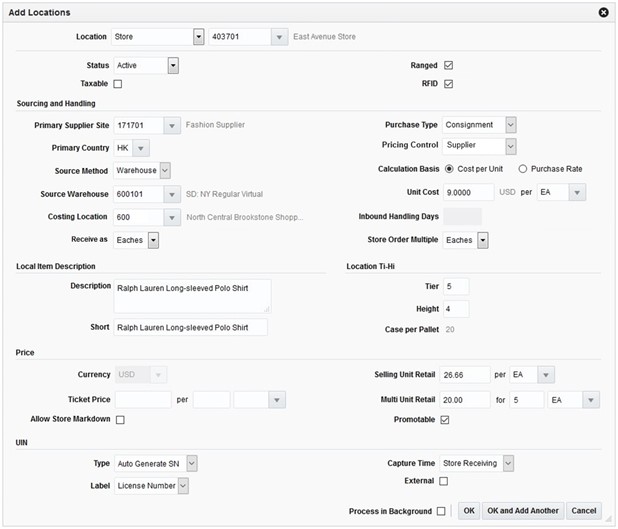
-
In the Location field, select the location type from the list. Then choose the location.
-
The system displays the information of the selected location.
-
Add the information at the item location level that is different at the location than at the item level.
Edit the displayed information in the following sections:
-
Status of the Item
-
Sourcing and Handling information
-
Primary Supplier Site – Enter or select a primary supplier site for the location if it's different from the one specified at the item level.
-
Primary Country – Enter or select a primary country for the location if it's different from the one specified at the item level.
-
Purchase Type – This field is available only when consignment/concession functionality is used in the system. Select a value to specify ownership type of item if it's different from what's defined at the item supplier country level. A SKU level item can have a different purchase type compared to the style item.
-
Pricing Control – This field is available only when consignment/concession and supplier-controlled pricing functionalities are used in the system. Select a pricing control of the location if it's different from what's defined at the item supplier country level. A SKU level item can have a different pricing control compared to the style item.
-
Calculation Basis – Only available when purchase type is consignment or concession. Specifies if the costing of the item will be based on per unit cost or a purchase rate.
-
Specify unit cost or purchase rate depending on the calculation basis specified.
-
Source Method – Select if the default source method for the location will be supplier or warehouse.
-
Source Warehouse – Default source warehouse for the location.
-
Store Order Multiples – Specify the multiple in which item needs to be shipped from a warehouse to the location.
-
The Ranged checkbox determines if the location is ranged intentionally for replenishment/selling or incidentally ranged by the Merchandising transaction when the item is not ranged to a specific location on the transaction.
-
Inbound Handling Days – Specify inbound handling days for warehouses.
-
Location Item Description
-
Tier - Height information
-
Costing information
-
-
Edit the information for the pack and the unit.
-
Type of the Unique Identification Number Type (UIN)
-
In the Type field, select the UIN type from the list. This number is used to identify the instance of the item at the location.
-
In the Label field, select the UIN label from the list. This number will be displayed in SIM.
-
-
- Selling Phase Start Date – Specify the preferences for the following parameters
related to the update of the selling phase start date specific to store locations –
- Update Selling Phase Start Date upon Receipt of –
- Direct to Store Orders (Y/N)
- Store to Store Transfers (Y/N)
- Warehouse to Store Transfers / Allocations (Y/N)
- Minimum Transfer / Allocation Units for Update
- Update Selling Phase Start Date upon Receipt of –
-
-
-
If the selected item is a parent item, the Apply Modifications to Child Items checkbox is displayed. The checkbox indicates whether or not the updates are also applied to the child item. The checkbox is selected by default.
-
The Process In Background checkbox determines if the ranging of items to the selected locations happens immediately or the ranging is submitted in the background.
Note:
This checkbox must be checked if the list of locations ranged is big, so that you do not have to wait for the ranging to complete. Submitting the ranging to background disables this page and the Item page goes into View mode.
You can check Asynchronous Job Log for status of the ranging happening in background.
-
Then choose one of the following options.
-
Click OK to add the location for the item and close the page.
-
Click OK and Add Another to add additional locations for item.
-
Click Cancel to reject all entries and close the page.
-
Editing Locations
To edit locations for an item, follow the steps below.
-
Select Actions > Edit, or use the Edit icon
 . The Edit Locations page appears.
-
Edit the fields, as necessary.
-
Then choose one of the following options.
-
Click OK to save your changes and close the page.
-
Click Cancel to reject all entries and close the page.
-
Item Location Traits
The Item Location Traits page is used to define and maintain item attributes at a single location or at multiple locations. Some of these attributes are downloaded at the Point of Service (POS) or a ticketing system, while others are entered for information only and drive no processing.
The Item Location Traits page contains the following sections.
-
Header
The header contains the item number and description.
-
Apply Updates To
This section contains the following subsections:
-
Note:
Only available if you selected the Mass Change > Locations Traits option in the Item Locations page.
-
Customer Order Attributes
-
Grocery Attributes
-
Figure 1-35 Item Location Traits Page
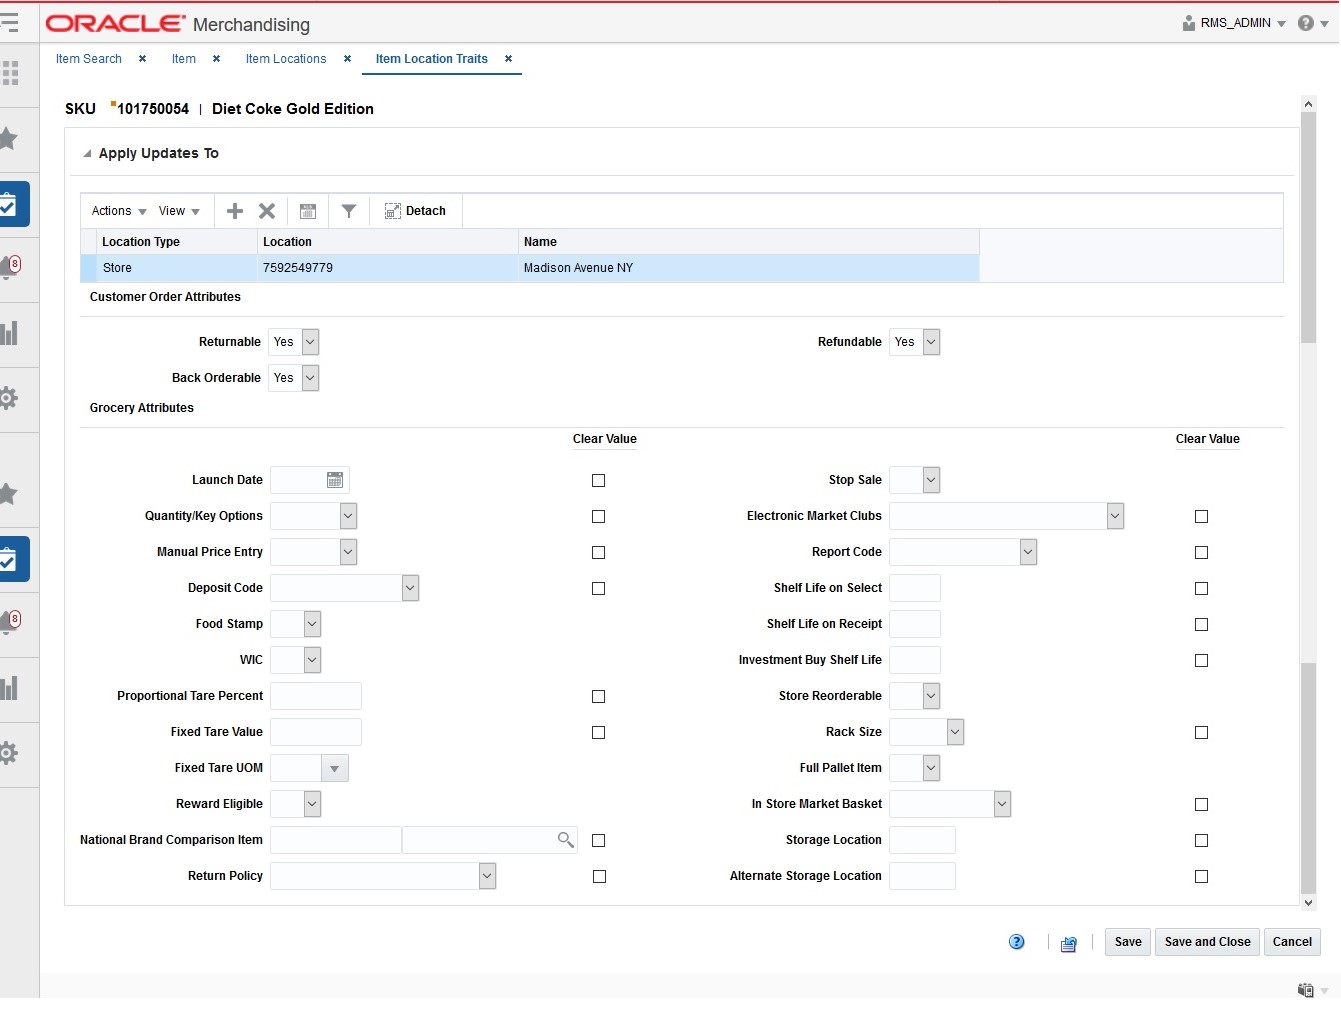
Table
In this table you can add and delete locations for the item attributes.
Note:
Only available if you selected the Mass Change > Locations Traits option in the Item Locations page.
Maintaining Item Location Traits
To define and maintain item location traits, follow the steps listed below.
-
From the Tasks menu, select Items > Manage Items. The Item Search page appears.
-
Enter or select search criteria as desired to make the search more restrictive.
-
Click Search. The items that match the search criteria are displayed in the Results section.
-
In the Item column, click the item link, or mark a record and select Actions > Edit, or use the Edit icon
 . The Item page appears.
-
Select More Actions > Locations. The Item Locations page appears.
Updating Multiple Locations
To updating multiple locations, by using the Mass Change option, follow the steps below.
-
In the Item Locations page select Mass Change > Location Traits. The Item Location Traits is displayed.
-
In the table of the Apply Updates To section, you can add one or more locations for which location traits may be updated.
-
Select Actions > Add, or use the Add icon
 . The Add Locations page appears.
-
In the Location field, select a location type from the list. Then select the location.
-
Then choose one of the following options.
-
Click OK to add the current location to the table and close the page.
-
Click OK and Add Another to add additional locations.
-
Click Cancel to reject your entries and close the page.
-
-
-
Enter, select or search the new values for the desired traits.
-
Choose a saving option.
Updating a Single Location
To update a single location, follow the steps listed below.
-
In the Item Locations page, select a location in the table.
-
Then select Actions > Location Traits. The Location Traits page appears with the highlighted location populated in the header of the Item Location Traits page.
-
Enter, select or search the new values for the desired traits.
-
Choose a saving option.
Viewing Item Location Traits
To view item location traits, follow the steps listed below.
-
From the Tasks menu, select Items > Manage Items. The Item Search page appears.
-
Enter or select search criteria as desired to make the search more restrictive.
-
Click Search. The items that match the search criteria are displayed in the Results section.
-
In the Results section, mark a record and select Actions > View, or use the View icon
 . The Item page appears.
-
Select More Actions > Locations. The Item Locations page appears.
-
In the Item Locations page, select a location in the table.
-
Then select Actions > Location Traits. The Location Traits page appears. View the item location traits.
-
Click Done to close the page.
Create Child Items
Merchandising provides the option to define three possible levels of hierarchy for items. Names of these levels are configurable. Depending on the industry and type of items, number of levels is utilized while creating items. A child item is an item that exists below another item, called the parent item, in the item hierarchy.
For example, fashion retailers usually utilize all three levels of item hierarchy to represent the style, SKU, and barcode items. In this case, the style is considered the parent item, and the SKU, usually differentiated by color and size, is the child of the parent and the barcode is a child of the SKU. SKU level is generally designated as transaction level, or where inventory and sales are tracked.
Hardline and grocery retailers generally utilize only two levels of item hierarchy where first level is the SKU, or transaction level, and the level below represents one or more barcodes. In this case the SKU is the parent and the barcode is the child item.
Therefore, depending on the business requirements, child items can be created for transaction level items using differentiators, or without differentiators for sub-transaction level items, such as barcodes.
With Diffs
In the Item Children by Diff page, you can edit child items created with differentiators, generate EAN13s or create grandchildren.
You can perform the following actions in this page.
-
Edit the description and other details of level 2 or level 3 items that were created with differentiators.
-
Generate EAN13s.
-
Create children of level 2 transaction level items.
The Item Children by Diff page contains the following sections.
-
Header
The header displays the Item Level (SKU/Style/ Reference Item), the item number and the item description. Additionally, the transaction level and the currency are displayed in the right hand corner. The differentiator groups/values associated with the parent item are displayed.
Figure 1-36 Item Children by Diff Page
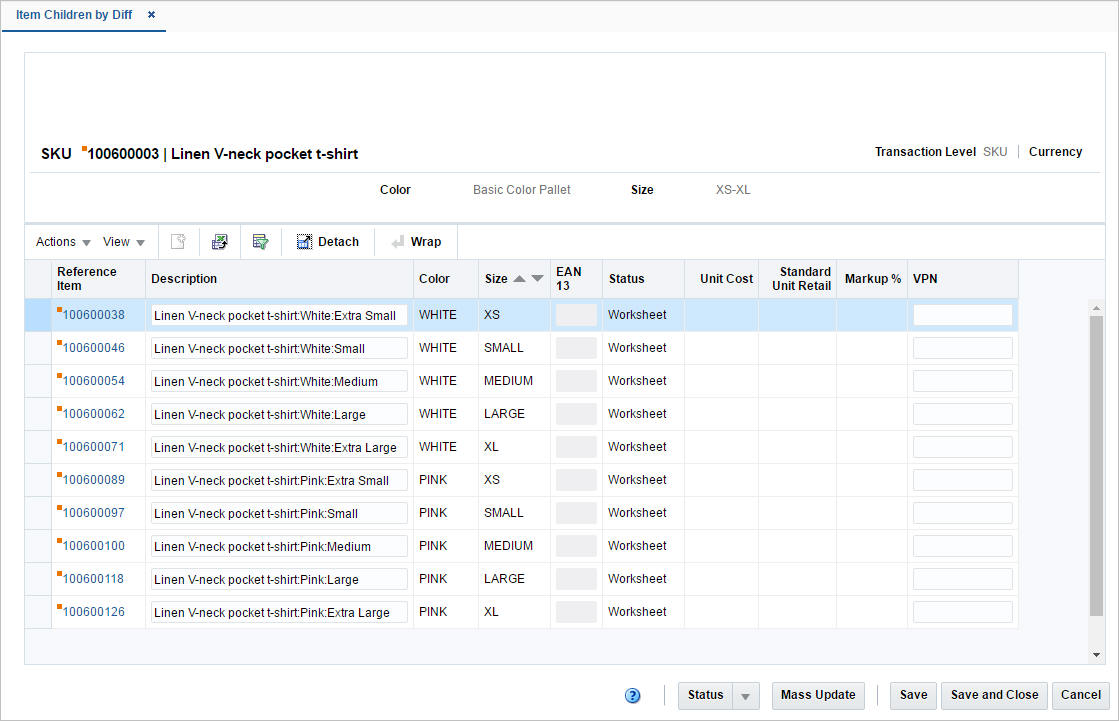
Table
The table lists the child items. The item level description, description, EAN 13, status, unit cost, standard unit retail, markup % and VPN are displayed by default.
You can edit the Description, the EAN 13 and the VPN (Vendor Product Number) column directly in the table.
Maintain Item Children by Diff
To maintain item children, follow the steps listed below.
-
From the Tasks menu, select Items > Manage Items. The Item Search page appears.
-
Enter or select search criteria as desired to make the search more restrictive.
-
Click Search. The items that match the search criteria are displayed in the Results section.
-
In the item column, click the item link, or mark a record and select Actions > Edit, or use the Edit icon
 . The Item page appears.
-
Click More Actions > List Children. The Item Children by Diff page appears.
Mass Update
To perform a mass update, follow the steps below.
-
Click Mass Update. The Mass Update page appears.
Figure 1-37 Mass Update Page
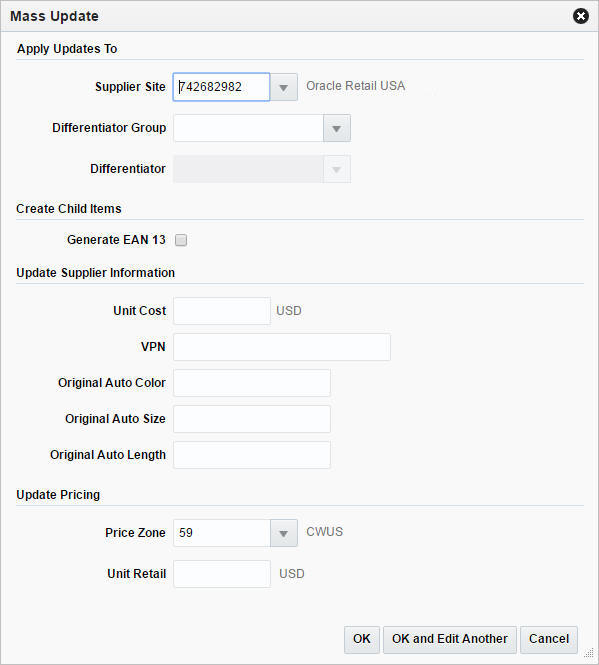
-
The Supplier Site field is populated with the parent item's primary supplier and the Price Zone field is populated with the price zone group's base zone.
-
In the Differentiator Group field, enter, select or search for a diff group.
-
If a diff group is selected. The Differentiator field enables, enter, select or search for the appropriate diff.
-
Select the Generate EAN 13 checkbox, to generate EAN 13 for the child items.
-
In the Update Supplier Information section, enter the values as necessary.
-
In the Unit Cost field, enter the unit cost, if necessary.
-
In the VPN field, enter the vendor product number, if necessary.
-
In the Supplier Diff fields, enter the diffs. All available diffs are displayed.
-
-
In the Update Pricing section, enter the values as necessary.
-
In the Price Zone field, edit the price zone, if necessary.
-
In the Unit Retail field, enter the unit retail price.
Note:
When the items are approved, the Update Pricing section is not available. You cannot update the price zone and the unit retail price.
-
-
Then choose one of the following options.
-
Click OK to add the item to the table and close the page.
-
Click OK and Add Another to add additional items.
-
Click Cancel to reject all entries and close the page.
-
Item Children
The Item Children page is used to create a subset of items from an item that is already entered into Merchandising. In this screen, you can perform the following actions:
-
Edit level 2 or level 3 items that were created without differentiators.
-
Edit the description of items at level 2 or level 3 of an item group.
-
Use the Actions menu to edit details for the selected level 2 or level 3 item.
The Item Children page contains the following sections.
-
Header
The header displays the Item Level (SKU/Style/ Reference Item), item number and the item description. Additionally, the transaction level is displayed in the right hand corner. If the parent item has differentiators associated, all differentiators are displayed.
Figure 1-38 Item Children Page
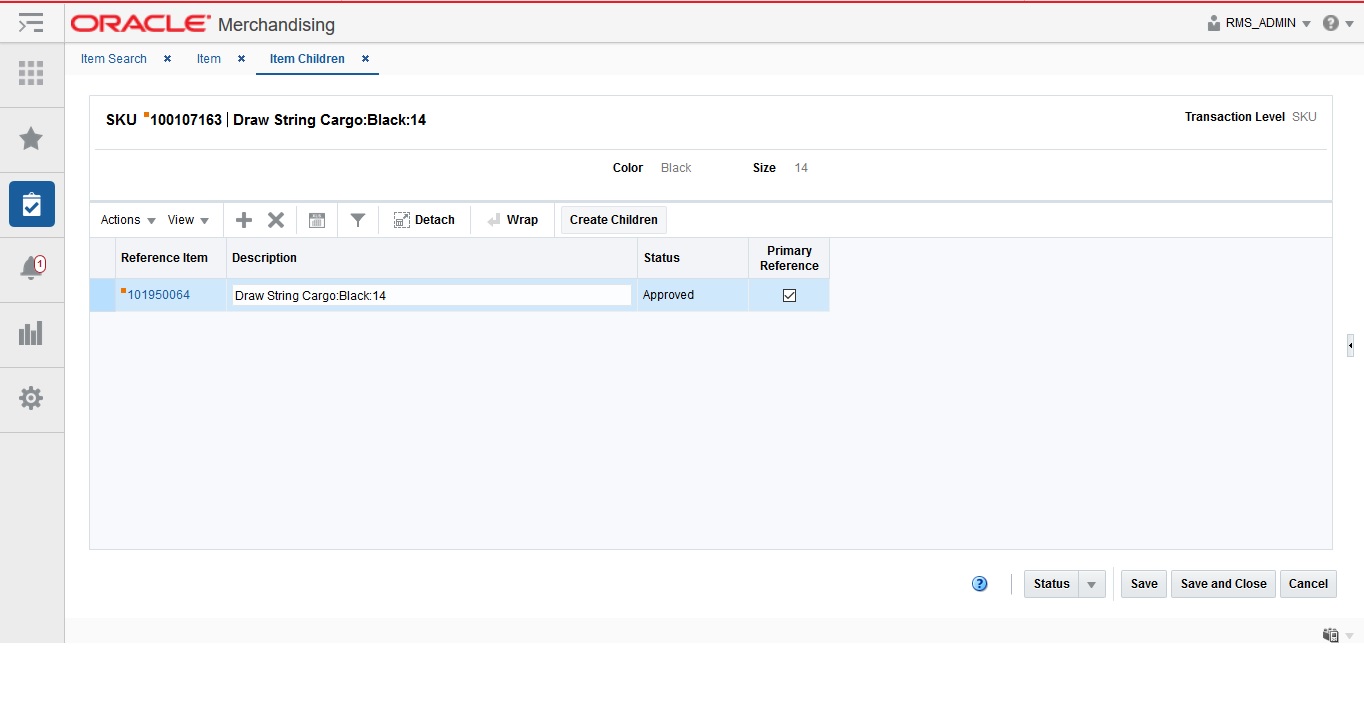
Table
The table lists the child items. The columns Reference Item, Description, Status and Primary Reference Item are displayed.
You can edit the Description column directly in the table.
Maintain Item Children
To maintain item children, follow the steps listed below.
-
From the Tasks menu, select Items > Manage Items. The Item Search page appears.
-
Enter or select search criteria as desired to make the search more restrictive.
-
Click Search. The items that match the search criteria are displayed in the Results section.
-
In the item column, click the item link, or mark a record and select Actions > Edit, or use the Edit icon
 . The Item page appears.
-
Click More Actions > List Children. The Item Children page appears.
Adding Items
To add items, follow the steps below.
-
Select Action > Add, or use the Add icon
 . The Add Item page appears.
Figure 1-39 Add Item Page
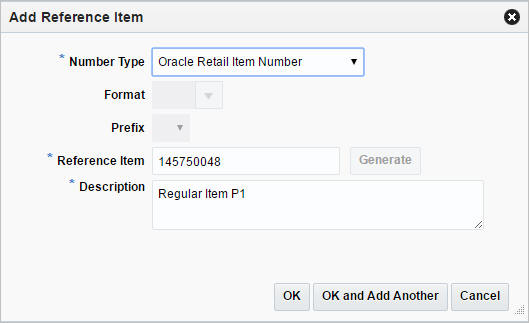
-
In the Number Type field, select a number type you want to add from the list. This field is a required field.
-
If you select Oracle Retail Item Number or UPC-A, the item number is automatically added.
-
If you select EAN/UCC-13, you can automatically generate the EAN number by clicking the Generate.
-
If you select Manual, the Description field accepts alphabetic text and does not validate digit, length, or characters. It is a 12-digit number starting with 3 that includes check digit validation.
-
If you select Variable Weight PLU, the fields Format and Prefix enable.
-
-
In the Reference Item field, enter the item. This field is a required field.
-
In the Description field, enter the description of the item. This field is a required field.
-
Then choose one of the following options.
-
Click OK to add the item to the table and close the page.
-
Click OK and Add Another to add additional items.
-
Click Cancel to reject all entries and close the page.
-
Create Children Page
In the Create Children page you can select differentiators while creating child items for items with differentiators. Differentiators can be applied individually, by differentiator range, or by differentiator group. When two types of diff values are combined, a level 2 or level 3 item is created for each possible combination of the two types. The new child items appear in the Pending Child Items section.
The Create Children page contains the following sections.
-
Header
The header of the page displays Item Level (SKU/Style/ Reference Item), the item number and item description.
Figure 1-40 Create Children Page
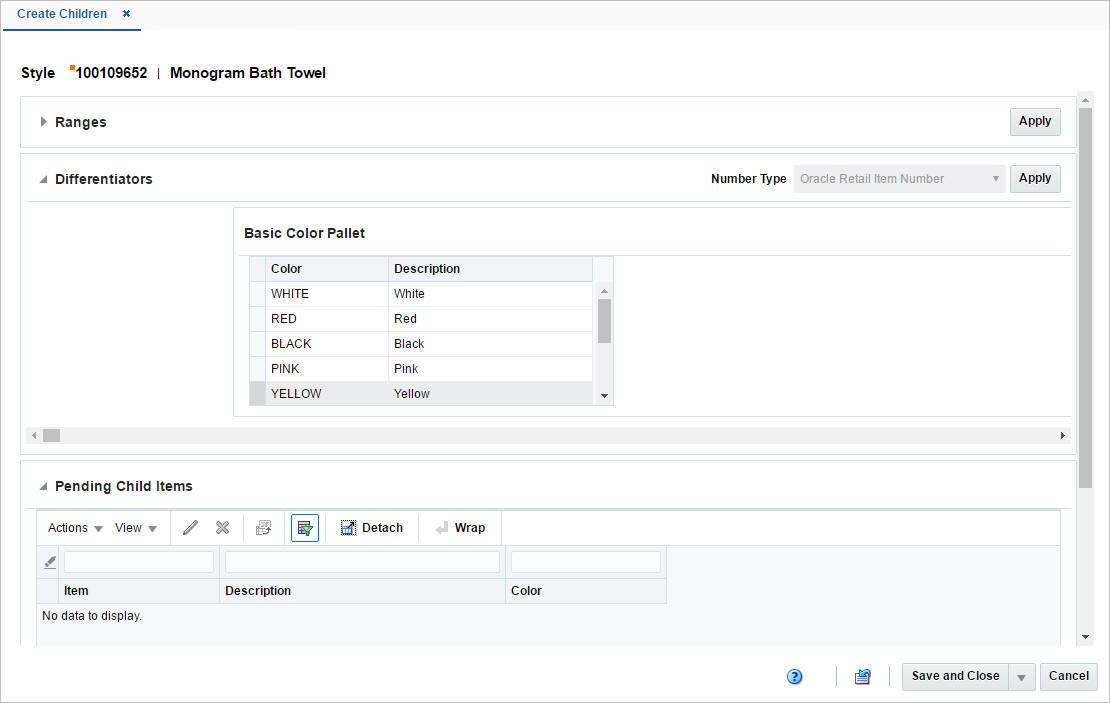
Ranges
This section is only available, if there are applicable differentiator ranges. Irrespective of the number of the possible ranges that can be applied, only one differentiator range is displayed by default.
Differentiators
The Differentiator section can contain up to four possible differentiator tables, listing all the differentiators for each differentiator group or ID. Only differentiator tables containing values are displayed, therefore the number of visible tables equals to the number of diff group/value of the item.
For group type diffs, the table header contains the diff group description. For value type diffs, the table header contains the diff type description. The tables display the columns diff type description and description.
Pending Child Items
The Pending Child Items table only lists new unique child items for further operations.
Create Child Items for Items with Diffs
To create children for Items with diffs, follow the steps listed below.
-
From the Tasks menu, select Items > Manage Items. The Item Search page appears.
-
Enter or select search criteria as desired to make the search more restrictive.
-
Click Search. The items that match the search criteria are displayed in the Results section.
-
In the item column, click the item link, or mark a record and select Actions > Edit, or use the Edit icon
 . The Item page appears.
-
Click Create Children. The Create Children page appears.
Applying a Diff Range
To apply a diff range, follow the steps below.
-
Go to the Range section.
Note:
This section is only available, if there are applicable differentiator ranges.
-
In the Range field, enter select or search for the first range.
-
Then click the Apply button in the top right corner of the section.
-
If there are more possible ranges that can be applied, the Add icon
 enables next to the range field.
-
If you click on the Add icon
 , a second range field appears, with a disabled Add icon
  and an enabled Delete icon
  .
.
-
Repeat these steps to add up to four diff ranges.
Note:
When you have added the fourth differentiator range, only the Delete icon
 will be enabled, since you can only add up to four differentiator ranges.
Applying Diffs
To apply diffs, follow the steps below.
-
In the Item Number Type field, select the type of item number that you want to associate with the item.
-
If you select Oracle Retail Item Number or UPC-A in the Item Number Type field, the item number is automatically added and displayed in the Pending Child Items table.
-
If you select EAN/UCC-13 in the Item Number Type field, you can automatically generate the EAN number by clicking the Generate button in the Edit Pending Child Item page.
For more information about how to edit pending child items, see the Editing Pending Child Items section.
-
If you select Manual in the Item Number Type field, the Description field accepts alphabetic text and does not validate digit, length, or characters. It is a 12-digit number starting with 3 that includes check digit validation
-
-
Select all diffs or individual diffs rows in the diff tables.
-
Then click Apply to generate child items. The Pending Child table is populated with all possible combination of the diffs selected in the Differentiator section.
-
If a range is applied for the diff group/value, the message Applied is displayed in the upper right corner of the individual table header.
Editing Pending Child Items
To edit pending child items, follow the steps below.
-
In the Pending Child Items section, select a record in the table.
-
Then select Actions > Edit, or use the Edit icon
 . The Edit Child Item page appears. The data of the selected child item is displayed.
-
If you edit a Variable Weight PLU, the format and prefix values are displayed.
-
Edit the Item and/or Description field, as necessary.
Note:
You can edit the description also directly in the table.
If you edit an item with the item type number EAN/UCC-13, you can automatically generate the EAN number by clicking Generate button.
-
Then choose one of the following options.
-
Click OK to add your changes to the table and close the page.
-
Click OK and Edit Next to edit the next child item in the table.
-
Click Cancel to reject your entries and close the page.
-
Add Up Charges
Item up charges refer to the set of expenses when moving an item from one store or warehouse to another within Merchandising.
Each up charge comprises of a calculation basis, cost basis, component rate and currency. The Item Up Charges page is only available when the Estimated Landed Costs option is set enabled.
The Item Up Charges page contains the following sections.
-
Header
The header varies depending on how you access the page:
When you access the Item Up Charges page through the Item page, the header displays the item type, item number and item description.
When you access the Item Up Charges page through the Item List Search page, the header displays the item list number and the item list description.
Figure 1-41 Item Up Charges Page
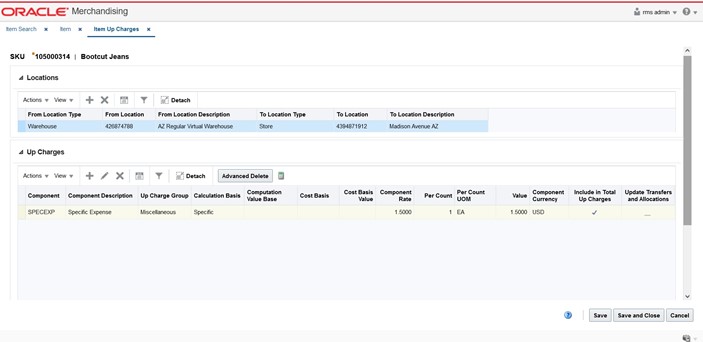
Locations
The Locations section displays the from and to locations containing expenses for the item or the items of the item list.
Maintaining Item Up Charges
To maintain item up charges, follow the steps listed below.
For Items:
-
From the Tasks menu, select Items > Manage Items. The Item Search page appears.
-
Enter or select search criteria as desired to make the search more restrictive.
-
Click Search. The items that match the search criteria are displayed in the Results section.
-
Select a record in the table.
-
In the Item column, click the item link, or mark a record and select Actions > Edit, or use the Edit icon
 . The Item page appears.
-
Then select More Actions > Item Up Charges. The Item Up Charges page appears.
For Item Lists:
-
From the Tasks menu, select Foundation Data > Items > Manage Item List. The Item List Search page appears.
-
Enter or select search criteria as desired to make the search more restrictive.
-
Click Search. The item lists that match the search criteria are displayed in the Results section.
-
Select a record in the table.
-
Then select Actions > Mass Change > Up Charges. The Item Up Charges page appears.
Adding Locations
To add locations for up charges, follow the steps listed below.
Note:
If you add locations for an item or an item list, you must enter an up charge component at the same time.
After you have added locations, you can select a location in the Locations section and add more components to this location.
-
In the Locations section select Actions > Add, or use the Add icon
 . The Add Locations
page appears.
Figure 1-42 Add Locations Page
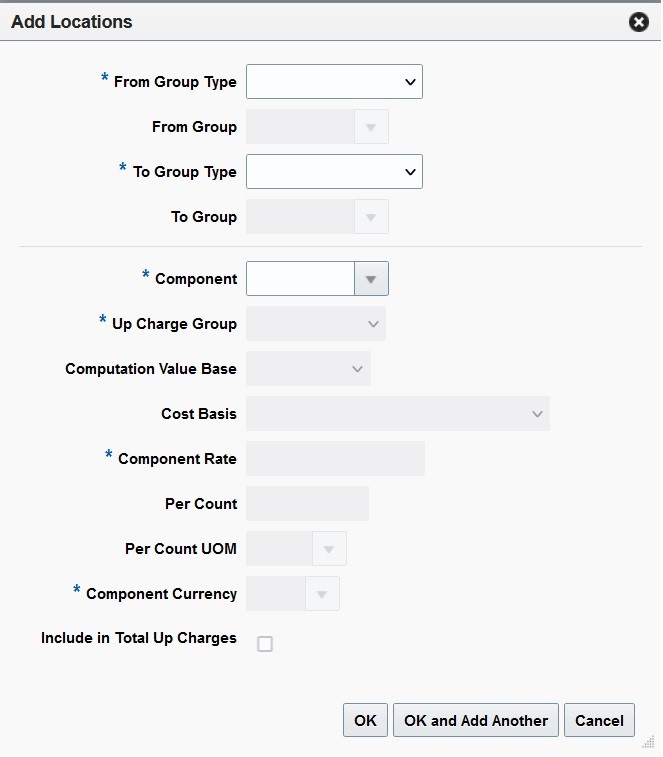
-
In the Locations section, enter the following fields.
-
In the From Group Type field, select a from location type from the list. This field is a required field.
-
In the From Group field, enter, select or search for the from location, if enabled.
-
In the To Group Type field, select the to location type from the list. This field is a required field.
-
In the To Group field, enter, select or search for the to location, if enabled.
-
-
In the Up Charges section, enter the following fields.
-
In the Maintenance Type field, select if you want to add or delete the component.
Note:
The Maintenance Type field is only displayed for item lists. If you select Add and the up charge already exists, the details of the existing up charge will be overridden.
-
In the Component field, enter, select or search for the component. This field is a required field. On selecting a component, the remainder of the fields below are defaulted from the component definition. These fields can be updated if required.
-
In the Up Charge Group field, select an up charge group from the list. This field is a required field.
-
In the Computation Value basis field select the basis required. Either this field or the Cost basis are required for components that have a Calculation basis set to Value in the component definition.
-
In the Cost basis field, select the basis from one of Weighted Average Cost/Acquisition cost, Supplier Cost and Off Invoice Net Cost.
-
In the Component Rate field, enter the rate. This field is a required field.
-
In the Per Count field, enter the number of counts, if enabled.
-
In the Per Count Unit of Measure, enter, select or search for the UOM, if enabled.
-
In the Component Currency field, enter, select or search for the currency.
-
Select the value of the Include in Total Up charge Indicator.
-
-
Then choose one of the following options.
-
Click OK to add the location and close the page.
-
Click OK and Add Another to add additional locations.
-
Click Cancel to reject all entries and close page.
-
Adding Components
To add more components to a location, follow the steps listed below.
-
In the Locations section, select a location in the table.
-
In the Up Charges section select Actions > Add, or use the Add icon
 . The Add Component
page appears.
Figure 1-43 Add Component Page
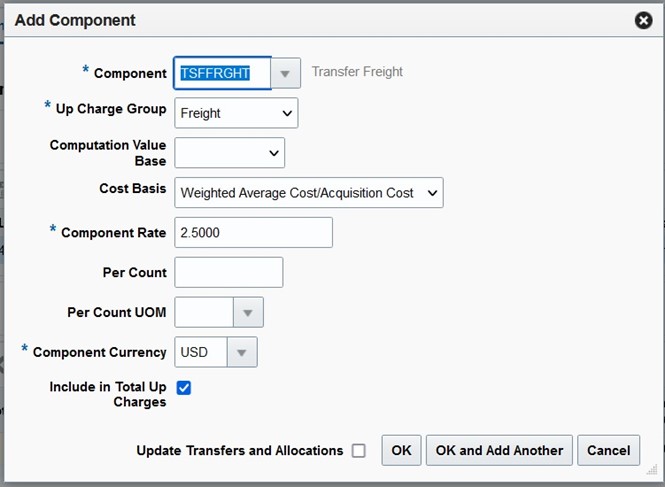
-
In the Maintenance Type field, select a type from the list.
Note:
The Maintenance Type field is only displayed for item lists. If you select Add and the up charge already exists, the details of the existing up charge will be overridden.
-
In the Component field, enter, select or search for the component. This field is a required field. On selecting a component, the remainder of the fields below are defaulted from the component definition. These fields can be updated if required.
-
In the Up Charge Group field, select the group from the list.
-
In the Computation Value basis field select the basis required. Either this field or the Cost basis are required for components that have a Calculation basis set to Value in the component definition.
-
In the Cost basis field, select the basis from one of Weighted Average Cost/Acquisition cost, Supplier Cost and Off Invoice Net Cost.
-
In the Component Rate field, enter the rate.
-
In the Per Count field, enter the number of counts.
-
In the Per Count Unit of Measure, enter, select or search for the UOM.
-
In the Component Currency field, enter, select or search for the currency.
-
Select the Update Transfers and Allocations checkbox to indicate that the transfers and allocations should be updated.
-
Select the value of the Include in Total Up charge Indicator.
-
Then choose one of the following options.
-
Click OK to add the component for the selected location and close the page.
-
Click OK and Add Another to add additional components for the location.
-
Click Cancel to reject all entries and close the page.
-
Editing Components
To edit existing components, follow the steps listed below.
-
In the Up Charges section, select a record.
-
Then select Actions > Edit, or use the Edit icon
 . The Edit Component page appears. The values of the selected component are displayed.
-
Edit the fields as necessary.
-
Then choose one of the following options.
-
Click OK to save your changes and close the page.
-
Click Cancel to reject all entries and close the page.
-
Advanced Delete
Use the Advanced Delete function to specify the desired From/Location combinations from which the selected component should be deleted.
Note:
This function is not available for item lists.
-
In the Up Charges section, select a record.
-
Then click the Advanced Delete button. The Advanced Delete page appears.
Figure 1-44 Advanced Delete Page
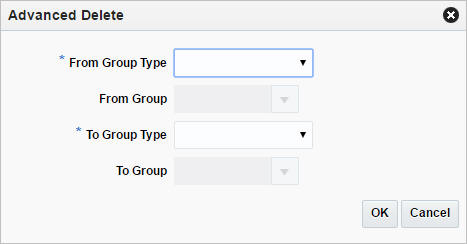
-
In the From Group Type field, select the from location type from the list. This field is a required field.
-
In the From Group field, select the from location, if enabled.
-
In the To Group Type field, select the to location type from the list. This field is a required field.
-
In the To Group field, select the to location, if enabled.
-
Then choose one of the following options.
-
Click OK to save your changes and close the page.
-
Click Cancel to reject all entries and close the page.
-
Define Substitute Items
In the Substitute Items page, you can designate and maintain substitute items with an item and all the related information. Substitute items are associated at the item/location level. Substitution relationship is primarily used by replenishment.
You can indicate whether the main item or the substitute item is primarily used to fill the recommended order quantities. For the warehouse, you can also select multiple substitute items for the main item and enter the order in which they are picked as substitute for the main item.
The Substitute Items page contains the following sections.
-
Header
The header of the page displays Item Level (SKU/Style/Reference Item), the item number and item description.
Figure 1-45 Substitute Items Page
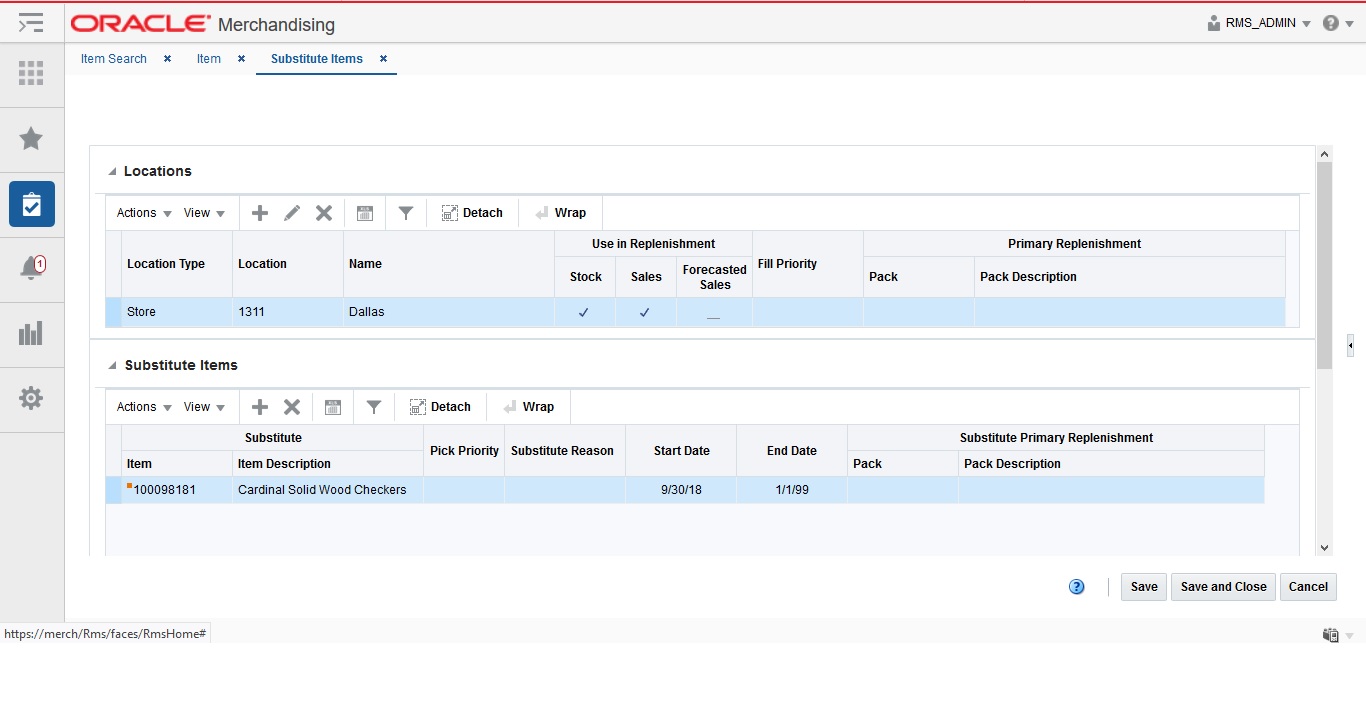
Locations
In this section you can maintain locations for substitute items. The table lists the following columns by default.
-
Location Type
-
Location
-
Location Name
-
Use in Replenishment Indicators such as stock, sales and sales forecast
-
Fill Priority
-
Primary Replenishment such as pack and pack description
Maintaining Substitute Items
To maintain substitute items, follow the steps below.
-
From the Tasks menu, select Items > Manage Items. The Item Search page appears.
-
Enter or select search criteria as desired to make the search more restrictive.
-
Click Search. The items that match the search criteria are displayed in the Results section.
-
In the Item column, click the item link, or mark a record and select Actions > Edit, or use the Edit icon
 . The Item page appears.
-
Select More Actions > Substitute Items. The Substitute Items page appears.
Adding a Location
To add a location, follow the steps below.
-
In the Locations section, select Actions > Add, or use the Add icon
 . The Add Locations page appears.
Figure 1-46 Add Locations Page
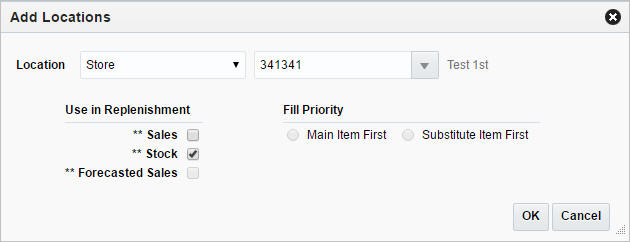
Note:
Only those locations which are ranged for the primary item can be added to the substitute items.
-
In the Location field, select the location type from the list. Then select the location.
-
In the Use in Replenishment section, select the checkbox next to the replenishment calculation indicator. You need to select one of the following options.
-
Stock: Indicates that the substitute item is included in determining the net inventory of the main item.
-
Sales: Indicates that the sales history for the substitute item is included in determining the maximum stock level.
-
Forecast Sales: Indicates that sales forecasts for the substitute items is used in calculating the location demand for the main item.
-
-
In the Fill Priority section, select whether the main item or the substitute item is primarily used to fill the recommended order quantities.
-
Then choose one of the following options.
-
Click OK to add the location.
-
Click Cancel to reject all entries and close the page.
-
Editing a Location
To edit a location, follow the steps below.
-
In the Locations section, select a location.
-
Then select Actions > Edit, or use the Edit icon
 . The Edit Locations page appears.
-
In the Location field, the location type and location are displayed.
-
In the Use in Replenishment section, edit the replenishment indicators, as necessary.
-
In the Fill Priority section, edit the options, as necessary.
-
Then choose one of the following options.
-
Click OK to save your changes.
-
Click Cancel to reject all entries and close the page.
-
Adding a Substitute Item
To add an item, follow the steps below.
-
In the Substitute Items section, select Actions > Add, or use the Add icon
 . The Add Substitute Item page appears.
Figure 1-47 Add Substitute Item Page
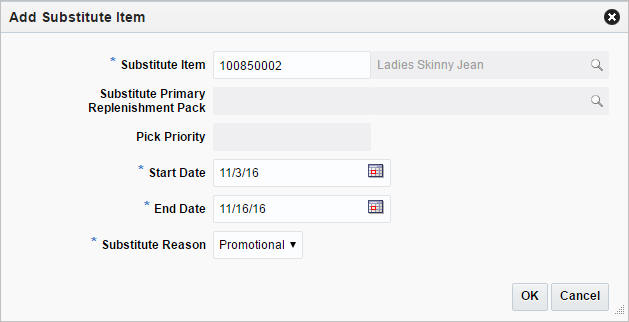
-
In the Substitute Item field, enter or search for the item. This field is a required field.
-
In the Substitute Primary Replenishment Pack field, enter or search for the substitute primary replenishment pack.
-
In the Pick Priority field, enter the priority level of the substitute item.
-
In the Start Date field, enter the starting date for the substitute item or use the Calendar icon to select a date. This field is a required field.
-
In the End Date field, enter the ending date for the substitute item or use the Calendar icon to select a date. This field is a required field.
-
In the Substitute Reason field, select the corresponding reason from the list. This field is a required field.
-
Then choose one of the following options.
-
Click OK to add the substitute.
-
Click Cancel to reject all entries and close the page.
-
Add User Defined Attributes
The Item UDA List page allows you to maintain and view the user defined attributes (UDA) that are associated with an item.
The Item UDAs page contains the following sections.
-
Header
The header of the page displays Item Level (SKU/Style/ Reference Item), the item number and item description.
Figure 1-48 Item UDAs Page
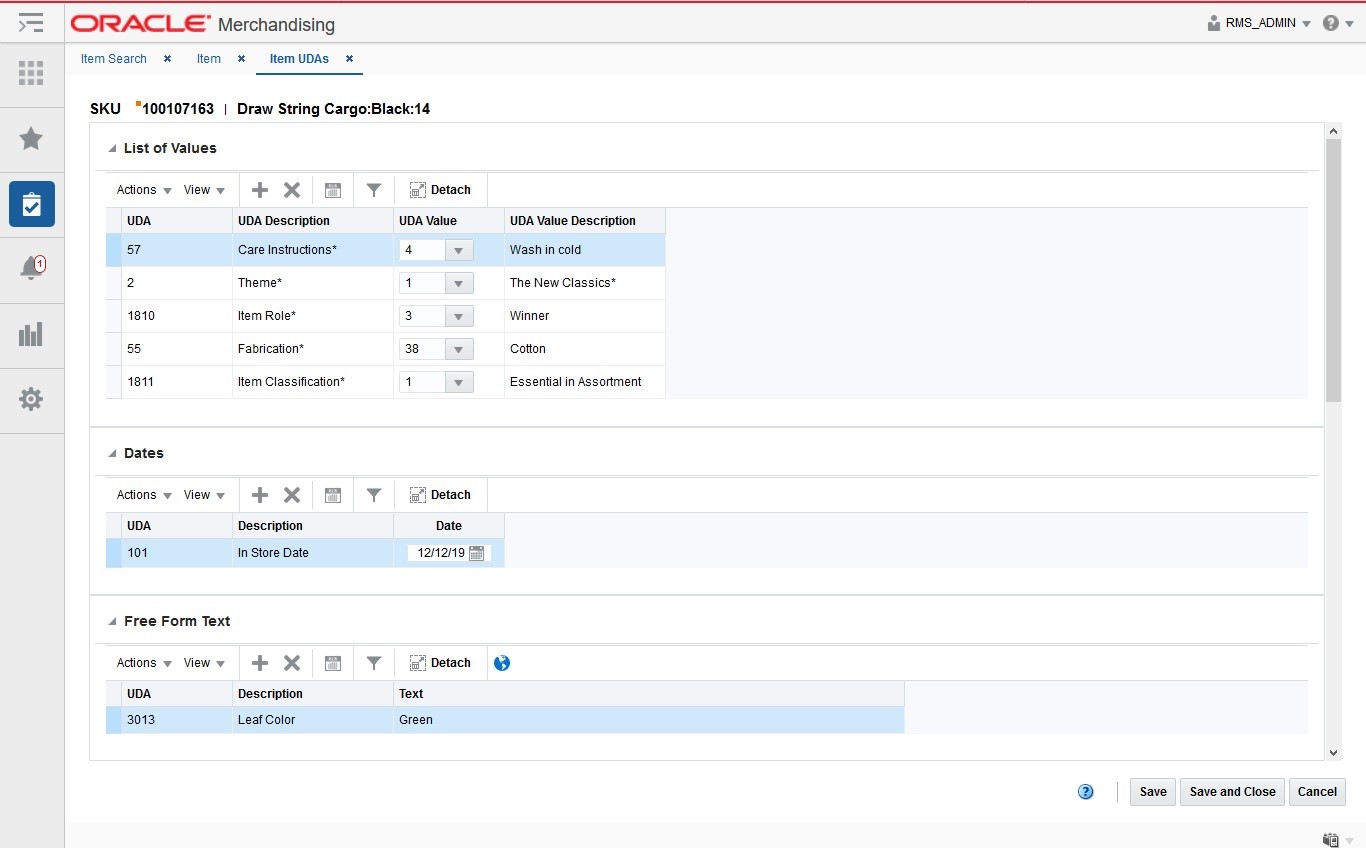
User Defined Attribute Defaults
When you create a new item and enter the Item UDAs page, the system verifies if any defaults are defined for the hierarchy in which the item is created. If defaults are defined, the UDA Defaults page appears.
The page displays the following defaults:
-
List of Values
-
Dates
-
Free Form Text
You can enter UDA values, dates or texts for each required UDA as well as for each non-required UDA directly in the corresponding table.
You can also delete the non-required UDAs by selecting Actions > Delete, or using the Delete icon ![]() .
.
To close the page choose one of the following options.
-
Click OK to add the UDA defaults to the corresponding tables in the Item UDAs page and exit the page.
-
Click Cancel to exit the UDA Defaults as well as the Item UDAs page.
List of Values
This section displays the user defined values for the selected item. You can edit the UDA Value field directly in the table.
Dates
This section contains the user defined dates for the item. You can edit the Date field, directly in the table.
Free Form Text
The Free Form Text section displays the user defined text for the item. You can edit the Text field directly in the table.
Maintaining User Defined Values
To maintain user defined attributes (UDAs) associated with an item, follow the steps below
-
From the Tasks menu, select Items > Manage Items. The Item Search page appears.
-
Enter or select search criteria as desired to make the search more restrictive.
-
Click Search. The items that match the search criteria are displayed in the Results section.
-
In the Item column, click the item link, or mark a record and select Actions > Edit, or use the Edit icon
 . The Item page appears.
-
Select More Actions > User Defined Attributes. The Item UDAs page appears.
Adding List of Values
To add a new UDA value, follow the steps below.
-
In the List of Values section select Actions > Add, or use the Add icon
 . The Add List of Values page appears.
Figure 1-49 Add List of Values Page
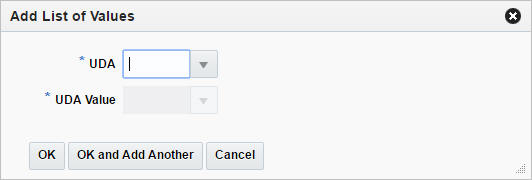
-
In the UDA field, enter, select or search for the desired attribute.
-
In the UDA Value field, enter, select or search for the value.
-
Then choose one of the following options.
-
Click OK to add the UDA value to the table and close the page.
-
Click OK and Add Another to add additional UDA values.
-
Click Cancel to reject all entries and close the page.
-
Adding Dates for User Defined Attributes
To add dates for user defined attributes, follow the steps below.
-
In the Dates section, select Actions > Add, or use the Add icon
 . The Add Dates page appears.
Figure 1-50 Add Dates Page
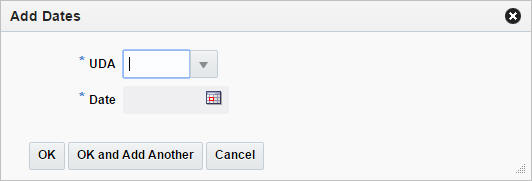
-
In the UDA field, enter, select or search for the desired attribute. This field is a required field.
-
In the Date field, enter the desired date or use the Calendar icon to select a date.This field is a required field.
-
Then choose one of the following options.
-
Click OK to add the date for the UDA to the table and close the page.
-
Click OK and Add Another to add additional UDA dates.
-
Click Cancel to reject all entries and close the page.
-
Adding Free Form Texts for User Defined Attributes
To add free form texts for user defined attributes, follow the steps below.
-
In the Free Form Text section, select Actions > Add, or use the Add icon
 . The Add Free Form Text page appears.
Figure 1-51 Add Free Form Text Page
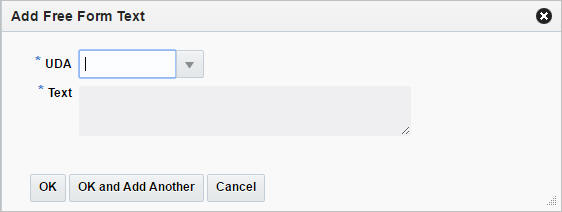
-
In the UDA field, enter, select or search for the desired attribute. This field is a required field.
-
In the Text field, enter the desired text. This field is a required field.
-
Then choose one of the following options.
-
Click OK to add the UDA text to the table and close the page.
-
Click OK and Add Another to add additional UDA texts.
-
Click Cancel to reject all entries and close the page.
-
Add Related Selling Items
In the Related Items page you can to add, delete or view item relationship details. Once the relationship type details have been created, items can be associated by providing an item number or an item list. The functionality of related items is used for the purpose of cross-selling, up-selling or defining substitution items for use by customer order applications, which assist in the selling process. Substitution relationships are also communicated to SIM for use during the fulfillment process.
The Related Items page contains the following sections.
-
Header
The header of the page displays Item Level (SKU/Style/ Reference Item), the item number and item description.
Figure 1-52 Related Items Page
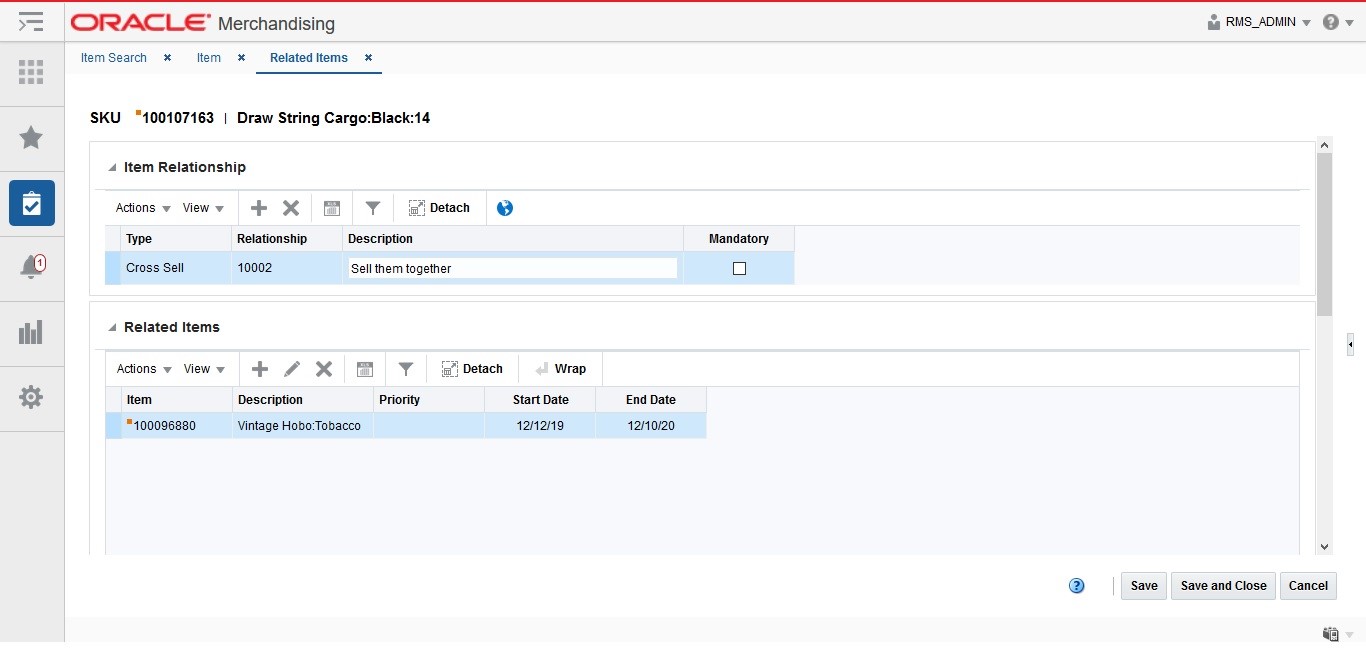
Item Relationship
In the Item Relationships section you can create the relationship. You have to add a relationship to enable the Related Items section.
You can edit the description as well as the Mandatory checkbox directly in the table.
Related Items
In Related Items section you can add, edit and delete related items. The table displays the item, item description, priority, start an end date by default.
Related Items - Actions Menu and Icons
Use the Actions Menu and icons to apply actions to the table. You can perform the actions listed below.
Table 1-10 Related Items- Actions Menu/Icons and Description
| Actions Menu/Icons | Description |
|---|---|
|
Add and Add icon |
You can add an item by selecting Actions > Add or by using the Add icon For more information about how to add an item, see the Adding Related Items section. |
|
Edit and Edit icon |
Select Actions > Edit, or use the Edit icon For more information about how to edit a related, see the Editing Related Items section. |
|
Delete and Delete icon |
You can delete a related item:
|
|
Export to Excel and Export to Excel icon |
You can export the records in the table to a Microsoft Excel spreadsheet by selecting Actions > Export to Excel or by using the Export to Excel icon |
Maintaining Related Items
To maintain related items, follow the steps below.
-
From the Tasks menu, select Items > Manage Items. The Items Search page appears.
-
Restrict your search to items in Worksheet status.
-
Click Search. The items that match the search criteria are displayed in the Results section.
-
In the Item column, click the item link, or mark a record and select Actions > Edit, or use the Edit icon
 . The Item page appears.
-
Then select More Actions > Related Items. The Related Item page appears.
Adding an Item Relationship
To add an item relationship, follow the steps below.
-
In the Item Relationship section, select Actions > Add, or use the Add icon
 . The Add Item Relationship page appears.
Figure 1-53 Add Item Relationship Page
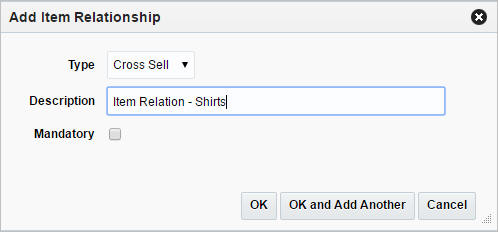
-
In the Type field, select the relationship type. Possible relationship types are:
-
Cross Sell: This option is used to associate an item which is related as being an add-on or an accessory to the main item.
-
Up-Sell: This option is generally used to associate an item of greater quality and value then the item it is being associated to.
-
Substitution: This option is used to define which items should be considered valid for substitution when fulfilling a customer order in the event that the ordered item is out of stock.
-
-
In the Description field, enter a description for the item relationship.
-
Select the Mandatory checkbox to indicate that the relationship is mandatory, meaning the main item cannot be purchased without selecting an item (or items) from the related list.
-
Then choose one of the following options.
-
Click OK to add the item relationship to the table and enable the Related Items section.
-
Click OK and Add Another to add additional item relationships.
-
Click Cancel to reject all entries and close the page.
-
Adding Related Items
To add related items to an item relationship, follow the steps below.
-
Select a record in the Item Relationship section.
-
In the Related Items section, select Actions > Add, or use the Add icon
 . The Add Related Items page appears.
Figure 1-54 Add Related Items Page
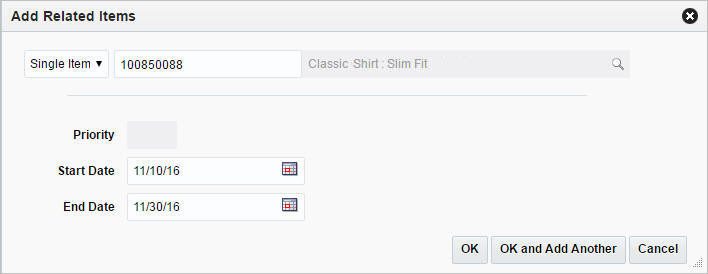
-
Select if you want to add a single item or an item list. Then enter or search for an item or enter, select or search for an item list.
-
In the Priority field, set the priority for the related item. This field is only enabled when the Relationship Type is Substitute for the selected record in the Item Relationship section.
You need to set a priority for that item when there is more than one related item.
-
In the Start Date field, enter a start date or use the Calendar icon to select a date.
-
In the End Date field, enter an end date or use the Calendar icon to select a date.
-
Then choose one of the following options.
-
Click OK to add the related item to the table.
-
Click OK and Add Another to add additional related items.
-
Click Cancel to reject all entries and close the page.
-
Editing Related Items
To edit related items, follow the steps below.
-
Select a record in the Related Items section.
-
Then select Actions > Edit, or use the Edit icon
 . The Edit Related Items page appears.
Figure 1-55 Edit Related Items Page
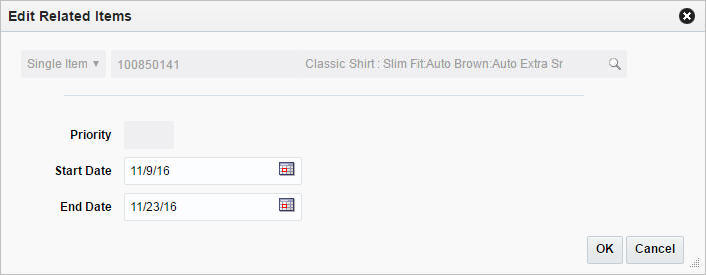
-
Edit the enabled fields as necessary.
-
Then choose one of the following options.
-
Click OK to save your changes for the related item.
-
Click Cancel to reject all entries and close the page.
-
Define Import Attributes
The Item Import Attributes page allows you to record and edit import information for a selected item.
The header of the Item Import Attributes page displays the item level description, or indicates if the item is a pack or reference item. Additionally the header displays the item number and the item description.
The attributes stored at the item level are used to describe the item and provide high-level tracking information. These attributes are maintained at the 'header' level of each of the functional item types within Merchandising/RTM.
Figure 1-56 Item Import Attributes Page
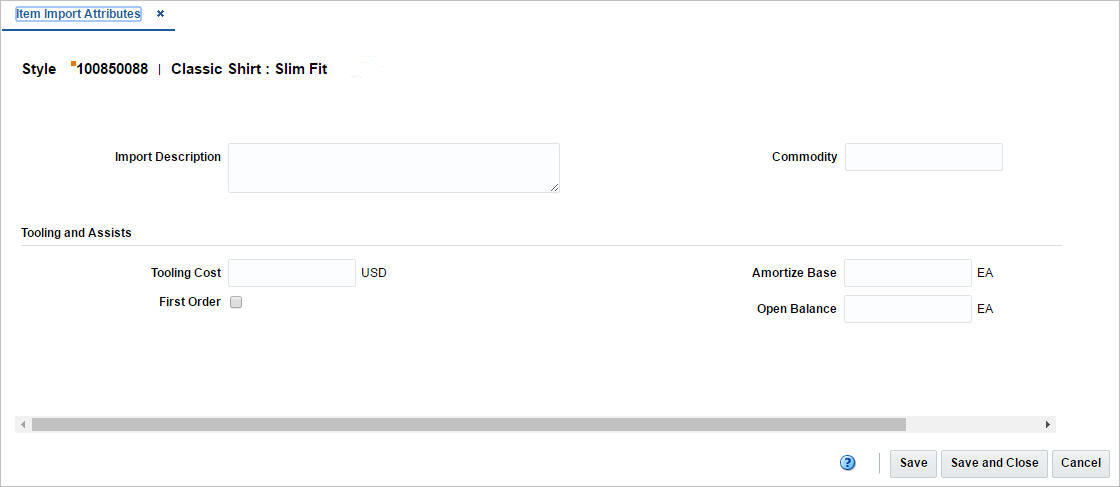
To record item import attributes, follow the steps below.
-
From the Tasks menu, select Items > Manage Items. The Items Search page appears.
-
Enter or select search criteria as desired to make the search more restrictive.
-
Click Search. The items that match the search criteria are displayed in the Results section.
-
In the Item column, click the item link, or mark a record and select Actions > Edit, or use the Edit icon
 . The Item page appears.
-
Then select More Actions > Import > Attributes. The Item Import Attributes page appears.
-
Then enter the attributes listed in the table below.
Table 1-11 Item Import Attributes - Fields and Description
| Fields | Description |
|---|---|
|
Import Description |
Enter the Importer's description associated with the item. This description is different from the standard item description, as it must be a minimum of 2000 characters in length to support a more detailed description of the item. |
|
Commodity |
Enter a generic entity used to group items together. For example, ceramic products might be used to group all ceramic products (including bowls, vases, figurines, and so on) that are imported into the country. |
|
Tooling and Assists: |
|
|
Tooling Costs |
Displays the tooling/assist costs for the item. When you record import attributes, enter the tooling/assist cost for the item. |
|
First Order |
If selected, the checkbox indicates that duty must be paid on the total value of the tooling expense the first time the item is shipped. Select or clear the First Order checkbox. |
|
Amortize Base |
Displays the number of units over which the tooling/assist cost will be amortized. This number is used to calculate the per unit amortization expense for estimated and actual landed cost records until the tooling costs are depleted. Enter the number of units over which the tooling cost will be amortized. |
|
Open Balance |
Displays the open balance of the number of units yet to be received over which the tooling costs will be amortized. The open balance is the number of units that the tooling costs will be amortized over minus the number of units already received. Enter the number of units in the open balance |
Eligible Tariff Treatments
The Eligible Tariff Treatments page allows you to maintain which tariffs are associated with an item.
Tariff Treatments are used to determine the duty, tax, and fee rates that will apply. Some tariff treatments are conditional and apply to only those items that meet certain eligibility requirements. In this page you can maintain the conditional tariff treatments. These tariff treatments are the ones for which the item is eligible.
The Eligible Tariff Treatments contains the following sections.
-
Header
The header of the page displays Item Level (SKU/Style/ Reference Item), the item number and item description.
Figure 1-57 Eligible Tariff Treatments Page
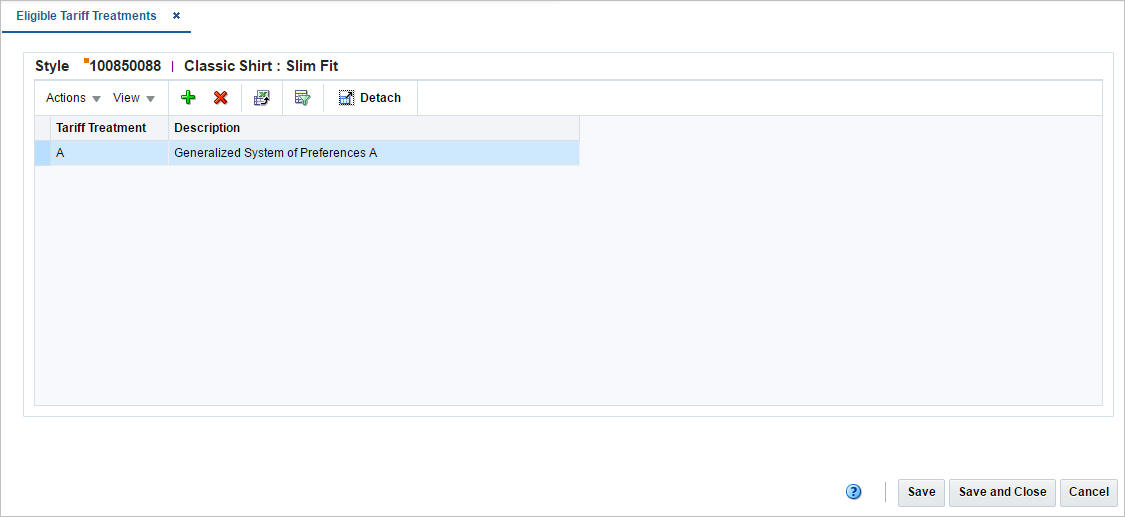
Maintain Tariff Treatments at the Item Level
To maintain which tariffs are associated with an item, follow the steps below.
-
From the Tasks menu, select Items > Manage Items. The Items Search page appears.
-
Enter or select search criteria as desired to make the search more restrictive.
-
Click Search. The items that match the search criteria are displayed in the Results section.
-
In the Item column, click the item link, or mark a record and select Actions > Edit, or use the Edit icon
 . The Item page appears.
-
Then select More Actions > Import > Eligible Tariff Treatments. The Eligible Tariff Treatments page appears.
Adding Tariff Treatments
To add tariff treatments, follow the steps below.
-
In the Eligible Tariff Treatments table, select Actions > Add, or use the Add icon
 . The Add Tariff Treatment page appears.
-
In the Tariff Treatment field, enter, select or search for the tariff you want to associate with the item. This field is a required field.
-
Then choose one of the following options.
-
Click OK to add the tariff to the table.
-
Click OK and Add Another to add additional tariff treatments for the item.
-
Click Cancel to reject your entries and close the page.
-
Item HTS
In the Item HTS page you can maintain the Harmonized Tariff Schedule classifications and assessments as well as view HTS details that are associated with an item.
Assessments are calculated at the item, country of sourcing, import country level. The cost components track the pertinent assessments for an item by HTS classification. They may be included in duty, expense, and actual landed cost calculations. Assessments differ from expenses in that they are defined by a government agency.
The Item HTS page contains the following sections.
-
Header
The header of the page displays Item Level (SKU/Style/ Reference Item), the item number and item description.
Figure 1-58 Item HTS Page
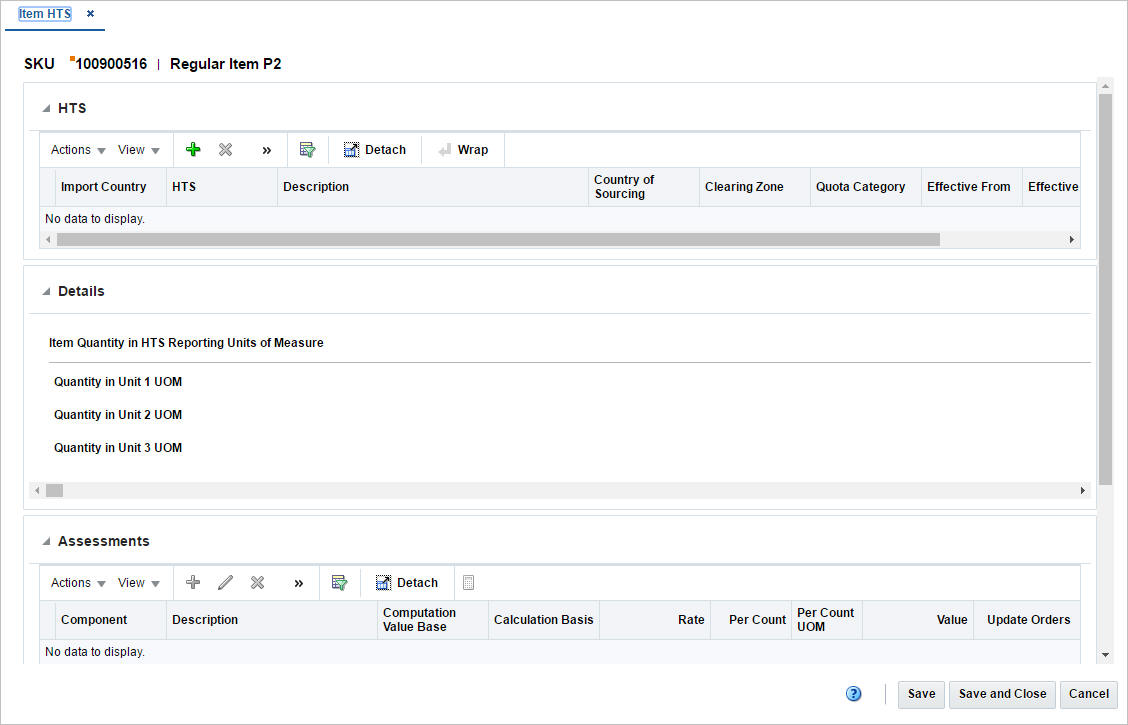
HTS
The HTS section contains the HTS records for the selected item. In this section you can add quota categories by import country. You can edit the Clearing Zone and the Status column directly in the table.
Details
The Details section displays the Tariff Treatment in the top right corner of the section. Additionally, the section contains the following three columns.
-
Item Quantity in HTS Reporting Units of Measure
This column lists the applicable units of measure 1-3.
-
Tariff Treatment Rates
This column lists rates, for example, specific or ad valorem rate.
-
HTS Details
This column lists the duty computation code, anti-dumping case and countervailing duty case number.
Assessments
The Assessments section displays the currency in the top right corner of the section. You can add, edit or delete assessments in this section.
The Assessments table shows the following columns by default.
-
Component and component description
-
Computation Value Base
-
Calculation Basis Rate
-
Per Count and Per Count UOM
-
Estimated Value and Estimated Value UOP
-
Update Orders
Maintaining HTS Classifications and Assessments for Items
To maintain HTS classifications and assessment for an item, follow the steps below.
-
From the Tasks menu, select Items > Manage Items. The Items Search page appears.
-
Enter or select search criteria as desired to make the search more restrictive.
-
Click Search. The items that match the search criteria are displayed in the Results section.
-
In the Item column, click the item link, or mark a record and select Actions > Edit, or use the Edit icon
 . The Item page appears.
-
Then select More Actions > Import > HTS. The Item HTSpage appears.
Adding HTS
To add a HTS classification for an item, follow the steps below.
-
In the HTS section, select Actions > Add, or use the Add icon
 . The Add HTS page opens.
Figure 1-59 Add HTS Page
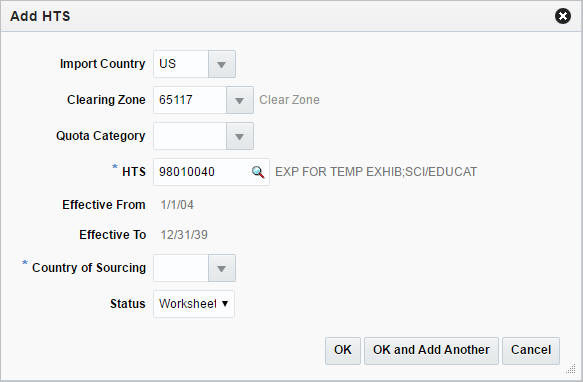
-
The import country and clearing zone for the selected are displayed by default.
-
The Quota Category field is populated automatically, once you select the HTS code.
-
In the HTS field, enter, select or search for the HTS code you want to add to the for the item. This field is a required field.
-
The Effective From field is populated automatically, once you select the HTS code.
-
The Effective To field is populated automatically, once you select the HTS codes.
-
In the Status field, select the status of the HTS. For example, select Worksheet. This field is a required field.
-
Then choose one of the following options.
-
Click OK to add the selected HTS code to the table.
-
Click OK and Add Another to add additional HTS codes.
-
Click Cancel to reject all entries and close the page.
-
Adding Assessment
To add an assessment for the selected item, follow the steps below.
-
In the Assessments section, click Actions > Add, or use the Add icon
 . The Add Assessment page opens.
-
In the Component field, enter or select the cost component. This field is a required field.
-
The Computation Value Base field is populated automatically, once you select the cost component.
-
The Calculation Basis field is populated automatically, once you select the cost component.
-
The Rate field is populated automatically, once you select the cost component. This field is a required field.
-
The Per Count field is populated automatically, once you select the cost component.
-
The Per Count UOM field is populated automatically, once you select the cost component.
-
Select the Update Orders checkbox to update the order with the entered information.
-
In the Component Nomination section, the following fields are populated automatically, once you select the cost component. These fields are required fields.
-
Nom Flag 1
-
In Duty
-
Nom Flag 3
-
In Exp
-
In ALC
-
-
Then choose one of the following options.
-
Click OK to add the assessment to the table and close the page.
-
Click OK and Add Another to add additional assessments.
-
Click Cancel to reject all entries and close the page.
-
-
In the Assessments section, select Actions > Recalculate, or use the Recalculate icon
 to update the values.
Editing Assessment
To edit an assessment for the selected purchase order follow the steps below.
-
In the Assessments section, click Actions > Edit or use the Edit icon
 to add assessments. The Edit Assessment page opens.
-
The Component field is populated with the selected component of the Assessment table.
-
The Computation Value Base field is populated automatically. If necessary edit the value.
-
The Calculation Basis field is populated automatically.
-
The Rate field is populated automatically. If necessary, edit the value. This field is a required field.
-
The Per Count field is populated automatically. If necessary, edit the value.
-
The Per Count UOM field is populated automatically. If necessary, edit the value.
-
Select Update Orders checkbox to update the order with the entered information.
-
In the Component Nomination section, the following fields are populated automatically. Edit the values, if necessary. These fields are required fields.
-
Nom Flag 1
-
In Duty
-
Nom Flag 3
-
In Exp
-
In ALC
Note:
To edit the fields, select the status of the assessment in relation to the other components. Select N/A if the assessment is not included in the calculation of total assessments and estimated landed costs. Select + (plus sign) to add the assessment to the total. Select - (minus sign) to subtract the assessment from the total.
-
-
Then choose one of the following options.
-
Click OK to save your changes and close the page.
-
Click Cancel to reject entries and close the page.
-
-
In the Assessments section, select Actions > Recalculate, or use the Recalculate icon
 to update the values.
Define VAT Rates
The Item VAT page allows you to maintain and view the value added tax (VAT) codes that are associated with an item at or above the transaction level.
An audit record is kept of who added the VAT code to the item and when the VAT code was added.
The Item VAT page contains the following sections.
-
Header
The header of the page displays Item Level (SKU/Style/ Reference Item), the item number and item description.
Figure 1-60 Item VAT Page
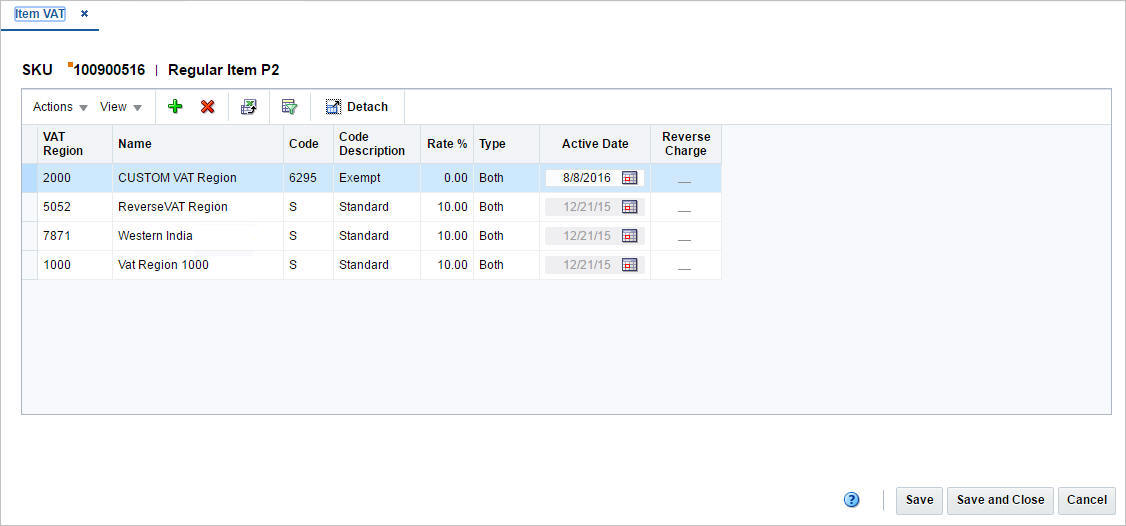
Table
The table displays the VAT Region, Name, Code, Code Description, Rate %, Type and Active Date as well as the Reverse Charge column by default.
Maintaining VAT Codes for Items
To maintain HTS classifications and assessment for an item, follow the steps below.
-
From the Tasks menu, select Items > Manage Items. The Items Search page appears.
-
Enter or select search criteria as desired to make the search more restrictive.
-
Click Search. The items that match the search criteria are displayed in the Results section.
-
In the Item column, click the item link, or mark a record and select Actions > Edit, or use the Edit icon
 . The Item page appears.
-
Then select More Actions > VAT Maintenance. The Item VAT page appears.
Adding VAT Codes
To add VAT code for an item, follow the steps below.
-
Select Actions > Add, or use the Add icon
 . The Add VAT Code page appears.
Figure 1-61 Add VAT Code Page
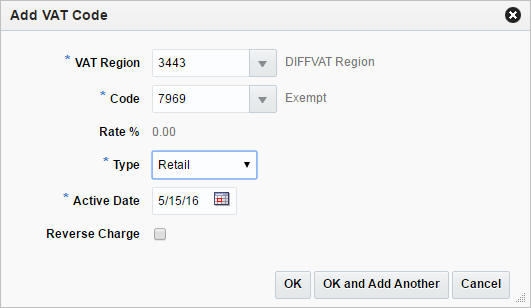
-
The VAT Region field, enter, select or search for the VAT region. This field is a required field.
-
In the Code field, enter, select or search for the VAT code.This field is a required field.
-
In the Type field, select the type of calculations in which VAT amounts should be included
-
The Active Date field, enter a date on which the VAT code becomes effective or use the Calendar icon to select a date. This field is a required field.
-
Select the Reverse Charge checkbox if reverse charge VAT is applicable for the item.
-
Then choose one of the following options.
-
Click OK to add the VAT code to the table.
-
Click OK and Add Another to add additional VAT codes.
-
Click Cancel to reject all entries and close the page.
-
Add Seasons and Phases
The Item Season page allow you to add and delete seasons and phases from items. When adding a season to an item, a season and a phase within the season is selected.
The seasons and phases of an item are used to track the sales of the item through reports. Season/phase records for items in a group can be added or overwritten if the passed item is above the item's group transaction level.
The Item Seasons page contains the following sections.
-
Header
The header of the page displays Item Level (SKU/Style/ Reference Item), the item number and item description.
Figure 1-62 Item Seasons Page

Table
The table displays the actions to be performed, the existing seasons and phases to be changed or deleted as well as the new seasons and phases to be added for the selected item.
Maintaining Seasons and Phases
To maintain seasons and phases for items, follow the steps below.
-
From the Tasks menu, select Items > Manage Items. The Item Search page appears.
-
Enter or select search criteria as desired to make the search more restrictive.
-
Click Search. The item lists that match the search criteria are displayed in the Results section.
-
In the Item column, click the item link, or mark a record and select Actions > Edit, or use the Edit icon
 . The Item page appears.
-
Then select More Actions > Season/Phases. The Item Season page appears.
Adding Seasons and Phases
To add a season and phase, follow the steps listed below.
-
Select Actions > Add or use the Add icon. The Add Season page appears.
Figure 1-63 Add Season Page
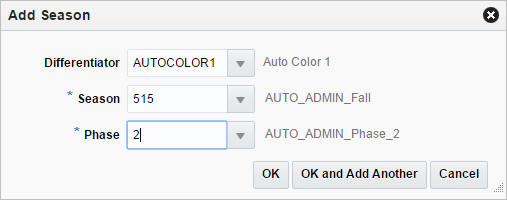
-
In the Differentiator field, enter, select or search for the differentiator. This field is only enabled, if the selected item has differentiators.
-
In the Season field, enter, select or search for the season you want to add. This field is a required field.
-
In the Phase field, enter, select or search for the phase you want to add. This field is a required field.
-
Then choose one of the following options.
-
Click OK to add the season and phase to the table and close the page.
-
Click OK and Add Another to add additional seasons/phases.
-
Click Cancel to reject all entries and close the page.
-
Add Tickets
The Item Ticket page allows you to associate ticket types or labels with a single item or multiple items. You can choose the conditions under which the tickets should be printed automatically, such as PO approval, item receipt or a permanent price change.
In case of a requirement for extra tickets, you can enter the percentage of extra tickets to be printed. If you add ticket types to items on an item list, any existing ticket types for those items are deleted and replaced with the new ticket types.
The Item Tickets page contains the following sections.
-
Header
For Items:
The header of the page displays the Item Level (SKU/Style/ Reference Item), the item number and item description.
For Item Lists:
The header contains the item list number and description.
Figure 1-64 Item Tickets Page

Item Tickets Table
The Item Tickets table displays the ticket type, description as well as when the ticket should be printed automatically.
You can edit the following columns directly in the table.
-
PO Print Type
Select when the ticket should be printed.
-
Print on Price Change
Select the checkbox to indicate that the ticket should be printed upon a price change.
-
Percentage Over Quantity
Enter the percentage of extra tickets, if needed.
Adding a Ticket Type
For Item Lists:
To add a ticket type to an item list, follow the steps below.
-
From the Tasks menu, select Foundation Data > Items > Manage Item List. The Item Search page appears.
-
Enter or select search criteria as desired to make the search more restrictive.
-
Click Search. The item lists that match the search criteria are displayed in the Results section.
-
Select a record in the table.
-
Then select Actions > Mass Change > Item Ticket. The Item Tickets page appears.
For Items:
To add a ticket type to an item, follow the steps below.
-
From the Tasks menu, select Items > Manage Items. The Item Search page appears.
-
Enter or select search criteria as desired to make the search more restrictive.
-
Click Search. The items that match the search criteria are displayed in the Results section.
-
In the Item column, click the item link, or mark a record and select Actions > Edit, or use the Edit icon
 . The Item page appears.
-
Select More Actions > Ticket Type. The Item Tickets page appears.
To add a ticket type, follow the steps below.
-
Select Actions > Add, or use the Add icon. The Add Ticket Type page appears.
-
In the Ticket Type field, enter, select or search for the desired ticket type.
-
In the PO Print Type field, select when the ticket should be printed.
-
Select the Print on Price Change checkbox to indicate that the ticket should be printed in case of a price change.
-
In the Percentage Over Quantity field, enter the percentage of the extra tickets needed, if necessary.
-
Then choose one of the following options.
-
Click OK to save the ticket type and close the page.
-
Click OK and Add Another to add additional ticket types.
-
Click Cancel to reject all entries and close the page.
-
Add Images
The Image page allows you to maintain, and view one or more images for an item. The location for an image must be a URL address. You can maintain images for items at the following levels:
The Item Images page contains the following sections.
-
Header
The header of the page displays the Item Level (SKU/Style/ Reference Item), the item number and item description.
Figure 1-65 Item Images Page

Table
The table lists the images for an item. The table displays the Web Address, File Name, Description, Image Type, Display Order and Primary columns by default.
You can edit the Description column directly in the table.
Maintaining Item Images
To maintain item images, follow the steps below.
-
From the Tasks menu, select Items > Manage Items. The Item Search page appears.
-
Enter or select search criteria as desired to make the search more restrictive.
-
Click Search. The item lists that match the search criteria are displayed in the Results section.
-
In the Item column, click the item link, or mark a record and select Actions > Edit, or use the Edit icon
 . The Item page appears.
-
Then select More Actions > Images. The Item Images page appears.
Adding Item Images
To add an item image, follow the steps below.
-
Select Actions > Add, or use the Add icon
 . The Add Image Path page appears.
Figure 1-66 Add Image Path Page
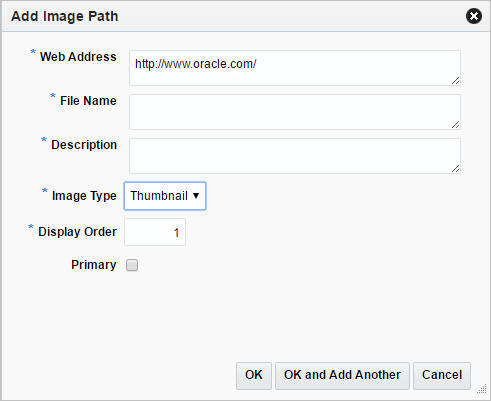
-
In the Web Address field, enter the appropriate address.
-
In the File Name field, enter the file name and extension.
-
In the Description field, enter a brief description of the item image.
-
In the Image Type field, select an image type from the list.
-
The Display Order field indicates the priority of usage of each image file defined.
-
Select the Primary checkbox to indicate that the image is the primary image for the item.
-
Then choose one of the following options.
-
Click OK to add the current image to the table and close the page.
-
Click OK and Add Another to add additional images for the item.
-
Click Cancel to reject all entries and close the page.
-
Editing Image Details
To edit item details, follow the steps below.
-
Select Actions > Edit, or use the Edit icon
 . The Edit Image Details page appears.
-
Edit the fields as necessary.
-
Then choose one of the following options.
-
Click OK to save your changes to the table and close the page.
-
Click Cancel to reject all entries and close the page.
-
Create a Like Item
To create like items:
-
From the Tasks menu, select Items > Manage Items. The Item Search page appears.
-
Enter or select search criteria as desired to make the search more restrictive.
-
Click Search. The items that match the search criteria are displayed in the Results section.
-
Select a record in the Results section.
-
Select Actions > Create Like Item, or click the Create Like Item icon.The Create Like Item page appears.
Figure 1-67 Create Like Item Page
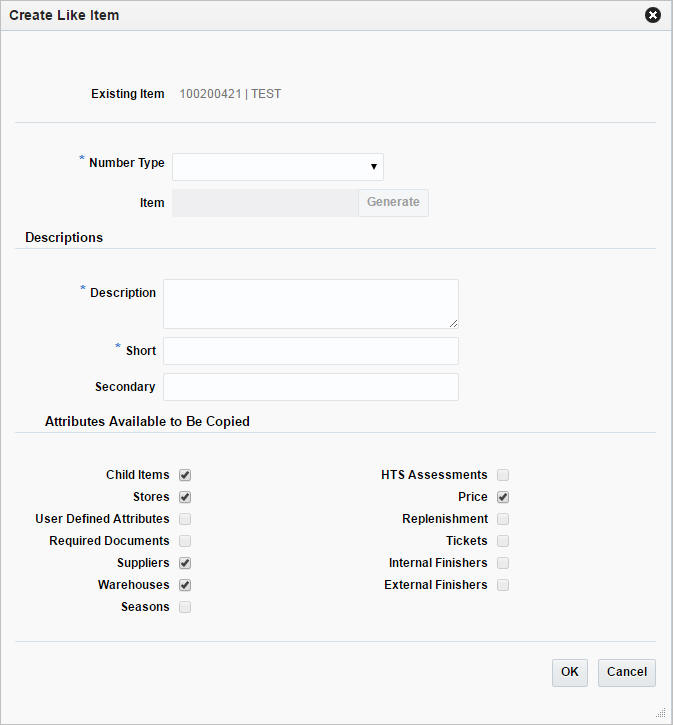
-
In the Number Type field, select the number type from the list. This field is a required field.
-
If you select Oracle Retail Item Number or UPC-A in the Item Number Type field, the item number is automatically added.
-
If you select EAN/UCC-13 in the Item Number Type field, you can automatically generate the EAN number by clicking the Generate button in the Edit Pending Child Item page.
-
If you select Manual in the Item Number Type field, the Description field accepts alphabetic text and does not validate digit, length, or characters. It is a 12-digit number starting with 3 that includes check digit validation
-
-
In the Description field, enter the description for the new item.
-
In the Short field, enter a short description for the new item.
-
In the Attributes to Be Copied section, select all attributes you want to copy from the like item.
-
Then choose one of the following options.
-
Click OK to navigate to Items page, which opens in edit mode with all the selected attributes copied from the like item.
For more information about the Item page, see the Item Page section.
-
Click Cancel to reject all entries and close the page.
-
Approve Items
After an item is created in Merchandising, it needs to be first submitted and then approved. Depending on your organization and process, the person to create and approve the item may be different. This workflow is to facilitate accountability and shared responsibility. An item can be submitted by using the status button on the screen. This button label shows the most logical next step in the approval flow. If there are other actions possible, they can be accessed through the dropdown. For example, when an item is in worksheet status, the button label is Submit and there is no other option available. However, when an item is in submitted status, the label of the button changes to Approve and the additional actions available in the dropdown are Worksheet and Submit Children; if the item has child items in worksheet status.
While submitting and approving an item that has child items under it, the option to submit and approve child items are also presented to the user. If such child items are not submitted and approved along with the parent item then it can be done separately from Item Children by Diff or Item Children page, depending on whether the child items are created by using differentiators or not. On these pages, the users have additional options and they can choose to submit and approve only the item selected in the table, or selected item and its children, or all items in the table, or all items in the table along with respective children. Parent items without any child items associated with them can also be approved.
Both at the time when item is submitted and when it is approved, there are a number of validations that are carried out by merchandising to ensure successful creation of item. Errors that prevent successful submission or approval of item can be viewed in Item Approval Errors page. This screen can be accessed by clicking the item status, in case errors are present.
Review Approval Errors
The Item Approval Error page allows you to view the reasons why an item cannot yet be submitted or approved.
To access the page
The Item Approval Errors page contains the following sections.
-
Header
The header of the page displays the Item Level (SKU/Style/ Reference Item), the item number and item description.
Figure 1-68 Item Approval Errors Page

Managing an Item
The Manage Items option opens the Item Search page. In this page you can perform the following actions.
-
Creating an item
-
Creating like item
-
Editing an item
-
Viewing an item
-
Cost change
-
Mass change item/location
You can assess the Item Search page from the Task menu, select Items > Manage Items. The Item Search page appears.
In the Item Search page you can search items by specifying various search criteria. You can choose to access items in the search results in edit or view mode depending on security privileges. There are also options for creating a new item or create like item.
The Item Search page includes the following sections:
-
Search
For more information on the Item Search page, see the Searching for an Item section.
Figure 1-69 Item Search Page
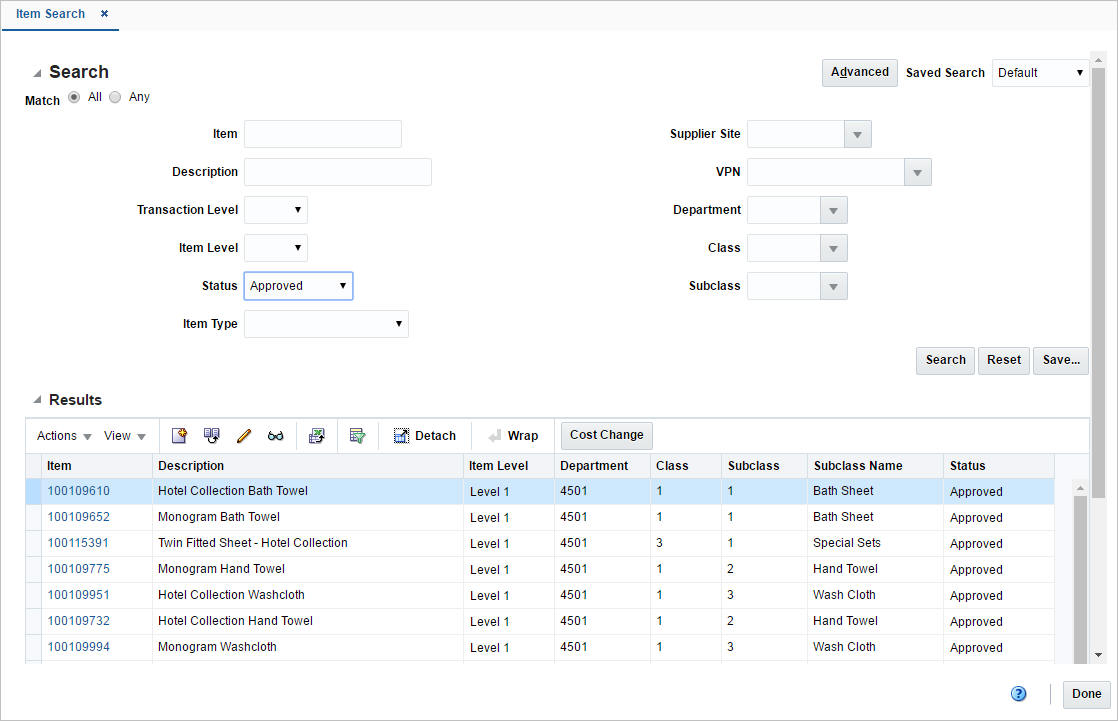
Searching for an Item
To search for an item:
-
From the Tasks menu, select Items > Manage Items. The Item Search page appears.
-
You can search for an item by providing search criteria in search section. Criteria can be provided either in Basic or Advanced mode, depending on the requirement. Basic is the default mode when the search screen is entered. Click Advanced to access the search panel in advanced mode. You can return to Basic mode by clicking Basic.
Searching for an Item Through the Basic Search Criteria
To search for an item through the basic search criteria:
-
Enter or select one or all of the following basic search criteria:
Table 1-12 Item Search - Basic Search Criteria and Description
Fields Description Item
Enter an item.
Description
Enter a description of an item.
Transaction Level
Select the transaction level from the list.
Item Level
Select the item level from the list.
Status
Select one of the following statuses from the list: Worksheet,Submitted, Approved, Delete Pending.
Item Type
Select one of the following item types from the list:Regular Item, Simple Pack, Complex Pack, Deposit Contents, Deposit Container, Deposit Crate, Deposit Returned Item, Transformed Orderable, Transformed Sellable.
Supplier Site
Enter the supplier site, select or search for the supplier site and number from the list.
VPN
Enter the VPN number, select or search for the VPN and number from the list.
Department
Enter the department number, select or search for the department name and number from the list.
Class
Enter the class number, select or search for the class name and number from the list.
Sub Class
Enter the sub class number, select or search for the sub class name and number from the list.
-
You can also click on the Saved Search drop down to select one of the saved sets of search criteria. Selecting a saved search populates the criteria section with saved criteria. If the saved search is selected to run automatically then the search will be executed too.
You can also choose to manage and personalize the saved searches by clicking Personalize in the list. The Personalized Saved Search page appears.
For more information on Personalized Saved Search, see Personalize Saved Search in the Oracle® Retail Merchandising Do the Basics User Guide.
-
Click Search. The items that match the search criteria are displayed in the Results section.
-
Click Reset to clear the search criteria and results.
-
Click the Save button to save the current set of search criteria as a Saved Search. The Create Saved Search page appears.
For information on the Create Saved Search page, see Create Saved Search in the Oracle® Retail Merchandising Do the Basics User Guide.
-
Click Done to close the page.
Searching for an Item Through the Advanced Search Criteria
To search for an item through the advanced search criteria:
-
Enter or select one or all of the advanced search criteria.
-
To narrow down the search, use the list next to the search fields. For example, determine if the entered value should equal or not equal the search result.
-
Click on the Saved Search list to select one of the saved search criteria. Selecting a saved search populates the search section with the saved search criteria. If the run automatically function is enabled for the search, the search is executed immediately.
You can also personalize your saved searches by selecting Personalize. The Personalize Saved Searches page appears.
For more information about the Personalized Saved Search, see Personalize Saved Search in the Oracle® Retail Merchandising Do the Basics User Guide.
-
Click Search. The items that match the search criteria are displayed in the Results section.
-
Click Reset to clear the search section and results.
-
Click Save As... to save the current search criteria. The Create Saved Search page appears.
For more information about how to save your search criteria, see Create Saved Search in the Oracle® Retail Merchandising Do the Basics User Guide.
-
Click Add Fields to add more fields for the advanced search. To remove the field from the search, click the x right next to the field.
-
Click Reorder to change the order of the available search fields. The Reorder Search Fields page appears.
-
Select the desired search field and use the up and down arrows to rearrange the order of the fields.
-
Click OK to confirm the new order of the fields and close the page.
-
Click Cancel to reject any changes and close the page.
-
-
Click Done to close the page.
Creating an Item
To create an item:
-
From the Tasks menu, select Items > Manage Items. The Item Search page appears.
-
Select Actions > Create, or click the Create icon
 . The Create Item page appears.
Figure 1-70 Create Item Page

For more information on how to create an item, see the Creating an Item section.
Editing an Item
To edit an item:
-
From the Tasks menu, select Items > Manage Item. The Item Search page appears.
-
Enter or select search criteria as desired to make the search more restrictive.
-
Click Search. The items that match the search criteria are displayed in the Results section.
-
Select a record in the Results section.
-
From the Actions menu, select Edit or click the Edit icon.
 . The Item page appears.
-
Make the necessary changes. For more information about the Item page, see the Item Page section.
View Item Details
The Item Details page displays the passed in item's hierarchy, it's parent and children if they available and any VPNs associated with the passed in item. The VPN section displays the VPNs associated with the highlighted item in the table.
To access the Item Details page:
-
Click the orange square icon in the upper left corner of the item number. The Item Details page appears.
-
View the item details. Click OK to close the page.
Figure 1-71 Item Details Page
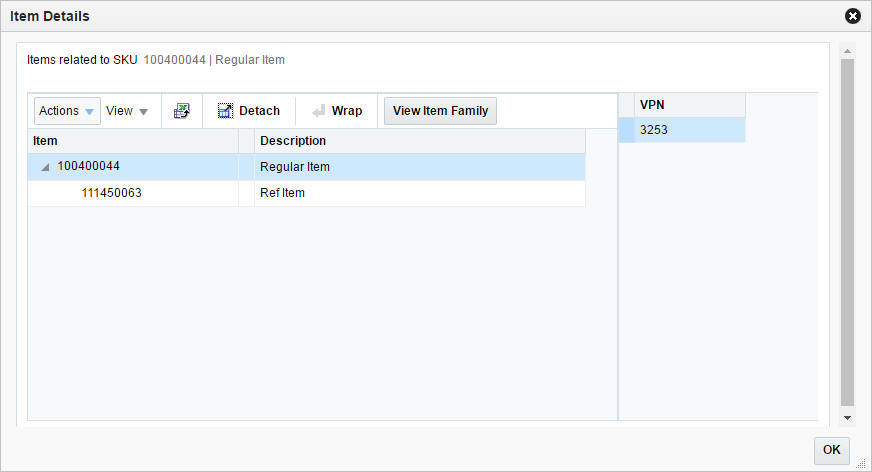
Table
The Item table shows the parents, siblings and or children of the passed in item
Table - Actions Menu and Icons
Use the Actions Menu and icons to apply actions to the table. You can perform the actions listed below.
Table 1-13 Table - Actions Menu/Icons and Description
| Actions Menu/Icons | Description |
|---|---|
|
Export to Excel and Export to Excel icon |
You can export the records in the table to a Microsoft Excel spreadsheet by selecting Actions > Export to Excel or by using the Export to Excel icon |
|
Wrap icon |
You can wrap the values in the table column by using the Wrap icon |
|
View Item Family button |
Depending on the passed in item, the displayed item level vary.
|
|
View Item Hierarchy button |
Depending on the passed in item, the displayed item level vary.
|
Table - View Menu and Icons
You can customize the view of the table by using the options in the View Menu.
Table 1-14 Table - View Menu/Icons and Description
| View Menu/Icons | Description |
|---|---|
|
Columns |
You can manage which of the columns will be shown in the table by clicking the Show All and Manage Columns options. |
|
Detach and Detach icon |
You can view the tables in the application in a separate page by clicking Detach or by using the Detach icon |
|
Collapse |
You can collapse the current item level by clicking the Collapse option. |
|
Expand |
You can expand the current item level by clicking the Expand option. |
|
Expand All Below |
You can expand all levels below the current item level by clicking the Expand All Below option. |
|
Collapse All Below |
You can collapse all levels below the current item level by clicking the Collapse All Below option. |
|
Expand All |
You can expand all item levels in the table by clicking the Expand All option. |
|
Expand All |
You can collapse all item levels in the table by clicking the Collapse All option. |
|
Scroll to First |
You can scroll to the first record in the table by clicking the Scroll to First option. |
|
Scroll to Last |
You can scroll to the last record in the table by clicking the Scroll to Last option. |
|
Reorder Columns |
You can reorder columns by clicking the Reorder Columns option. |
|
Query by Example and Query by Example icon |
You can filter the items by one or multiple column values by clicking the Query by Example option or by using the Query by Example icon |
Managing Item Locations
In the Change Item/Loc Attributes page you can modify attribute values for an item, item parent or list of items at a designated location or group of locations.
Whether you change attributes for one item or multiple items depends on how you access the page. When you edit an item, you can change the attributes for the item. When you use an item list, you can change the attributes for all items on the item list.
For items:
-
From the Tasks menu, select Items > Manage Items. The Item Search page appears.
-
Enter or select search criteria as desired to make the search more restrictive.
-
Click Search. The Items that match the search criteria are displayed in the Results section.
-
In the Results section, mark a record and select Actions > Mass Change Item/Location. The Change Item/Loc Attributes page appears.
For item lists:
-
From the Tasks menu, select Foundation Data > Items > Manage Item Lists. The Item List Search page appears.
-
Enter or select search criteria as desired to make the search more restrictive.
-
Click Search. The item lists that match the search criteria are displayed in the Results section.
-
In the Results section, mark a record and select Actions > Mass Change > Item/Locations. The Change Item/Loc Attributes page appears.
In a multi-channel environment, all changes at the warehouse level are applied at the virtual warehouse level. Each virtual warehouse within a physical warehouse can have a unique set of attributes.
The Change Item/Loc Attributes page contains the following sections.
-
Header
For items the header displays the item level description, or indicates if the item is a pack or reference item. Additionally the item number and item description is displayed.
For item lists the header displays the item list number and name.
Figure 1-72 Change Item/Loc Attributes
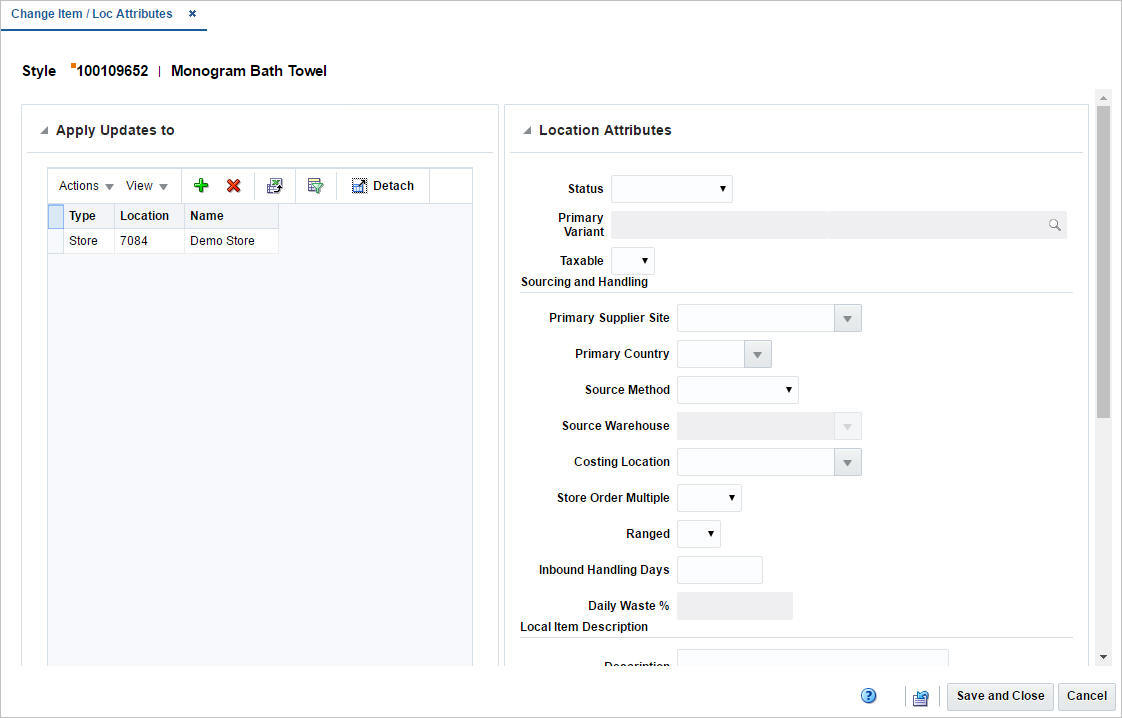
Apply Updates to
In the Apply Updates to section you can enter a location or group of locations you want to change for the selected item or item list. The table displays the location type, location and location name by default.
Apply Updates to - Actions Menu and Icons
Use the Actions Menu and icons to apply actions to the table. You can perform the actions listed below.
Table 1-15 Apply Updates to - Actions Menu/Icons and Description
| Actions Menu/Icons | Description |
|---|---|
|
Add and Add icon |
You can add new locations by selecting Actions > Add or by using the Add icon For more information about how to add a location, see the Adding Locations section. |
|
Delete and Delete icon |
You can delete one or more locations from the table:
|
|
Export to Excel and Export to Excel icon |
You can export the records in the table to a Microsoft Excel spreadsheet by selecting Actions > Export to Excel or by using the Export to Excel icon |
Apply Updates to - View Menu and Icons
You can customize the view of the table by using the options in the View Menu.
Table 1-16 Apply Updates to - View Menu/Icons and Description
| View Menu/Icons | Description |
|---|---|
|
Columns |
You can manage which of the columns will be shown in the table by clicking the Show All and Manage Columns options. |
|
Detach and Detach icon |
You can view the tables in the application in a separate page by clicking Detach or by using the Detach icon |
|
Sort |
You can sort columns by the following options:
|
|
Reorder Columns |
You can reorder columns by clicking the Reorder Columns option. |
|
Query by Example and Query by Example icon |
You can filter the items by one or multiple column values by clicking the Query by Example option or by using the Query by Example icon |
Location Attributes
In the Location Attributes section enter the attributes you want to change. The changes to attributes are applied to the locations that remain in the table in the Apply Updates to section.
Table 1-17 Location Attributes - Fields and Description
| Fields | Description |
|---|---|
|
Status |
Select the item status at the location from the list. |
|
Primary Variant |
Enter or search for an item as the primary variant. This field is only available for items higher than transaction level. |
|
Taxable |
Indicate if the item is taxable at the location or not. |
|
Sourcing and Handling: |
|
|
Primary Supplier Site |
Enter, select or search for the supplier who will be the primary supplier for the item/location combination. |
|
Primary Country |
Enter, select or search for the primary country for the item/location combination. |
|
Source Method |
Select the sourcing method from the list. |
|
Source Warehouse |
Enter, select or search for the source warehouse. Only available if you select Warehouse as the source method. |
|
Costing Location |
Enter, select or search for the costing location. |
|
Store Order Multiple |
Select the pack size level at which the item is shipped between warehouses and stores. |
|
Ranged |
Select if the locations are ranged for replenishment. |
|
Inbound Handling Days |
Enter the number of inbound handling days for the item. |
|
Daily Waste % |
Enter the average percentage lost form inventory on a daily basis due to natural wastage |
|
Local Item Description: |
|
|
Description |
Enter the item description. |
|
Short |
Enter a short description for the item |
|
Location Tier Height: |
|
|
Tier |
Enter the tier. |
|
Height |
Enter the height. |
|
Price: |
|
|
Ticketing Price |
Enter the ticket price. |
|
UIN: |
|
|
UIN Type |
Select the unique identification number UIN Type for the location from the list. |
|
UIN Label |
Select the UIN label for the locations from the list. |
|
Capture Time |
Select the capture time from the list. |
| Selling Phase Start Date: | |
| Selling Phase Start Date | Select a date indicating the selling phase start date for store locations. |
| Update Selling Phase Start Date upon Receipt of | |
| Direct to Store Orders | Select the option from the list. |
| Store to Store Transfers | Select the option from the list. |
| Warehouse to Store Transfer / Allocations | Select the option from the list. |
| Minimum Transfer / Allocation Units for Update | Enter the minimum number of units to trigger an update to the selling phase start date. |
Adding Locations
To add one or more locations want to change for the selected item or item list, follow the steps below.
-
In the Apply Updates to section, select Actions > Add, or use the Add icon
 . The Add Location page appears.
-
In the Location field, select a location type from the list. Then enter the location.
-
Then choose one of the following options.
-
Click OK to add the current locations to the table.
-
Click OK and Add Another to add additional locations to the table.
-
Click Cancel to reject all entries and close the page.
-
View Open Orders
The Open Orders by Item page allows you to view a list of the outstanding orders for a selected item, item parent, or pack item.
To access the Open Orders by Item page, follow the steps below.
-
From the Tasks menu, select Items > Manage Items. The Item Search page appears.
-
Enter or select search criteria as desired to make the search more restrictive.
-
Click Search. The item lists that match the search criteria are displayed in the Results section.
-
In the Item column, click the item link, or mark a record and select Actions > Edit, or use the Edit icon
 . The Item page appears.
-
Then select More Actions > Order Details. The Open Orders by Item page appears.
The page contains the following sections.
-
Header
The header of the page displays the Item Level (SKU/Style/ Reference Item), the item number and item description.
Figure 1-73 Open Orders by Item Page
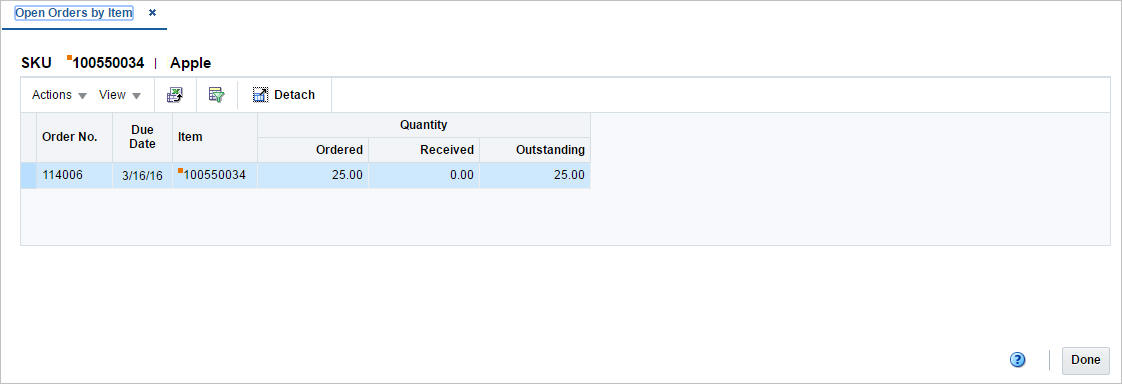
View Packs
In the Packs by Component page you can search for and view all the pack items that contain a specified component item.
To view packs by component:
-
From the Tasks menu, select Items > Packs by Component. The Packs by Component page appears.
Figure 1-74 Packs by Component Page
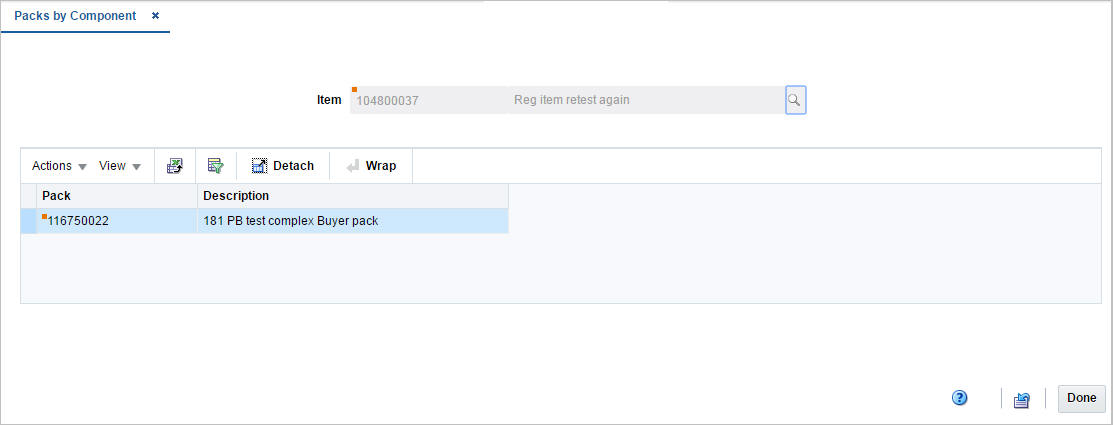
-
To search by reference item, enter the item number of the reference item, or click the Search link to search and select the item.
-
The item numbers and descriptions of the item at and above the transaction level appear.
-
Click Done to close the page.
Request Tickets
Items generally have tickets or labels affixed to them in the store. While shoppers may note the price and size, sales clerks may glean quite a bit of additional information from the tickets and labels. An item may have multiple tickets and labels.
You can choose what information is printed on tickets and labels and under what circumstances they should be automatically printed. When necessary, you can choose to print tickets on demand. Ticket requests are transmitted to an external ticketing system for printing.
Before you can use tickets and labels, you must add the types of tickets to the system. After entering a unique ID and description for a ticket type, you choose which attributes of an item are to be printed on the ticket type. You also indicate whether the ticket type is a shelf edge label. If the ticket type is a shelf edge label, only one label per request is printed.
After the ticket types are defined, you can associate one or more ticket types with an item. You can associate ticket types with multiple items by using an item list.
The Ticket Request page allows you to enter what type of information must be printed on the ticket. You can choose from two types of information:
-
Attributes: System-defined characteristics of an item. For example, you can specify that the department, class, subclass, and retail price be printed on tickets.
-
User Defined Attributes: User-defined characteristics of an item. For example, you can indicate that a user-defined date, free-form text, or value be printed on tickets.
At this point, you indicate the circumstances under which tickets are automatically printed. The circumstances are:
-
When a purchase order is approved
-
When an order is received
-
When a permanent price change takes effect
If you use an item list, the ticket types that you add to the item list supersede existing ticket types associated with the items on the item list. A message appears requesting if the same ticket types to any subordinate level items.
Should the need arise, you can request tickets on demand. The request may be for a single item, items on an item list, or items on a purchase order. Requests may be edited until the tickets are printed.
Figure 1-75 Ticket Request Page
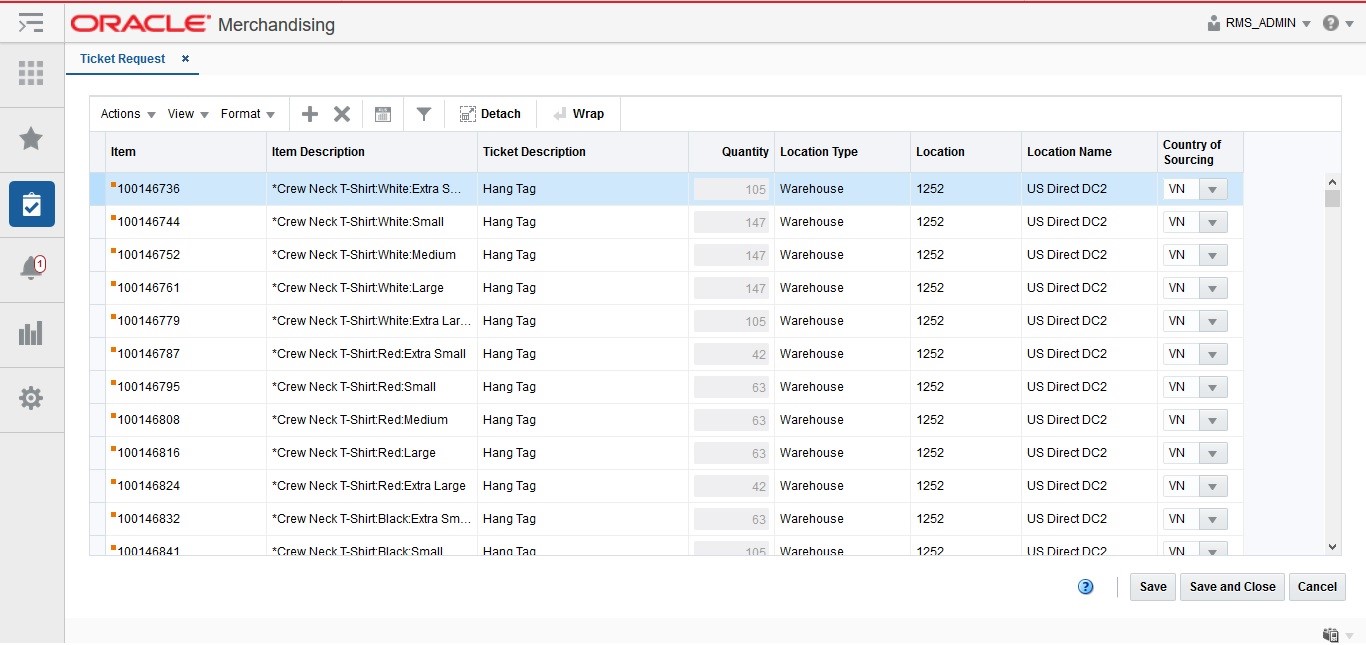
Adding Items
To add items:
-
From the Tasks menu, select Items > Ticket Request. The Ticket Request page appears.
-
From the Actions menu, click Add or click the Add icon
 . The Add Items page appears.
Figure 1-76 Add items Page
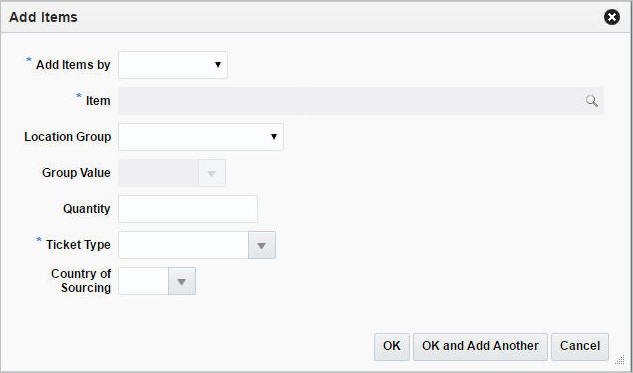
-
In the Add Items By field, select the items from the list. The options are: Single Item, Item List, Purchase Order. This field is a required field.
-
In the Item field, add the item number for which the tickets needs to be generated. This field is a required fiel.d
-
In the Location Group field, select the location group from the list.
-
In the Group Value field, enter the ID of the location group, select or search for the group.
-
In the Quantity field, enter the number of tickets that needs to be generated.
-
In the Ticket Type field, select or search for the ticket type. This field is a required field.
-
Then choose one of the following options.
-
Click OK to add the item to the table and close the page.
-
Click OK and Add Additional to add additional items.
-
Click Cancel to reject all entries and close the page.
-
Manage Product Restrictions
Creating a Product Restriction
The Product Restriction page allows you to create, edit, and copy point of sale (POS) product restriction configurations. With product restriction configurations, you can restrict the sale of items for various reasons. You select the dates on which the configuration is valid at the stores.
To view product restriction:
-
From the Tasks menu, select Items > Create Product Restriction. The Product Restriction page appears
Figure 1-77 Product Restriction Page

-
In the Restriction field, a unique product restriction configuration ID is filled in automatically.
-
In the Restriction Type field, you can create product restrictions for the following restriction types:
-
Food stamp: Customers can use food stamps to purchase the associated items.
-
Minimum age: Customer must be at least a specified age to purchase the associated items. You specify the minimum age.
-
Container deposit: Customers must pay a deposit when purchasing the associated items. You specify the amount of the deposit.
-
Container redemption value: Customers may receive a refund if they return the containers for the associated items. You specify the amount of the refund.
-
Day/time/date: Customers cannot purchase the associated items before or after a specific time, on a specific day of the week, or on a specific date. You can also specify a combination of these time restrictions.
-
Tender type: Customers cannot use a specific type of tender to purchase the associated items.
-
Non-discountable: Customers cannot receive a discount on the associated items.
-
Returnable: Customers cannot return the associated items.
-
Quantity Limit: Customers are limited to a maximum quantity of the associated items that they can purchase in a single sale. You specify the quantity limit.
When you copy a configuration, the basic configuration information, such as product restriction type, are copied into a new configuration and assigned a new ID. However, the associated stores and items are not copied, so you must add stores and items to the new configuration.
-
-
In the Effective Date field, enter the date, or select the calendar button and select a date.
-
The Created field displays the date and timestamp when the product restriction was created.
Managing Product Restrictions
The Manage Product Restrictions option opens the Product Restriction Search page.
Managing product restriction involves performing one or more of the following tasks:
-
Searching for product restriction
-
Creating a product restriction from an existing product restriction
-
Editing a product restriction
-
Viewing a product restriction
You can access the Manage Product Restriction page from the Task Menu, select Items > Manage Product Restrictions. The Product Restriction Search page appears.
The Manage Product Restriction Search page includes the following sections:
-
Search
For more information on the Product Restriction Search page, see the Searching for a Product Restriction section.
Figure 1-78 Search Results Section
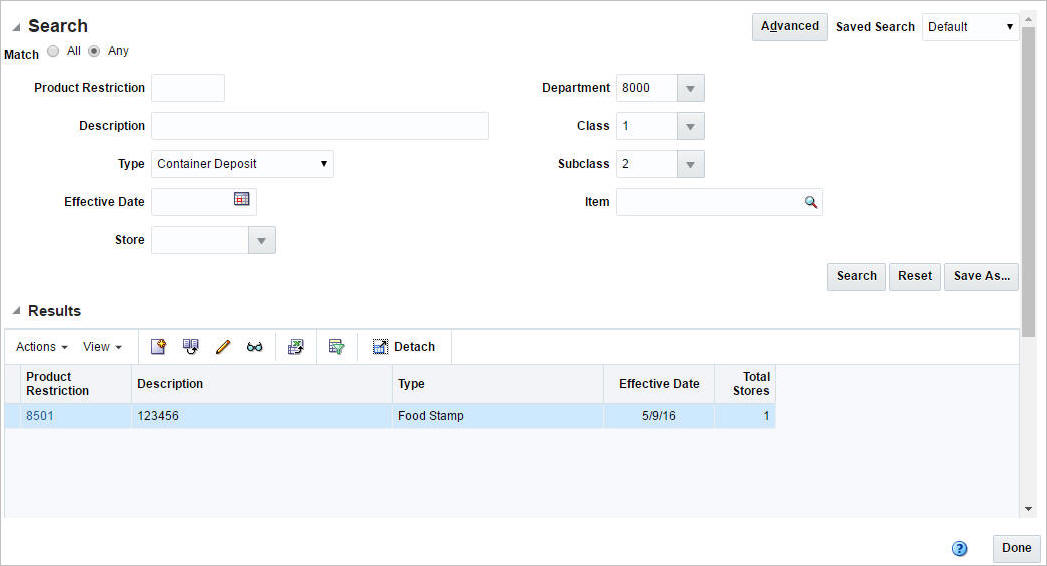
Searching for a Product Restriction
To search for a product restriction:
-
From the Tasks menu, select Items > Manage Product Restrictions. The Product Restriction Search page appears.
-
You can search product restriction by providing search criteria in search section. Criteria can be provided either in Basic or Advanced mode, depending on the requirement.
Basic is the default mode when the search screen is entered. Click Advanced to access the search panel in advanced mode. You can return to Basic mode by clicking Basic.
Searching for a Product Restriction Through the Basic Search Criteria
To search for a product restriction through the basic search criteria:
-
Enter or select one or all of the following basic search criteria.
Table 1-18 Product Restriction - Basic Search Criteria and Description
Fields Description Match option
Check radio button All or Any.
All - only product restrictions matching all entered search criteria are shown.
Any - product restrictions matching any of the entered search criteria are shown.
Product Restriction
Enter the product restriction configuration.
Description
Enter a description for the product restriction configuration.
Type
Select the restriction type.
Effective Date
Enter the date or click the calendar button and select a date.
Store
Enter, select or search for the store.
Department
Enter the department number, select or search for the department name and number from the list.
Class
Enter the class number, select or search for the class name and number from the list.
Sub Class
Enter the subclass number, select or search for the subclass name and number from the list.
Item
Enter the item or search the item by using the search icon.
-
You can also click on the Saved Search drop down to select one of the saved set of search criteria. Selecting a saved search populates the criteria section with saved criteria. If the saved search is selected to run automatically then search will be executed too.
You can also choose to manage and personalize the saved searches by clicking Personalize in the list. The Personalized Saved Searched page appears.
For more information on Personalized Saved Search, see Personalize Saved Search in the Oracle® Retail Merchandising Do the Basics User Guide.
-
Click Search. The product restrictions that match the search criteria are displayed in the Results section.
-
Click Reset to clear the search criteria and results.
-
Click Save.. button to save the current set of search criteria as a Saved Search. The Create Saved Search page appears.
For information on Create Saved Search page, see Create Saved Search in the Oracle® Retail Merchandising Do the Basics User Guide.
-
Click Done to close the page.
Searching for a Product Restriction Through the Advanced Search Criteria
To search product restriction through the advanced search criteria:
-
Enter or select one or all of the following advanced search criteria.
Table 1-19 Product Restriction - Advanced Search Criteria and Description
Fields Description Match option
Check radio button All or Any.
All - only product restrictions matching all entered search criteria are shown.
Any - product restrictions matching any of the entered search criteria are shown.
Product Restriction
Enter the product restriction configuration.
Description
Enter a description for the product restriction configuration.
Type
Select the restriction type.
Effective Date
Enter the effective date for the product restriction or click the calendar button and select a date.
Tender Type
Select the tender type from the list.
Minimum Age
Enter the minimum age for the product restriction.
Store
Enter, select or search for the store.
Department
Enter the department number, select or search for the department name and number from the list.
Class
Enter the class number, select or search for the class name and number from the list.
Sub Class
Enter the subclass number, select or search for the subclass name and number from the list.
Item
Enter the item or search the item by using the search icon.
Figure 1-79 Search Section in Advanced Search Mode

-
To narrow down the search, use the list next to the search fields. For example, determine if the entered value should equal or not equal the search result.
-
Click on the Saved Search list to select one of the saved search criteria. Selecting a saved search populates the search section with the saved search criteria. If the run automatically function is enabled for the search, the search is executed immediately.
You can also personalize your saved searches by selecting Personalize. The Personalize Saved Searches page appears.
For more information about the Personalized Saved Search, see Personalize Saved Search in the Oracle® Retail Merchandising Do the Basics User Guide.
-
Click Search. The product restrictions that match the search criteria are displayed in the Results section.
-
Click Reset to clear the search section and results.
-
Click Save As... to save the current search criteria. The Create Saved Search page appears.
For more information about how to save your search criteria, see Create Saved Search in the Oracle® Retail Merchandising Do the Basics User Guide.
-
Click Add Fields to add more fields for the advanced search. To remove the field from the search, click the x right next to the field.
-
Click Reorder to change the order of the available search fields. The Reorder Search Fields page appears.
-
Select the desired search field and use the up and down arrows to rearrange the order of the fields.
-
Click OK to confirm the new order of the fields and close the page.
-
Click Cancel to reject any changes and close the page.
-
-
Click Done to close the page.
Creating from an Existing Product Restriction
When you copy a configuration, the basic configuration information, such as product restriction type, are copied into a new configuration and assigned a new ID. However, the associated stores and items are not copied, you must add stores and items to the new configuration.
To create from an existing product restriction:
-
From the Tasks menu, select Items > Manage Product Restrictions. The Product Restriction Search page appears.
-
From the Actions menu, select Create from Existing or click the Create from Existing icon
 . The Product Restriction page appears.
-
Figure 1-80 Product Restriction Page in Create from Existing Mode

-
In the Restriction field, enter the restriction ID. A unique product restriction configuration ID is filled in automatically.
-
In the Effective Date field, enter the date or click the calendar button and select a date.
For more information about the Product Restriction page, see the Creating a Product Restriction section.
-
Then choose one of the following options.
-
Click Save to save the product restriction.
-
Click Save and Close to save the product restriction and close the page.
-
Click Cancel to reject all entries and close the page.
-
Editing Product Restriction
To edit product restriction:
-
From the Tasks menu, select Items > Manage Product Restrictions. The Product Restriction Search page appears.
-
Select the product restriction you want to edit.
-
From the Actions menu, select Edit or click the Edit icon.
 . The Product Restriction page appears.
Figure 1-81 Product Restriction Page in Edit Mode

-
Make the necessary changes and click Save to save the changes.
For more information about the Product Restriction page, see the Creating a Product Restriction section.
-
Then choose one of the following options.
-
Click Save to save the product restriction.
-
Click Save and Close to save the product restriction and close the page.
-
Click Cancel to reject all entries and close the page.
-
Upload/Download Items from a Spreadsheet
Merchandising supports downloading of items into a spreadsheet to allow you to enrich or perform mass maintenance on the item data. This data can be re-uploaded into a staging area for sequential enrichment or uploaded into Merchandising. New items can also be created through the upload flow. This section summarizes the workflow for both download and upload of item data.
Note:
For more detail on the templates available and the template specific validations refer to the Oracle® Retail Merchandising System Item Induction Overview White Paper Release 16.0 in the Oracle Retail Merchandising Functional Library (Doc ID 1585843.1) on My Oracle Support.
Download from Staging
You can download items either from the staging area or from Merchandising depending on the nature of updates you intend to make. Typically items are downloaded from the staging areas for purposes of enrichment or to correct for errors from an earlier upload. The data set to be downloaded can be selected using the filter criteria, similar to that used in the Item Search function in Merchandising. Alternately, you can also select all data that was part of an earlier upload or download request by selecting the process ID that uniquely identifies the request.
Figure 1-82 Item Download from Staging Page
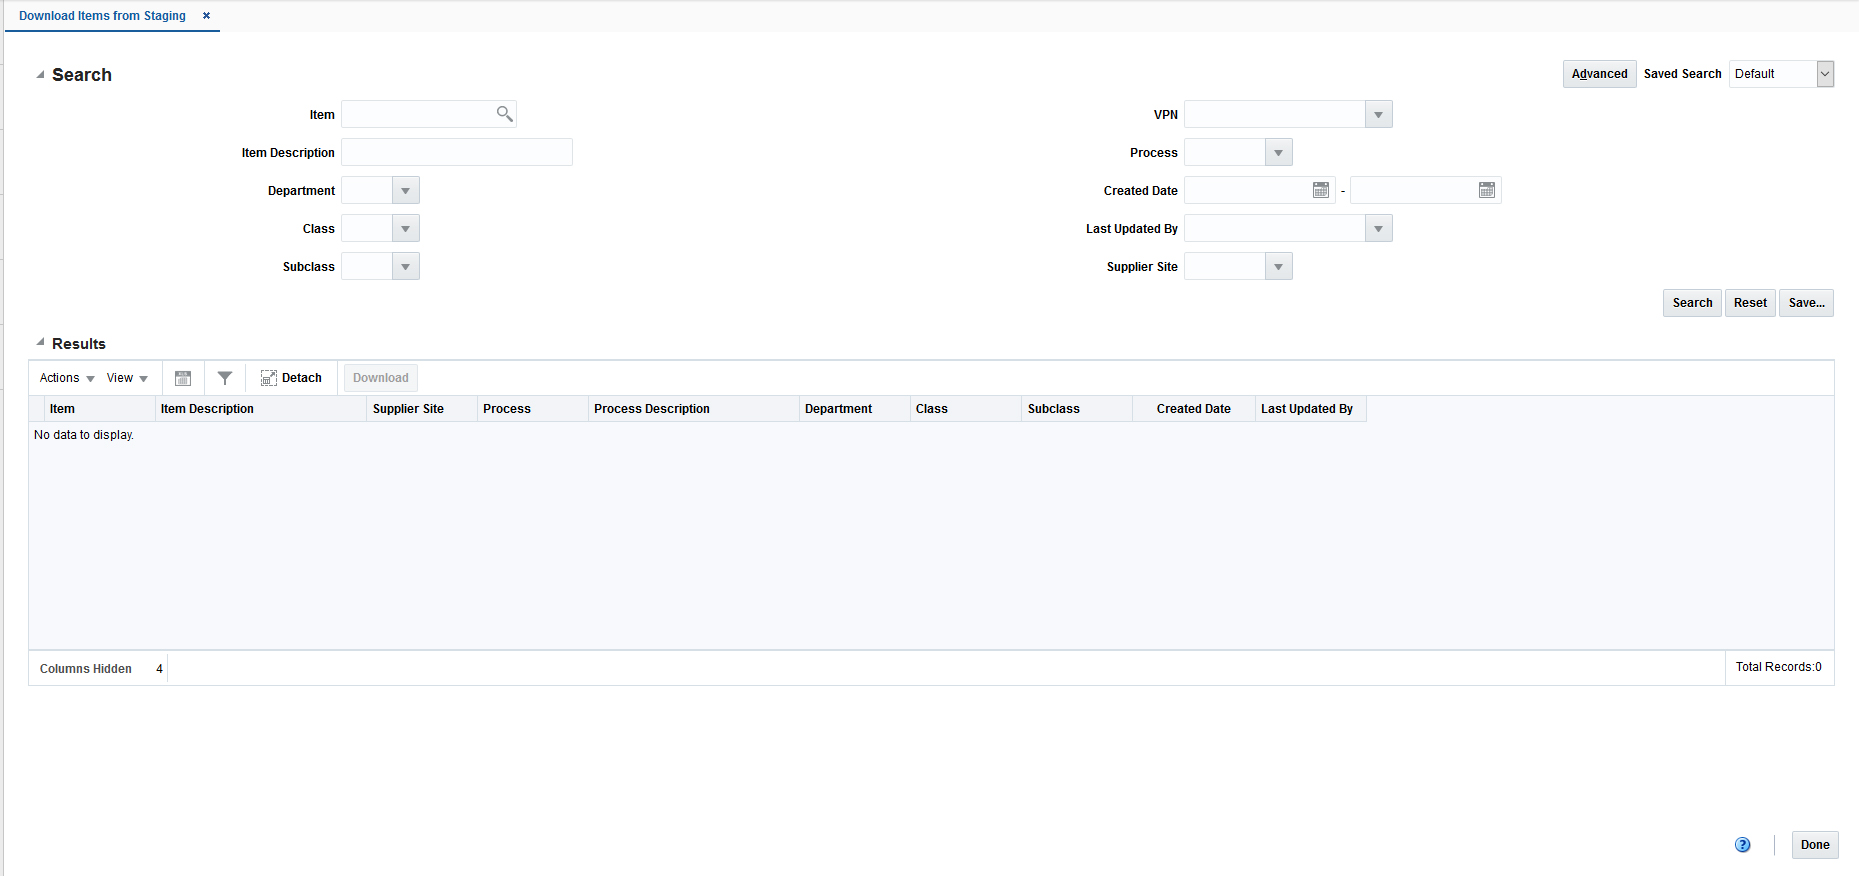
-
From the Tasks menu, select Items> Download from Staging. The Item Download from Staging page appears.
-
Search for the items you want to download according to basic or advanced search criteria. The search results are shown in the Result section.
For more details regards the basic and advanced search function in Merchandising, see Searching for a Deal Through the Basic Search Criteria and Searching for a Deal Through the Advanced Search Criteria in the Oracle® Retail Merchandising Do the Basics User Guide.
-
To download all items displayed in the Result section, select Actions > Download, or use the Download button. The Download page appears.
Figure 1-83 Download from Staging Page

-
In the Template field, select the template you want to download. This field is a required field.
-
The Process Description field displays the default process name with the date and timestamp. You can edit the name of the download process in this field. This field is a required field.
-
Then choose one of the following options.
-
Click OK to open the spreadsheet with the selected items on your desktop.
-
Click Cancel to reject all entries and close the page.
-
-
Click Done to close the Item Download from Staging page.
Upload from Staging
Data currently available in the staging area can be uploaded into Merchandising. This is typically for cases wherein multiple levels of enrichment have been carried out in the staging area before the upload.
Figure 1-84 Item Upload from Staging
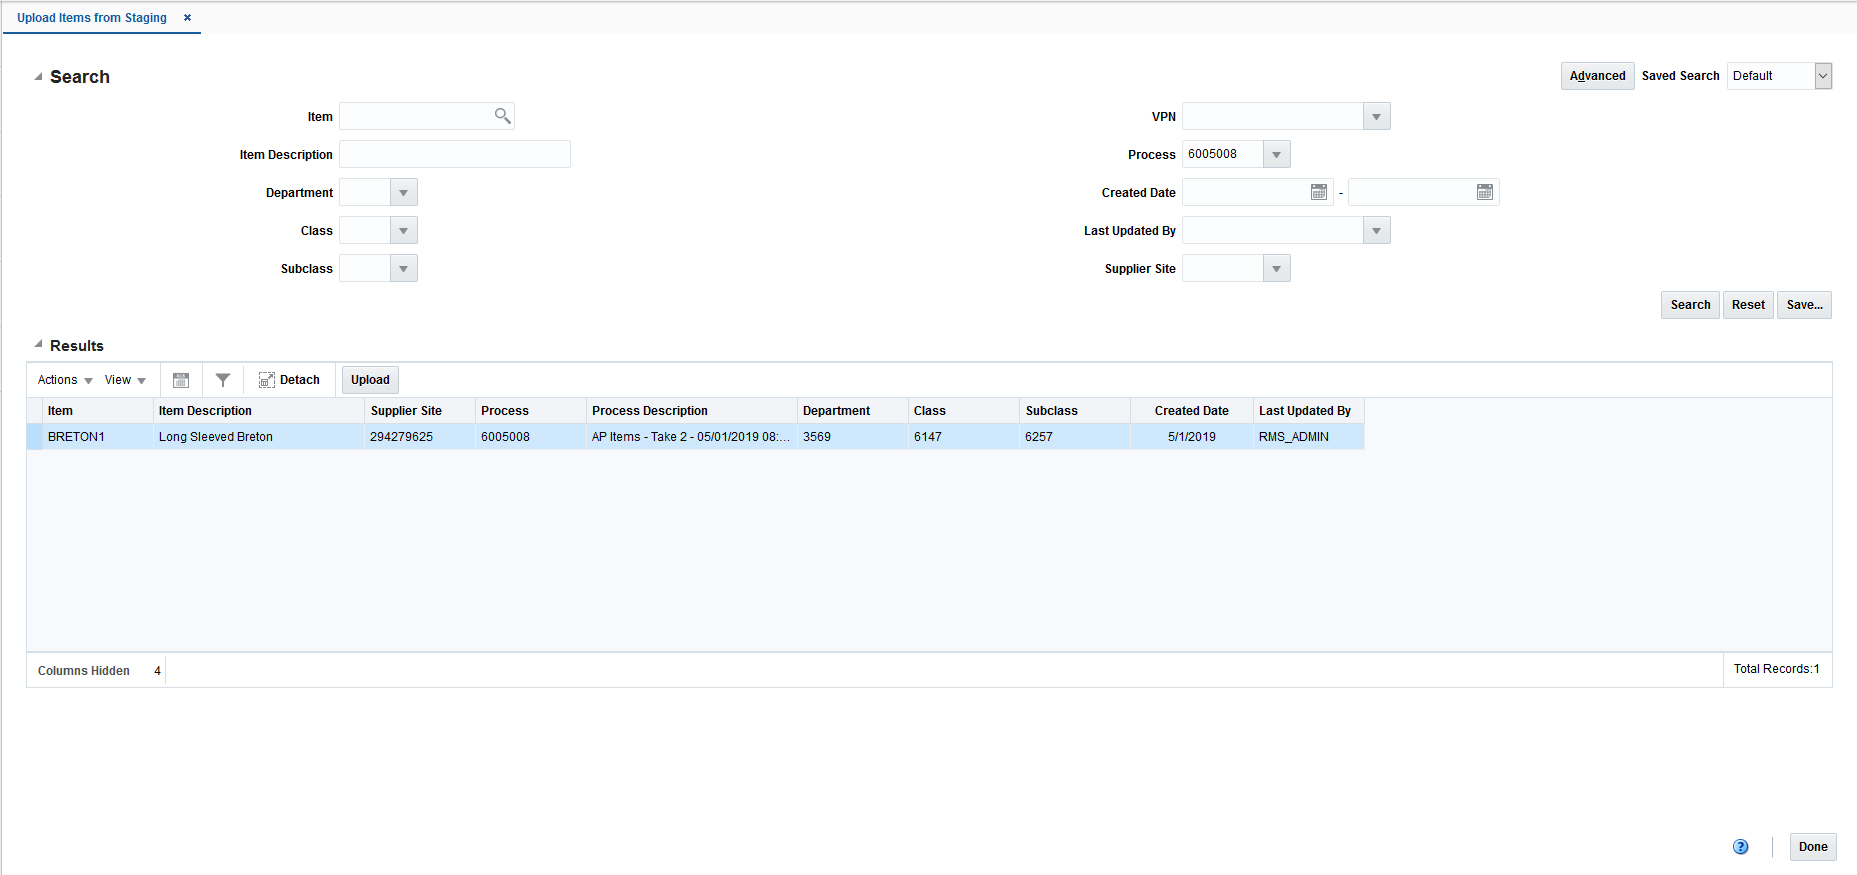
-
From the Tasks menu, select Items > Upload from Staging. The Item Upload from Staging page appears.
-
Search for the items you want to upload according to basic or advanced search criteria. The search results are shown in the Result section
For more details regards the basic and advanced search function in Merchandising, see Searching for a Deal Through the Basic Search Criteria and Searching for a Deal Through the Advanced Search Criteria in the Oracle® Retail Merchandising Do the Basics User Guide.
-
To upload all items displayed in the Result section, select Actions > Upload, or use the Upload button. The Upload page appears.
Figure 1-85 Upload from Staging Page

-
In the Template field, select the template you want to upload to Merchandising.
-
The Process Description field displays the default process name with the date and timestamp. You can edit the name of the upload process in this field.
-
Then choose one of the following options.
-
Click OK to upload the items to Merchandising. The Result section is cleared.
-
Click Cancel to cancel the upload and close the Upload page.
-
-
Click Done to close the Item Upload from Staging page.
Download from Merchandising
Similarly data can be downloaded from Merchandising. Item data is typically downloaded for purposes of mass updates, workflow changes or reporting considerations.
Figure 1-86 Item Download from Merchandising
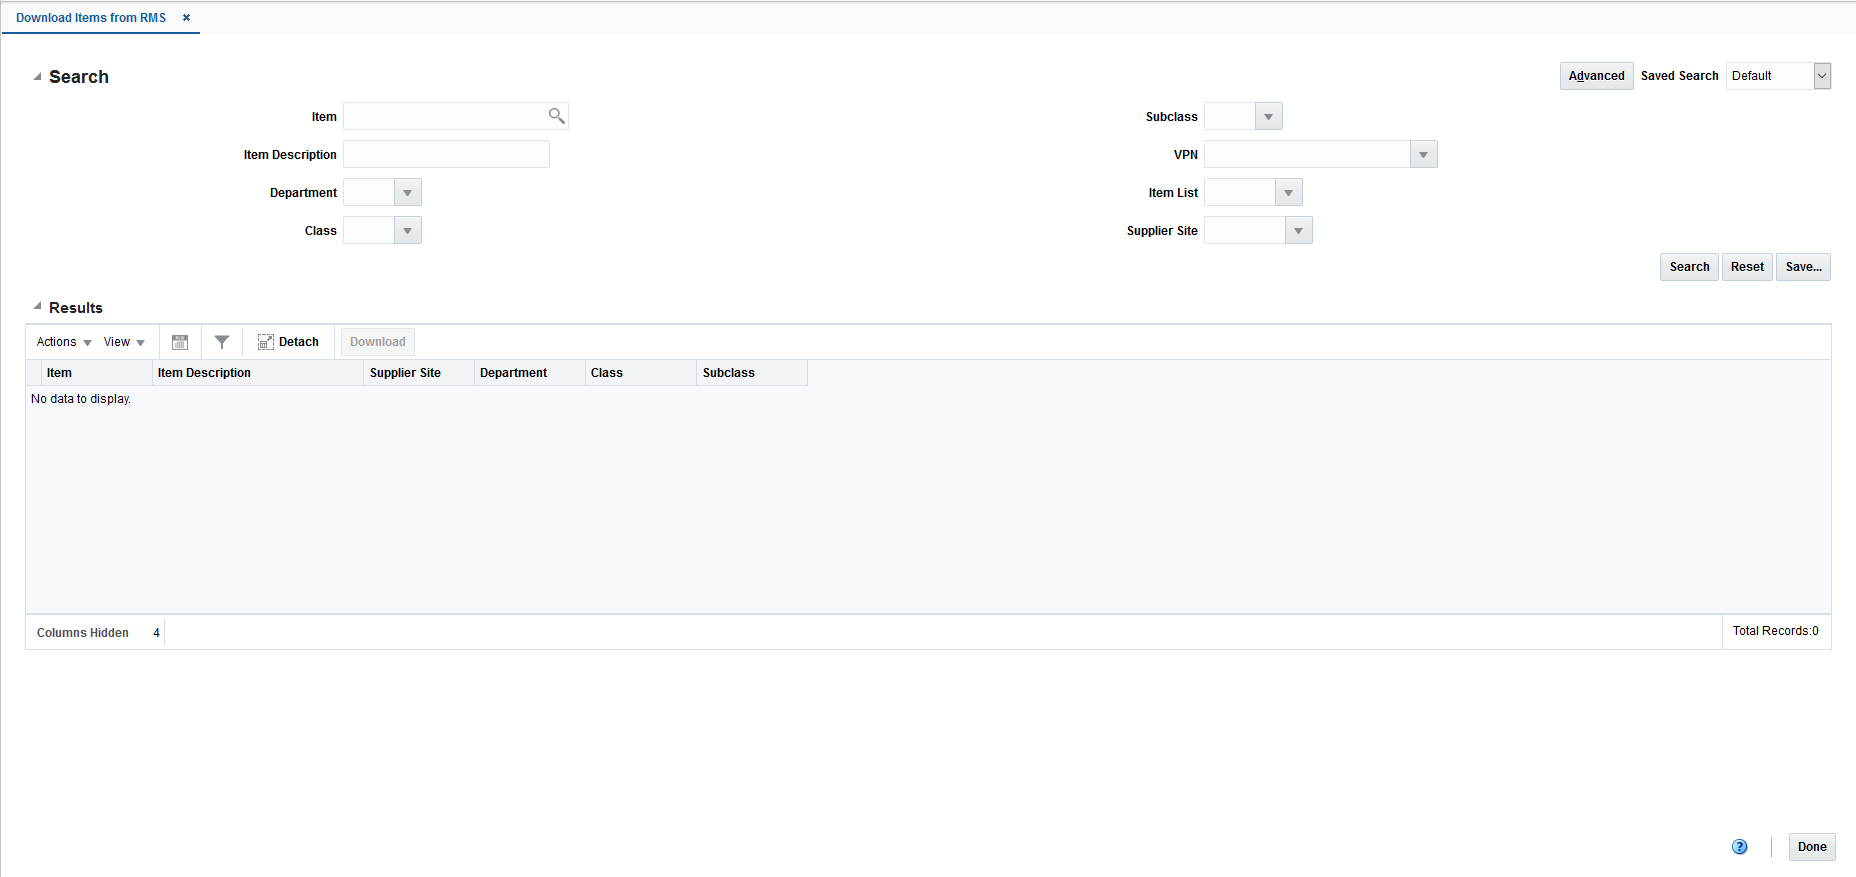
In addition to download of item data, you can also download blank templates in a specified template format that carry just the worksheets and column headers without any data. Such templates are generally used for creating new items manually. Blank Templates can be downloaded from by navigating to Foundation Data > Data Loading > Download Blank Template. You need to select the Type as Items and one of the Templates from the list available before opting to download the template. See Download Blank Templates in the Oracle Retail Merchandising Foundation Cloud Service Do the Basics User Guide.
-
From the Tasks menu, select Items> Download Items from Merchandising. The Item Download from Merchandising page appears.
-
Search for the items you want to download according to basic or advanced search criteria. The search results are shown in the Result section.
For more details regards the basic and advanced search function in Merchandising, see Searching for a Deal Through the Basic Search Criteria and Searching for a Deal Through the Advanced Search Criteria in the Oracle® Retail Merchandising Do the Basics User Guide.
-
To download all items displayed in the Result section, select Actions > Download, or use the Download button. The Download page appears.
Figure 1-87 Download from Merchandising Page

-
In the Template field, select the template you want to download. This field is a required field.
-
The Process Description field displays the default process name with the date and timestamp. You can edit the name of the download process in this field. This field is a required field.
-
Then choose one of the following options.
-
Click OK to open the spreadsheet with the selected items on your desktop.
-
Click Cancel to reject all entries and close the page.
-
-
Click Done to close the Item Download from Merchandising page.
Upload from a File
Once enrichment or updates have been carried out to downloaded data, you can upload the spreadsheet to have your updates applied in Merchandising or to update the staged item data.
Figure 1-88 Item Upload from File Page
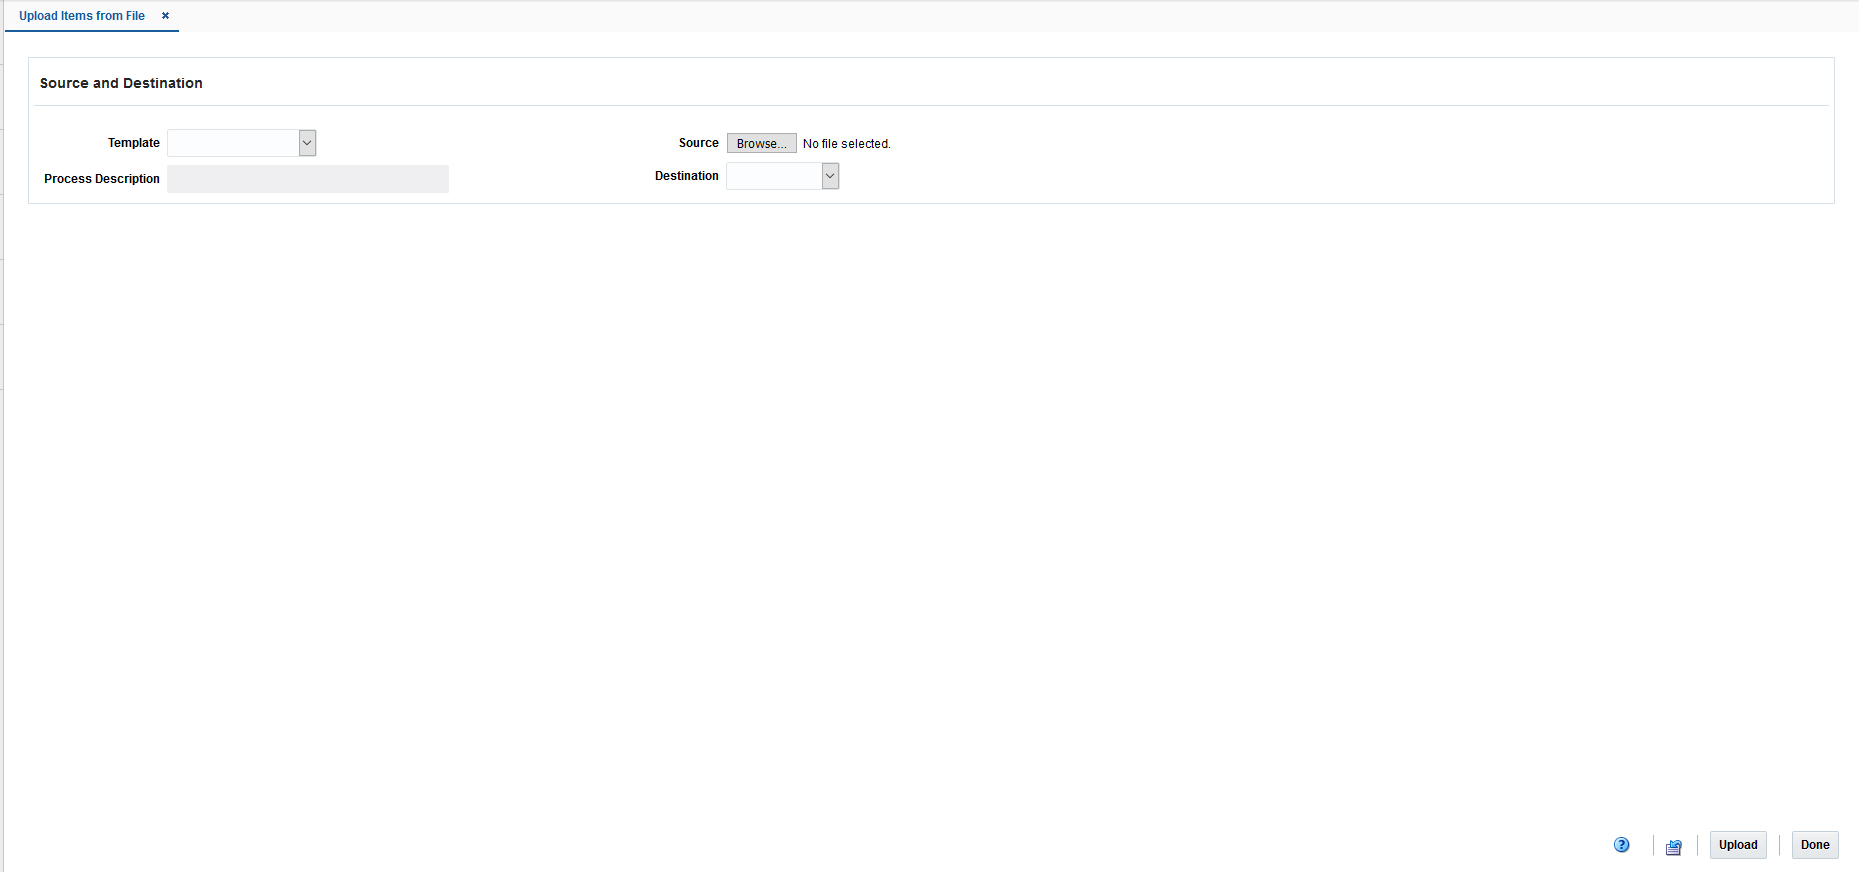
-
From the Tasks menu, select Items > Upload from File. The Item Upload from File page appears.
-
In the Template field, select the template you want to upload to Merchandising tables or Staging tables.
-
The Process Description field displays the default process name with the date and timestamp. You can edit the name of the upload process in this field.
-
In the Source field, click the Browse button to upload the file.
-
In the Destination field, choose either Merchandising Tables or Staging Tables from the list.
-
Then choose one of the following options:
-
Click Upload to upload the file to Merchandising Tables or Staging Tables.
-
Click Revert to undo any changes.
-
-
Click Done to close the Item Upload from File page.
Update Staged Diffs
The Staged Diffs page allows you to add diff to parent items which are either present in Merchandising or in stating.
-
From the Tasks menu, select Items > Update Staged Diffs. The Staged Diffs page appears.
Figure 1-89 Staged Diffs Page

-
In the Item Parent field, enter or search for the item parent.
-
In the VPN field, enter or search for the VPN number.
-
Click Display Diffs. The sections Item Parent Differentiators, Differentiators and Pending Child Items appear.
Figure 1-90 Sections Staged Diffs Page
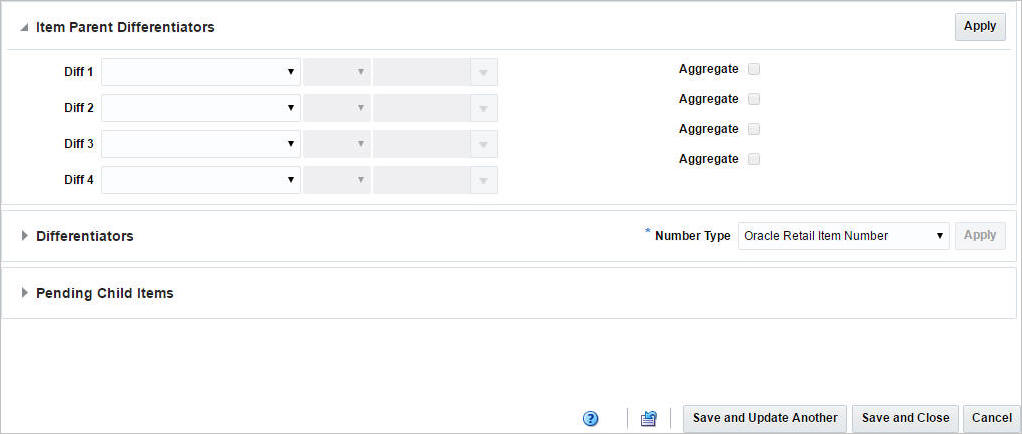
Item Parent Differentiators
There are four differentiator fields in the Item Parent Differentiators section and each field will look for a different Diff Group ID or Diff ID. You need to manually select the value from the existing set of diff groups present in Merchandising using the diff values as a basis for the selection, or the Diff Group IDs or Diff IDs which are present in the staging table for the item parent. Specifying a diff group field or a diff value is mandatory to proceed with diff ID selection.
For a given Diff Group, the User Diff Value field will be populated with all Diff value variations available in the staging area for the parent item selected.
The Aggregate check box can be selected for three of the four diff groups specified. If any of the diff groups has the aggregate checkbox set, then the aggregate indicator flag should be set for the parent item during finalization.
The Diff ID and Diff Description are populated by the system, if the DIFF_VALUE populated in the result row exactly matches the description of any Diff ID present in Merchandising under the corresponding diff group. The user can also remap a Diff value to a different Diff ID.
Click Apply. The Differentiator tables are displayed in the Differentiator section.
Differentiators
In the Differentiator section there are four possible tables listing all the differentiators, one for each Differentiator Group or ID.
Differentiators - Actions Menu and Icons
Use the Actions Menu and icons to apply actions to the table. You can perform the actions listed below.
Table 1-20 Differentiators - Actions Menu/Icons and Description
| Actions Menu/Icons | Description |
|---|---|
|
Add and Add icon |
You can add differentiators by clicking Add from the Actions menu or by clicking the Add icon For more information on adding a differentiator, see the Adding Differentiators section. |
|
Edit and Edit icon |
You can edit a differentiator by clicking Edit from the Actions menu or by clicking the Edit icon For more information on editing a differentiator, see the Editing Differentiators section. |
|
Delete and Delete icon |
You can delete a differentiator:
|
Differentiators - View Menu
You can customize the view of the table by using the options in the View Menu.
Table 1-21 Differentiators - View Menu and Description
| View Menu | Description |
|---|---|
|
Columns |
You can manage which of the columns will be shown in the table by clicking Show All and Manage Columns options. |
|
Sort |
You can sort columns by the following options:
|
|
Reorder Columns |
You can reorder columns by clicking the Reorder Columns option. |
Adding Differentiators
To add differentiators:
-
From the Actions menu, click Add or click the Add icon
 . The Add Differentiators page appears.
Figure 1-91 Add Differentiator Page

-
In the Diff field, enter, select or search for a diff. This field is a required field.
-
Then choose one of the following options.
-
Click OK to add the diff to the table and close the page.
-
Click OK and Add Another add additional diffs to the table.
-
Click Cancel to reject all entries and return to the Staged Diff Page.
-
-
In the Differentiator section, select diffs in the tables.
-
The number type is displayed by default.
The field defaults to the parent item's number type if no other children exist in Merchandising. If the parent item already exists in Merchandising with one or more children, the number type is set to the number type of the child items and is disabled. If the item parent is from Staging, then the number type defaults to the item parent's number type, but can be edited.
-
Click Apply. The Pending Child Items section expands and displays the child items in the table, based on the diffs that have selected in the diffs table.
Editing Differentiators
To edit differentiator:
-
Select the differentiator you want to edit in one of the diff tables.
-
From the Actions menu, click Edit or click the Edit icon
 . The Edit Differentiator page appears.
-
Edit the enabled fields as necessary.
-
Then choose one of the following options.
-
Click OK to save the changes and close the page.
-
Click Cancel to reject all entries and close the page.
-
Pending Child Items
The Pending Child Items table shows the child items that can be created using the selected Diffs.
You can edit the Description column directly in the table.
Pending Child Items - Actions Menu and Icons
Use the Actions Menu and icons to apply actions to the table. You can perform the actions listed below.
Table 1-22 Pending Child Items - Actions Menu/Icons and Description
| Actions Menu/Icons | Description |
|---|---|
|
Edit and Edit icon |
Select Actions > Edit or use the Edit icon For more information about how to edit a pending child item, see the Editing Pending Child Items section. |
|
Delete and Delete icon |
You can delete a pending child item:
|
|
Export to Excel and Export to Excel icon |
You can export the records in the table to a Microsoft Excel spreadsheet by selecting Actions > Export to Excel or by using the Export to Excel icon |
|
Wrap icon |
You can wrap the values in the table column by first clicking the column on which you would like the text to wrap and then using the Wrap icon |
Pending Child Items - View Menu and Icons
You can customize the view of the table by using the options in the View Menu.
Table 1-23 Pending Child Items - View Menu/Icons and Description
| View Menu/Icons | Description |
|---|---|
|
Columns |
You can manage which of the columns will be shown in the table by clicking the Show All and Manage Columns options. |
|
Detach and Detach icon |
You can view the tables in the application in a separate page by clicking Detach or by using the Detach icon |
|
Sort |
You can sort columns by the following options:
|
|
Reorder Columns |
You can reorder columns by clicking the Reorder Columns option. |
|
Query by Example and Query by Example icon |
You can filter the items by one or multiple column values by clicking the Query by Example option or by using the Query by Example icon |
Editing Pending Child Items
To edit pending child items, follow the steps below.
-
In the Pending Child Items section, select a record in the table.
-
Then select Actions > Edit, or use the Edit icon
 . The Edit Child Item page appears. The data of the selected child item is displayed.
-
If you edit a Variable Weight PLU, the format and prefix values are displayed.
-
Edit fields, as necessary.
Note:
You can edit the description also directly in the table.
If you edit an item with the item type number EAN/UCC-13, you can automatically generate the EAN number by clicking Generate button.
-
Then choose one of the following options.
-
Click OK to add your changes to the table and close the page.
-
Click OK and Edit Next to edit the next child item in the table.
-
Click Cancel to reject your entries and close the page.
-
View Issues
For downloads that occur in the background or uploads, you will receive a notification when the processing is complete. The notification will specify whether the process was executed successfully or not. Clicking on the link in the notification will take you to the Data Loading Status page in order to see the details. Alternatively, this page can be accessed by navigating to the Data Loading -> Review Status option in the task list. This task flow opens up the Data Loading status page, which lists the status of each upload/download request. Requests that were processed successfully will have their status set to Processed Successfully. Requests that were not processed successfully will have their status set to either Processed with Errors or Processed with Warnings. For such requests, you can access the View Issues page by clicking on the View Issues button to review details of the errors or warnings associated with a selected upload or download request. See View Data Loading Status.
Figure 1-92 Item Issues Page
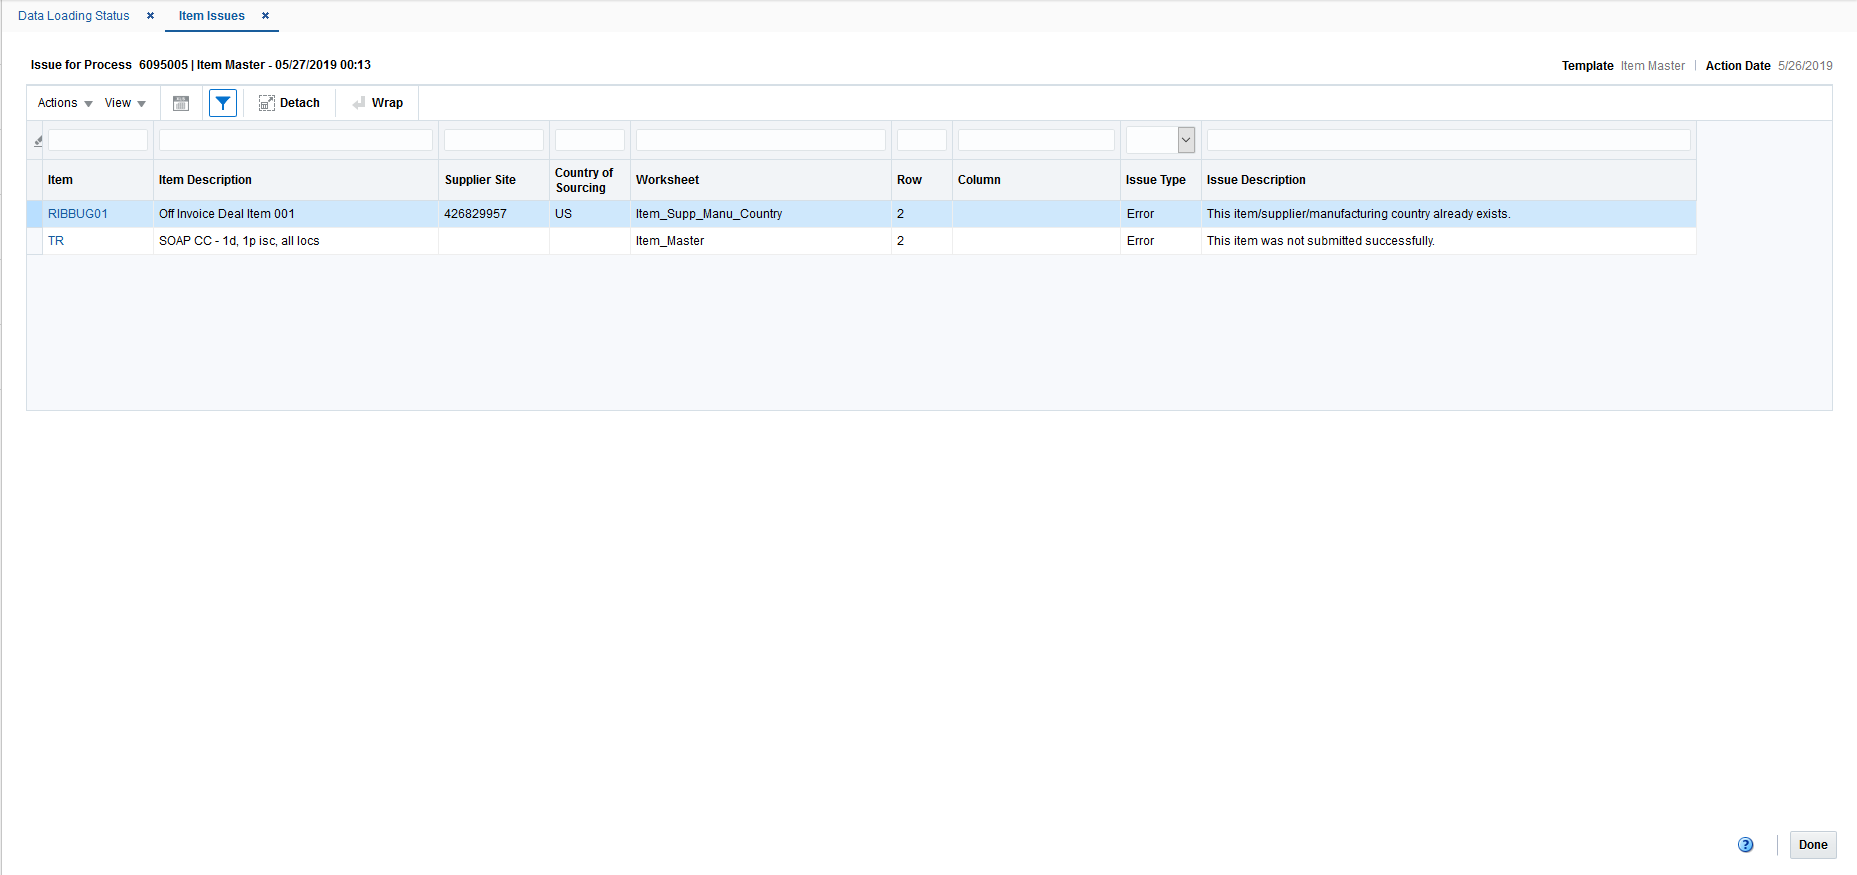
The details provided typically include the worksheet in which the error is encountered, the row and column in the spreadsheet that is in error, and the error description. If the errors involved supplier or supplier/country data in the upload, then the table will display those additional details. Issues that are flagged as errors will need to be fixed in order to successfully create or update the item in Merchandising. Issues that are warnings can be ignored, but may also require updates to data depending on the warning.
Errors in download processing are typically due to the inability to access the data or insufficient privileges to create and write to the specified location. These errors can be resolved by removing any constraints that might have placed a lock on the data or ensuring that any constraints on creation of the spreadsheet are relaxed.
Errors in upload request processing are typically data related and likely require data correction. The users can use the error details in the View Issues screen as a guide to make corrections to the originally uploaded spreadsheet or download a new version through the Data Loading Status screen. If using this method, a worksheet containing a list of errors associated with the data set will be included as a separate tab in the downloaded spreadsheet to serve as an offline reference for carrying out the corrections. Once the errors have been corrected, the data can be re-uploaded into the staging area or Merchandising as needed, using the corrected file.