Temporary Stores
There are two types of temporary stores:
-
Extension Stores - uses the same store number as the brick and mortar store (physical store). The store is extended to a remote location such as in a mall. Stock and sales are associated with the parent store. Only Extension Store requests can be created/maintained in Xstore POS.
-
Event Stores - unique store number with no affiliation to an actual brick and mortar store. Also referred to as a standalone popup store. Store operates completely standalone, reporting its own sales and handles own inventory. Event Stores can only be created in Xadmin. See Oracle Retail Xstore Office User Guide for more information.
The following topics are covered in this section:
Requesting a Temporary Store
To request a mobile server for specific dates or for an indefinite amount of time to host a temporary store.
-
Select System Admin from the Main Menu.
-
Click Temporary Store in the System Admin menu. A list of requests for that store within the last year is displayed. View-only information shows the status of the request, the assigned server and any notes added to the event.
The status can be:
-
Submitted
-
Approved
-
Rejected (rejected by the Home Office)
-
Cancelled (cancelled by Xstore user)
You can only cancel a request that is in Submitted or Approved status. See Cancel a Temporary Store Request.
-
-
Select an event to open or select New to create a new request for an extension type temporary store.
To create a new request:-
Enter description, start date, and an end date.
-
If it is an indefinite request no end date is required. Select the check box for Indefinite Use?
-
Select Use Store Tax Location? if required. If left unchecked, you are prompted for the tax location each time a register is opened.
-
-
Select Process. After the request has been submitted there is no option to update the request. It has to be cancelled if not required.
A message is shown in the Message Tab to alert you when the status of a temporary store request for a mobile server for has changed.
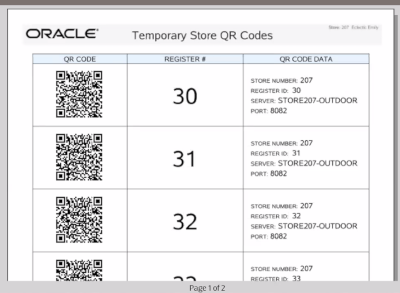
Once approved, you can generate a report to show QR codes. The QR code can be scanned to quickly set up mobile devices that will be used at the temporary store.
View/Print QR Codes
When a temporary store request has been approved by the home office, you can access the QR codes for setting up mobile devices to be used at the temporary store.
To view/print QR codes:
-
Select System Admin from the Main Menu.
-
Click Temporary Store in the System Admin menu. A list of requests for that store within the last year is displayed.
-
Select an Approved request.
-
Select View/Print QR Codes.
Figure 24-10 Temporary Store QR Codes

-
A Register Range screen appears. Enter the register range to print the QR Codes
Cancel a Temporary Store Request
You can only cancel a request that is in Submitted or Approved status.
To cancel a request for a temporary store:
-
Select System Admin from the Main Menu.
-
Click Temporary Store in the System Admin menu. A list of requests for that store within the last year is displayed. View-only information shows the status of the request.
-
Select an event to open.
-
Select Cancel Request.
-
Select Yes to confirm the cancellation.
The request is changed to Cancelled status.