Touch-Screen Functions
The following sections explain how to navigate with a touchscreen or keyboard.
Touch-Screen Navigation
Oracle Retail Xstore Point of Service uses multi-touch gesture navigation throughout to allow for full touch-screen transactions.
Note:
Touch-screen navigation is configurable by your corporate office; all features may not be activated on your system.
Sale Screen Touch-Screen Navigation
The Sale screen contains the following touch components.
Figure 2-1 Sales Screen Touch-Screen Navigation
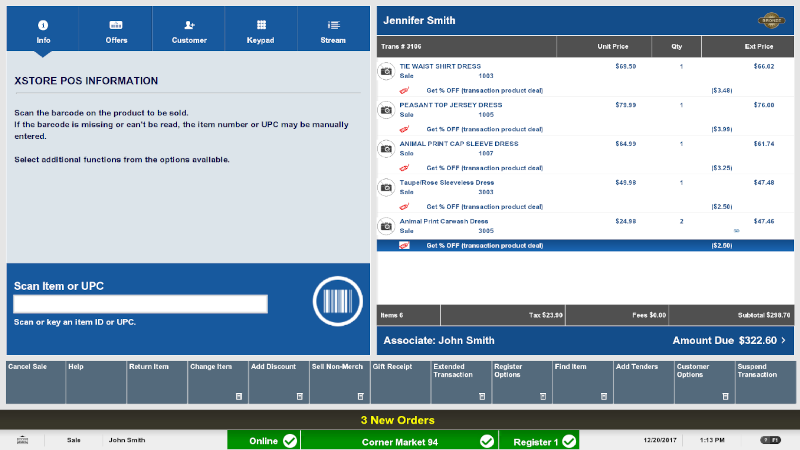
Table 2-2 Touch-Screen Actions
| Touch-Screen Action | Description |
|---|---|
|
Tap Customer Loyalty Banner |
If no customer is attached, Oracle Retail Xstore Point of Service invokes the add-customer process. If a customer has been assigned to the transaction, Oracle Retail Xstore Point of Service opens the customer maintenance screen. |
|
Swipe Customer Loyalty Banner |
Swiping from left to right opens a prompt to remove the assigned customer. |
|
Tap Bar Code Graphic |
Invokes the find item feature. Oracle Retail Xstore Point of Service Base is set to open the item matrix. |
|
Tap Item ID |
Displays item information. |
|
Tap item quantity |
Invokes the change quantity process. This displays the numeric keypad. |
|
Swipe Item |
Swiping from left to right opens a prompt to void the item. |
|
Tap Unit Price |
Invokes the change price process. This displays the numeric keypad. |
|
Tap Associate Area |
Invokes the change commissioned associate process (with an item selected) |
|
Tap Amount Due |
Invokes Add Tenders. |
Customer Maintenance Touch-Screen Navigation
The following touch-screen components are available in the Customer Maintenance screen:
Contact Information Tab
The Customer Maintenance tab has the following touch-screen elements:
Figure 2-2 Customer Maintenance Touch-Screen Navigation
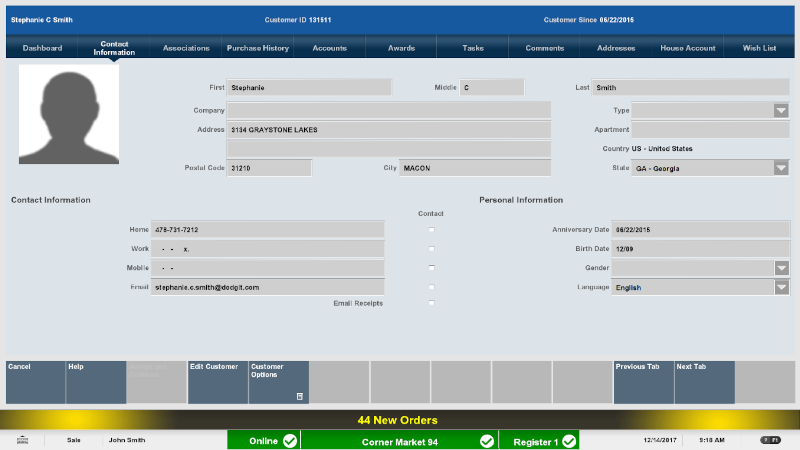
Table 2-3 Customer Maintenance Touch-Screen Navigation
| Touch-Screen Action | Description |
|---|---|
|
Tap Header |
Tap the Customer Header to return to the previous screen while in a transaction. |
|
Swipe Form |
Swipe from left to right in the form area to open editing mode. |
Purchase History Tab
The Purchase History tab has the following touch-screen elements:
Figure 2-3 Purchase History Tab Touch-Screen Navigation
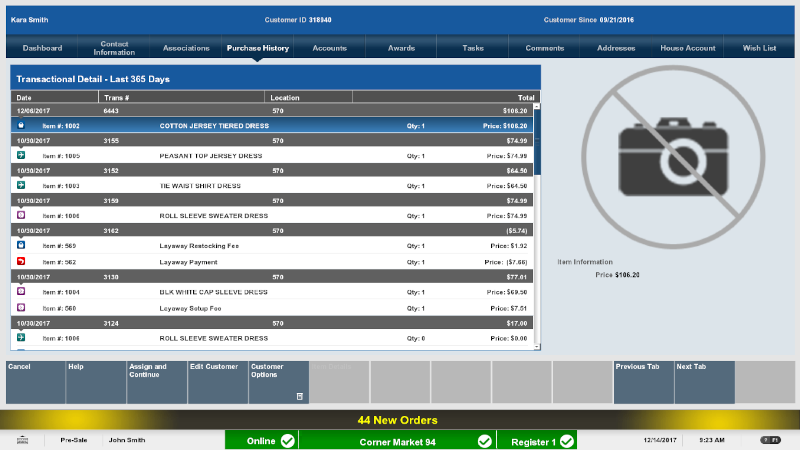
Table 2-4 Purchase History Tab Touch-Screen Navigation
| Touch-Screen Action | Description |
|---|---|
|
Swipe Transaction Detail Header |
Swipe from right to left in the Transaction Detail Header to collapse the history display. |
|
Swipe Transaction Detail Header |
Swipe from left to right in the Transaction Detail Header to open the history display. |
|
Tap Transaction Header |
Tap one Transaction Header to collapse the selected transaction. |
|
Tap Transaction Header |
Tap a collapsed Transaction Header to open the selected transaction. |
|
Tab Item |
Tap a specific item and the INFO tab to display the item detail. |
Virtual Keyboard
Figure 2-4 Virtual Keyboard
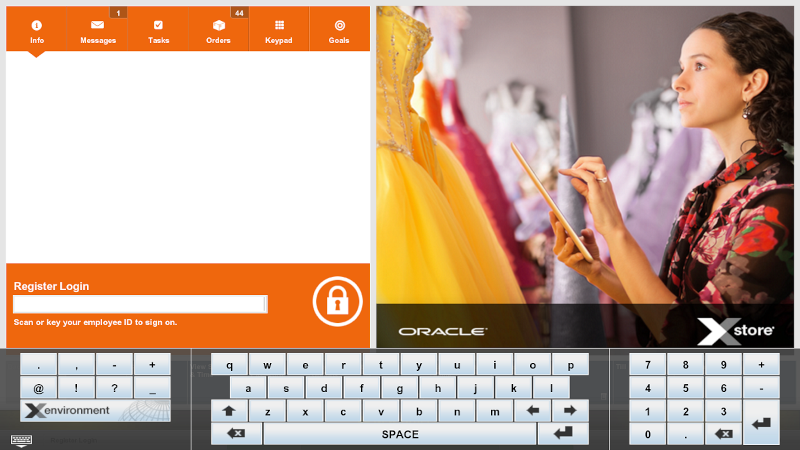
The following table describes how to use the virtual keyboard:
Table 2-5 Virtual Keyboard Navigation
| Function | Navigation |
|---|---|
|
Launch virtual keyboard |
Do one of the following:
|
|
Switch virtual keyboard layouts |
If your store has multiple keyboards configured, swipe left or right to select a different keyboard. |
|
Data entry |
Tap keyboard keys to enter information into a field. |
|
Close virtual keyboard |
Do one of the following:
|
|
Switch to Xenvironment |
Tap the Xenvironment button on the
keyboard to open Xenvironment.
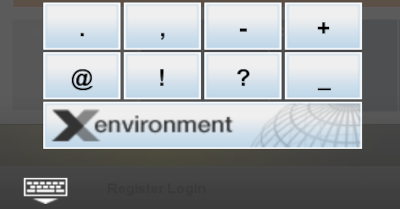 To return to Oracle Retail Xstore Point of Service, tap
or click the Start POS button.
 |
Active Keyboard Keys
Use the following guidelines to navigate through the Oracle Retail Xstore Point of Service system:
Table 2-6 Active Keyboard Keys
| Key | Description |
|---|---|
|
arrows |
Use the up and down arrow keys to browse through list boxes. |
|
Enter |
Press Enter to select OK at any prompt that includes OK (Enter) as an option. Also press Enter in active list boxes to select the highlighted option. |
|
Esc |
Press Esc to exit any prompt that has Back or Cancel as an option. You can also press Esc to exit the current menu and return to the previous menu. In either case, if changes were made that were not saved, you must verify that you want to exit without saving your changes. |
|
Function keys |
On each Oracle Retail Xstore Point of Service window, the F1 through F12 function keys correspond to the menu options. Press the function key that corresponds to the option to choose it. |
|
Home/End |
Use these keys to jump to the top (Home) or bottom (End) of the current page of a report that you are viewing. |
|
Plus (+)/Minus(-) |
Use these two keys to increase (+) or decrease (-) the on-screen magnification level of a report that you are viewing. |
|
Shift+Tab |
Press Shift+Tab to move to the previous list box on an Oracle Retail Xstore Point of Service window. When the first list box is reached, press Shift+Tab to activate the last list box on the window. |
|
Tab |
Press Tab to move from the first list box to the next list box on the window. When the last list box is reached, press Tab to activate the first list box on the window. |
|
Spacebar |
Press Spacebar to select items in multiple-select lists. |
|
Ctrl+Tab |
Press Ctrl+Tab to access the Information, Coupon, Task, Message, Sales Goals, and Associated Items tabs and move one tab forward on the Register Login screen and the Back Office Login screen. |
|
Ctrl+Shift+Tab |
Press Ctrl+Shift+Tab to access the Information, Coupon, Task, Message, Sales Goals, and Associated Items tabs and move one tab backward on the Register Login screen and the Back Office screen. |