5 Self Checkout Console
The Self Checkout Console allows associates to oversee all Self Checkout registers in a store from a web browser and provides the ability to open, close, activate, or deactivate single or multiple Self Checkout registers at a time. Additionally, individual registers can be halted in the event of suspicious or problematic activity. The Self Checkout Console also alerts associates of any Self Checkout registers needing associate assistance or experiencing hardware errors. The Self Checkout management features available in the Self Checkout Console are also available in the Store Console. In addition to supporting Self Checkout registers, the Store Console provides centralized management for traditional point-of-sale registers; however, some Self Checkout-specific functions are not applicable to traditional registers.
For more information about the Store Console, see the Xstore Point of Service User Guide. Self Checkout Console functions, such as Activate, Close, and Pause, are available for SCO registers in the Store Console.
The Self Checkout Console includes the following:
Self Checkout Console Overview
The Self Checkout Console includes the following areas:
Self Checkout Console Login
The Self Checkout Console uses the Xstore permissions. An associate may have access to the console but not necessarily all of the actions. All logged in users will have the ability to Pause a register from the console.
To gain access to the Self Checkout Console functions, login is required.
-
Select Associate Login.
Figure 5-1 Associate Login

-
Scan your badge or enter your Employee ID.
-
Enter your Password.
-
Select Login. The Self Checkout Console appears.
-
Shared Device - Shared Device mode controls how approval prompts behave after login.
-
Enabled: each security-sensitive action requires credential entry.
-
Disabled: the system uses the signed-in user’s credentials automatically. If that user lacks permission, the action is denied and no alternate user prompt is shown.
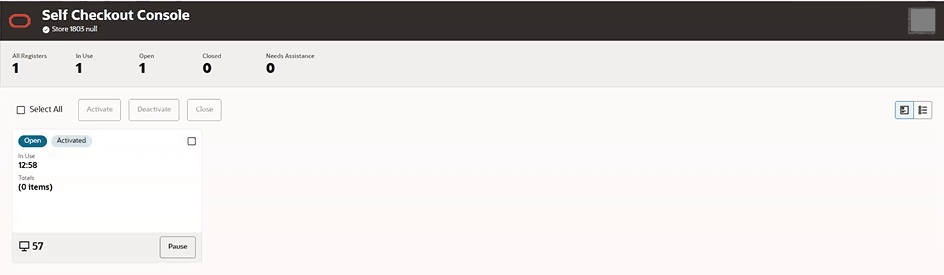
Figure 5-2 Self Checkout Console
-
Selection Panel
The selection panel on the Self Checkout console enables an associate to quickly select all of the Self Checkout registers in their store and perform an action on them, for example, at the end of the day, the ability to close all Self Checkout registers at once. It also allows an associate to select one or more registers to take action on.
The following actions are available:
-
Card View (Default)/Table View
-
Note:
Pause is a single register action. It is not available for more than one register at a time.
Views
The Self Checkout Console has two register views, Card View and Table View. These views display the exact same information. In medium or small screens (tablets and handhelds) a List View will display in place of a Table.
Card View
In Card View the registers move based on defined parameters based on the actions of the registers.
Figure 5-3 Console - Card View
When a user logs into the console, the Card View is the default view. Each Self Checkout register will have a register card that provides specific details about the Self Checkout register which include:
-
The Select All check box to select all of the Register Cards.
-
A badge indicating an Open, Deactiveted or Closed status.
-
A check box to select each specific register to perform an action on.
-
The running transaction session length.
-
Totals area:
-
A running cart total in the store local currency - this is the amount the customer will pay which includes taxes.
For country-specific configurations, the running cart total reflects the tax, fiscal, and receipt rules applied to the Self Checkout transaction before payment.
-
A running item count.
-
-
An icon indicating when an associate is logged in.
-
A register message is displayed at a time when applicable. The order of messages can be:
-
Assistance
-
Hardware Issue
-
Pending Action
-
-
Register Number
The register cards will have the following colors depending on the activity/issues for the register:
-
Red - High Alert - example Assistance required
-
Orange - Medium Alert - example Hardware issues
-
Blue - Low Alert or Informational
-
White - Registers that are open or closed but do not require assistance or have a hardware issue
Switching from card view to table view clears all selected registers.
Selecting a register card will open the Register Details.
Table View
In Table View the registers are always displayed by register number (Ascending). Medium or small screens (tablets and handhelds) display this information in a list layout rather than a table.
Figure 5-4 Console - Table View

Select the Table View icon to switch from Card View located in the Selection Panel.
The Table View presents the same data as the Card View in a table format or list view when displayed on smaller screens. Select a column label to sort ascending or descending when a table is presented. The check box in the first column selects all Registers.
Every row has a check box to select each specific register to perform an action.
Click the horizontal ellipsis to Pause or view the Register Details for that register.
Actions
In the selection panel an associate performs one of four actions on any selected register(s). Activate, Deactivate, and Close are disabled until one or more registers are selected.
-
Note:
Pause is a single register action. It is not available for more than one register at a time. Pause is disabled when a register is Closed, Deactivated, or has a Hardware Issue.
Either select individual register cards or Select All to perform the actions in the Card or Table view.
Register Details
To view the Register Details, select a register card or select the register number in table view or from the ellipsis in table view, select Register Details.
Figure 5-5 Console - Register Details
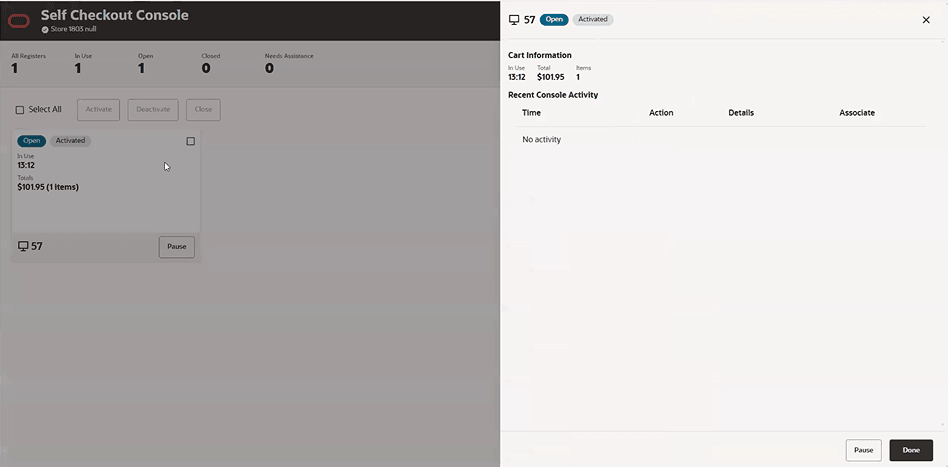
Figure 5-6 Console - Table View Register Details
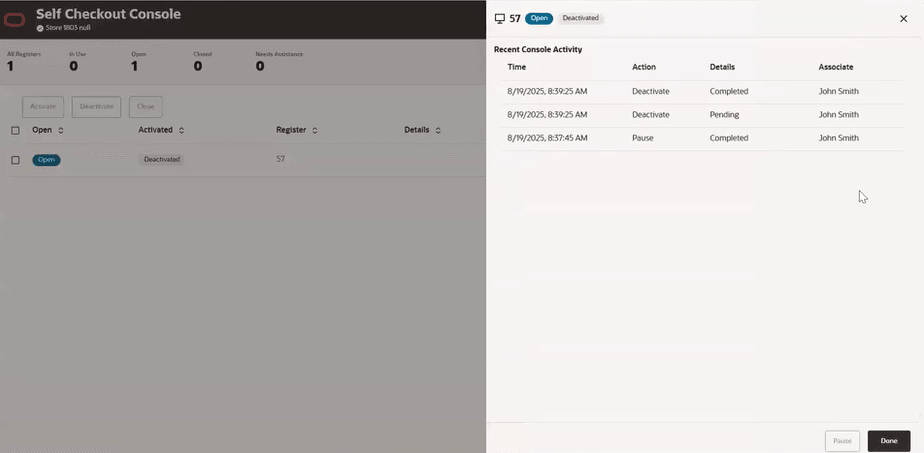
Register Details include:
-
Register Number
-
Open, Deactivated or Closed Badge
-
Messages - All messages that apply to the register display here. In card view and table view only the most important message displays. The order of messages that display in priority order are: Assistance, Hardware Issue, and Pending Action.
-
Cart Information - Displays the running transaction length, running cart total, and running items count. A “Last Seen” timestamp shows when a workstation last communicated with the system and automatically hiding inactive workstations after a configurable threshold (24 hours by default). The value is displayed as a relative elapsed time (for example, Last seen just now or Last seen 15 minutes ago ). The Last Seen value is intended for informational purposes only and does not indicate workstation status or availability.
-
Recent Console Activity - Displays the console activities taken per register and the effect that each action had on the register. Only those actions performed on the console are displayed. Any actions, for example, opening a register that are performed on the physical register and not on the console will not display in this activity list.
This information includes:-
Date - Time/Date Stamp
-
Action - The type of action performed on the register
-
Result - The resolution of the action
-
Associate - The User Name of the Associate who performed the action
-
Note:
Actions from previous days do not display. Up to fifteen actions will be listed, and older events will fall off the list as new activities take place.Activate Registers
Registers that are closed or deactivated will be opened upon activating them. If a register is already open no new action is taken on the register as the command is ignored because the register is already in the proposed state. The command will be listed in the recent console activity list found in the register details as not applicable.
-
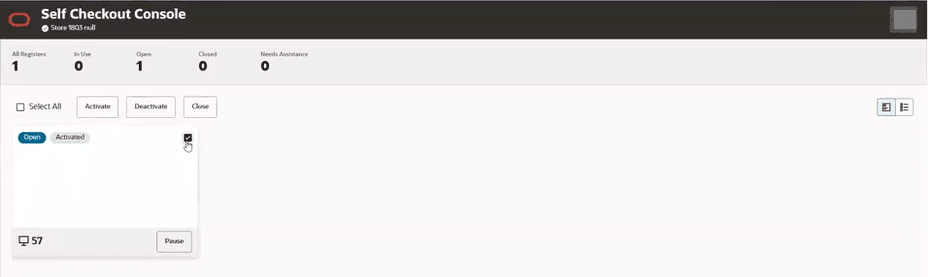
Select the check box in one or more registers, or select the check box for Select All to select all the Register Cards.
Figure 5-7 Console - Card View Register Selected
-
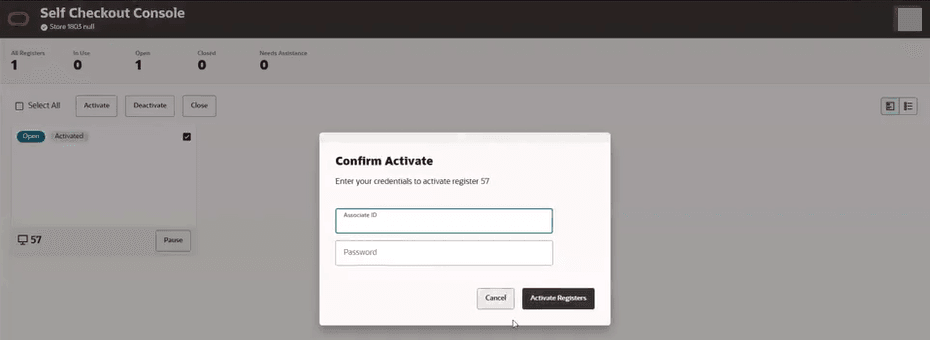
Click Activate. A confirmation window appears, the register is Open.
Figure 5-8 Console - Confirm Activate Register Prompt
-
You are prompted to enter your login credentials.
-
Then click Activate Registers to activate the selected registers, or click Cancel to return to the Console.
-
Select the check box for one or more rows, or select the check box for Select All to select all the rows.
-
Click Activate. A confirmation window appears, the register is Open.
-
You are prompted to enter your login credentials.
-
Then click Activate Registers to activate the selected registers, or click Cancel to return to the Console.
Deactivate Registers
Deactivating one or more registers provides the retailer the ability to adjust the number of registers that are open when there are periods of low traffic in the store, or number of personnel needed to supervise the self check out area are not available to supervise a large number of Open and Activated self checkouts.
Registers that are deactivated will remain open but not available for customer transactions. If a register is already deactivated the command is ignored because the register is already in the proposed state. The command will be listed in the recent console activity list found in the register details as not applicable.
-
Select the check box in one or more registers, or select the check box for Select All to select all the Register Cards.
-
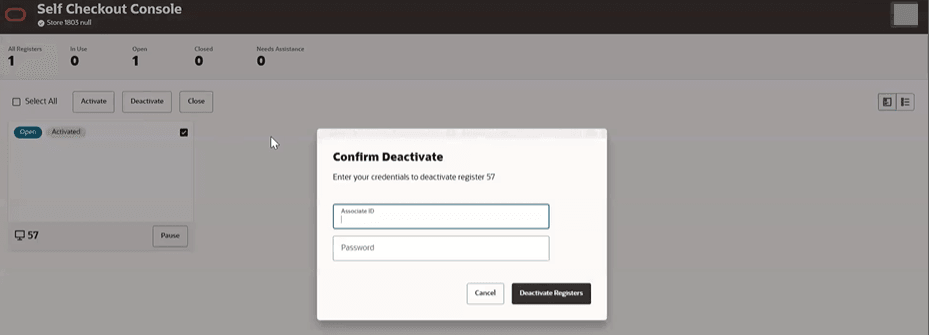
Click Deactivate. A confirmation window appears.
Figure 5-9 Console - Confirm Deactivate Registers Prompt
-
You are prompted to enter your login credentials.
-
Then click Deactivate Registers to deactivate the selected registers, or click Cancel to return to the Console.
Note:
Deactivating a register does not Close the register. It is still in an Open state and can be reactivated by using the Action: Activate.-
Select the check box for one or more rows, or select the check box for Select All to select all the rows.
-
Click Deactivate. A confirmation window appears.
-
You are prompted to enter your login credentials.
-
Then click Deactivate Registers to deactivate the selected registers, or click Cancel to return to the Console.
Note:
Deactivating a register does not Close the register. It is still in an Open state and can be reactivated by using the Action: Activate.Close Registers
Closing a register will close any open and deactivated registers. If the register is already closed the command will be ignored as the register is already in the proposed state. The command will be listed in the recent console activity list found in the register details as not applicable. Registers that are open and in use will list as “Pending Close” until the transaction at the register is completed. Once the action can be performed on the register this “Pending Close” message will no longer display and the register will be closed.
-
Select the check box in one or more registers, or select the check box for Select All to select all the Register Cards.
-
Click Close. A confirmation window appears.
-
Click OK to close the selected registers, or click Cancel to return to the Console.
-
Select the check box for one or more rows, or select the check box for Select All to select all the rows.
-
Click Close. A confirmation window appears.
-
Click OK to close the selected registers, or click Cancel to return to the Console.
Pause Registers
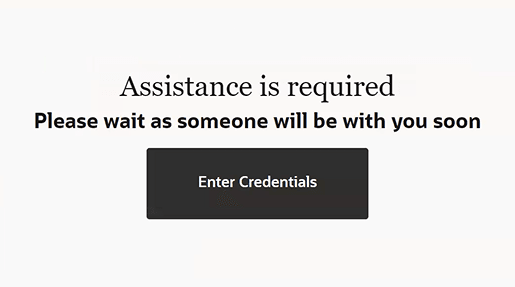
When an associate selects Pause on the Self Checkout Console the self checkout register will display a prompt that states assistance is required, requiring an associate to log in.
Note:
Pause is a single register action. It is not available for more than one register at a time.The Pause feature is used when an associate sees there is unusual or atypical activity being performed on a self check out. Selecting Pause for that Self Checkout may not be immediate. The process will continue until there is a break point in the process. At that time a message will display on the self checkout register letting the customer know that an associate will be with them soon. The Self Checkout remains paused until an associate enters their credentials.
An associate can pause a register in card view and table view:
Card View
-
Select the card and the Details Drawer will display the Pause button at the bottom of the drawer.
-
Click Pause to pause the selected register, or click Cancel to return to the Console.
Table View
-
Click the horizontal ellipsis in the desired row.
-
Click Pause. A confirmation window appears.
-
Click Pause to pause the selected register, or click Cancel to return to the Console.
Register Details
-
From the Card view, click a register card to display the register details, or from the table view click the horizontal ellipsis in the desired row and click Register Details.
-
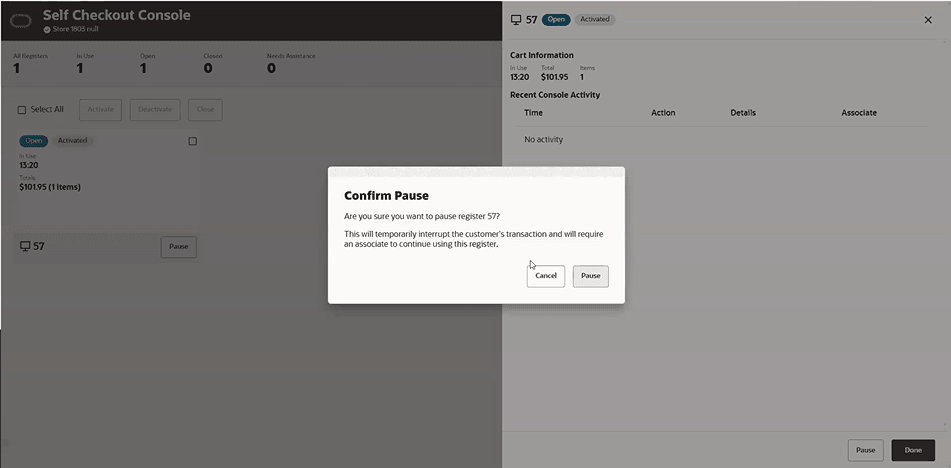
Click Pause. A confirmation window appears.
Figure 5-10 Console - Register Details Pausing a Register
-
Click Pause to pause the selected register, or click Cancel to return to the Card or Table View.
Figure 5-11 Console - Card View Register Paused
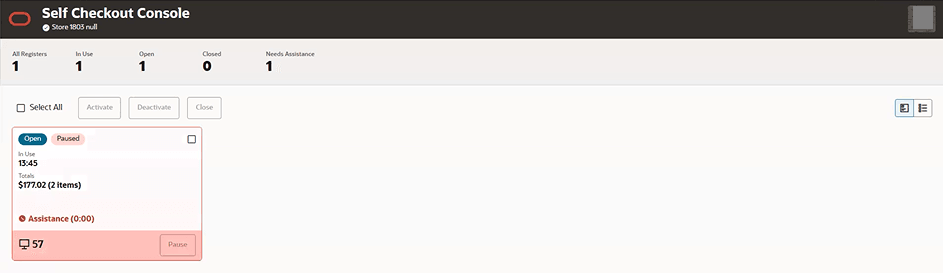
Figure 5-12 SCO - Message when Register Paused
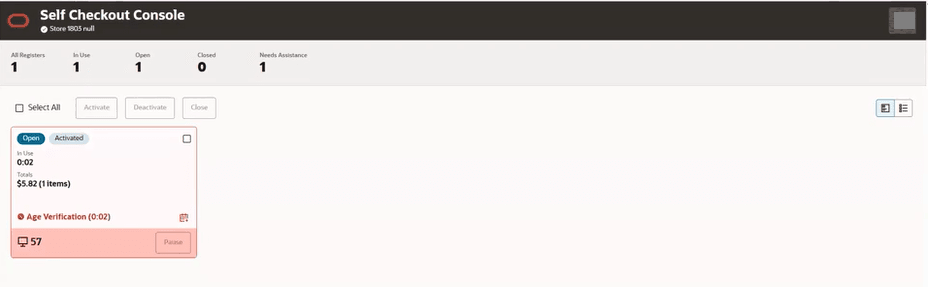
Age Verification
-
Approve - Confirm age remotely
-
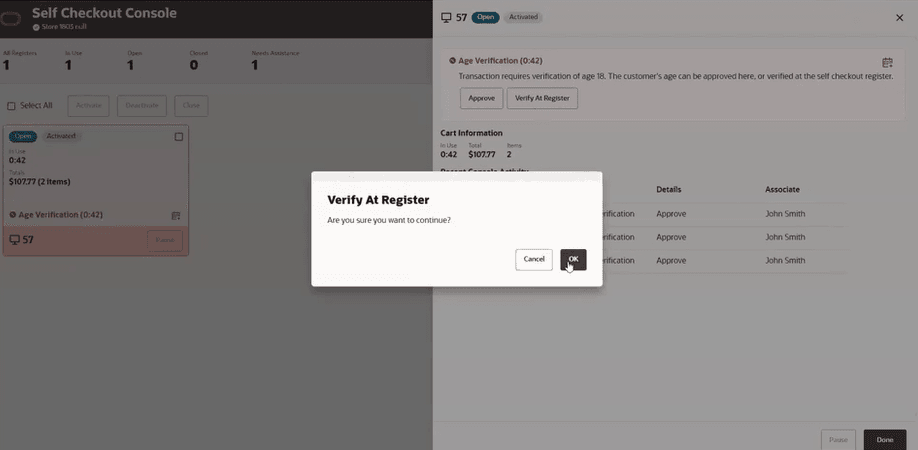
Verify at Register - Verify age with customer at register
The store must be configured for approving age verification on the console.
Figure 5-13 Console - Age Verification
Confirm Age Remotely
To confirm the age of the customer remotely, follow the steps below:
- Select the card/row to open the register details.
Figure 5-14 Console - Card View Age Verification Register Details
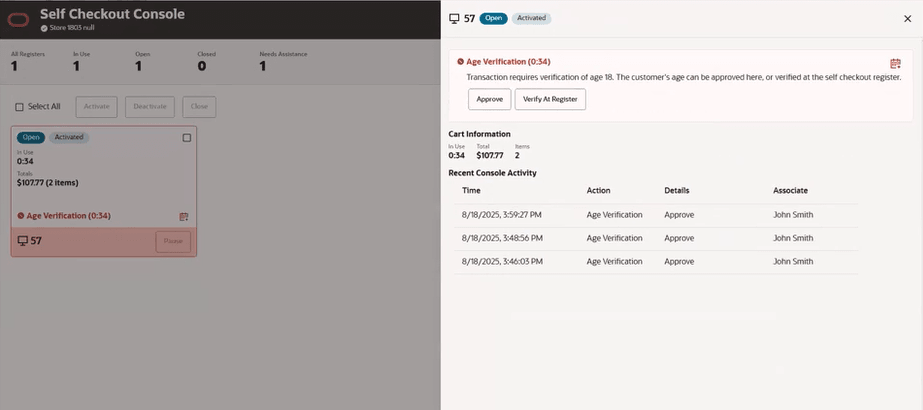
- Visually confirm that the customer is of age and select the Approve
button in the alert. A confirmation window appears.
Figure 5-15 Console - Approve Customer Age
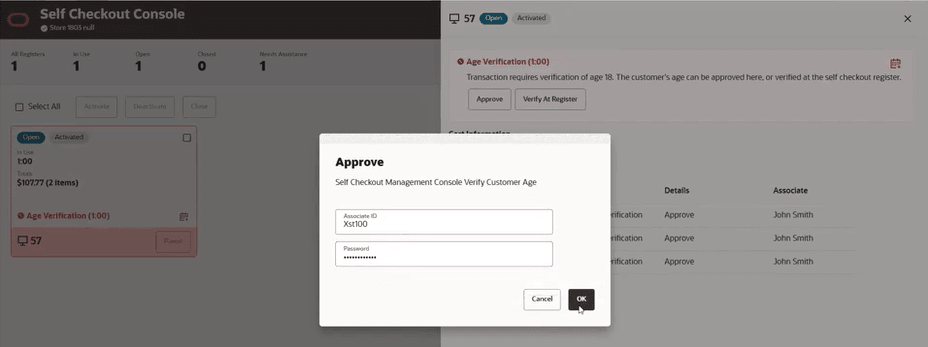
- You are prompted to enter your login credentials.
- Select OK to approve the age of the customer or select Cancel to remove item from the basket.
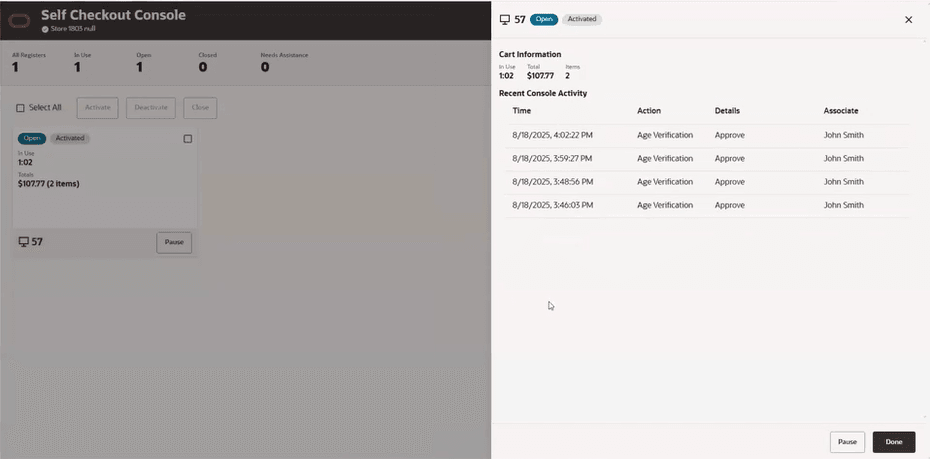
- The age confirmation response is displayed in the Recent Activity Table.
- The assistance message is removed from both the card and the list.
Figure 5-16 Console - Customer Age Approved
Verify Age with Customer
Figure 5-17 Console - Verify at Register Prompt
For more information, see the Age Restricted Items section.
Working with Messages
The Self Checkout Console can display messages that are helpful for knowing the state of the register. Examples: Assistance, Hardware Issue, and Pending Action .
-
Assistance: A message that displays when the self checkout register requires an associate to log into the register and assist a customer.
-
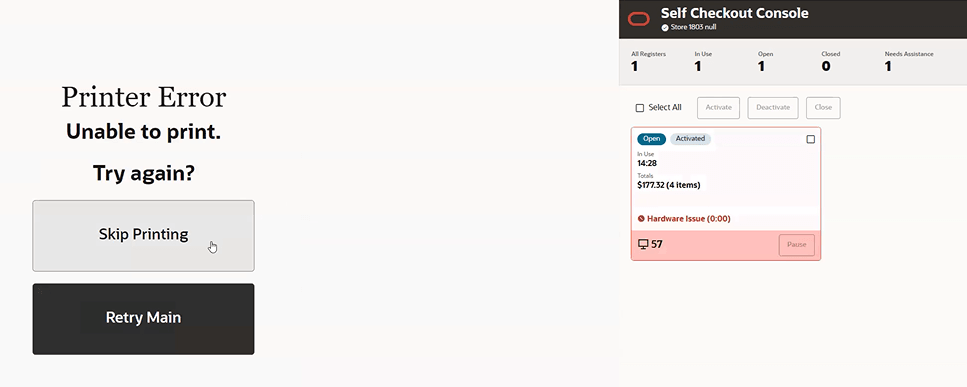
Hardware Issue: A message that alerts an associate when there is a hardware issue that must be addressed before the register can be used by customers.
Figure 5-18 Console - Hardware Issues
-
Pending “Action”: A message that displays when an action has been taken by an associate on the console, but the register is not able to take immediate action on the command.
Note:
An example of Pending “Action” is Pending Close.
An example, is when a register is in use by a customer and a close action has been taken on that register. In the console the message will display for that register, "Pending Close" until the transaction is completed. When the transaction is completed then the pending message will be removed and the register will be closed.
Note:
Card View and Table View show only one message. Register cards will show all applicable messages.Alerts
A retailer can create custom high, medium, and low level alerts to the Self Checkout Console.
Passive Messages
A retailer can create Passive Messages that enable the ability to send custom, informational messages to the Self Checkout Console based on workflow events at a Self Checkout.
Custom Assistance Request Messages
A retailer can create Custom Assistance Request Messages which allow a retailer to post custom messages to the Self Checkout Console when putting a Self Checkout register into a "needs assistance" state.