Creating a Deployment Plan
Use a Deployment Plan to roll out updates on a pre-defined schedule when setting up a Configurator or File Upload deployment. Scheduled roll-outs are created by defining phased plans (that is templates) containing Waves. The plans created here will be available when you schedule a deployment. See Deployment: Using a Deployment Plan.
-
From the Oracle Retail Xstore Office menu, select Deployment - Deployment Plans, or click the Deployment Plans link in the Deployment Manager panel.
-
At the Deployment Plans page, click Add New to create a new Deployment Plan.
Figure 7-10 Deployment Plans Page

-
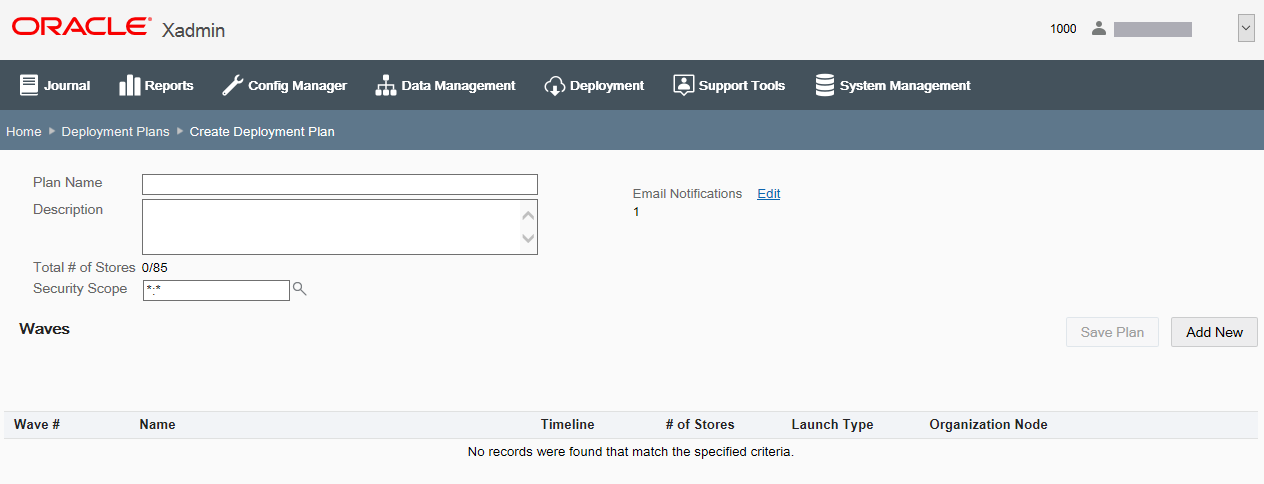
At the Create Deployment Plan page, complete the fields as required to identify this plan and to define the scope:
Figure 7-11 Creating Deployment Plan Page

Table 7-4 Creating a Deployment Pan Fields
Field Description Plan Name
Enter a name for the plan, up to 60 characters.
Description
Enter a description for the plan, up to 255 characters. This name can be changed after the plan has been created and saved.
Security Scope
Select the target level (store or org node) for this plan. This value defaults to the highest level of the logged-on user. If a user has more than one hierarchy node assigned, there is no default.
Email Notifications
Review/edit the email addresses for emails to be sent for Wave Approval reminders and Wave Approval waiting notifications. See Email Notifications for more information about this feature.
-
Click Add New to define the Waves for this plan at the Create Wave page:
Figure 7-12 Create Wave Page

Note:
To be valid, a Deployment Plan must have a minimum of one Wave. You can add any number of Waves to the Deployment Plan. For global scope only, you can select the All Remaining Stores check box to quickly add all stores in the node that have not been included in any previous waves. This can be used to make sure there are no missing stores in the Deployment Plan.
Table 7-5 Create Waves Fields
Field Description Wave Name
Enter the Wave name or accept the default name.
By default, each Wave is numbered automatically to track the number of waves in the plan. You can append additional text to the wave number (for example, Wave 1: Reg1) or change the text (for example, First Wave - Reg1), up to 60 characters.
Launch
(day(s) after previous wave)
For Wave 1, this will default to NA since the first wave is the baseline date used to calculate all subsequent days.
For Waves 2 and above, enter the interval between waves, up to 4 digits maximum.
Note: Zero (0) is a valid entry for the number of days after the previous wave. This allows multiple waves to start on the same day, possibly with different launch types.
Launch Type
Approval Required [DEFAULT] - User approval is needed before the Wave launches.
Automatic - The Wave launches automatically on the set number of days after the previous wave completes.
-
To specify which stores/nodes this Wave should deploy to:
-
Click Add Organization Nodes.
-
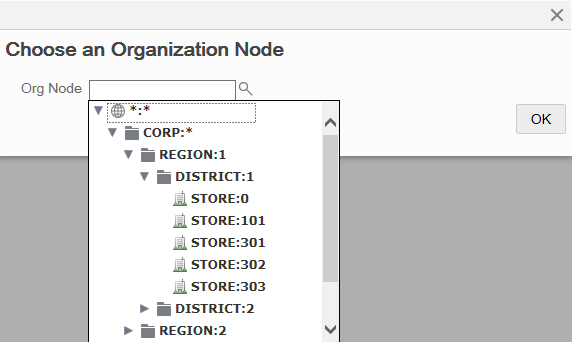
Expand the org hierarchy node tree as needed to select the stores/nodes for this Wave.
Figure 7-13 Org Hierarchy Node Tree

Note:
The nodes returned in this list are filtered based on the Scope you selected for the Plan. Store collections are not included in this list.
-
Click OK.
The selected store/node is listed on the Create Wave page along with a Delete link. If needed, you can click Delete to remove the store/node from the Wave.
Figure 7-14 Wave 1 - First Store/Node Added Example

-
-
[OPTIONAL] Repeat step 5 to add additional stores/nodes to this Wave.
-
After adding all stores/nodes to this Wave, click Save Wave. The Wave is added to the Deployment Plan and you are returned to the Create Deployment Plan page.
About Wave Validation:
The same node cannot be selected in multiple Waves (for example, District 1 in Wave 1 and District 1 in Wave 2). If you try to add an org node in multiple Waves, a message displays. Click OK to close the message box and then click Delete to remove the duplicate Organization Node from the Wave.
Overlap within a Wave or between Waves is not allowed. If you try to add overlapping stores/nodes between two waves, a message displays. Click Yes to continue. Click No to return to the Create Wave page and then click Delete to remove the duplicate store from the Wave.
-
[OPTIONAL] To create additional Waves for the Deployment Plan, return to step 4 on page 10. Repeat as often as needed.
-
The next wave defaults to the next higher number, for example, Wave 2 follows Wave 1.
-
Enter the number of days this wave should be launched after the previous wave. For example, schedule Wave 2 to launch 7 days after Wave 1 is launched, and schedule Wave 3 to launch 5 days after Wave 2 is launched, and so on.
-
Select the launch type, Approval Required or Automatic.
-
-
When all Waves have been added to the Deployment Plan, click Save Plan to save all plan changes and return to the Deployment Plans page.
About Deployment Plan Validation:
If the Deployment Plan does not cover all stores within the selected scope, a message displays. Click Yes to save the plan even though not all stores in the selected scope are included. Click No to return to the Create Deployment Plan where you can make changes as needed.
-
The Deployment Plans page displays information about each plan.
Figure 7-15 Deployment Plans Page

Table 7-6 Deployment Plans Fields
Field Description Plan ID
The auto-generated plan Identifier.
Plan Name
The name of the plan.
Security Scope
The target level (store or org node) for this plan.
# of Waves
The number of waves in the Deployment Plan.
Created On
The date the plan was created.
Description
The plan description.
Delete Icon
See Deleting an Deployment Plan and Waves below.