14 Ticketing
Ticket printing on the mobile application is accessible from Inventory Management/Print Item menu. The system supports two types of ticketing that is, Item Ticket and Shelf Label. There are two modes of printing tickets, auto print and manual print.
The user is taken to the Auto Print Mode by default when the dialog is accessed. In auto print mode, the user can print tickets quickly with the pre-defined attributes by just scanning or entering the items. The user can change the ticket attributes or switch to the Manual mode using the Default Attributes option.
In manual print item mode, the user can pre-set the type, format, override price, quantity and change the attributes if required for every ticket on the fly. The user can select the country of manufacture for the ticket.
Ticketing Mobile
The ticketing dialog in the mobile application allows users to print the item tickets and shelf edge labels. This dialog supports printing tickets either in Auto mode or Manual. In Auto Print you can quickly scan the items and print the tickets and labels without any user intervention by presetting the values whereas in Manual the user can change certain ticket components before printing the ticket.
The basic objective in Auto mode is, you scan an item and system determines whether there are any price events exists for the event type set for the specific date and tickets are generated whereas in Manual mode you scan an item and the system fetches all the price events for the effective on specific date or days range based on the setting and allows you to print tickets for one or more events.
Auto Print Item
Figure 14-1 Auto Print Item
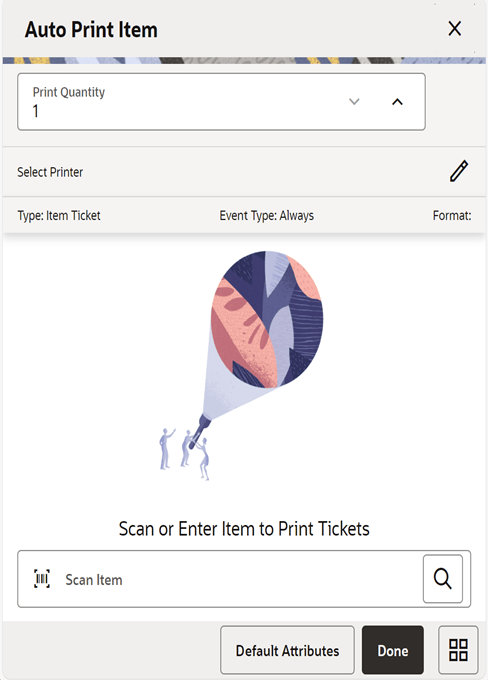
Figure 14-2 Auto Print Item
The ticketing dialog in the mobile application is accessed from the Print Item menu under the Inventory Management. By default, when you open this dialog, it will be set to Auto Print and you can change the attributes and the mode using the Default Attributes option.
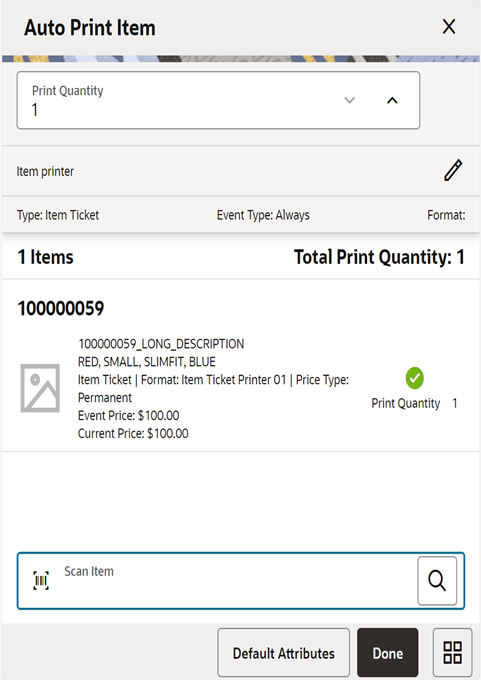
On the Auto Print screen, you can scan the items and the system automatically submits the print request as and when you scan the items. The search option on the scan bar helps you to search the items using the lookup feature.
Default Settings
The system will set the below default values when you enter the screen and will remain until you change the values in the Default Attributes screen. The settings done in the Default Attributes will stay in the memory until the you exit the dialog and when you come back to the ‚Print Item‘, the system will take the system default values.
Type
When you enter the screen, by default the system will set the type to print the item tickets and you can change it using the default attributes.
Event Type
The system will by default set the event type based on the Print Item Events store parameter. You can change the event type to print using the Default Attributes screen.
The system determines what tickets need to be submitted by looking at the item meeting the configured event as described below.
-
Always Print: This option will always print a ticket regardless of if there is a price change.
-
Clearance: Only print a ticket if on the specific date any clearance event is effective.
-
Promotion: Only print a ticket if on the specific date any promotion event is effective.
-
Regular or Clearance: Only print a ticket if on the specific date any Regular or Clearance event is getting effective.
-
Regular: Only print a ticket if on the specific date any Regular even of getting effective.
-
Any Price Event: Based on the date selected, if any price event goes into effect (clearance, promotion or regular price) a ticket is generated. If there is no price event goes into effect, the system prints nothing.
Days Range
Auto print is meant for the specific date, when you enter the screen, the system by default assigns the current date to look for the events. You can change the date using the Default Attributes screen.
Format
Format - The system determines the format for the item based on the following method.
The system determines the default format what is set on the default attributes screen.
If nothing is set on the default attributes screen, the system checks what is the event applied for the scanned item (Promotion, Clearance and Regular) on the ticket and see whether the corresponding format is available in the format assignment and if available, associate that to the ticket.
If the format assignment for the event is not set or if nothing is set in default attributes, the system does not generate the ticket. It displays the error message at the item level and does not print a ticket.
Printer
The system will assign the default printer based on the ticket print format configuration and allows you to change using the pencil icon. If the system could not find the default printer assigned, it will prompt you to select one.
Print Quantity
On this screen the print quantity is set to 1 when you enter the dialog and allows you to change the preset value. You can change the method the preset value is calculated on the Default Attributes screen.
-
If it is set to SOH, the system will prepopulate the value with the current SOH of the scanned item.
-
In case of Shelf Label and if the user has set Facings, the system fetches the shelf label quantity defined in the sequence table to populate the print quantity field.
-
If the setting is custom, the system will prepopulate it with the custom value defined in the Default Attributes screen.
-
If it is set to Available, the system will default it to the current Available quantity.
-
The system will default to 1 if the Available or SOH is not >0.
The system will allow you to change the print quantity value on the Auto Print Screen only when the setting on the default attributes screen for the print quantity is custom.
On each row, the system displays the item image if configured, item ID, description, print status, type, format assigned, price type, effective date, event price, current price, override price if any, SOH, print quantity and error if any.
The system generates the ticket after a valid scan and submits to the assigned printer. If the system is not able to print the ticket for an item due to non-assignment of format or if no pricing is available, it will display an error at the item level and allows you to scan further items.
Manual Print Item
Figure 14-3 Manual Print Item
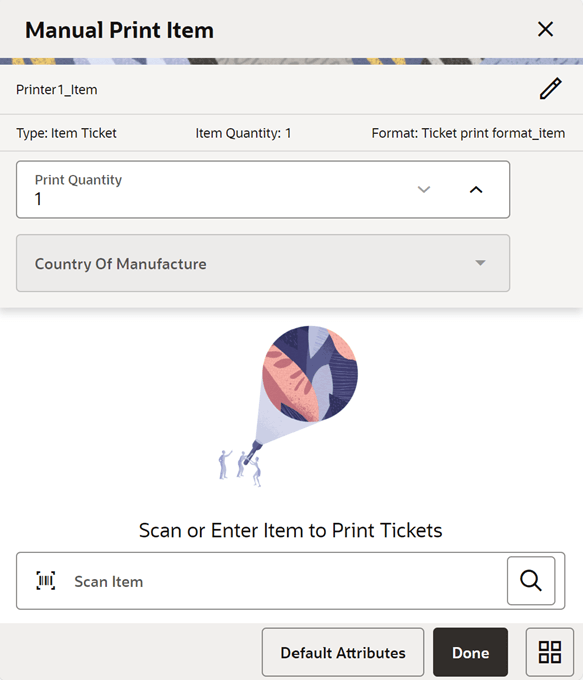
Figure 14-4 Manual Print Item
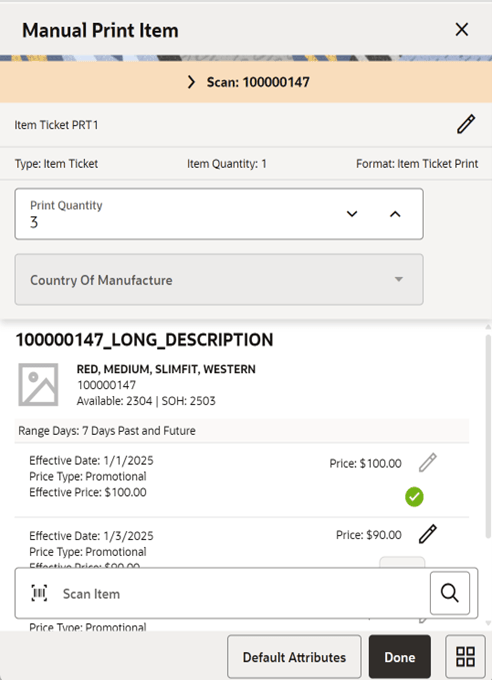
Figure 14-5 Manual Print Item
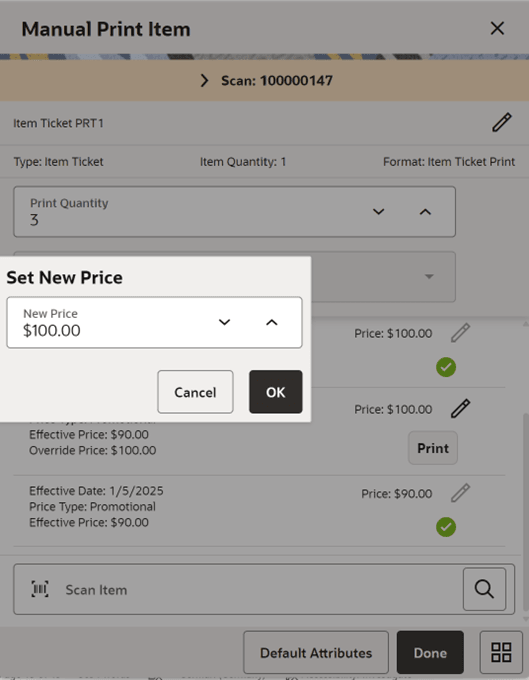
Figure 14-6 Manual Print Item
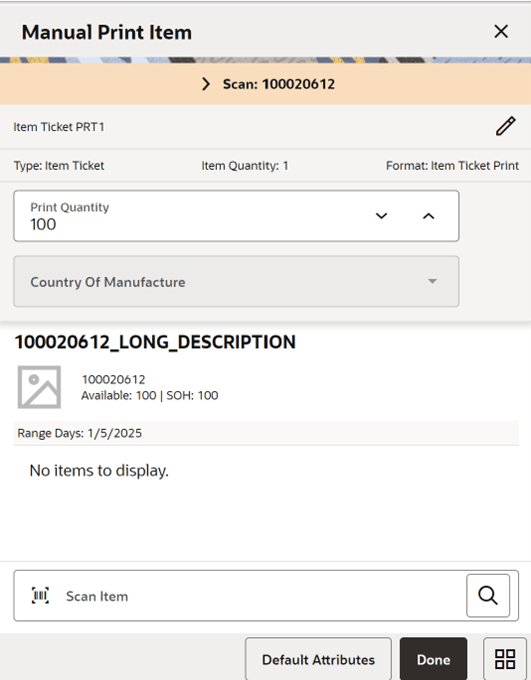
From the Auto Print Item, you can switch to the Manual Print by changing the mode on the Default Attributes screen.
On the Manual Print Item screen, after scanning the valid item, you are allowed to modify the print quantity, country of manufacturer, override price and change the printer on the same screen.
The search option on the scan bar helps you to search the items using the lookup feature.
If there are more than one pricing records for the scanned item for the given days range, the system will display all the individual pricing records and allows you to select the print at every record level.
If there are no pricing records effective on the given date is available, the system will indicate no records to display and allows you to scan a different item.
Default Settings
Printer
The system will assign the default printer based on the ticket print format configuration and allows you to change using the pencil icon. If the system could not find the default printer assigned, it will prompt you to select one.
Print Quantity
The value will be prepopulated based on the 'Default Print Quantity' setting in the Default Attributes screen and allow you to edit.
-
If it is set to SOH, the system will prepopulate the value with the current SOH of the scanned item.
-
In case of Shelf Label and if the user has set Facings, the system fetches the shelf label quantity defined in the sequence table to populate the print quantity field.
-
If the setting is custom, the system will prepopulate it with the custom value defined in the Default Attributes screen.
-
If it is set to Available, the system will default it to the current Available quantity.
-
The system will default to 1 if the Available or SOH is not >0.
Type
This field indicates what is the ticket type. Based on what is set on default attributes screen. It could be Item Ticket or Shelf Label.
Format
The system determines the default format for the item based on the following logic:
-
The system determines the default format what is set on the default attributes screen.
-
If nothing is set on the default attributes screen, the system checks what is the event applied for the scanned item (Promotion, Clearance and Regular) on the ticket and see whether the corresponding format is available in the format assignment and if available, associate that to the ticket.
-
If system could not find the assignment, it displays an error when you attempt to print.
Country of Manufacture
By default, the system fetches the country of manufacturer associated to the item and allows to edit.
-
On selecting, the system shows the list of country of manufacture for the user to select.
-
If the system is not able to find the country of manufacture associated to the item, this field is disabled.
Item Quantity
This field will hold the quantity of the item that is printed on the ticket. This value is fetched if it is set on the default attributes screen. Shown only when value exists.
Range Days
This indicates the range days.
-
Specific Date- It shows the specific date selected.
-
Range- N Days Past and Future. (N is the number of days for range)
-
Past- N Days Past.
-
Future- N Days Future
SOH
This shows the Stock on Hand of the scanned item.
Available
The system displays the available quantity of the item.
In addition to the above fields, you can see the below fields at the individual pricing record level.
Price
You can see the effective price on the field and edit(override) using the pencil icon if you have allow override ticket price permission. The overridden price is shown on the override price.
Effective Date
The system fetches the effective date and shows on the list for the user to select the print.
Price Type
The system fetches the price type of the item effective based on the day of the print date.
Values include Permanent, Promotional and Clearance.
After providing the inputs, you can select the print option to print the tickets or labels.
Default Attributes
Figure 14-7 Default Attributes
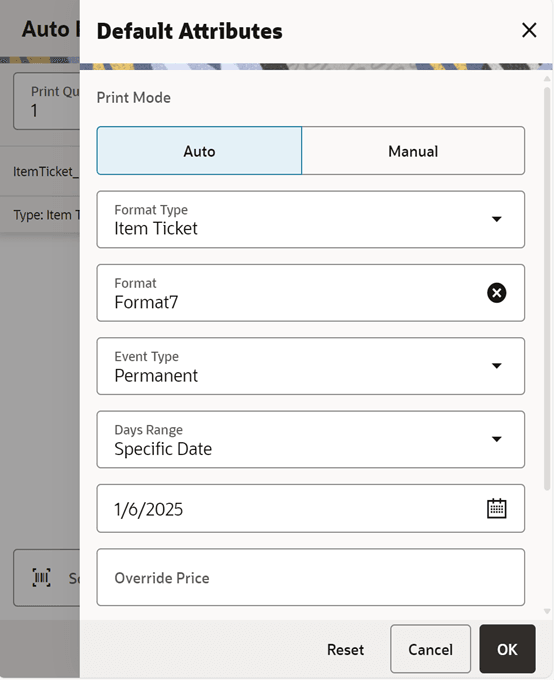
Figure 14-8 Default Attributes
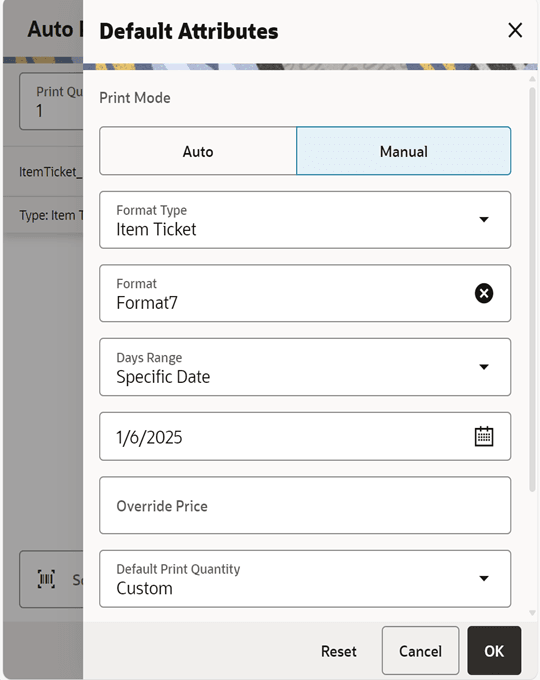
This screen is for you to switch the mode of printing and set the default attributes. You can access this screen from the Default Attributes button on the Auto Print Item or Manual Print Item screen.
Following are the list of fields for which you can set the default values to apply in Manual and Auto print.
Print Mode
This allows to switch the mode. By default, the current mode you are working will be selected.
For example, if you are in Auto Print Item and you select the Default Attributes, the mode selected will be Auto, here you can either change the attributes for Auto or switch mode to Manual and set the attributes for manual print and select ok.
Format Type
This allows to select either Item Ticket or Shelf Label.
Format
This will show the list of formats in the system based on the format type selected.
Default - This will show the default format set on the Ticket Print Format.
Event Type
Displayed only if you select the Auto mode.
Values include Always, Promotion, Clearance, Permanent, Clearance or Permanent, Any Price Event
Default - Picks up from the store parameter 'Item Print Events'.
Days Range
The system allows a maximum of 7 days in range.
Values:
-
Specific Date (Date Widget)
-
Range (Not available for Auto)
-
Past (Not available for Auto)
-
Future (Not available for Auto)
-
Default-Specific
Number of future days from today
Displayed only when Future is selected from Days range field.
Default = 1. 0 Indicates Today
The system prints the tickets for the events effective today and x days later.
Example: If the user gives 3 on 7/1/20 the system prints the tickets for the price events that are effective on 7/1/20, 7/2/20, 7/3/20 and 7/4/20.
If you change the mode to auto, the system will hide this field.
Number of past days from today
Displayed only when Past is selected from Days range field.
Default = 1. 0 Indicates Today.
If you change the mode to auto, the system will hide this field.
Number of days for range
Displayed only when Range is selected from Days range field.
Default = 1. 0 indicates Today.
The system prints the tickets for the price events effective that are x days prior, today and x days later.
Example: If the user gives 3 on 7/1/2020 the system prints the tickets for the price event effective on 06/28/20, 06/29/20, 06/30/20, 07/01/20, 07/02/20, 07/03/20 and 07/04/20.
If you change the mode to auto, the system will hide this field.
Override Price
Editable in case the user has permission to override ticket price.
If a value is given here, the system will take this as overridden price and apply this price when generating the ticket.
Default Print Quantity
You can provide the default print quantity for printing the tickets/labels.
Values:
-
SOH
-
This option is listed only in case of Item Ticket.
-
If this is selected, the system will default the SOH of the item on the print quantity field on the Auto and Manual print item.
-
-
Available
-
This option is listed only in case of Item Ticket.
-
If this is selected, the system will default the Available SOH of the item on the print quantity field on the Auto and Manual print item.
-
-
Facings
-
This option is listed only in case of Shelf Label and sequencing is turned on Store Parameter (Display Sequence Fields).
-
The shelf label quantity defined in the sequence table is used to populate the print quantity field.
-
-
Custom
-
If this is selected, the system will allow the user to set a custom value and that is prepopulated on the print quantity field on the Auto and Manual print item.
-
Item Quantity
Default = 1
This is displayed for the Manual Mode.
This captures the item quantity that need to be sent to the printer. Note: Item Quantity is different from Print Quantity. This is a place holder to indicate the quantity of the item and that need to be printed on the ticket.
Select Printer
Figure 14-9 Select Printer
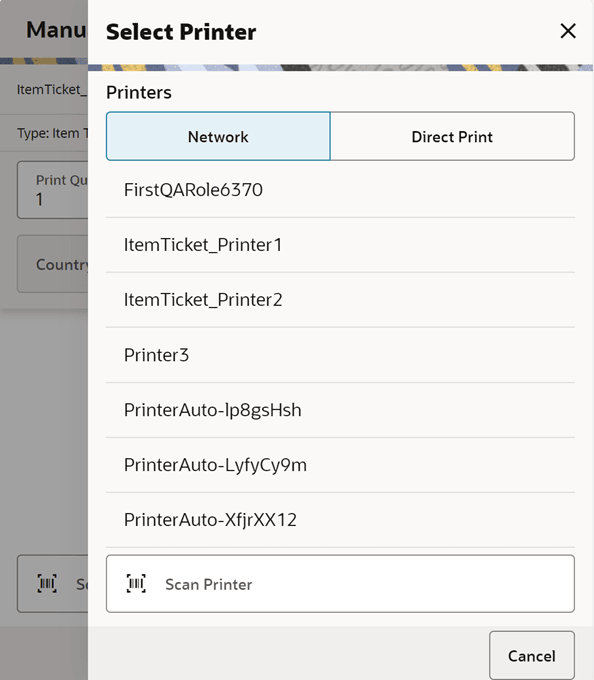
This is screen appears when you select the pencil icon on the printer field to set the printer for ticket printing.
On this screen, you can filter the printers by Network or Direct Print.
Network printers are printers that are configured in the store.
Direct Print printers are printers like Blue Tooth printers that are configured in the device.
On this screen you can select or scan the barcode of the printer and submit the tickets for printing.
This screen is accessed from the Auto Print Item, Manual Print Item screens and Print Tickets popup that appears when printing tickets from the container items screen.
This screen lists all the printers that are available in the system for the item tickets and label type.
The selected printer is displayed on the Auto Print Item, Manual Print Item screens for you to know to which printer the tickets/labels are submitted for printing.
Note:
For specific information on how tickets are sent to the printer see the Store Inventory Operations Cloud Services Implementation Guide.Quick Print Ticket
Figure 14-10 Select Printer Screen
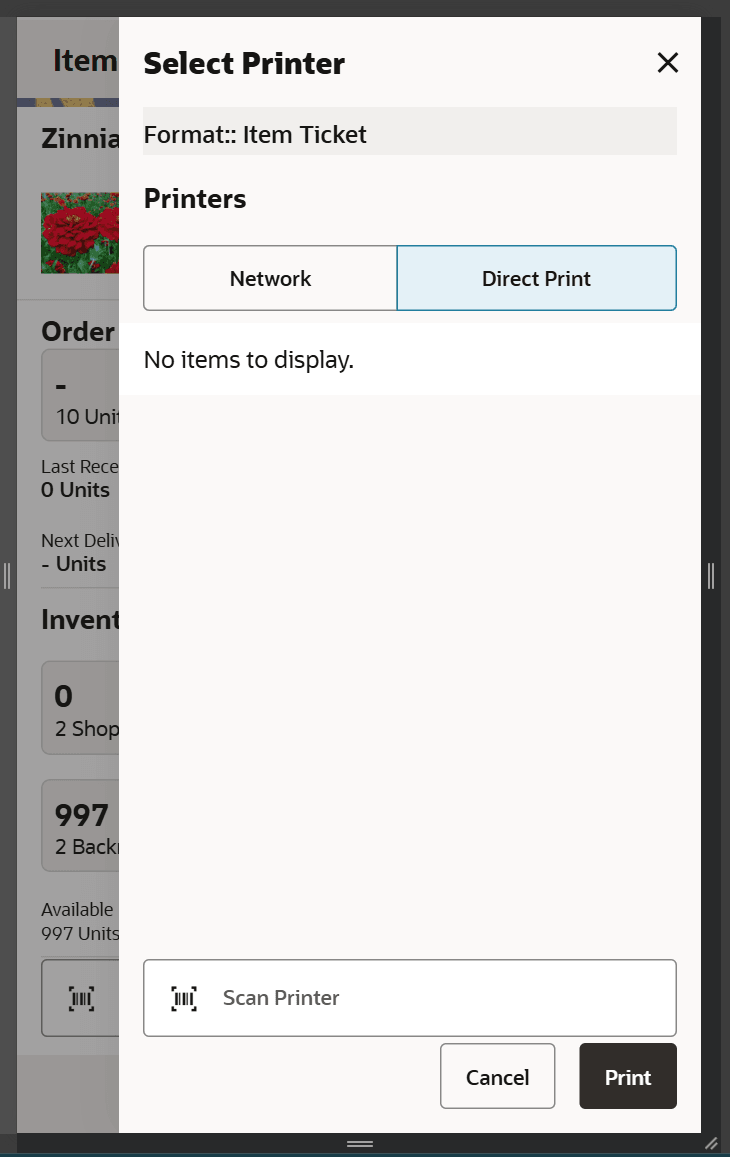
The Select Printer screen displays a list of printers including Bluetooth printers.
On this screen, you can filter the printers by Network or Direct Print.
Network printers are printers that are configured in the store.
Direct Print printers are printers like Blue Tooth printers that are configured in the device.
On this screen you can select or scan the barcode of the printer and submit the tickets for printing.
This ticket print will always be the item default ticket format.
For Bluetooth printing, the ticket must have a ZPL attached.
The system will print the tickets for the current event that is effective for the item.
The Print Ticket option will be available in: Item Lookup, Quick Orders and Quick Count.