Adding Test Data in a Flow
To add data to a component in a flow:
- In the flow tree structure, click Edit Test Data icon next to the component. Alternatively, you can right-click the component and select Edit Test Data.
- Enter the test data in the Test Data page. The Webservice Test Data page has 3 sections.
- Pre Validations
The Pre Validations section can be used for specifying functions that can generate randomized test data for the flow/component step. It is used to add functions in the components that may be specific to the flow being developed. Click New Row to add new rows.
Note: The new Generate Test Data.. option in the Test Data drop-down list allows randomized test data to be generated based on certain user defined rules. These can be specified using an intuitive GUI. It is used for randomized generation of test data for a flow run. Usage of functions in the Pre-validations section for the same is supported, but is a legacy method of random data generation.Figure 8-4 Pre-validation functions
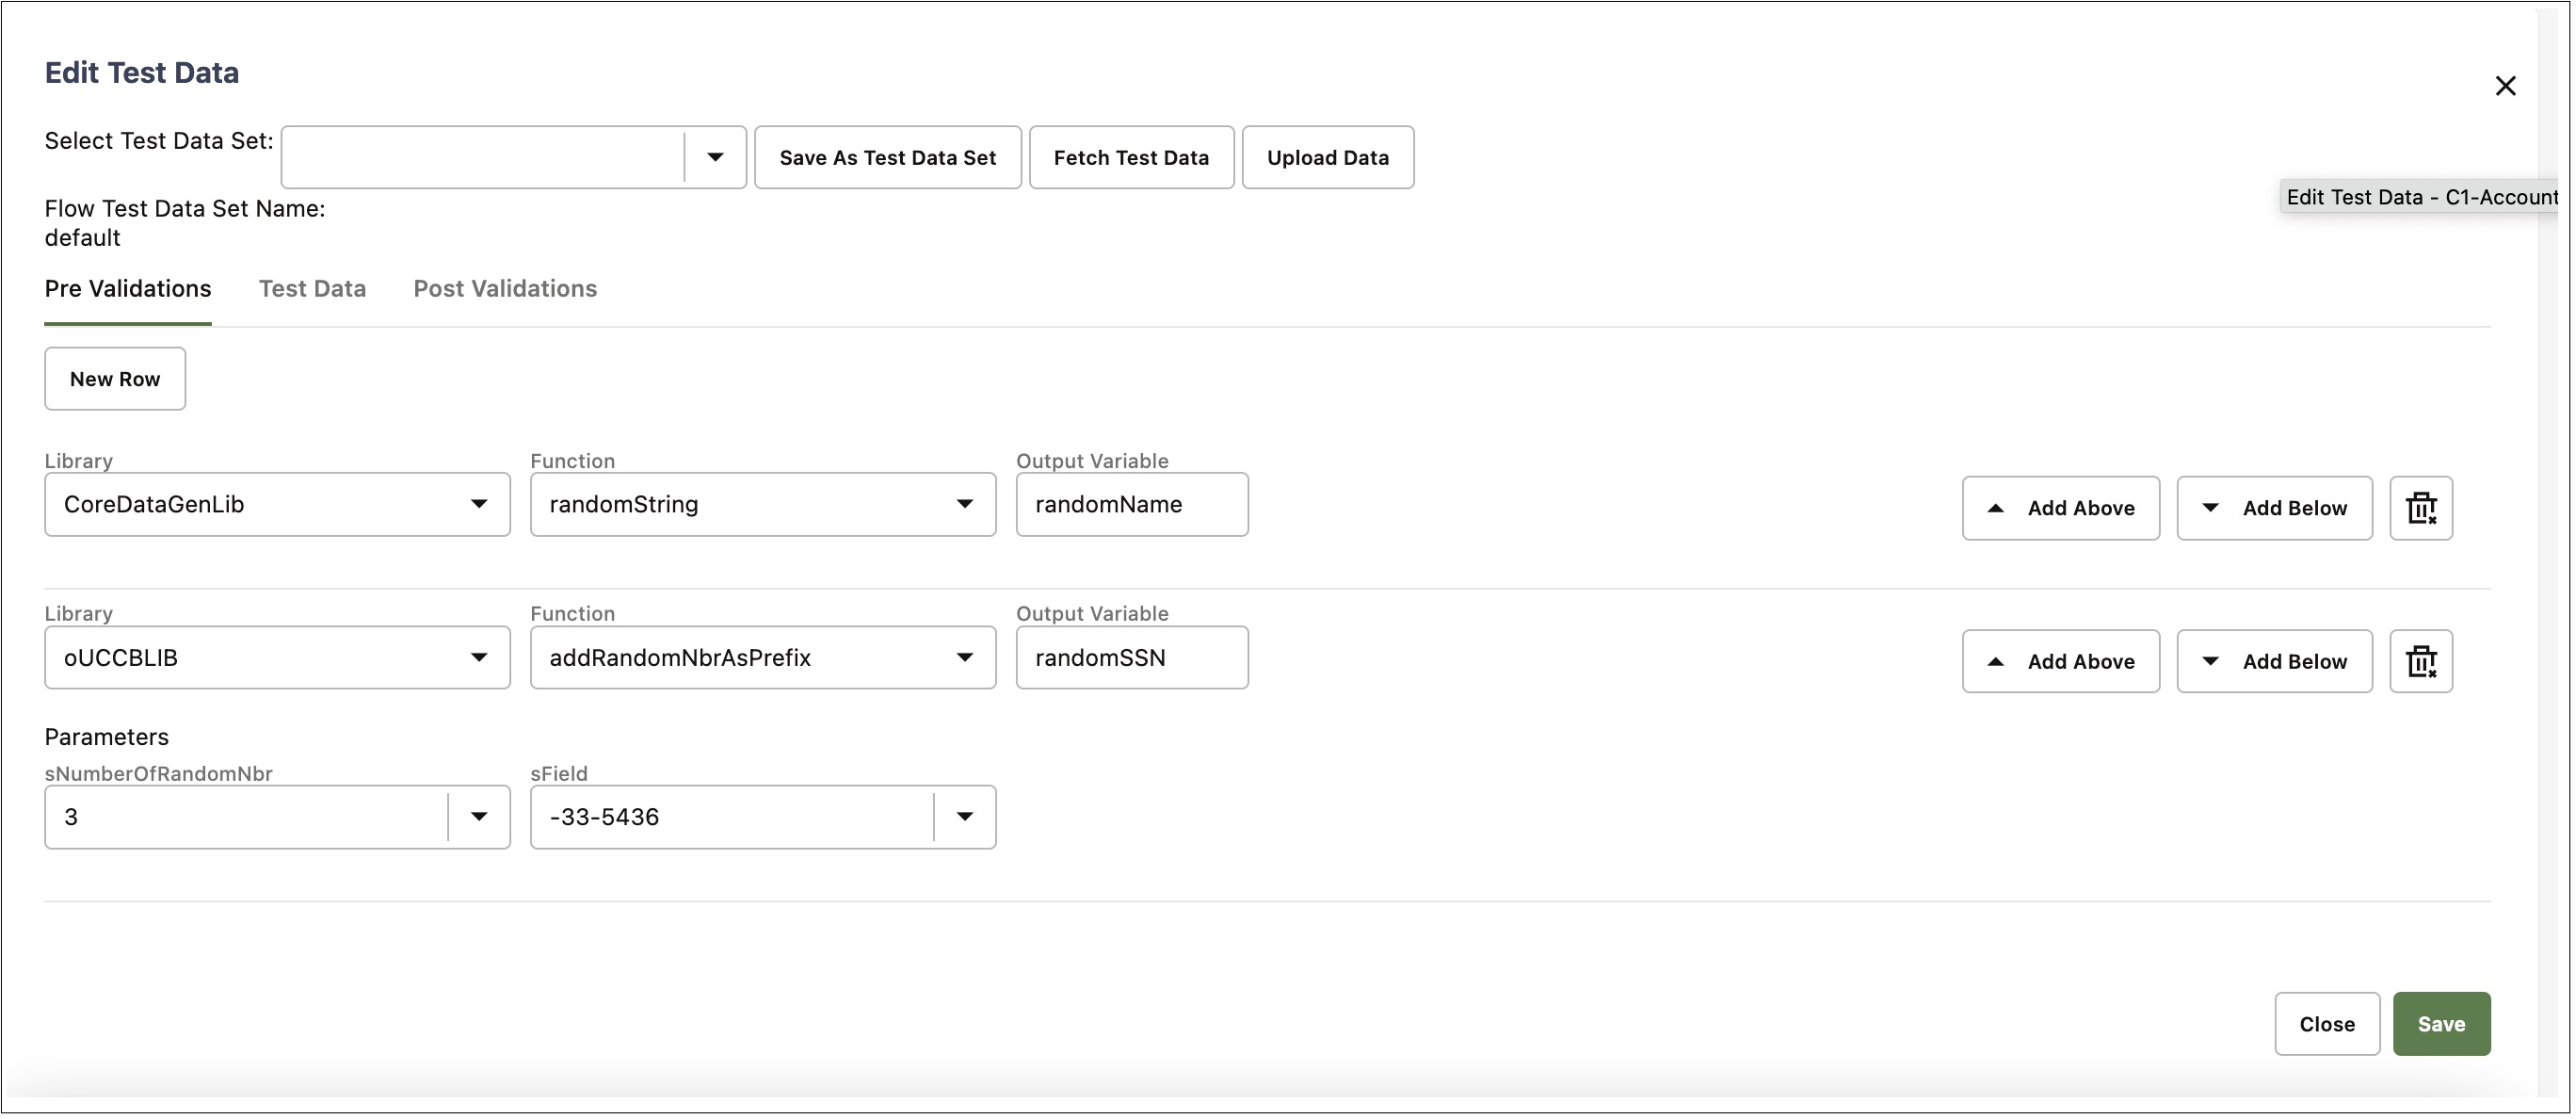
The library in which the function exists can be selected in the Library field. Based on the library selected the function can be selected from the Function drop-down list. If the function outputs a value, provide the custom global variable name in the Output Variable field into which the function output is stored. This variable can be used as test data in the Test Data section or in subsequent pre validations or post validations sections. The function inputs can be specified against the parameter fields, based on the number of input parameters that the function needs. The variable names defined in the pre validations and post validations sections will be automatically prefixed with “fvar” and presented in the test data field's drop down under the Global Variables section, so they can clearly be distinguished from the global variables defined in the component definition.
- Test Data
The test data corresponding to each of the elements in the component can be specified in the Test Data GUI.
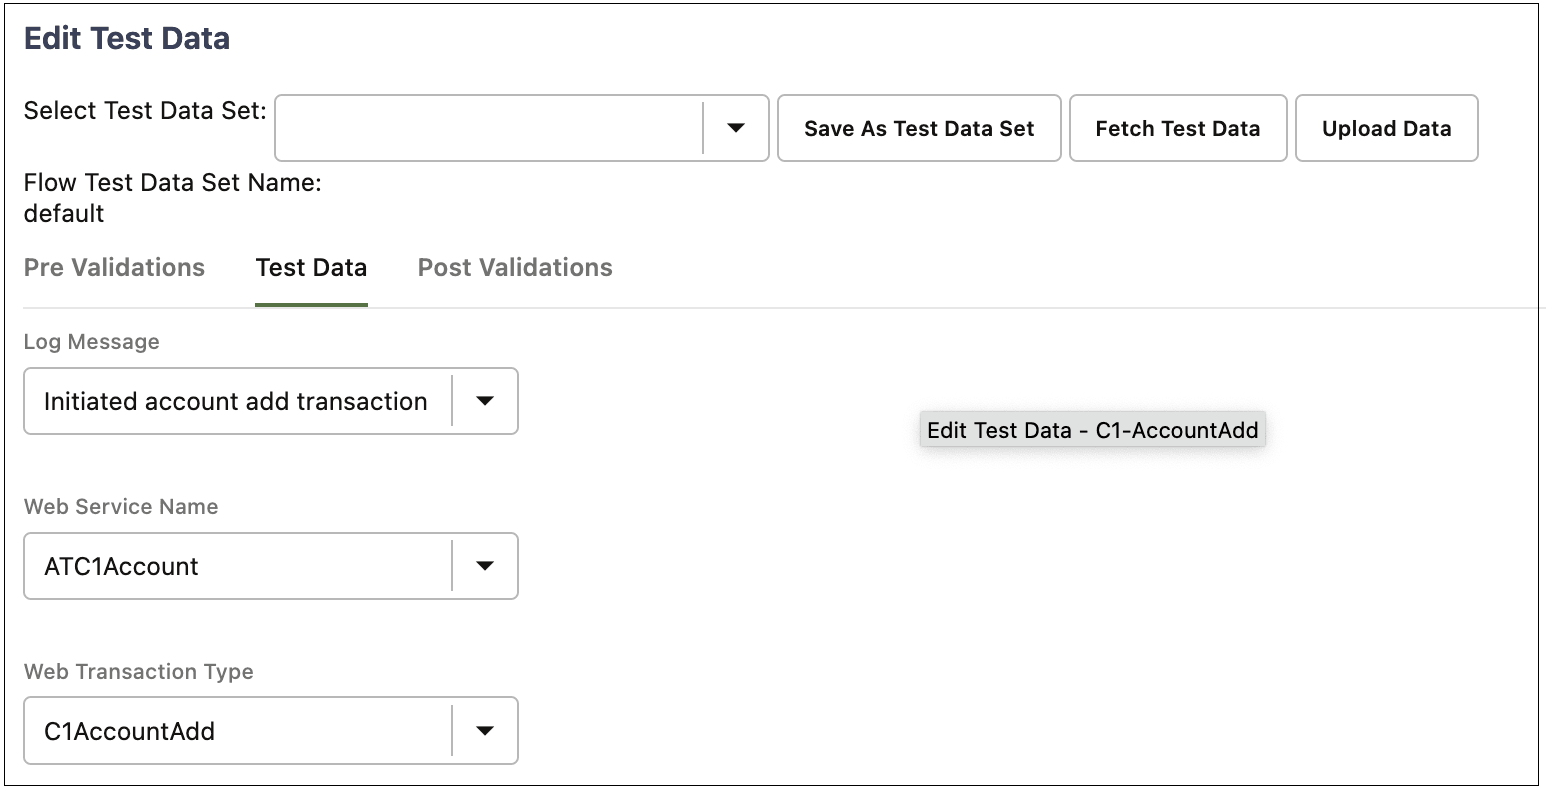
- The Web Service Name and Web Transaction Type fields help define the web service end point to which the request needs to be posted to during the test execution. Most of the components have the web service name and transaction type specified as the default data in the component definition. You can select the corresponding values by clicking on the test data drop down corresponding to the web service name/transaction type fields and selecting the value under the Default Data section in the list of values.
The Web Service Details section has a switch inside the Integration Environment sub section to enable/disable the field to provide integration environment details. This pertains to the environment identifier provided in the flow or user configuration set, for a given integration environment that is being tested.
Refer to Support for Integration Flowsfor more details.
- The Log Message field appears for most of the components that have this option enabled. This is free text field and any value entered in this field will be added to the flow run summary report. This helps to identify what a component step does in a flow, by looking at the summary report.
Figure 8-5 Web service settings for component test data
- Test data pertaining to a component line can be specified against that specific line in the test data Value field in the Test Data section. The test data field is an editable drop down field, so test data can either be selected from the drop-down list or can be keyed into the test data field. The test data field drop down provides 3 options to populate the test data:
- Data From..: This option allows the test data to be set from the web service response of any preceding component in the flow. It allows test data to be passed between components, without the use of global variables.
Refer to the Moving Data Between Components without Using Global Variables for more information on this feature usage.
- Generate Test Data..: This option suppots randomized test data to be generated during a flow run, based on a set of rules. The generated test data is used as input to the field against which this option is specified.
To specify rules for the randomized test data generation:
- Select Generate Test Data.. option from the drop-down list.
- In the Generate Test Data window, select the Generator Type from the following list:
- Random String Generator: To generate random strings
- Random Number Generator: To generate random numbers
- Data Generator: To generate dates
- Based on the selected generator type, appropriate fields and options are enabled.
- Random String Generator supports 2 types of rule definitions.
- If Parameter Based Definition is selected:
- Specify the minimum and maximum length of the random string to be generated.
- Enable/disable upper case, lower case, and number switches to allow or disallow the character type in the generated string.
- If Format Based Definition is selected:
- Specify the format of the string to be generated.
- 'U' for upper case character, 'L' for lower case character, and 'N' for number.
- Example: Specifying the format as UU43-LLLtest-NU generates BX43-hsgtest-7R. To use character U,L,N as part of the string, precede it with “\”.
- If Parameter Based Definition is selected:
- Random Number Generator supports number generation between the specified minimum and maximum values. The number of decimals that should be part of the generated number can also be specified.
- Date Generator is not a random generator, but generates the date based on specified conditions. It can be used to retrieve/generate the date when the flow is run. It can also used to add or subtract days, minutes, and hours from a specified date time or current time to generate a calculated date.
To generate a date, an input date has to be provided in the Input Date field, which can be Current Date (date of the flow run) or a variable containing a date or the date can be obtained from the output of a previous component using the Data From.. option.
If a a global variable or Data From .. is selected, the Input Date Format must to be provided, which specifies the format of the date in the input variable.
- Timezone: Timezone of the input date field that defaults to the user’s timezone.
- Operation: Specifies if a duration needs to be added to or subtracted from the input date.
- Day(s)/Hour(s)/Minute(s): Specifies the duration that needs to be added to or subtracted from the input date.
- Output Date Format: Specifies the format in which the output date should be generated.
Note:
The date formats are pre-populated with 3 date time formats that are generally used in Oracle Utilities Application Framework. A custom format can be specified by entering the date time format. All Java date time formats are supported.
- After entering the necessary inputs for Generate Test Data, click Save.
- Data From..: This option allows the test data to be set from the web service response of any preceding component in the flow. It allows test data to be passed between components, without the use of global variables.
- Default Data: This section allows test data to be set from the default data specified in the component definition. For most of the UTA components, the default data is set only for the web service name and the transaction type fields. If the default data is not specified in the component definition for a given field, this option will not be displayed in the test data field drop down.
- Global Variables: This section allows test data to be set using the global variables defined in the preceding components in the same flow. The list of available global variables are displayed under this section. A global variable can be set as test data input for a given field, in which case, during the course of test flow run, the value populated into the global variable in the preceding component steps will be used as the test data.
- If an element is a repeatable group or list element, click Add List in the Action column to add multiple repetitions of the list elements. You can add a new instance of the list elements under the group, so another set of test data can be provided.
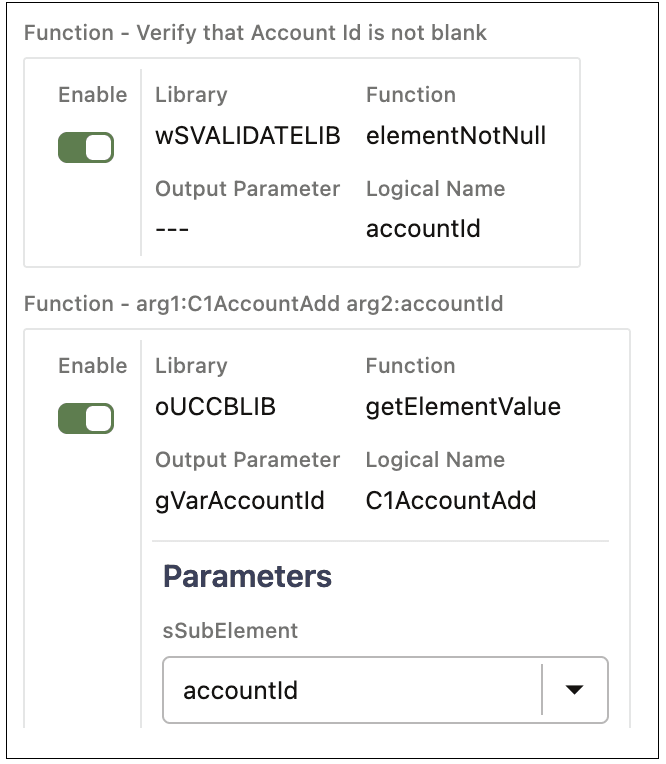
- The bottom part of the Test Data GUI shows the functions defined in the component. Enable or disable the validations/functions defined in the component by appropriately switching Enable in the first cell. If the switch is not enabled, during the course of the test run, the function/validation will not be triggered. The switch only appears for rows to which this feature is applicable.
Figure 8-6 Test Data Validation and Value Retrieval Functions
Note:
If the test data includes the double quotes character (“ “), it needs to be escaped with another double quote character. Example: To enter My “Test Data”, enter it as My “”Test Data””.
- The Web Service Name and Web Transaction Type fields help define the web service end point to which the request needs to be posted to during the test execution. Most of the components have the web service name and transaction type specified as the default data in the component definition. You can select the corresponding values by clicking on the test data drop down corresponding to the web service name/transaction type fields and selecting the value under the Default Data section in the list of values.
- Post Validations
The Post Validations section is used to add verification functions post the base validations. The validations determine if a particular flow step has passed or failed, during the course of the test flow run. Validation failure is considered as a flow step failure. Each of the component comes with a base set of validations and these can be disabled or enabled in the Test Data GUI using the switch corresponding to the validation line in the test data UI for the component. And, if any new or more of these verifications are to be added based on the flow specific requirements or if a specific set of values have to be retrieved from the response of the component run, the Post Validations section can be used.
The post validations section allows users to add any number of functions/validations to the component step in a flow. These will be specific to the component's instance in that flow. These will not apply to the component when used in other flows. Specification of functions in the Post Validations section follows the same pattern as the one specified in the Pre-validations section.
The following types of validations can be provided in the Post Validations section:
- Function-Based Validations
Validations are added to the Post Validations section using the library functions that are similar to adding the functions in the Pre-validations section. The WSValidateLib function library provides the necessary functions to validate a response from the application being tested. The validation library functions process elements in the web service response to determine if the set conditions have been met. This determines if a component step in a flow has failed or passed.
The function library based validations will continue to be supported along side the condition based validations. But, for ease of use and improved functionality, the condition based validations are recommended to be used.Figure 8-7 Function-based and condition-based post-validations
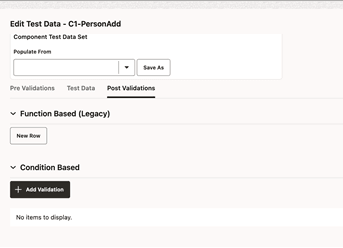
- Condition-Based Validations
With the condition-based flow validation feature, you can very quickly and easily define complex validations for a flow step using Oracle Utilities Testing Accelerator's advanced and intuitive user interface. This reduces the flow development times while increasing the ease of defining validations in the flow.
To add a condition based validation:
- On the Test Data screen for a component in a flow, navigate to the Post Validations section.
- In the Condition Based Validation section, click + Add Validation.
- On the Add Validation screen, provide appropriate information to create the validation.
To provide the details about the elements to validate:
- Select the element/response/variable that needs to be validated.
- From the Response Element.. drop-down list, select the element to be validated. If the element is a group/list element, you can specify additional condition(s) to select specific values.
Example: If a Oracle Utilities Testing Accelerator flow reads a person object from Oracle Utilities Customer Cloud Service using the C1-PersonRead component and if the requirement is to validate that the office phone number in the person object is not null, then a new validation can be added. On the Add Validation screen, select Response Element.. from the Element to Validate field.
Figure 8-8 Selecting an element to validate
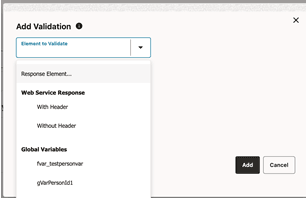 On the new window, select the element to be validated. In this case, it is the personPhone/phone.
Figure 8-9 Selecting a component response element
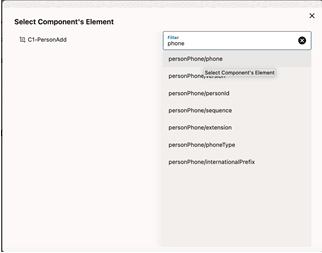 After the group/list element is selected, add the condition. Since the office phone number needs to be validated, a condition to select the list that has the phoneType as OFFICE should be specified. Based on this condition, if there are multiple phone numbers for the person entity, only the phone number corresponding to the phoneType 'OFFICE' is validated.
Figure 8-10 Element selection conditions
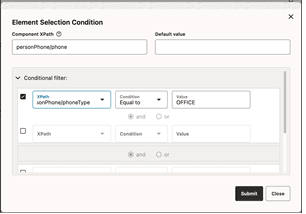
- On the Element Selection Condition screen, click Submit, and then click Close.
There is also another option to validate part of or the complete response of the component's web service request. On the Add Validation screen, click the Element to Validate field. In the drop-down list, scroll down to the Web Service Response section and select any of the With Header or Without Header options. This option allows validations involving verification of a substring in the response. As the name suggests, the 'with header' and 'without header' options allow validation of the response including and excluding the response header.
The third option on the Add Validation screen, Global Variable allows validation of values stored in the global variables of the flow.
The Condition field allows the specification of the condition to be applied to a validation, such as 'equals', 'not equals', etc.Figure 8-11 Validation comparison conditions
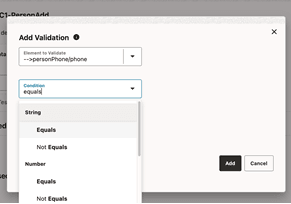
Four different categories of validations are supported based on the type of data being validated:
- Validation conditions under the String section allow validating a string in the element/response/variables. These are essentially string comparisions. Note that the validations on the Web Service Response are typically string comparisions.
- Validation conditions under the Number section allow comparison of numbers using conditions such as less than, greater than, etc.
- Validation conditions under the Date section allow the comparison of date time values. If the conditions under the Date section are selected, the corresponding date time format needs to be specified against the Element to Validate and Value to Compare fields. A date format from the existing options can be selected or a Java supported date format can be explicitly specified in the date format field.
- Validation conditions under the Any section allow the verification of existence or non-existence of elements in the response.
The Value to Compare field specifies the value to be used for validation/comparision based on the condition. The field supports specification free text/static values or selection of global variables or response values from previous component steps in the flow using the Data From.. option.
- Click Add to add and save the validation.
- The sequence of the condition based validations can be altered by dragging the dropping the rows holding the condition based validation.
- Function-Based Validations
- Pre Validations
- Click Save & Close to return to the Flow Creation page.