Note:
- This tutorial requires access to Oracle Cloud. To sign up for a free account, see Get started with Oracle Cloud Infrastructure Free Tier.
- It uses example values for Oracle Cloud Infrastructure credentials, tenancy, and compartments. When completing your lab, substitute these values with ones specific to your cloud environment.
Govern Public Access to OCI Resources using OCI IAM Network Perimeters and Network Sources
Introduction
We operate in a world where we need to be hypervigilant about our data and infrastructure. For example, even the most careful cloud administrators can fall victim to account takeover techniques such as phishing attacks and privilege escalation. Moreover, nobody wants to misconfigure the security of their data that results in accidentally exposing it to the public internet. Public cloud providers such as Oracle Cloud Infrastructure (OCI) include Oracle Cloud Infrastructure Identity and Access Management (OCI IAM) services that enable you to apply additional security layers that can help reduce your attack surface and improve the security posture of your infrastructure, data, and applications.
OCI IAM provides Network Perimeters, which restricts the set of IP addresses that can access the OCI Console. In addition, Network Sources enable you to write policies that restrict access to specific OCI resources based on the requestor’s IP address. In this tutorial, we will explore both features and explain how you can enable them in your OCI tenancy.
Objectives
-
Understand the following OCI security features and use them to enhance the security posture of your OCI tenancy.
- OCI IAM Network Perimeters
- OCI IAM Network Sources
Prerequisites
- Admin account with identity domains.
Use OCI IAM Network Perimeters
When a user attempts to sign-in to an application protected by an OCI IAM identity domain (which includes the OCI Console itself), the sign-on action is evaluated by the relevant Sign-On Policy for the application. This policy consists of a series of rules, with conditions and resulting actions. The rules are evaluated in order, until the conditions of that rule are met by the current sign on context, then the action associated with that rule is enacted. The action results in access being allowed, access being denied, or the user being prompted for additional authentication factor before access is allowed.
Network perimeters can be used in conjunction with sign-on polices to block or allow access to the OCI Console. For more information, see Network perimeters and Managing Sign-On Policies.
-
Blocklists: We can use this approach to block users who attempt to sign in from suspicious IP addresses. A blocklist can contain one or more IP addresses.
-
Allowlists: We can use this approach to restrict access only to a predefined set of one or more IP addresses.
Note: Changing sign-on policies could result in account lockout. Sign-on rule priority is extremely important and should be carefully considered. We recommend having a separate browser session open, authenticated with administrative credentials, while testing the approaches described later.
How Network Perimeters Work?
In order to implement a network perimeter based allow list, at least two rules are required.
- Allows access based upon the network perimeter.
- Deny access if condition is not met.
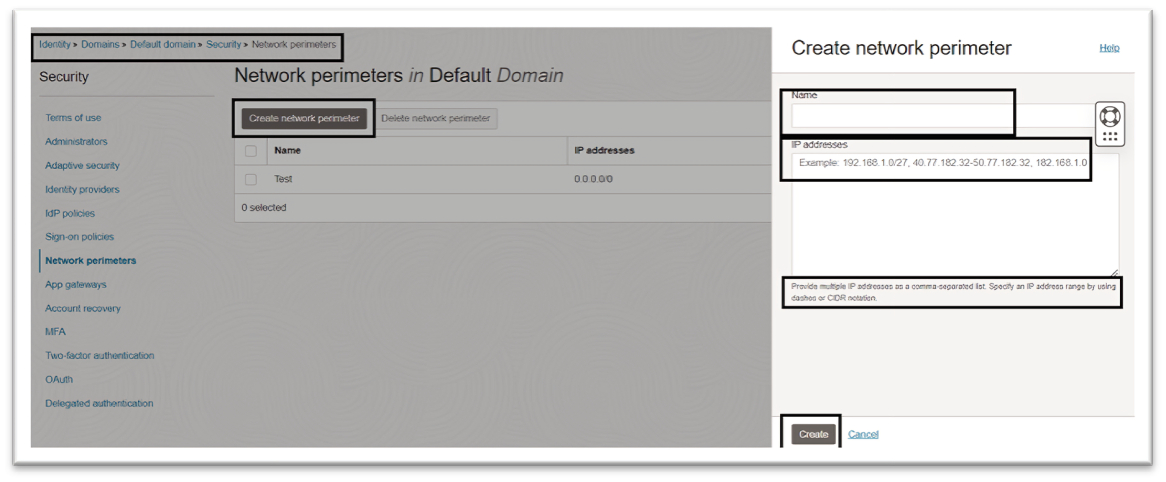
To configure network perimeters in the OCI Console, navigate to the Security section of identity domains, select Network Perimeters, and add the required IP addresses. For more information, see Creating a Network Perimeter.
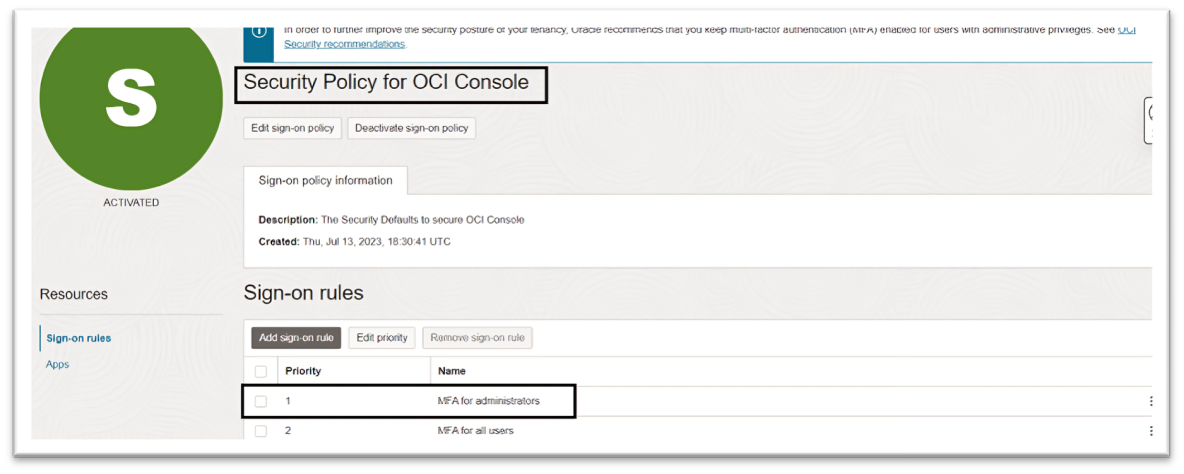
Your tenancy may have a seeded sign-on rule to enforce multi-factor authentication (MFA) for access to the OCI Console. For more information, see IAM MFA and Implementing multi-factor authentication in OCI IAM identity domains.
We will use this policy to enforce our network perimeter rules. You may optionally choose to create a new sign-on policy. For more information, see Creating a Sign-On Policy
Note: For safety, to ensure that an emergency access account is never locked out of our tenancy, an additional rule can be created at the highest priority which carves out an exception specifically for that account.
For our scenario, the following three rules will ensure all the points discussed above are covered.
-
Rule 1: MFA for Administrators: If you select the pre-seeded sign-on policy, you will see the sign-on rule named MFA for administrators. This rule is used to enforce MFA for OCI administrators. We will keep this rule intact for emergency access to your tenancy.
-
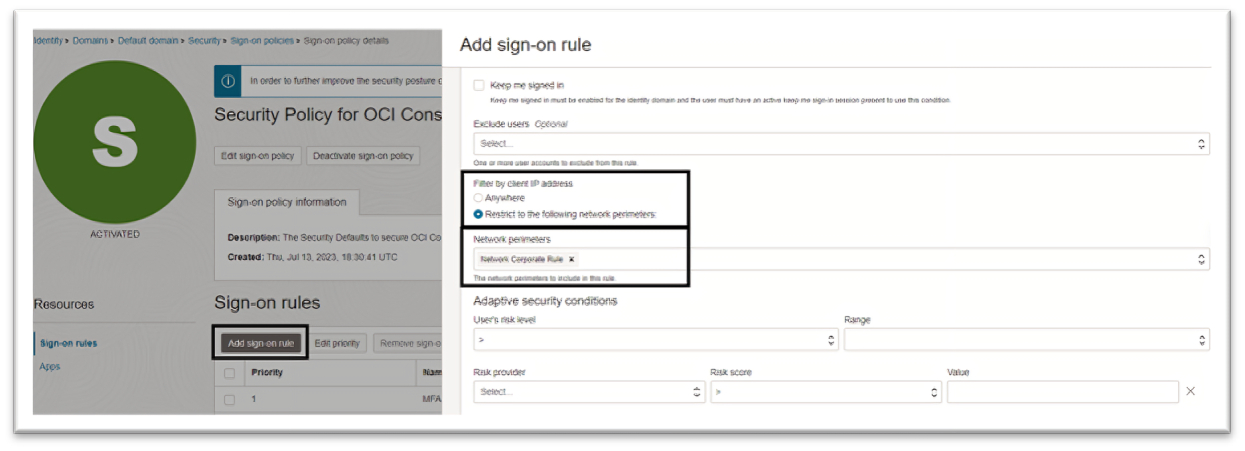
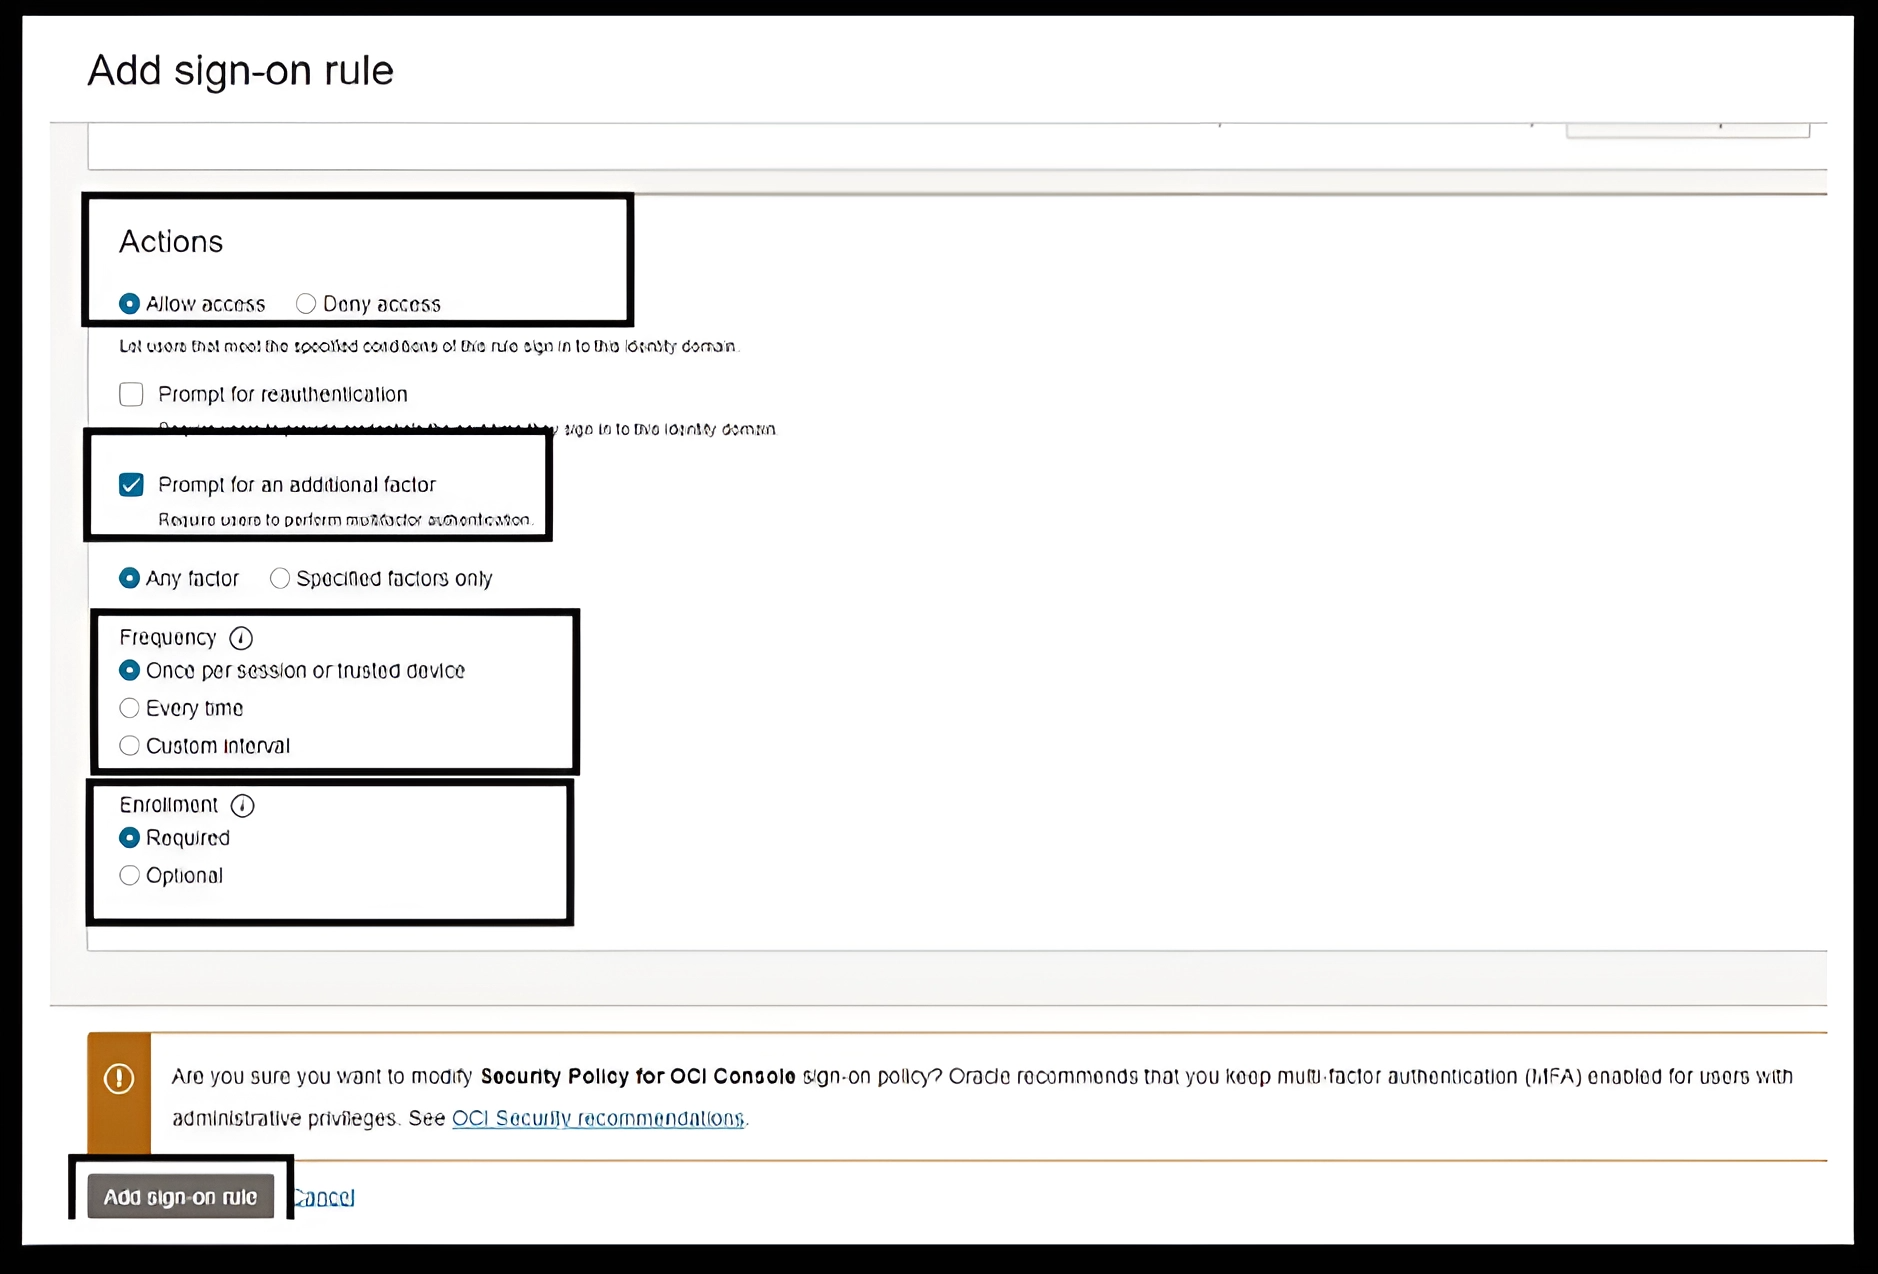
Rule 2: Allow Corporate Access: This rule will create an allowlist to ensure that access to the OCI Console is only allowed from the corporate network. This will leverage the set of IP addresses predefined in network perimeters.
-
Rule 3: Deny Unknown Access: This rule will ensure all users will have to be within the defined network perimeters to access the OCI Console. Under Filter by Client IP address, select Anywhere and under Actions, select Deny access.
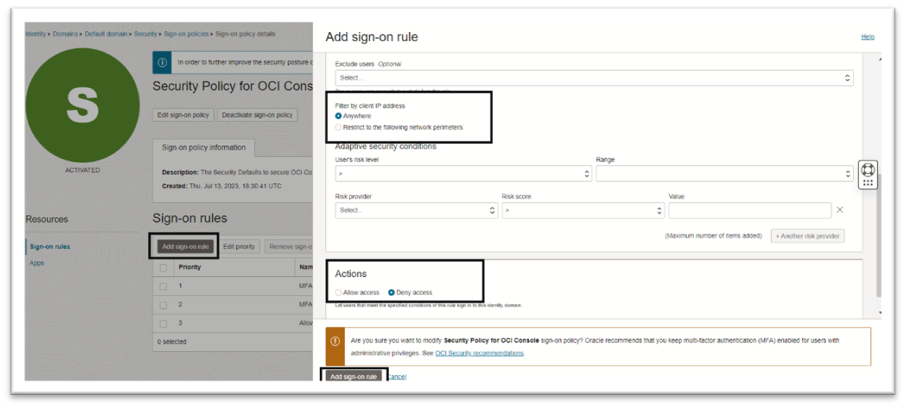
Note: Remember, this rule must have a lower priority than rules that allow access. Incorrect prioritization could result in your inability to access the OCI Console.
Alternative to the allowlist approach, you can optionally create a blocklist to prevent access from a defined set of IP addresses. To enable a blocklist approach, the sign-on policy rules will be:
- Rule 1: MFA for Administrators: Rule for administrators and emergency access accounts.
- Rule 2: Deny IP’s: Rule to deny access if source IP is within the defined blocklist.
- Rule 3: Allow all Other Access: To allow all other access and prompt for an additional authentication factor.
Use OCI IAM Network Sources
Network perimeters help to manage the networks from which users can access the OCI Console, whereas network sources helps to restrict access to certain OCI services and resources.
Network sources enable you to define a set of IP addresses that can be referenced by OCI access policies to restrict access based on the originating IP address. For example, you can restrict access to an OCI Object Storage bucket limiting access only to the users logged in from your corporate network.
Network sources support both public IP addresses and private IP addresses from virtual cloud networks within your tenancy.
How Network Sources Work?
To configure network sources in the OCI Console, navigate to Identity & Security, select Network Sources, and create a new network source that specifies the allowed IP addresses. For more information, see Creating a Network Source.
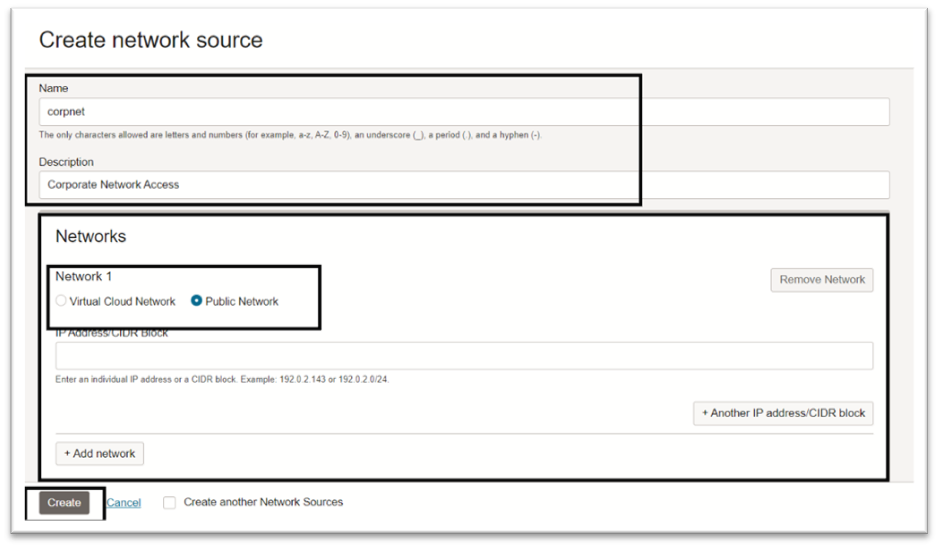
Based on your use case, create, or modify your OCI policy and add the request.networkSource.name condition. For more information, see How Policies Work.
Note: Allow group CorporateUsers to manage
object-familyin tenancy whererequest.networkSource.name='corpnet'.
Next Steps
In this tutorial, we explained how network perimeters and network sources can help restrict access to your OCI resources and help improve your cloud security posture. For more information about OCI IAM best pratices, see Best Practices for Identity and Access Management (IAM) in Oracle Cloud Infrastructure.
Related Links
Acknowledgments
- Author - Chetan Soni (Cloud Solutions Engineer)
More Learning Resources
Explore other labs on docs.oracle.com/learn or access more free learning content on the Oracle Learning YouTube channel. Additionally, visit education.oracle.com/learning-explorer to become an Oracle Learning Explorer.
For product documentation, visit Oracle Help Center.
Govern Public Access to OCI Resources using OCI IAM Network Perimeters and Network Sources
F94263-01
March 2024
Copyright © 2024, Oracle and/or its affiliates.