Note:
- This tutorial requires access to Oracle Cloud. To sign up for a free account, see Get started with Oracle Cloud Infrastructure Free Tier.
- It uses example values for Oracle Cloud Infrastructure credentials, tenancy, and compartments. When completing your lab, substitute these values with ones specific to your cloud environment.
Autoscale an Oracle Cloud Infrastructure Instance Pool based on OCI Load Balancer HTTP Requests
Introduction
In this tutorial, we will see how to automatically scale an Oracle Cloud Infrastructure (OCI) instance pool based on the number of HTTP requests received by the OCI Load Balancer. We will cover three main topics.
- OCI Monitoring Alarm Metrics: Monitor your load balancer and set up alarms based on HTTP request metrics.
- OCI Notifications service: Send notifications when an alarm is triggered.
- OCI Functions: Create and use functions to adjust the size of your instance pool based on the notifications received.
OCI Monitoring: Use the OCI Monitoring service to actively and passively monitor cloud resources using the metrics and alarms features. The OCI Monitoring service uses metrics to monitor resources and alarms to notify you when these metrics meet alarm-specified triggers.
OCI Notifications: When something happens with your resources in OCI, you can get human-readable messages through supported endpoints, including email and text messages (SMS) using alarms, event rules, and connectors. You can also automate tasks through custom HTTPS endpoints and OCI Functions.
OCI Functions: OCI Functions is a fully managed, multi-tenant, highly scalable, on-demand, Functions-as-a-Service platform. It is built on enterprise-grade OCI and powered by the Fn Project open source engine. Use OCI Functions (sometimes abbreviated as Functions, and formerly known as Oracle Functions) when you want to focus on writing code to meet business needs.
High Level Architecture

Note:
This tutorial is designed solely for educational and study purposes. It provides an environment for learners to experiment and gain practical experience in a controlled setting. It is crucial to note that the security configurations and practices employed in this tutorial might not be suitable for real-world scenarios.
Security considerations for real-world applications are often far more complex and dynamic. Therefore, before implementing any of the techniques or configurations demonstrated here in a production environment, it is essential to conduct a comprehensive security assessment and review. This review should encompass all aspects of security, including access control, encryption, monitoring, and compliance, to ensure that the system aligns with the organization’s security policies and standards.
Security should always be a top priority when transitioning from a lab environment to a real-world deployment.
Objectives
-
Set up an autoscaling mechanism for an OCI instance pool. This autoscaling mechanism will be based on the number of HTTP requests received by the OCI Load Balancer. You will learn how to:
-
Monitor HTTP request metrics: Set up OCI Monitoring to track HTTP request metrics from your load balancer.
-
Create and configure alarms: Define and configure alarms that trigger based on specific HTTP request thresholds.
-
Set up event notifications: Establish event notifications to alert you when an alarm is triggered.
-
Implement OCI Functions: Create and deploy functions to automatically adjust the size of your instance pool in response to the triggered alarms.
-
Prerequisites
-
OCI Environment
-
Oracle account with admin permissions.
-
A compartment to create your resources.
Note: Note the compartment name and compartment ID.
-
VCN with a private subnet. For more information, see Creating a Virtual Cloud Network.
-
OCI Load Balancer attached to the instance pool with a backendSet pointing to the instances on the pool. For more information, see Creating a Load Balancer.
-
Instance pool with at least 1 instance that has a simple HTTP application running on port
80. For more information, see Using Instance Configurations and Instance Pools.
-
-
Local Machine Environment
-
An Oracle Linux compute instance on the private subnet. This is important for accessing resources on the private subnet, such as OCI Streaming and OCI Functions that will be deployed during this tutorial.
-
An OCI Bastion host to connect to the Oracle Linux compute instance and perform tasks for the tutorial. For more information, see Bastion Overview.
-
Set up local Oracle Cloud Infrastructure Command Line Interface (OCI CLI). For more information, see Installing the CLI.
-
Local Docker to be able to build images, if you are using Oracle Linux, see Docker: Install Docker on Oracle Linux 8 (OL8).
-
Local FN CLI to be able to deploy your function to OCI. For more information, see Installing the Fn Project CLI.
-
Task 1: Set up Dynamic Groups
Go to your domain, click Dynamic Groups and create the following groups.
Dynamic Group Name: MyFunctions.
ALL {resource.type = 'fnfunc', resource.compartment.id = 'pasteYourCompartmentOCID'}
Task 2: Create Policies
Go to Policies and create the following policies.
Policy Name: FunctionsPolicies.
Allow dynamic-group MyFunctions to read repos in compartment YOUR-COMPARTMENT-NAME
Allow dynamic-group MyFunctions to manage compute-management-family in compartment YOUR-COMPARTMENT-NAME
Allow dynamic-group MyFunctions to manage load-balancers in compartment YOUR-COMPARTMENT-NAME
Allow dynamic-group MyFunctions to read metrics in compartment YOUR-COMPARTMENT-NAME
Allow dynamic-group MyFunctions to read alarms in compartment YOUR-COMPARTMENT-NAME
Allow dynamic-group MyFunctions to manage instance-pools in compartment YOUR-COMPARTMENT-NAME
Allow dynamic-group MyFunctions to manage instance-family in compartment YOUR-COMPARTMENT-NAME
Allow dynamic-group MyFunctions to read app-catalog-listing in compartment YOUR-COMPARTMENT-NAME
Allow dynamic-group MyFunctions to use volume-family in compartment YOUR-COMPARTMENT-NAME
Allow dynamic-group MyFunctions to use virtual-network-family in compartment YOUR-COMPARTMENT-NAME
Task 3: Create OCI Container Registry
-
Go to Developer Services, click Container registry and create a private repository for the Fn image.
Repository Name:
lab/fn-autoscale-instance-pool.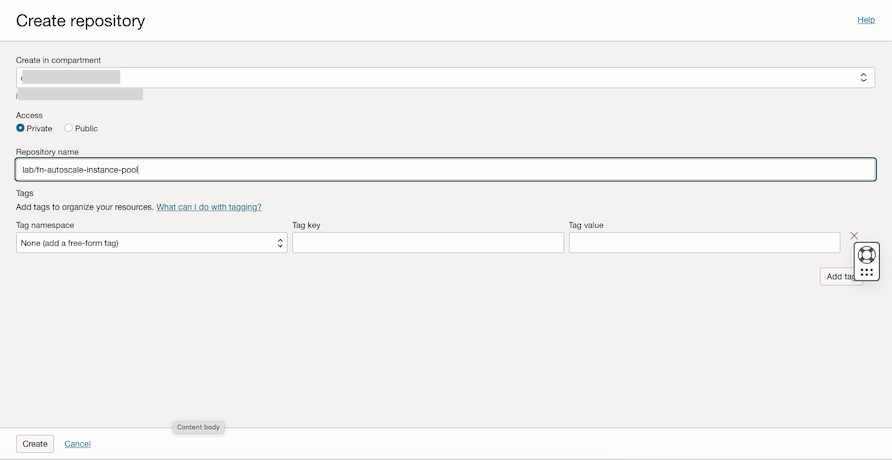
-
Check the repositories and note the Namespace.
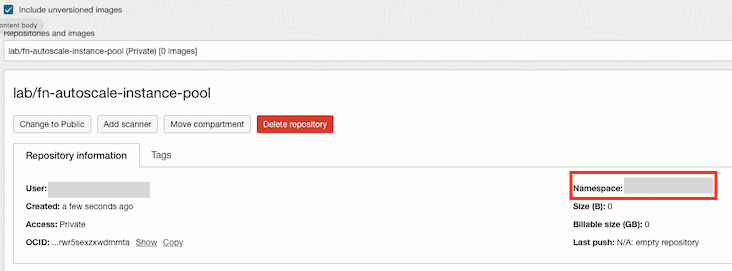
-
Open the terminal shell where you have OCI CLI and Docker installed, and proceed with the log in on the registry. Check the correct URL for your region. In this tutorial, we are using Brazil East (Sao Paulo) region where the registry URL is
gru.ocir.io.docker login gru.ocir.io Username: <your container namespace>/youruser Password: YOUR_AUTH_TOKEN_CREATED_EARLIER
Task 4: Create the Python OCI Functions to Autoscale the Instance Pool
Note: Ensure you have selected your private subnet, the same subnet of your stream pool.
-
Go to the OCI Console and click Developer Services. Under Functions, click Applications and Create application.
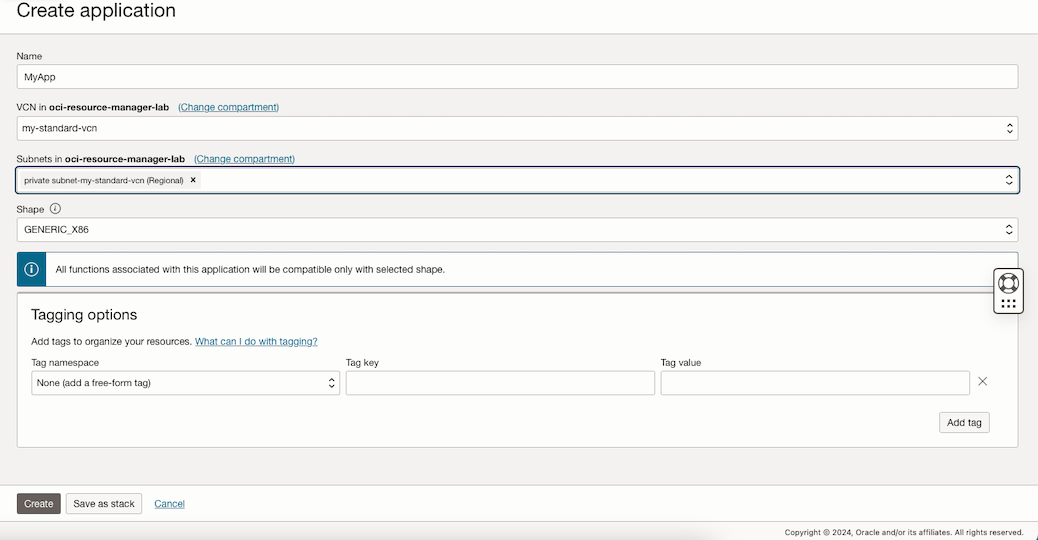
-
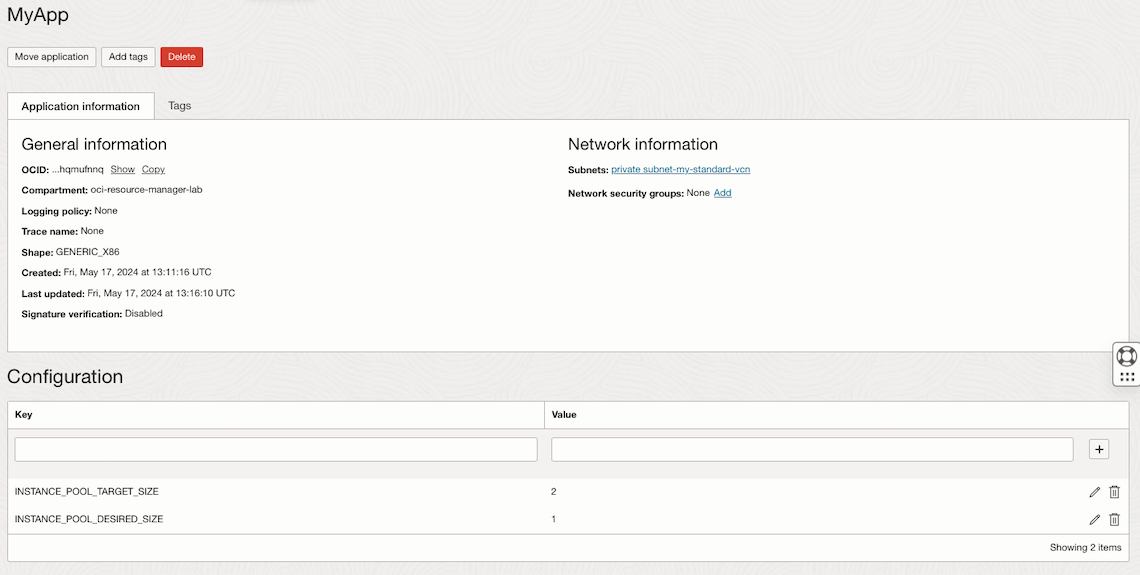
Create a few configurations to set up the scaling sizes.
Note: These configuration variables are used to determine the values that the function will use to scale-in and scale-out the instance pool.
Secret Name Value INSTANCE_POOL_TARGET_SIZE Set the value for new instance pool size INSTANCE_POOL_DESIRED_SIZE Set the regular size of the instance pool For this tutorial, we are using an instance pool of 1 instance and scale-out to
2.
-
Go to the terminal shell where you have Docker, OCI CLI, Fn Project CLI installed and run the following commands to initialize the function.
Note: If you followed the tasks, your Docker log in command has already been executed by now, if not, proceed with the Docker log in Task 3.3.
mkdir lab
cd lab
fn create context oci-cloud --provider oracle
fn use context oci-cloud
fn update context oracle.compartment-id PASTE_YOUR_COMPARTMENT_OCID
fn update context api-url https://functions.sa-saopaulo-1.oraclecloud.com
fn update context registry gru.ocir.io/PASTE_YOUR_REGISTRY_NAMESPACE/lab
fn init --runtime python fn-autoscale-instance-pool
cd fn-autoscale-instance-pool
ls -lrt
Note: In this tutorial, we are using Brazil East(Sao Paulo) region, if you are using a different region, you need to change the
api-urlandregistrylocations.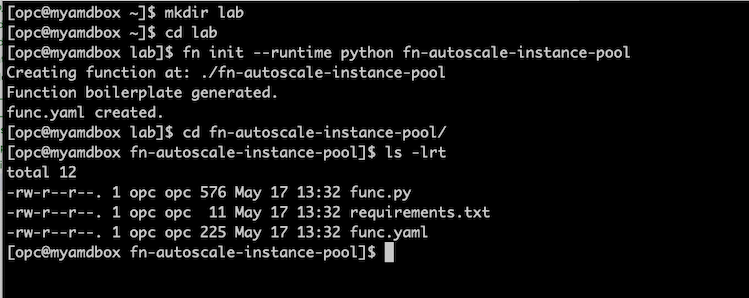
The
initcommand will create a Hello World function onfunc.py. We will overwrite this code. -
Get the Python function sample code from here: func.py and overwrite the local
func.pycreated during functioninitcommand.# Copy the function code from this lab and save it on /tmp/func.py in your shell machine ls -lrt /tmp/func.py # Overwrite the func.py with tha lab's code cp /tmp/func.py func.py # Add the OCI package on the requirements.txt file, this will be needed to work with OCI. echo -e "\noci" >> requirements.txt # Check if requirements.txt has two lines cat requirements.txt
-
Build the new code and deploy the function.
ls -lrt
fn deploy --app MyApp
Task 5: Create the OCI Notifications
-
Go to the OCI Console and click Developer Services. Under Application Integration, select Notifications and click Create Topic.
Name:
AutoScaleTopic.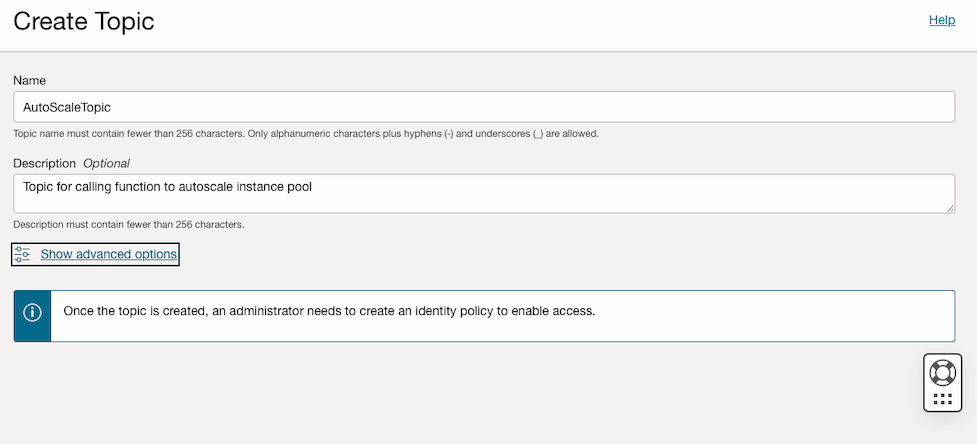
-
Click Subscriptions to create a new subscription and select the function created in Task 4.
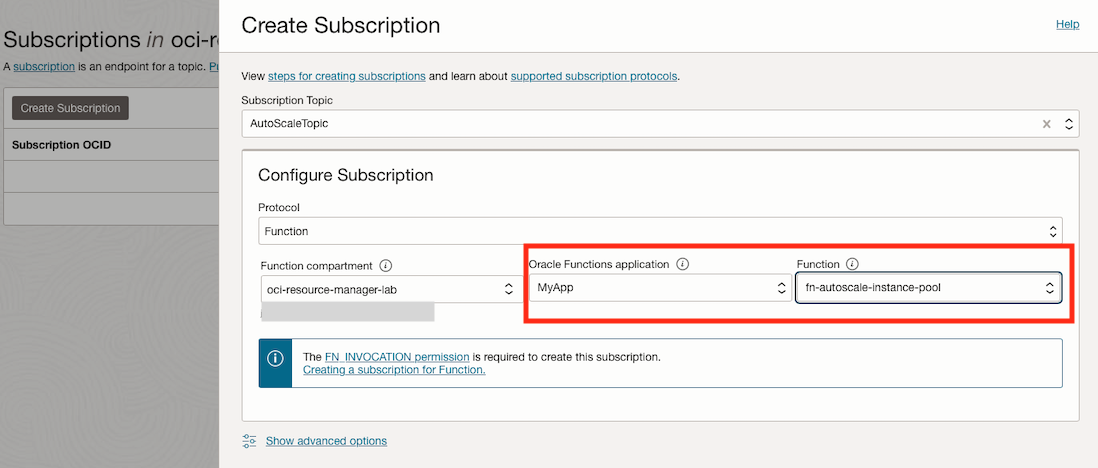
Task 6: Create the Alarm Definition to Scale-out (Adjust Instance Pool Size to the Target Value)
-
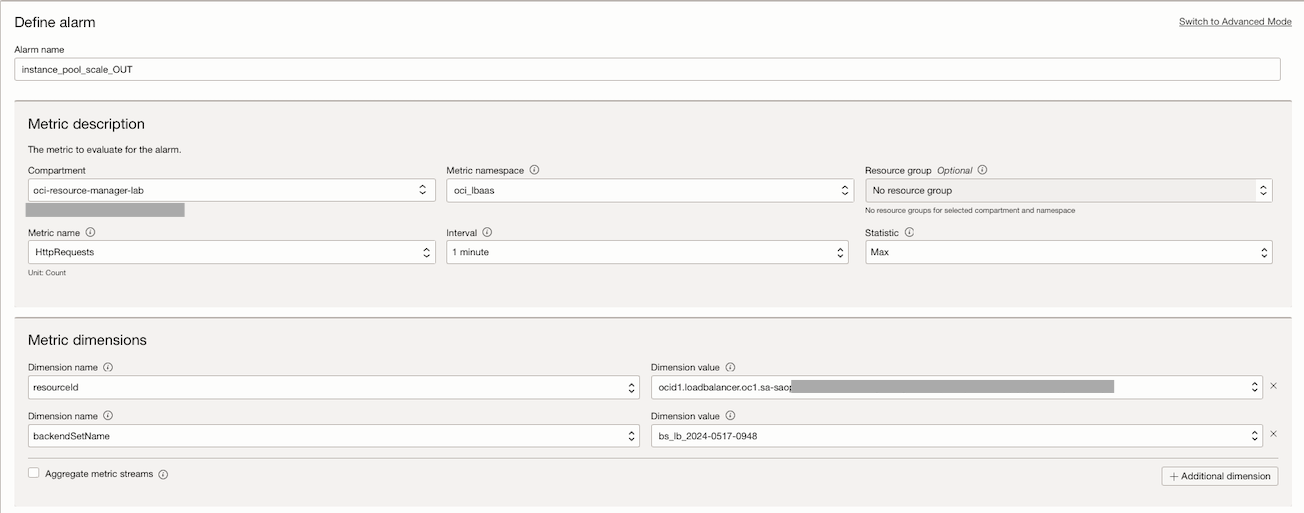
Go to the OCI Console and click Observability & Management. Under Monitoring, select Alarm Definitions and click Create Alarm.
Note: The thresholds, interval on this alarm is defined for the tutorial, you can customize with your own needs depending on your application.
Alarm Name:
instance_pool_scale_OUT. -
Enter the following information to define the alarm.
-
In the Metric Description section, enter the following information.
- Metric Namespace:
oci_lbaas. - Metric Name:
HttpRequests. - Interval:
1 minute. - Statistic:
Max.
- Metric Namespace:
-
In the Metric Dimensions section, enter the following information.
-
First metric dimension:
- Dimension Name:
resourceID. - Dimension Value: Select your load balancer OCID.
- Dimension Name:
-
Second metric dimension:
- Dimension Name:
backendSetName. - Dimension Value: Select your backendSet name.
- Dimension Name:
-
-
In the Trigger Rule 1 section, enter the following information.
- Operator:
greater than. - Value:
30. - Alarm Body: The number of connections is higher than expected, initiate the scaling process.

- Operator:
-
-
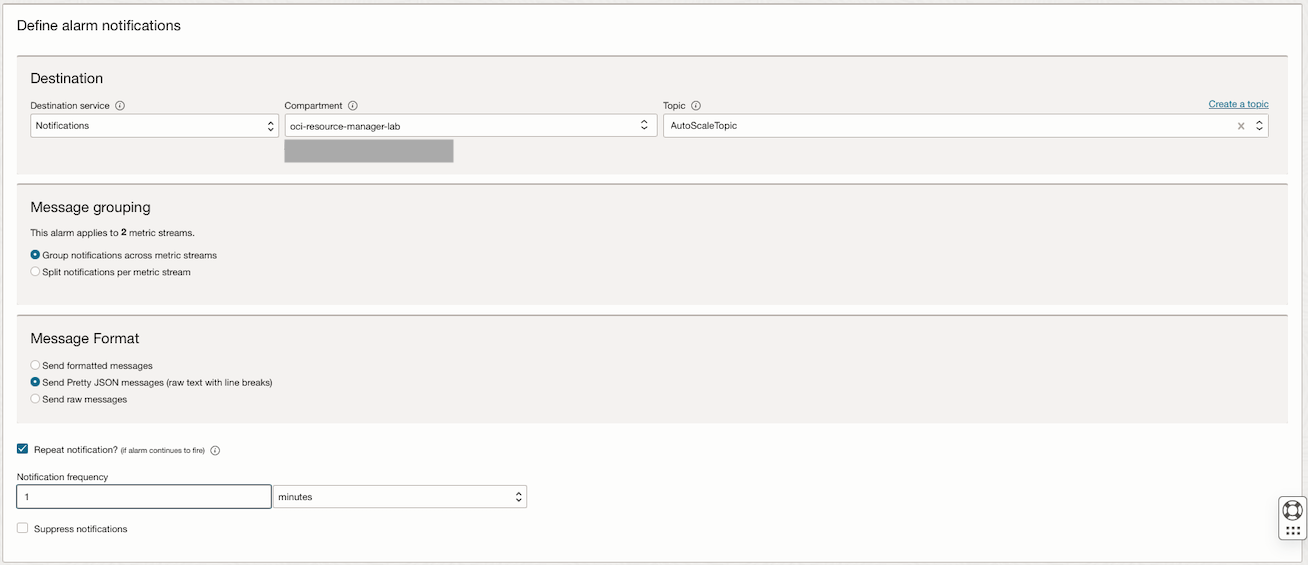
Enter the following information to define the alarm notifications.
-
In the Destination section, enter the following information.
- Destination Service: Select Notifications.
- Compartment: Select your compartment.
- Topic: Select your topic.
-
In the Message Format section, select Send Pretty JSON messages (raw text with line breaks) and for testing purpose, select Repeat notification? with 1 minute of Notification frequency.
-
-
Click Advanced Options and add a new tag.
Note: This is a mandatory tagging in order to define the type of scaling, in or out.
Tag Namespace: Select None (apply a freeform tag).
Tag Key:autoscaling_type. Value:out.
Task 7: Create the Alarm Definition to Scale-in (Adjust Instance Pool Size back to the Desired Size)
-
Go to the OCI Console and click Observability & Management. Under Monitoring, select Alarm Definitions and click Create Alarm.
Note: The thresholds, interval on this alarm is defined for the tutorial, you can customize with your own needs depending on your application.
Alarm Name:
instance_pool_scale_IN. -
Enter the following information to define the alarm.
-
In the Metric Description section, enter the following information.
- Metric Namespace:
oci_lbaas. - Metric Name:
HttpRequests. - Interval:
1 minute. - Statistic:
Max.
- Metric Namespace:
-
In the Metric Dimensions section, enter the following information.
-
First metric dimension:
- Dimension Name:
resourceID. - Dimension Value: Select your load balancer OCID.
- Dimension Name:
-
Second metric dimension:
- Dimension Name:
backendSetName. - Dimension Value: Select your backendSet name.
- Dimension Name:
-
-
In the Trigger Rule 1 section, enter the following information.
- Operator:
less than. - Value:
30. - Alarm Body: The connection count is back to the acceptable value, calling scale-in to reduce the number of instances back to the desired value.

- Operator:
-
-
Enter the following information to define the alarm notifications.
-
In the Destination section, enter the following information.
- Destination Service: Select Notifications.
- Compartment: Select your compartment.
- Topic: Select your topic.
-
In the Message Format section, select Send Pretty JSON messages (raw text with line breaks).
-
-
Click Advanced Options and add a new tag.
Note: This is a mandatory tagging in order to define the type of scaling, in or out.
Tag Namespace: Select None (apply a freeform tag).
Tag Key:autoscaling_type. Value:in.
Task 8: Create Load and Check the Alarm Working
-
Get your LoadBalancer IP and run several calls to your application on port
80. Open your shell console and run the following code to call your load balancer.i=1 while true do echo "Request $i" curl http://your-ip-here ((i++)) echo "" # Prints a newline for better readability between requests doneOutput of the simple application load.

Note: This is a simple HTTP Apache web server to demonstrate the scenario.
-
Check your instance pool actual size and status. For this tutorial, we have an instance pool with size
1.
-
Open the alarm definition to view the metrics and check if the alarm will fire.
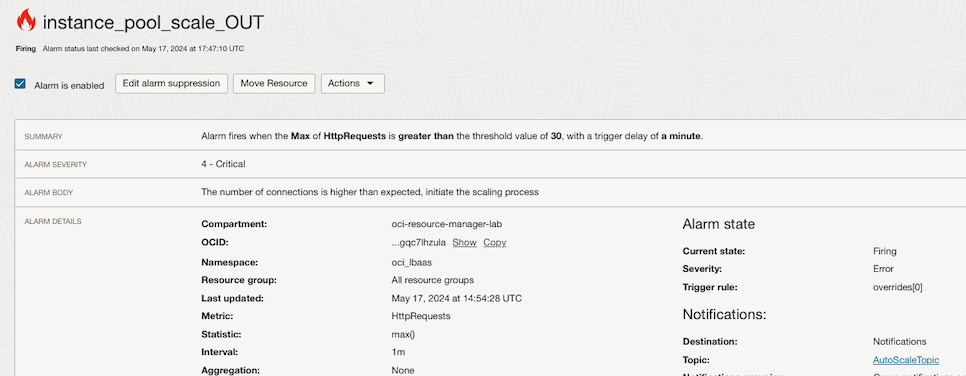

-
After few minutes depending on the metric interval it will fire the scale-out function.
Open the instance pools and check the State, which is Scaling and Target Instance count is
2.
After scaling process, you can see the instance pool size is
2.
-
Stop the shell script and wait until the alarm from scale-out transition is back to OK and then observe the alarm for scale-in. Wait for a few minutes until both alarms are updated, and observe when the alarm for scale-in will fire.

Now, the scale-in alarm is in fire state.
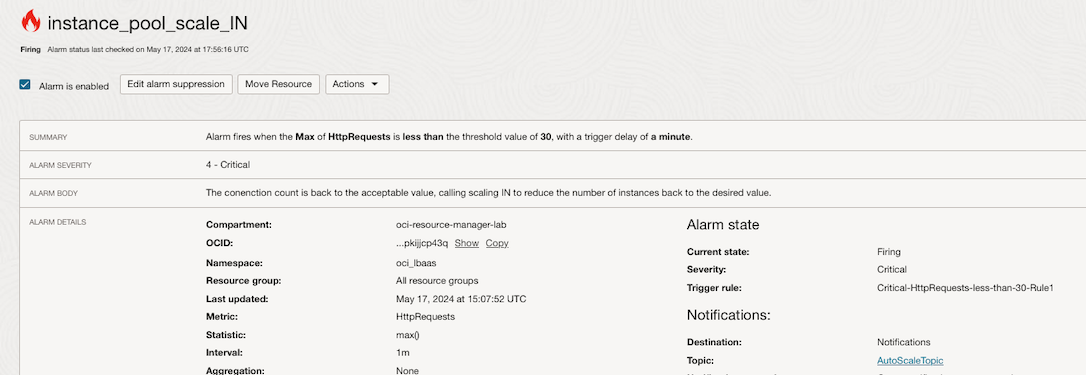
Notice the HttpRequests have dropped to a number below the threshold of
30.
The instance pool scale-in has started.

Notice the instance pool size is back to the desired value of
1.
Related Links
Acknowledgments
- Author - Joao Tarla (Oracle LAD A-Team Solution Engineer)
More Learning Resources
Explore other labs on docs.oracle.com/learn or access more free learning content on the Oracle Learning YouTube channel. Additionally, visit education.oracle.com/learning-explorer to become an Oracle Learning Explorer.
For product documentation, visit Oracle Help Center.
Autoscale an Oracle Cloud Infrastructure Instance Pool based on OCI Load Balancer HTTP Requests
F99372-01
May 2024