Note:
- This tutorial requires access to Oracle Cloud. To sign up for a free account, see Get started with Oracle Cloud Infrastructure Free Tier.
- It uses example values for Oracle Cloud Infrastructure credentials, tenancy, and compartments. When completing your lab, substitute these values with ones specific to your cloud environment.
Configure VMware vSAN file share with Oracle Cloud VMware Solution
Introduction
Oracle Cloud VMware Solution provides customer-managed native Oracle Cloud Infrastructure (OCI) service that provisions VMware Software Defined Data Center (SDDC)) in a customer’s tenancy. The Oracle Cloud VMware Solution SDDC consists of VMware software products(vSphere, vSAN and NSX-T) built on top of the OCI’s hyper-converged bare metal compute hardware.
Oracle Cloud VMware Solution currently uses BM DenseIO2.52 (Intel) and BM Dense E4.128 (AMD) compute shapes to create a VMware SDDC and offers an option to deploy SDDC with VMware vSphere versions 6.5, 6.7 and 7.0.
Note: The End of General Support for VMware vSphere 6.5 and 6.7 was October 15, 2022. To upgrade, see the Perform an in-place upgrade from Oracle Cloud VMware Solution 6.x to 7.x tutorial link in the Related Links section.
VMware vSAN offers software-defined storage capabilities to SDDC workloads by combining all-flash NVMe drives from OCI bare metal server. VMware vSAN also offers a native integrated File Service to create file shares in the VMware vSAN datastore that SDDC VMs can access. The data stored in a file share can be accessed from any device that has access rights. The VMware vSAN File Service exposes storage endpoints to clients for the respective storage protocol used such as SMB, NFSv3, NFSv4.1.
Objective
This tutorial provides an operational overview of how to configure the VMware vSAN File Service and provide file share capabilities to the SDDC VMs (clients). The focus of this tutorial is to highlight the ‘how-to’ steps required to configure the VMware vSAN file share with best practices architecture in an Oracle Cloud VMware Solution environment.
The intent is to provide existing Oracle Cloud VMware Solution customers to use the VMware vSAN file service option within Oracle Cloud VMware Solution SDDC as a shared file storage for the workloads. Customers can always use this architecture and implementation for the applications requiring shared file storage capabilities without paying an additional cost for external file storage service.
Prerequisites
- Microsoft Active Directory Domain Controller
- DNS Server
- VLAN backed network port group
- Communication between NSX Overlay (workload network) segment to VCN Subnet
Architecture Overview
The architecture diagram below represents the VMware vSAN file share implementation within Oracle Cloud VMware Solution SDDC. It also depicts how the Oracle Cloud VMware Solution SDDC VMs (clients) are connected to NSX overlay segment to utilize the VMware vSAN File share service.
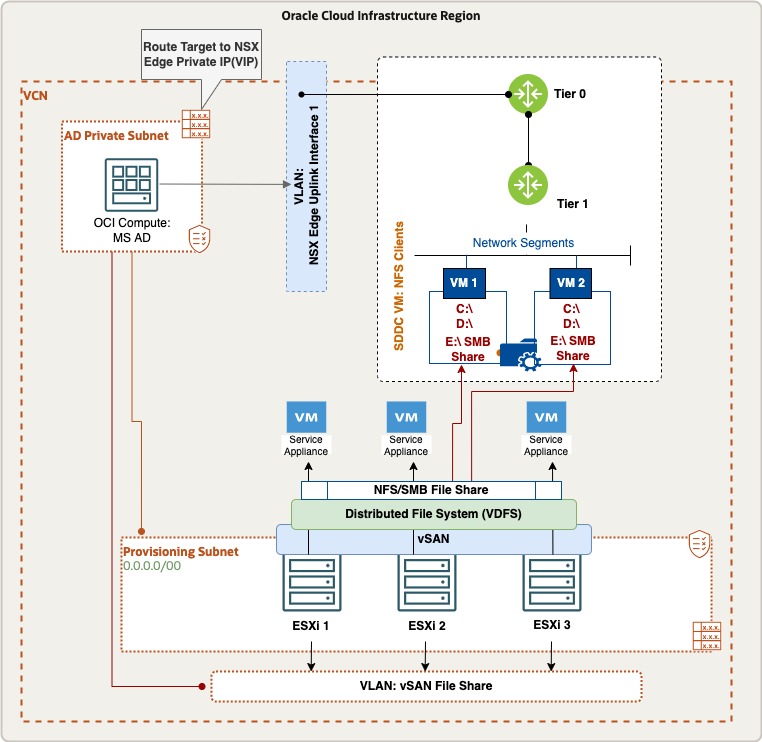
The architecture has the following components:
- Provisioning Subnet: In this tutorial, the provisioning subnet is created during the Oracle Cloud VMware Solution SDDC provisioning and the ESXi management vmkernel network is created.
- VLAN for VMware vSAN File Share: Dedicated VLAN is required for VMware vSAN file share.
- NSX Overlay Network: The NSX overlay logical network segment is created in NSX where SDDC VMs (clients) will be connected.
- Service Appliance: Service appliance VMs are created per ESXi host as part of the VMware vSAN file share operation.
- MS Active Directory: The MS active directory is hosted in an OCI native compute instance. You can optionally place this MS-AD server inside the Oracle Cloud VMware Solution SDDC or use your on-premises corporate AD. However, the recommendation is to keep the MS AD locally within your OCI tenancy.
- Uplink 1 VLAN: The communication between NSX Overlay and VCN Subnet will be routed through Uplink 1 VLAN.
Task 1: Create a dedicated VLAN
This section describes how to create a VLAN backed DvPortgroup for the VMware vSAN file share.
-
Login to the OCI console and from the left navigation pane, go to Networking, click Virtual Cloud Network, and then select the VCN where you have deployed the Oracle Cloud VMware Solution SDDC.
-
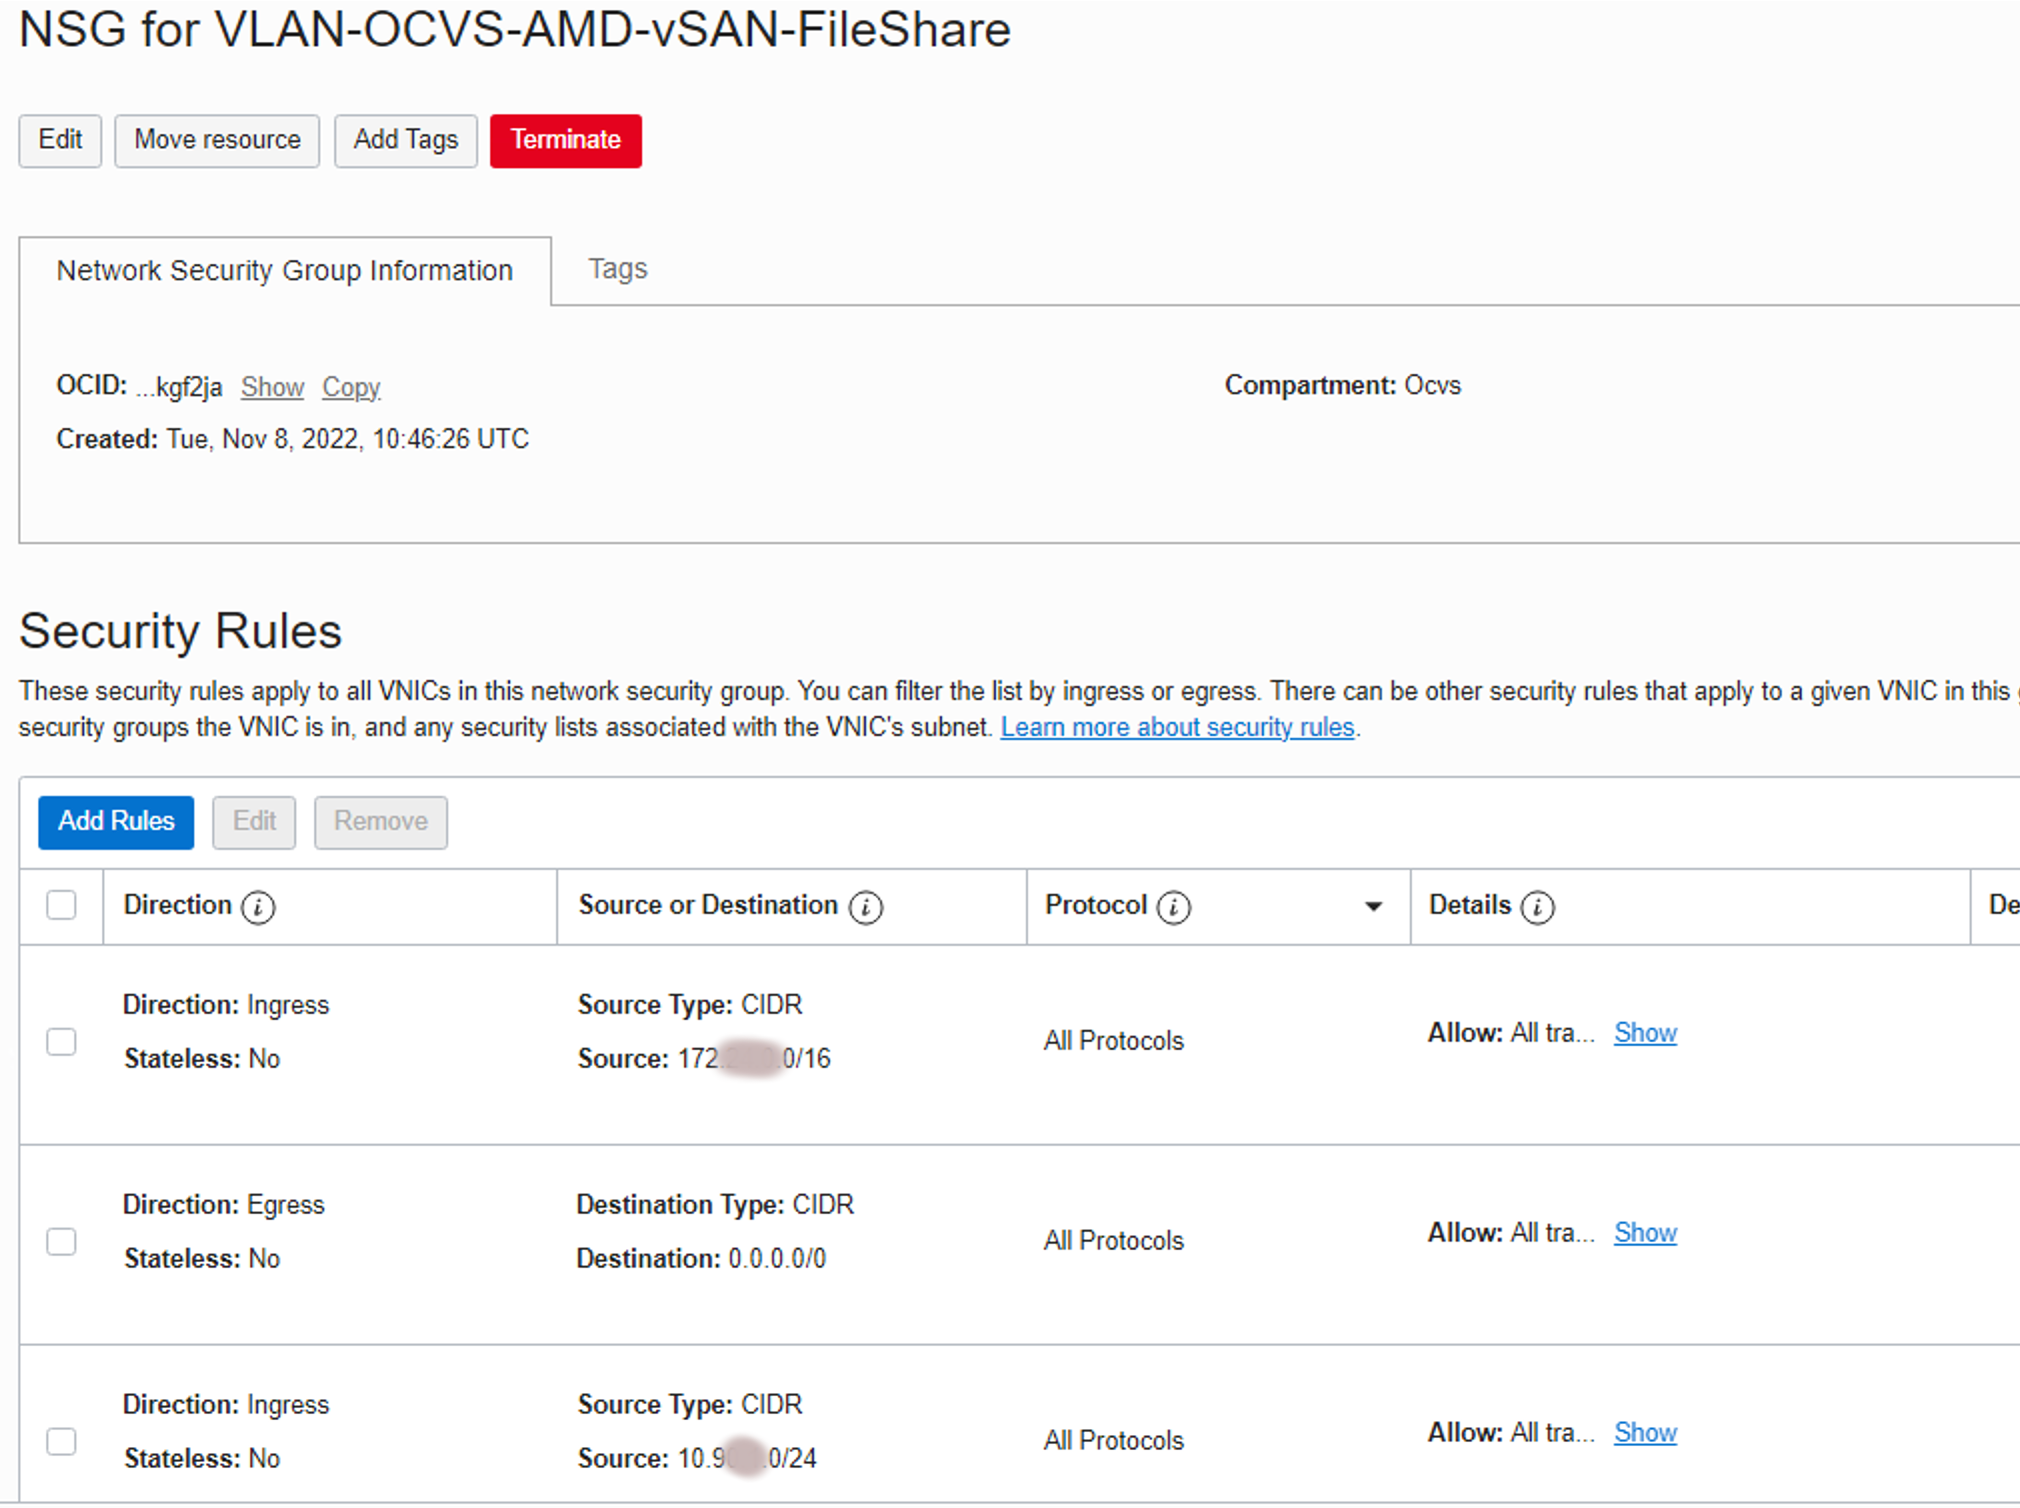
Navigate to Network Security Groups and click Create Network Security Group.
Note: We are creating this Network Security Group for the VMware vSAN File Share VLAN to accept the inter-VCN and overlay traffic.
-
Add ingress and egress rule to accept the communication from the VCN CIDR and NSX overlay network where the SDDC VMs are connected.
-
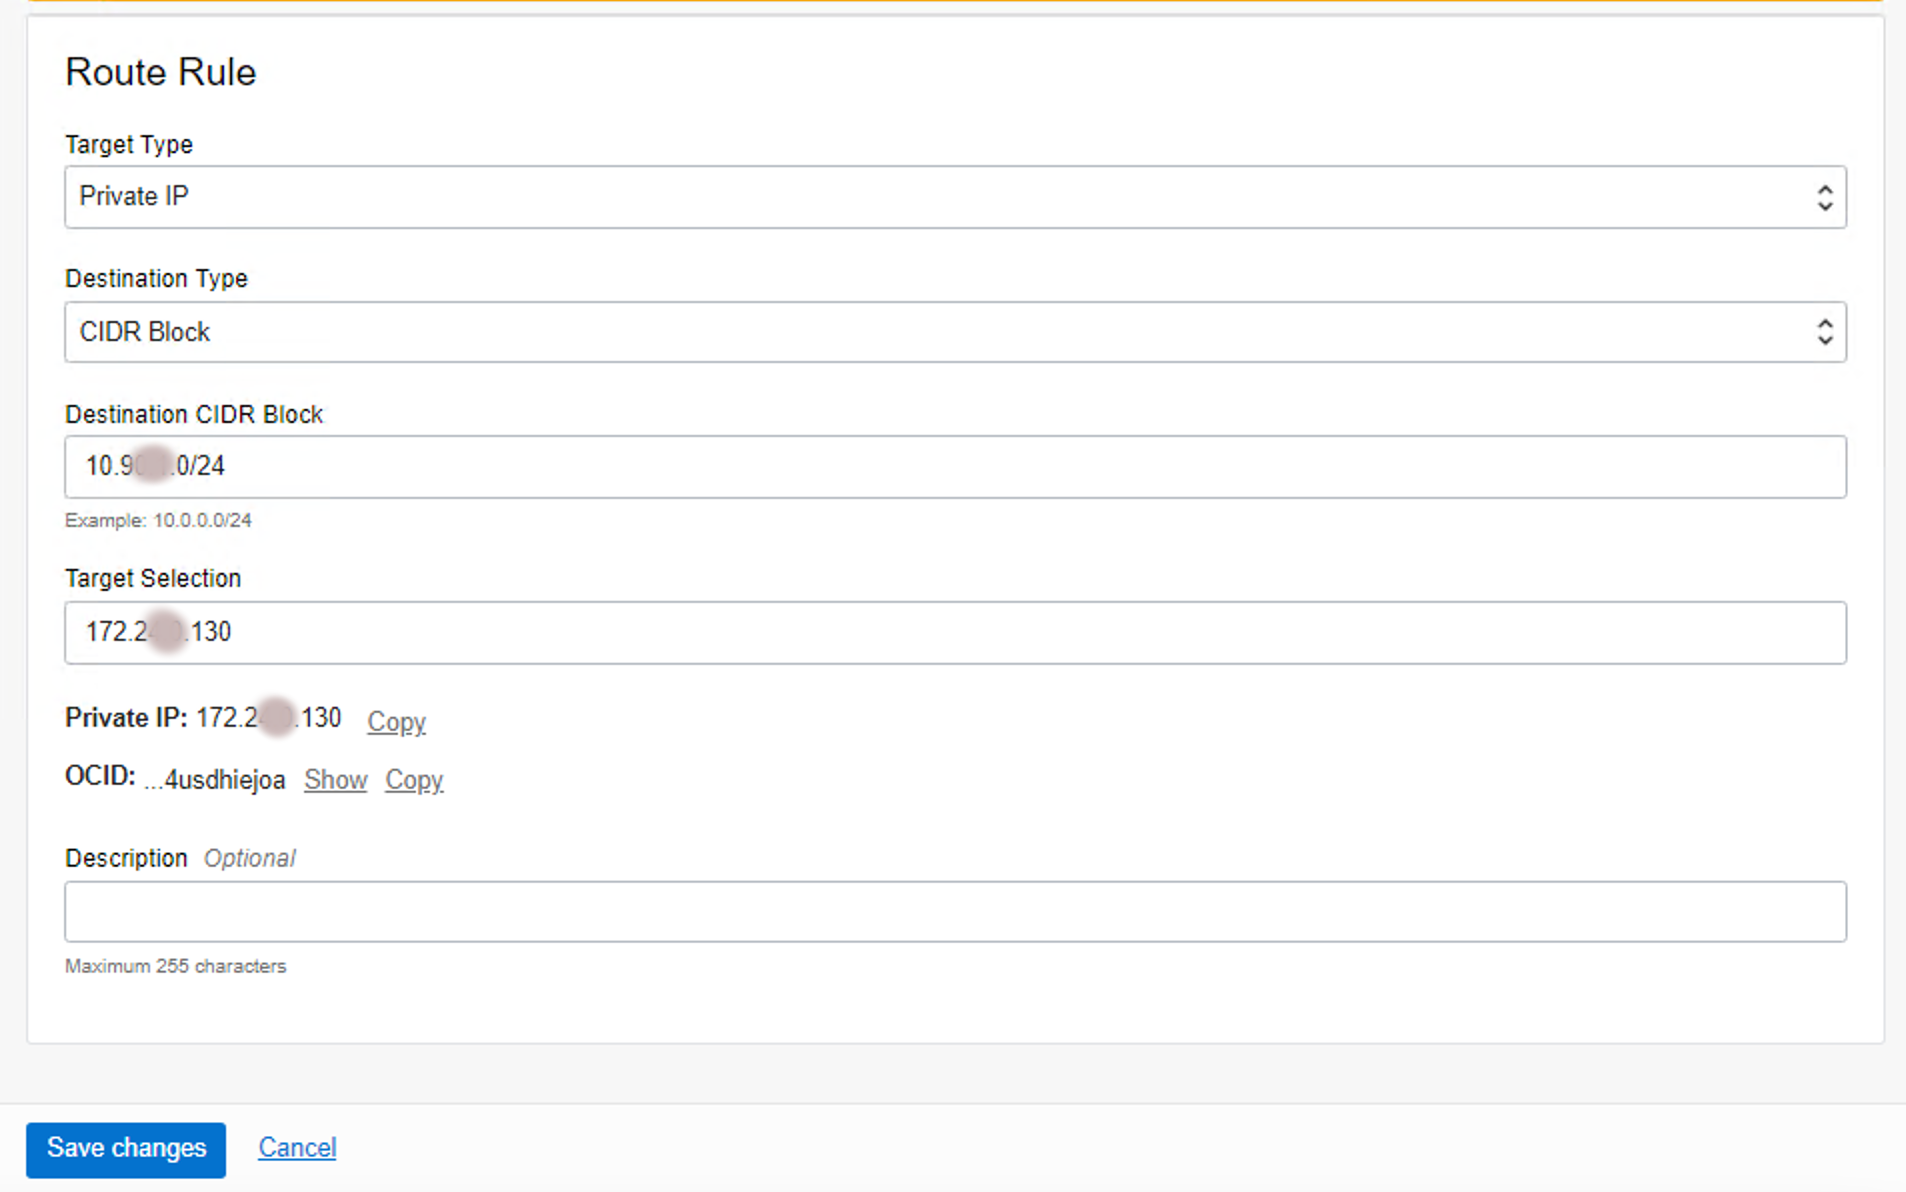
Now, let’s create a Route Table for VMware vSAN VLAN file share. Click Route Tables under the VCN and then click Create Route Table.
-
Provide the name of the Route Table, select the appropriate compartment and click +Another Route Rule to add the routes.
Note: Add a route of Target Type: Private IP and the destination CIDR of NSX Overlay network and use Target selection as NSX VIP IP.
-
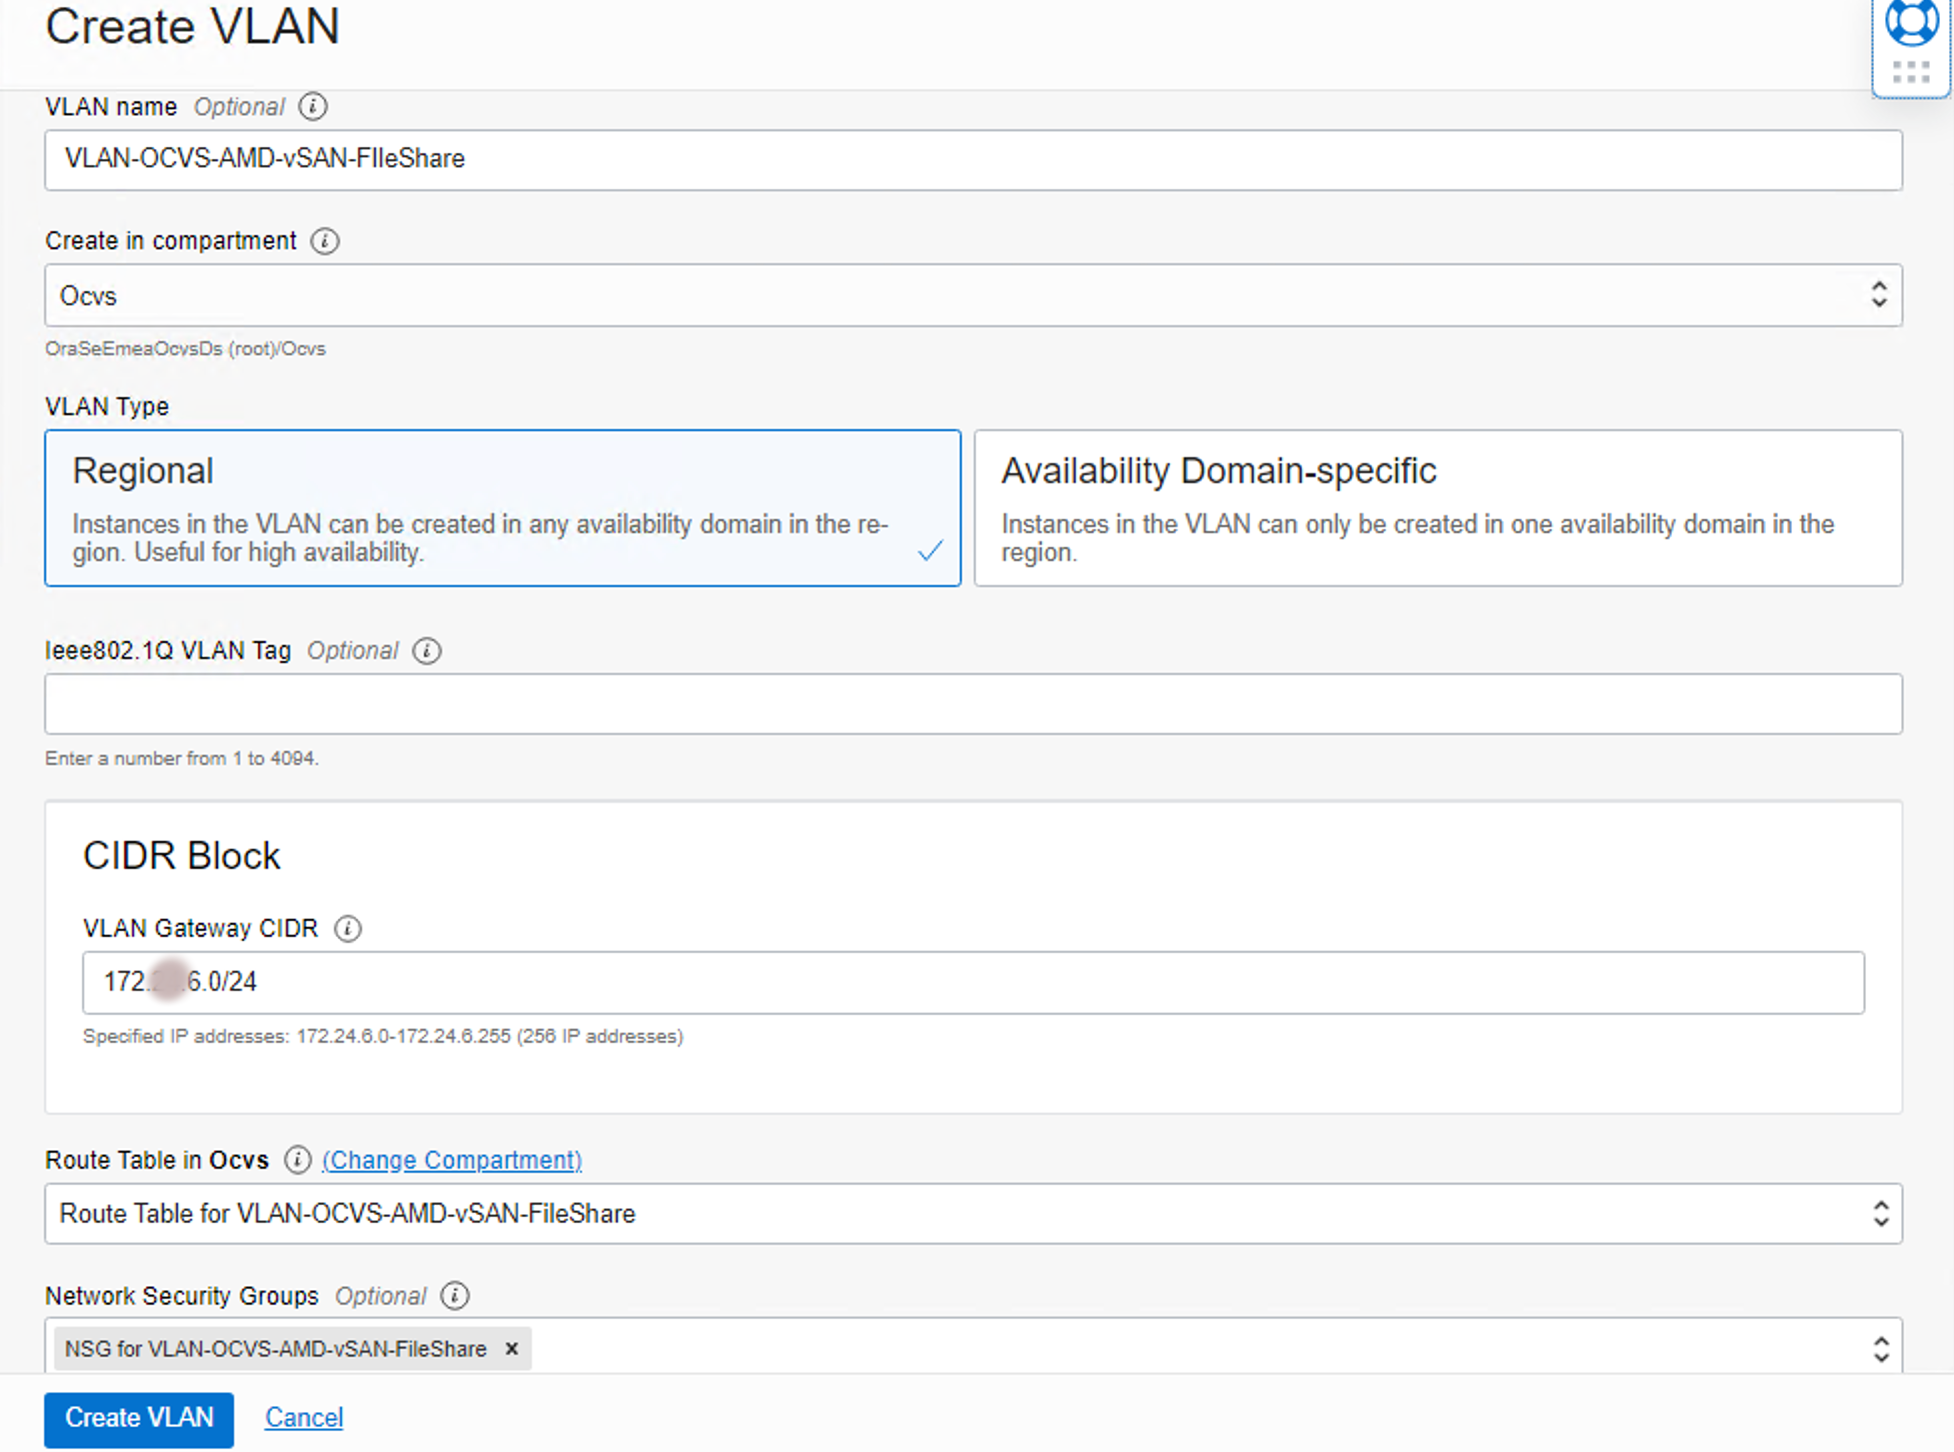
Now, let’s create a VLAN for VMware vSAN file share and associate the network security group and route table created in the previous steps. Click on the VLANs under VCN and then click Create VLAN.
- Provide the name of the VLAN.
- Select the compartment.
- Select the Regional VLAN Type.
- Provide the Network CIDR Block.
- Associate the Route Table created in Step 4.
- Associate the Network Security Group created in Step 2.
-
Click Create VLAN.
Note: Now we should associate the newly created VLAN to each ESXi host in the cluster. Each OCI compute instance has 2 physical NICs and every VLAN created should be associated with both the physical NICs. To do so, navigate to the Compute, and then click Instances.
-
Locate your ESXi compute instance and click on the instance to open.
-
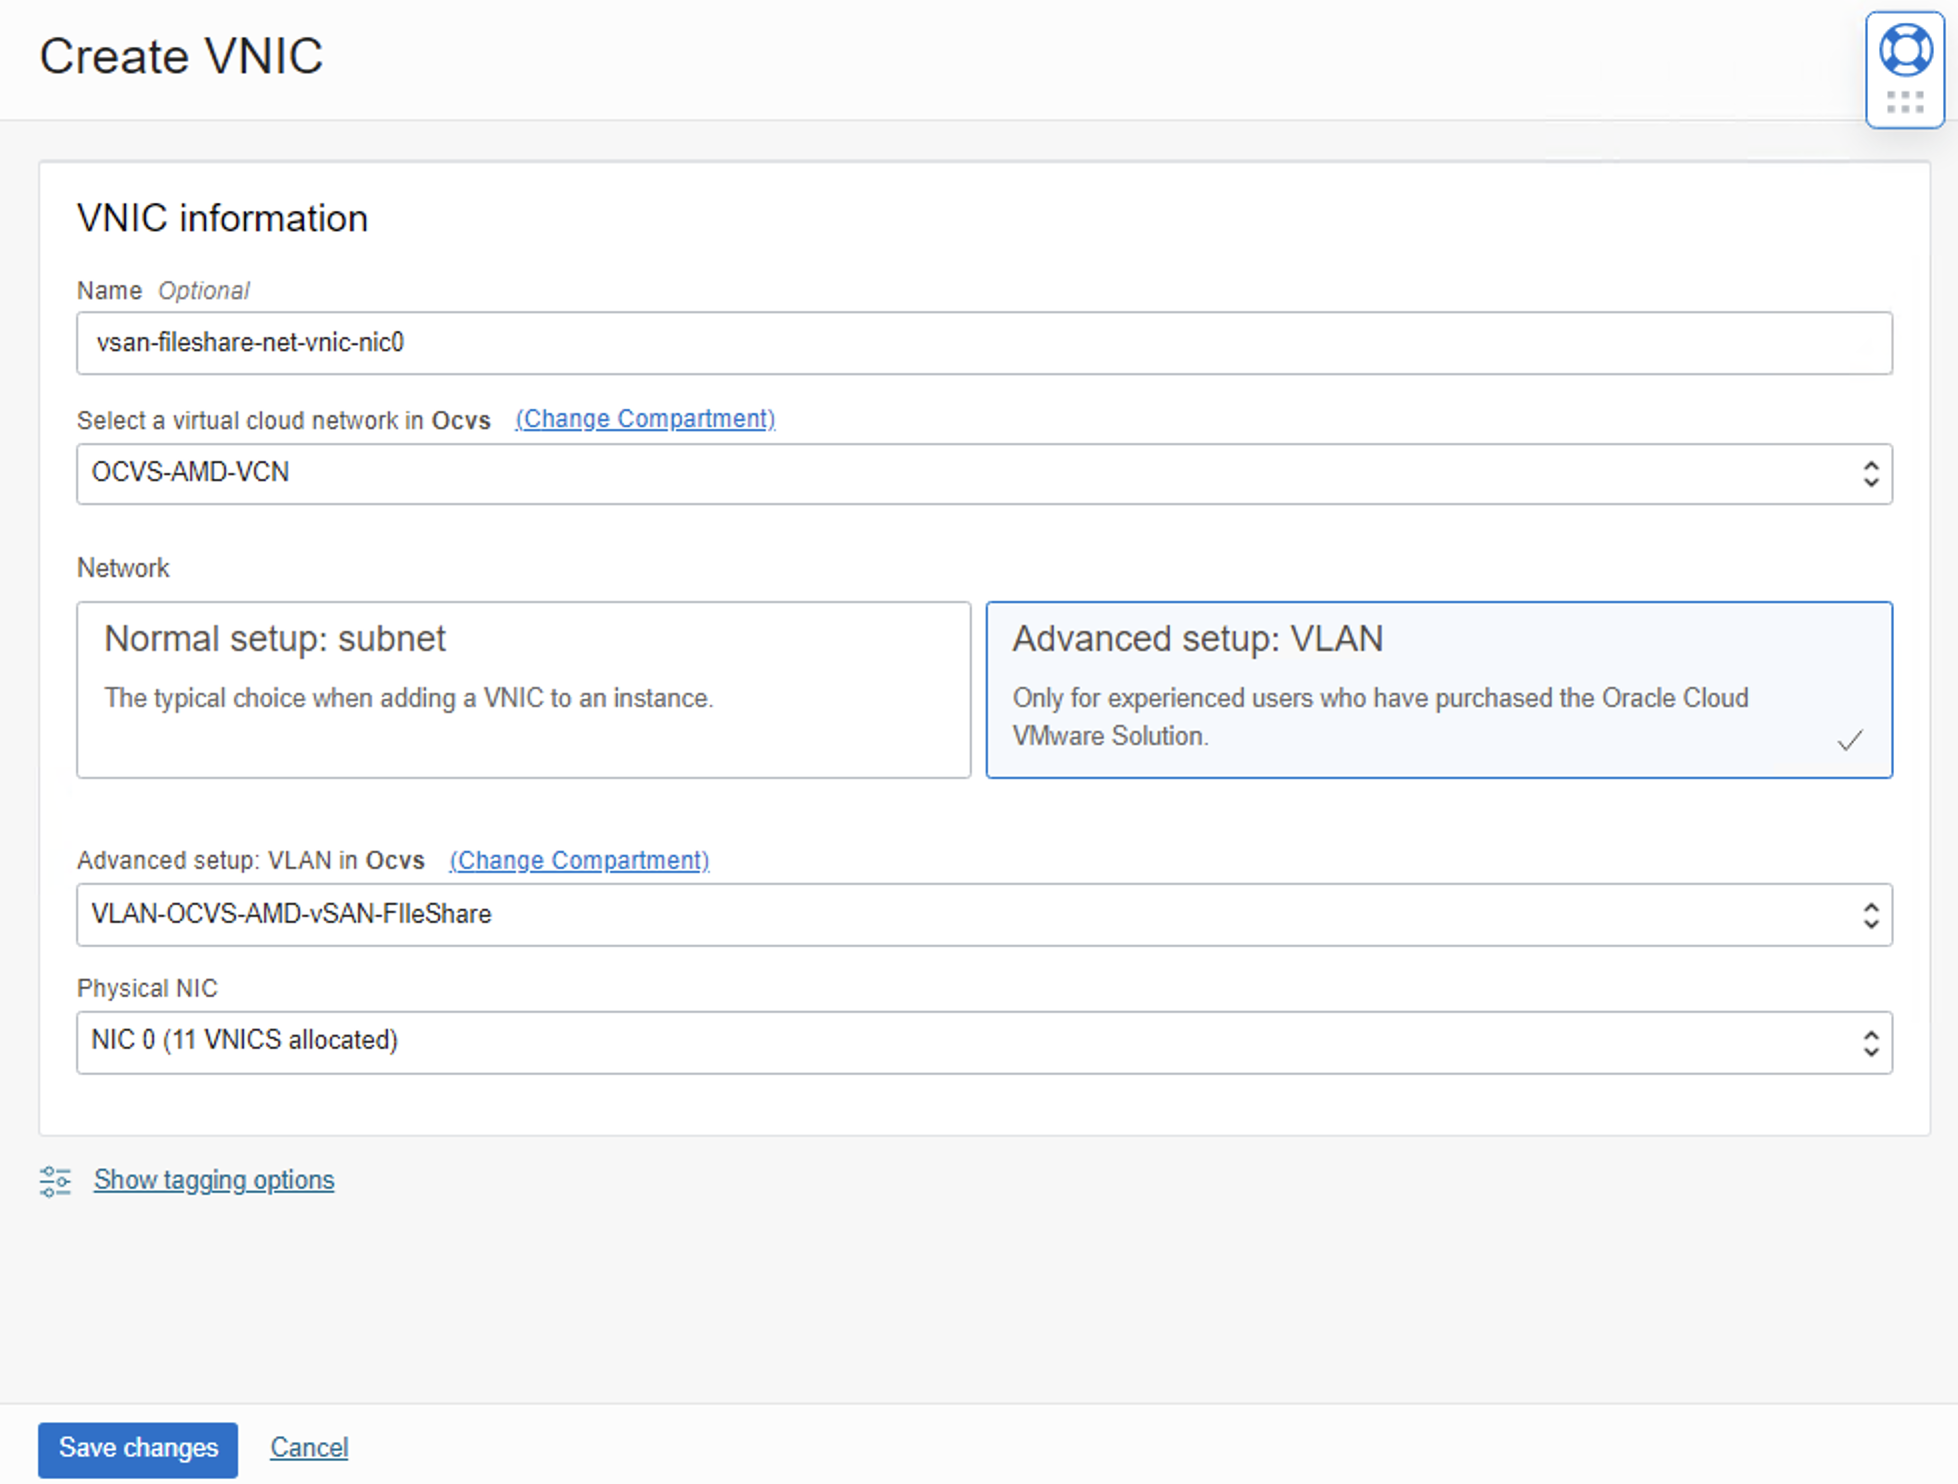
Navigate to Attached VNICs and click Create VNIC.
- Provide the name of the VNIC but provide nic0 as suffix to the name.
- Select the Virtual Cloud Network.
- Select “Advanced setup: VLAN” as a Network.
- Select the VLAN created in step 7.
- Select the Physical NIC as “NIC 0”
-
Click Save Changes.
-
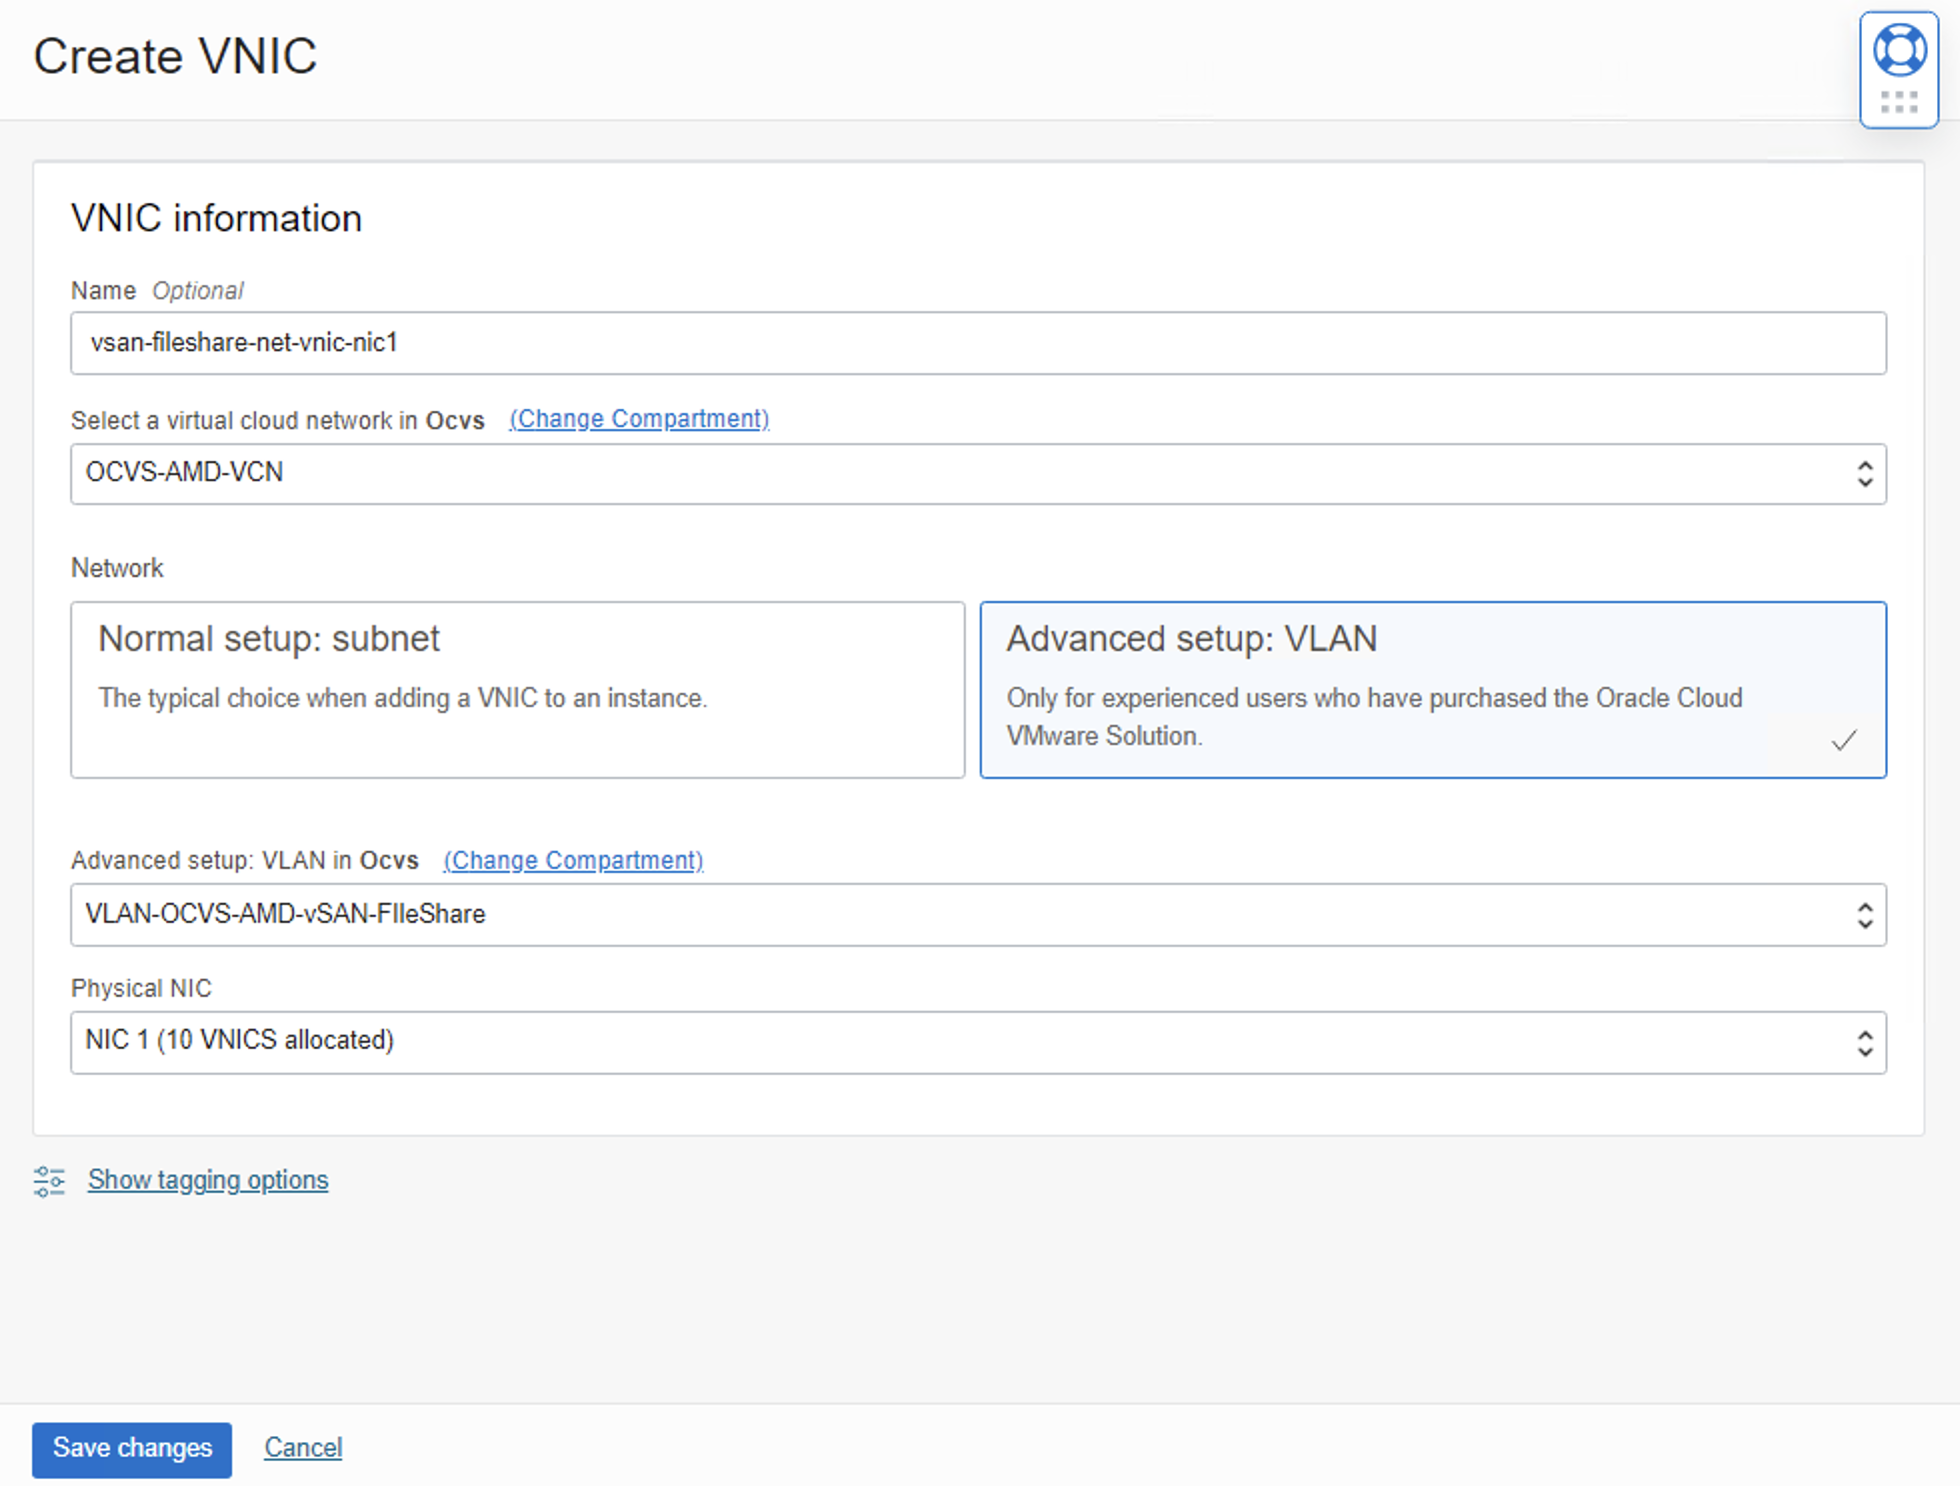
On the same OCI compute instance, the VLAN should be attached to the second physical NIC. Click Create VNIC.
-
Provide the same name as step 9.1 with suffix nic1.
-
Select the VCN.
-
Select the “Advanced setup: VLAN” as a Network.
-
Select the VLAN created in step 7.
-
Select the Physical NIC as “NIC 1”.
-
Click Save Changes.
-
Repeat the steps 8 to 12 for all the remaining ESXi hosts.
-
As a result of these steps, you are expected to see two VNICS associated with the VLAN attachment and with VLAN tag. Note down the VLAN tag. In this example screenshot below, the VLAN tag is 3661.

-
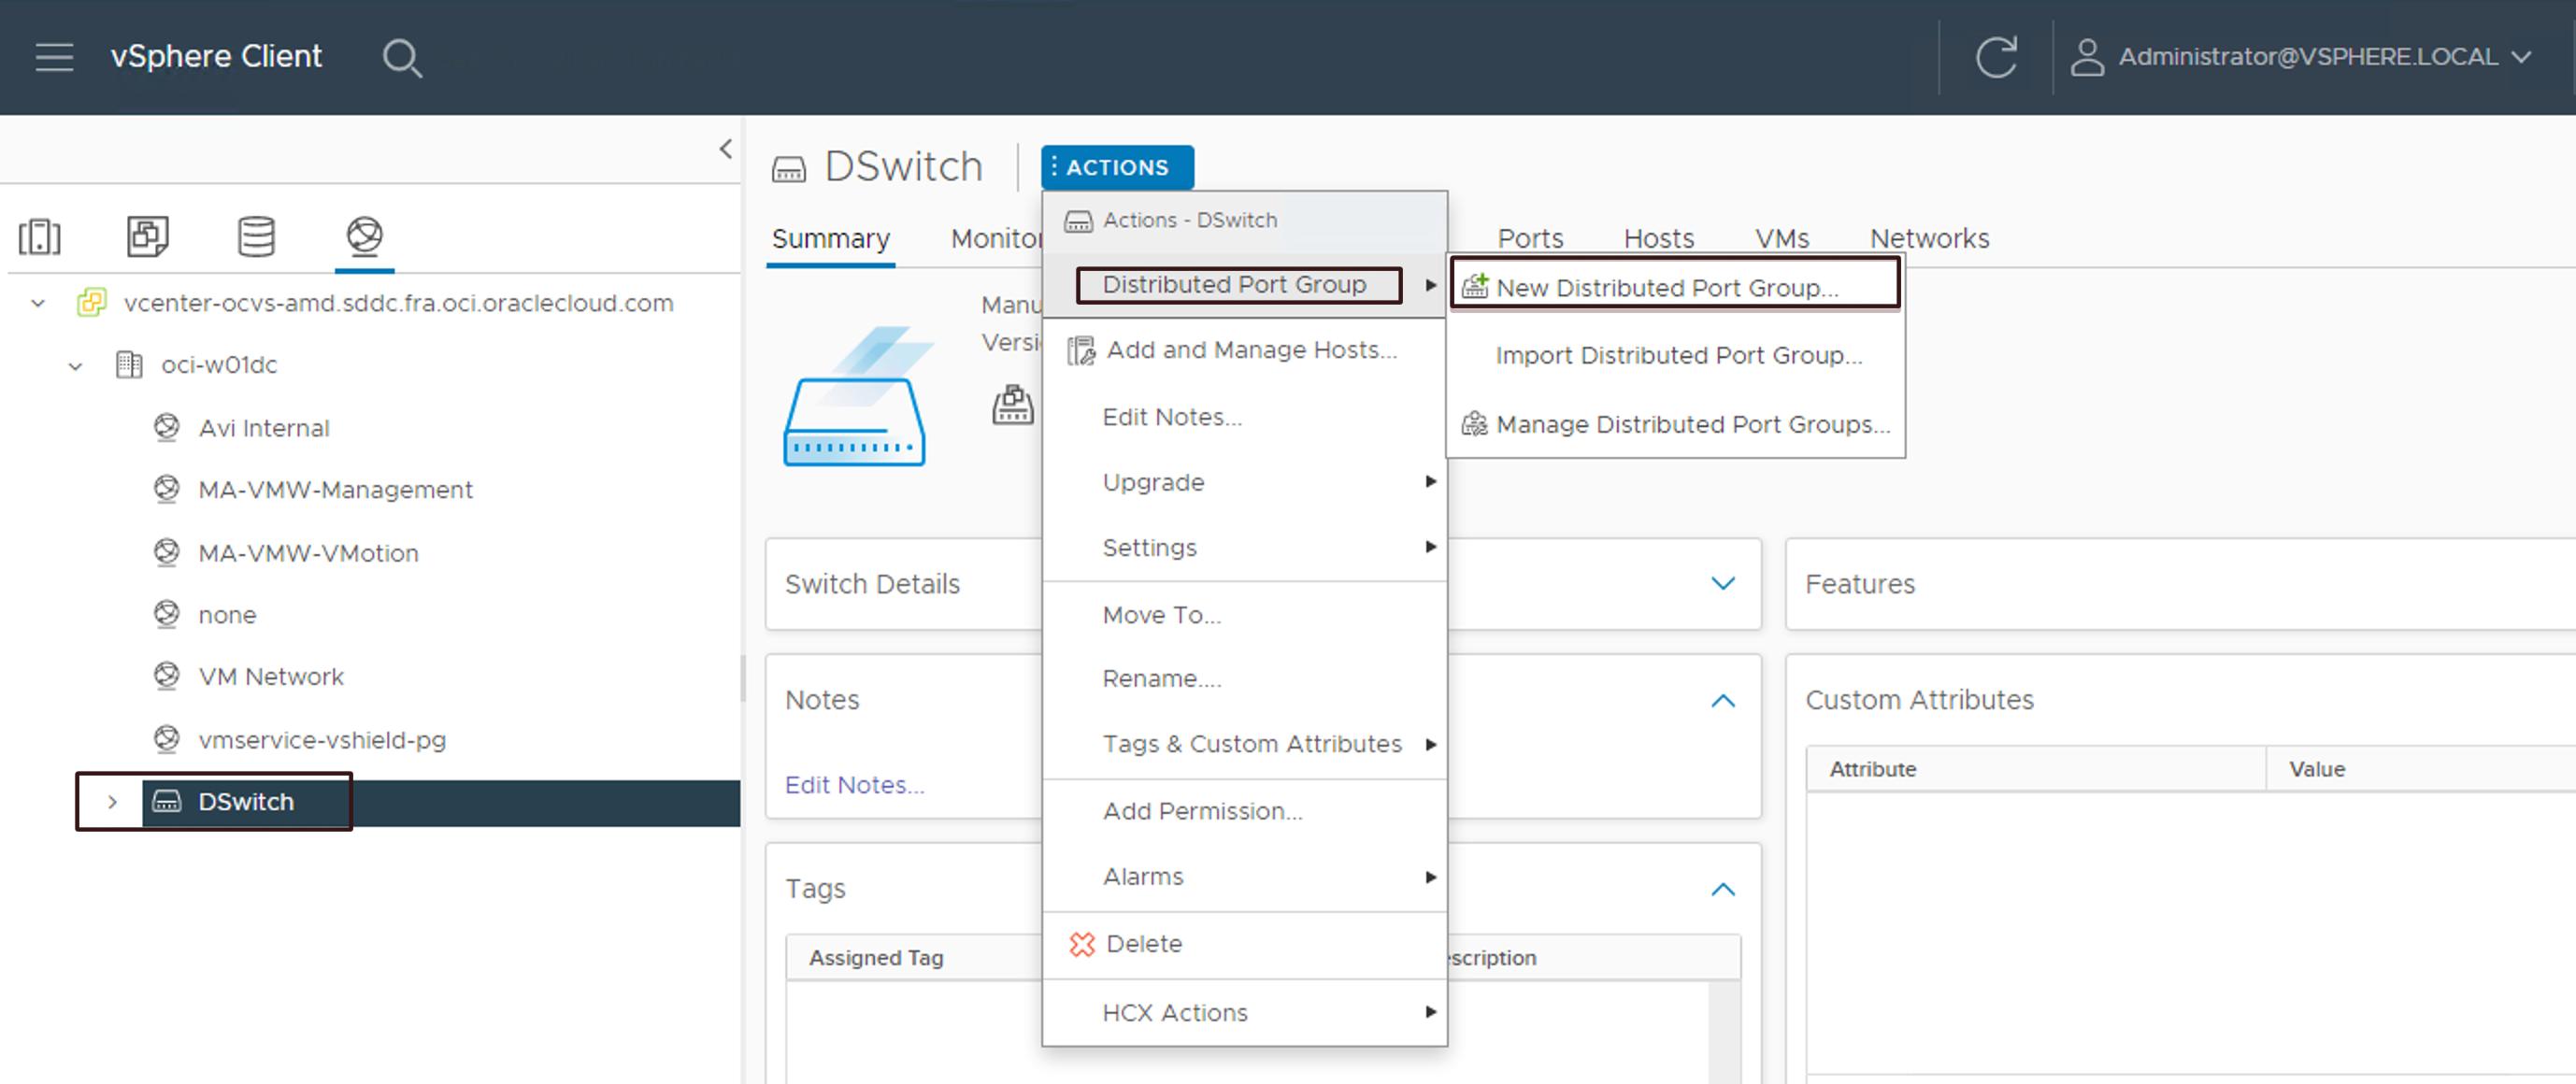
Now, let’s create DvPortgroup in the vCenter from this new VLAN. Login to the vCenter server and navigate to Networking view.
-
Click DSwitch, ACTIONS, Distributed Port Group, and then click New Distributed Port Group.
-
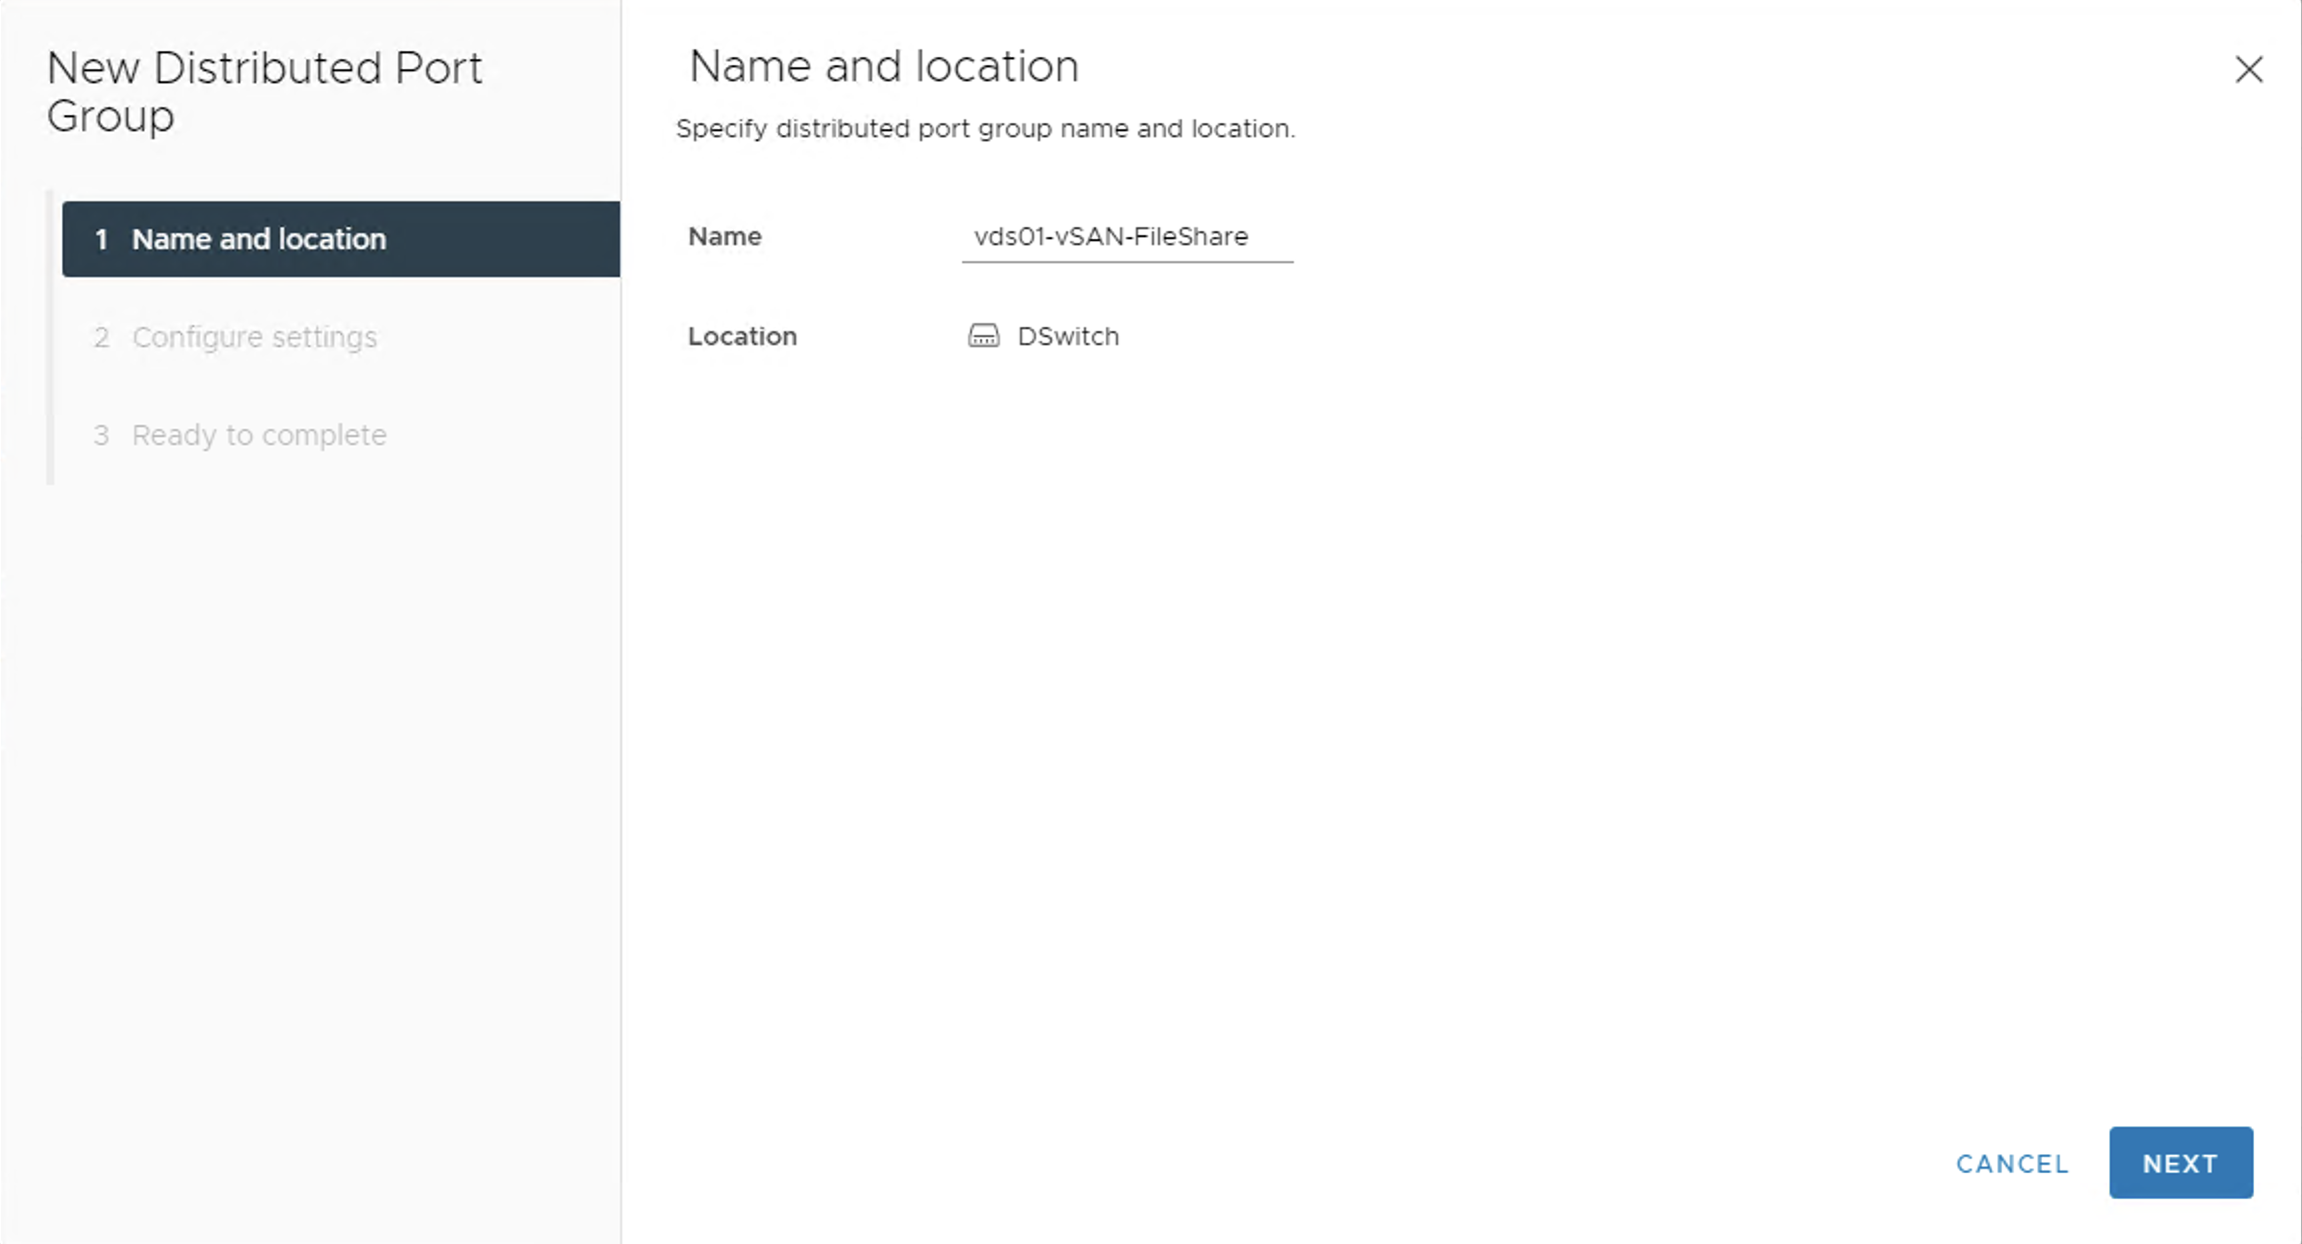
Provide the name of the DvPortgroup and click NEXT.
-
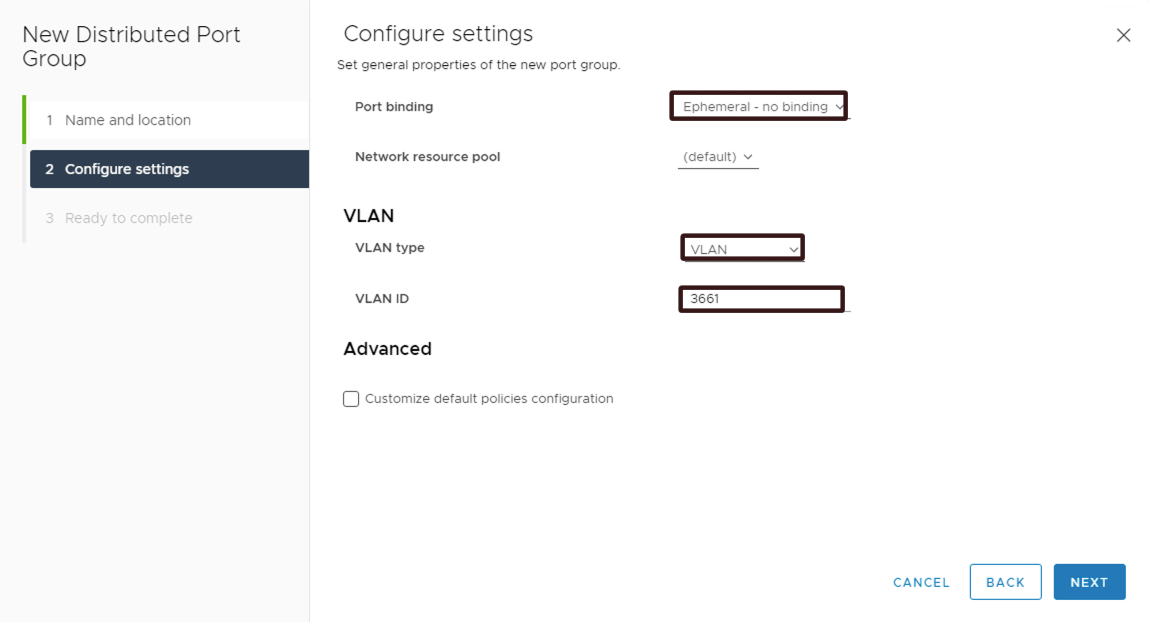
Configure the following settings on the wizard:
- Port binding : Ephemeral-no binding
- Network resource Pool: default
- VLAN Type: VLAN
- VLAN ID: VLAN Tag (from step 14)
-
Click NEXT and then click FINISH.
-
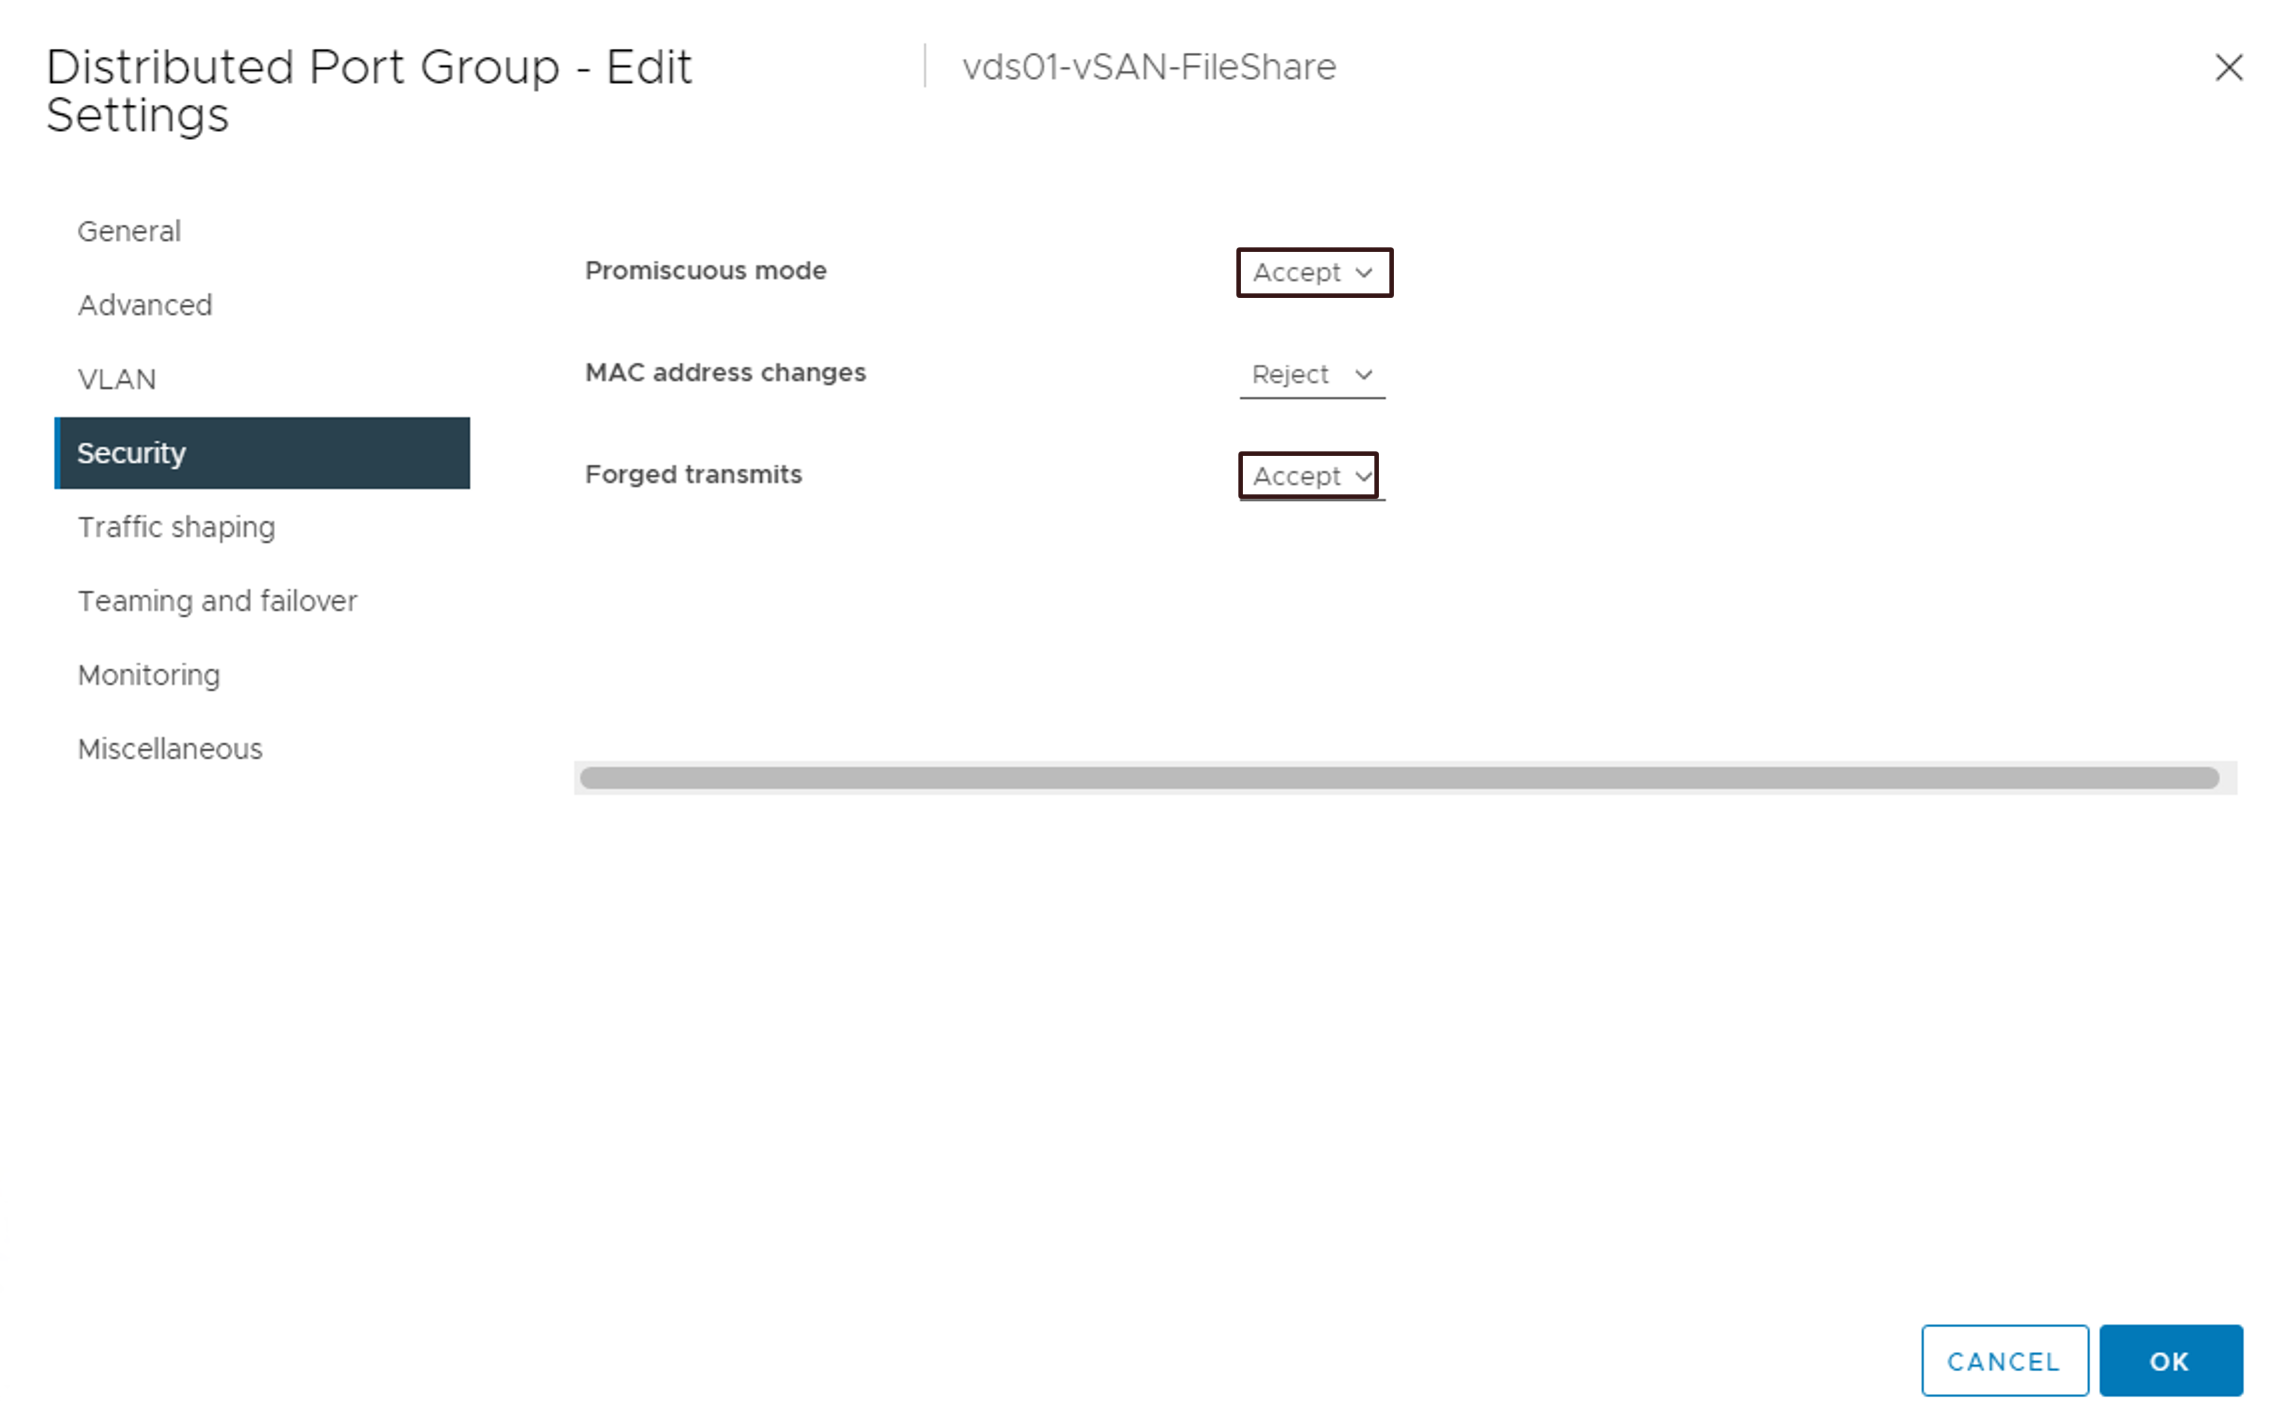
Right-click on the newly created DvPortgroup and click Edit Settings.
-
Click Security and select Accept from the Promiscuous mode and Forged transmits drop-down lists.
Task 2: Configure VMware vSAN file share
-
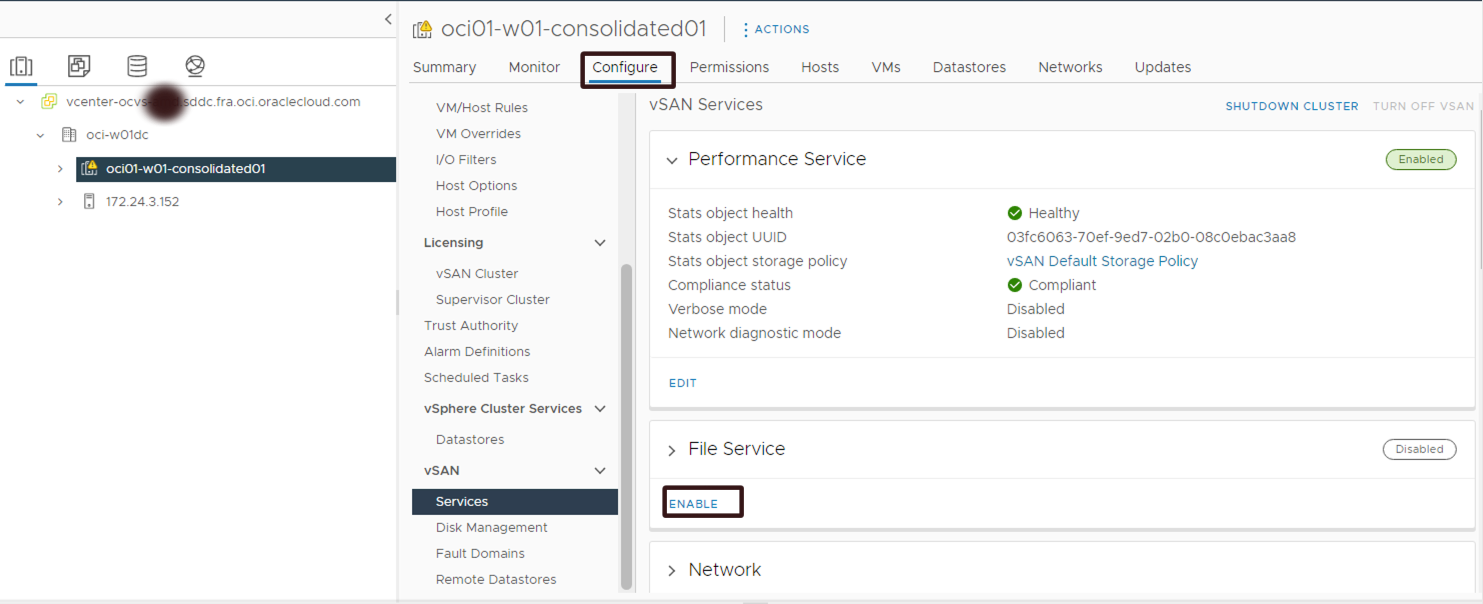
Login to Oracle Cloud VMware Solution vCenter Server, navigate to the Hosts & Cluster view and select cluster.
-
Navigate to Configure and select Services under vSAN and click ENABLE.
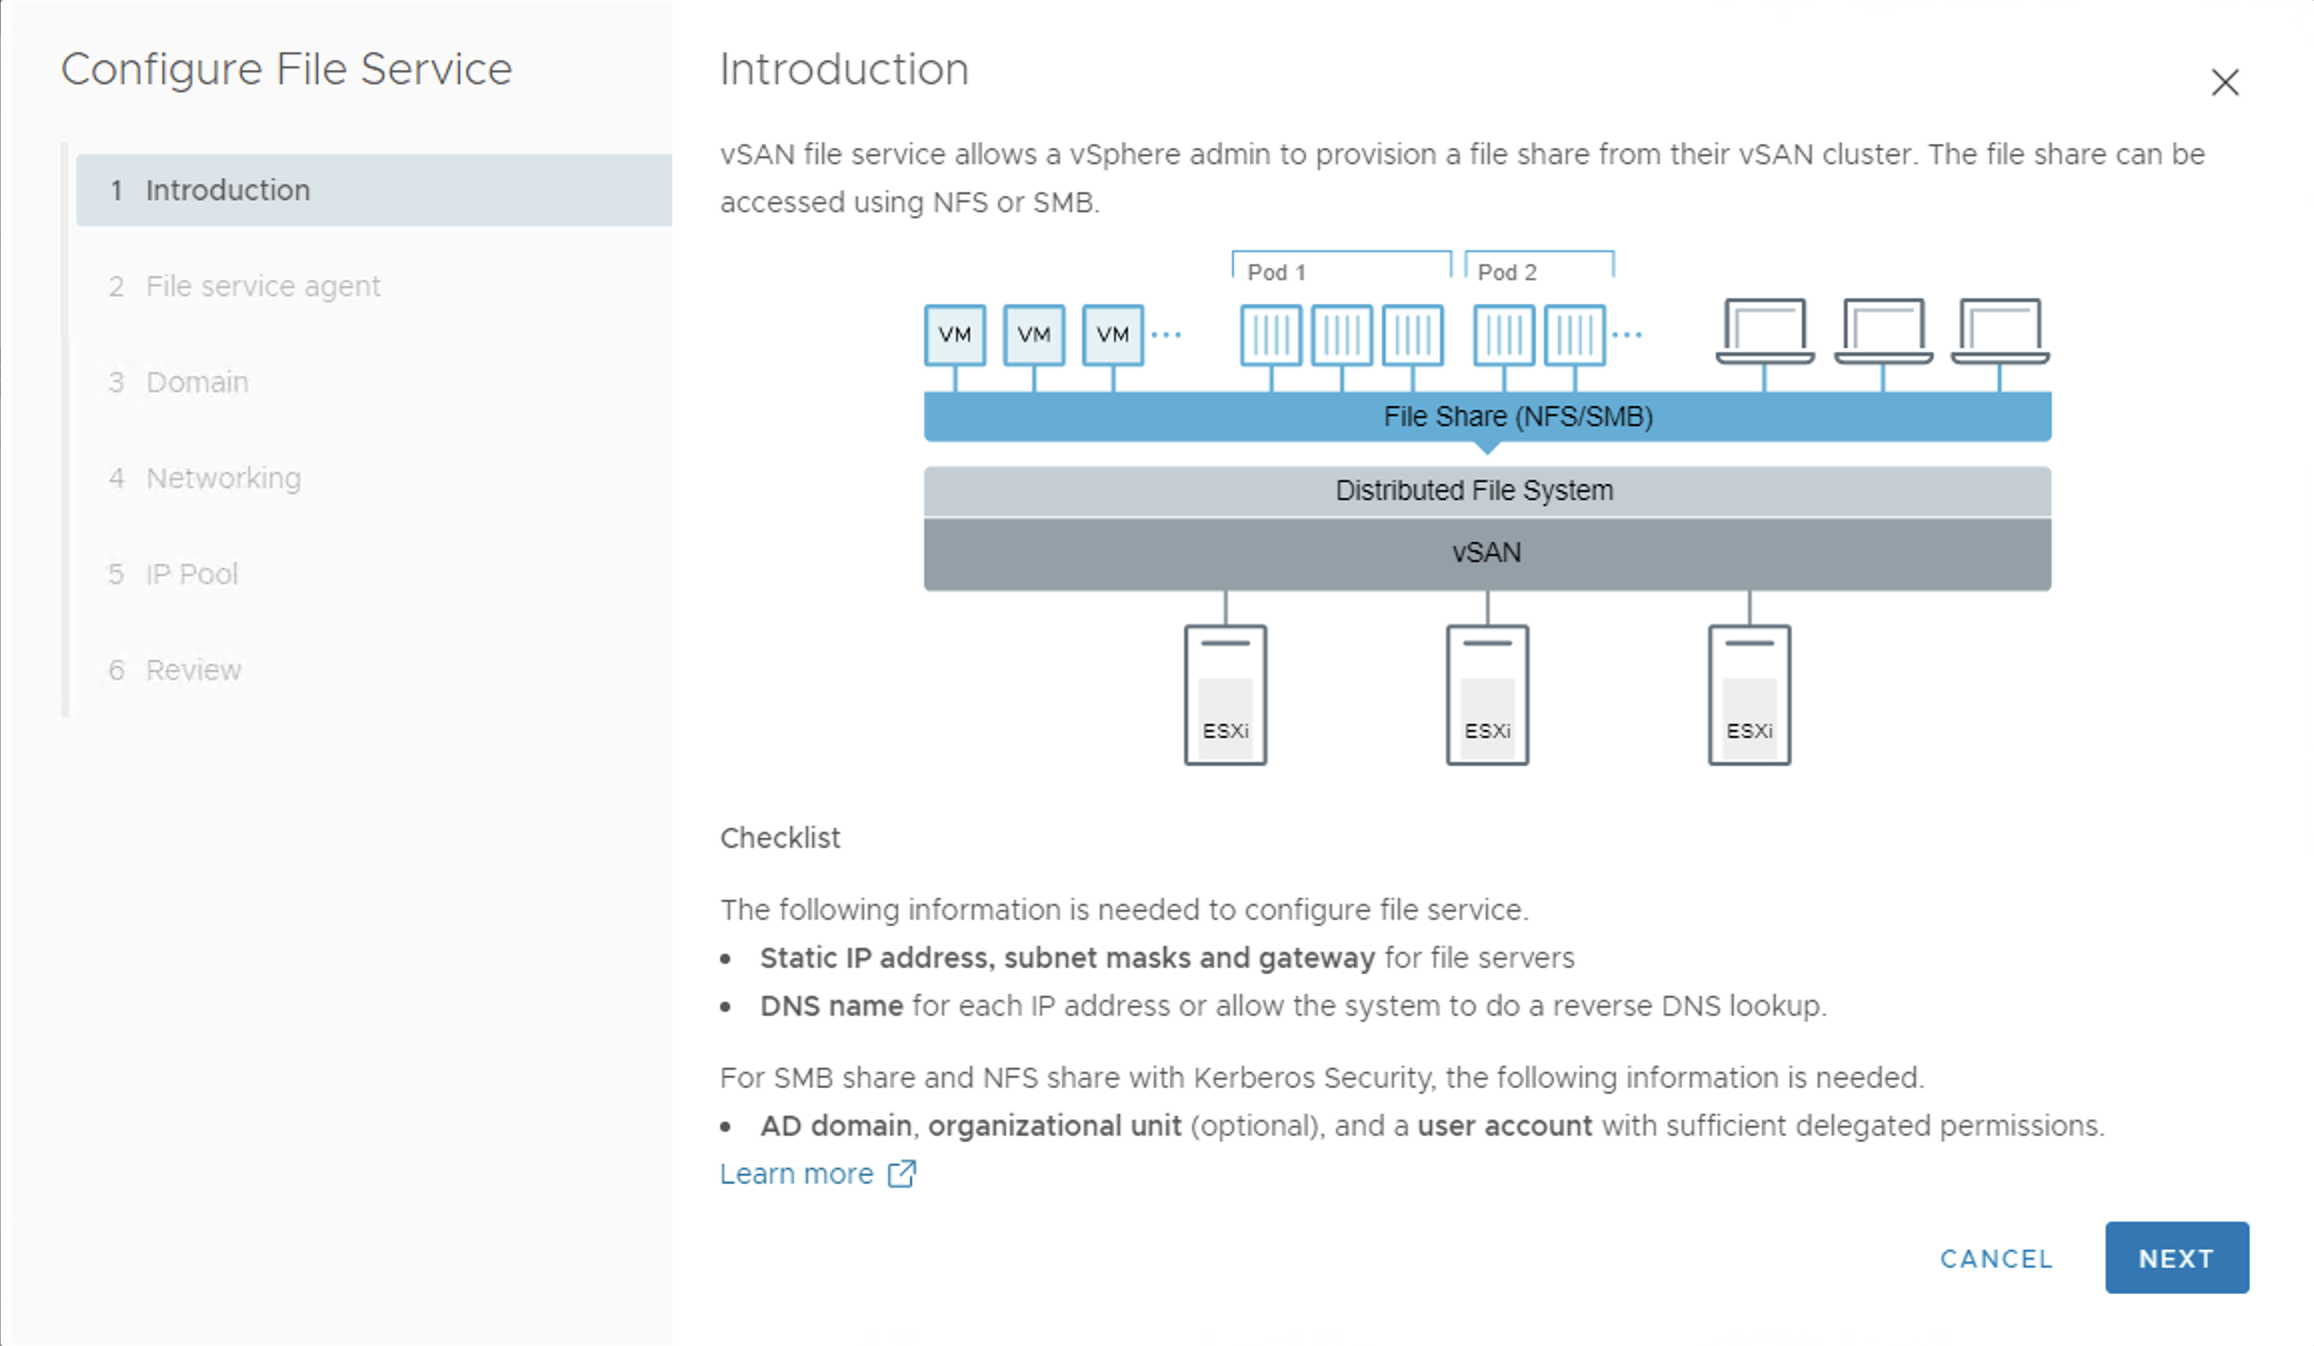
-
The vSAN file service configuration wizard will appear. Click NEXT.
-
Leave the default option selected Automatically load latest OVF and select the Trust the certificate checkbox.
NOTE: The default Oracle Cloud VMware Solution implementation has outbound internet connectivity for vCenter server. If you have changed this setting for any reason then make sure the vCenter has internet access to fetch the OVF or download the OVF file from the url shown in the wizard and use Manual load OVF option.

-
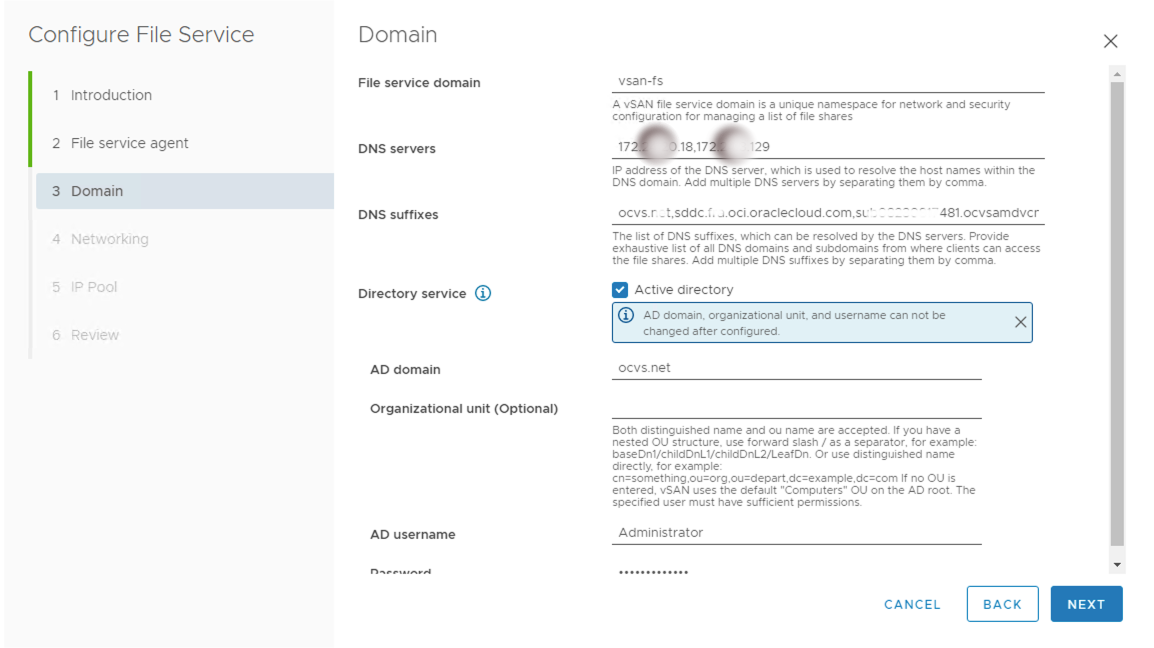
On the wizard provide inputs as below.
- File service domain: Provide vSAN file service domain. Should be a unique namespace.
- Provide the DNS Servers: In this example, the DNS server IP addresses that resolves the vCenter, ESXi hosts and other SDDC VM workloads are provided.
- DNS Suffix: provide the DNS suffix.
- Select the checkbox for Directory service: Active directory.
- AD domain: Provide the name of the AD domain.
- AD Username: Provide the AD user who has administrative privileges.
- Password: Provide the password for the AD user.
-
Click NEXT.
-
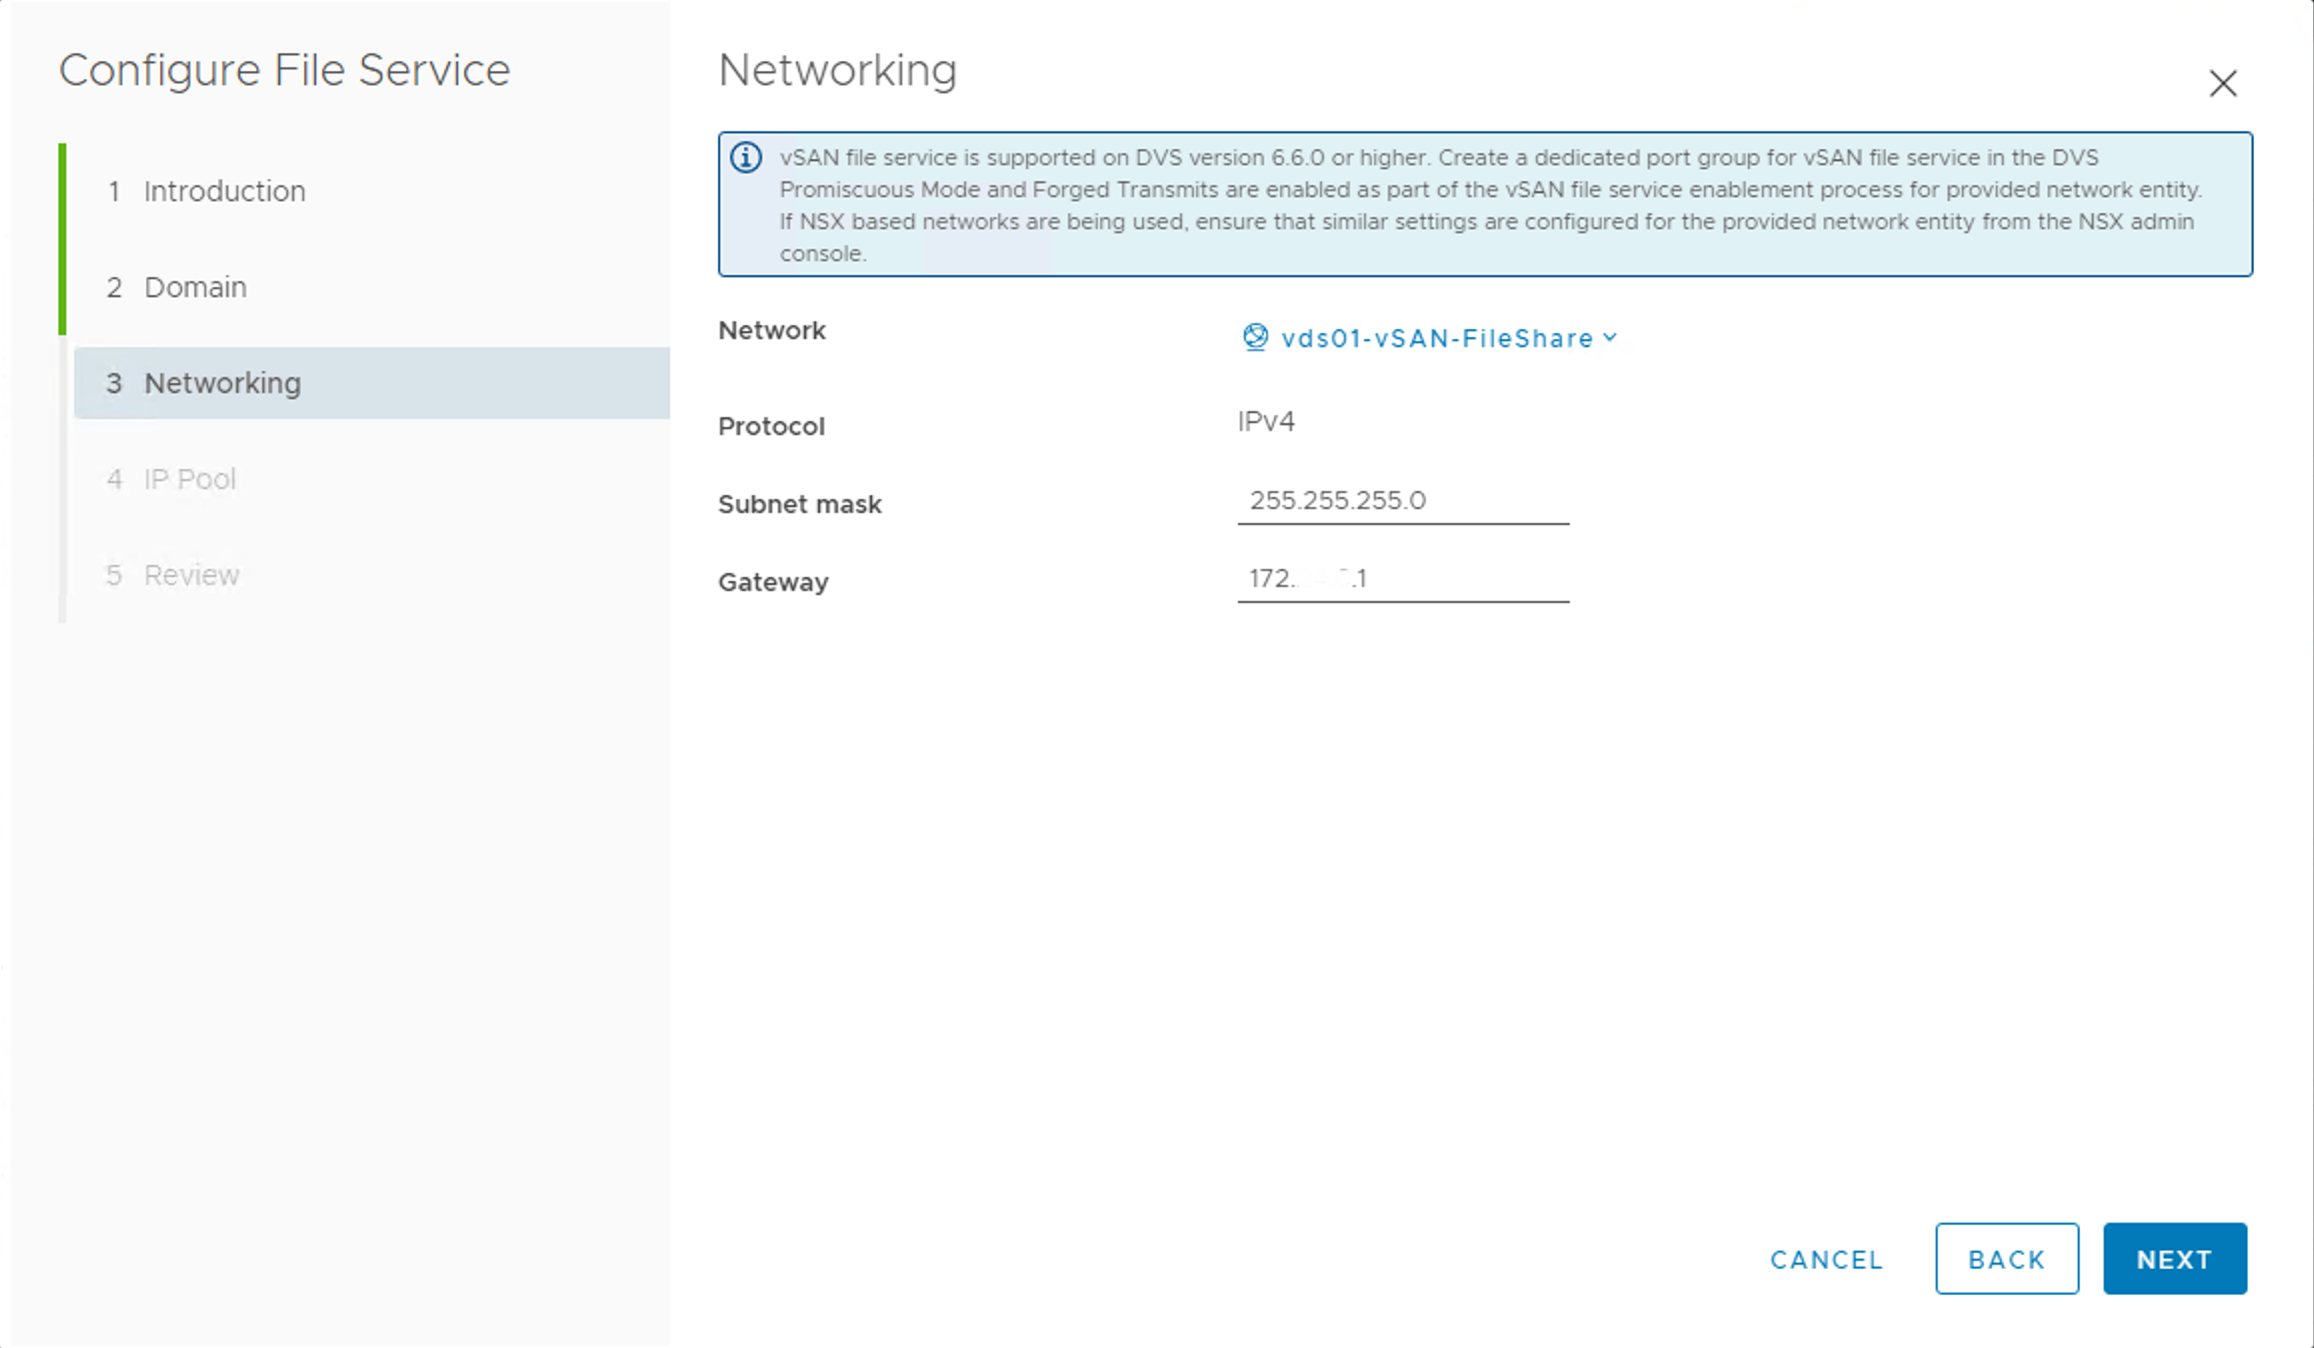
Select the network that was created in Task 1 (steps 15 to 21).
-
Provide the subnet mask and gateway of the network.
-
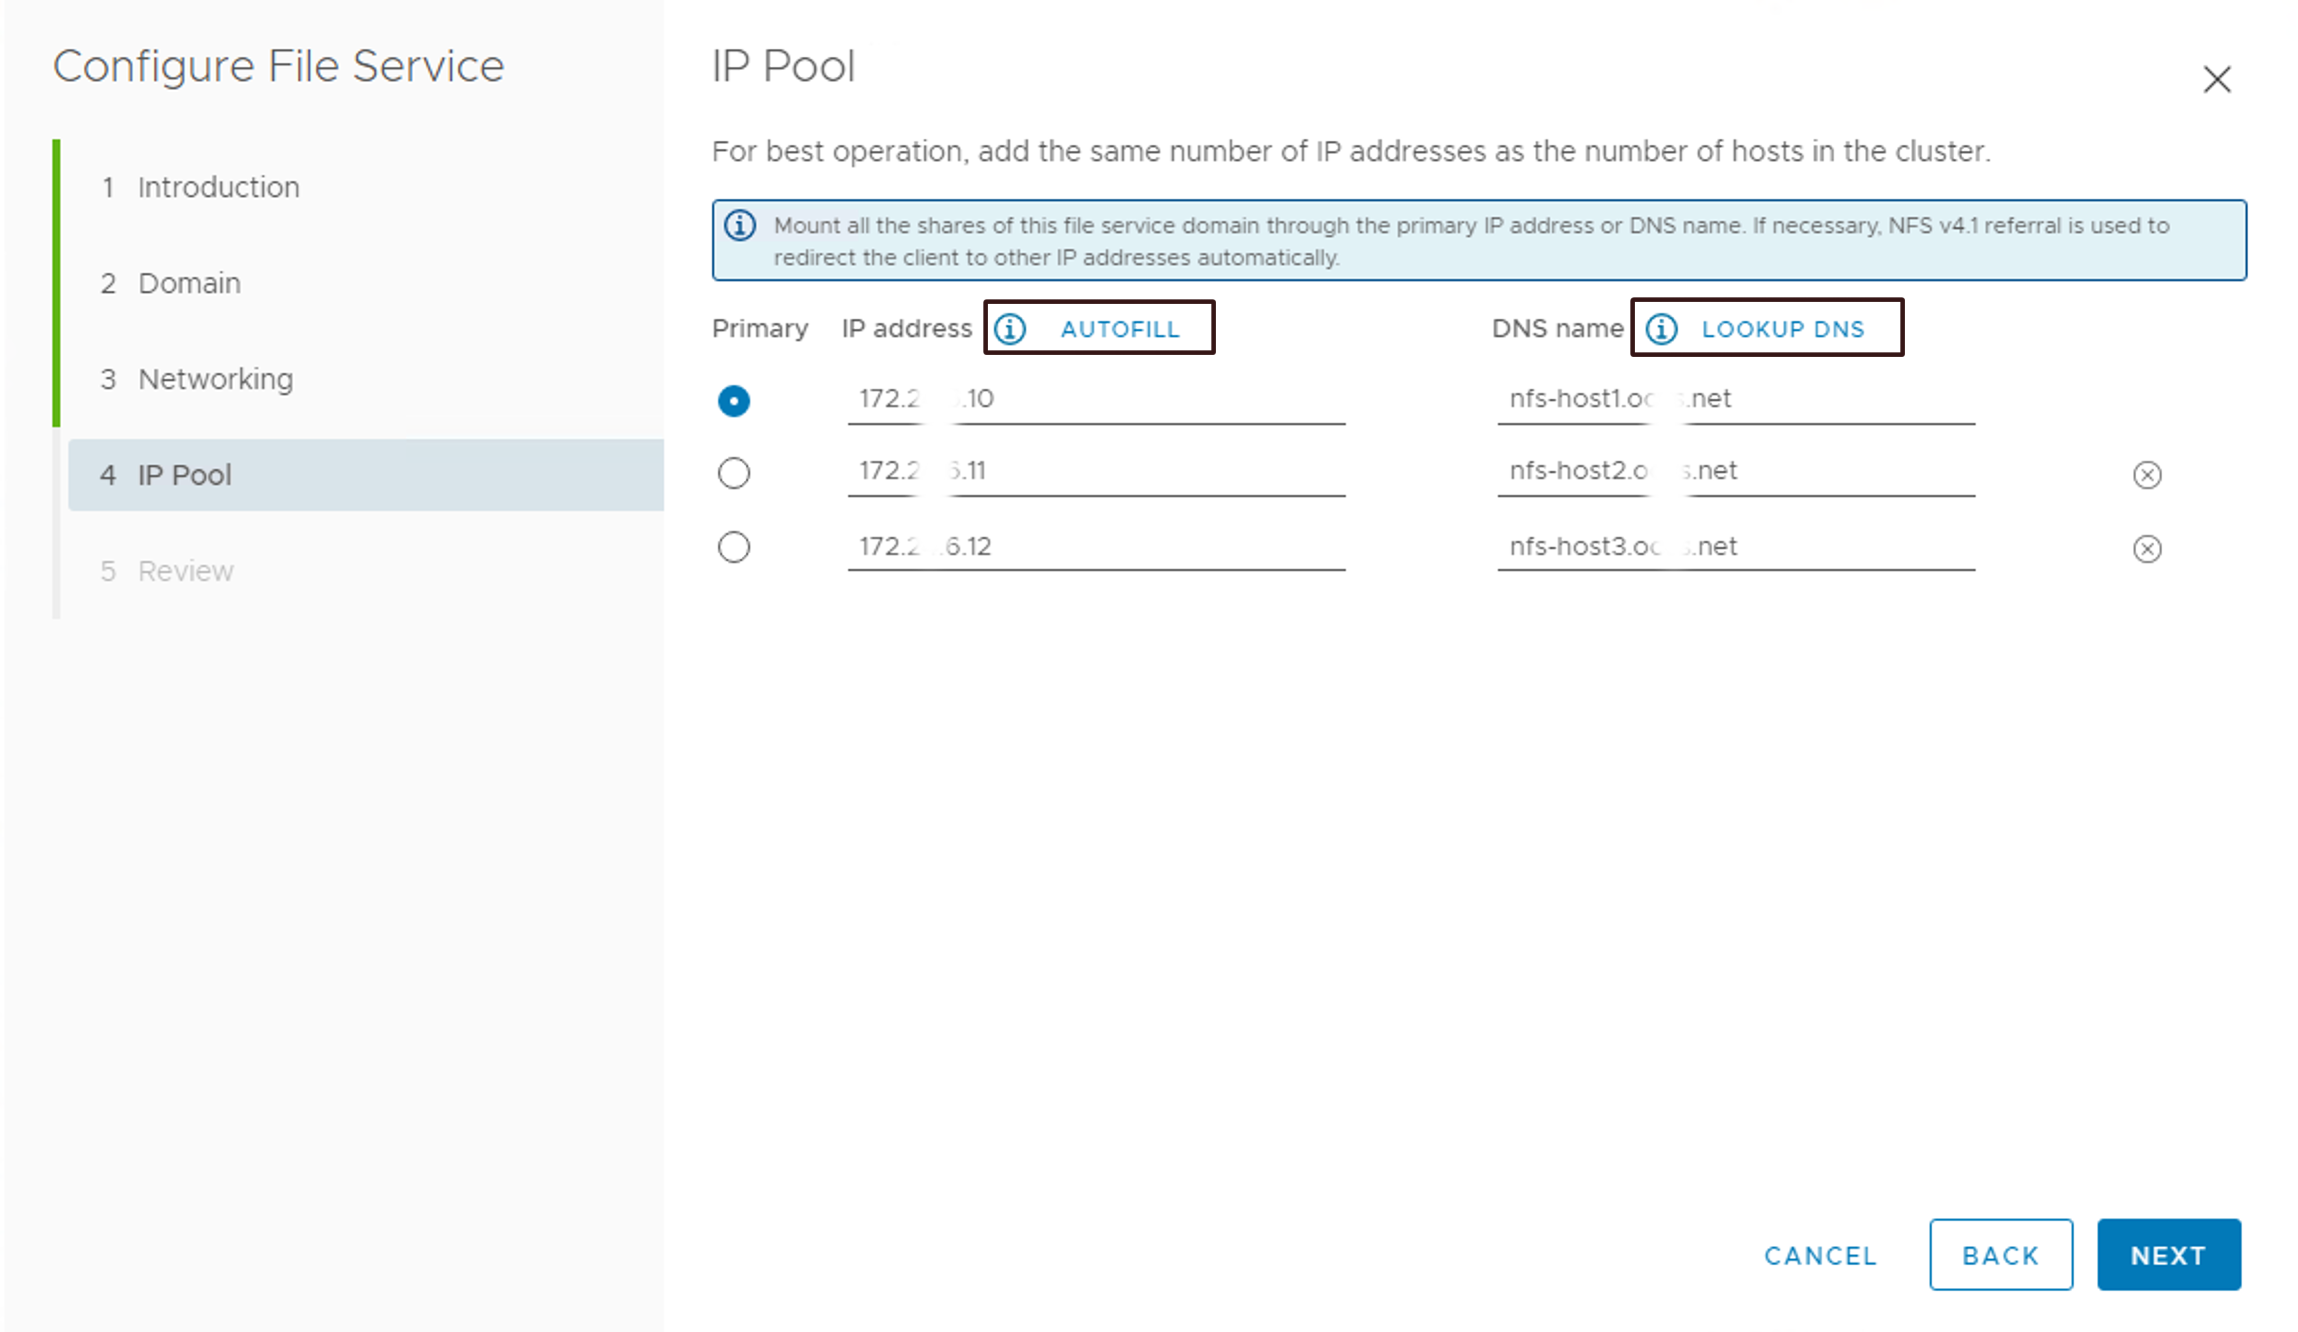
Now in the next screen, the IP addresses of the same number of esxi hosts in the cluster should be provided with the name resolution.
-
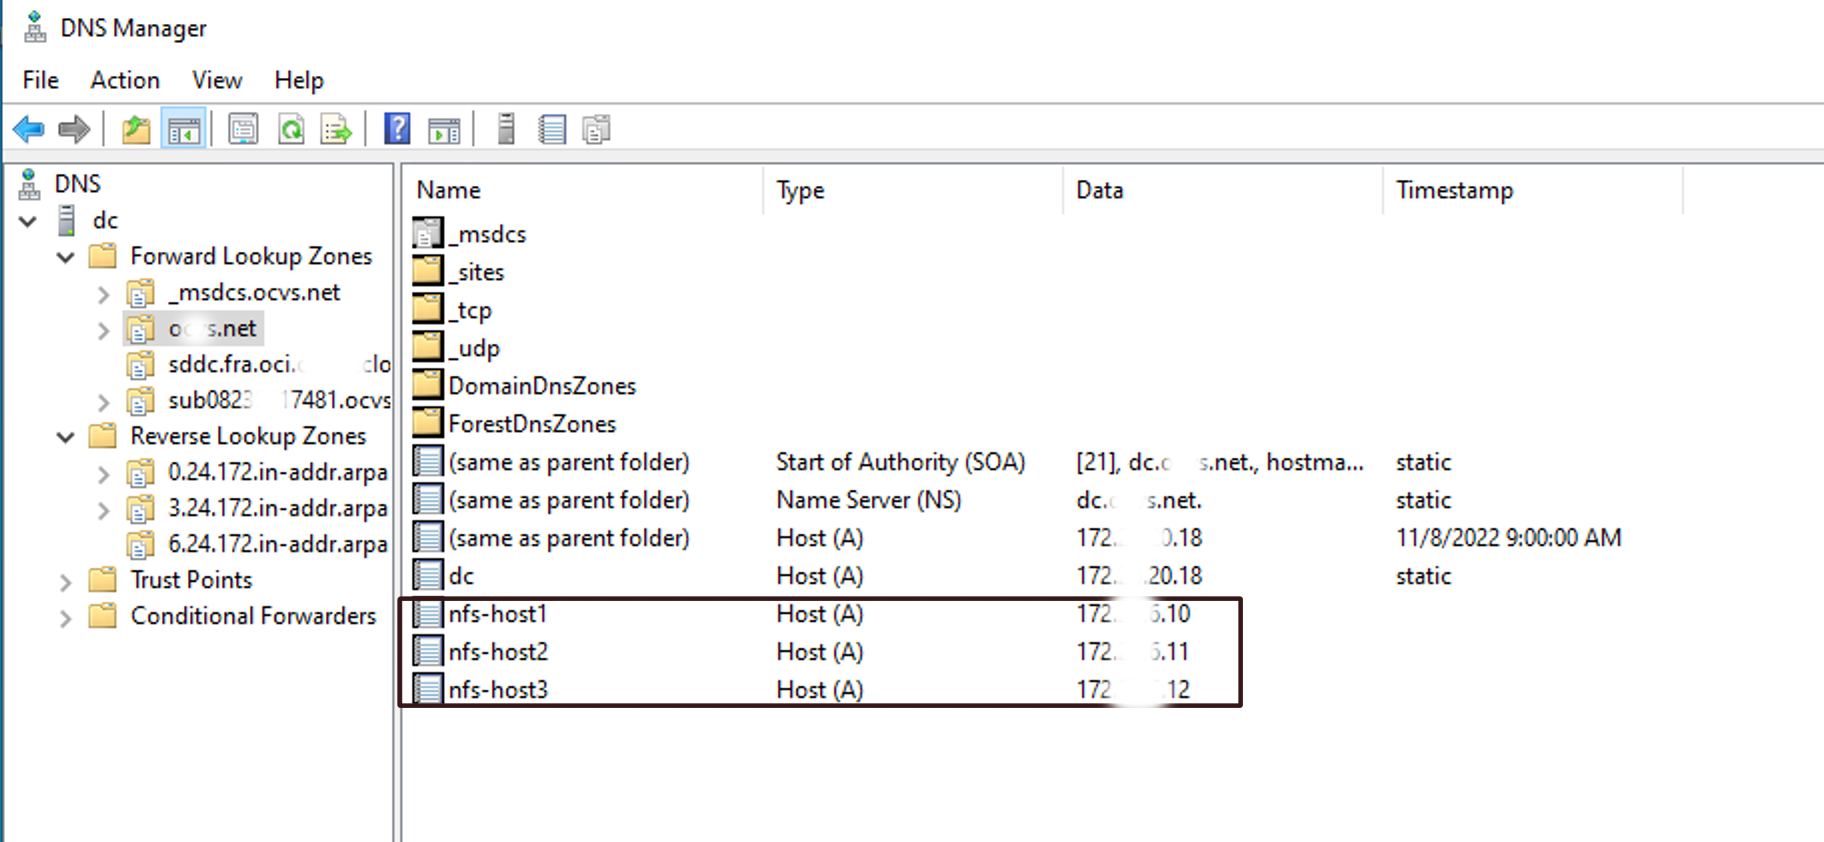
Login to the AD/DNS server and create the A and PTR records for the free static IP addresses. Refer to the screenshot below where the Oracle Cloud VMware Solution cluster consists of 3 ESXi hosts and therefore 3 DNS records are pre-created.
-
Provide the first IP address on the VMware vSAN file share IP Pool screen and click AUTOFILL. The remaining number of IP addresses are auto populated in the sequence.
-
Click LOOKUP DNS and these values should be auto populated as a result of step 10.
-
Review the configuration parameters and click FINISH.
-
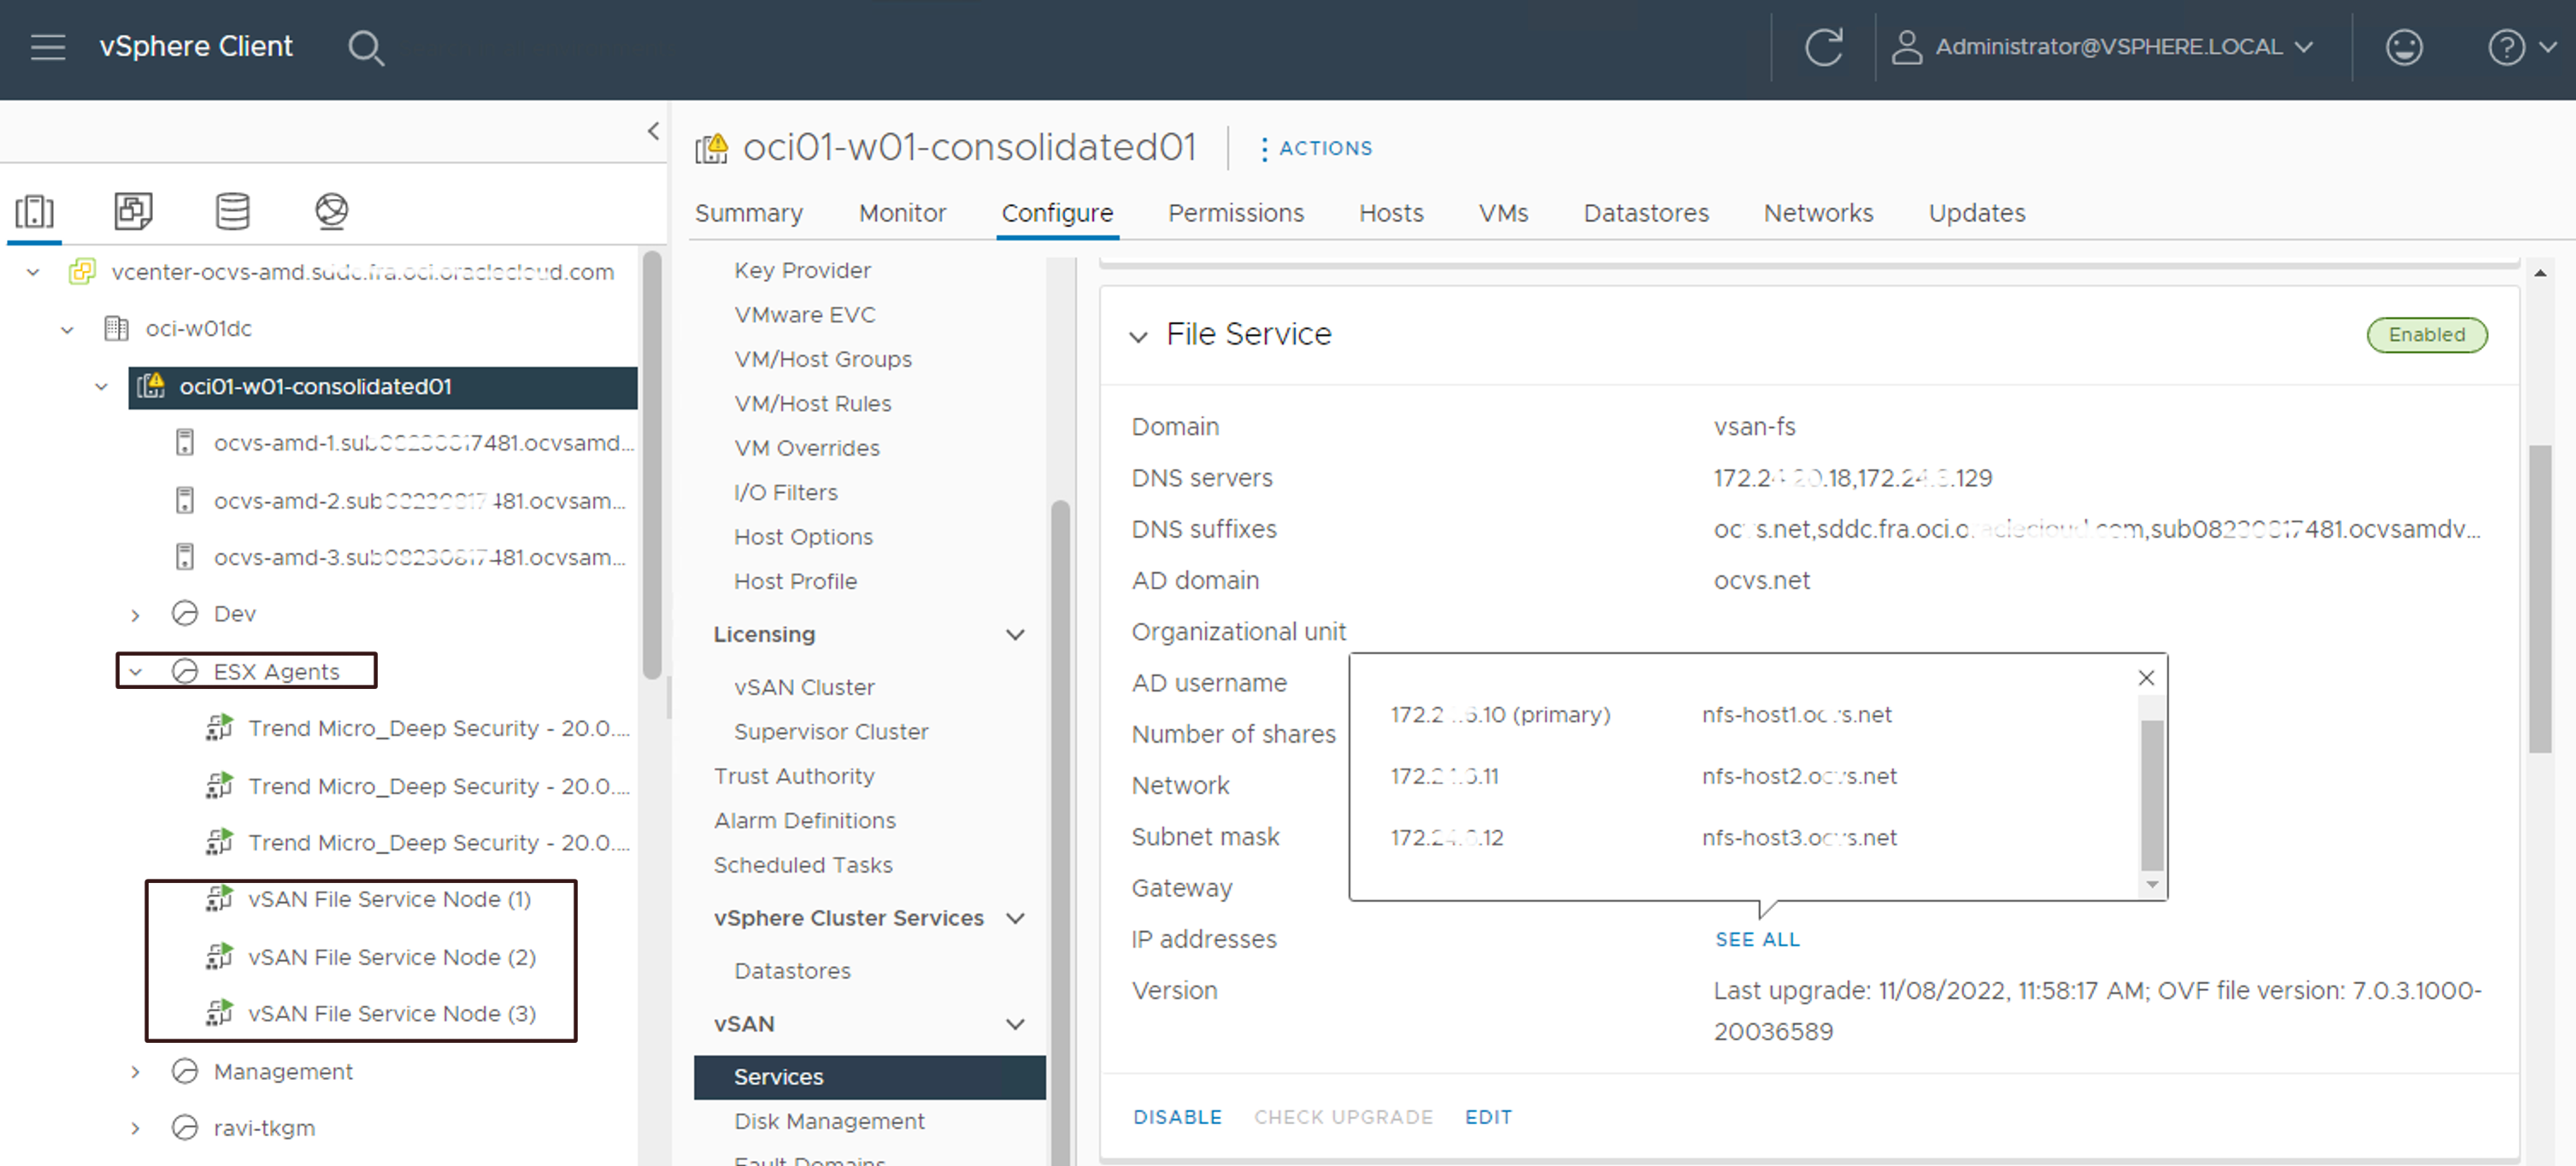
Once the operation is successful you are expected to see the following output in the vCenter Server.
Task 3: Validate the VMware vSAN file share setup
You must validate the VMware vSAN file share setup with the clients (SDDC VMs). Here we will create the vSAN file share and mount it to the SDDC VM.
Assumptions / Prerequisites:
- The SDDC VMs are connected to NSX overlay segment.
- The SDDC VMs are joined to the Active Directory Domain Controller which is used by VMware vSAN file share.
- The NFS client is installed on the SDDC VMs.
Task 3.1 : Create VMware vSAN file share
-
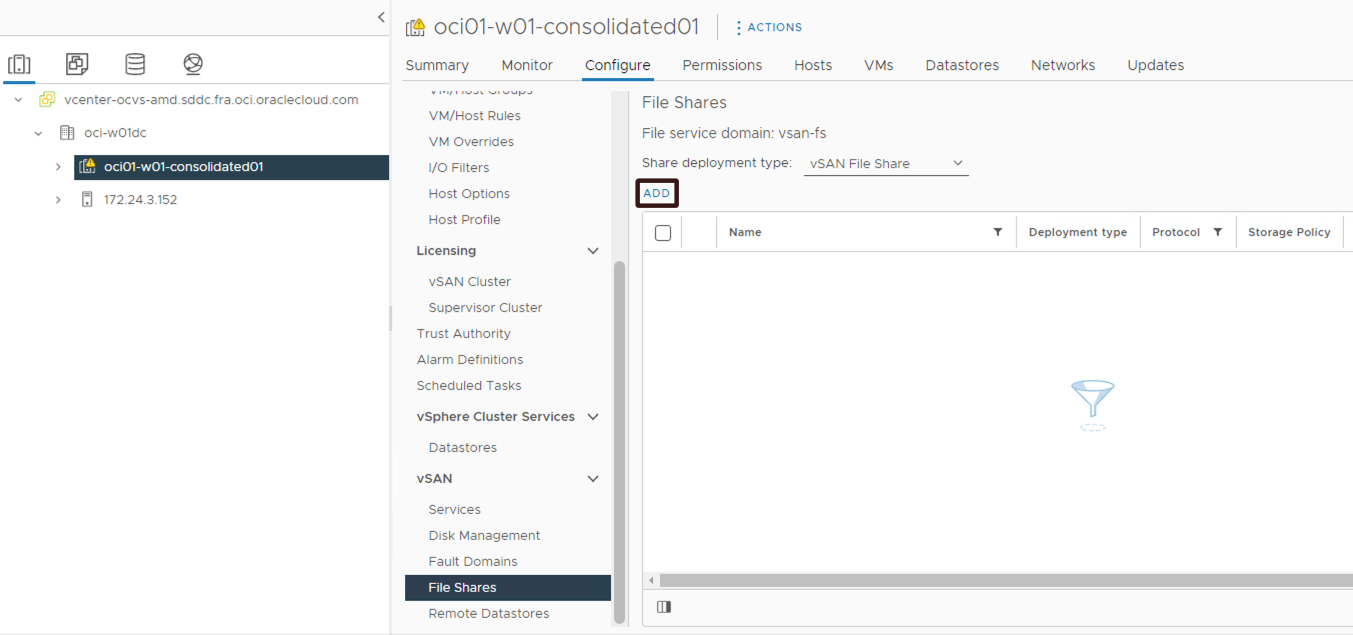
Login to the vCenter server, navigate to the Hosts & Cluster view and click on the cluster, Configure, File Shares under vSAN and then click ADD.
-
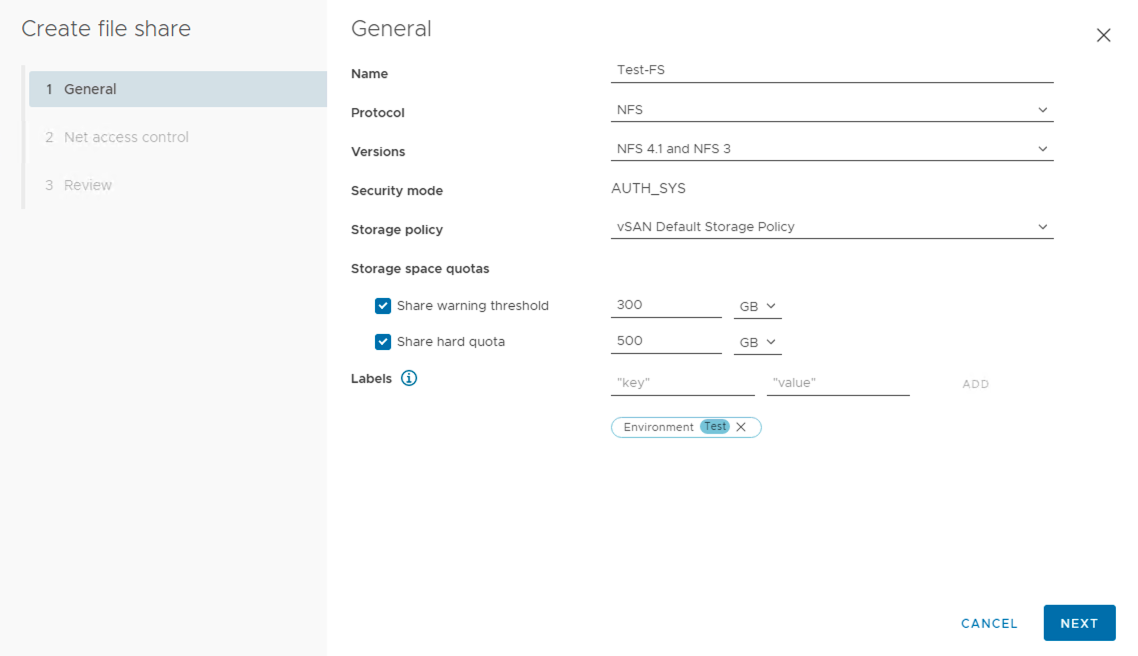
Provide the details in the wizard to create a file share with the NFS or SMB protocols.
- Name: Provide the name of the file share.
- Protocol: Select the protocol as per your choice NFS or SMB. In this example, NFS has been selected.
- Versions: Select the NFS version. It supports NFS 4.1 and NFS 3 as well. The NFS versions are not applicable if the SMB protocol is selected.
- Storage policy: Select the vSAN storage policy. You can select the existing one or choose to create a custom storage policy according to your requirement.
- (Optional) Select the storage space quotas.
- (Optional)Labels: Select labels or tags.
-
Click NEXT.
-
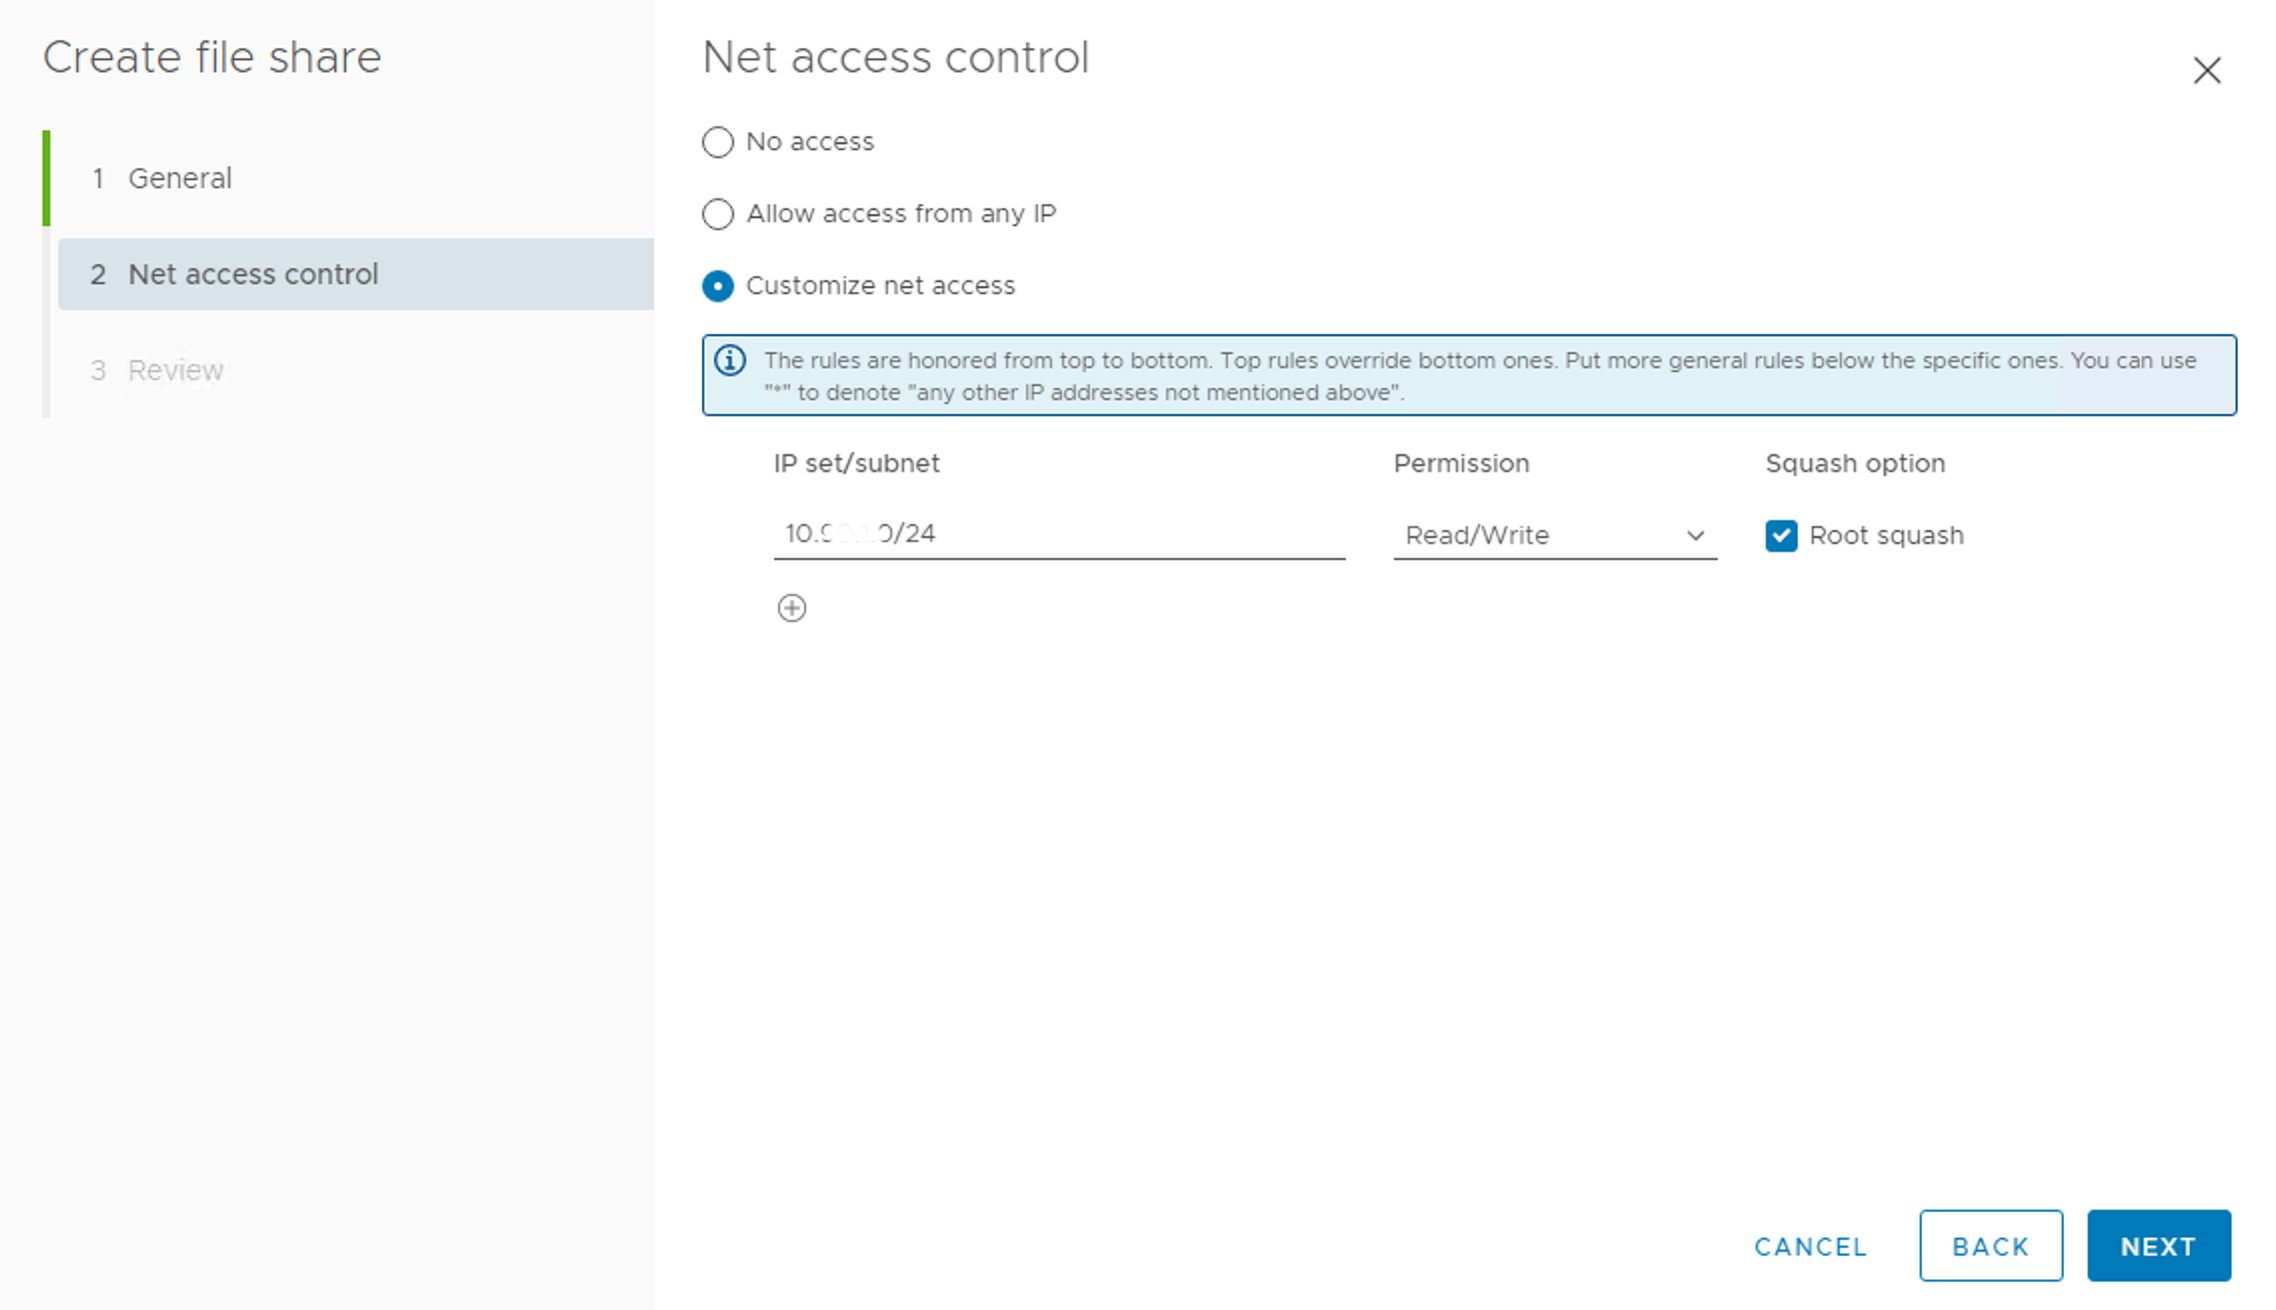
Select the Net access control to decide how and who can access the file share. Refer to the screenshot below where specific IP CIDR is allowed to communicate with the file share. Click NEXT.
-
Review the configuration and click FINISH. Once the file share is created, you should be able to capture the details from the vCenter server.
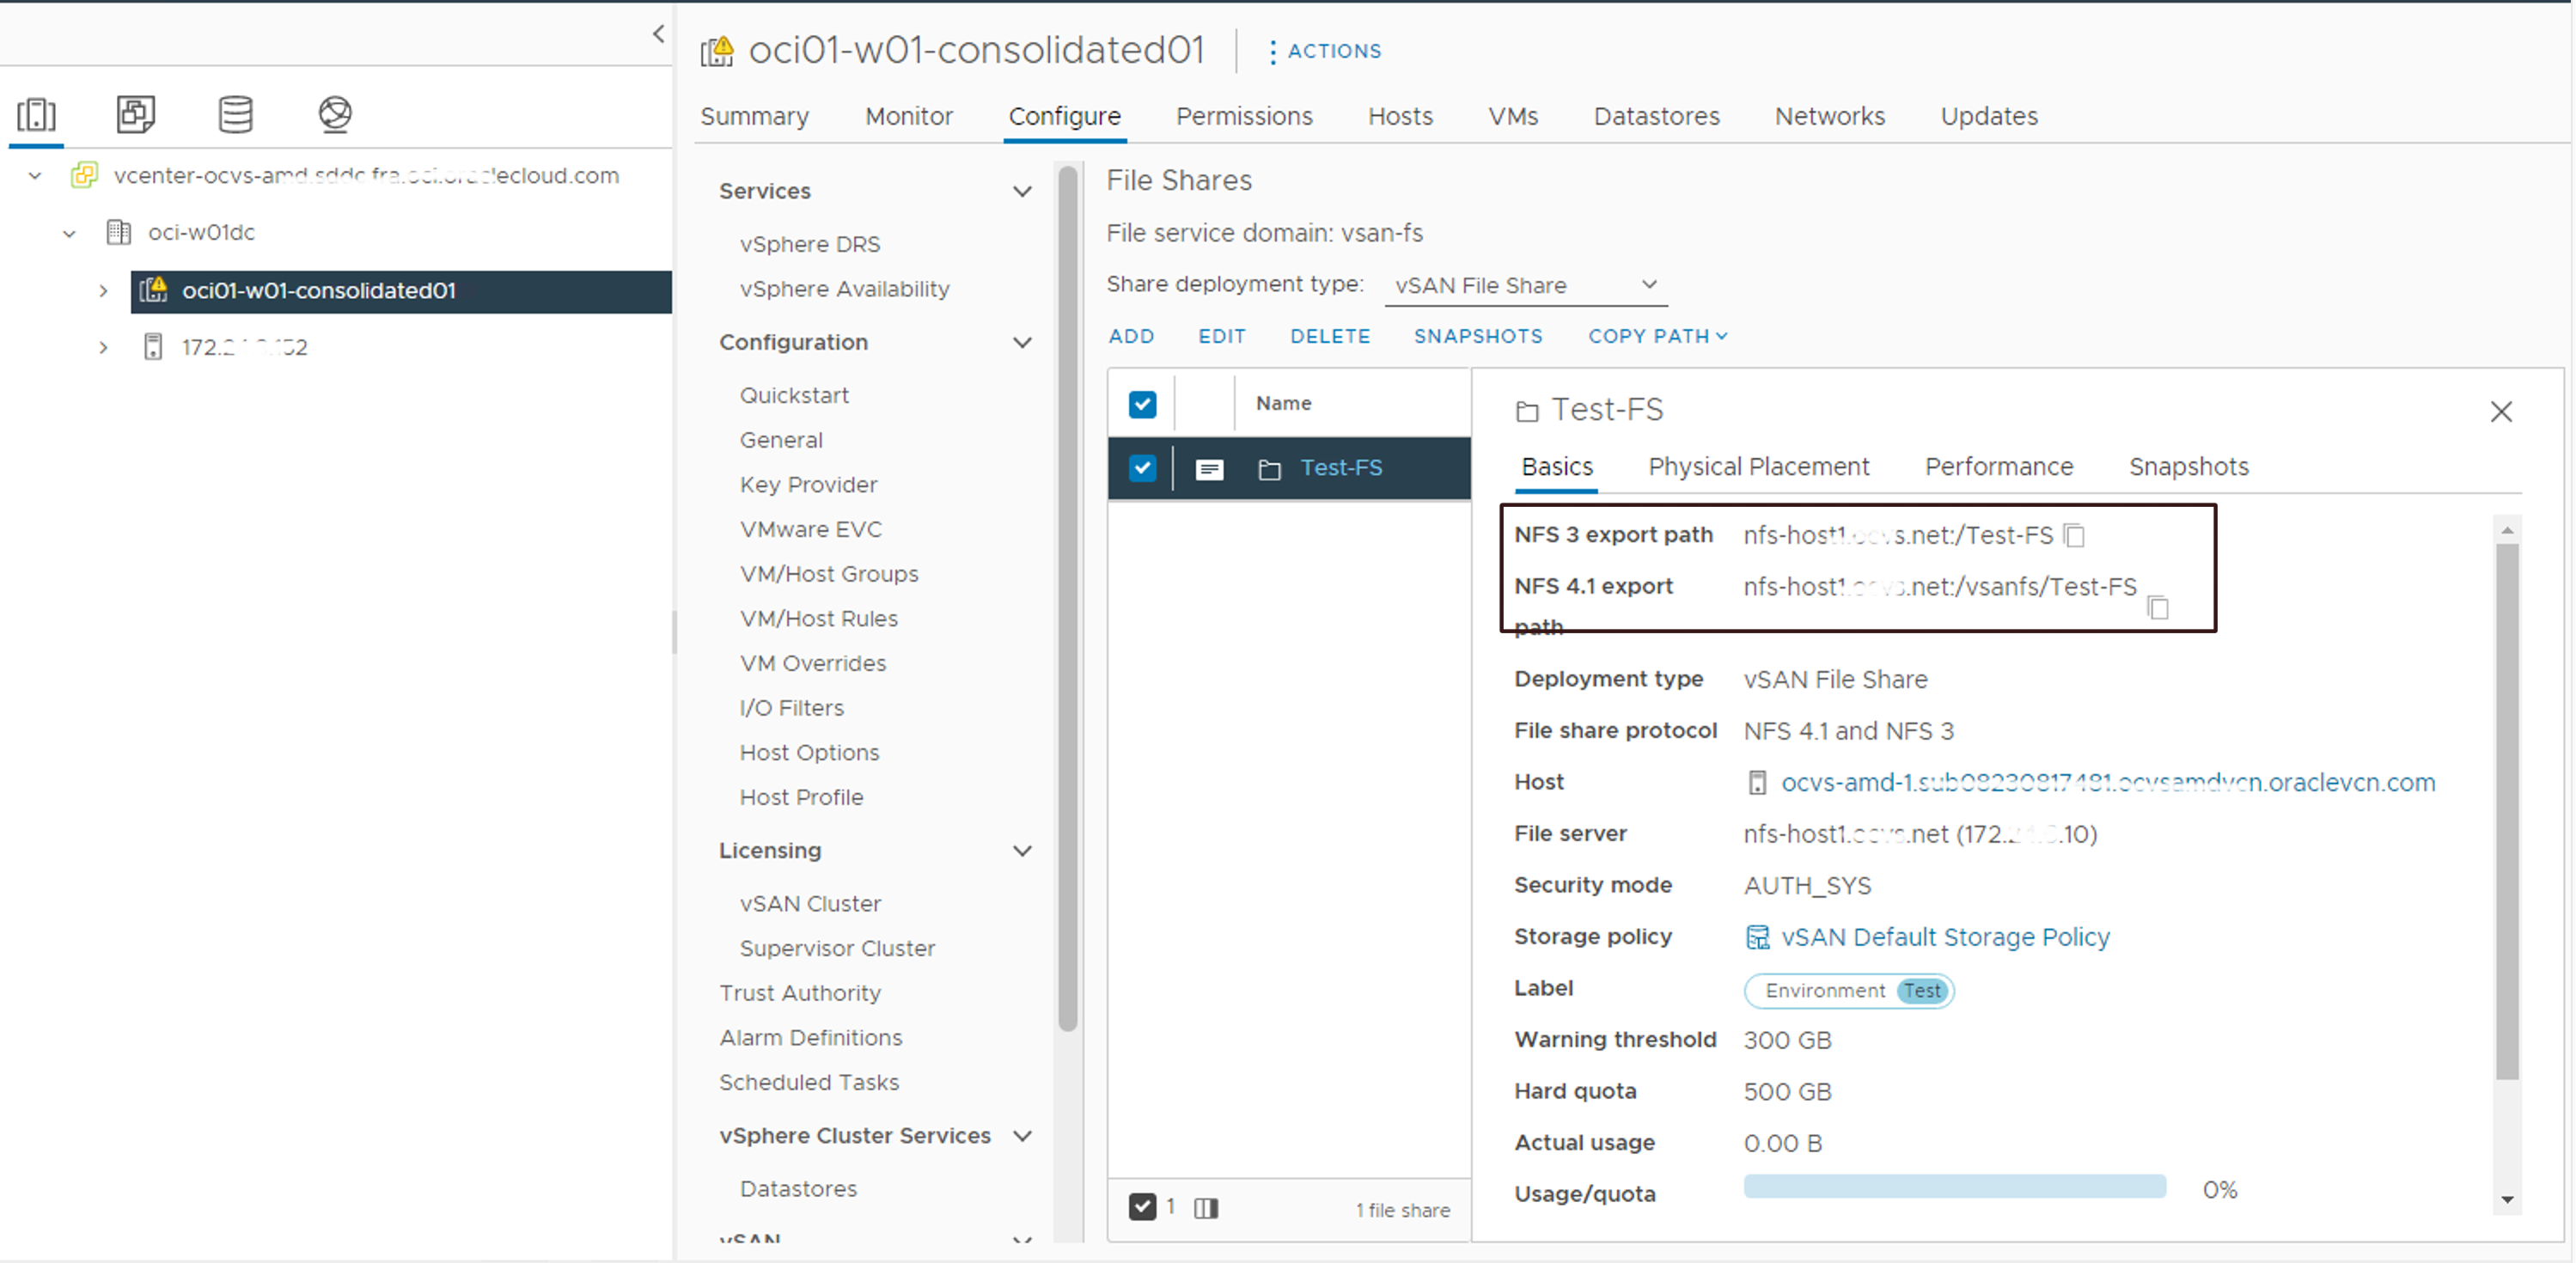
-
Login to the vCenter server and navigate to the Hosts & Cluster view, Configure, File Share under vSAN, and click on View File Share created in Task 2. This page will show you the export path for NFS v3 and NFS v4.1.
-
Now, Mount the NFS to the client VMs.
-
Login to client SDDC VM and install the NFS client (Windows, Linux) if not already done so.
-
Map the vSAN file share as shown in the screenshot below.
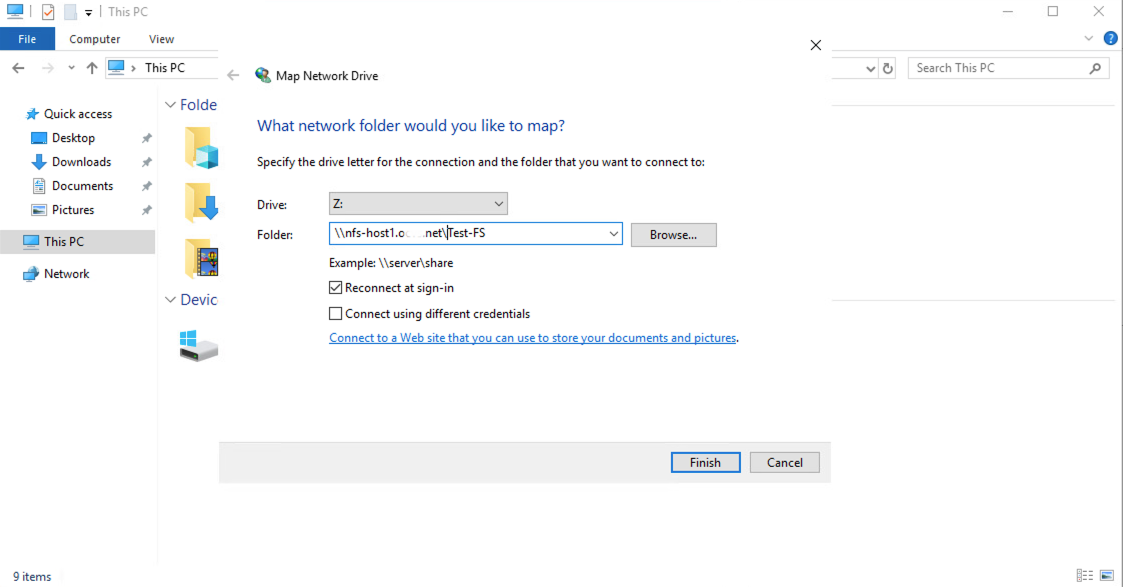
As a result, you should be able to see shared network drive mounted on the operating system. Refer to the sample screenshot below for Windows client.

Related Links
- Oracle Cloud VMware Solution
- Oracle Cloud VMware Solution Overview Help Center
- Perform an in-place upgrade from Oracle Cloud VMware Solution 6.x to 7.x
Acknowledgments
Author: Devendra Gawale (Cloud VMware Solutions Specialist, EMEA)
More Learning Resources
Explore other labs on docs.oracle.com/learn or access more free learning content on the Oracle Learning YouTube channel. Additionally, visit education.oracle.com/learning-explorer to become an Oracle Learning Explorer.
For product documentation, visit Oracle Help Center.
Configure VMware vSAN file share with Oracle Cloud VMware Solution
F73800-01
November 2022
Copyright © 2022, Oracle and/or its affiliates.