Note:
- This tutorial requires access to Oracle Cloud. To sign up for a free account, see Get started with Oracle Cloud Infrastructure Free Tier.
- It uses example values for Oracle Cloud Infrastructure credentials, tenancy, and compartments. When completing your lab, substitute these values with ones specific to your cloud environment.
Deploy Oracle SOA Suite in Oracle Visual Builder Studio
Introduction
Oracle Visual Builder Studio is the official Oracle tool for automating DevOps processes with different technologies like:
- Kubernetes/Docker
- functions
- Application Servers like Oracle Weblogic, IIS, JBoss, Tomcat
- Oracle Forms
- Oracle SOA Suite
- Oracle Integration (OIC)
This tutorial shows an example of how to implement the following functionalities in Oracle SOA Suite.
- Exposure of a REST Service
- Working with Kafka (or Oracle Cloud Streaming) topics through a Kafka-compatible REST API
- Implement an embedded Java call
- Automatically deploy your SOA Suite package to SOA server
Important Note: Currently, it is only possible to implement CI/CD with Oracle SOA Suite through Oracle Visual Builder Studio. This is because only Visual Builder Studio has plug-ins already pre-installed in the virtual machine to process and compile (BUILD) the necessary packages. Therefore, it is not yet possible to implement CI/CD with other market tools such as Jenkins.
Objectives
Implement a project in SOA Suite that can be automatically deployed through the DevOps process with Oracle Visual Builder Studio.
Prerequisites
Knowledge of the following:
- SOA Suite concepts and components
- Kafka concepts and uses
- Development on JDeveloper IDE
Task 1: Create your Oracle Streaming instance
Oracle Cloud Streaming is an application that aims to serve as a message queue just like the open-source Kafka tool. Oracle Streaming is a managed solution, meaning you create an instance for use and don’t have to worry about infrastructure governance. Pay only for what you use. The tool also allows you to use Kafka’s REST API, making it compatible with existing Kafka projects with the advantages of “cloud as a service”.
In this tutorial, we will execute a SOA service implementation to produce and another service to consume data in a message queue. So our first stop will be provisioning an Oracle Streaming environment.
-
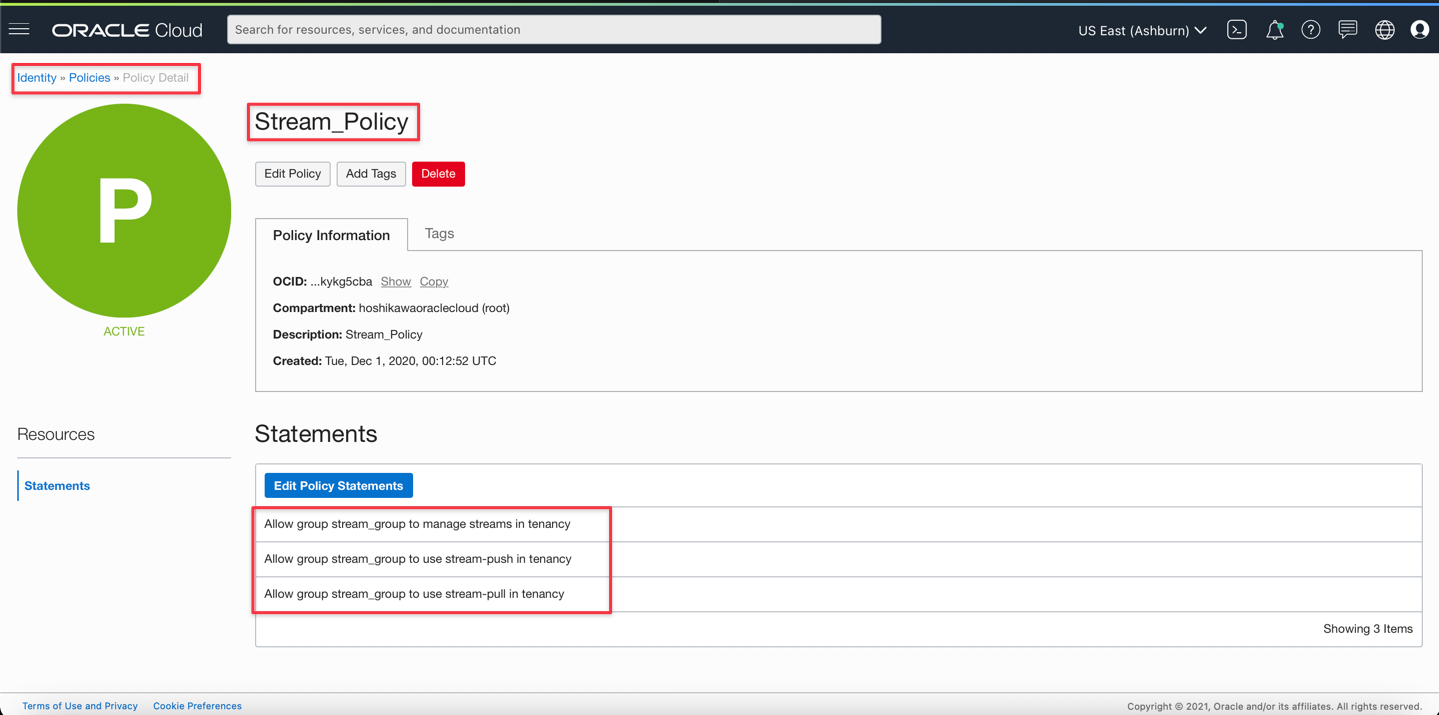
Create a user group for Streaming and enable users in this group. Once this is done, we can then determine the access to this group through the policies. See the following example of how to determine the access for using Oracle Cloud Streaming.
-
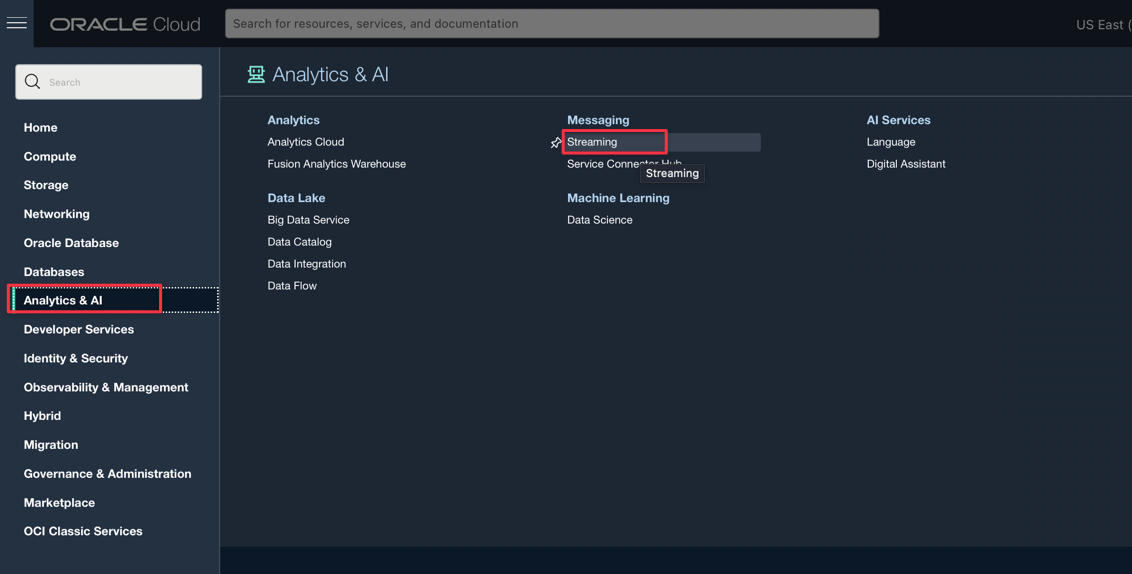
Create the Oracle Cloud Streaming instance. In the main menu, select the Analytics & AI, Streaming as shown in the following image.
-
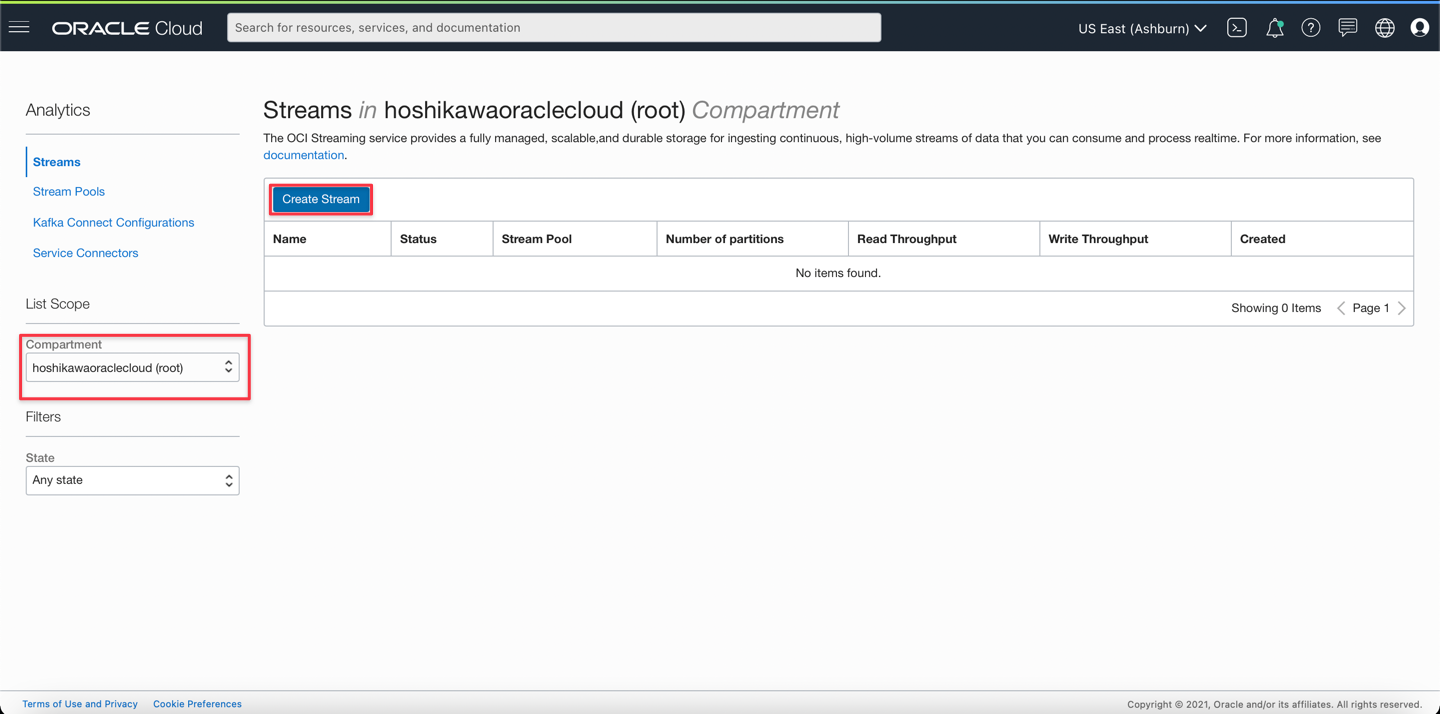
Once this is done, you will see the console with instances of Oracle Cloud Streaming. To create your instance, select the compartment and click Create Stream.
-
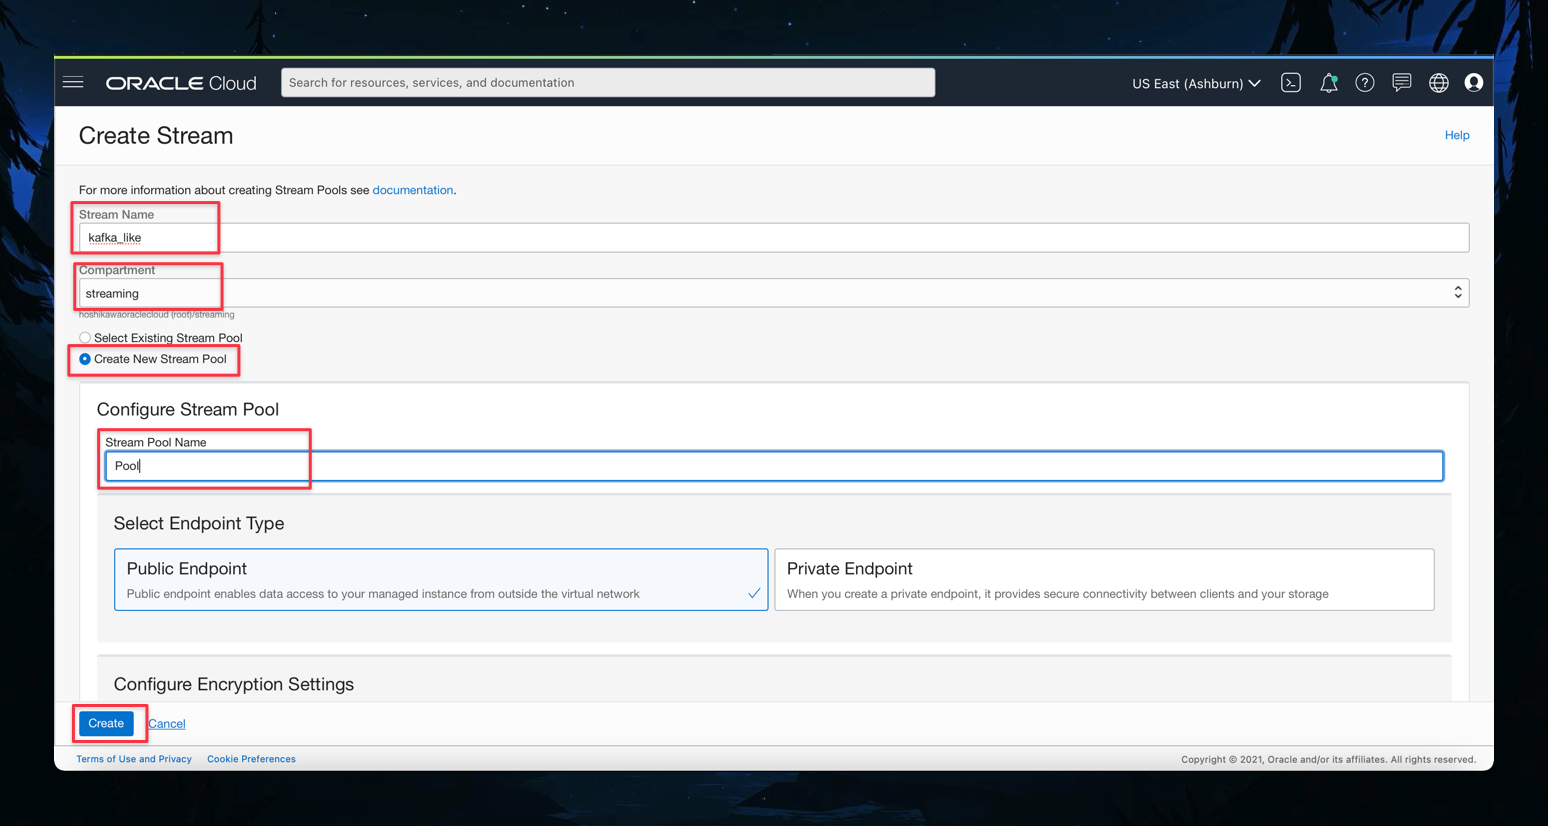
Provide the instance data, such as name and compartment. Also, request that a new Stream Pool be created and provide a name for your pool. Click Create.
-
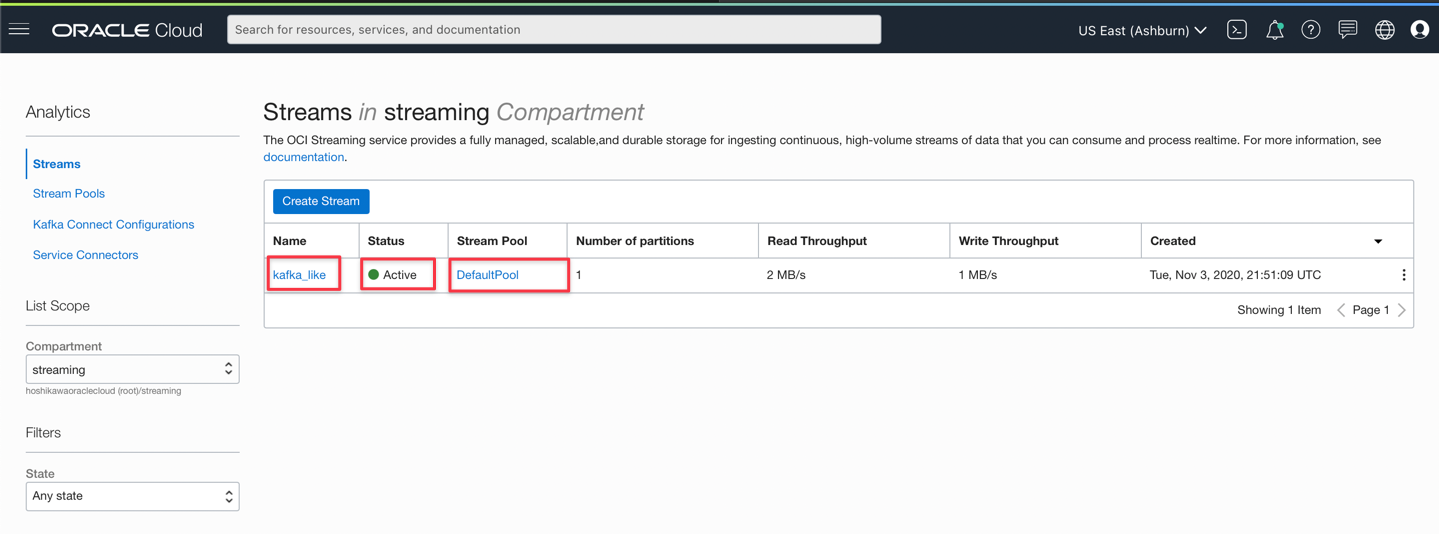
Wait for the stream creation to complete. The stream is created as shown in the following image.
-
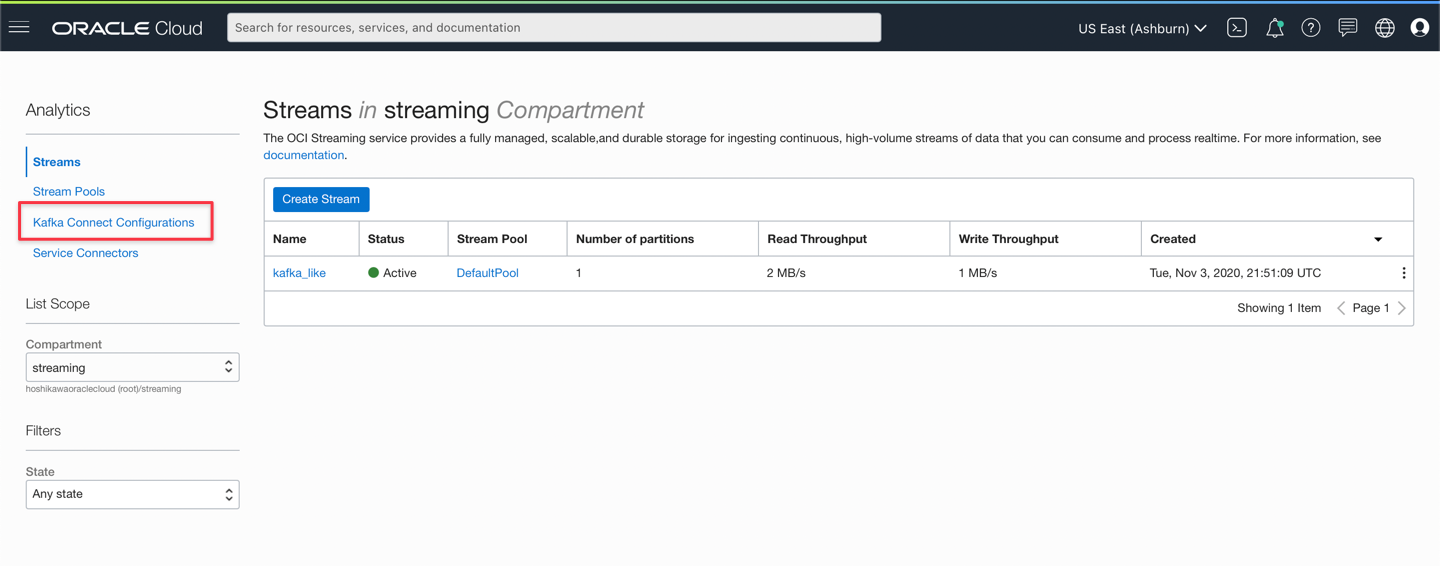
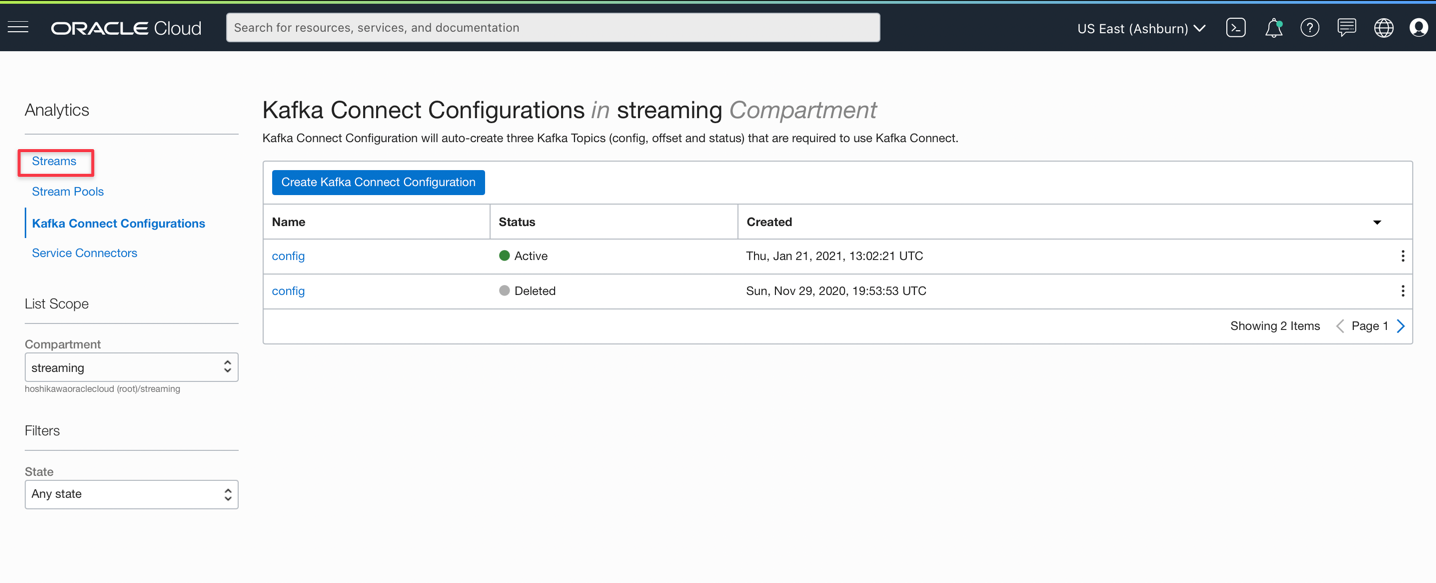
Get settings from the Kafka-compatible REST API by clicking on the Kafka Connect Configurations link as shown in the following image.
-
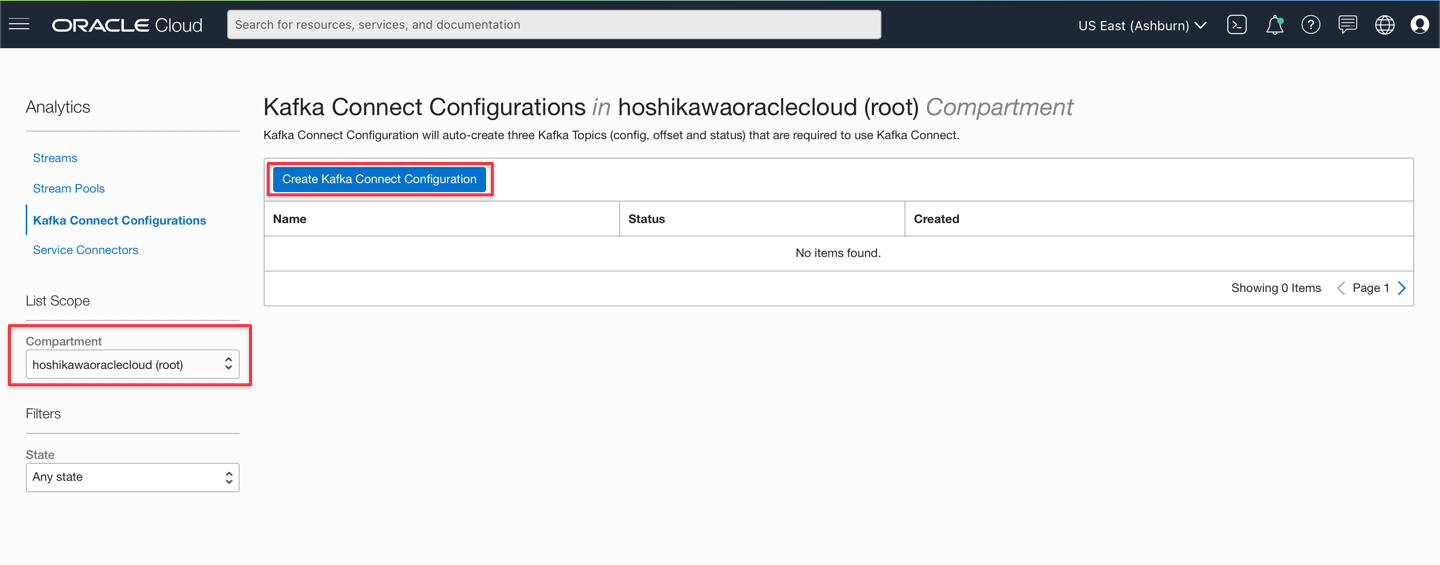
Create the configuration by selecting the compartment and clicking on the Create Kafka Connect Configuration option.
-
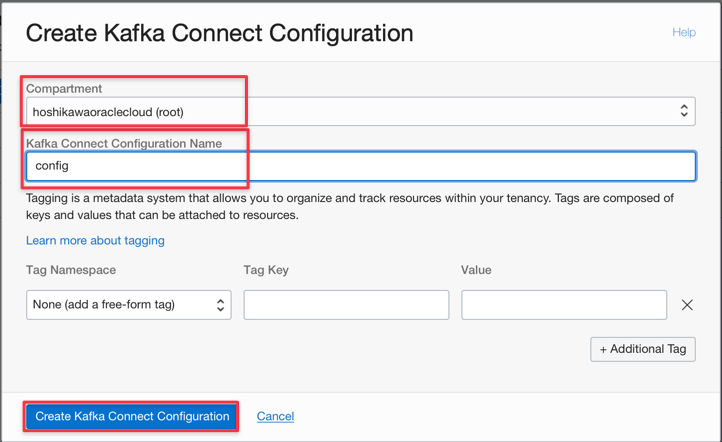
Enter the compartment and name of your configuration as shown in the following image. Create the configuration by clicking Create Kafka Connect Configuration.
-
Get the configuration parameters to connect to Oracle Cloud Stream. Go to the Streams option from the links on the left.
-
Click on the Pool created earlier.
-
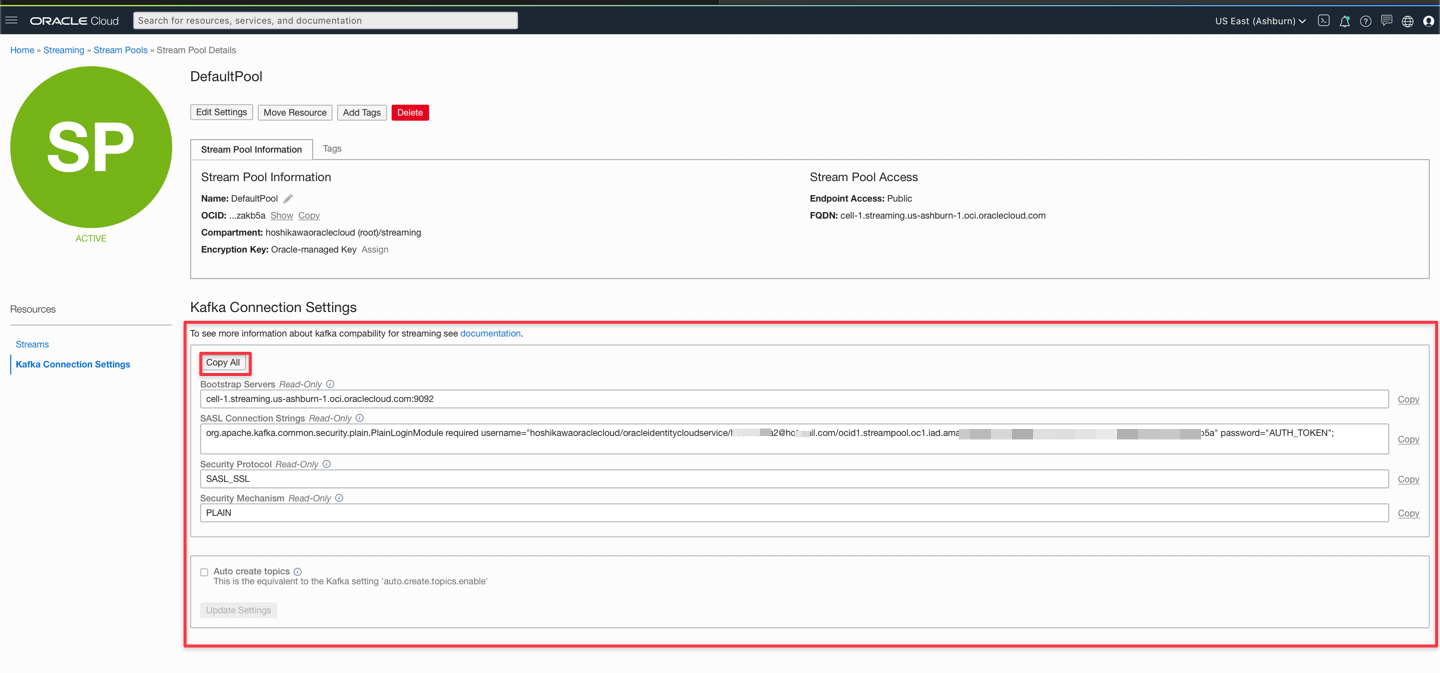
Click Kafka Connection Settings.
-
Copy the parameters to use in your Java code.
Task 2: Create your SOA Suite project in JDeveloper
We will create an instance of Oracle Cloud Streaming in order to replace Kafka. Create a project with the following objectives:
- Project to produce and consume a Streaming queue like Kafka
- REST service to test both services
The complete project is included in this tutorial. You can change the settings to compile, package and deploy to your SOA Suite instance.
Note: This tutorial does not include detailed steps to implement REST services. For more information, see How to Implement and Consume REST Services with Oracle SOA Suite.
-
Download the SOAKafkaProducerApp project using this link: SOAKafkaProducerApp.zip.
-
Find the
/SOAKafkaProducerApp/SOAKafkaProducerApp/SOAKafkaProducerApp.jwsapplication file. -
You can view the projects in JDeveloper:
SOAKafkaProducerPrjandSOAKafkaConsumerPrj
-
-
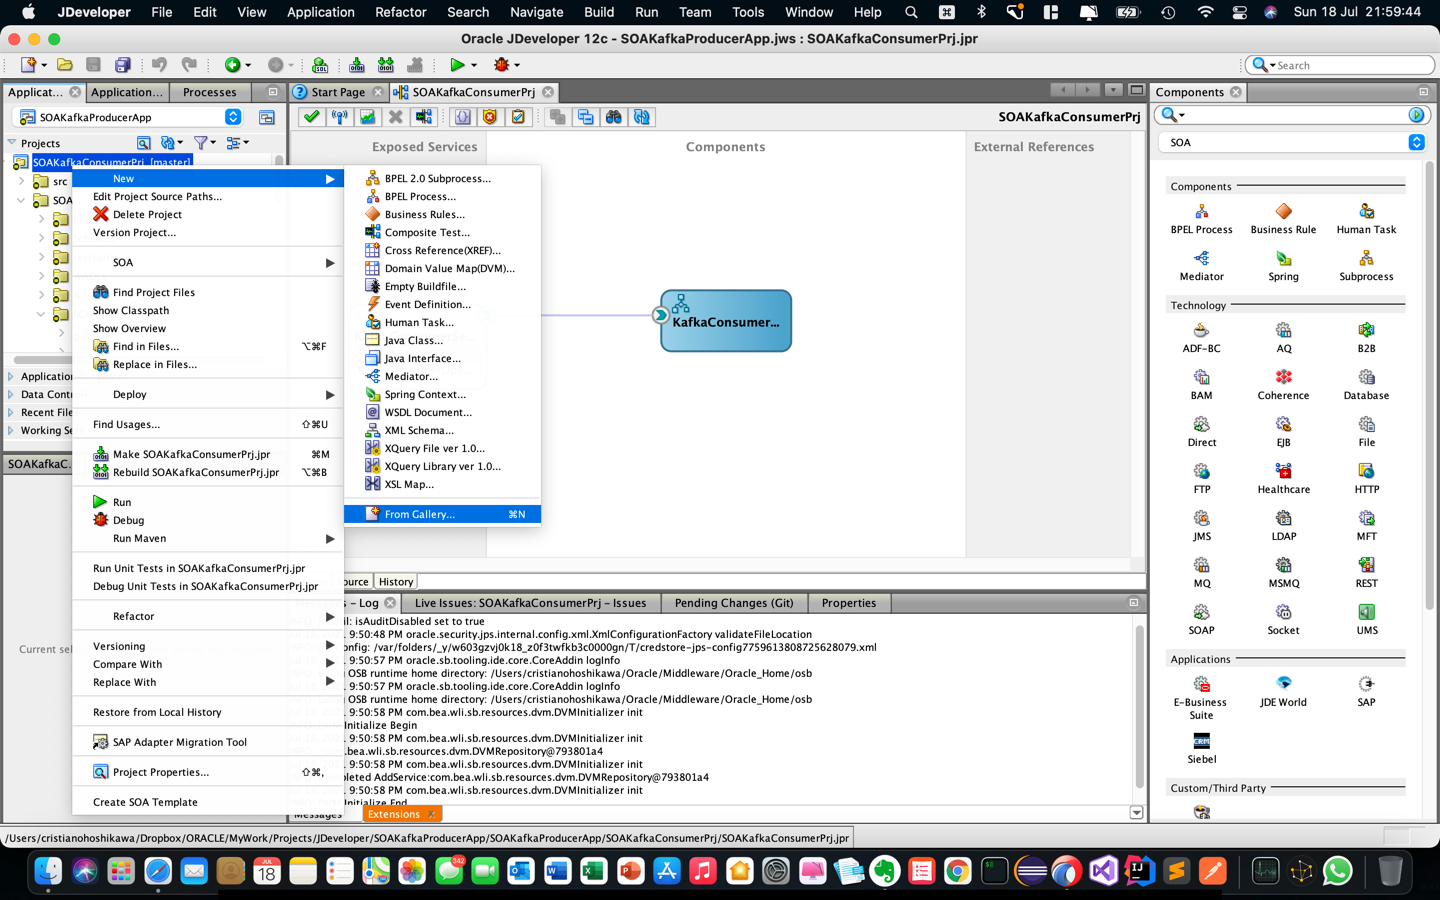
Click on the application tree and look for SOAKakfaConsumerPrj and double-click
KafkaConsumeras shown in the following image.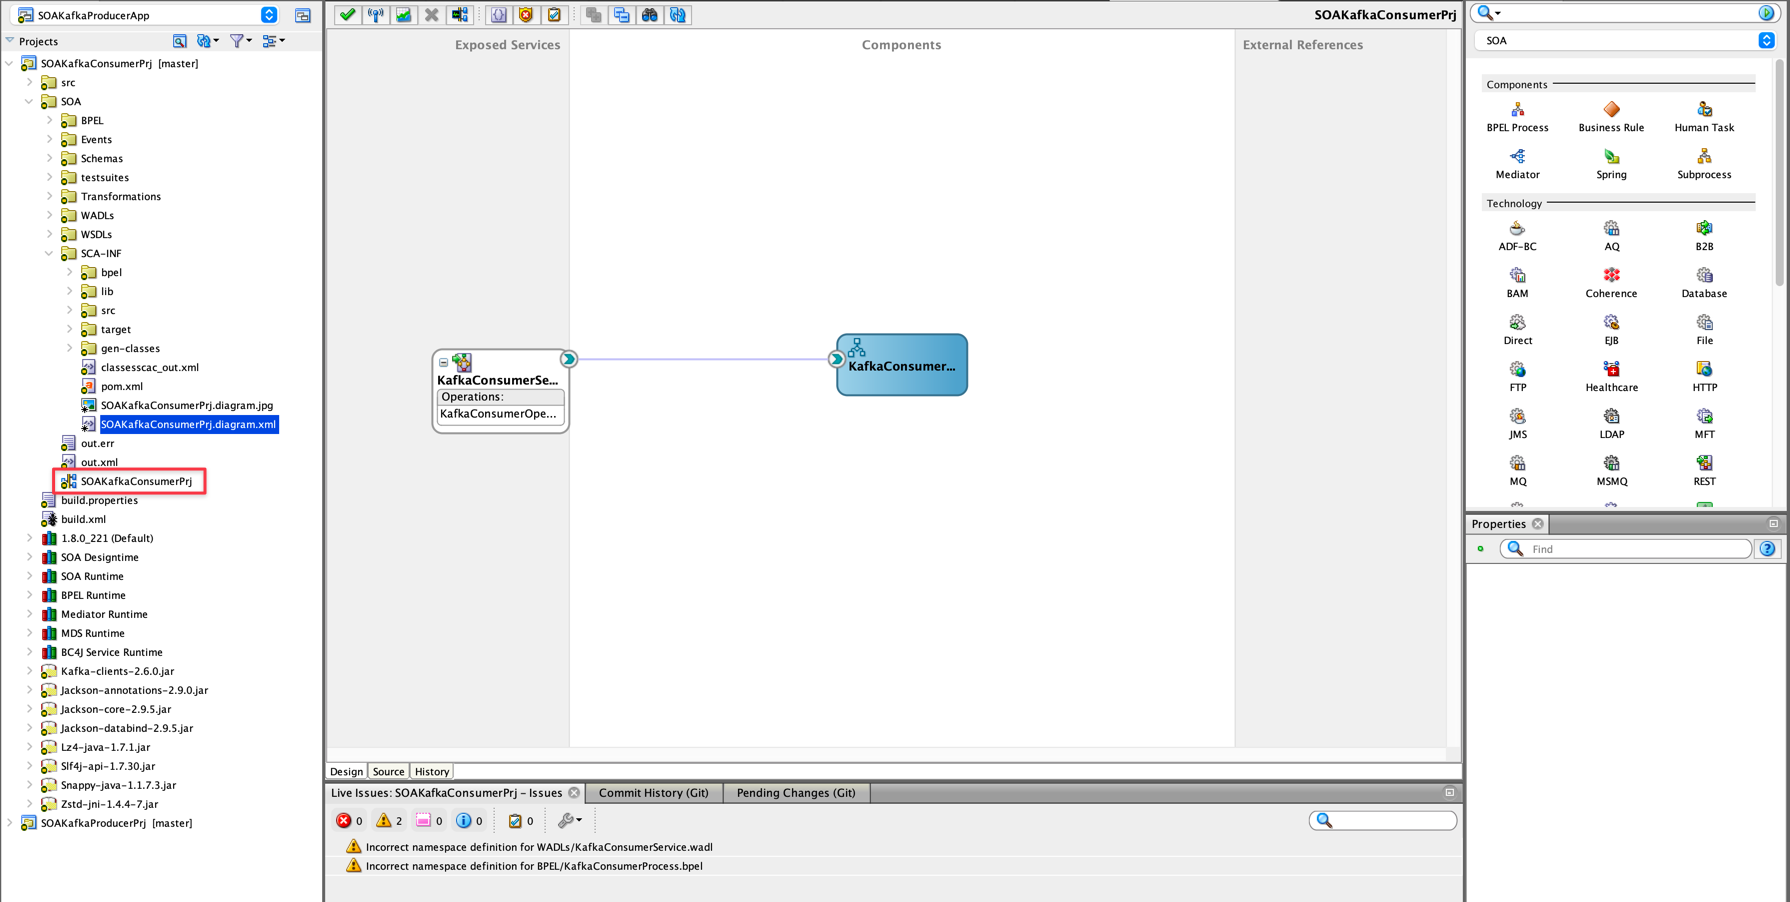
-
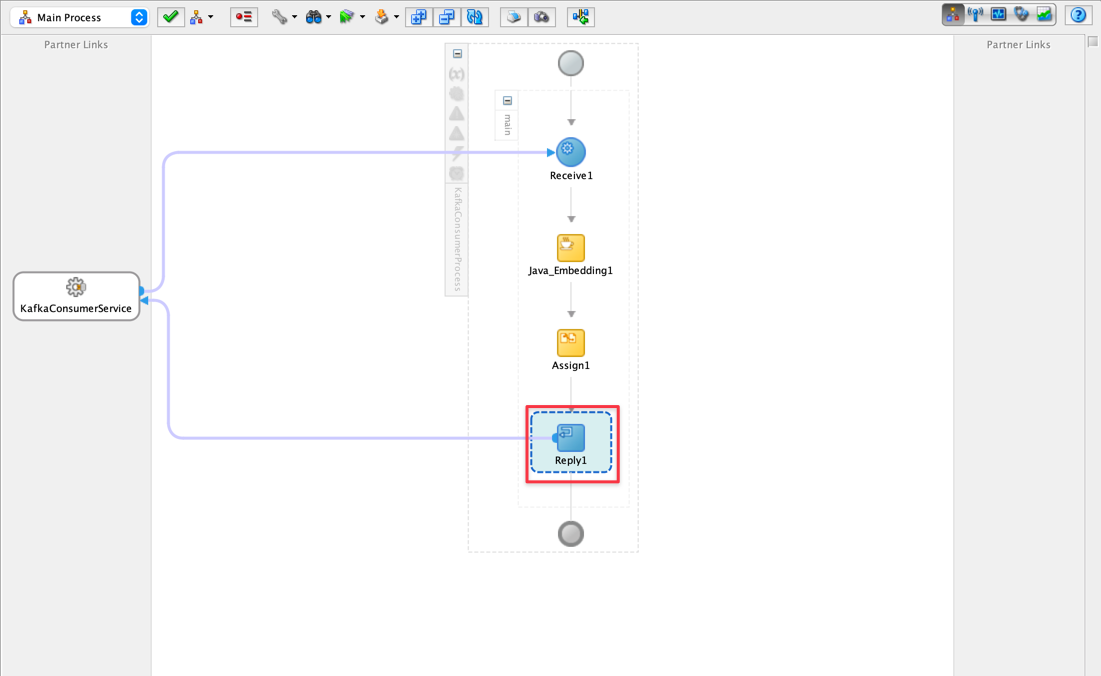
This is the vision of the SOA project for Kafka queue consumption. This is a typical implementation of the SOA Composite type. This is a REST service (component laid out in the Exposed Services lane) and must be deployed on SOA Server. The component linked to the service is the implementation of the service itself and is arranged in the Components swimlane as shown in the previous image. By double-clicking on the
KafkaConsumercomponent you will be directed to the implementation of the service as shown below:
-
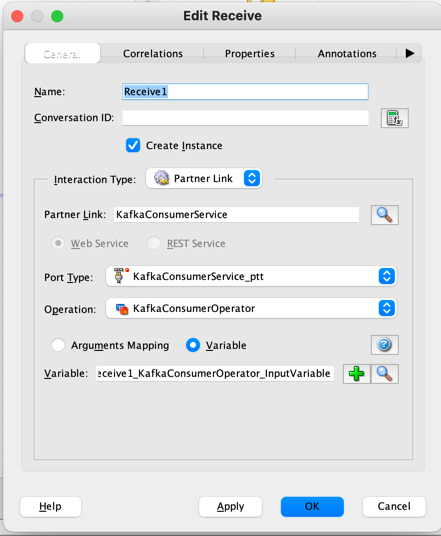
The first implementation stage starts with a component called Receive, responsible for receiving initial work parameter(s), typical of a REST call. In this tutorial, we will not pass parameters, but it is illustrated here for services that need this resource.
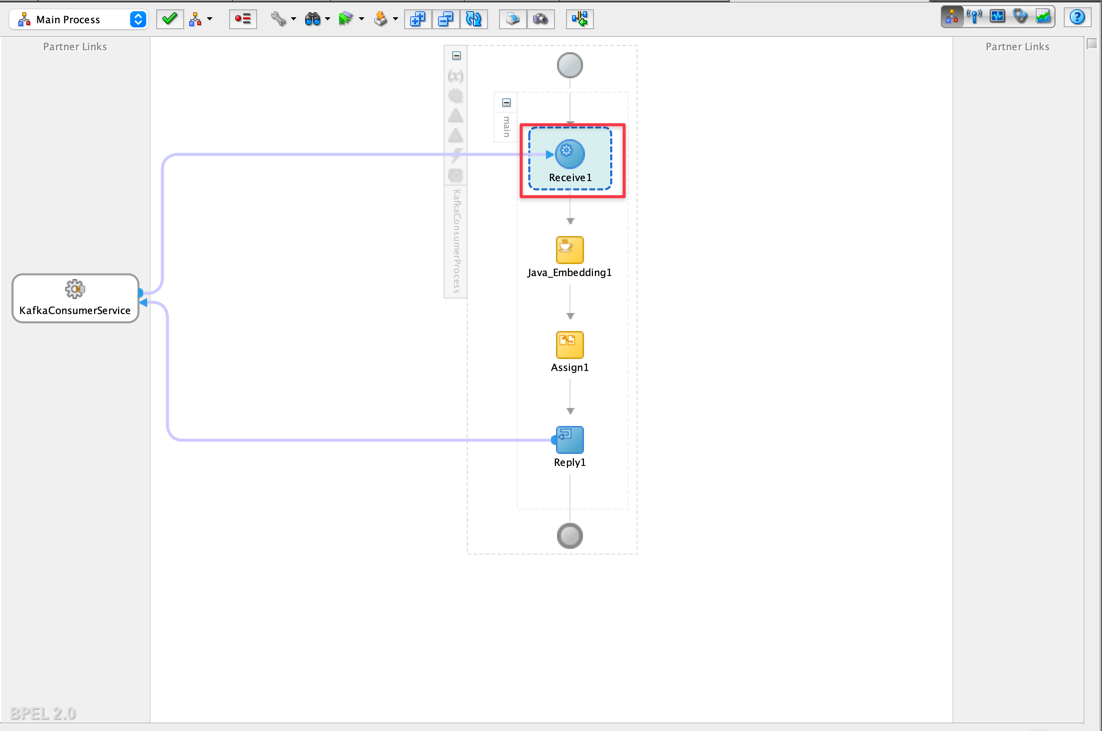
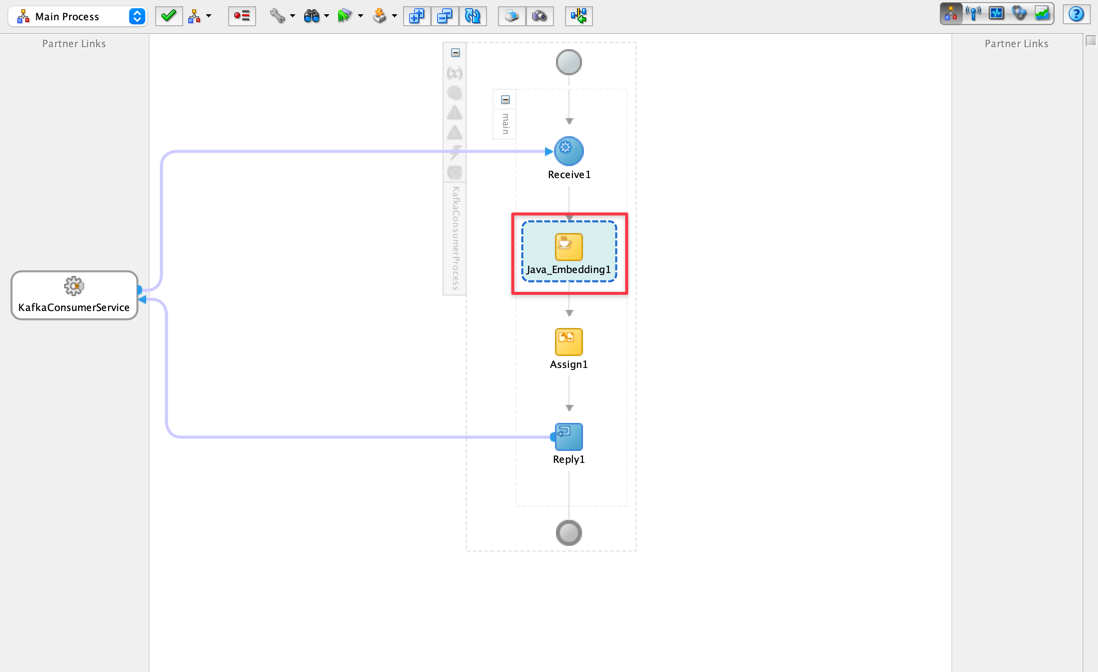
-
The Java Embedded component is responsible for calling a Java routine that, in this case, will call a class called
KafaExamplecommented later.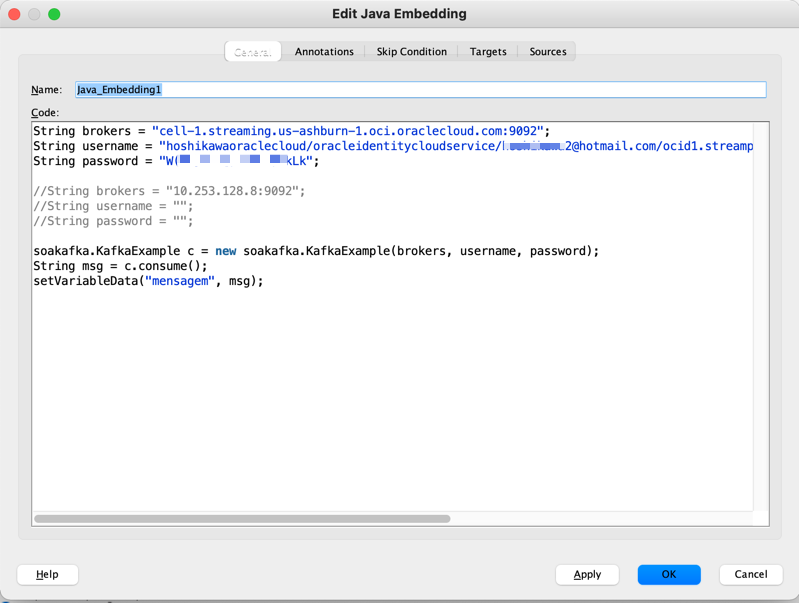
-
The Java code called in this Java Embedding is responsible for the Kafka or Oracle Stream queue production and consumption routines (keep in mind that the API for Oracle Streaming is Kakfa compatible).
java
		package soakafka;

		import org.apache.kafka.clients.consumer.ConsumerRecord;
		import org.apache.kafka.clients.consumer.ConsumerRecords;
		import org.apache.kafka.clients.consumer.KafkaConsumer;
		import org.apache.kafka.clients.producer.KafkaProducer;
		import org.apache.kafka.clients.producer.Producer;
		import org.apache.kafka.clients.producer.ProducerRecord;
		import org.apache.kafka.common.serialization.StringSerializer;
		import org.apache.kafka.common.serialization.StringDeserializer;

		import java.util.Arrays;
		import java.util.Date;
		import java.util.Properties;

		import java.util.concurrent.ExecutionException;

		import org.apache.kafka.clients.producer.Callback;
		import org.apache.kafka.common.errors.WakeupException;

		public class KafkaExample {
		    private final String topic;
		    private final Properties props;

		    public KafkaExample(String brokers, String username, String password) {
		        this.topic = "kafka_like";

		        String jaasTemplate = "org.apache.kafka.common.security.scram.ScramLoginModule required username=\"%s\" password=\"%s\";";
		        String jaasCfg = String.format(jaasTemplate, username, password);

		        String serializer = StringSerializer.class.getName();
		        String deserializer = StringDeserializer.class.getName();
		        //Propriedades
		        props = new Properties();
		        props.put("bootstrap.servers", brokers);
		        props.put("group.id", "kafka-hoshikawa");
		        props.put("enable.auto.commit", "false");
		        props.put("max.poll.records", "10");
		        props.put("auto.offset.reset", "earliest");
		        props.put("key.deserializer", deserializer);
		        props.put("value.deserializer", deserializer);
		        props.put("security.protocol", "SASL_SSL");
		        props.put("sasl.mechanism", "PLAIN");
		        props.put("sasl.jaas.config", jaasCfg);
		        //props.put("ssl.client.auth", "requested");
		    }

		    public String consume() {
		        String ret = "";
		        KafkaConsumer<String, String> consumer = new KafkaConsumer<>(props);
		        consumer.subscribe(Arrays.asList(topic));

		        try {
		          while (true) {
		            ConsumerRecords<String, String> records = consumer.poll(100);
		            for (ConsumerRecord<String, String> record : records)
		            {
		              System.out.println(record.offset() + ": " + record.value());
		              ret = ret + record.value();
		            }
		              if (ret != "")
		                break;
		          }
		        } catch (Exception e) {
		          // ignore for shutdown
		        } finally {
		          consumer.commitAsync();
		          consumer.close();
		        }
		        return ret;
		    };

		    public void produce(String message) {
		        Producer<String, String> producer = new KafkaProducer<String, String>(props);
		        ProducerRecord record = new ProducerRecord<String, String>(topic, "msg", message);

		        Callback callback = (data, ex) -> {
		            if (ex != null) {
		                ex.printStackTrace();
		                return;
		            }
		            System.out.println(
		                "Mensagem enviada com sucesso para: " + data.topic() + " | partition " + data.partition() + "| offset " + data.offset() + "| tempo " + data
		                    .timestamp());
		        };
		        try {
		            producer.send(record, callback).get();
		        } catch (ExecutionException | InterruptedException e) {
		        }
		        finally {
		            producer.close();
		        }
		    }

		    public static void main(String[] args) {
		                /*
				String brokers = System.getenv("CLOUDKARAFKA_BROKERS");
				String username = System.getenv("CLOUDKARAFKA_USERNAME");
				String password = System.getenv("CLOUDKARAFKA_PASSWORD");
		                */
		                String brokers = "cell-1.streaming.us-ashburn-1.oci.oraclecloud.com:9092";
		                String username = "hoshikawaoraclecloud/oracleidentitycloudservice/hoshikawa2@hotmail.com/ocid1.streampool.oc1.iad.amaaaxxxxxxxxxxxxxxxxxxxxxxxxxxxxxxxxxxxxkgztajzakb5a";
		                String password = "Wxxxxxxxxxxxxxxxxxxxxxxk";
				KafkaExample c = new KafkaExample(brokers, username, password);
		        c.consume();
		    }
		}

		    public static void main(String[] args) {
		                /*
				String brokers = System.getenv("CLOUDKARAFKA_BROKERS");
				String username = System.getenv("CLOUDKARAFKA_USERNAME");
				String password = System.getenv("CLOUDKARAFKA_PASSWORD");
		                */
		                String brokers = "cell-1.streaming.us-ashburn-1.oci.oraclecloud.com:9092";
		                String username = "hoshikawaoraclecloud/oracleidentitycloudservice/zzzzzzzzz2@zzzzzzil.com/ocid1.streampool.oc1.iad.amaaaxxxxxxxxxxxxxxxxxxxxxxxxxxxxxxxxxxxxkgztajzakb5a";
		                String password = "Wxxxxxxxxxxxxxxxxxxxxxxk";
				KafkaExample c = new KafkaExample(brokers, username, password);
		        c.consume();
		    }
		}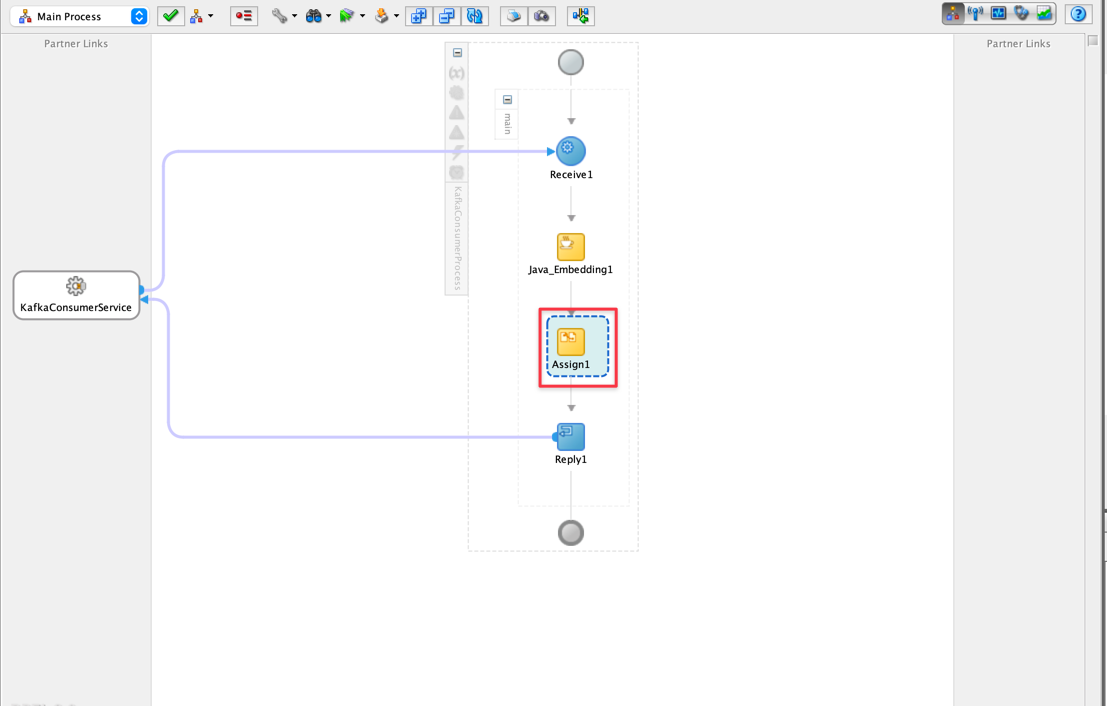
-
-
Include Java packages in your code with Maven.
-
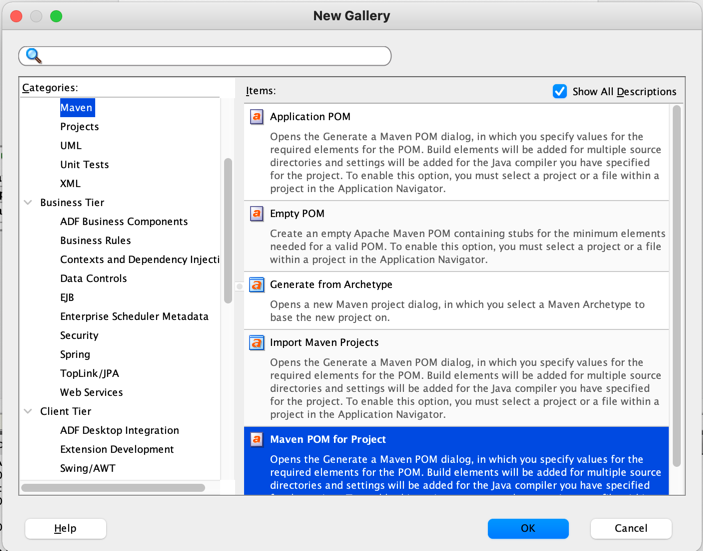
In this project, we inject Java code to call the Kafka or Oracle Cloud Streaming API. Because it is Java code, package inclusions are often necessary to use frameworks. Maven is the most used tool in these cases and for that, you must include it in your project. With the right mouse button, open the option over your project and select From Gallery as shown in the following image.
-
Select the Maven POM for Project option.
Now you will be able to configure your package with the necessary frameworks.
-
-
Build with Maven.
-
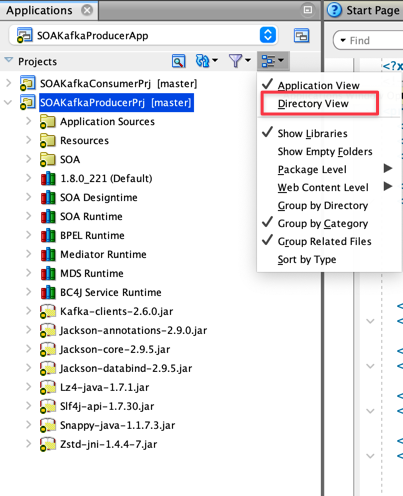
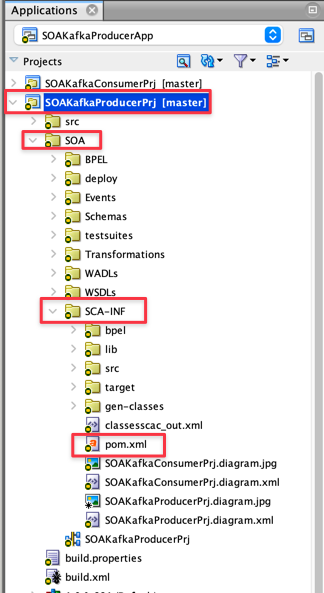
Click on the Application Windows options and then click Directory View to access the /SOA/SCA-INF/pom.xml file.
-
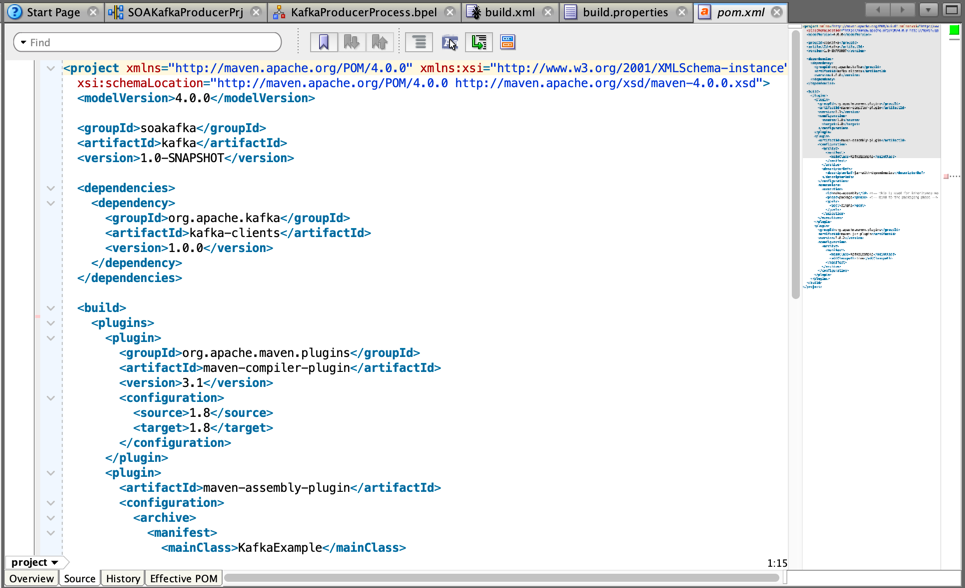
Double-click on the pom.xml file to open it in the JDeveloper editor and select the Source tab to view the code.
-
This way you will be able to visualize the code of the pom.xml file.
-
Here’s a very important change to the DevOps process. You MUST include these lines for automation.
Note: The project in this tutorial is already configured to support DevOps automation, but for new projects, follow this procedure to automate the DevOps process. Between the
tag and the tag you can include this code, which will be responsible for assembling your software package for later deployment with **Ant**. For DevOps automation, you need to include the following 3 lines.
<directory>target</directory><outputDirectory>classes</outputDirectory><sourceDirectory>src</sourceDirectory>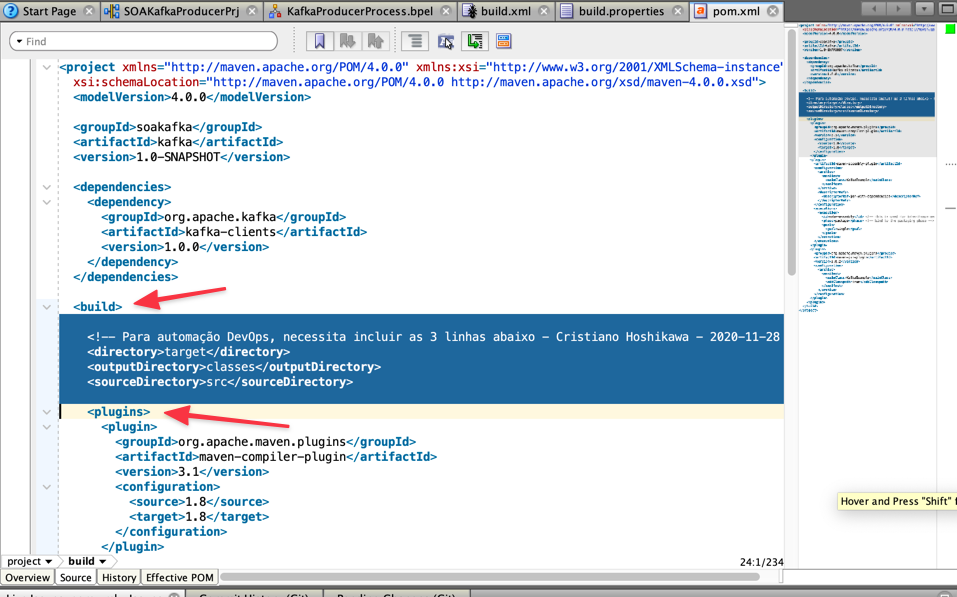
So your complete code will look like this:
xml
    pom.xml

    <project xmlns="http://maven.apache.org/POM/4.0.0" xmlns:xsi="http://www.w3.org/2001/XMLSchema-instance"
      xsi:schemaLocation="http://maven.apache.org/POM/4.0.0 http://maven.apache.org/xsd/maven-4.0.0.xsd">
      <modelVersion>4.0.0</modelVersion>

      <groupId>soakafka</groupId>
      <artifactId>kafka</artifactId>
      <version>1.0-SNAPSHOT</version>

      <dependencies>
        <dependency>
          <groupId>org.apache.kafka</groupId>
          <artifactId>kafka-clients</artifactId>
          <version>1.0.0</version>
        </dependency>
      </dependencies>

      <build>

        <!-- For DevOps automation, you need to include the 3 lines below - Cristiano Hoshikawa - 2020-11-28 -->
        <directory>target</directory>
        <outputDirectory>classes</outputDirectory>
        <sourceDirectory>src</sourceDirectory>

        <plugins>
          <plugin>
            <groupId>org.apache.maven.plugins</groupId>
            <artifactId>maven-compiler-plugin</artifactId>
            <version>3.1</version>
            <configuration>
              <source>1.8</source>
              <target>1.8</target>
            </configuration>
          </plugin>
          <plugin>
            <artifactId>maven-assembly-plugin</artifactId>
            <configuration>
              <archive>
                <manifest>
                  <mainClass>KafkaExample</mainClass>
                </manifest>
              </archive>
              <descriptorRefs>
                <descriptorRef>jar-with-dependencies</descriptorRef>
              </descriptorRefs>
            </configuration>
            <executions>
              <execution>
                <id>make-assembly</id> <!-- this is used for inheritance merges -->
                <phase>package</phase> <!-- bind to the packaging phase -->
                <goals>
                  <goal>single</goal>
                </goals>
              </execution>
            </executions>
          </plugin>
          <plugin>
            <groupId>org.apache.maven.plugins</groupId>
            <artifactId>maven-jar-plugin</artifactId>
            <version>3.0.2</version>
            <configuration>
              <archive>
                <manifest>
                  <mainClass>KafkaExample</mainClass>
                  <addClasspath>true</addClasspath>
                </manifest>
              </archive>
            </configuration>
          </plugin>
        </plugins>
      </build>
    </project>
-
-
Build and Deploy with Ant.
-
Ant is a well-known tool in the market, developed by the Jakarta project, responsible for automating compilations, package builds and application deployments for projects such as Java. In the DevOps process, Ant will be fundamental for building the SOA Suite package and also for deploying this package on the remote Weblogic SOA Suite server.
-
To create your build.xml file, With the right mouse button, open the option over your project and select From Gallery as shown in the following image.
-
Select the Ant option on the left side menu and then click Buildfile from Project.

-
The build.xml file is a very common configuration file for use with Ant.
xml build.xml <?xml version="1.0" encoding="UTF-8" ?> <!--Ant buildfile generated by Oracle JDeveloper--> <!--Generated Oct 12, 2020 11:35:33 PM--> <project xmlns="antlib:org.apache.tools.ant" name="SOAKafkaProducerPrj" default="all" basedir="."> <property environment="env" /> <property file="build.properties"/> <path id="library.SOA.Designtime"> <pathelement location="${install.dir}/soa/plugins/jdeveloper/extensions/oracle.sca.modeler.jar"/> </path> <path id="library.SOA.Runtime"> <pathelement location="${install.dir}/soa/soa/modules/oracle.soa.fabric_11.1.1/fabric-runtime.jar"/> <pathelement location="${install.dir}/soa/soa/modules/oracle.soa.fabric_11.1.1/tracking-api.jar"/> <pathelement location="${install.dir}/soa/soa/modules/oracle.soa.fabric_11.1.1/tracking-core.jar"/> <pathelement location="${install.dir}/soa/soa/modules/oracle.soa.fabric_11.1.1/edn.jar"/> <pathelement location="${install.dir}/soa/soa/modules/oracle.soa.mgmt_11.1.1/soa-infra-mgmt.jar"/> <pathelement location="${oracle.commons}/modules/com.oracle.webservices.fabric-common-api.jar"/> </path> <path id="library.BPEL.Runtime"> <pathelement location="${install.dir}/soa/soa/modules/oracle.soa.bpel_11.1.1/orabpel.jar"/> </path> <path id="library.Mediator.Runtime"> <pathelement location="${install.dir}/soa/soa/modules/oracle.soa.mediator_11.1.1/mediator_client.jar"/> </path> <path id="library.MDS.Runtime"> <pathelement location="${oracle.commons}/modules/oracle.mds/mdsrt.jar"/> </path> <path id="library.BC4J.Service.Runtime"> <pathelement location="${oracle.commons}/modules/oracle.adf.model/adfbcsvc.jar"/> <pathelement location="${oracle.commons}/modules/oracle.adf.model/adfbcsvc-share.jar"/> <pathelement location="${oracle.commons}/modules/commonj.sdo.backward.jar"/> <pathelement location="${oracle.commons}/modules/commonj.sdo.jar"/> <pathelement location="${oracle.commons}/modules/oracle.toplink/eclipselink.jar"/> <pathelement location="${oracle.commons}/modules/com.oracle.webservices.fmw.wsclient-impl.jar"/> <pathelement location="${oracle.commons}/modules/com.oracle.webservices.fmw.jrf-ws-api.jar"/> <pathelement location="${oracle.commons}/modules/com.oracle.webservices.fmw.web-common-schemas-impl.jar"/> </path> <path id="classpath"> <path refid="library.SOA.Designtime"/> <path refid="library.SOA.Runtime"/> <path refid="library.BPEL.Runtime"/> <path refid="library.Mediator.Runtime"/> <path refid="library.MDS.Runtime"/> <path refid="library.BC4J.Service.Runtime"/> </path> <target name="init"> <tstamp/> <mkdir dir="${workspace}/SOAKafkaProducerApp/SOAKafkaProducerPrj/SOA/SCA-INF/classes"/> </target> <target name="all" description="Build the project" depends="deploy,copy"/> <target name="clean" description="Clean the project"> <delete includeemptydirs="true" quiet="true"> <fileset dir="${output.dir}" includes="**/*"/> </delete> </target> <target name="compile" depends="init"> <javac srcdir="${workspace}/SOAKafkaProducerApp/SOAKafkaProducerPrj/SOA/SCA-INF/src/soakafka" destdir="${workspace}/SOAKafkaProducerApp/SOAKafkaProducerPrj/SOA/SCA-INF/classes" includeantruntime="false"> <include name="${workspace}/SOAKafkaProducerApp/SOAKafkaProducerPrj/SOA/SCA-INF/lib/**"/> </javac> </target> <target name="sca-compile" depends="compile"> <ant antfile="${middleware.home}/soa/bin/ant-sca-compile.xml" inheritAll="false"> <property name="scac.input" value="${workspace}/SOAKafkaProducerApp/SOAKafkaProducerPrj/SOA/composite.xml"/> </ant> </target> <target name="sca-package" depends="sca-compile"> <ant antfile="/${middleware.home}/soa/bin/ant-sca-package.xml" inheritAll="false"> <property name="compositeDir" value="${workspace}/SOAKafkaProducerApp/SOAKafkaProducerPrj/SOA"/> <property name="compositeName" value="SOAKafkaProducerPrj"/> <property name="revision" value="${revision}"/> <property name="sca.application.home" value="${workspace}/SOAKafkaProducerApp/SOAKafkaProducerPrj"/> </ant> </target> <target name="deploy" description="Deploy JDeveloper profiles" depends="sca-package"> <taskdef name="ojdeploy" classname="oracle.jdeveloper.deploy.ant.OJDeployAntTask" uri="oraclelib:OJDeployAntTask" classpath="${oracle.jdeveloper.ant.library}"/> <ora:ojdeploy xmlns:ora="oraclelib:OJDeployAntTask" executable="${oracle.jdeveloper.ojdeploy.path}" ora:buildscript="${oracle.jdeveloper.deploy.dir}/ojdeploy-build.xml" ora:statuslog="${oracle.jdeveloper.deploy.dir}/ojdeploy-statuslog.xml"> <ora:deploy> <ora:parameter name="workspace" value="${oracle.jdeveloper.workspace.path}"/> <ora:parameter name="project" value="${oracle.jdeveloper.project.name}"/> <ora:parameter name="profile" value="${oracle.jdeveloper.deploy.profile.name}"/> <ora:parameter name="nocompile" value="false"/> <ora:parameter name="outputfile" value="${oracle.jdeveloper.deploy.outputfile}"/> </ora:deploy> </ora:ojdeploy> <!-- Deployment SOA Suite Composite --> <ant antfile="/${middleware.home}/soa/bin/ant-sca-deploy.xml" target="deploy" inheritall="false"> <property name="user" value="${WEBLOGICUSER}"/> <property name="password" value="${WEBLOGICPWD}"/> <property name="serverURL" value="${WEBLOGICURL}"/> <property name="sarLocation" value="${workspace}/SOAKafkaProducerApp/SOAKafkaProducerPrj/SOA/deploy/sca_SOAKafkaProducerPrj_rev${revision}.jar"/> <property name="overwrite" value="true"/> </ant> </target> <target name="copy" description="Copy files to output directory" depends="init"> <patternset id="copy.patterns"> <include name="**/*.GIF"/> <include name="**/*.JPEG"/> <include name="**/*.JPG"/> <include name="**/*.PNG"/> <include name="**/*.cpx"/> <include name="**/*.dcx"/> <include name="**/*.ejx"/> <include name="**/*.gif"/> <include name="**/*.ini"/> <include name="**/*.jpeg"/> <include name="**/*.jpg"/> <include name="**/*.png"/> <include name="**/*.properties"/> <include name="**/*.sva"/> <include name="**/*.tag"/> <include name="**/*.tld"/> <include name="**/*.wsdl"/> <include name="**/*.xcfg"/> <include name="**/*.xlf"/> <include name="**/*.xml"/> <include name="**/*.xsd"/> <include name="**/*.xsl"/> <include name="**/*.exm"/> <include name="**/*.xml"/> <exclude name="build.xml"/> </patternset> <copy todir="${output.dir}"> <fileset dir="SOA/SCA-INF/src"> <patternset refid="copy.patterns"/> </fileset> <fileset dir="."> <patternset refid="copy.patterns"/> </fileset> </copy> </target> </project> -
The
build.propertiesfile determines the properties that will be used in thebuild.xmlconfiguration file.build.properties oracle.commons=../../../../oracle_common/ install.dir=../../../.. oracle.home=${env.ORACLE_HOME_SOA_12_2_1} oracle.jdeveloper.workspace.path=${env.WORKSPACE}/SOAKafkaProducerApp/SOAKafkaProducerApp.jws middleware.home=${env.MIDDLEWARE_HOME_SOA_12_2_1} workspace=${env.WORKSPACE} oracle.jdeveloper.ant.library=${env.ORACLE_HOME_SOA_12_2_1}/jdev/lib/ant-jdeveloper.jar oracle.jdeveloper.deploy.dir=${env.WORKSPACE}/SOAKafkaProducerApp/SOAKafkaProducerPrj/deploy oracle.jdeveloper.ojdeploy.path=${oracle.home}/jdev/bin/ojdeploy javac.nowarn=off oracle.jdeveloper.project.name=SOAKafkaProducerPrj revision=1.0 oracle.jdeveloper.deploy.outputfile=${env.WORKSPACE}/SOAKafkaProducerApp/SOAKafkaProducerPrj/deploy/sca_${profile.name}_rev{$revision} output.dir=classes javac.deprecation=off oracle.jdeveloper.deploy.profile.name=* javac.debug=on WEBLOGICPWD=${env.WEBLOGICPWD} WEBLOGICURL=${env.WEBLOGICURL} WEBLOGICUSER=${env.WEBLOGICUSER}
-
-
Initialize the SOA Suite environment for test. First open the firewall port of your SOA Suite environment. The port to be released is 9092, which represents the Oracle Streaming or Kafka port.
-
Enable Embedded SOA Server in JDeveloper.
-
JDeveloper has an integrated SOA Suite server for development and testing. It is a server with practically all the functionalities necessary for you to develop your SOA services. In order to use this server, you must create and activate it.
-
To activate the server, you first need to view the application servers. For this, go to the “Window” option and select Application Servers as shown in the following image.
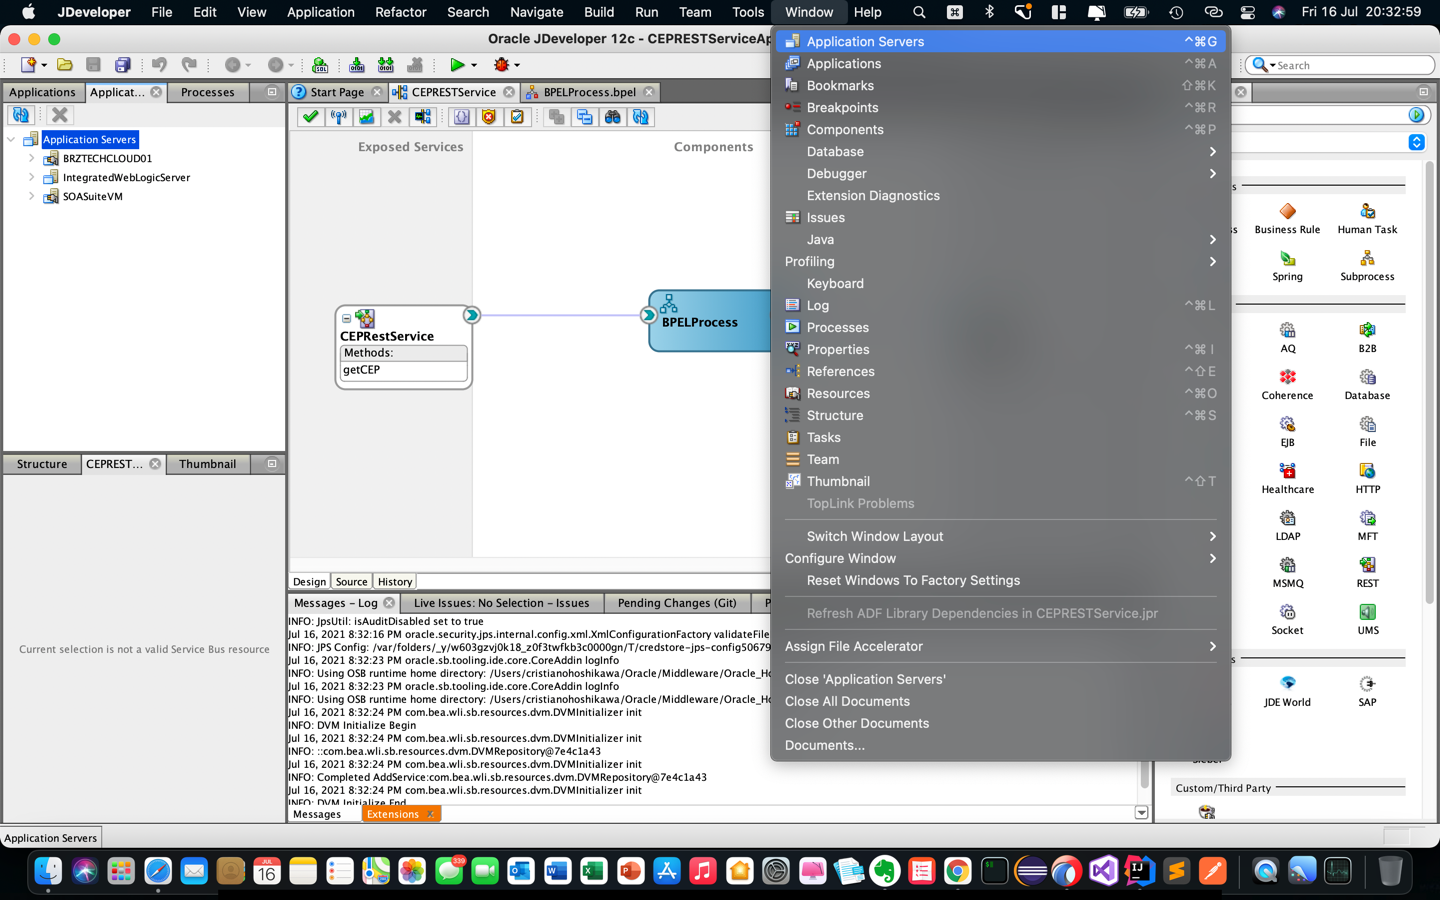
-
The application servers window will appear on the left side of the screen. Make sure the
integratedWeblogicServeris already created in your window. If not, you’ll need to create it and then activate it for use. -
Go to the Run option and select Start Server Instance as shown in the following image.
-
Enter the required data to create your weblogic instance. Write down the values as you will need them later for testing.
-
If you created the server or if it was already available, right-click on your server and activate it as shown in the following image.
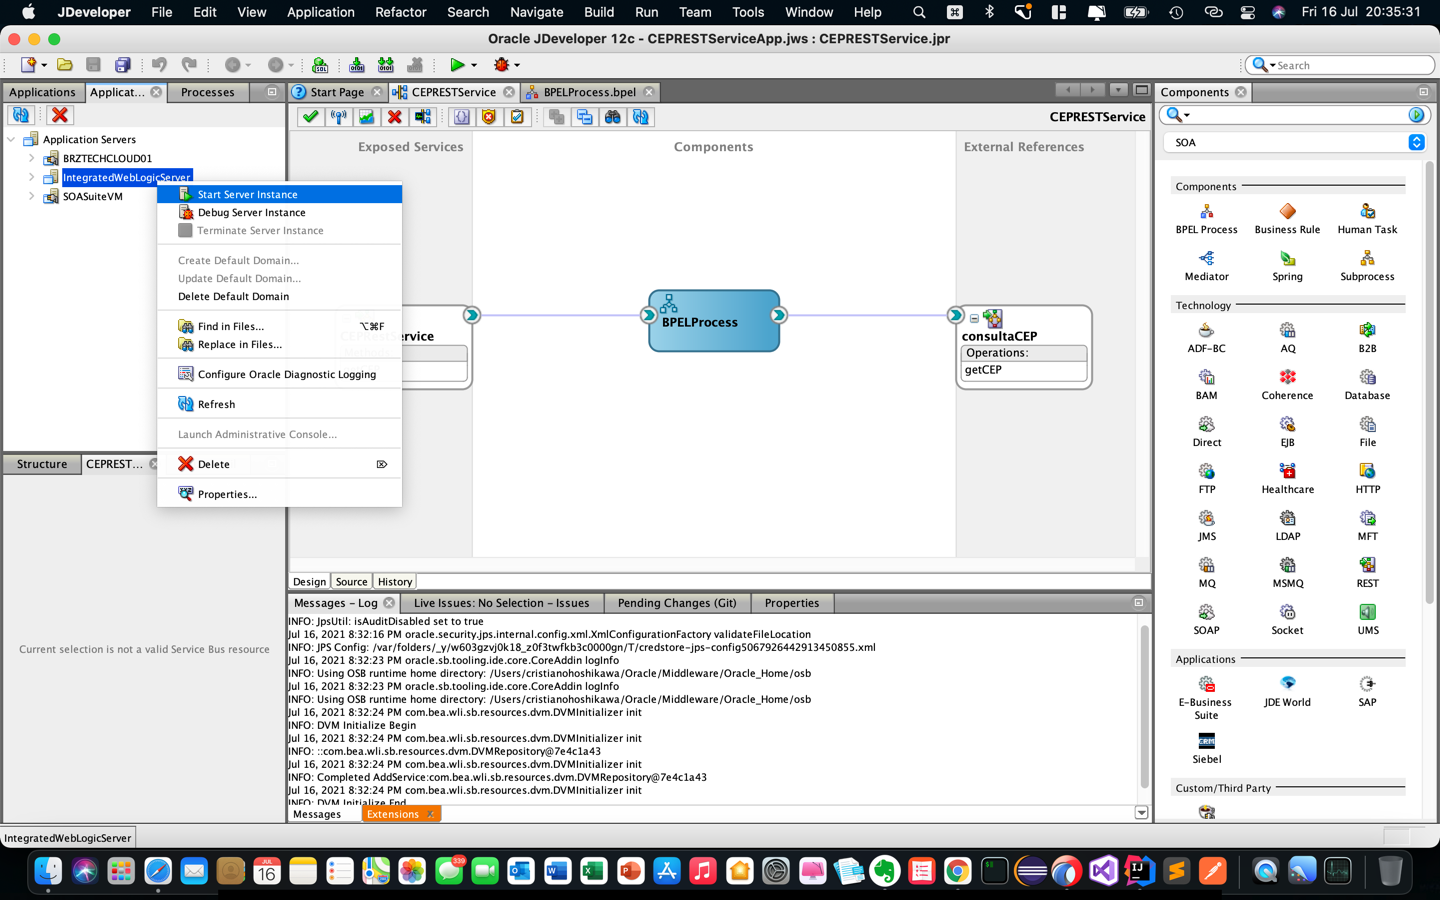
-
-
Run a Manual Deployment in SOA Suite.
-
First, let’s perform the deployment of your Kafka consumer service (
SOAKafkaConsumerPrj) manually. To do so, locate your Applications tab and open the menu options with the right mouse button, as shown in the following image.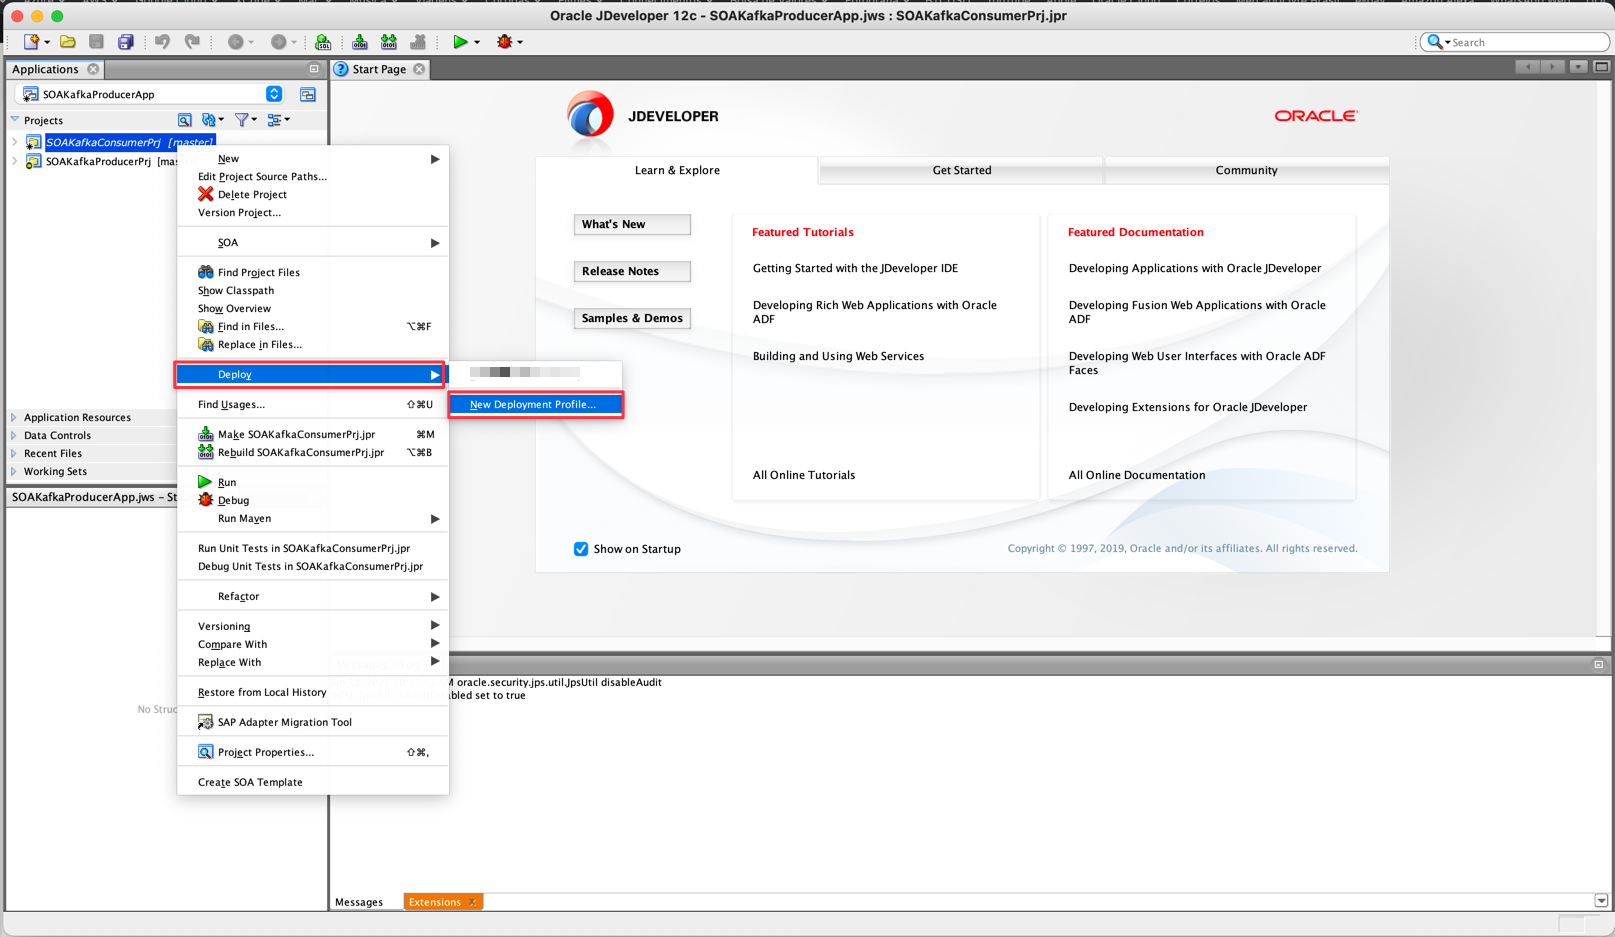
-
Select the Deploy option and then create a new deployment profile. You will see a configuration screen and you must choose the type of profile as SOA-SAR File as we will generate a file.
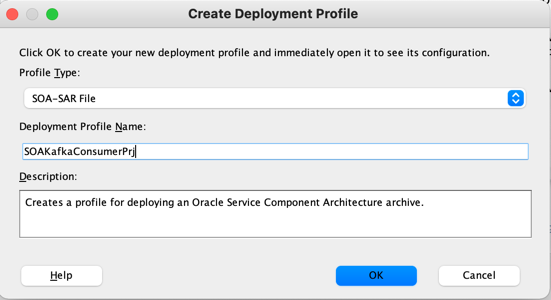
-
This is preparation for us to be able to deploy your package in the next step. On the next screen, keep the given options and click OK.
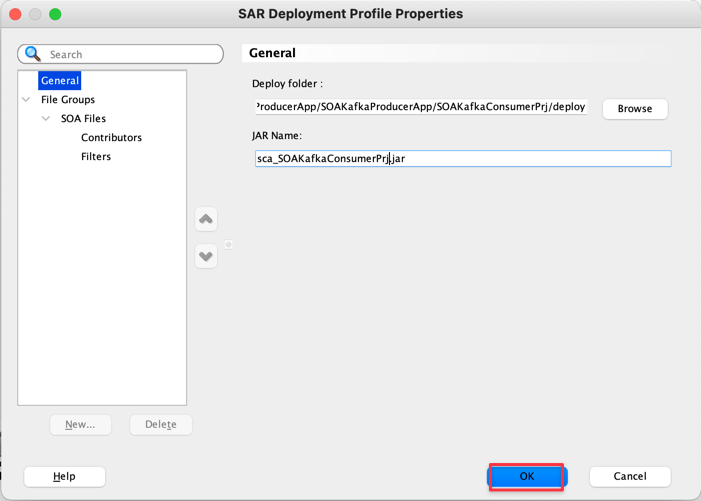
-
Open the Deploy menu option again. The deployment option is created and ready to use. Select it.
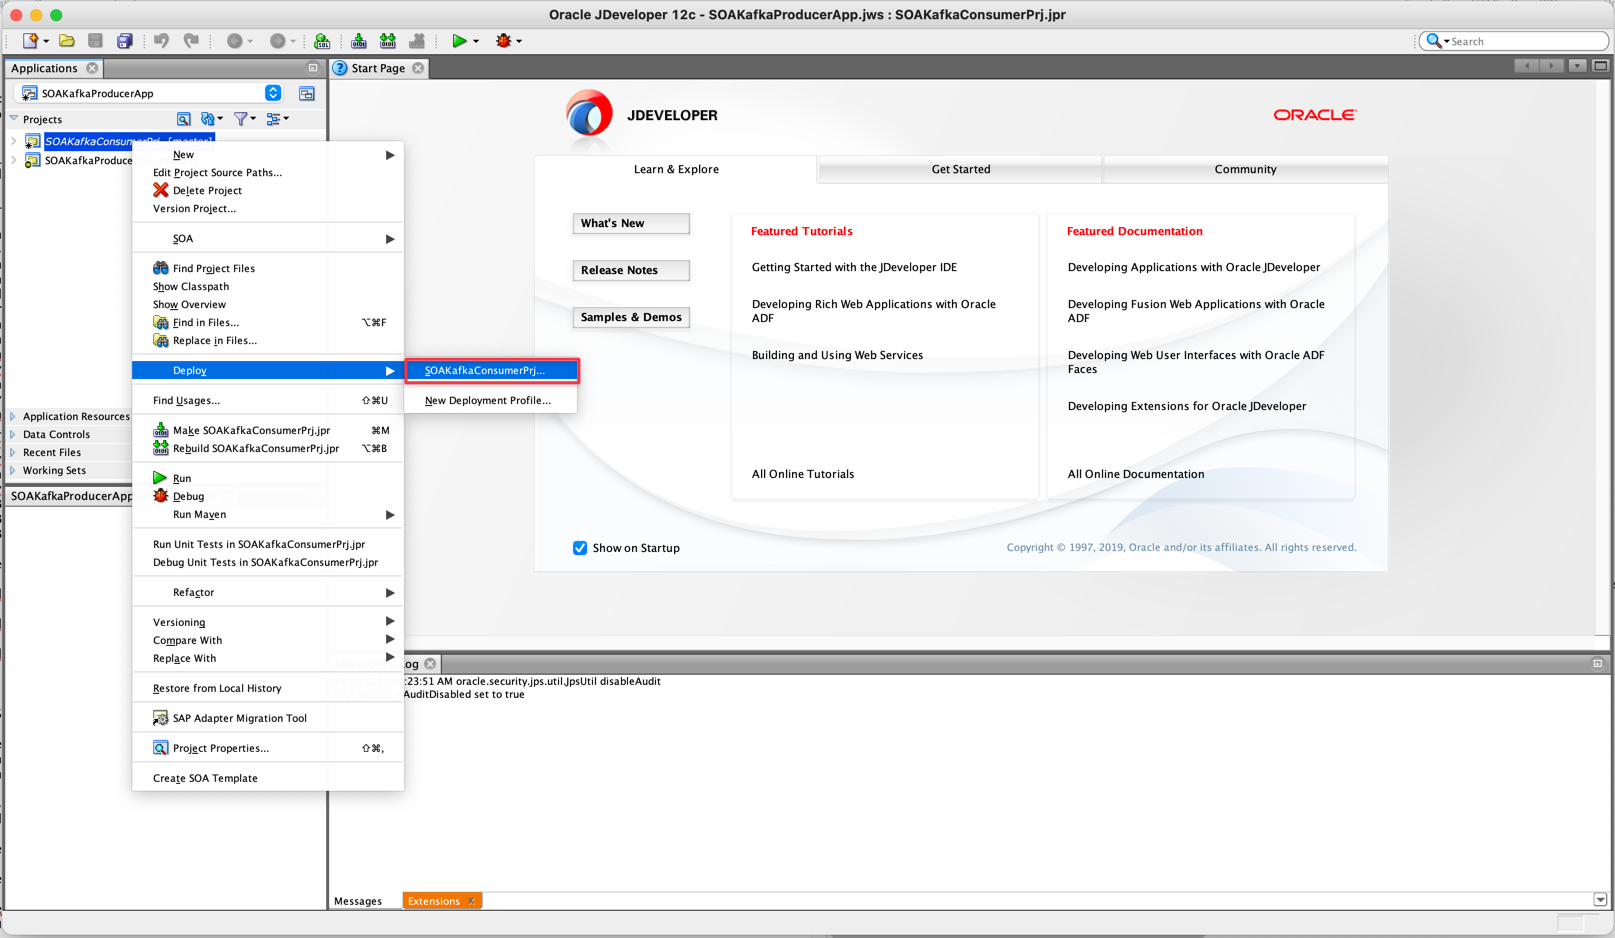
-
Now let’s choose the option to deploy directly to your SOA server. Then choose the option as shown below.
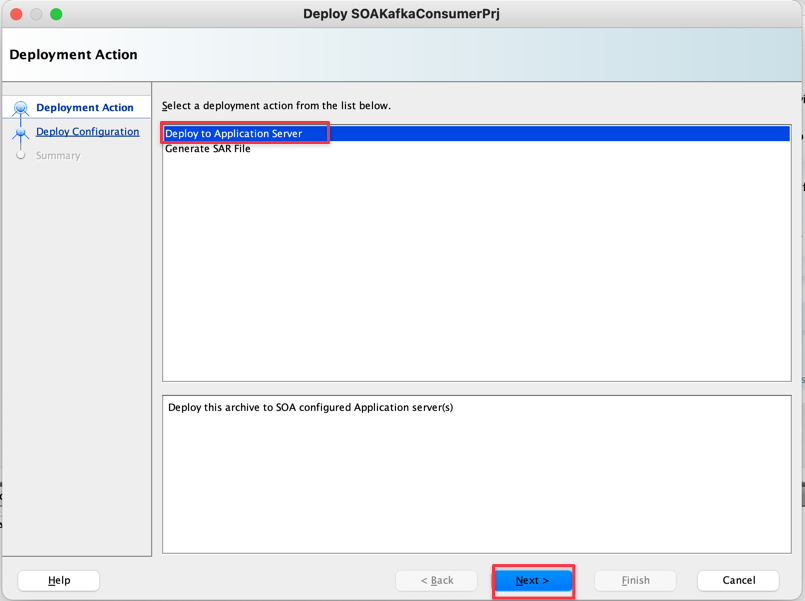
-
Leave all options provided and select Overwrite any existing composites with the same revision ID. If this option is unchecked and you try to perform consecutive deployments after your first run, you will be interrupted with an error message.
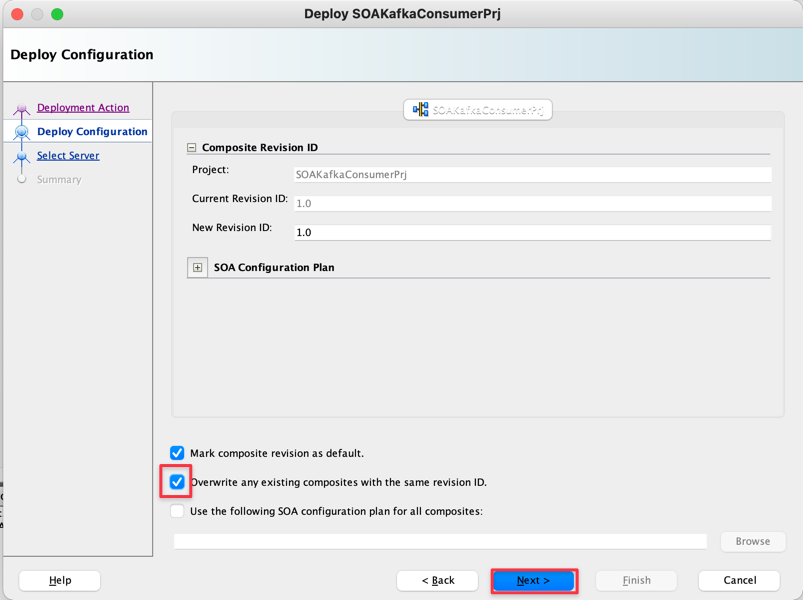
-
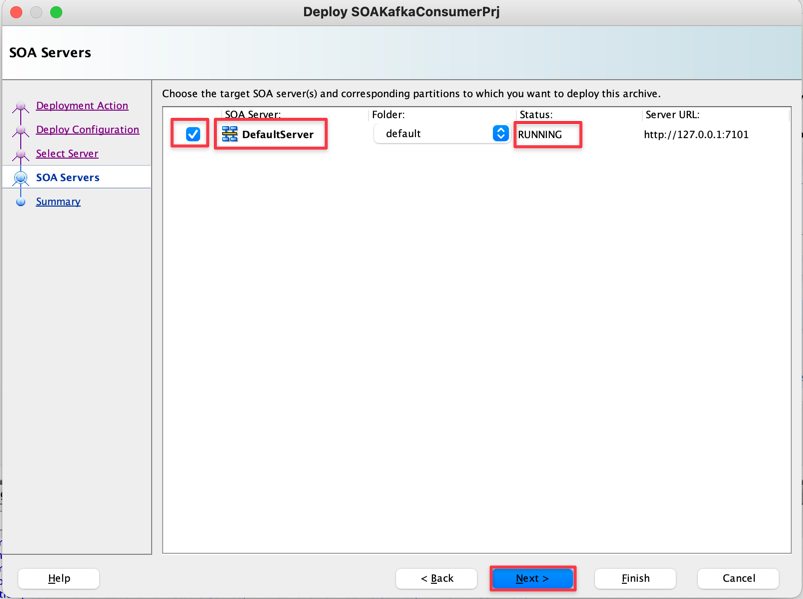
Then select the IntegratedWeblogicServer option. This option represents JDeveloper’s embedded server explained in the previous section (How to enable Embedded SOA Server in JDeveloper).
-
If your JDeveloper Weblogic server was successfully created and started, you will see the option below and the “RUNNING” status confirming that everything is OK. If you don’t see this option, you probably haven’t created the server yet or haven’t started it. Review the previous steps.
-
Confirm with Next until the summary screen and click Finish.
-
In the bottom center window, you can follow the deployment of your application. Wait until you see Deploy finished as success message.
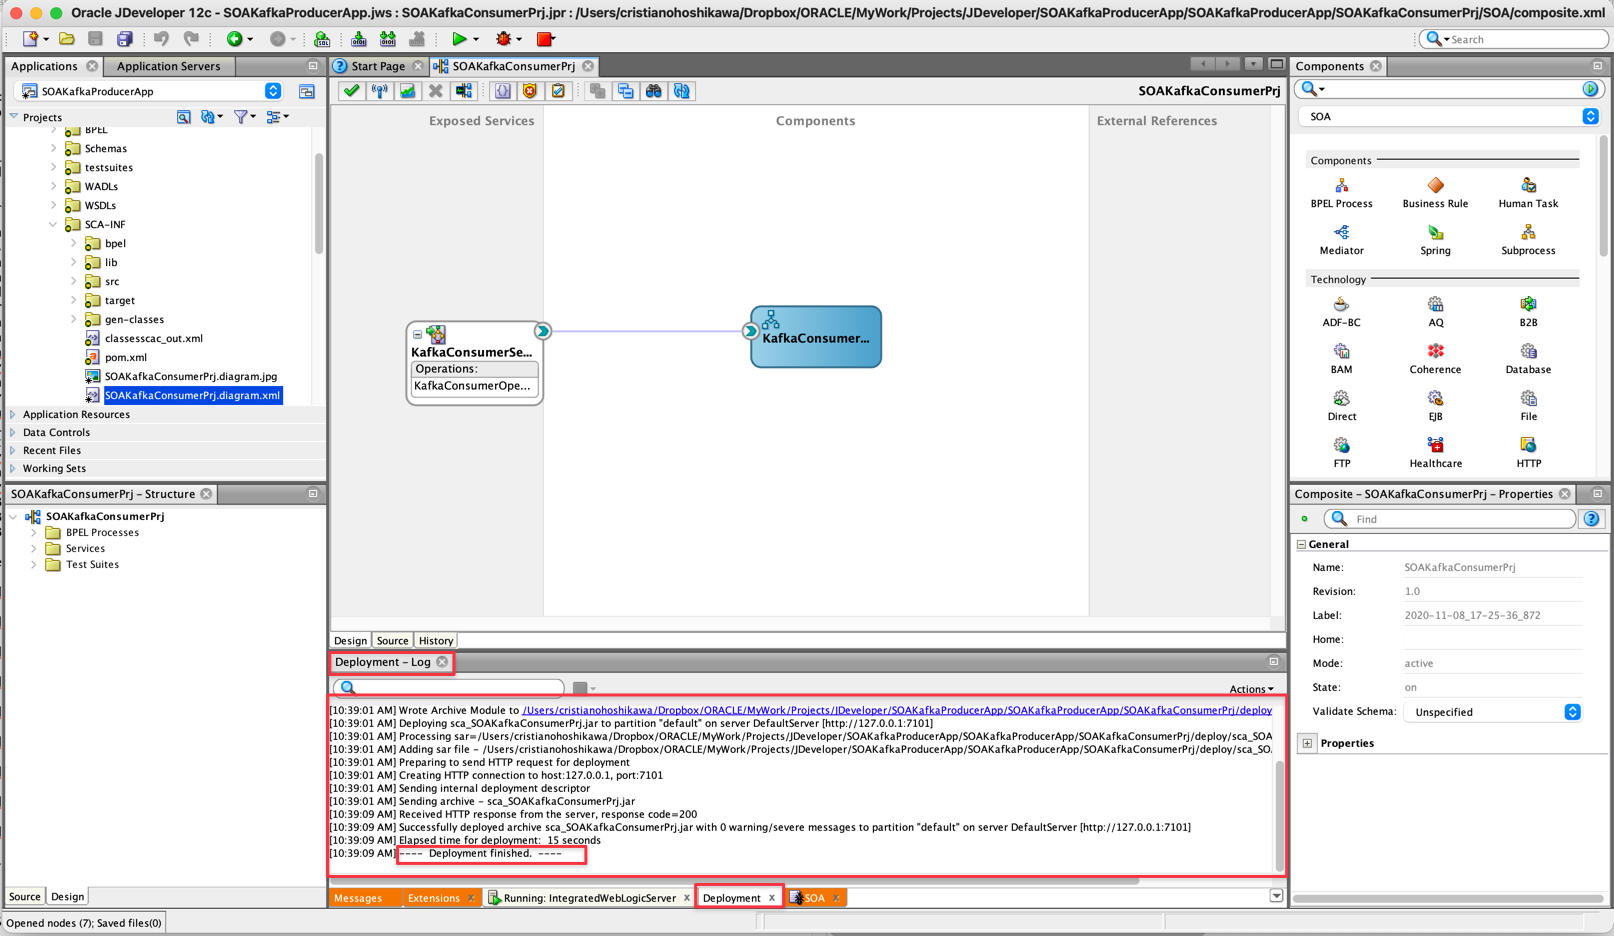
-
-
Install the JKS certificate in Weblogic.
-
In SSL environments, it will be necessary to create security through keys (public/private) which will be done through JKS certificates, suitable for the WebLogic environment. The key generation process is done by obtaining the certificate of your Oracle Cloud Streaming instance and adding this certificate to a JKS file, which we will call DemoTrust (
DemoTrust.jks).Note: The DemoTrust.jks file will be stamped with an ALIAS as well as a password which will be used in your Java code.
-
After creating your JKS file, you can move this file into your WebLogic server structure.
-
Get the Oracle Cloud Streaming Certificate. For more information, see Using the Oracle Cloud Infrastructure Streaming Service Adapter with Oracle Integration Generation 2.
-
Generate the JKS file.
-
Install the JKS file in Weblogic.
echo -n | openssl s_client -connect cell-1.streaming.us-ashburn-1.oci.oraclecloud.com:9092 | sed -ne  '/-BEGIN CERTIFICATE-/,/-END CERTIFICATE-/p' > ociStreaming.cert
keytool -keystore Streaming_truststore.jks -alias OSSStream -import -file ociStreaming.cert
sudo keytool -importcert -file ociStreaming.cert -keystore DemoTrust.jks -alias "kafka" -storepass DemoTrustKeyStorePassPhraseFor example:
echo -n | openssl s_client -connect cell-1.streaming.us-ashburn-1.oci.oraclecloud.com:9092 | sed -ne  '/-BEGIN CERTIFICATE-/,/-END CERTIFICATE-/p' > ociStreaming.cert
keytool -keystore Streaming_truststore.jks -alias OSSStream -import -file ociStreaming.cert
sudo keytool -importcert -file ociStreaming.cert -keystore DemoTrust.jks -alias "kafka" -storepass DemoTrustKeyStorePassPhrase-
If you want to generate or delete keystores by alias, follow these steps:
shell sudo keytool -import -v -file streaming.us-ashburn-1.oci.oraclecloud.com.cer -storepass changeit -keystore /Library/Java/JavaVirtualMachines/jdk1.8.0_221.jdk/Contents/Home/jre/lib/security/cacerts -alias "kafka" sudo keytool -delete -alias kafka -keystore /Library/Java/JavaVirtualMachines/jdk1.8.0_221.jdk/Contents/Home/jre/lib/security/cacerts -storepass changeit sudo keytool -import -v -file streaming.us-ashburn-1.oci.oraclecloud.com.cer -keystore DemoTrust.jks -alias "kafka" -storepass DemoTrustKeyStorePassPhrase sudo keytool -delete -alias kafka -keystore DemoTrust.jks -storepass DemoTrustKeyStorePassPhrase -
Find your wlserver folder which usually has this path:
/wlserver/server/lib. For example:cd /u01/app/oracle/middleware/wlserver/server/lib,cd /User/u01/Oracle/Middleware/Oracle_Home/wlserver/server/lib -
Replace the
DemoTrust.jksfile with the one generated in this step. -
After copying the
DemoTrust.jksfile, you must change the directory where you deployed the file. Change the /src/soakafka/KafkaExample.java files of both projects (SOAKafkaProducerprjandSOAKafkaConsumerprj) when creating the class as follows: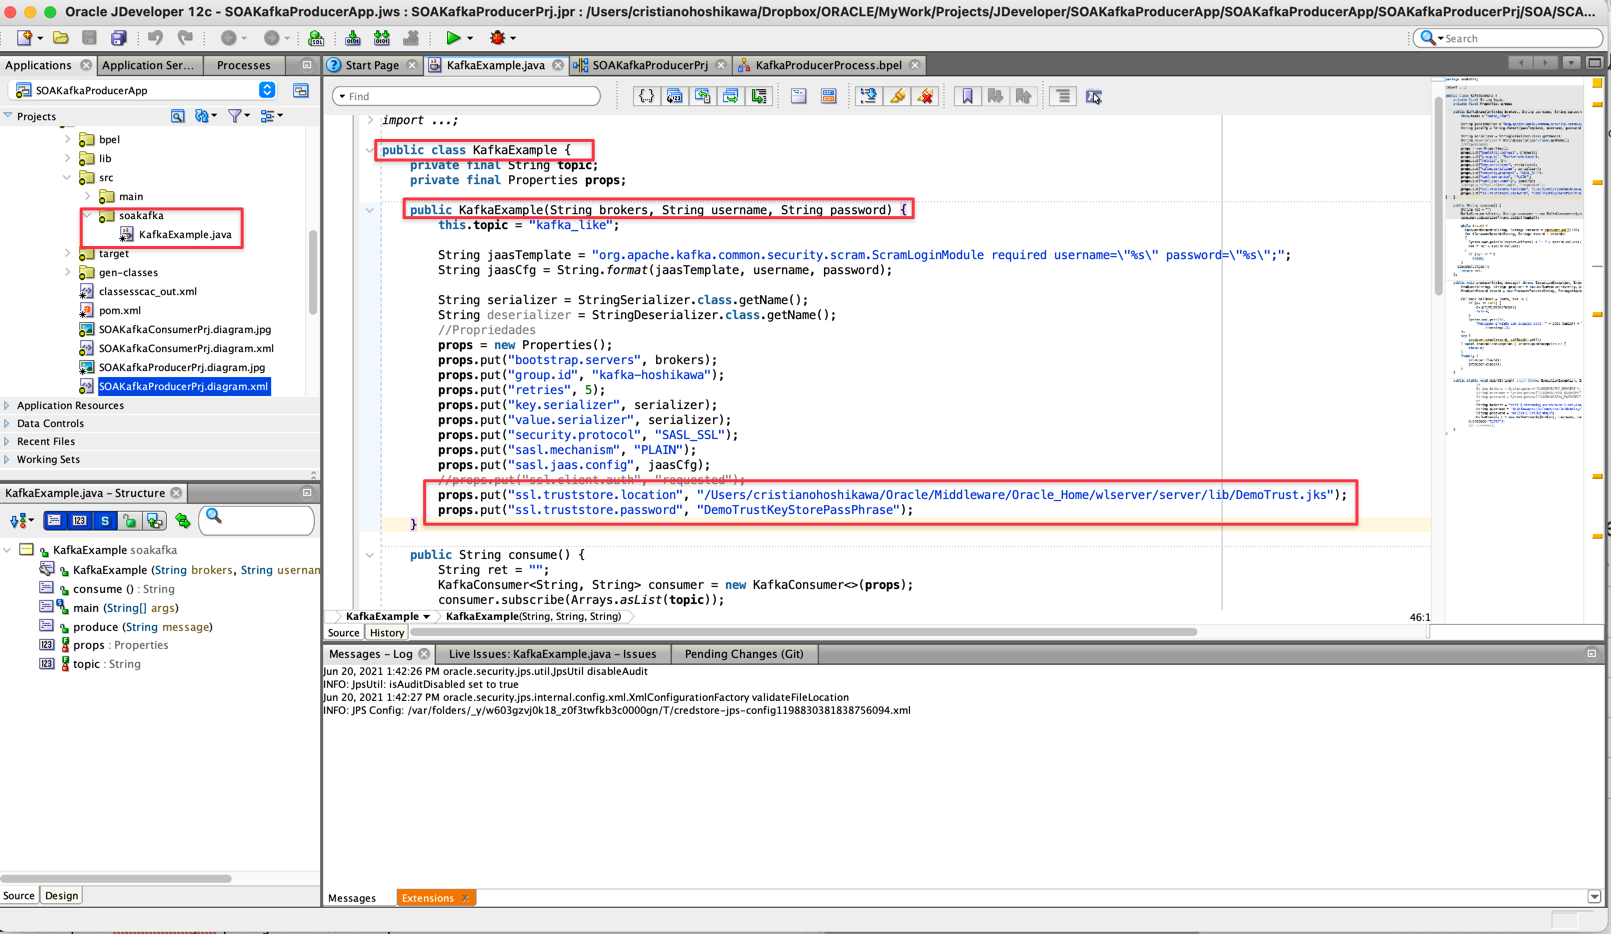
-
-
-
-
Test the application.
-
After uploading the test environment, your instance will be available at: http://localhost:7101/em.
-
Remember your username and password.
-
Go to your application under SOA menu item and Deployed Components option.

-
Fill in the message parameter required by the service, as per the implementation. This parameter was called “msg” and the message format is JSON according to the previous steps.
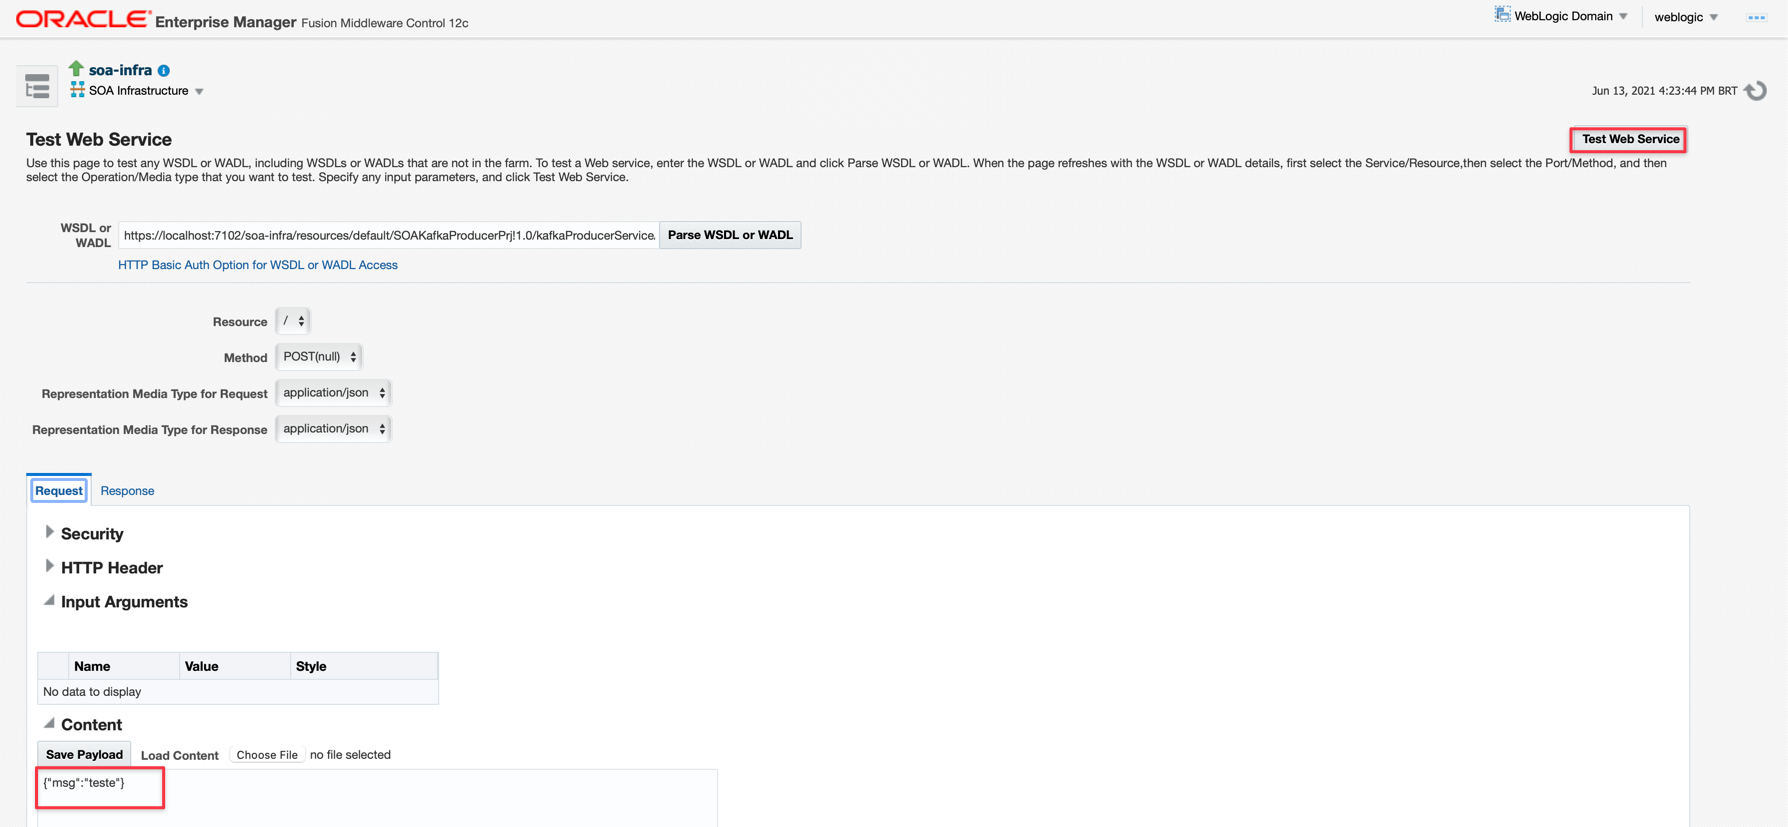
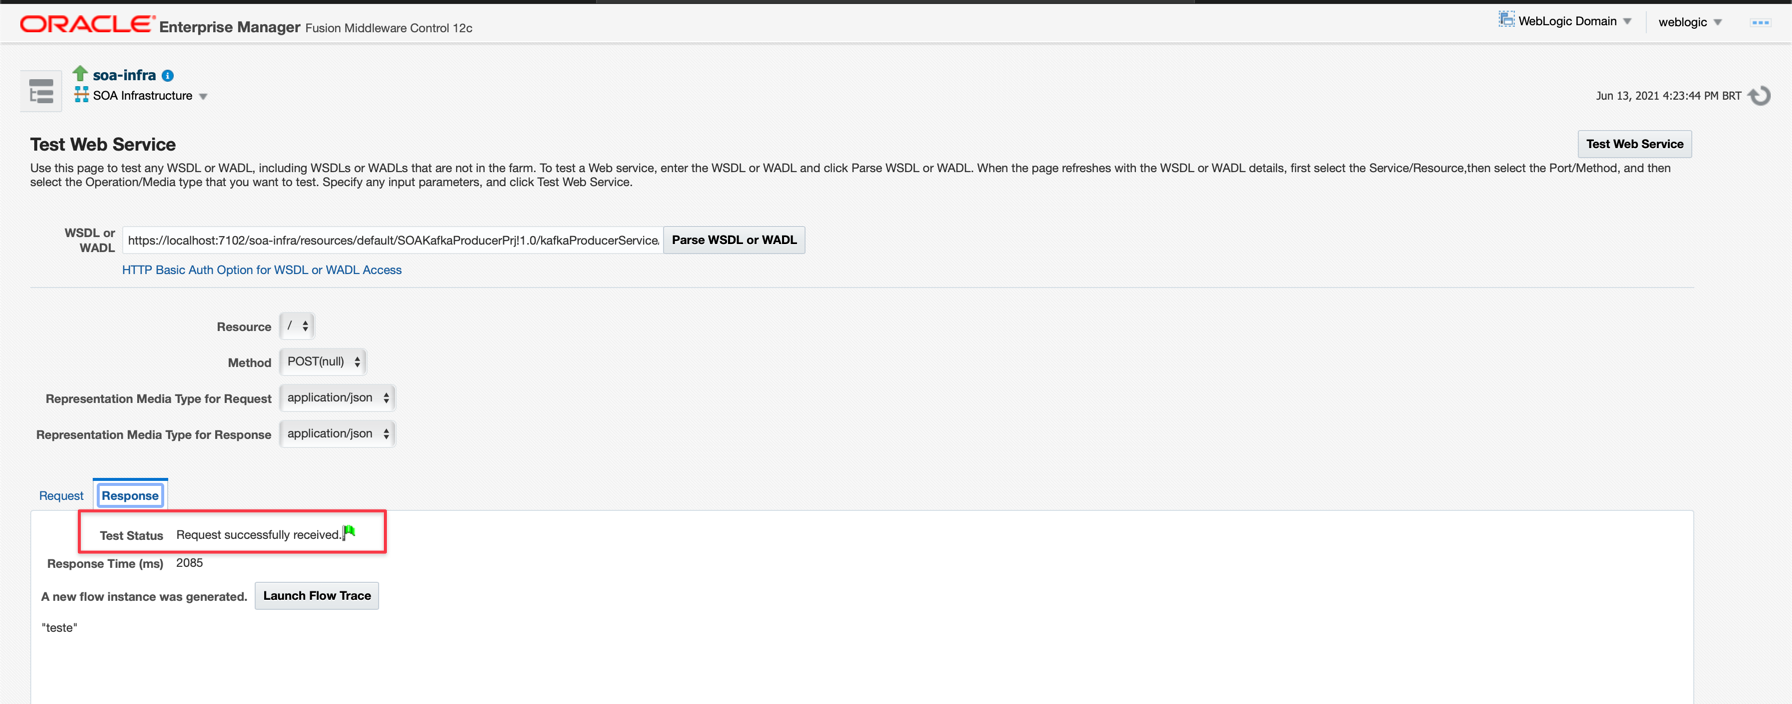
-
After entering your message in JSON format, click “Test Web Service” to run your Producer service on the message queue.
-
Task 3: Create a SOA Suite Instance on Oracle Cloud
You must have an active instance of Oracle SOA Suite for your application to be deployed. The instance to be used in this tutorial will be the image available on our Marketplace and will have a SOA Suite structure served by a bastion to protect the server.
-
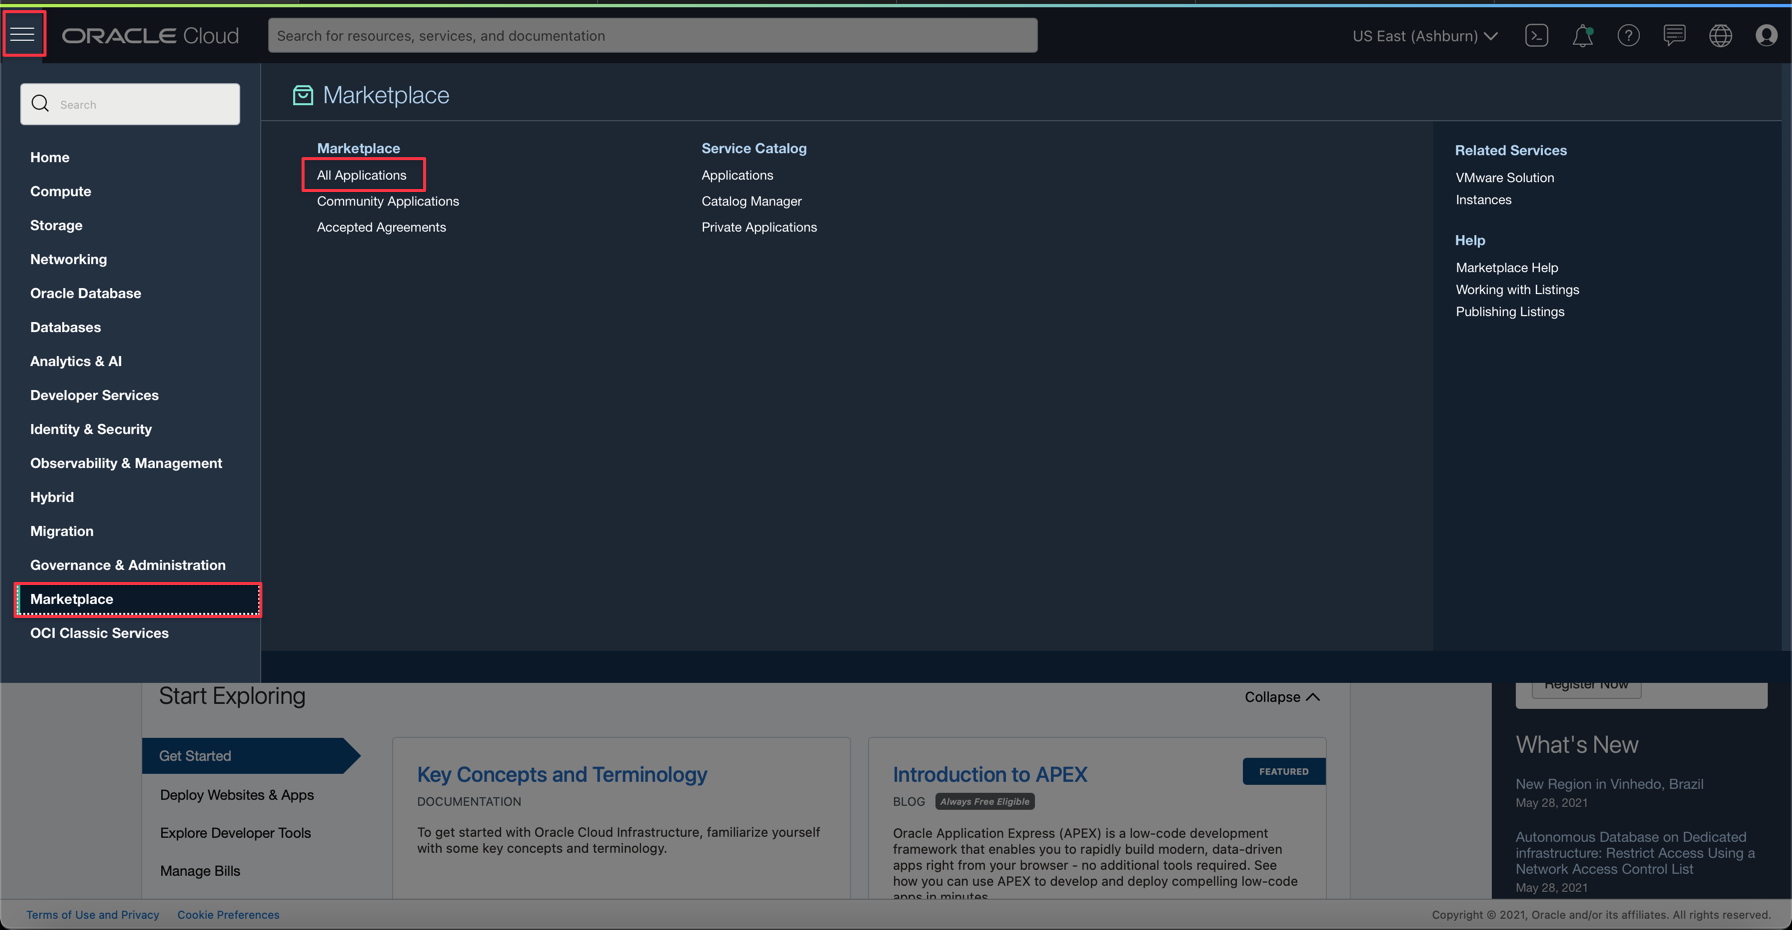
For this, let’s create an instance. In the Oracle Cloud console , click on the main menu (in the upper left corner of the screen), option “Marketplace” and “All Applications” as below:
-
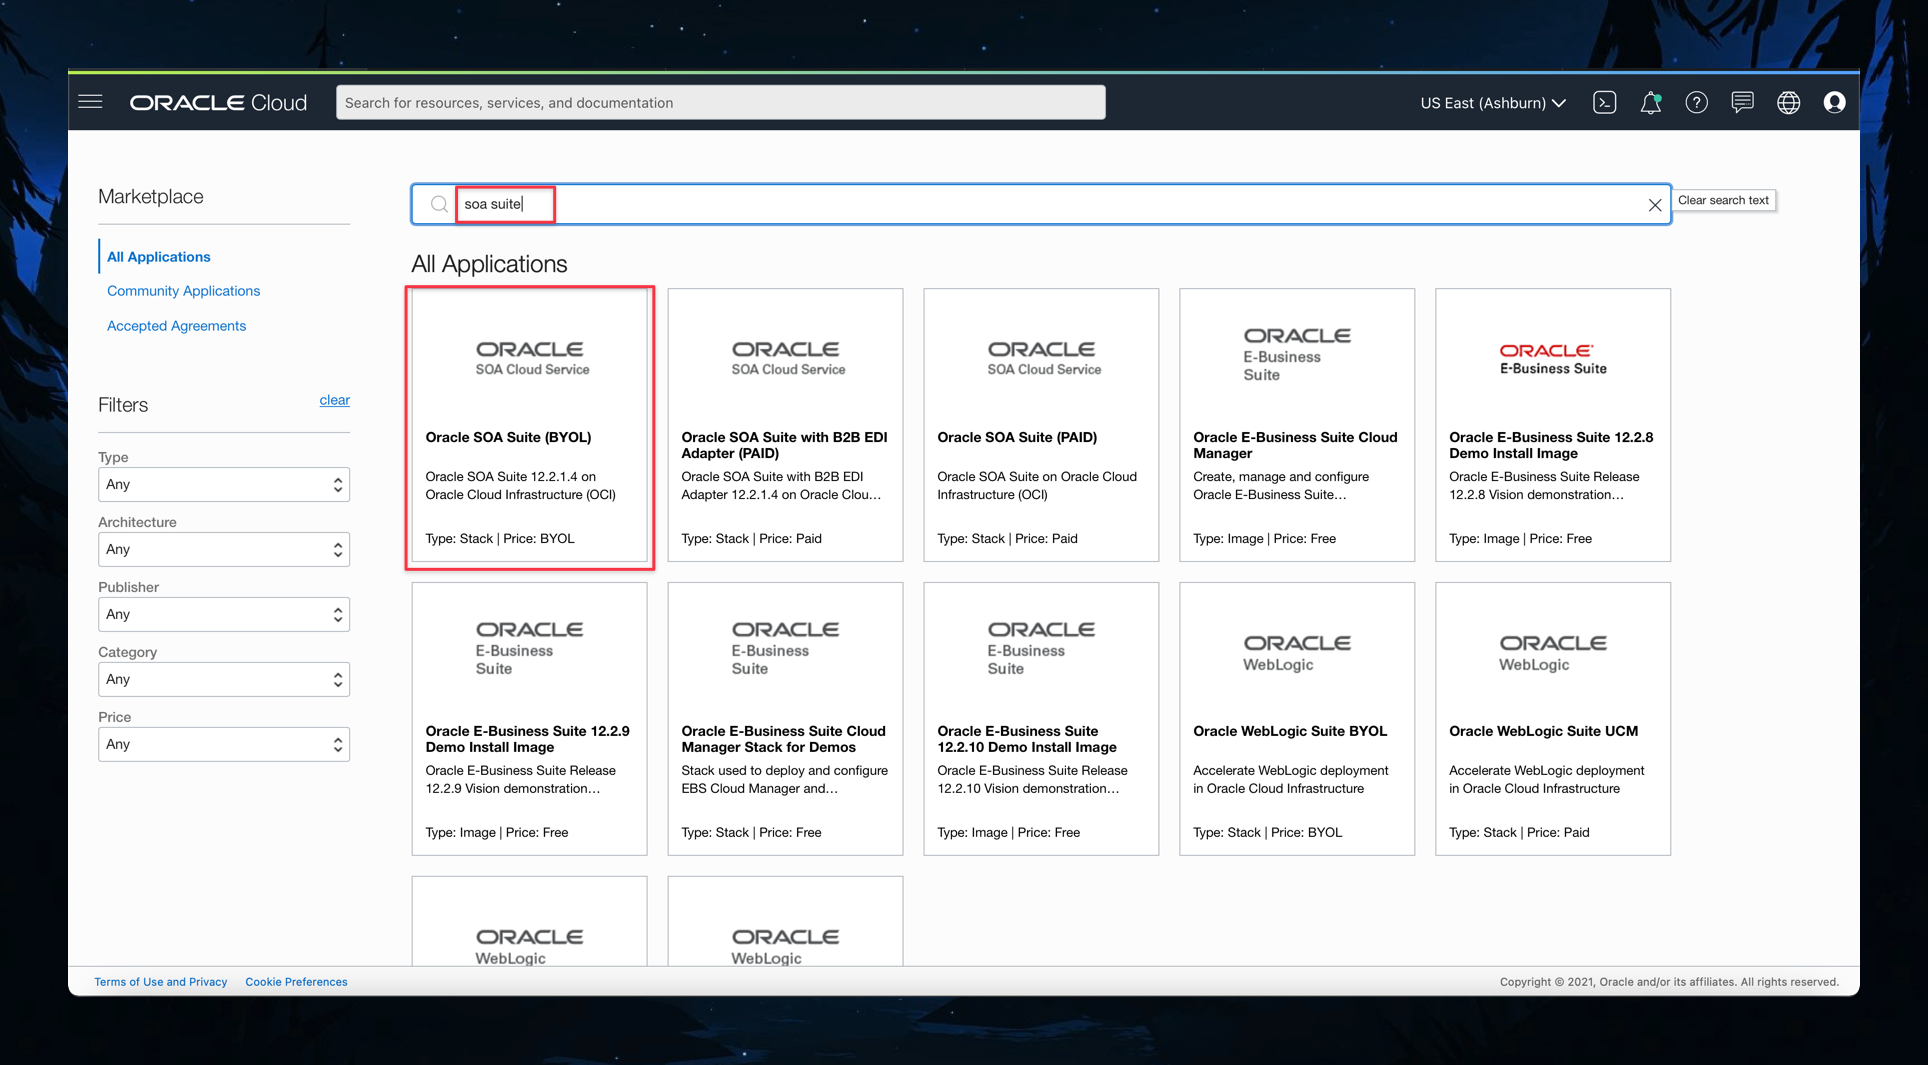
In the image search screen, type “soa suite” to find the correct image:
-
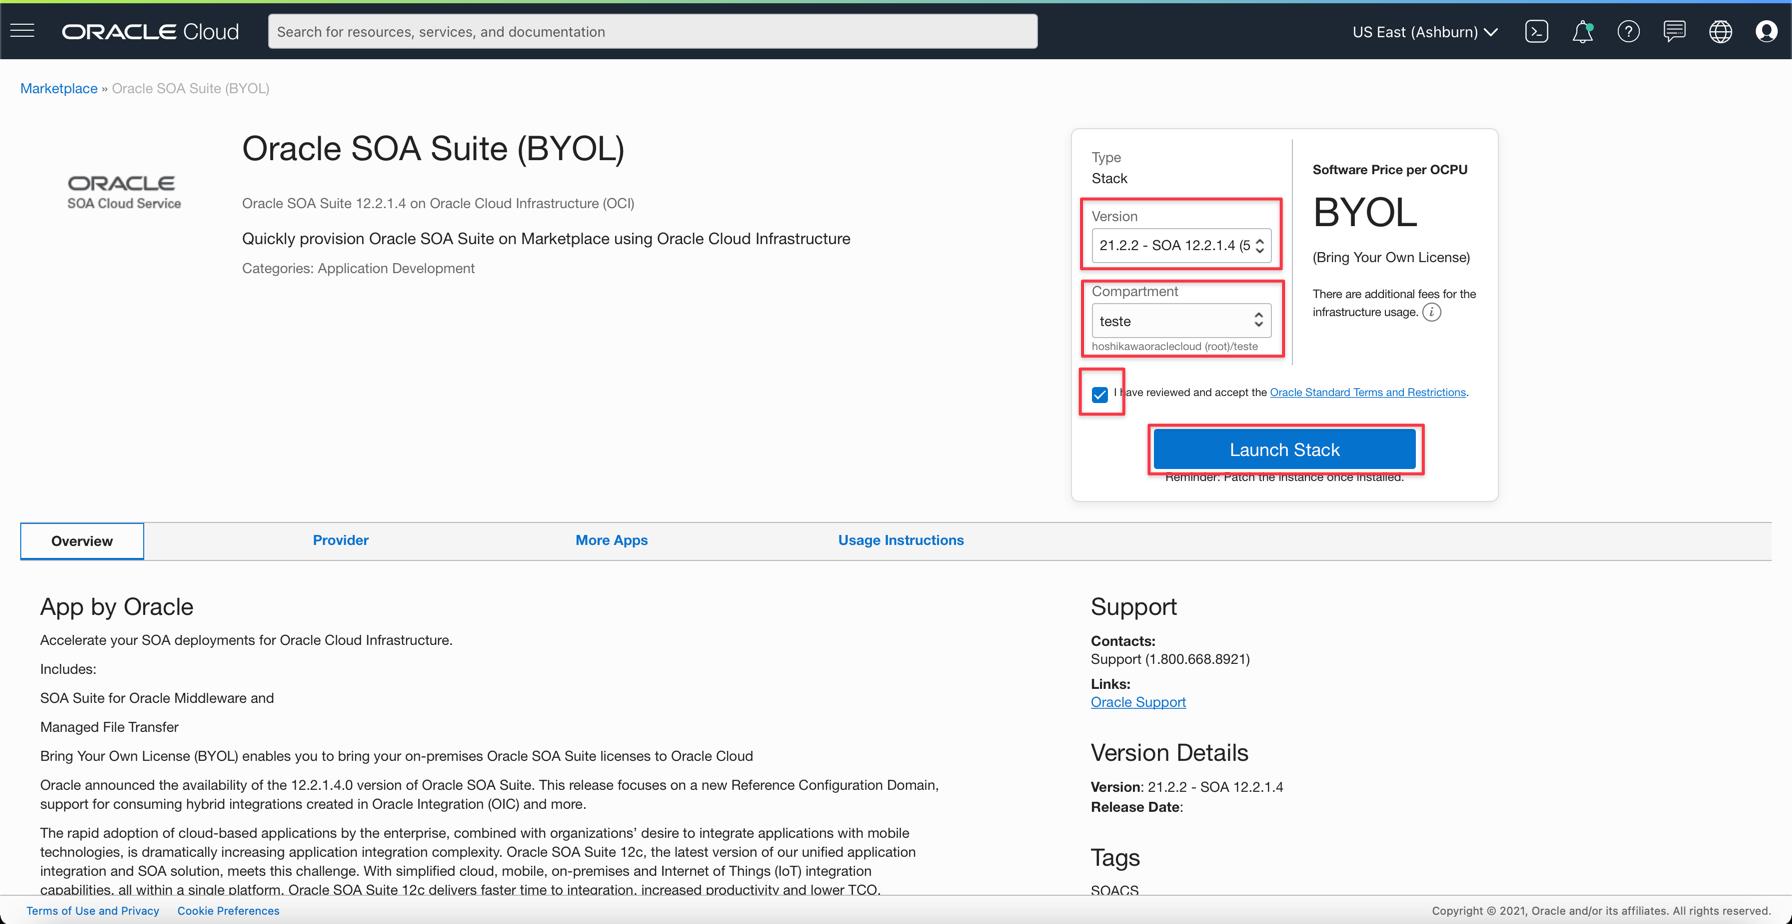
Click on the “Oracle SOA Suite (BYOL)” option to start creating the instance. You will see some mandatory options to select. For more information, see Using Oracle SOA Suite on Marketplace in Oracle Cloud Infrastructure.
-
Confirm SOA Suite version: 12.2.1.4 or higher (this workshop was developed with version 12.2.1.4).
-
Select the compartment in which you want the SOA Suite instance to be created.
-
Confirm acceptance of the terms and conditions of the licensing agreement.
-
Click Launch Stack.
-
-
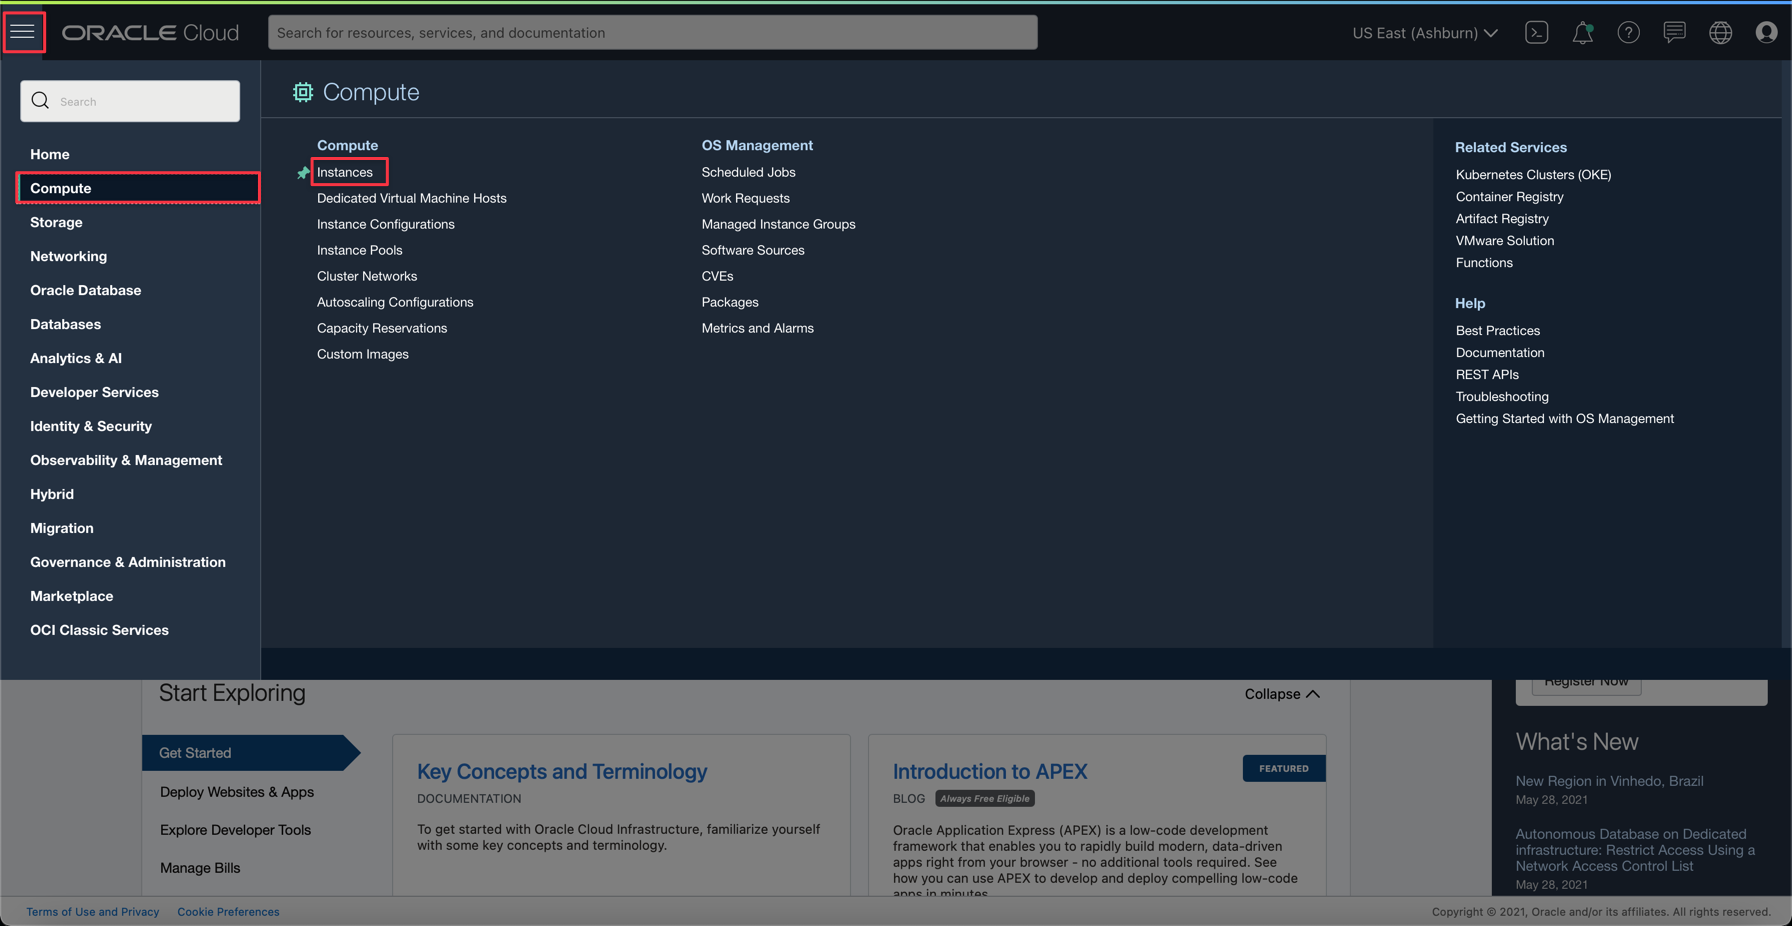
From the Oracle Cloud console main menu, go to Compute and Instances.
-
Select the compartment where you created your SOA Suite instance and when you select it you will see 2 virtual machines.
- The SOA Suite Server
- The VM that will serve as a bastion for protecting the SOA Suite server
Note: The VM bastion will have a public IP, which it will be possible to access via the Internet to access the SOA Suite server by opening an IP tunnel, explained later.

-
To establish a tunnel between the Bastion Server and the SOA Suite instance, you can do it through the SSH command as below:
shell
    ssh -Y -i <Arq.Chave SSH> -L <Port SOA>:<IP Instance SOA Suite>:<Port External> opc@<IP Public Bastion>

    Example:
    ssh -Y -i keyrvbastion.pem -L 7002:10.253.128.9:7002 opc@152.67.55.11
After establishing the connection via Bastion, you can access the Weblogic Enterprise Manager with http://localhost:7002/em.
Task 4: Automate the deployment with Oracle Visual Builder Studio
Now let’s automate the deployment of SOA implementations to the Weblogic server created in the previous step. For this you will need an instance of Oracle Visual Builder Studio. Oracle Visual Builder Studio works by projects, so you can create a project and include the users that will take part in its execution.
You can find more information about the operation in the Related Links section at the end of this document, search for Deploy with Visual Builder Studio. Next, follow the steps to configure an automated build and deployment of your SOA Suite implementations to the Weblogic server.
-
Configure a virtual machine for BUILD in ORACLE SOA Suite. Before starting the settings, you will need to configure a virtual machine that meets the needs of compiling an Oracle SOA Suite project , for this, you will need to select the correct tools to be installed in this VM.
-
Click Organization on the left side menu and then click Virtual Machine Templates.
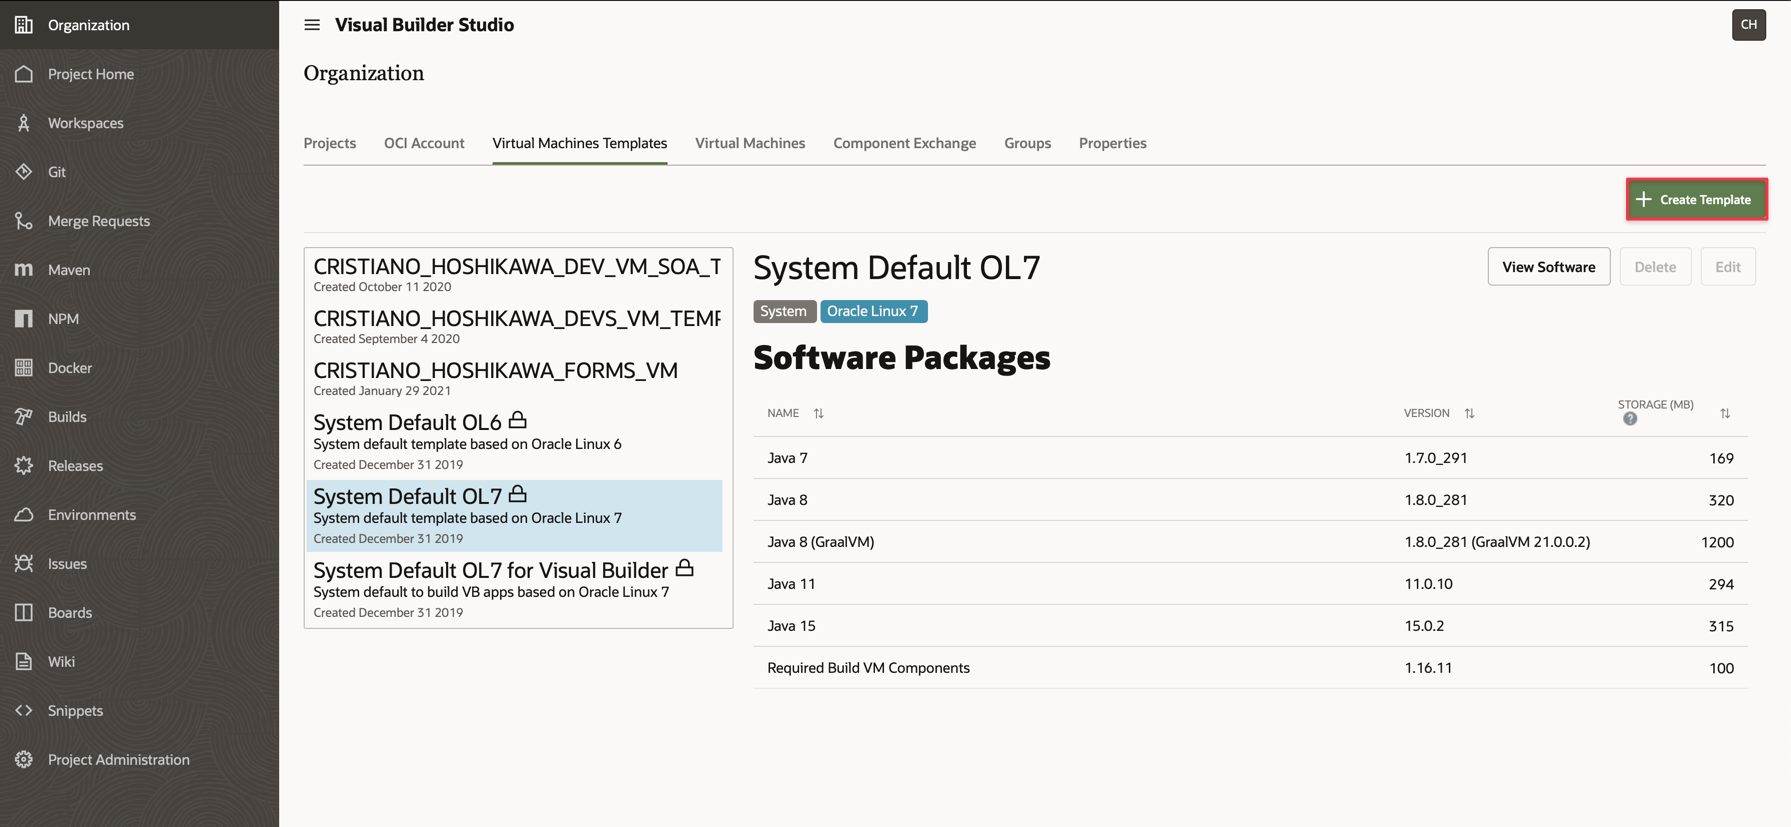
-
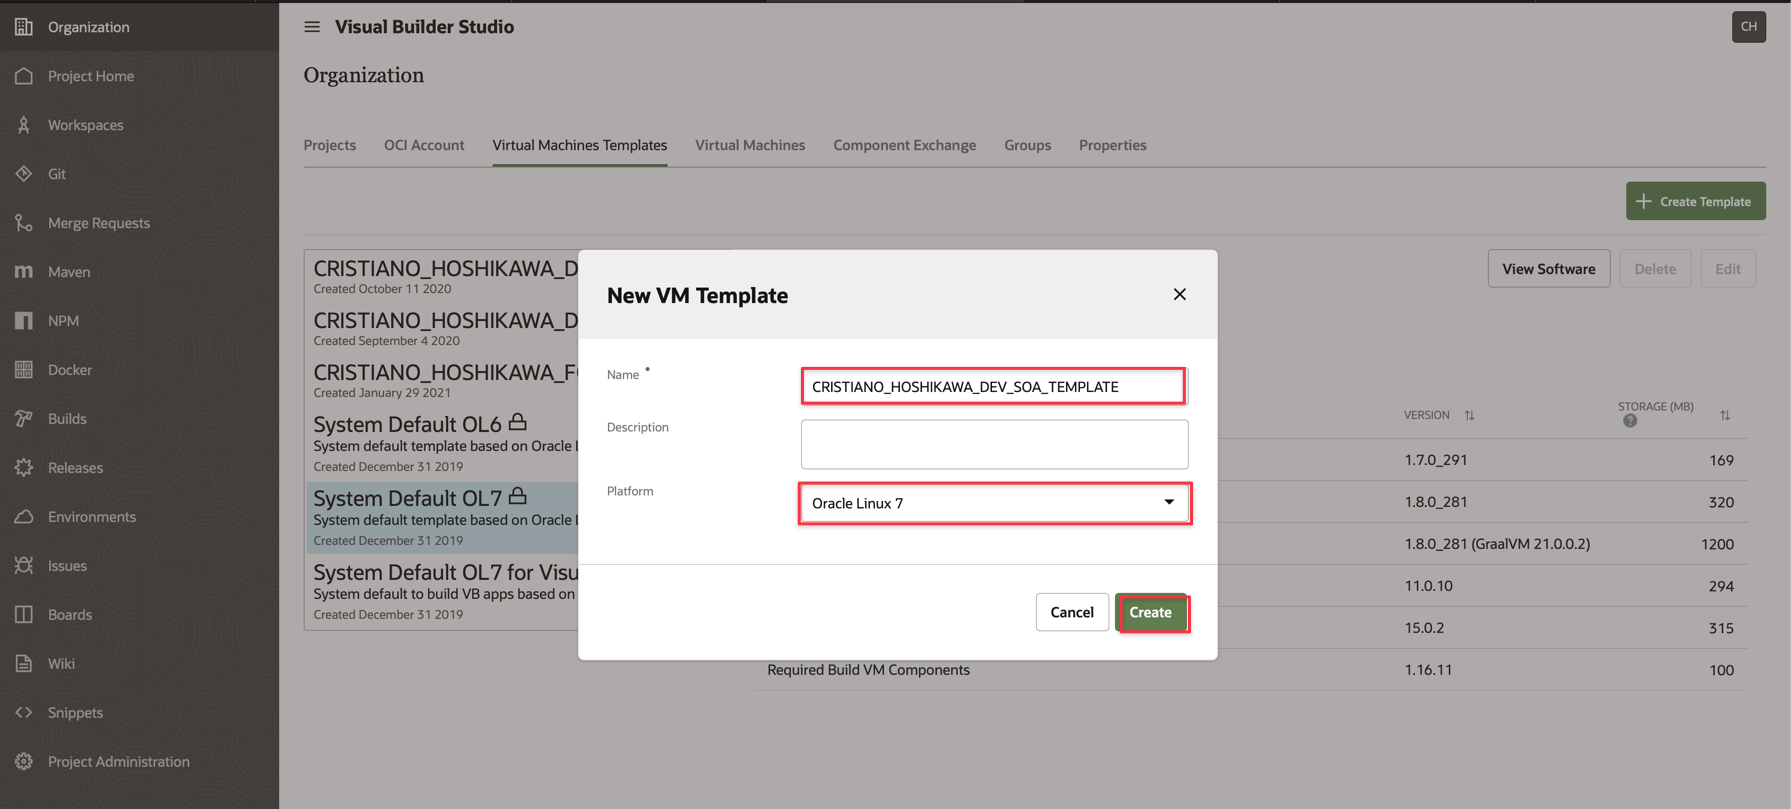
Click Create Template to configure which tools will be available for building your SOA Suite projects. Then type a name for your Template and if you want, optionally, you can describe about this template. Don’t forget to select which platform this VM will be on. Choose the Oracle Linux option (until the date of this document, we had Oracle Linux 7, but you can select another more recent option.
-
Select all the important components for building your projects. Choose all the options as below.
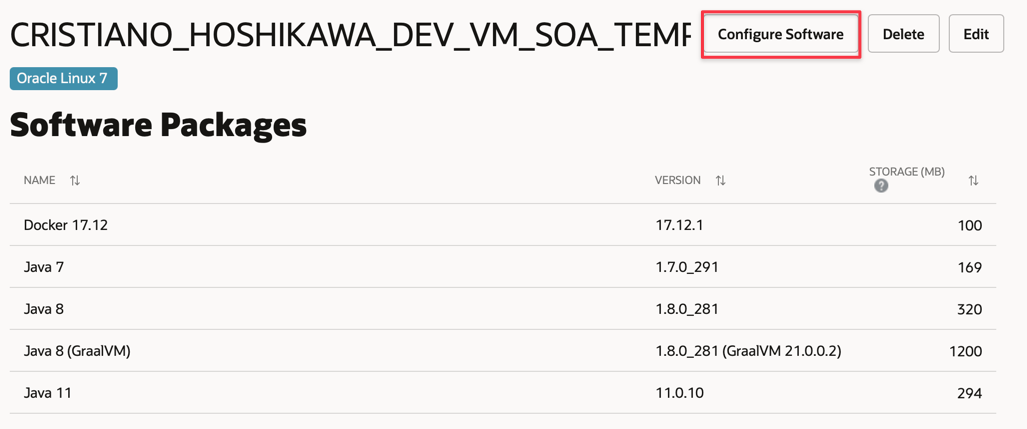
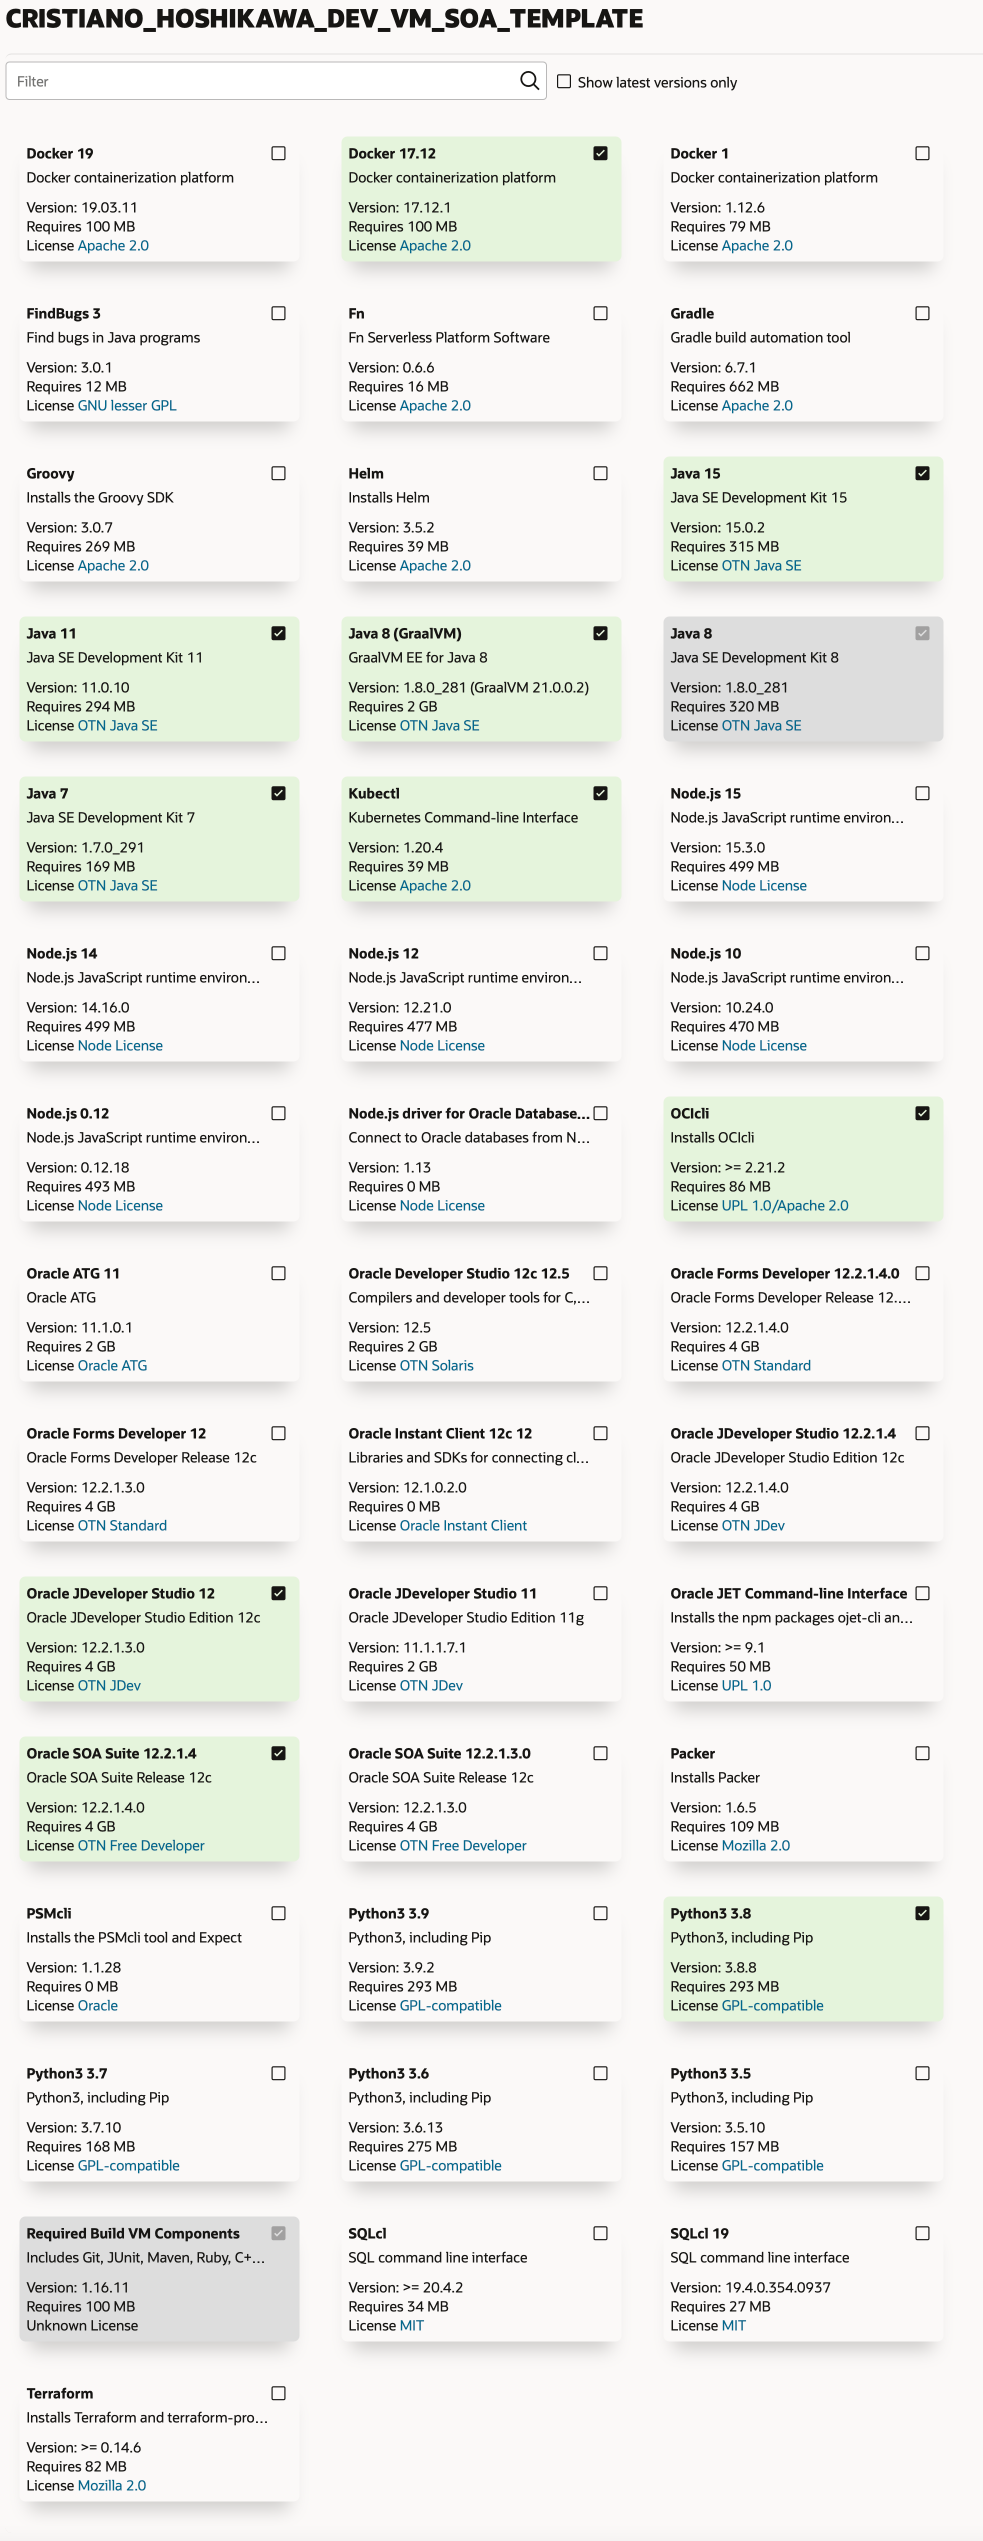
Your TEMPLATE is created and your VM will be instantiated as soon as a project asks for a build.
-
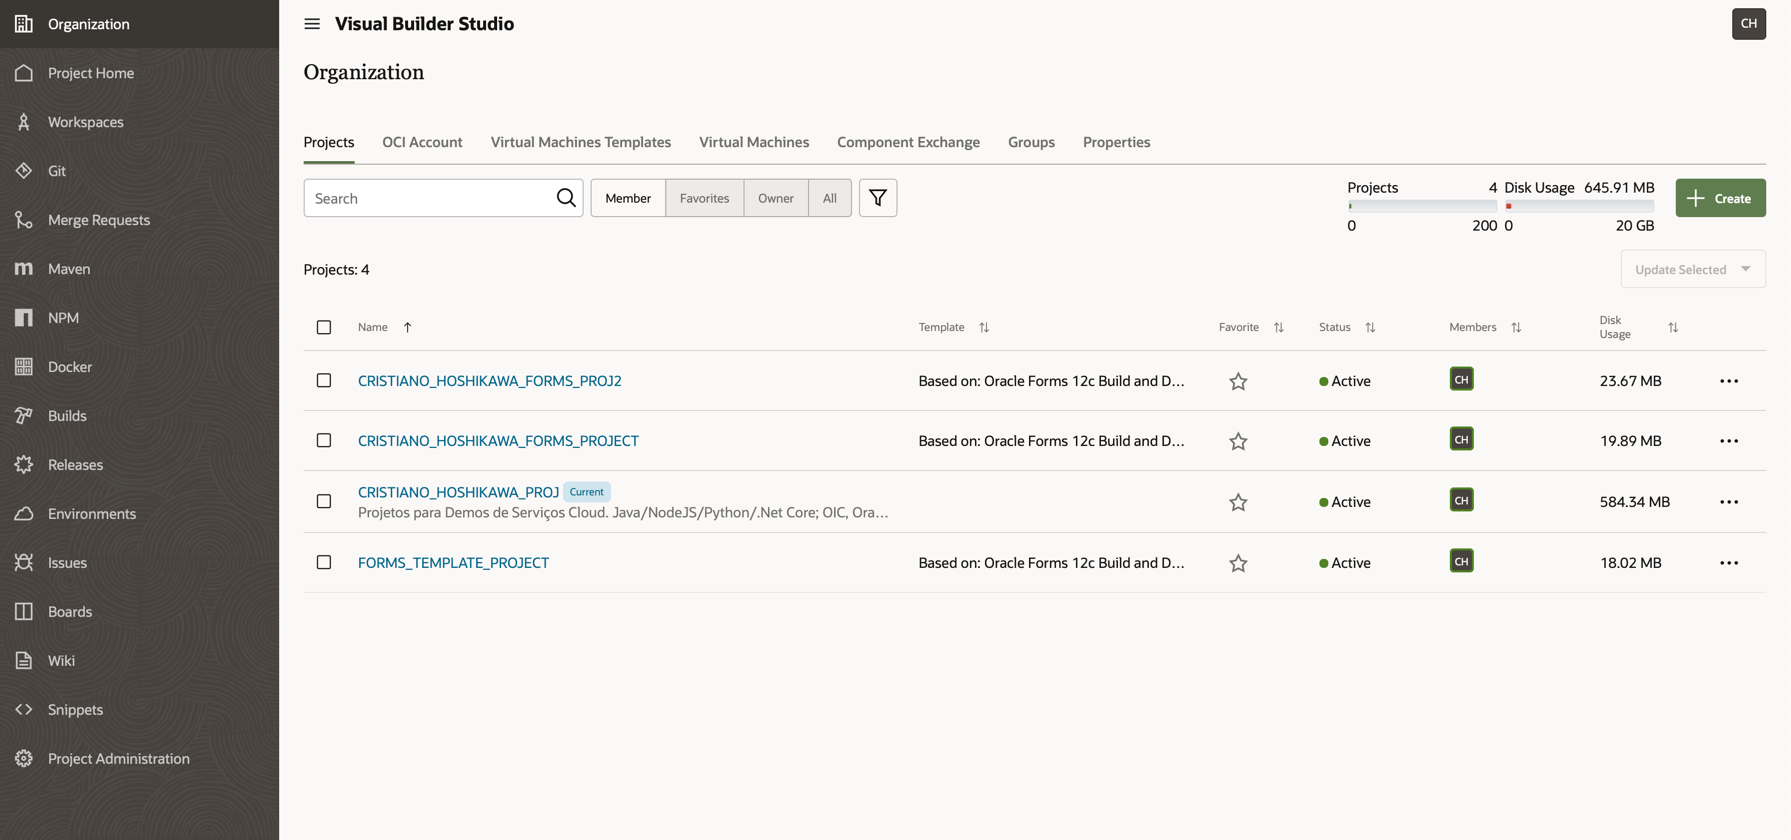
BUILD configuration of a project in Oracle Visual Builder Studio. First, open a project within Oracle Visual Builder Studio, in the example below, click on CRISTIANO HOSHIKAWA PROJ.
-
You will see your project page, along with a left side menu with the available options and on the right side your projects in the source code repository and also the team that is part of this project (project users).
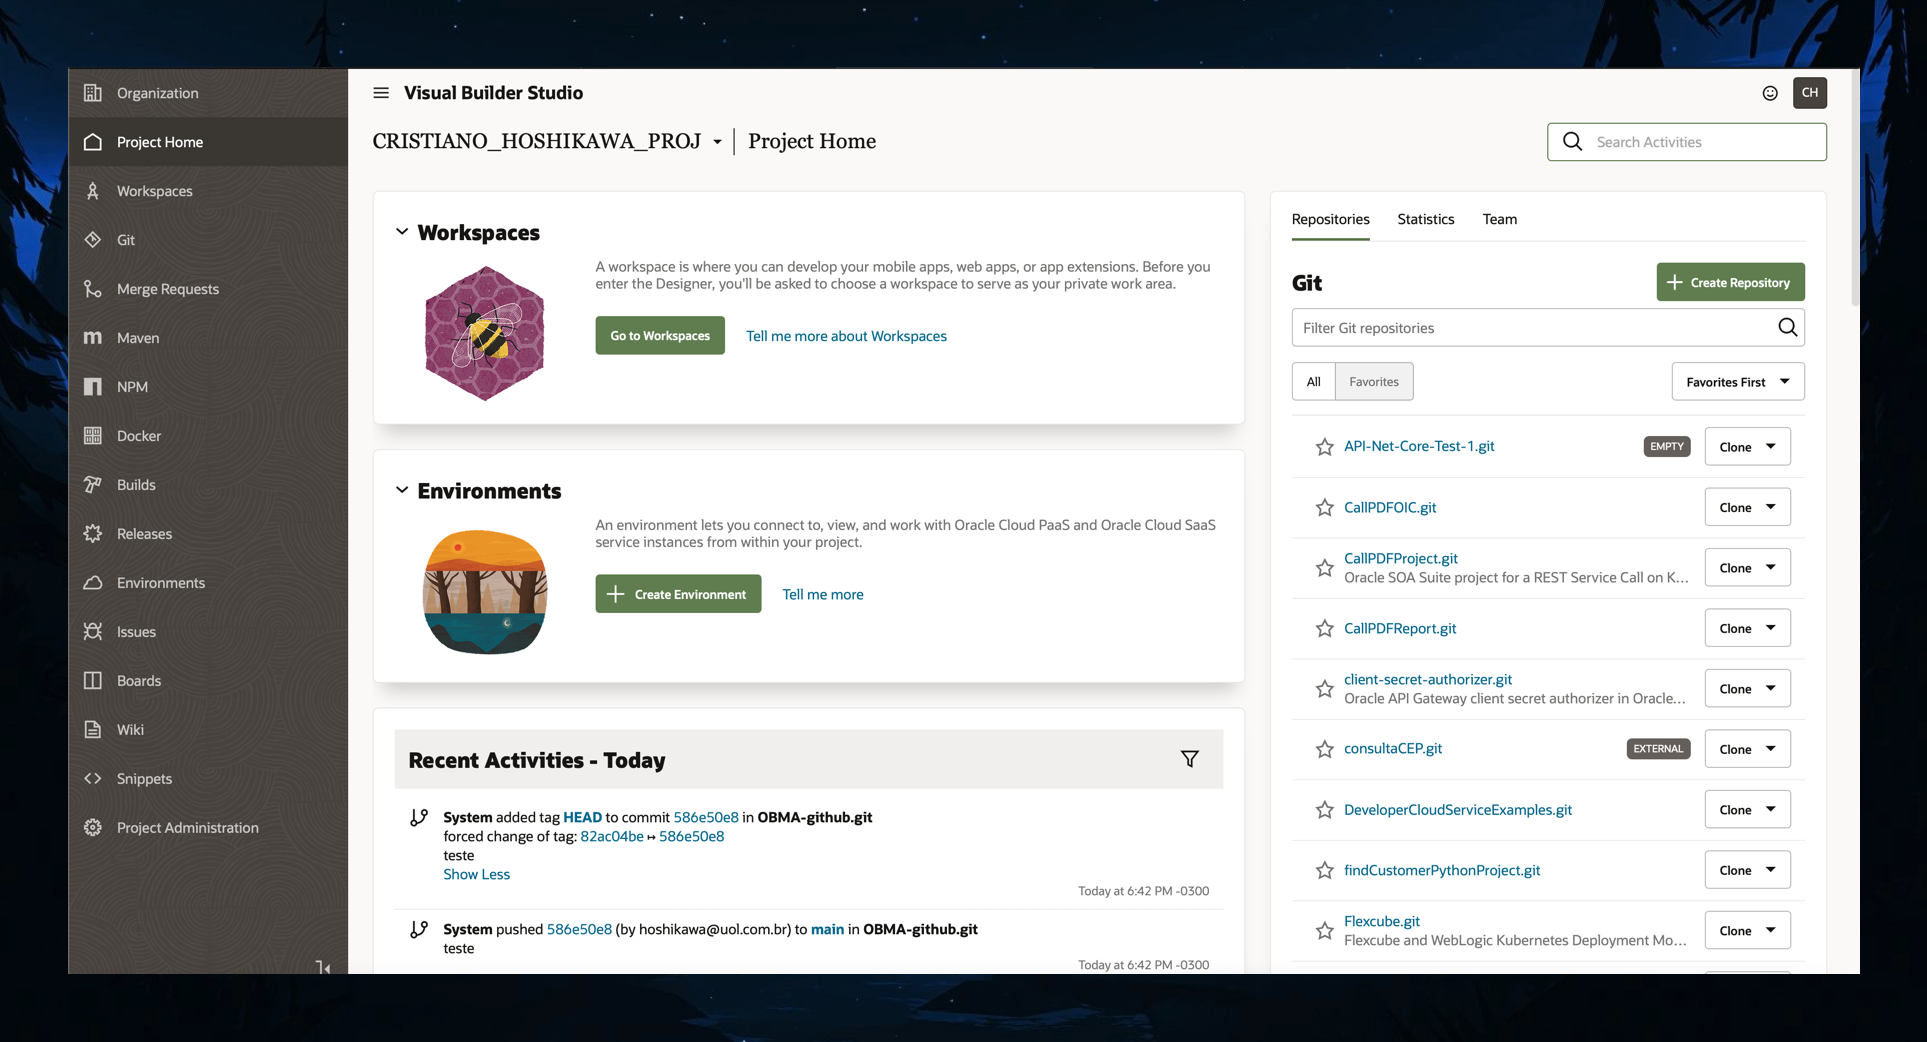
-
-
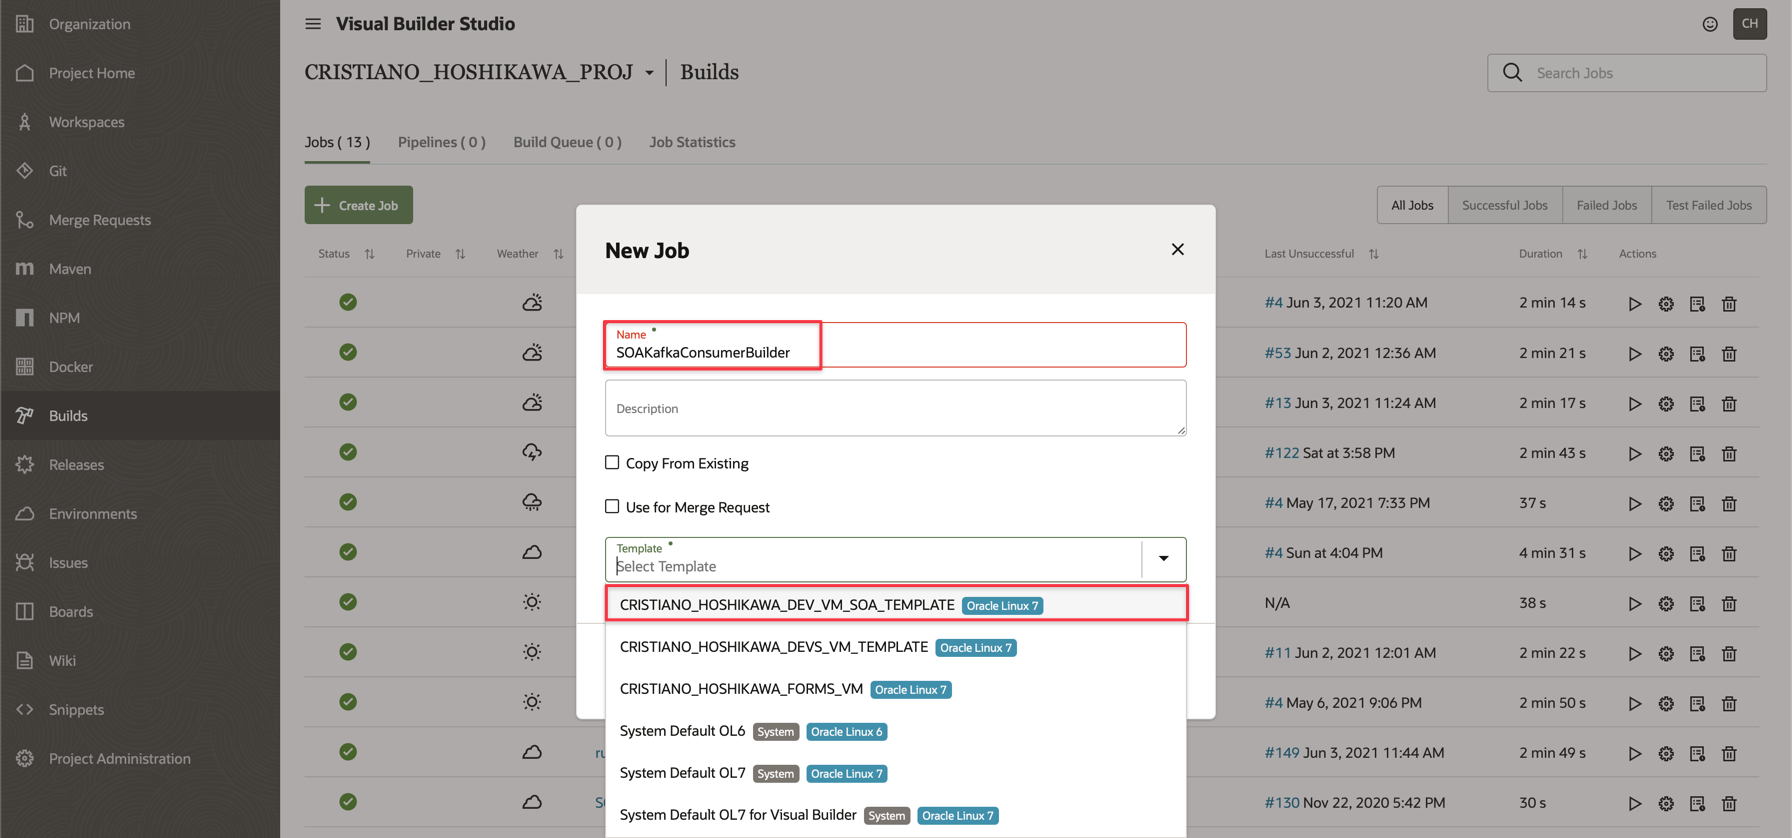
Click on the BUILD option on the left side menu to view all existing settings and then let’s configure a new BUILD for your project. Click Create Job.

-
Enter a name for your Job and also select the VM Template (created in the previous session).
-
-
Now let’s configure the build of your project step-by-step. The first part of the configuration will be to establish the repository of the Oracle SOA Suite project that must be previously created with the source code. In this document, we are working with the SOAKafkaProducerApp project available in the git of this document. You will be able to clone this project to the git of your Oracle Visual Builder Studio instance .
-
After cloning the
SOAKafkaProducerAppproject to your Visual Builder Studio, configure your BUILD with the name of the git repository and select the option “Automatically perform build on SCM commit”. Also check that the branch name matches your git project.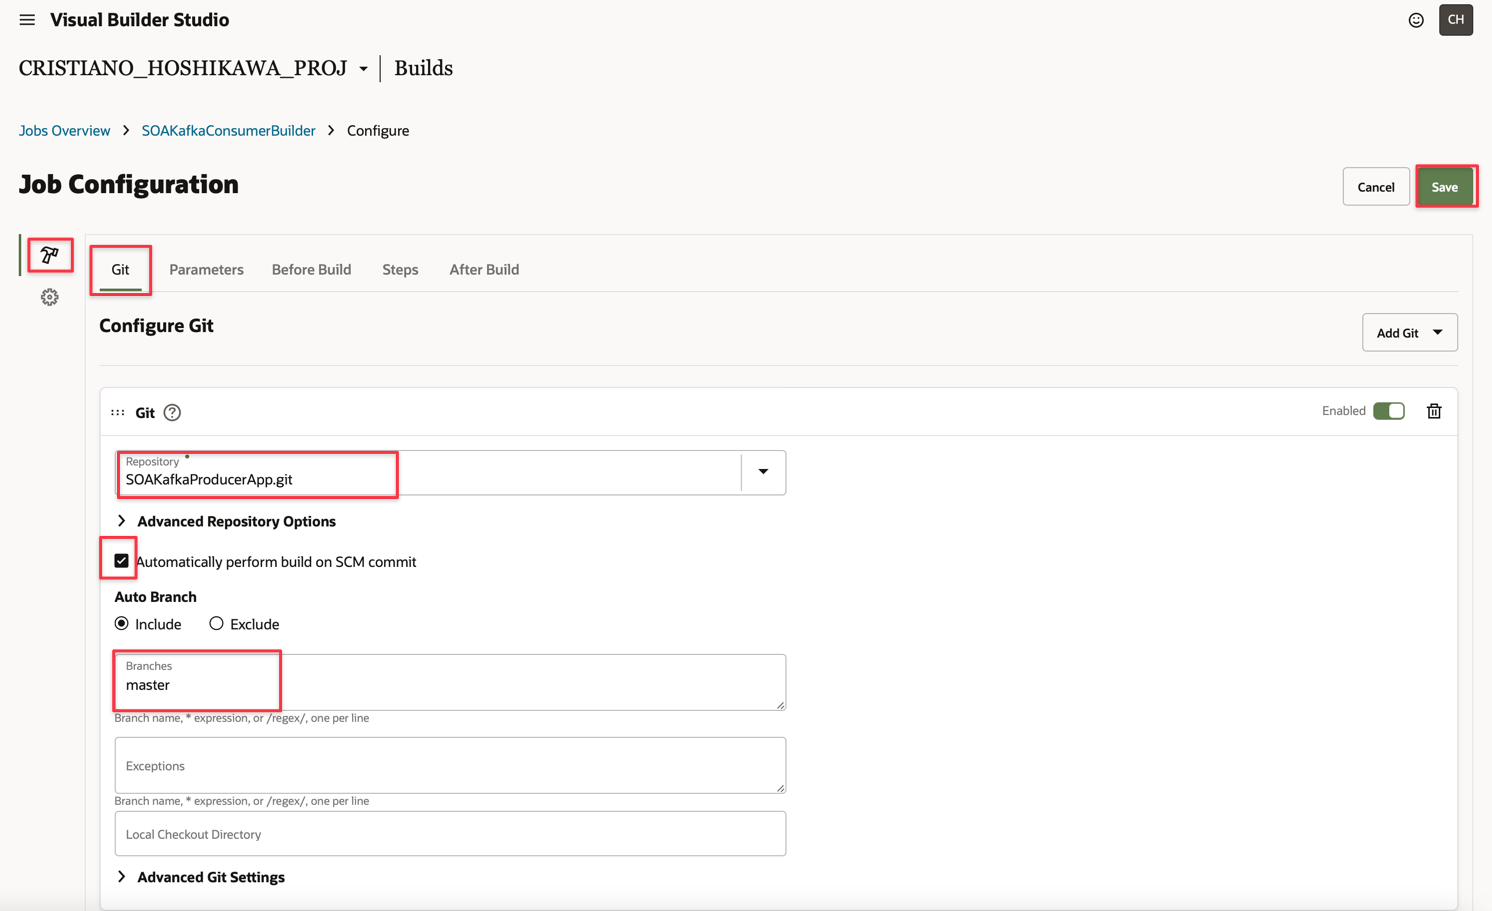
-
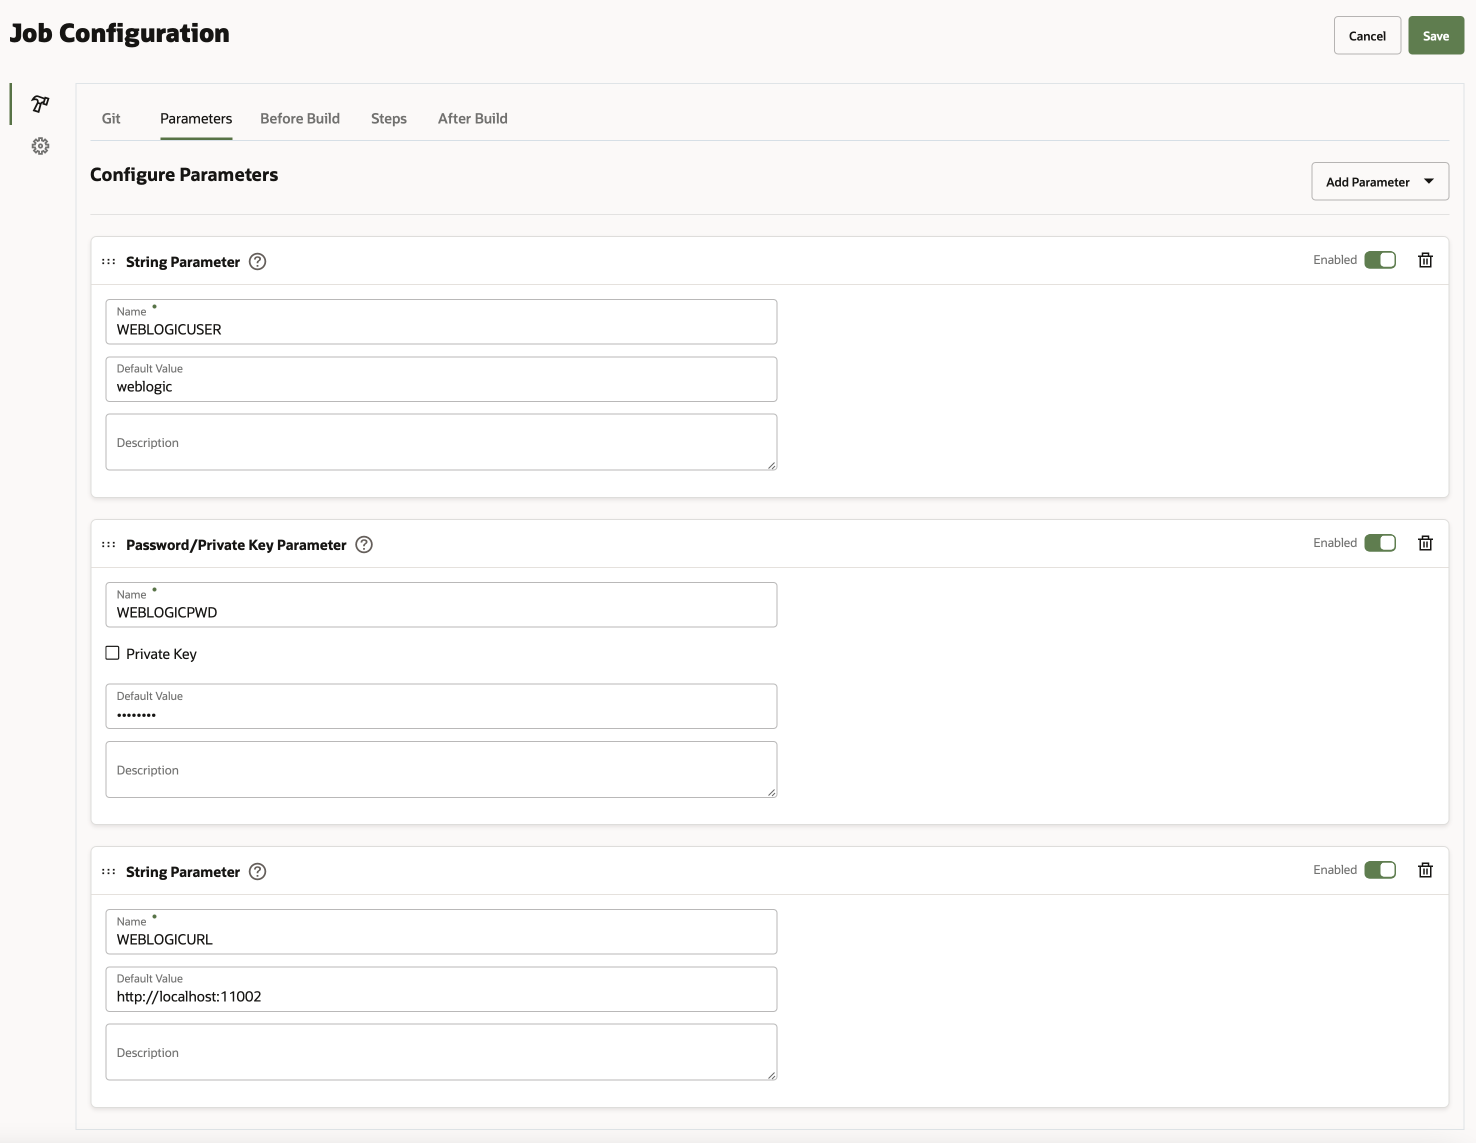
Now select the “Parameters” tab. You will have to create 3 parameters with the Combobox menu “Add Parameters” on the right side. Below, the names that must be created and also in parentheses, the type:
-
WEBLOGICUSER: the Weblogic user (String type)
-
WEBLOGICPWD: your Weblogic user password (type Secret/Password)
-
WEBLOGICURL: the URL of your Weblogic instance (String type)
-
An important observation is that the URL in WEBLOGICURL must be localhost as a tunnel will be established through the Bastion Server
-
-
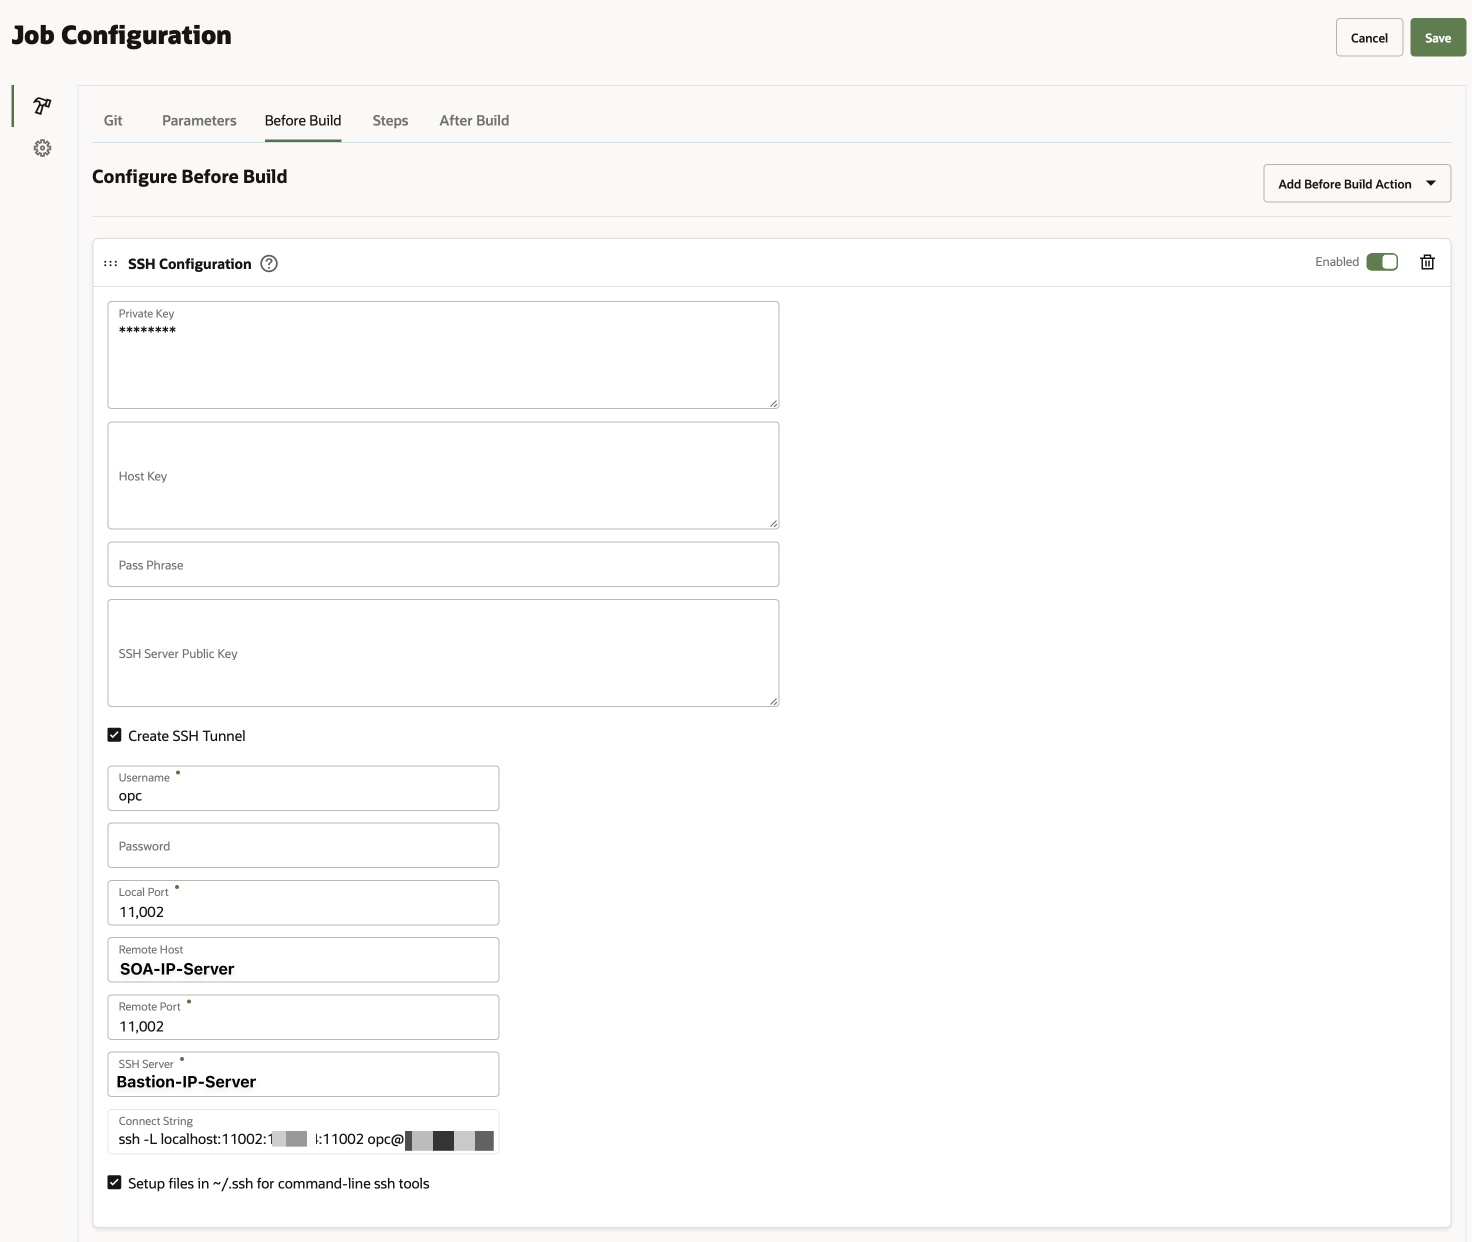
Now click on the “Before Build” tab to configure the SSH tunnel from the Bastion Server to the Weblogic SOA Suite Server. Remember to have your SSH key (Private Key) and fill in the corresponding field. Fill in the data for the tunnel assembly.
-
Username: opc
-
Local Port: 11002
-
Remote Host: Private IP of your SOA Suite instance
-
Remote Port: 11002
-
SSH Server: Public IP of your Bastion
-
An important observation is that port 11002 was previously configured so that it is exactly the access port for deploying your SOA Suite projects.
-
-
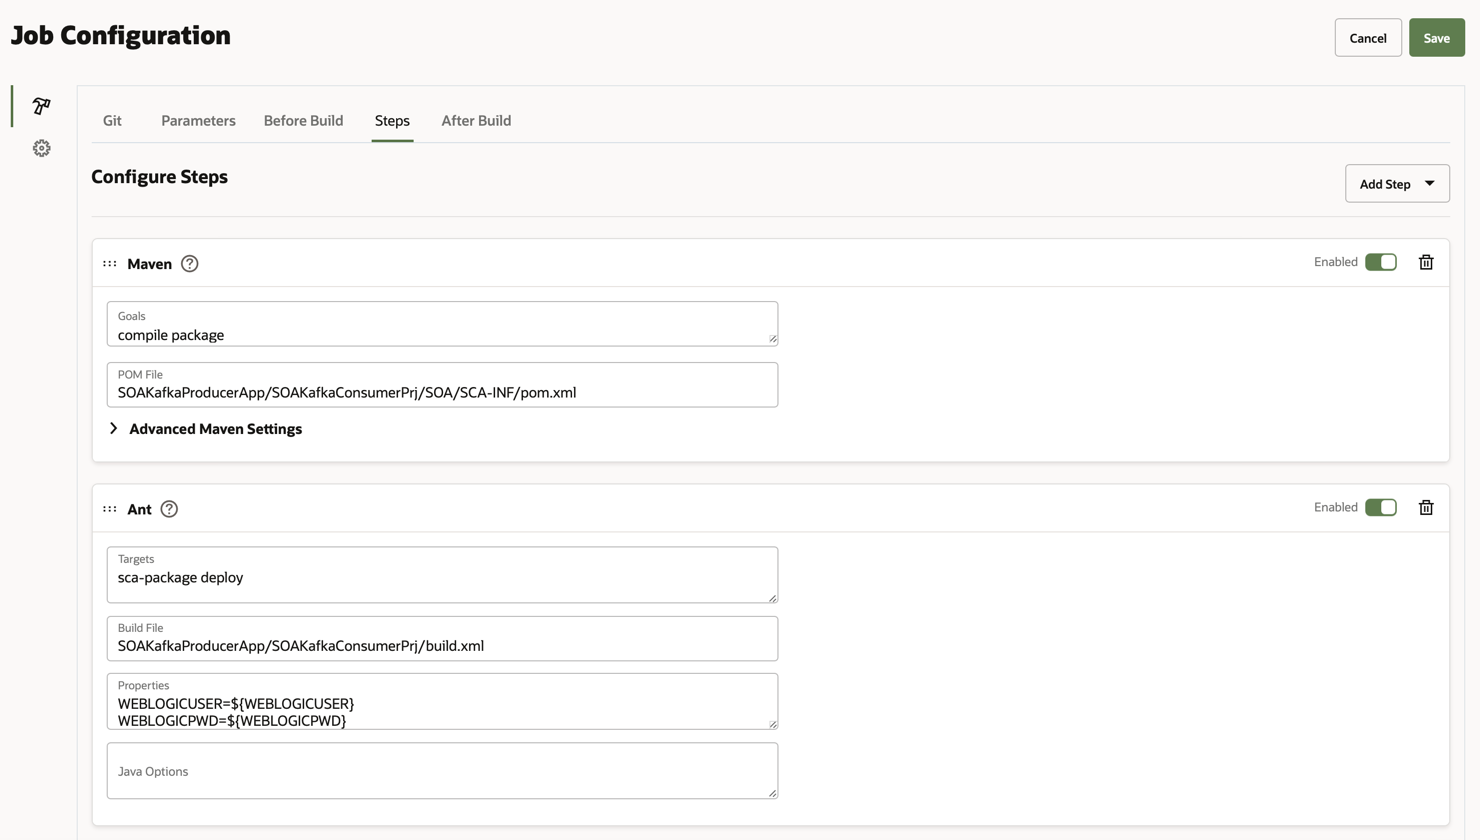
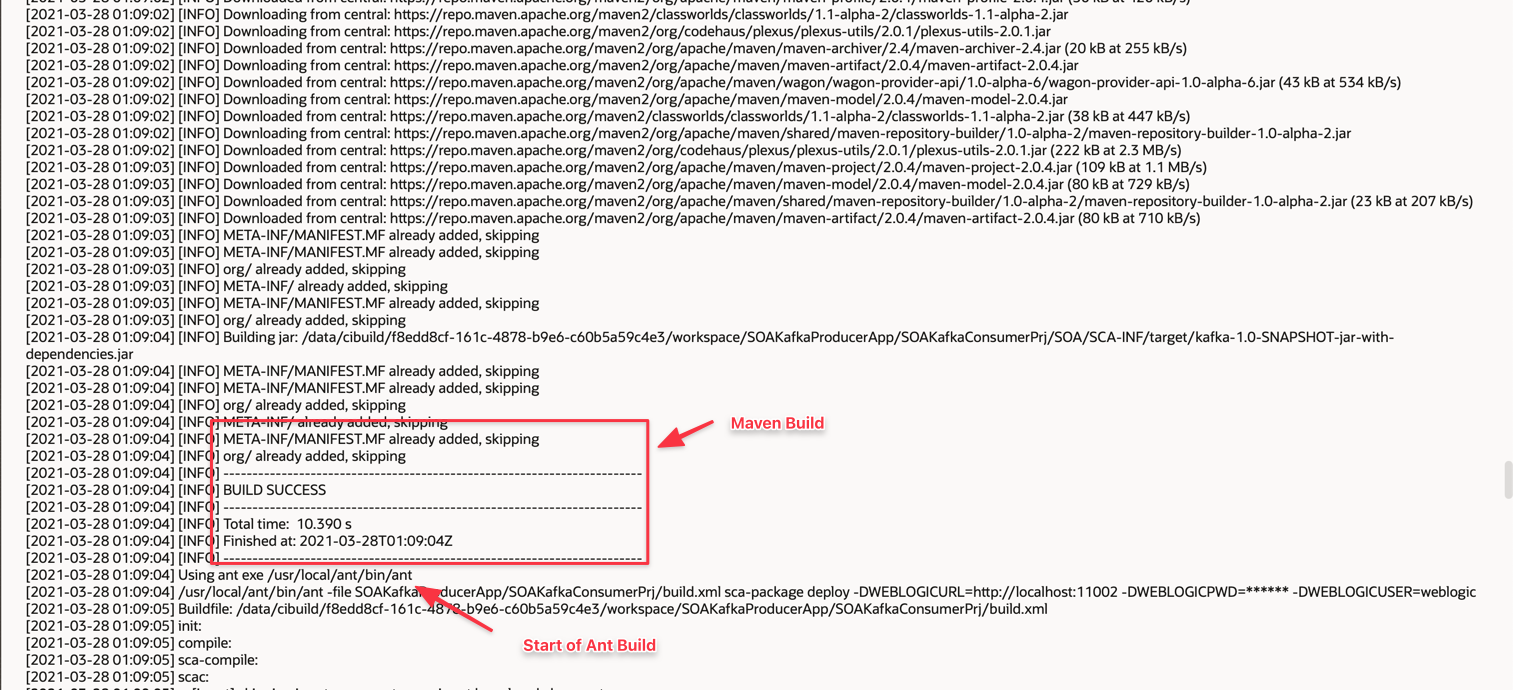
Click on the “Steps” tab to configure BUILD (via Maven) and DEPLOYMENT (via ANT) of your SOA Suite project. Fill in as follows:
- MAVEN
-
Goals: compile package
-
POM File: SOAKafkaProducerApp/SOAKafkaConsumerPrj/SOA/SCA-INF/pom.xml. This is the Maven pom.xml file for assembling your project package
-
ANT
-
Targets: sca-package deploy
-
Build File: SOAKafkaProducerApp/SOAKafkaConsumerPrj/build.xml. This is the Ant build.xml file for deploying your application after build.
-
-
Properties
-
WEBLOGICUSER=${WEBLOGICUSER}
-
WEBLOGICPWD=${WEBLOGICPWD}
-
WEBLOGICURL=${WEBLOGICURL}
-
Important Note:
-
The SOAKafkaProducerApp application has 2 projects: SOAKafkaProducerPrj and SOAKafkaConsumerPrj.
-
We are illustrating the configuration of one of the projects. The same steps must be performed for the other project.
-
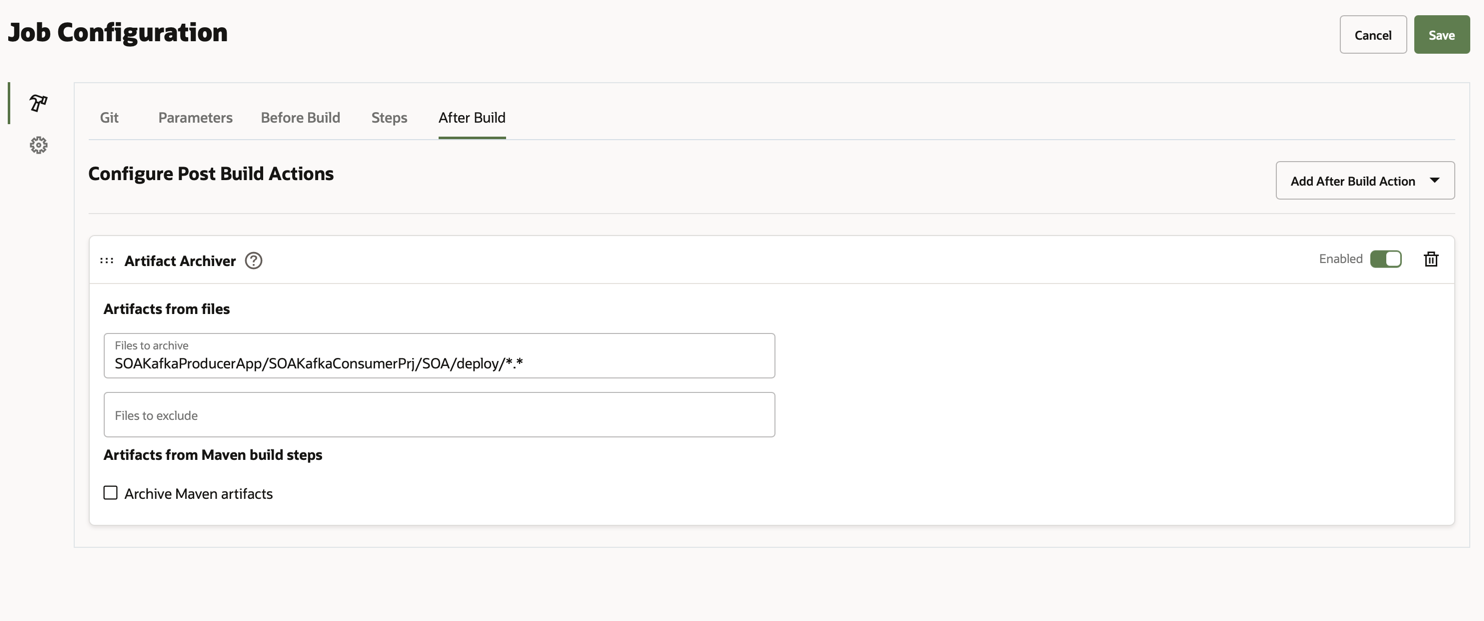
Now let’s finish the BUILD configuration. Select the “After Build” tab. This step is optional, however you may want to generate the artifact created by the previous step when running Maven. For this, configure this step so that the artifact is generated for later download.
-
-
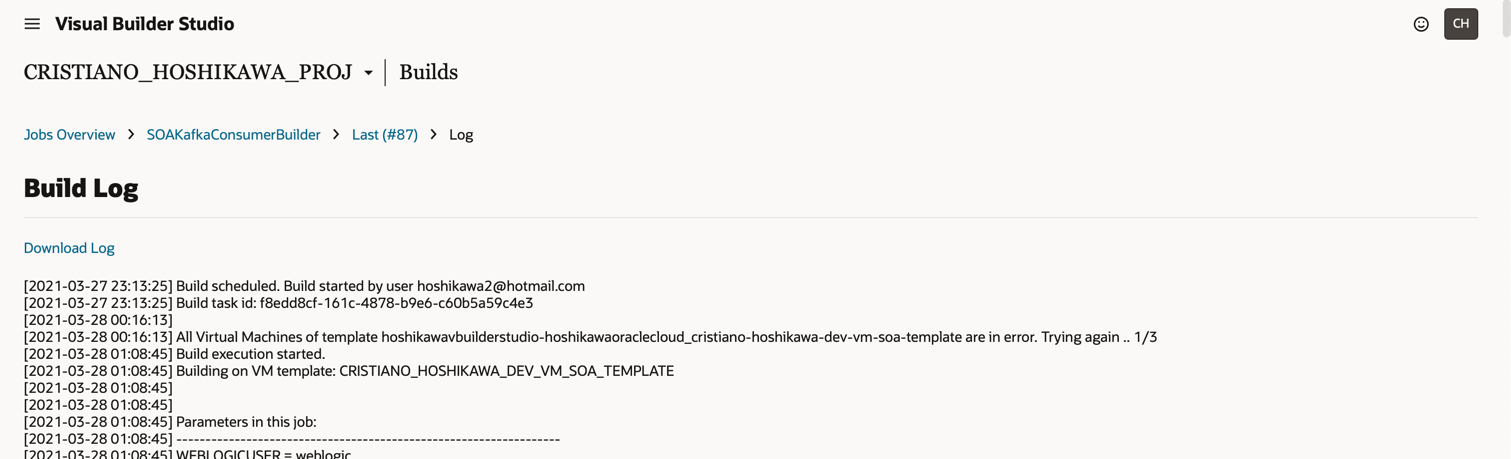
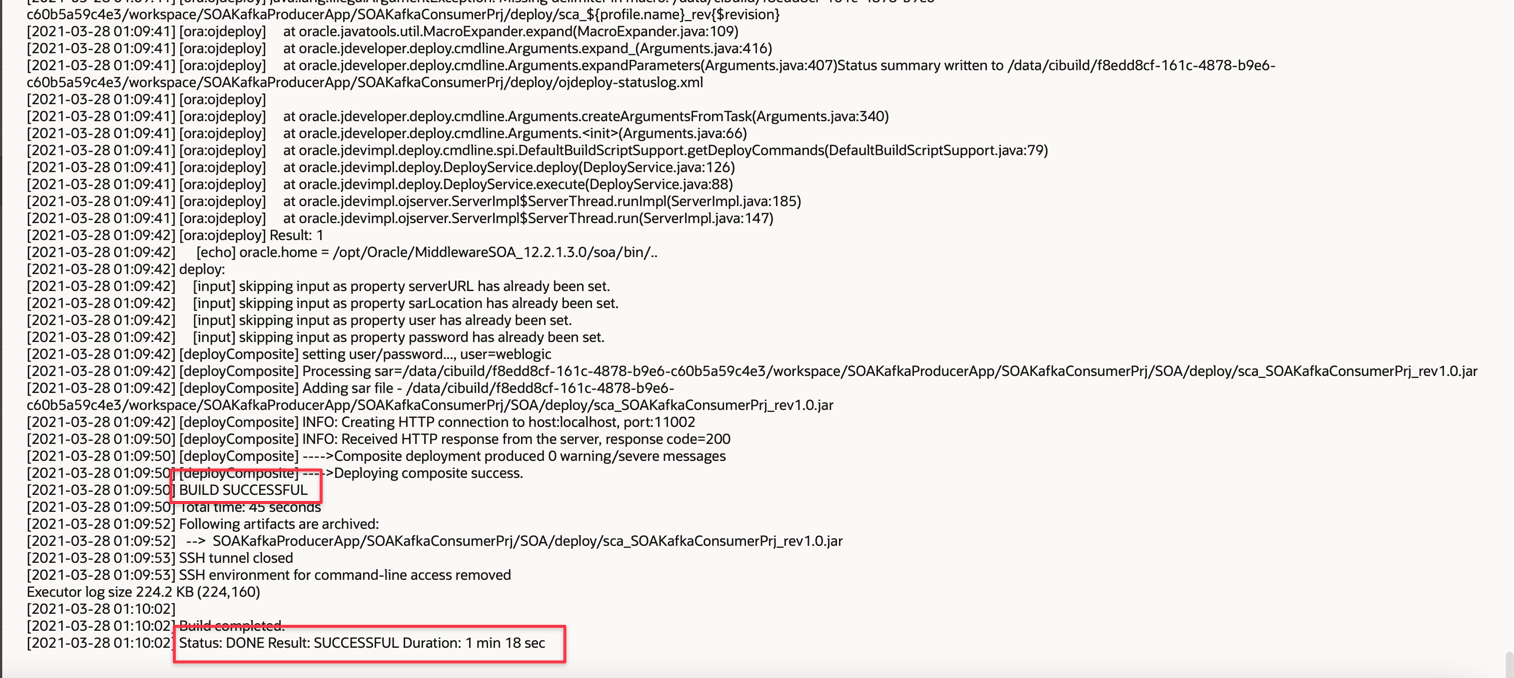
Execute the BUILD in Oracle Visual Builder Studio. Once configured, every time there is a commit in your code repository (Visual Builder Studio git), the BUILD will start automatically. You can also run the BUILD manually, for this you just have to click on the BUILD option. Try running BUILD and you will be able to check the generated Logs.
Related Links
-
Using the Oracle Cloud Infrastructure Streaming Service Adapter with Oracle Integration
-
How to use an SSH Tunnel in Oracle Developer Cloud Service Build Jobs
-
Using the Oracle Cloud Infrastructure Streaming Service Adapter with Oracle Integration
-
Weblogic integrated server Demo Identity Keystore and Demo Trust Keystore
Acknowledgments
- Author - Cristiano Hoshikawa (Oracle LAD A-Team Solution Engineer)
More Learning Resources
Explore other labs on docs.oracle.com/learn or access more free learning content on the Oracle Learning YouTube channel. Additionally, visit education.oracle.com/learning-explorer to become an Oracle Learning Explorer.
For product documentation, visit Oracle Help Center.
Deploy Oracle SOA Suite in Oracle Visual Builder Studio
F79404-01
March 2023
Copyright © 2023, Oracle and/or its affiliates.