Generate Identity and Access Management Reports from Oracle Cloud Infrastructure Audit
Introduction
Oracle Cloud Infrastructure (OCI) Identity Domains are the successor to Oracle Identity Cloud Service and bring all the capabilities from Oracle Identity Cloud Service into a core Oracle Cloud Infrastructure service. Oracle Identity Cloud Service was a self-contained SaaS-like offering and provides Reports on User Activity and the like within the service.
Unlike Oracle Identity Cloud Service, OCI Identity Domains exists within the larger OCI context. An OCI design principle is to use common service capabilities where possible and as a result, some of the Reports which were made available within Oracle Identity Cloud Service are being deprecated, as the data which they utilized is now available via the common service capability provided by OCI Audit.
This tutorial demonstrates how to construct the deprecated reports from the OCI Audit data and make those reports available within OCI Dashboard.
Objectives
-
Create Saved Searches in OCI Logging for OCI IAM Reports.
-
Export OCI IAM Reports for offline processing.
-
Add those Searches to the OCI Dashboard.
Prerequisites
- Permissions to read Audit data for the compartment containing the OCI IAM Domain (which will be the tenancy root for the Default Domain).
Task 1: Explore the OCI Identity and Access Management Audit Events
Every OCI service creates Audit records on user or service action, and OCI IAM is no exception, creating Audit records on User access, as well as any change or event that occurs within OCI IAM.
-
Access the Logging Service under the Observability & Management capabilities within the OCI Console, then select the Search section.
-
Click Select logs to search to set the context for the log search to the compartment containing the OCI IAM Identity Domain for which you wish to generate the report.
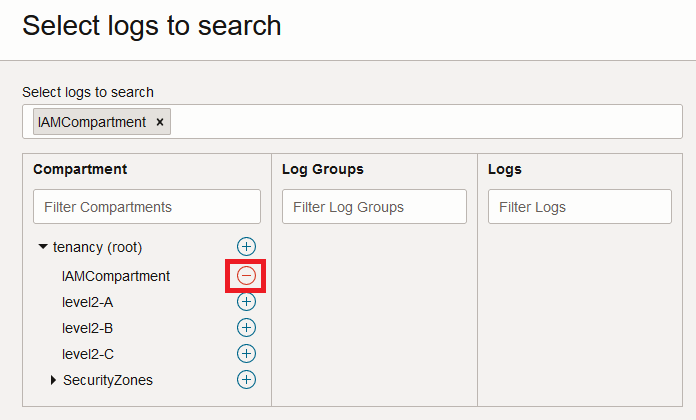
After selecting the relevant compartment you will likely see several entries for user or service activity, with the specific entries being dependant upon how your tenancy is being used. You may also see your own or other login events. If you don’t see any entries, then ensure you have the correct region selected by expanding More Search Options, or expand the time window by modifying the Filter by time setting.
-
Click Show Advanced Mode to bring up the ability to enter free-text queries, then add one of the following to the end of the default query (after ‘sort by datetime desc’) to generate the same content which was included in the Oracle Identity Cloud Service report.
Report Query Successful Logins Report | where data.additionalDetails.eventId = 'sso.session.create.success' | select data.additionalDetails.domainDisplayName as Domain, data.additionalDetails.actorName as Login, data.additionalDetails.eventId as Result, data.additionalDetails.ssoRp as Provider, time_format(datetime, 'yyyy-MM-dd hh:mm:ss z') as DateFailed Logins Report | where data.additionalDetails.eventId='sso.authentication.failure' | select data.additionalDetails.domainDisplayName as Domain, data.additionalDetails.actorName as User, data.additionalDetails.eventId as Result, data.message as Comments, time_format(datetime, 'yyyy-MM-dd hh:mm:ss z') as DateApplication Access Report | where data.additionalDetails.eventId = 'sso.session.create.success' or data.additionalDetails.eventId = 'sso.authentication.failure' or data.additionalDetails.eventId = 'sso.session.modify.success' | select data.additionalDetails.domainDisplayName as Domain, data.additionalDetails.actorDisplayName as User, data.additionalDetails.actorName as Login, data.additionalDetails.eventId as "Success/Failure", data.additionalDetails.ssoRp as Application, time_format(datetime, 'yyyy-MM-dd hh:mm:ss z') as DateAudit Log Report | where data.additionalDetails.eventId = 'sso.app.access.success' or data.additionalDetails.eventId = 'sso.app.access.failure' or data.additionalDetails.eventId = 'sso.session.create.success' or data.additionalDetails.eventId = 'sso.authentication.failure' or data.additionalDetails.eventId = 'sso.session.delete.success' or data.additionalDetails.eventId = 'admin.user.create.success' or data.additionalDetails.eventId = 'admin.user.activated.success' or data.additionalDetails.eventId = 'admin.user.deactivated.success' or data.additionalDetails.eventId = 'admin.user.update.success' or data.additionalDetails.eventId = 'admin.user.delete.success' or data.additionalDetails.eventId = 'admin.user.password.reset.success' or data.additionalDetails.eventId = 'admin.me.password.reset.success' or data.additionalDetails.eventId = 'admin.me.password.change.success' or data.additionalDetails.eventId = 'admin.policy.create.success' or data.additionalDetails.eventId = 'admin.rule.create.success' or data.additionalDetails.eventId = 'admin.policy.update.success' or data.additionalDetails.eventId = 'admin.rule.update.success' or data.additionalDetails.eventId = 'admin.passwordpolicy.create.success' or data.additionalDetails.eventId = 'admin.passwordpolicy.update.success' or data.additionalDetails.eventId = 'admin.grant.create.success' or data.additionalDetails.eventId = 'admin.grant.delete.success' or data.additionalDetails.eventId = 'admin.group.create.success' or data.additionalDetails.eventId = 'admin.group.add.member.success' or data.additionalDetails.eventId = 'admin.group.remove.member.success' or data.additionalDetails.eventId = 'admin.group.delete.success' or data.additionalDetails.eventId = 'admin.app.create.success' or data.additionalDetails.eventId = 'admin.app.update.success' or data.additionalDetails.eventId = 'admin.app.delete.success' or data.additionalDetails.eventId = 'admin.app.activated.success' or data.additionalDetails.eventId = 'admin.app.deactivated.success' or data.additionalDetails.eventId = 'notification.delivery.success' or data.additionalDetails.eventId = 'notification.delivery.failure' or data.additionalDetails.eventId = 'sso.auth.factor.initiated' or data.additionalDetails.eventId = 'sso.bypasscode.create.success' | select time_format(datetime, 'yyyy-MM-dd hh:mm:ss z') as Date, data.additionalDetails.domainDisplayName as Domain, data.additionalDetails.actorName as Actor, data.additionalDetails.eventId as "Event Id", data.message as "Event Description", data.additionalDetails.adminResourceName as TargetApp Role Assignments Report | where data.additionalDetails.eventId = 'admin.approle.add.member.success' or data.additionalDetails.eventId = 'admin.approle.remove.member.success' | select data.additionalDetails.domainDisplayName as Domain, data.additionalDetails.actorDisplayName as Approver, data.additionalDetails.adminAppRoleAppName as "Application Name", data.additionalDetails.adminRefResourceName as Beneficiary, data.additionalDetails.adminRefResourceType as "User/Group", data.additionalDetails.adminResourceName as "Application Role Name", time_format(datetime, 'yyyy-MM-dd hh:mm:ss z') as Date, data.additionalDetails.eventId as "Added/Removed"For example, for the
Successful LoginsReport, the query would look similar to the below.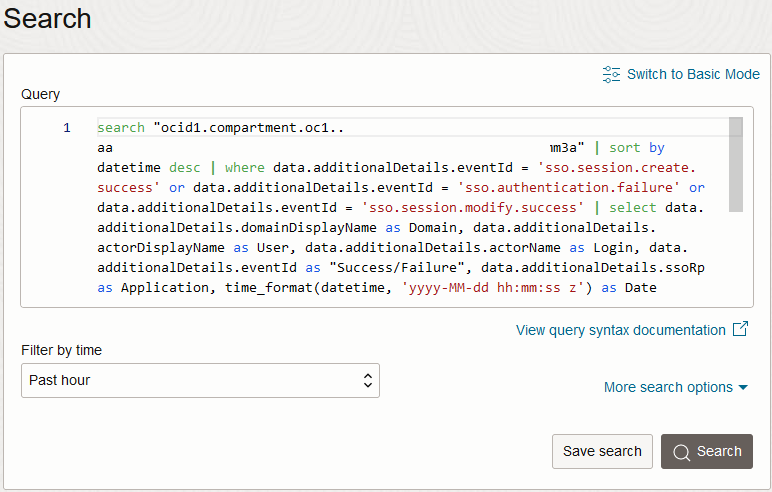
-
Click Search to use the updated query. If it does not return any results, you may need to modify the time filter.
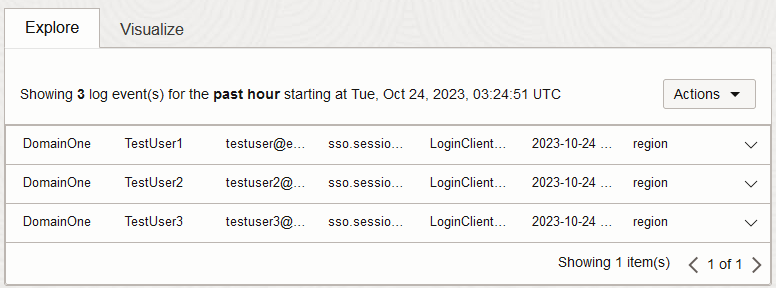
-
Any results returned can be exported by clicking Export log data (JSON) from the Actions drop-down above the results.
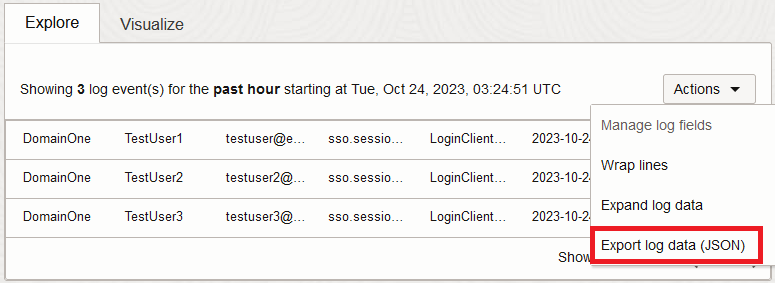
Note: Oracle Identity Cloud Service reports supported downloading as a
CSVfile while this export only supportsJSONexport, however the select statements used in the above queries flatten theJSONto a single object with attributes, which should enable you to convert between theJSONexport andCSVif required.
Task 2: Create a Saved Search for your Report
To avoid re-entering the query each time you wish to access these reports, you can leverage OCI Logging’s Saved Search capability.
-
Once you have validated the query, click Save Search to allow the query to be reused and embedded in the dashboard.
-
Enter a name for your search, such as ‘Successful_Login_Report’ or similar, as well as description, then click Save.
-
From the Saved Searches Interface, you can click back into your search to obtain the latest set of data.
Note: You cannot directly export the results from the Saved Search Interface, instead you need to use Explore with Log Search from the Actions drop-down, then export the results from the Search view.
Task 3: Add the Report to an OCI Dashboard
In addition to accessing the reports from within the OCI Logging service, they can also be made available via OCI’s dashboard capability, to allow for the OCI IAM events to be reviewed centrally.
-
Navigate to the OCI Console landing page, click Oracle Cloud in the top banner, then swap to the Dashboard view.
-
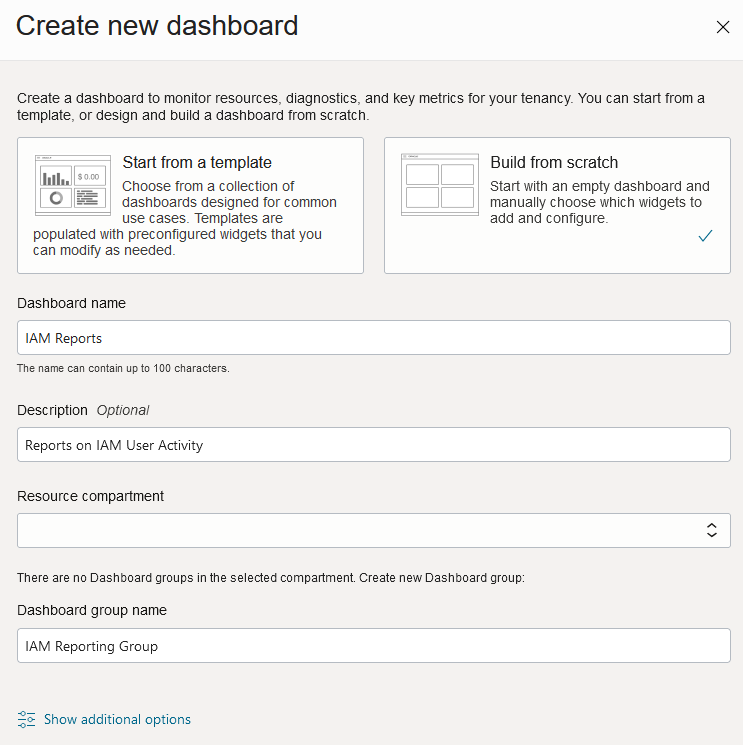
Create a new Dashboard for the OCI IAM Reports, by clicking New Dashboard.
-
Select Build from Scratch, and add an appropriate name and description.
-
Create a new Dashboard Group, or assign this Dashboard to an existing Group if appropriate.
-
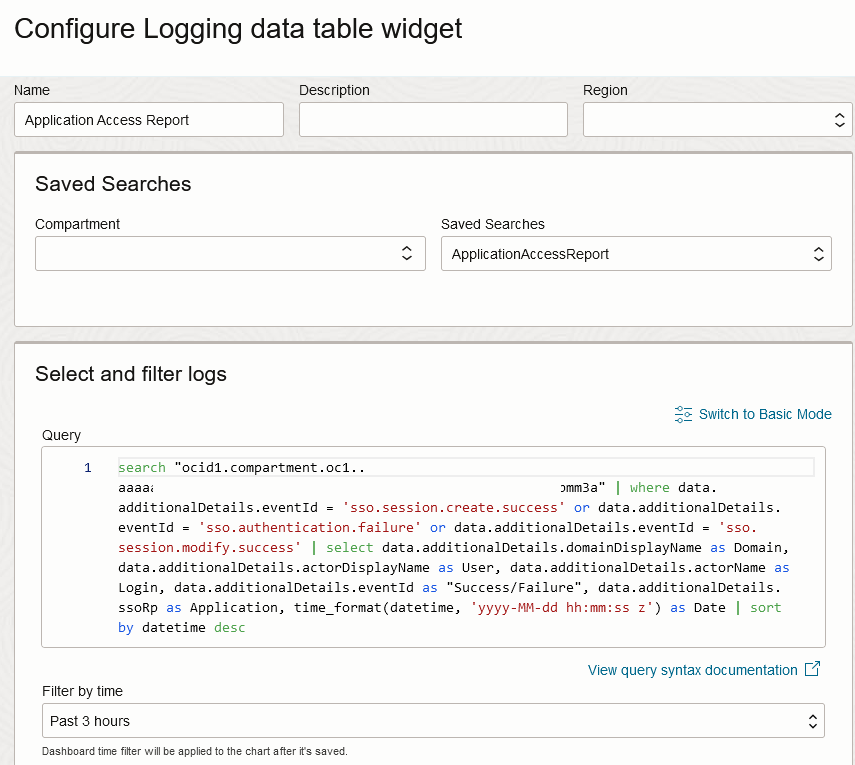
Click Add Widget, then select Logging Data Table, and then click Configure on the new widget.
-
Provide an appropriate Name, then select your Saved Search. Add an appropriate default time period.
-
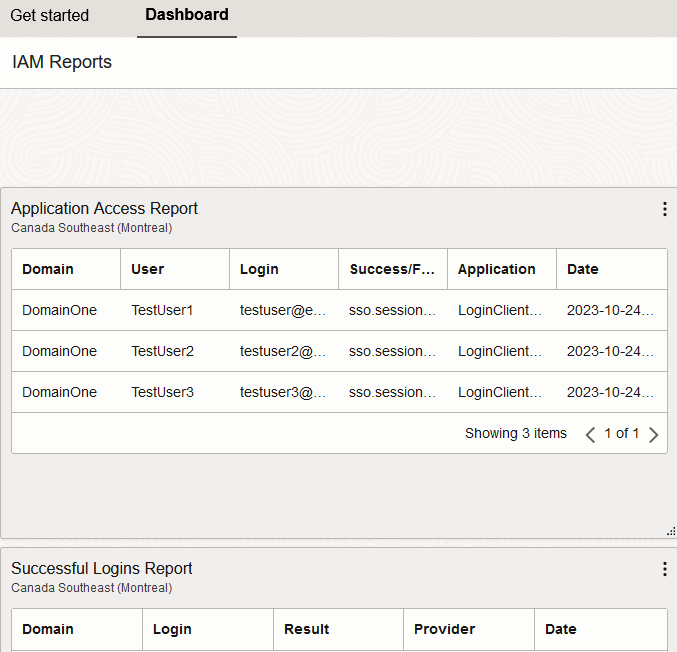
Modify the layout and add other Saved Searches as appropriate.
Automating Extraction of the Report Data
The approaches above provide the ability to perform ad-hoc reporting on IAM data. However, for ongoing operations, there may be a requirement to automate the extraction of this data. In order to do this, you can leverage the OCI API, OCI CLI or one of the OCI SDKs.
The SearchLogs API can be invoked using a request similar to the following, adjusting the time range and adding the query from the initial Log Search:
POST https://logging.<region>.oci.oraclecloud.com/20190909/search?limit=1000
Body:
{
  "timeStart": "2025-01-01T00:00:00.000Z",
  "timeEnd": "2025-01-02T00:00:00.000Z",
  "searchQuery": "<log search query from Task #1>",
  "isReturnFieldInfo": false
}
The equivalent OCI CLI command is the following:
oci logging-search search-logs --search-query "<log search query from Task #1>" --time-start "2025-01-01T00:00:00.000Z" --time-end "2025-01-02T00:00:00.000Z" --is-return-field-info falseNote: Escape double quotation characters (
") in your search query with backslashes (\). i.e.as "Success/Failure"becomesas \"Success/Failure\".
If you prefer to have Audit Events pushed to an alternative system then OCI Connector Hub or OCI Events could be used to facilitate log forwarding, such as in Implement multicloud security using OCI Audit to capture events from OCI Identity and Access Management covering Audit forwarding to Azure Sentinel.
Related Links
Acknowledgments
- Authors - Manoj Gaddam (Principal Product Manager - OCI Identity/IDCS), Callan Howell-Pavia (Principal Member of Technical Staff - OCI Identity/IDCS)
More Learning Resources
Explore other labs on docs.oracle.com/learn or access more free learning content on the Oracle Learning YouTube channel. Additionally, visit education.oracle.com/learning-explorer to become an Oracle Learning Explorer.
For product documentation, visit Oracle Help Center.
Generate Identity and Access Management Reports from Oracle Cloud Infrastructure Audit
F88486-03