Note:
- This tutorial requires access to Oracle Cloud. To sign up for a free account, see Get started with Oracle Cloud Infrastructure Free Tier.
- It uses example values for Oracle Cloud Infrastructure credentials, tenancy, and compartments. When completing your lab, substitute these values with ones specific to your cloud environment.
Create an Oracle Cloud Infrastructure Compute Instance Webserver using an OCI Database as the main Backend
Introduction
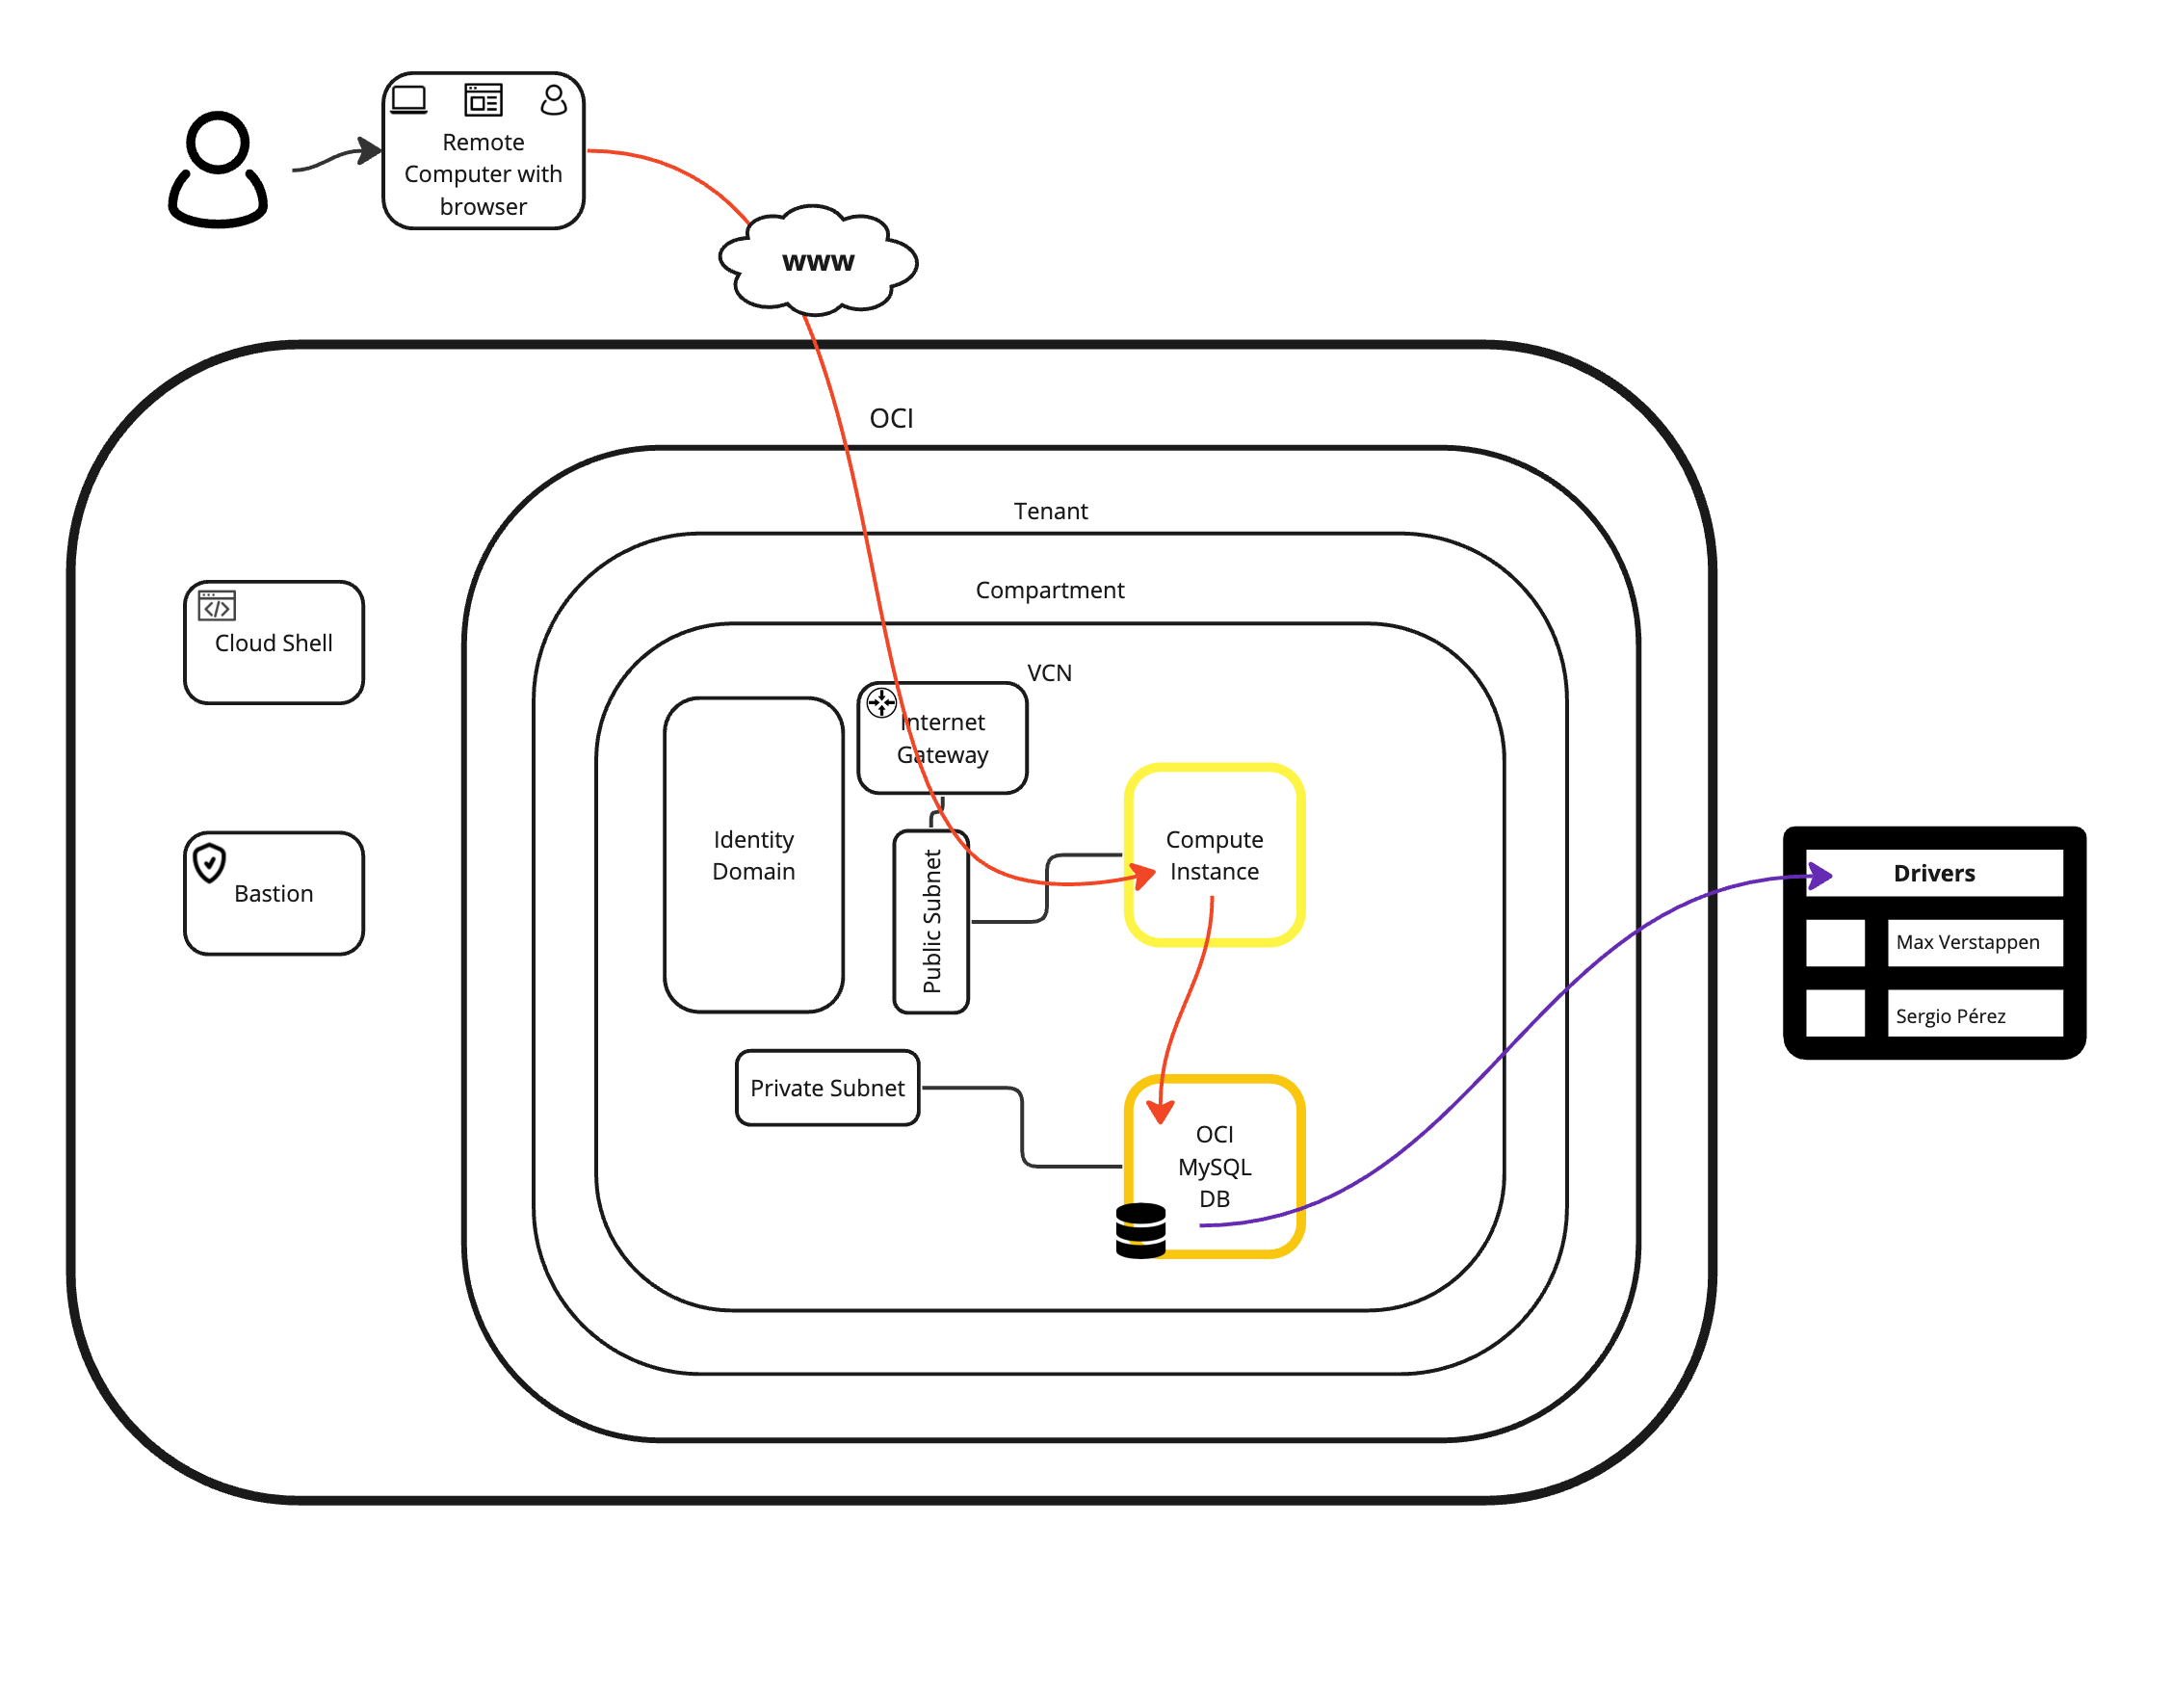
In this tutorial, we will create a two-tier application consisting of an Oracle Cloud Infrastructure (OCI) Compute instance that will act as a webserver and an OCI Database service (MySQL). We have created a sample website and database and this website will retrieve the data from the OCI Database table.
Objectives
-
We will create a two-tier web application where we will use an OCI compute instance that is public internet facing as the frontend with PHP and NGINX webserver and a private facing MySQL Database with sample data. Install PHP MySQL modules and create a database with sample data to access the website and sample data successfully.
-
Task 1: Create a new virtual cloud network (VCN).
-
Task 2: Create a new public subnet and private subnet.
-
Task 3: Create a new OCI Compute instance.
-
Task 4: Create a new MySQL Database engine.
-
Task 5: Create a new database with sample data.
-
Task 6: Install and configure an NGINX webserver with PHP.
-
Task 7: Create a website that connects to the database and displays the records on a webpage.
-
Task 1: Create a new Virtual Cloud Network (VCN)
We already have a VCN created but if you still need to create a new VCN, follow the tutorial: Create a New VCN with IPv6 Enabled.
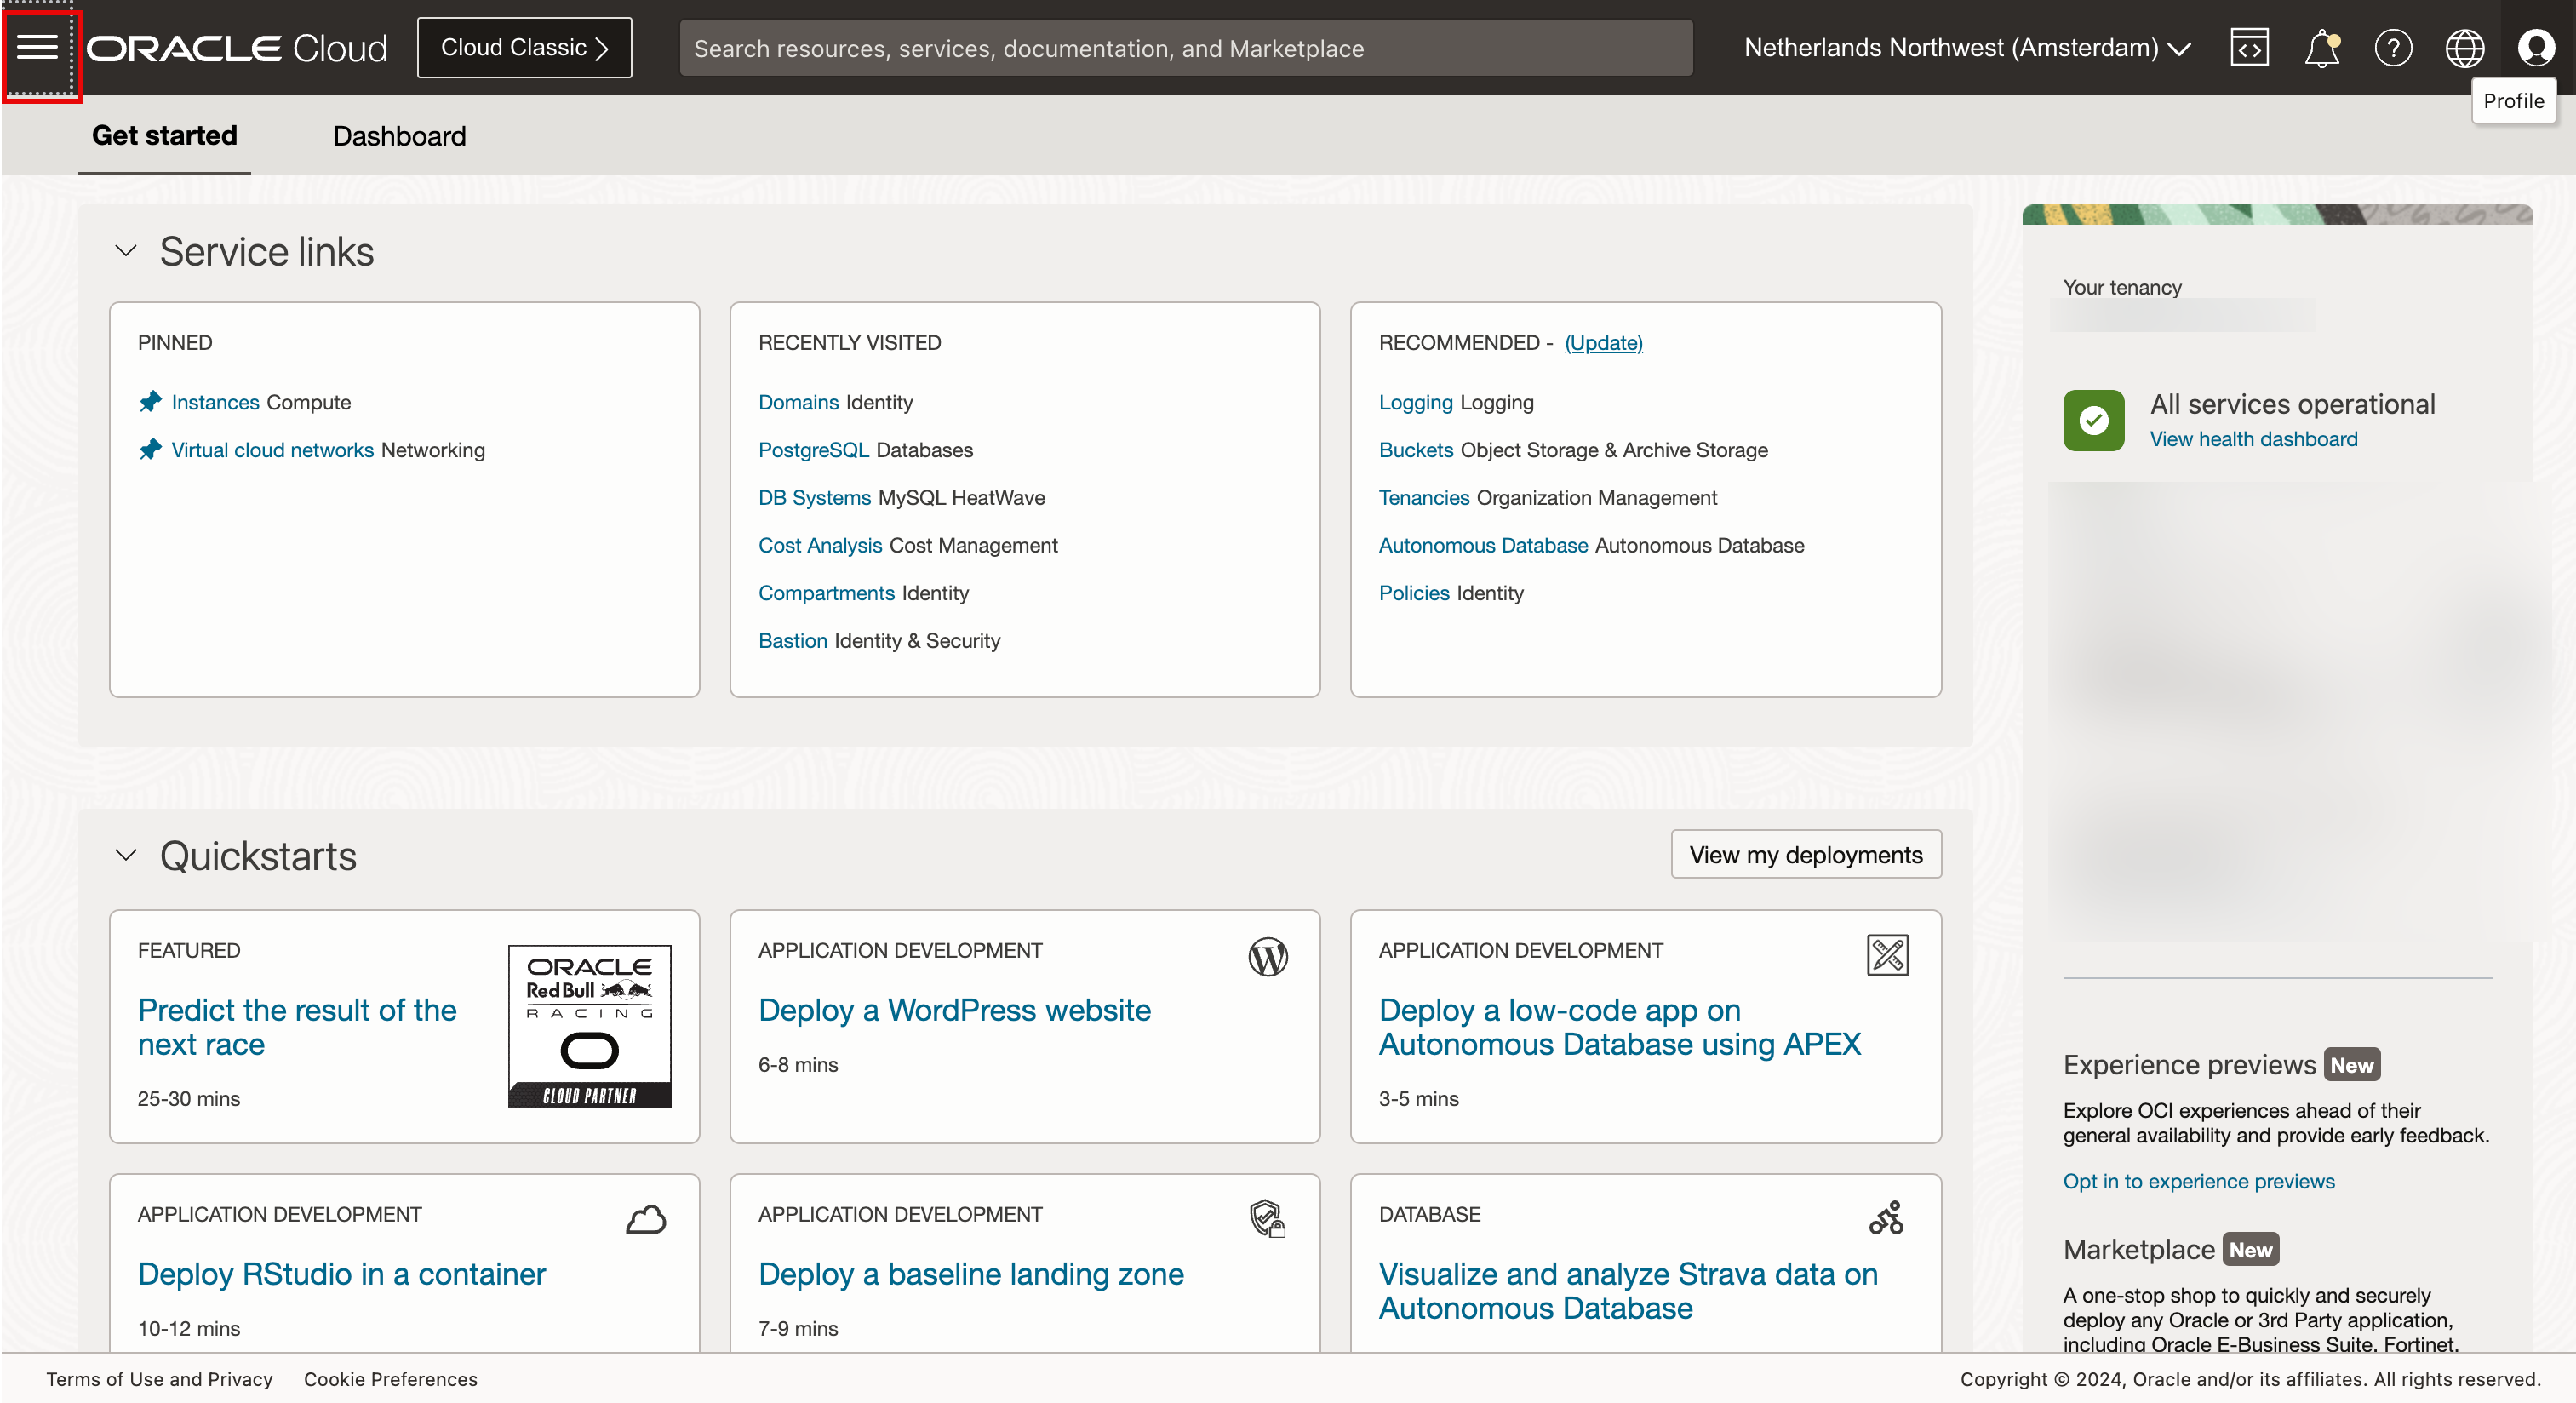
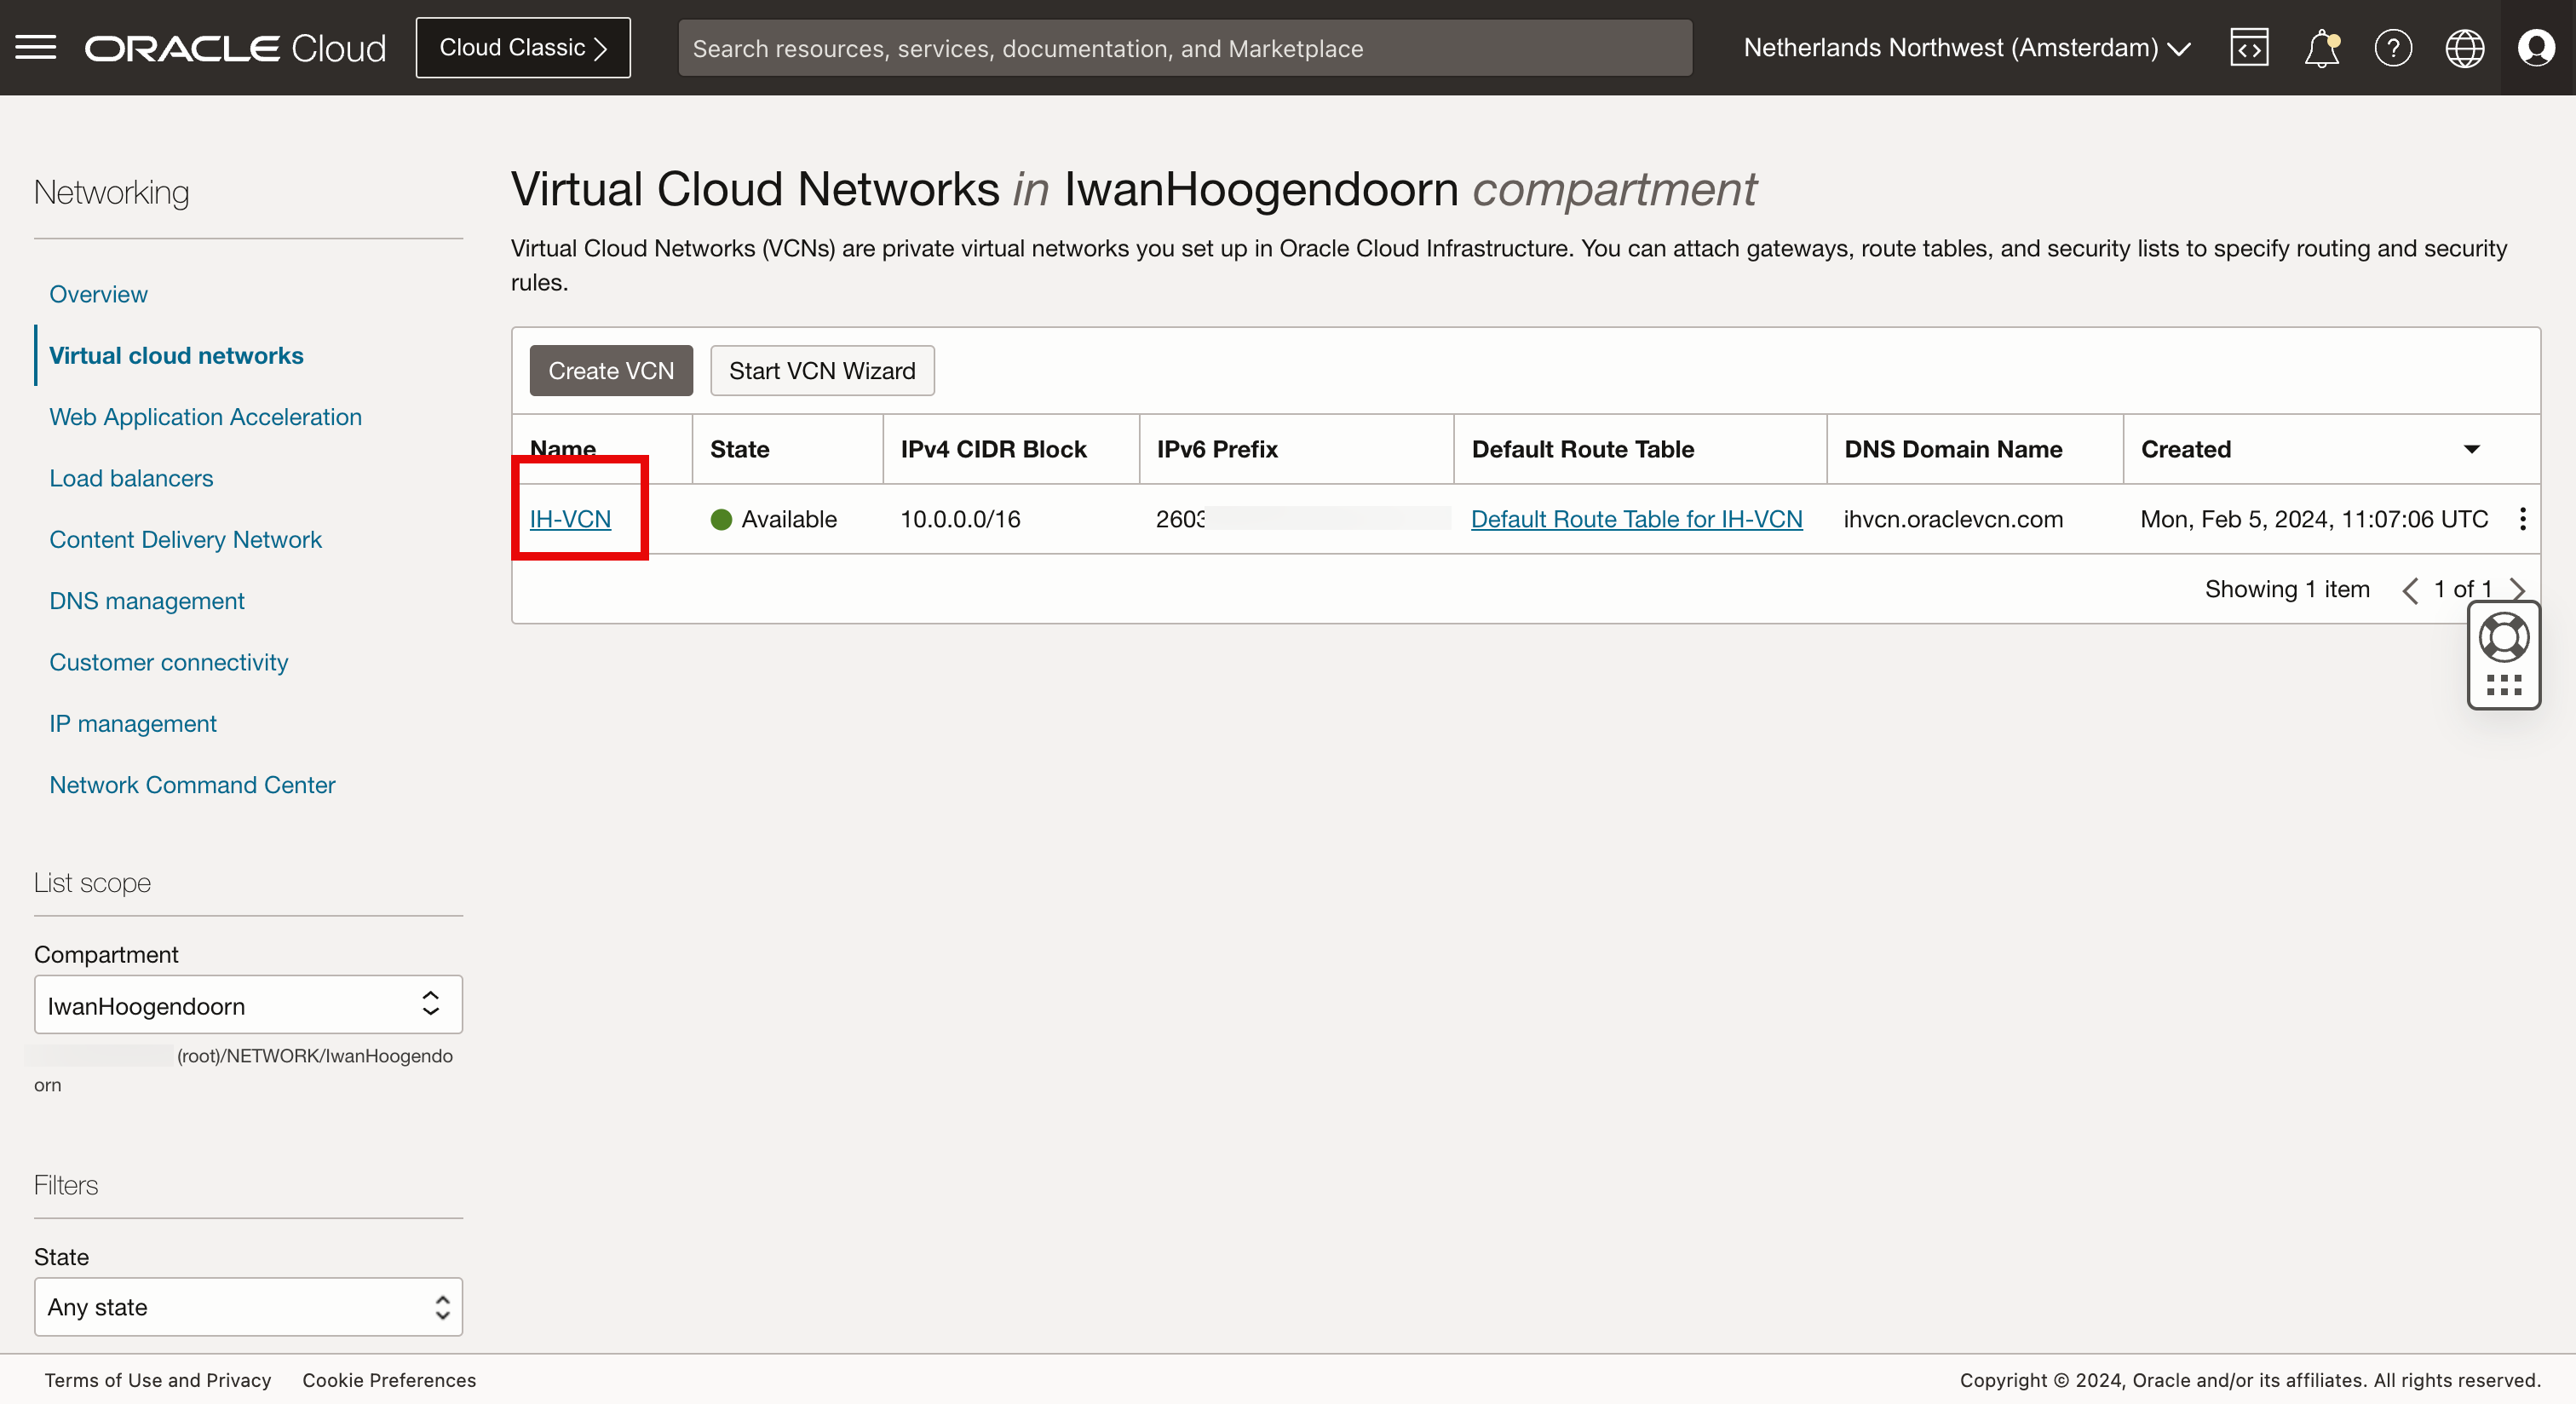
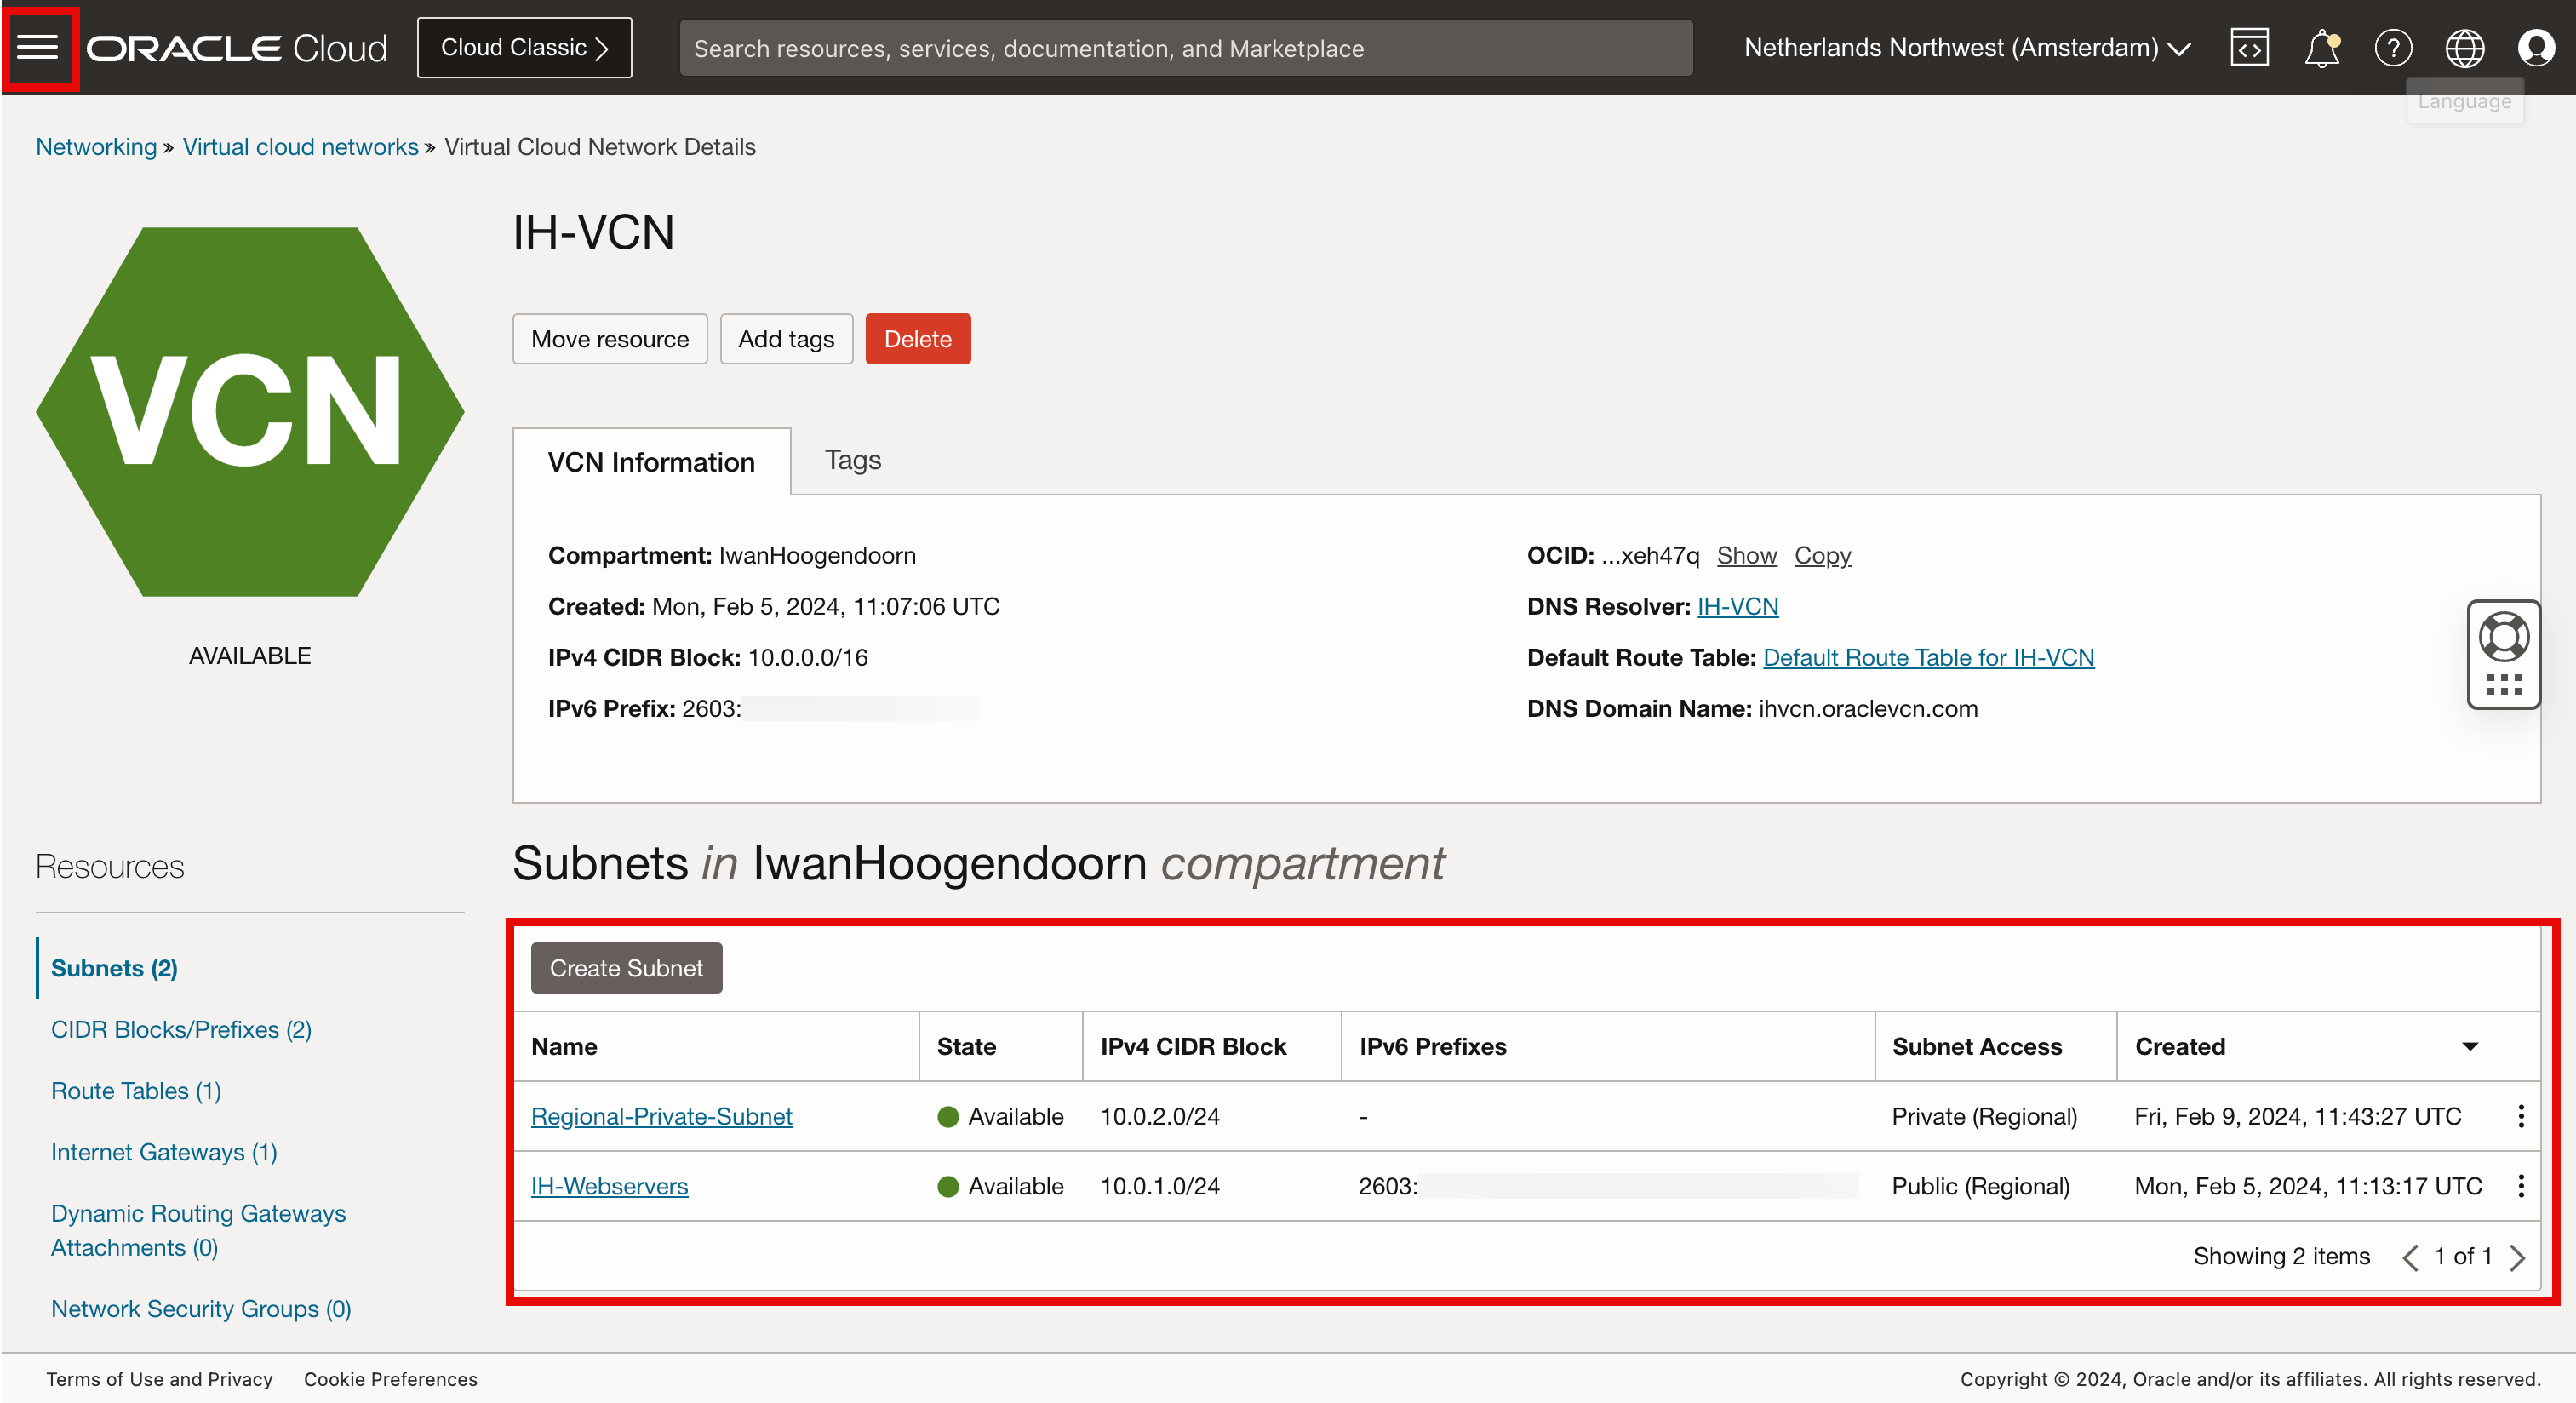
Click the hamburger menu from the upper left corner. Click Virtual Cloud Networking to verify if the virtual cloud network exists.
For this tutorial, we already have a VCN.
Task 2: Create a new Public Subnet and Private Subnet
We already have a public and private subnet created but if you still need to create new subnets, follow the tutorials: Create a new Public Subnet with IPv6 Enabled and Create a Private Subnet inside the VCN.
Inside this VCN, we have a public and private subnet available. We will connect OCI Compute instance to the public subnet and OCI Database to the private subnet.
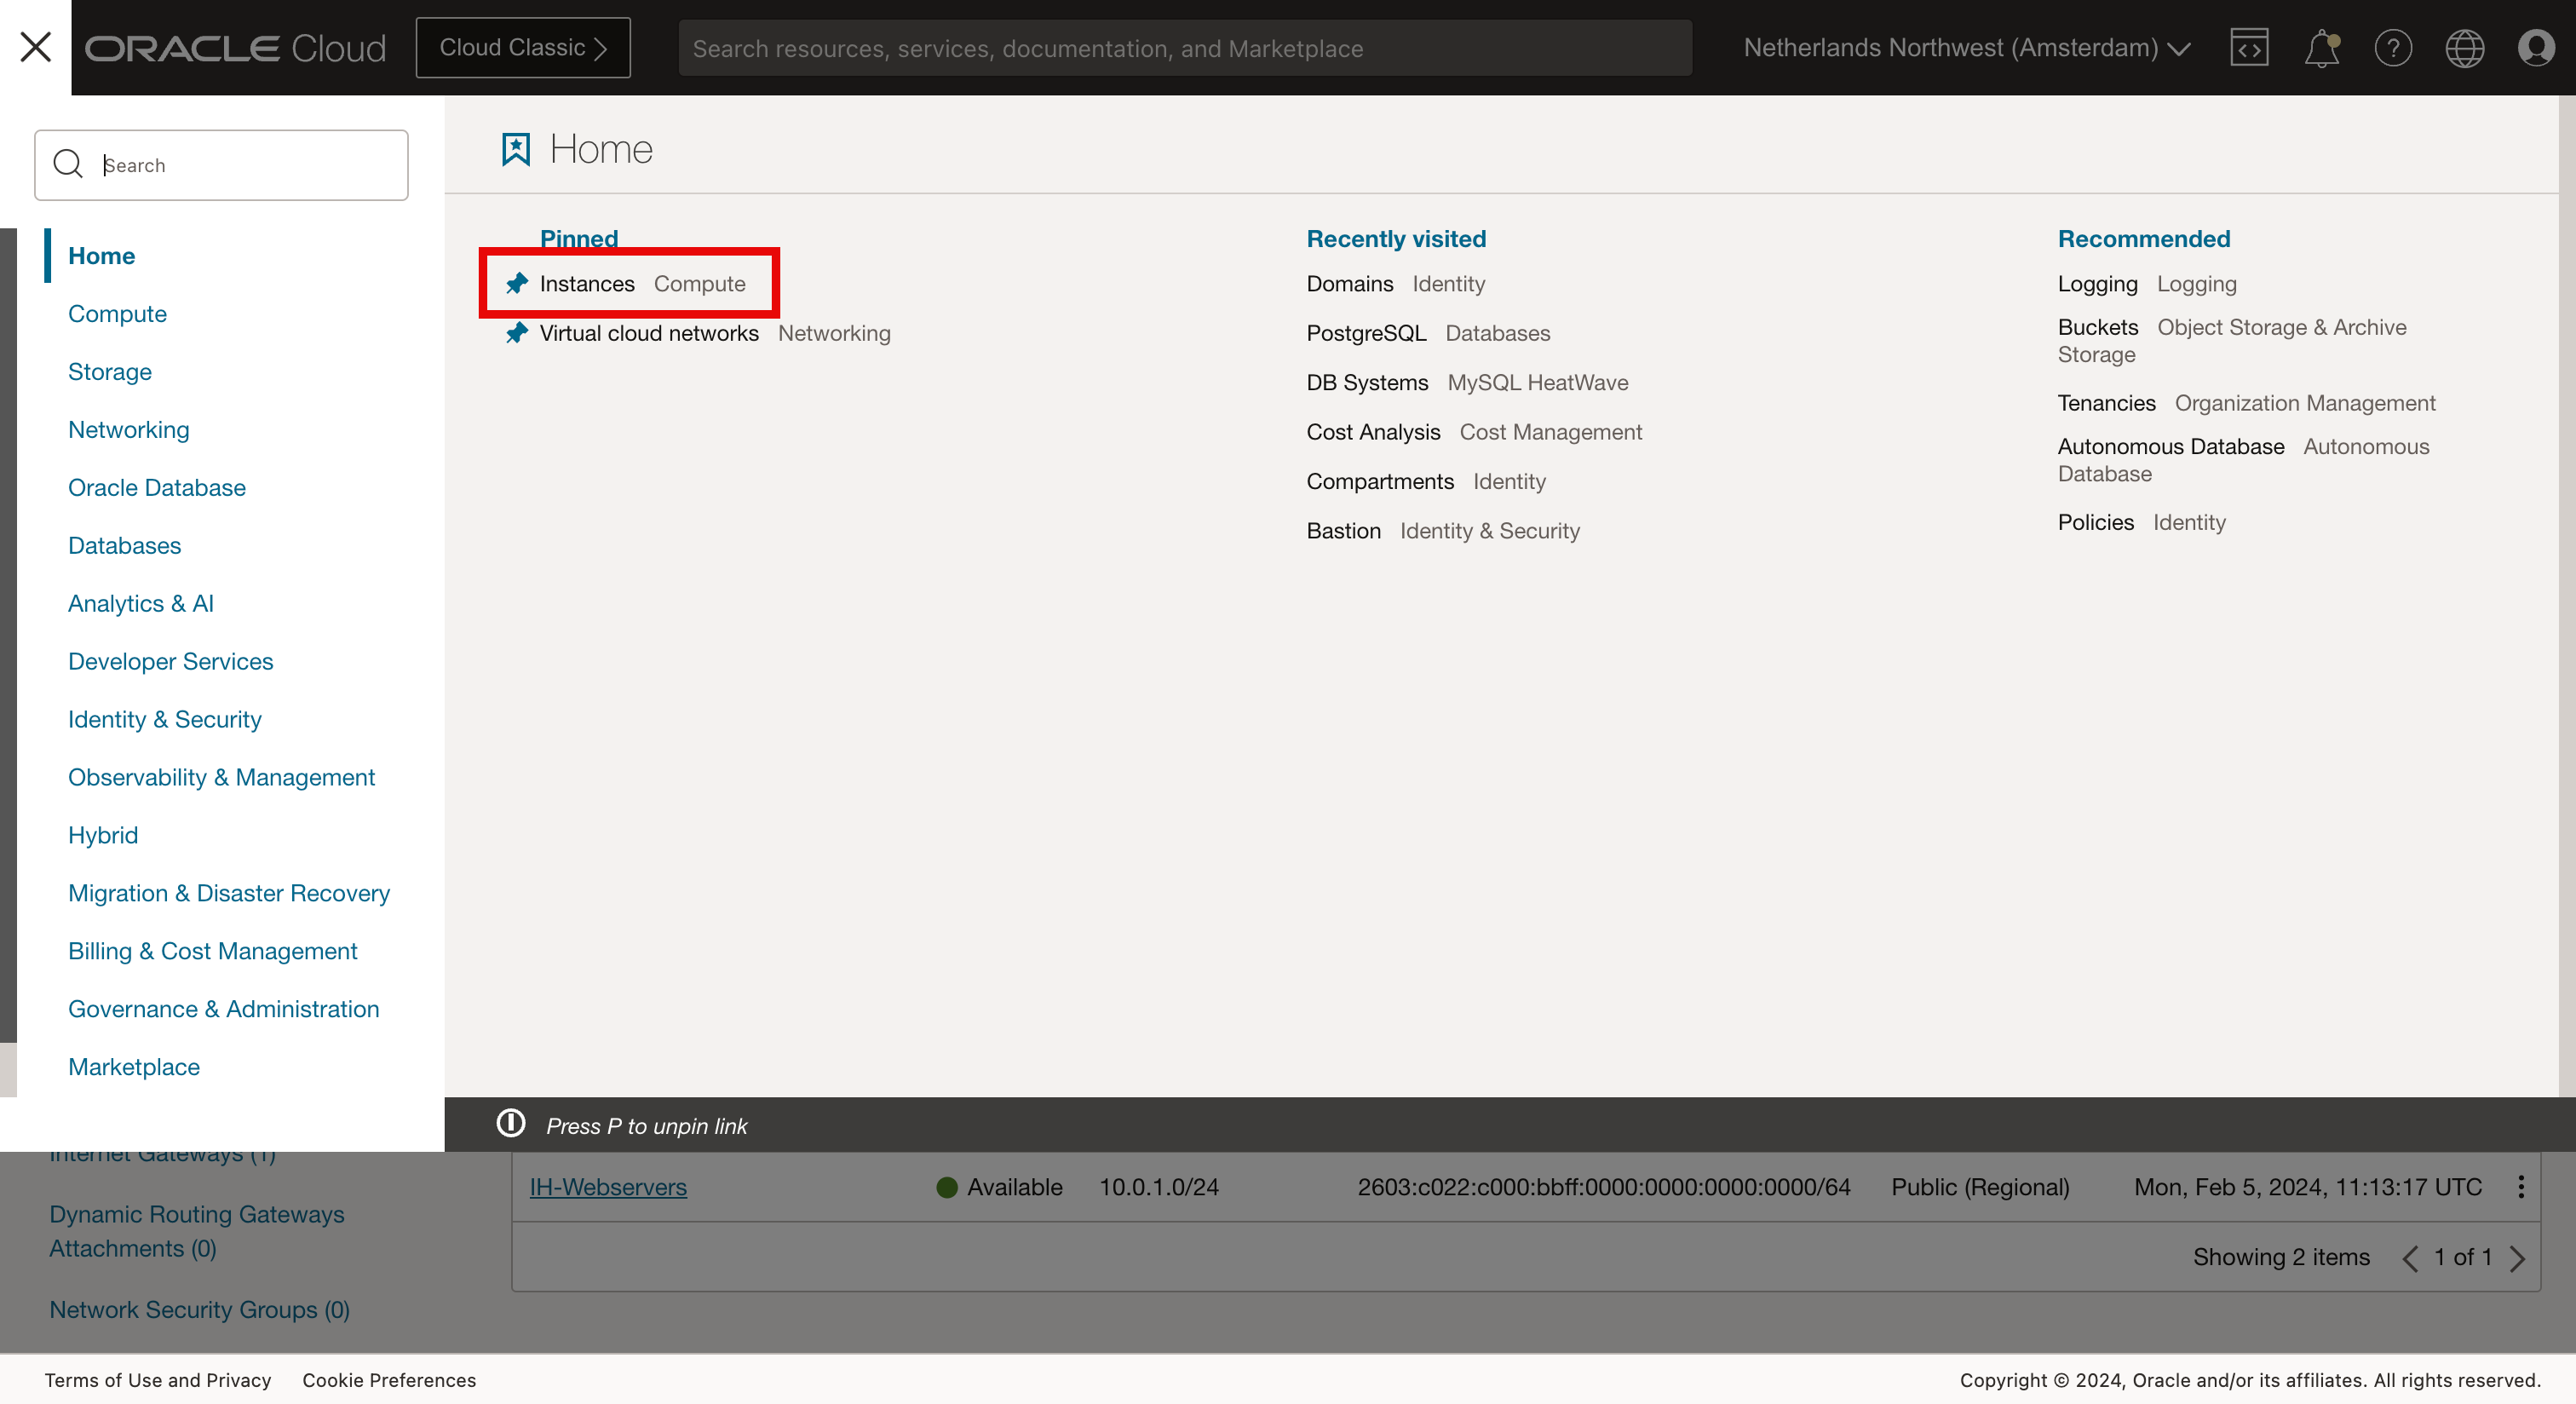
To review the available OCI Compute instances, click the hamburger menu from the upper left corner.
Task 3: Create a new OCI Compute Instance
We already have an OCI Compute instance created but if you still need to create a new OCI Compute instance, follow the tutorial: Task 3: Create a New Instance with IPv6 Enabled.
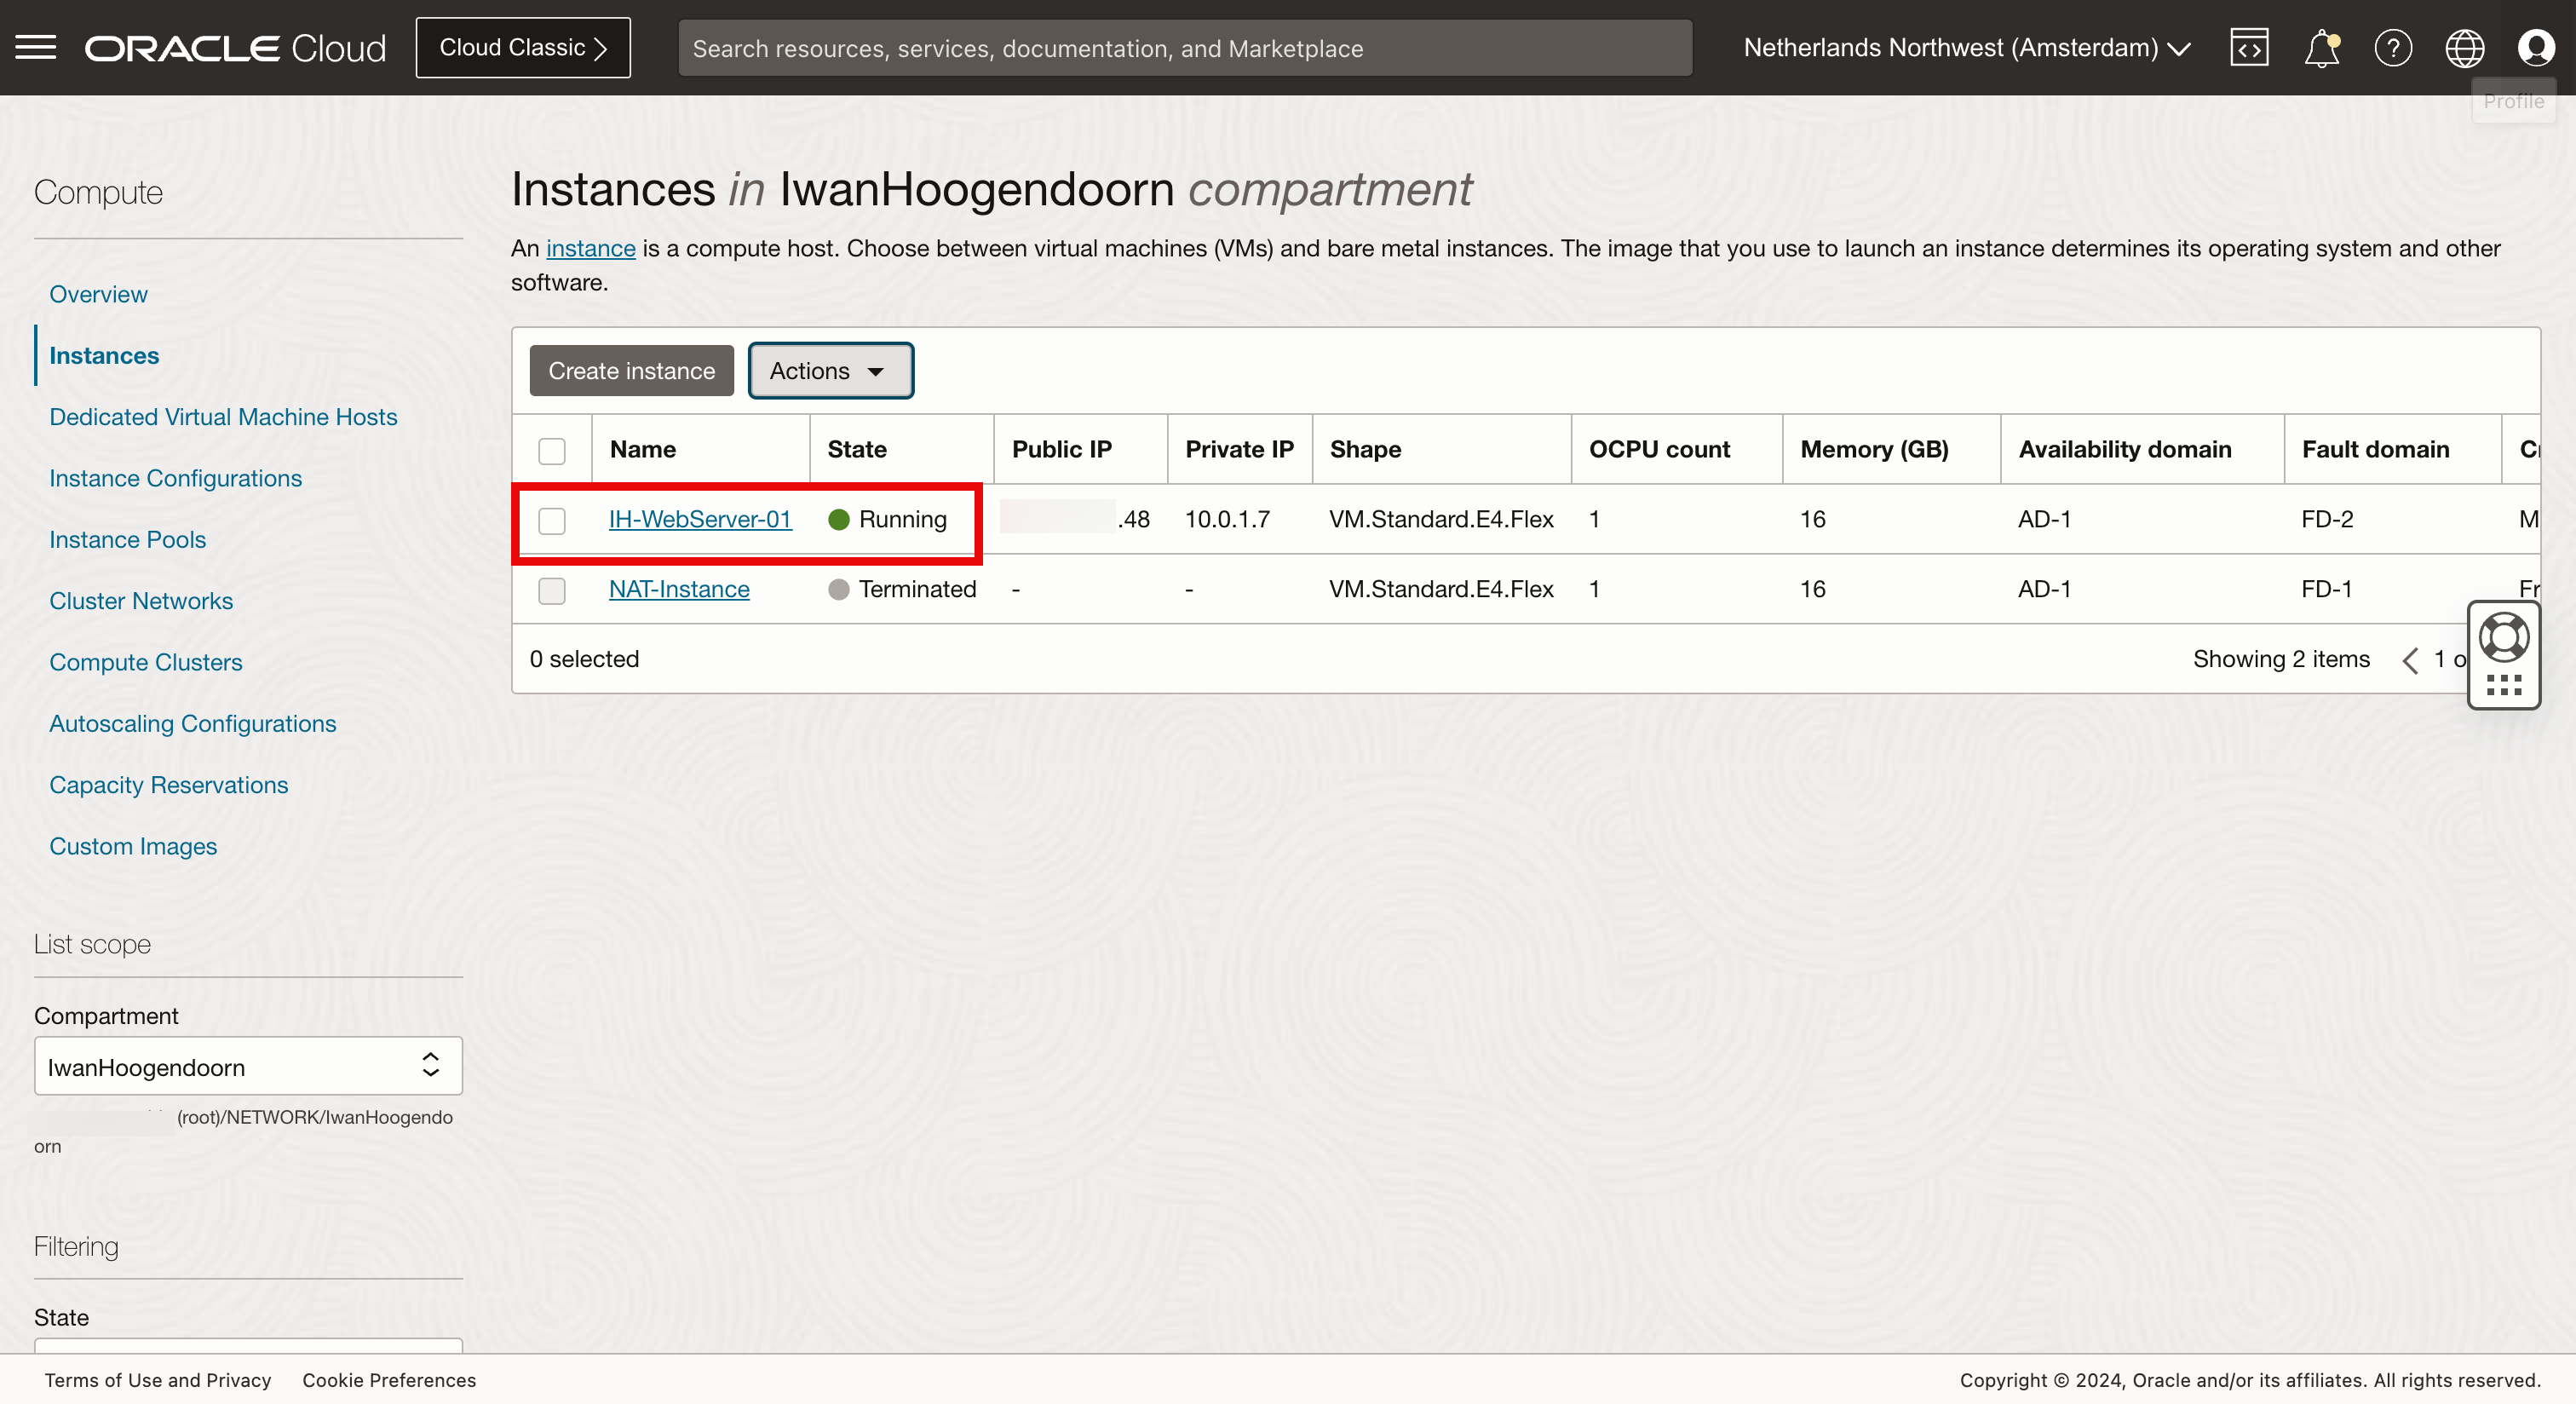
Click Instances to review the OCI Compute instances.
The public facing compute instance is up and running.
Task 4: Create a new MySQL Database engine
-
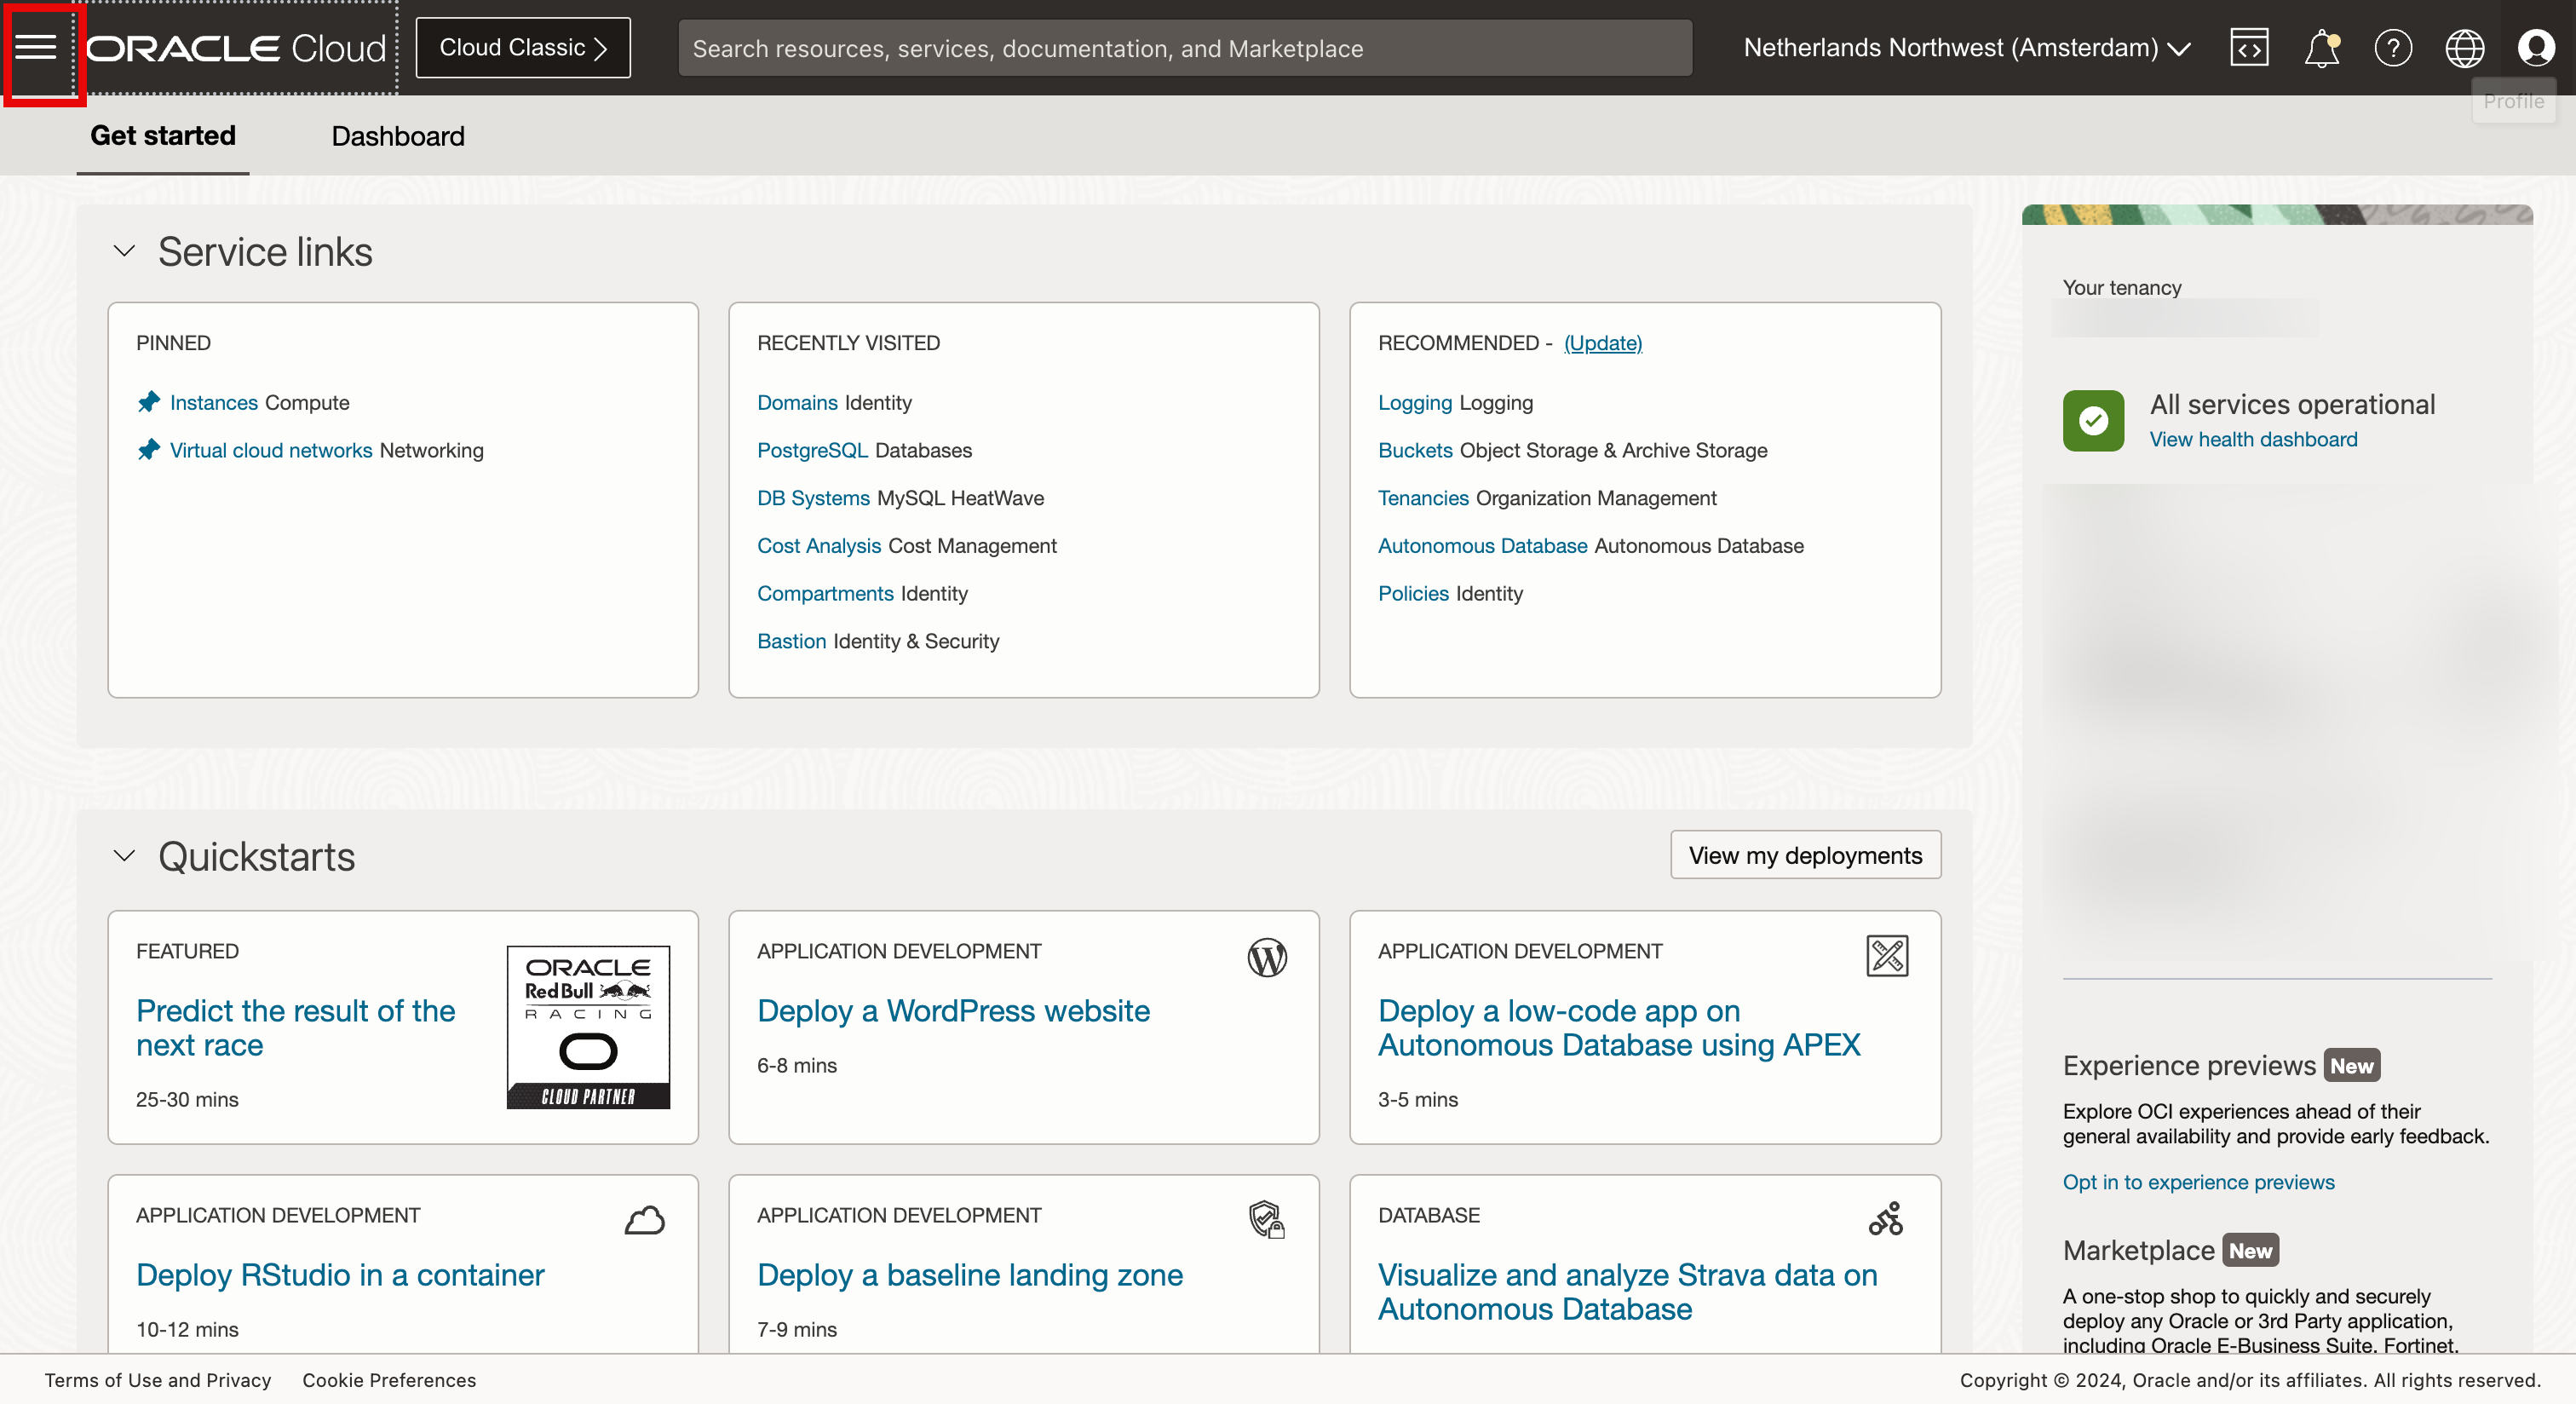
Click the hamburger menu from the upper left corner.
- Click Databases.
- Click MySQL HeatWave.
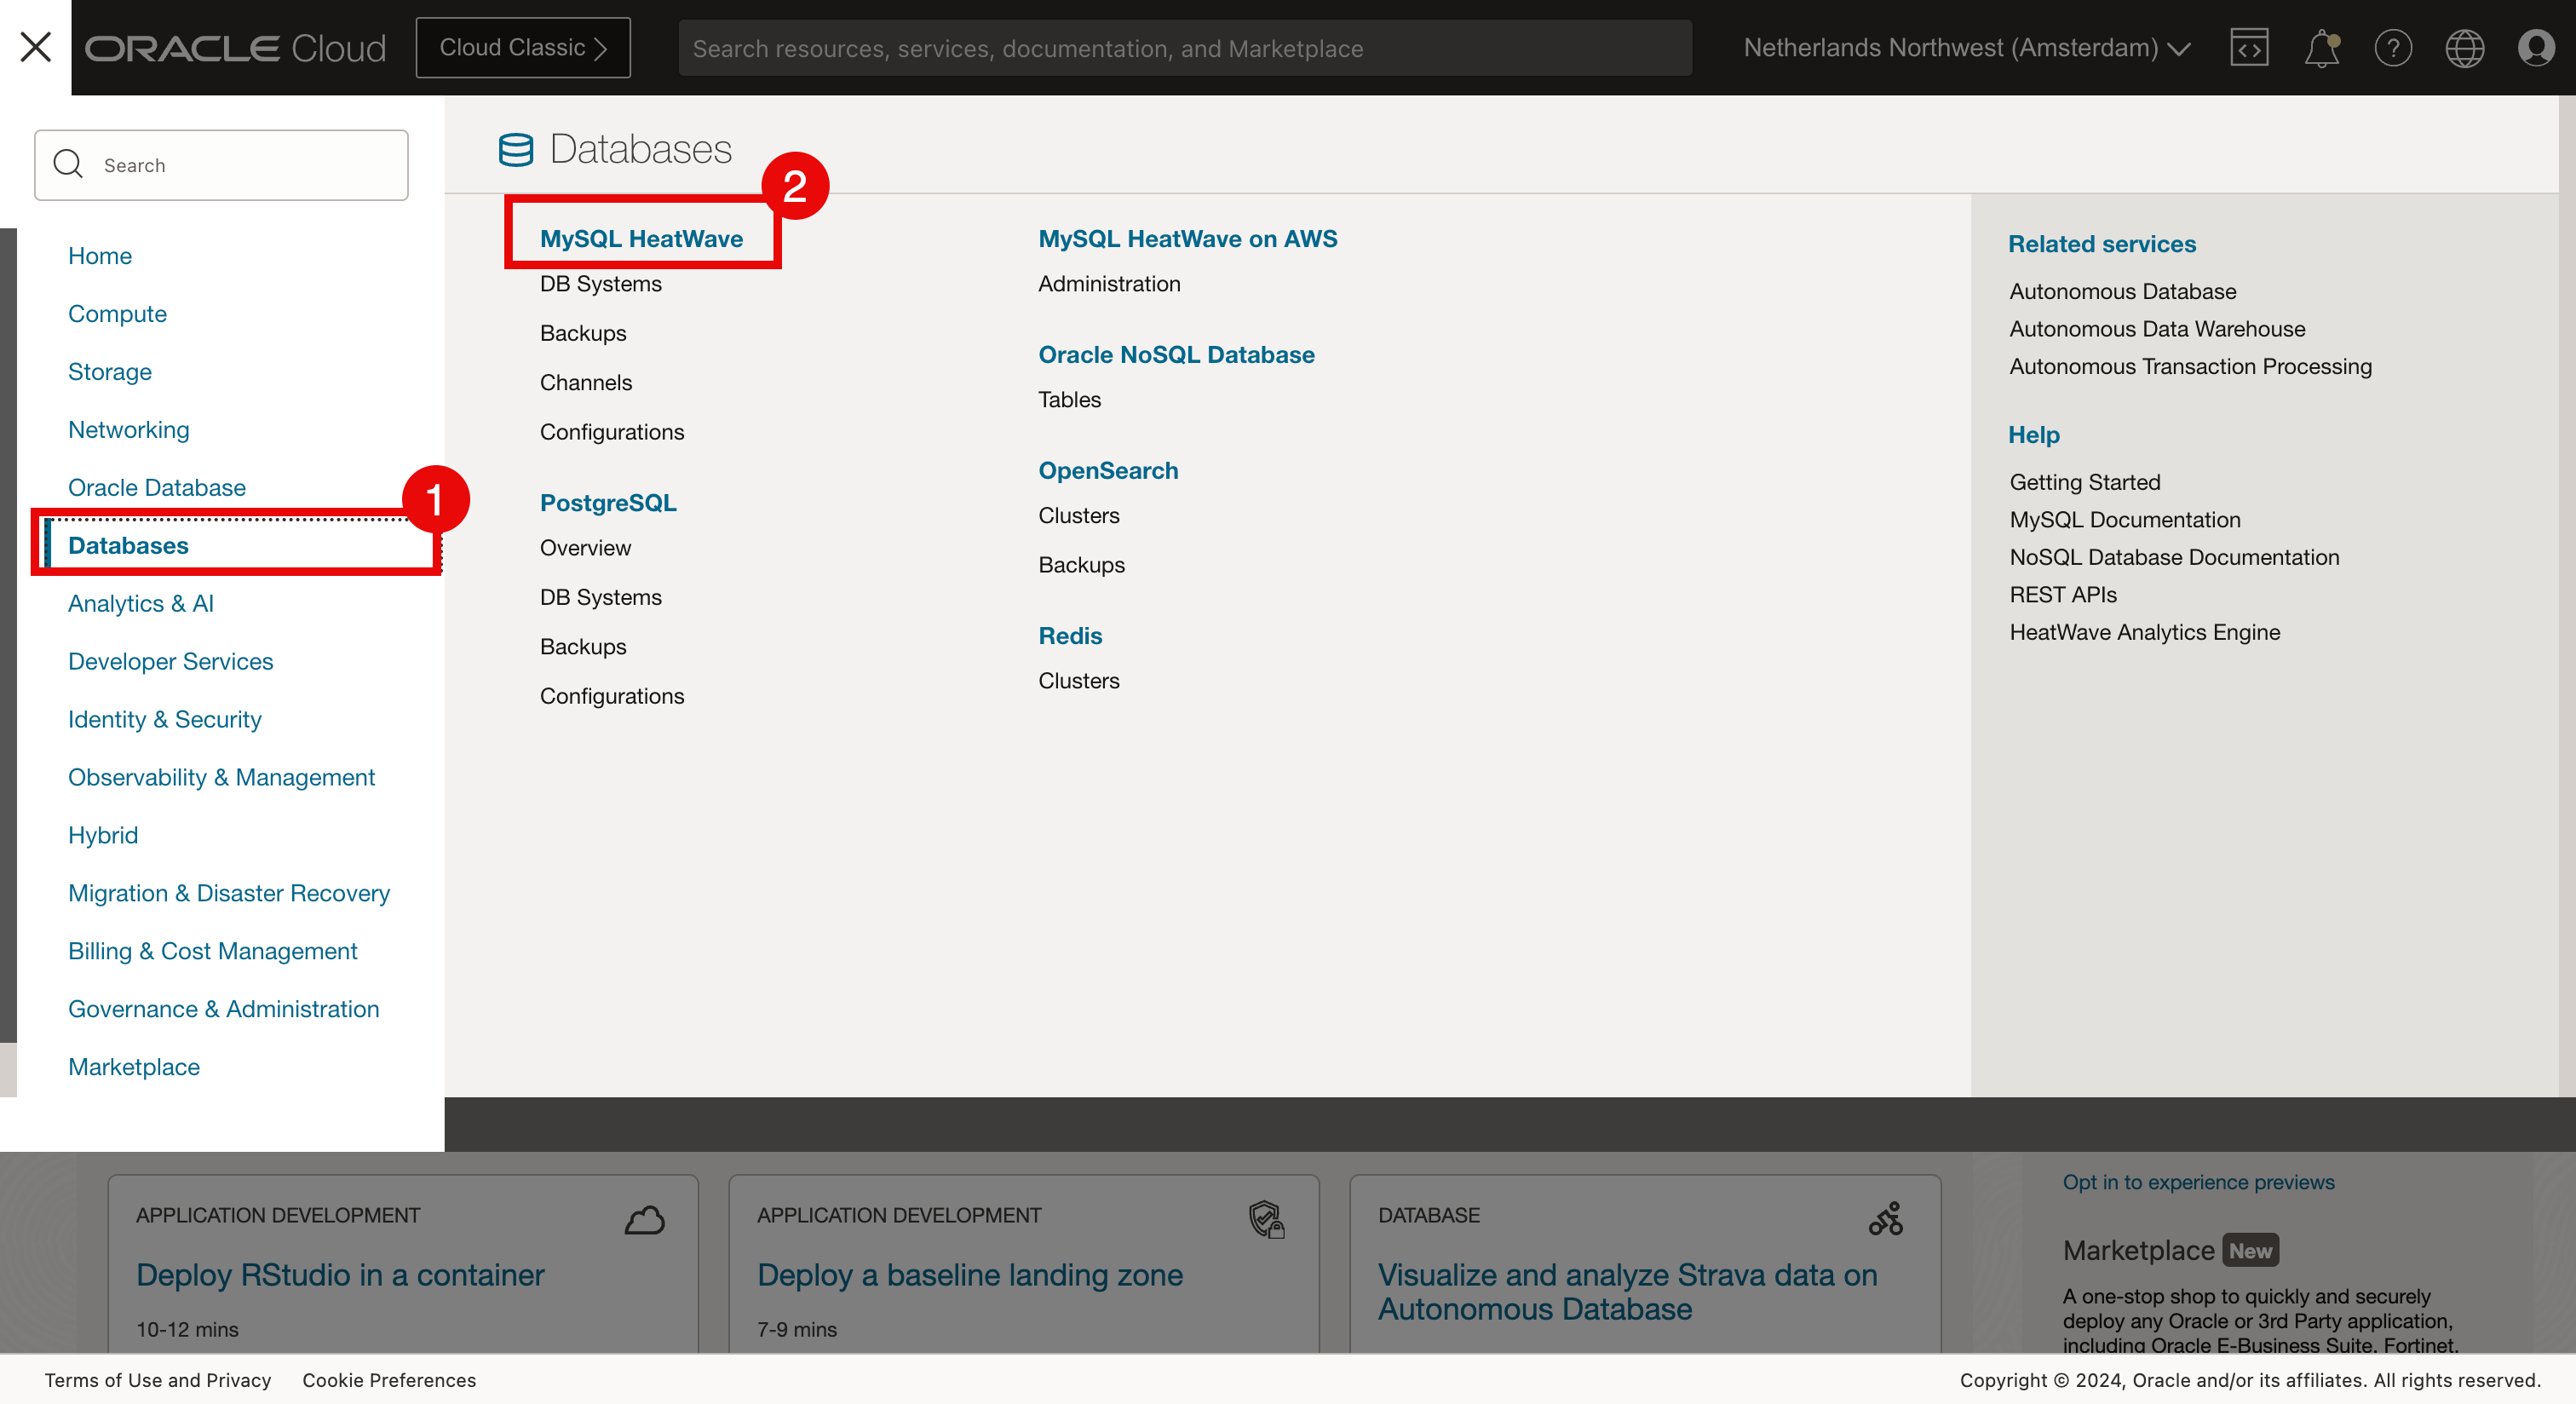
-
Click Create DB system.
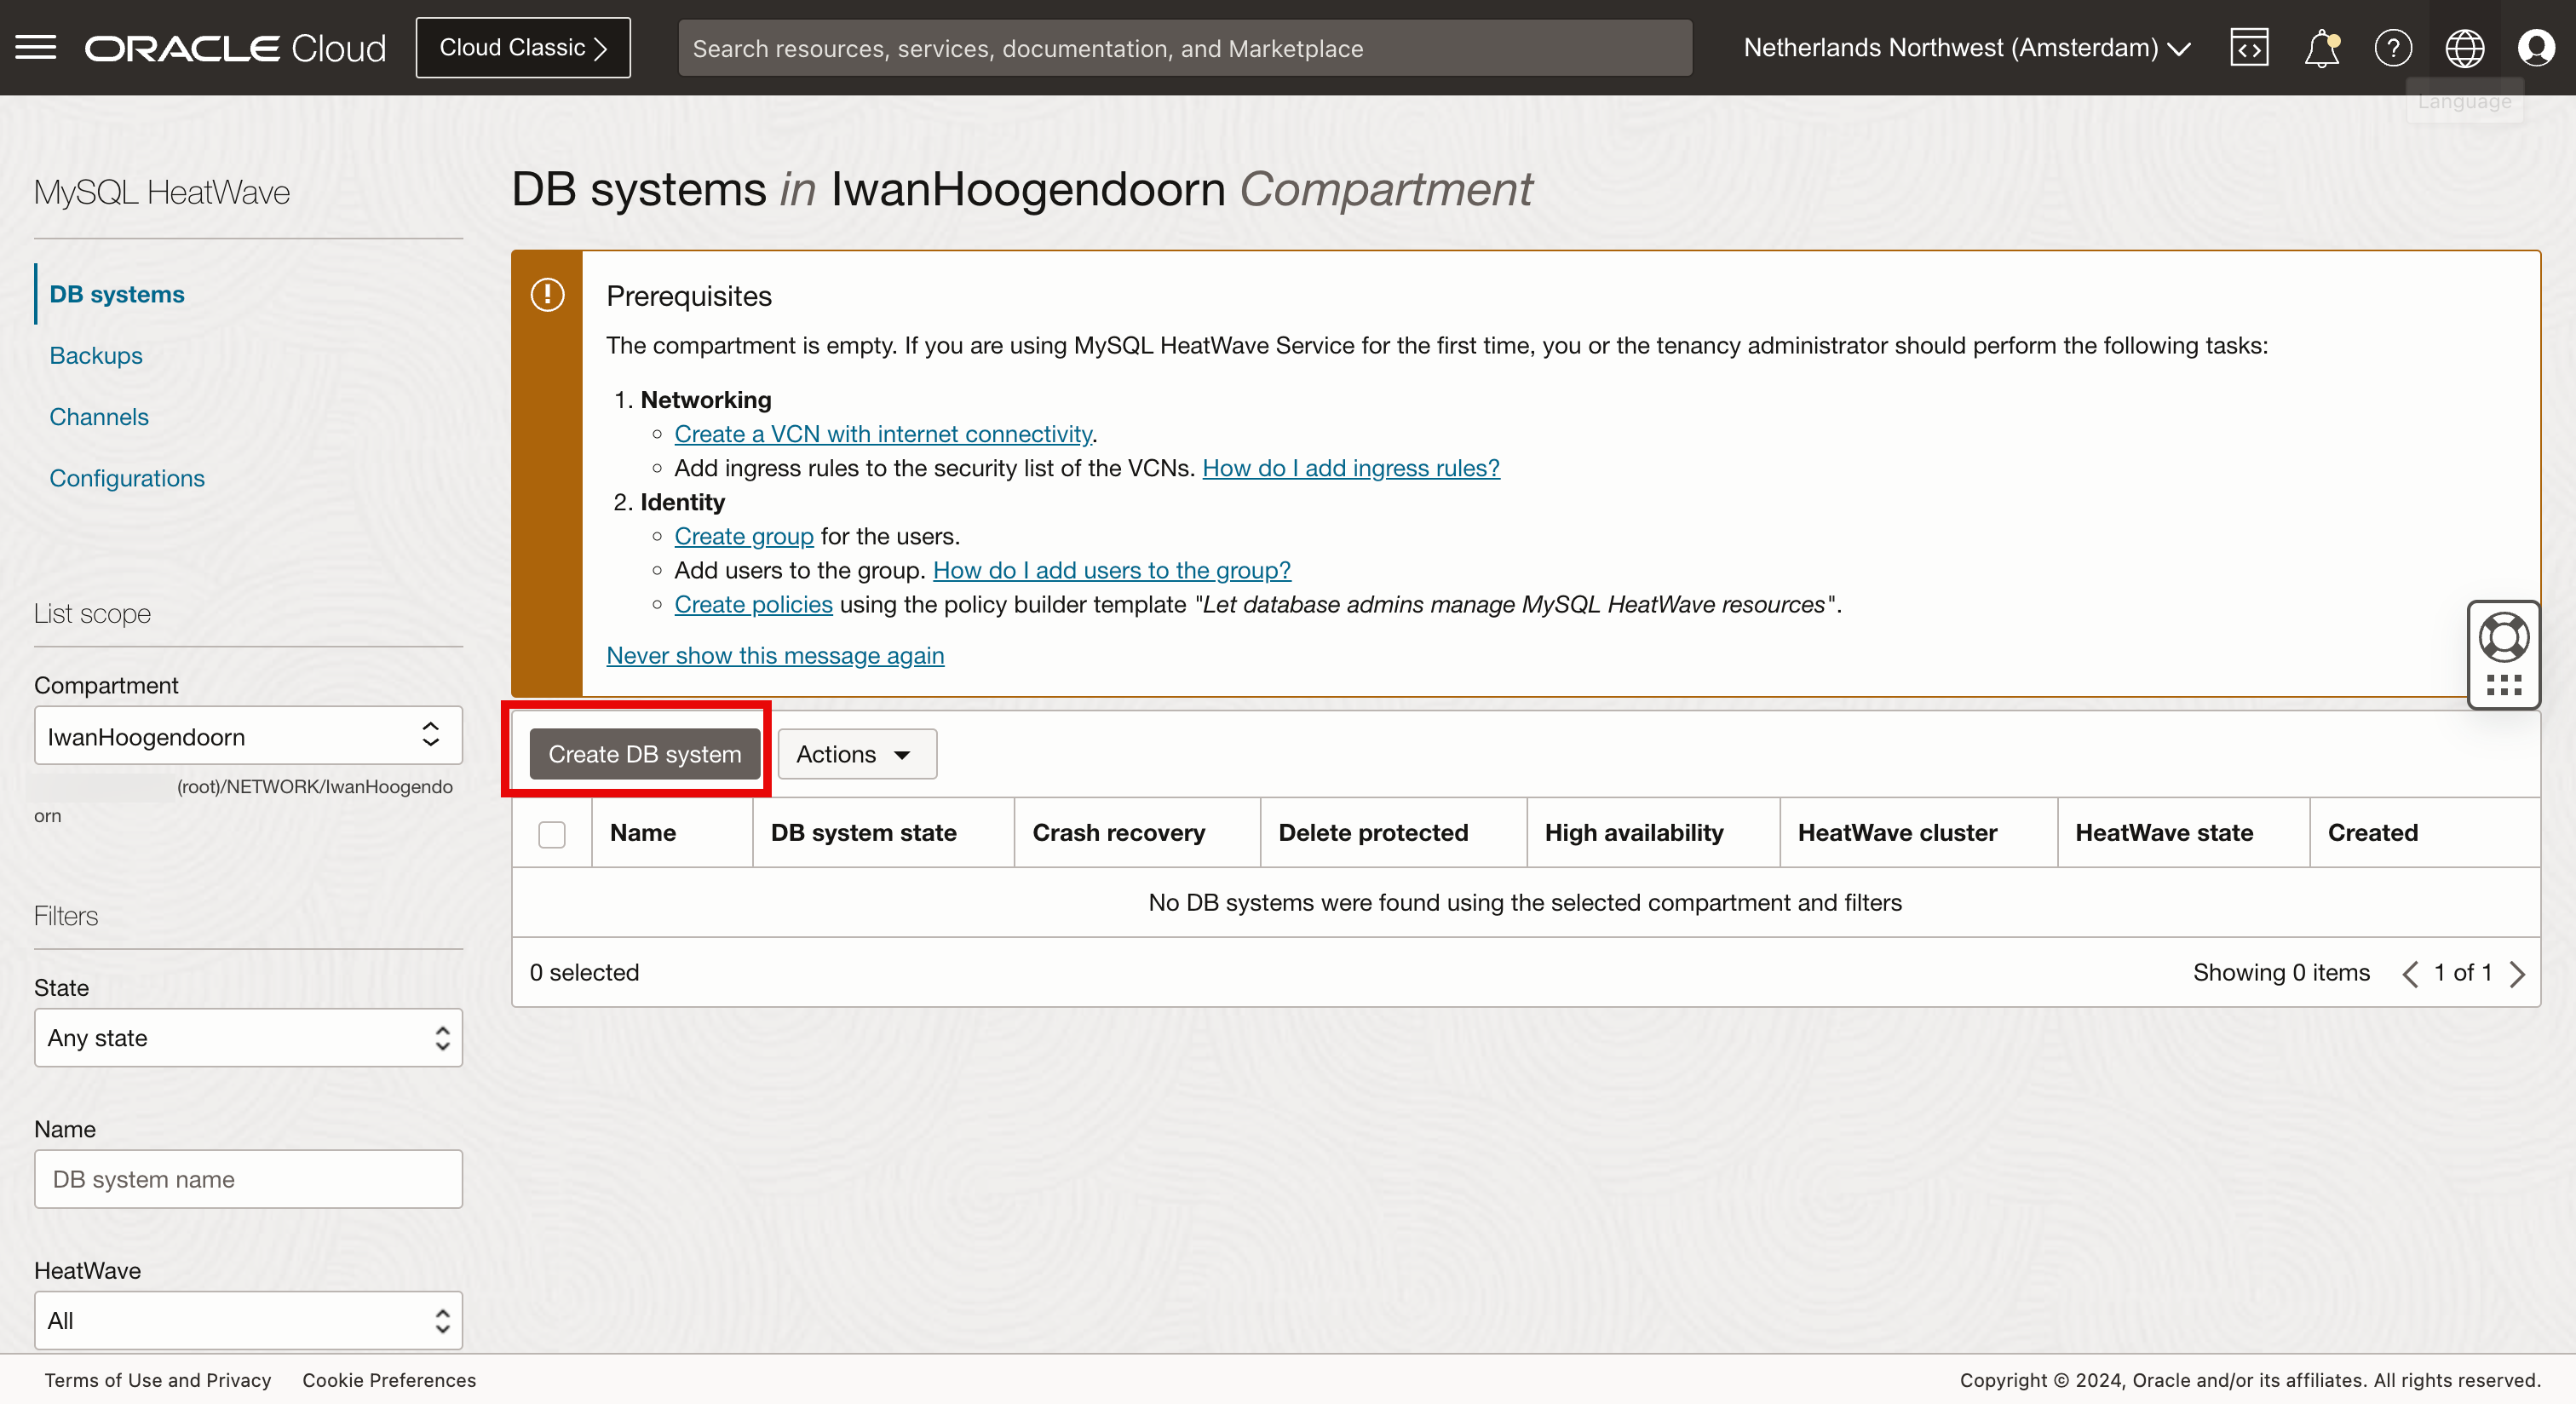
-
In Create DB system, enter the following information.
- Select Development or Testing.
- Enter a Name.
- Scroll down.
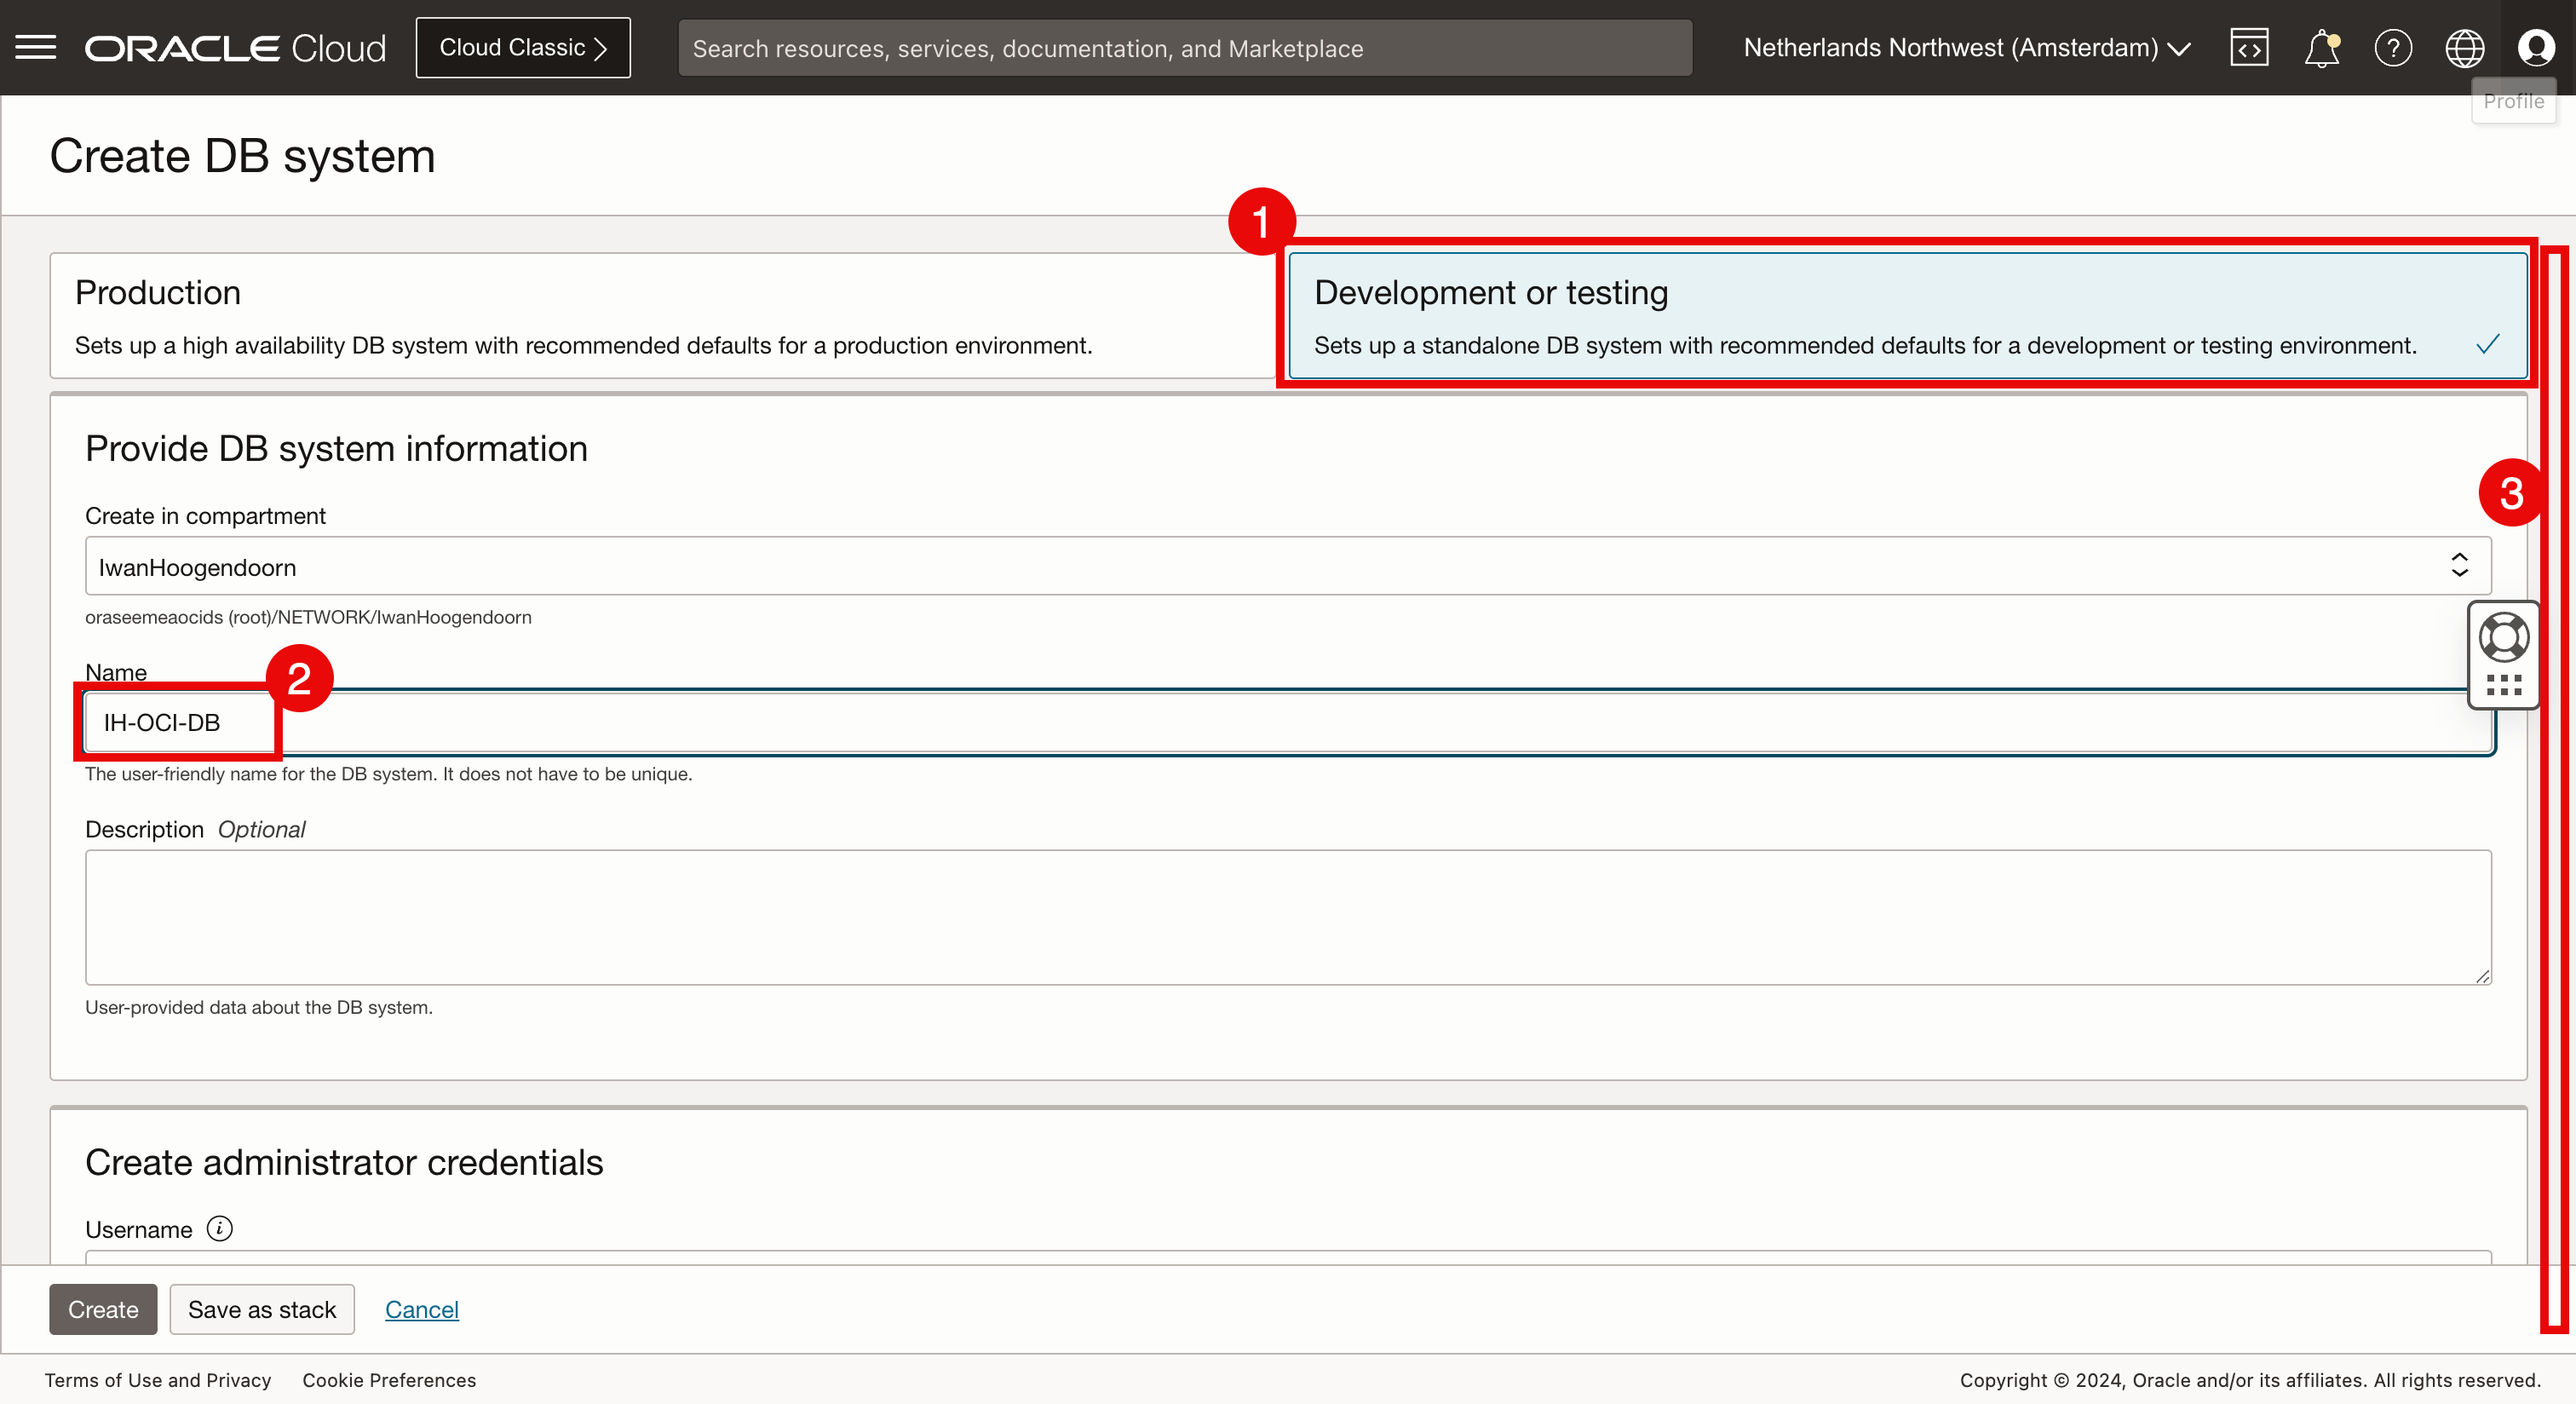
-
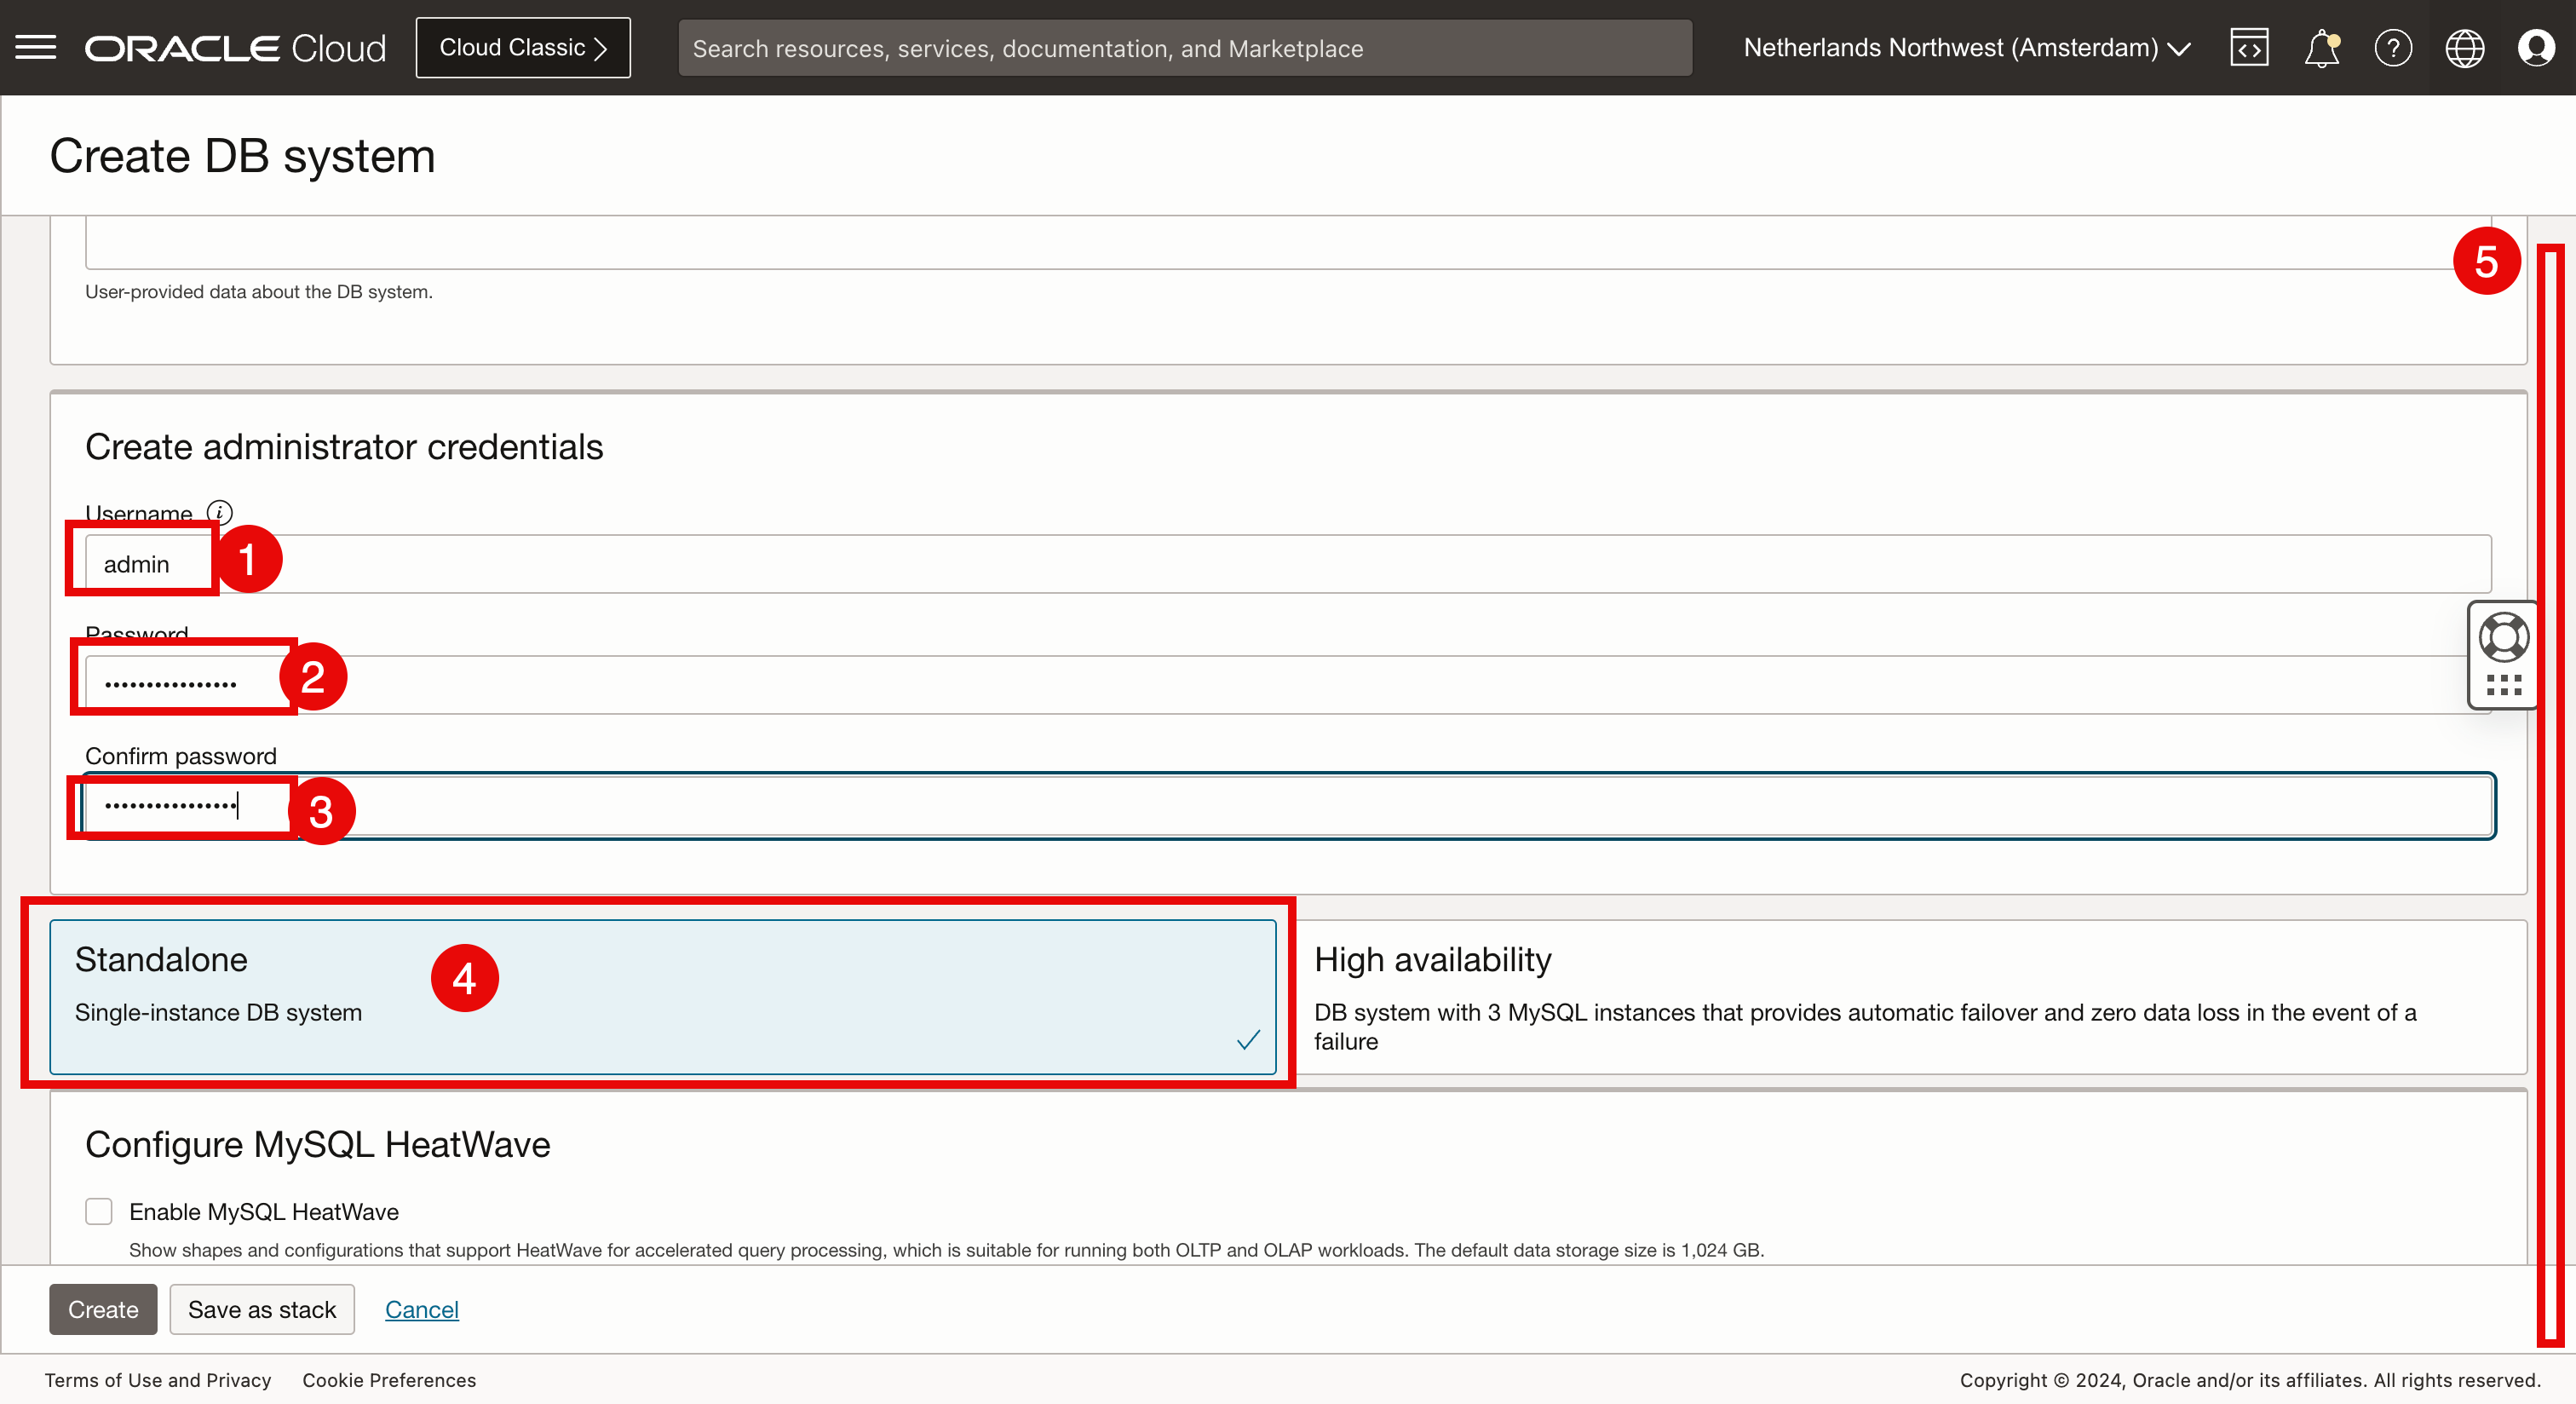
In the Create administrator credentials section, enter the following information.
- Enter the Username.
- Enter the Password.
- Enter the Confirm password.
- Select Standalone.
- Scroll down.
- Select the VCN for the database.
- Select the private subnet to connect the database.
- Scroll down.
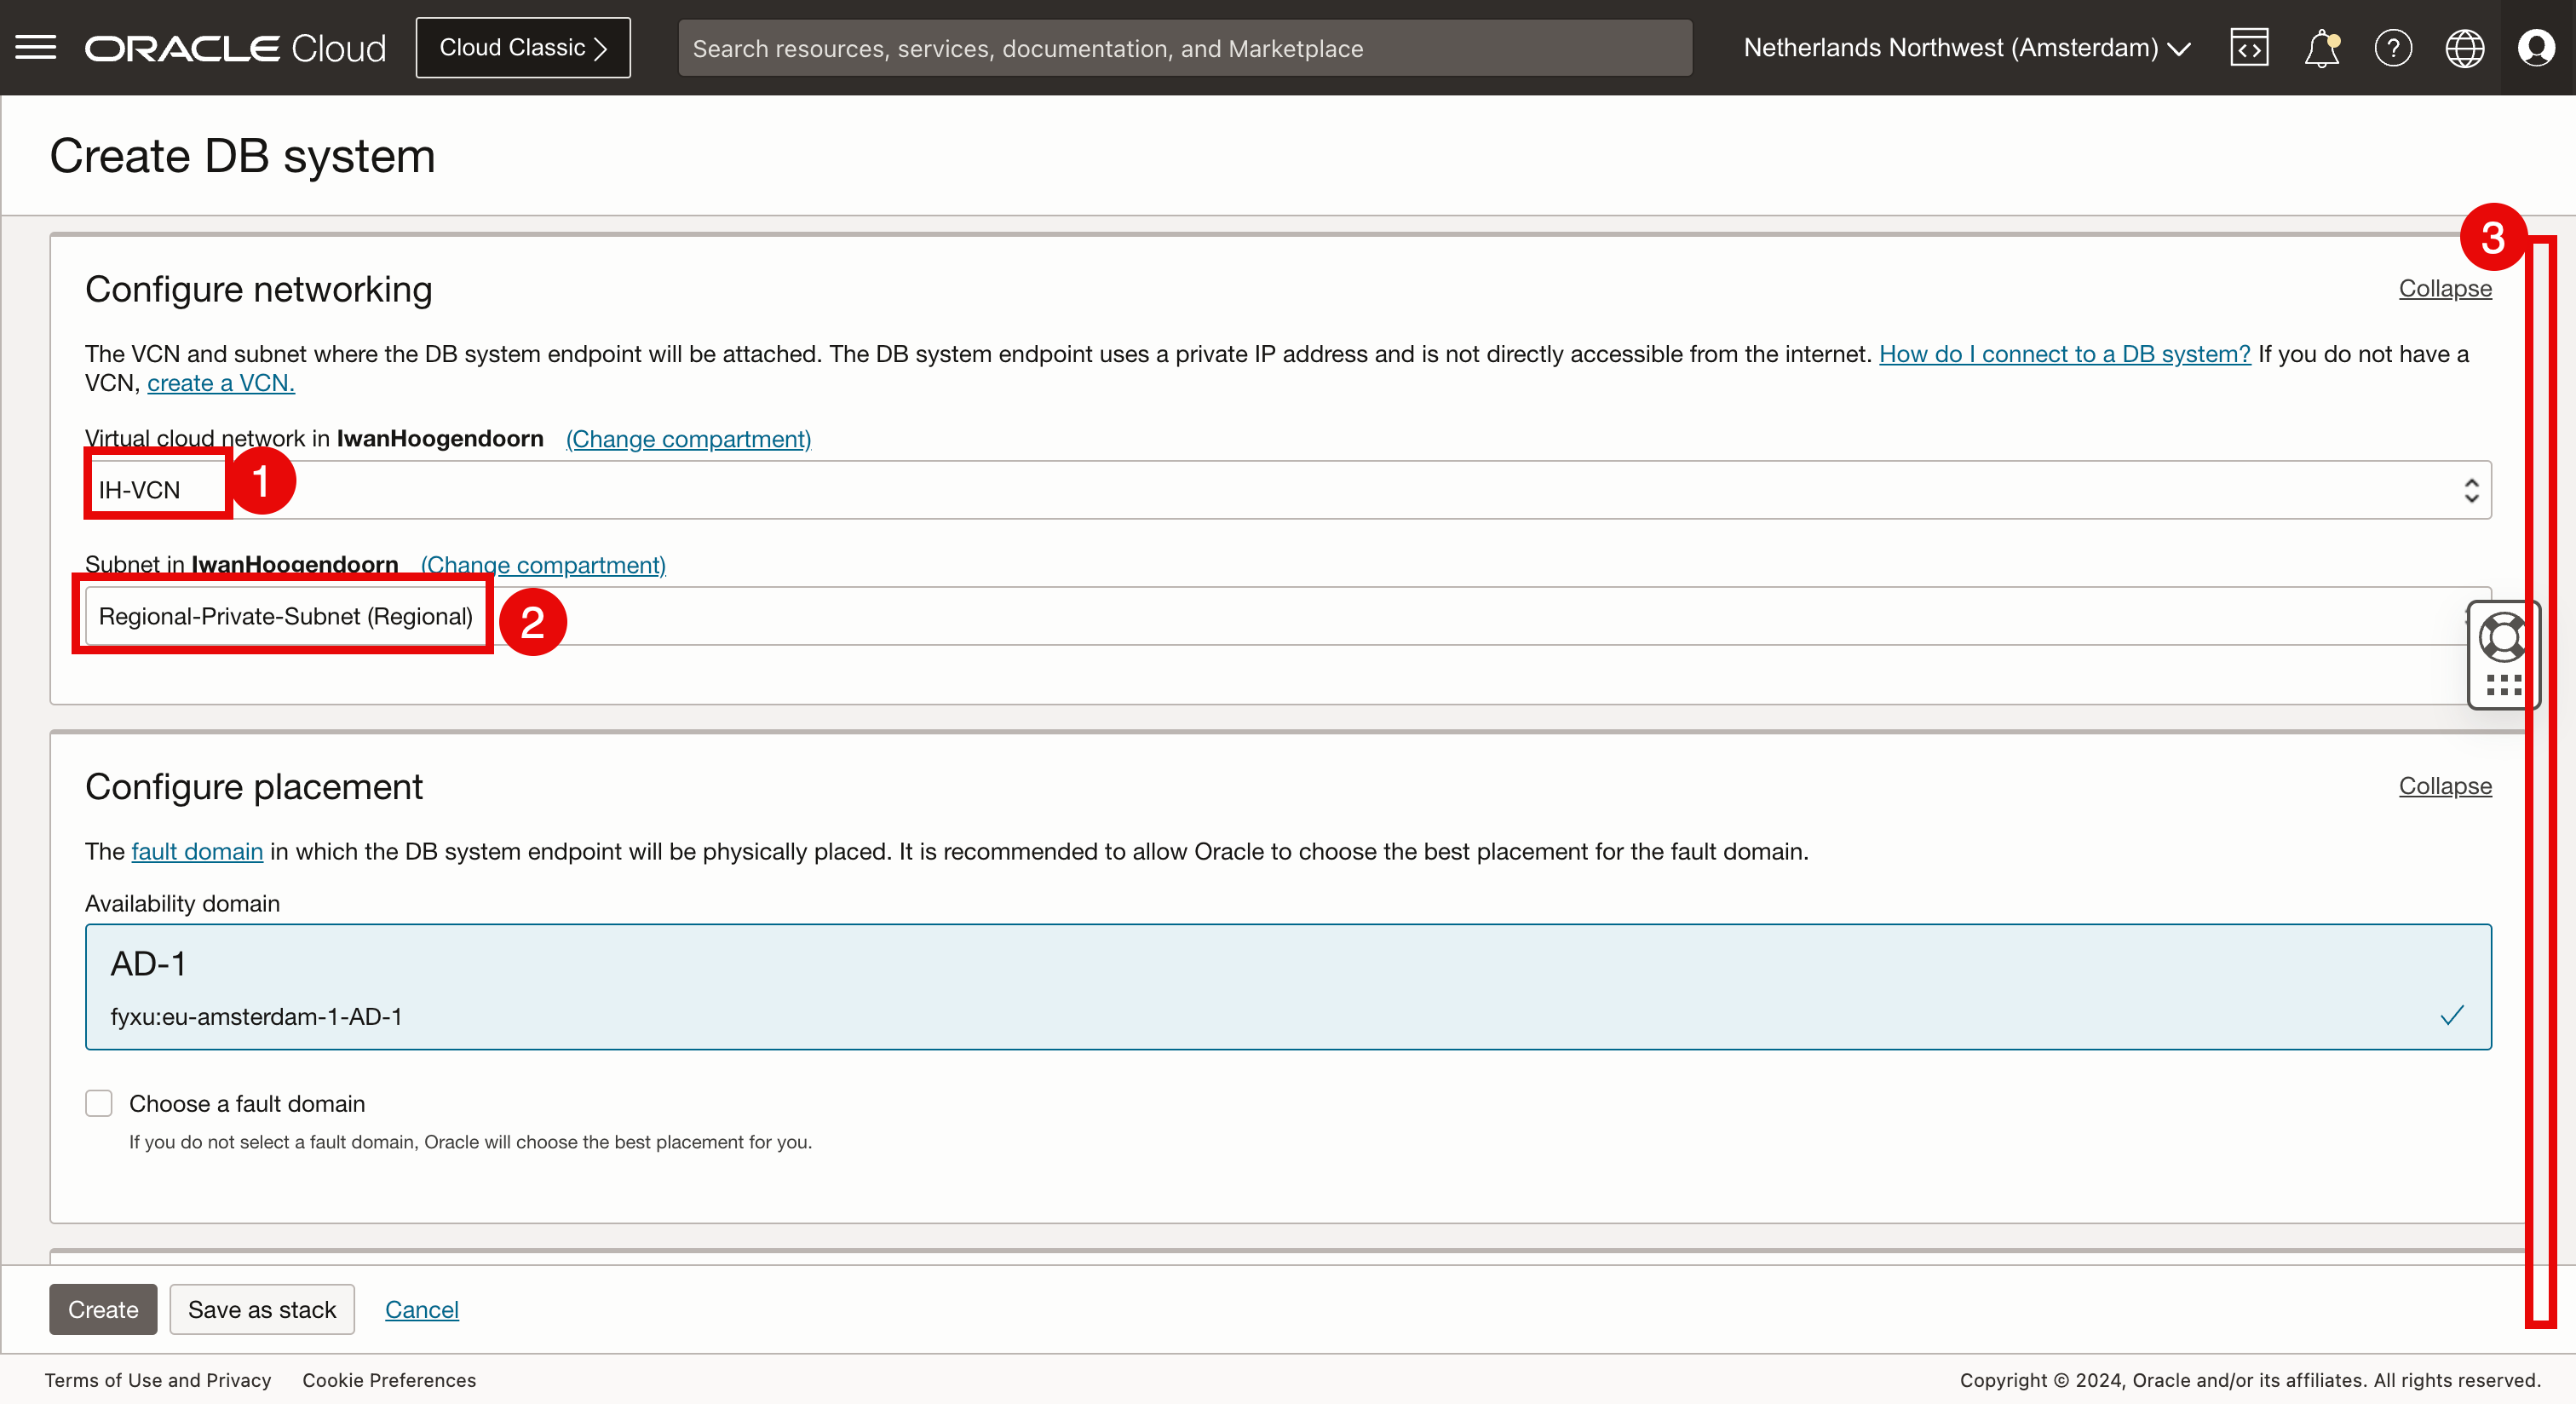
-
Scroll down.
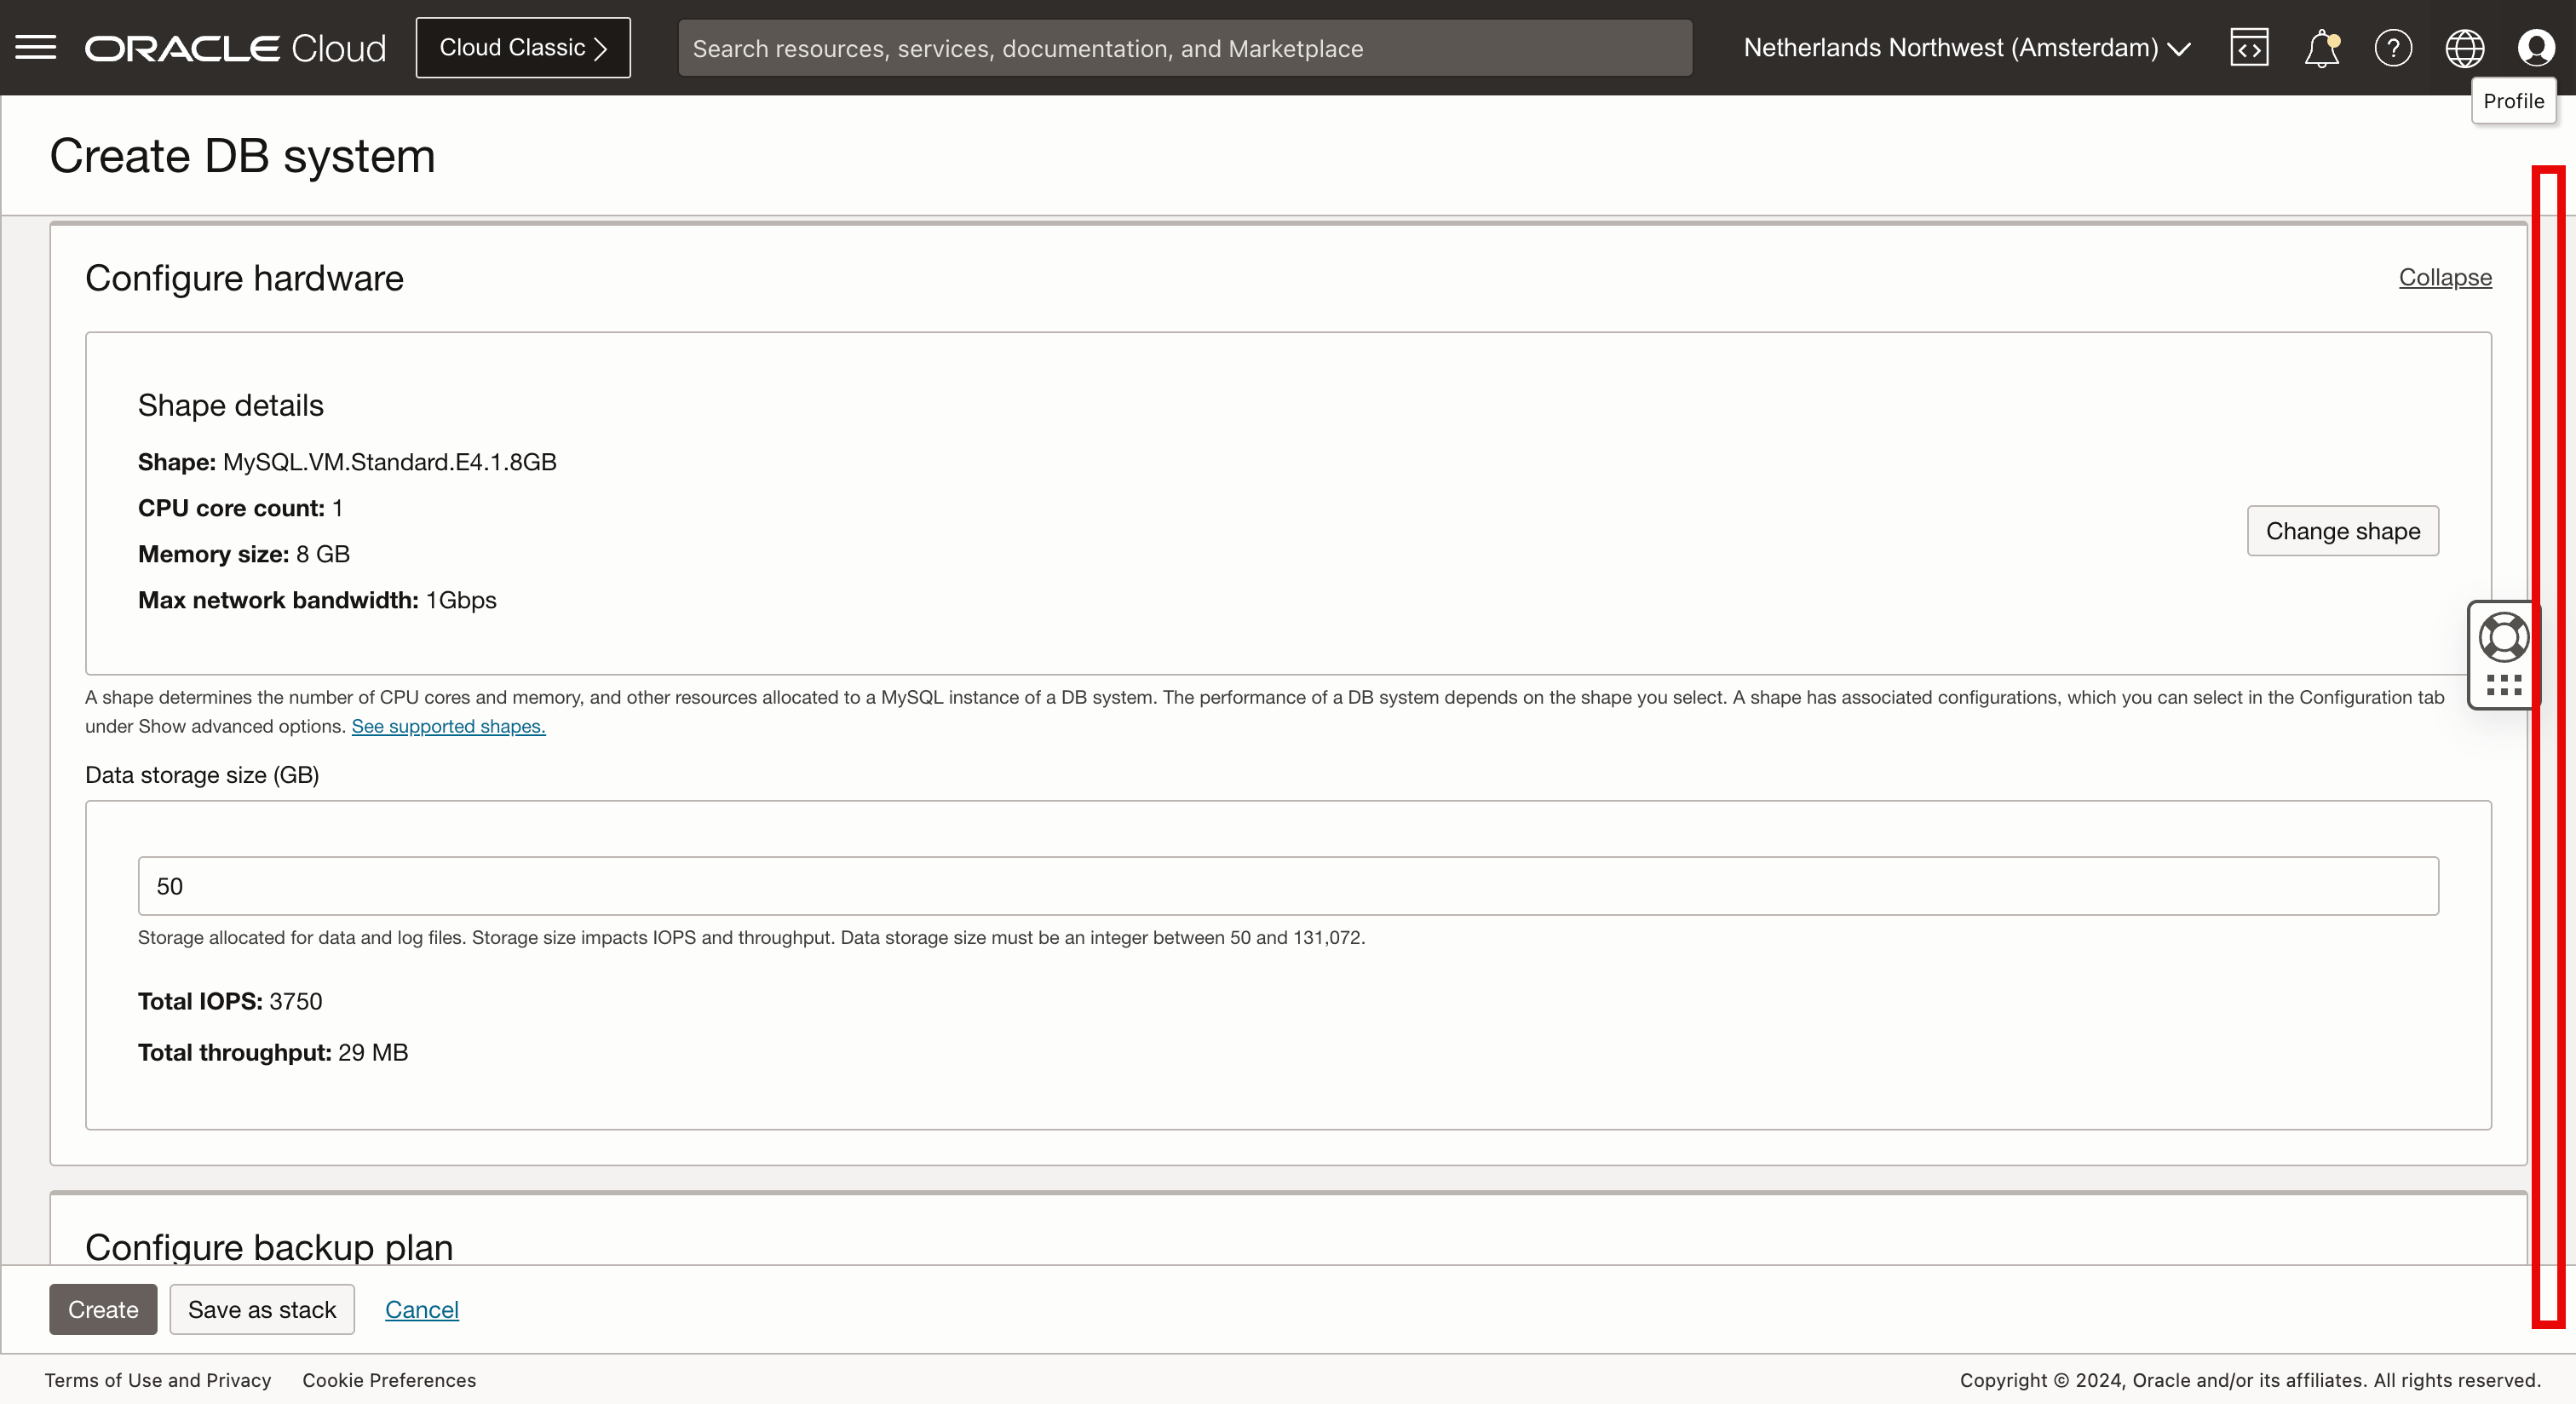
-
Click Create to create the database.
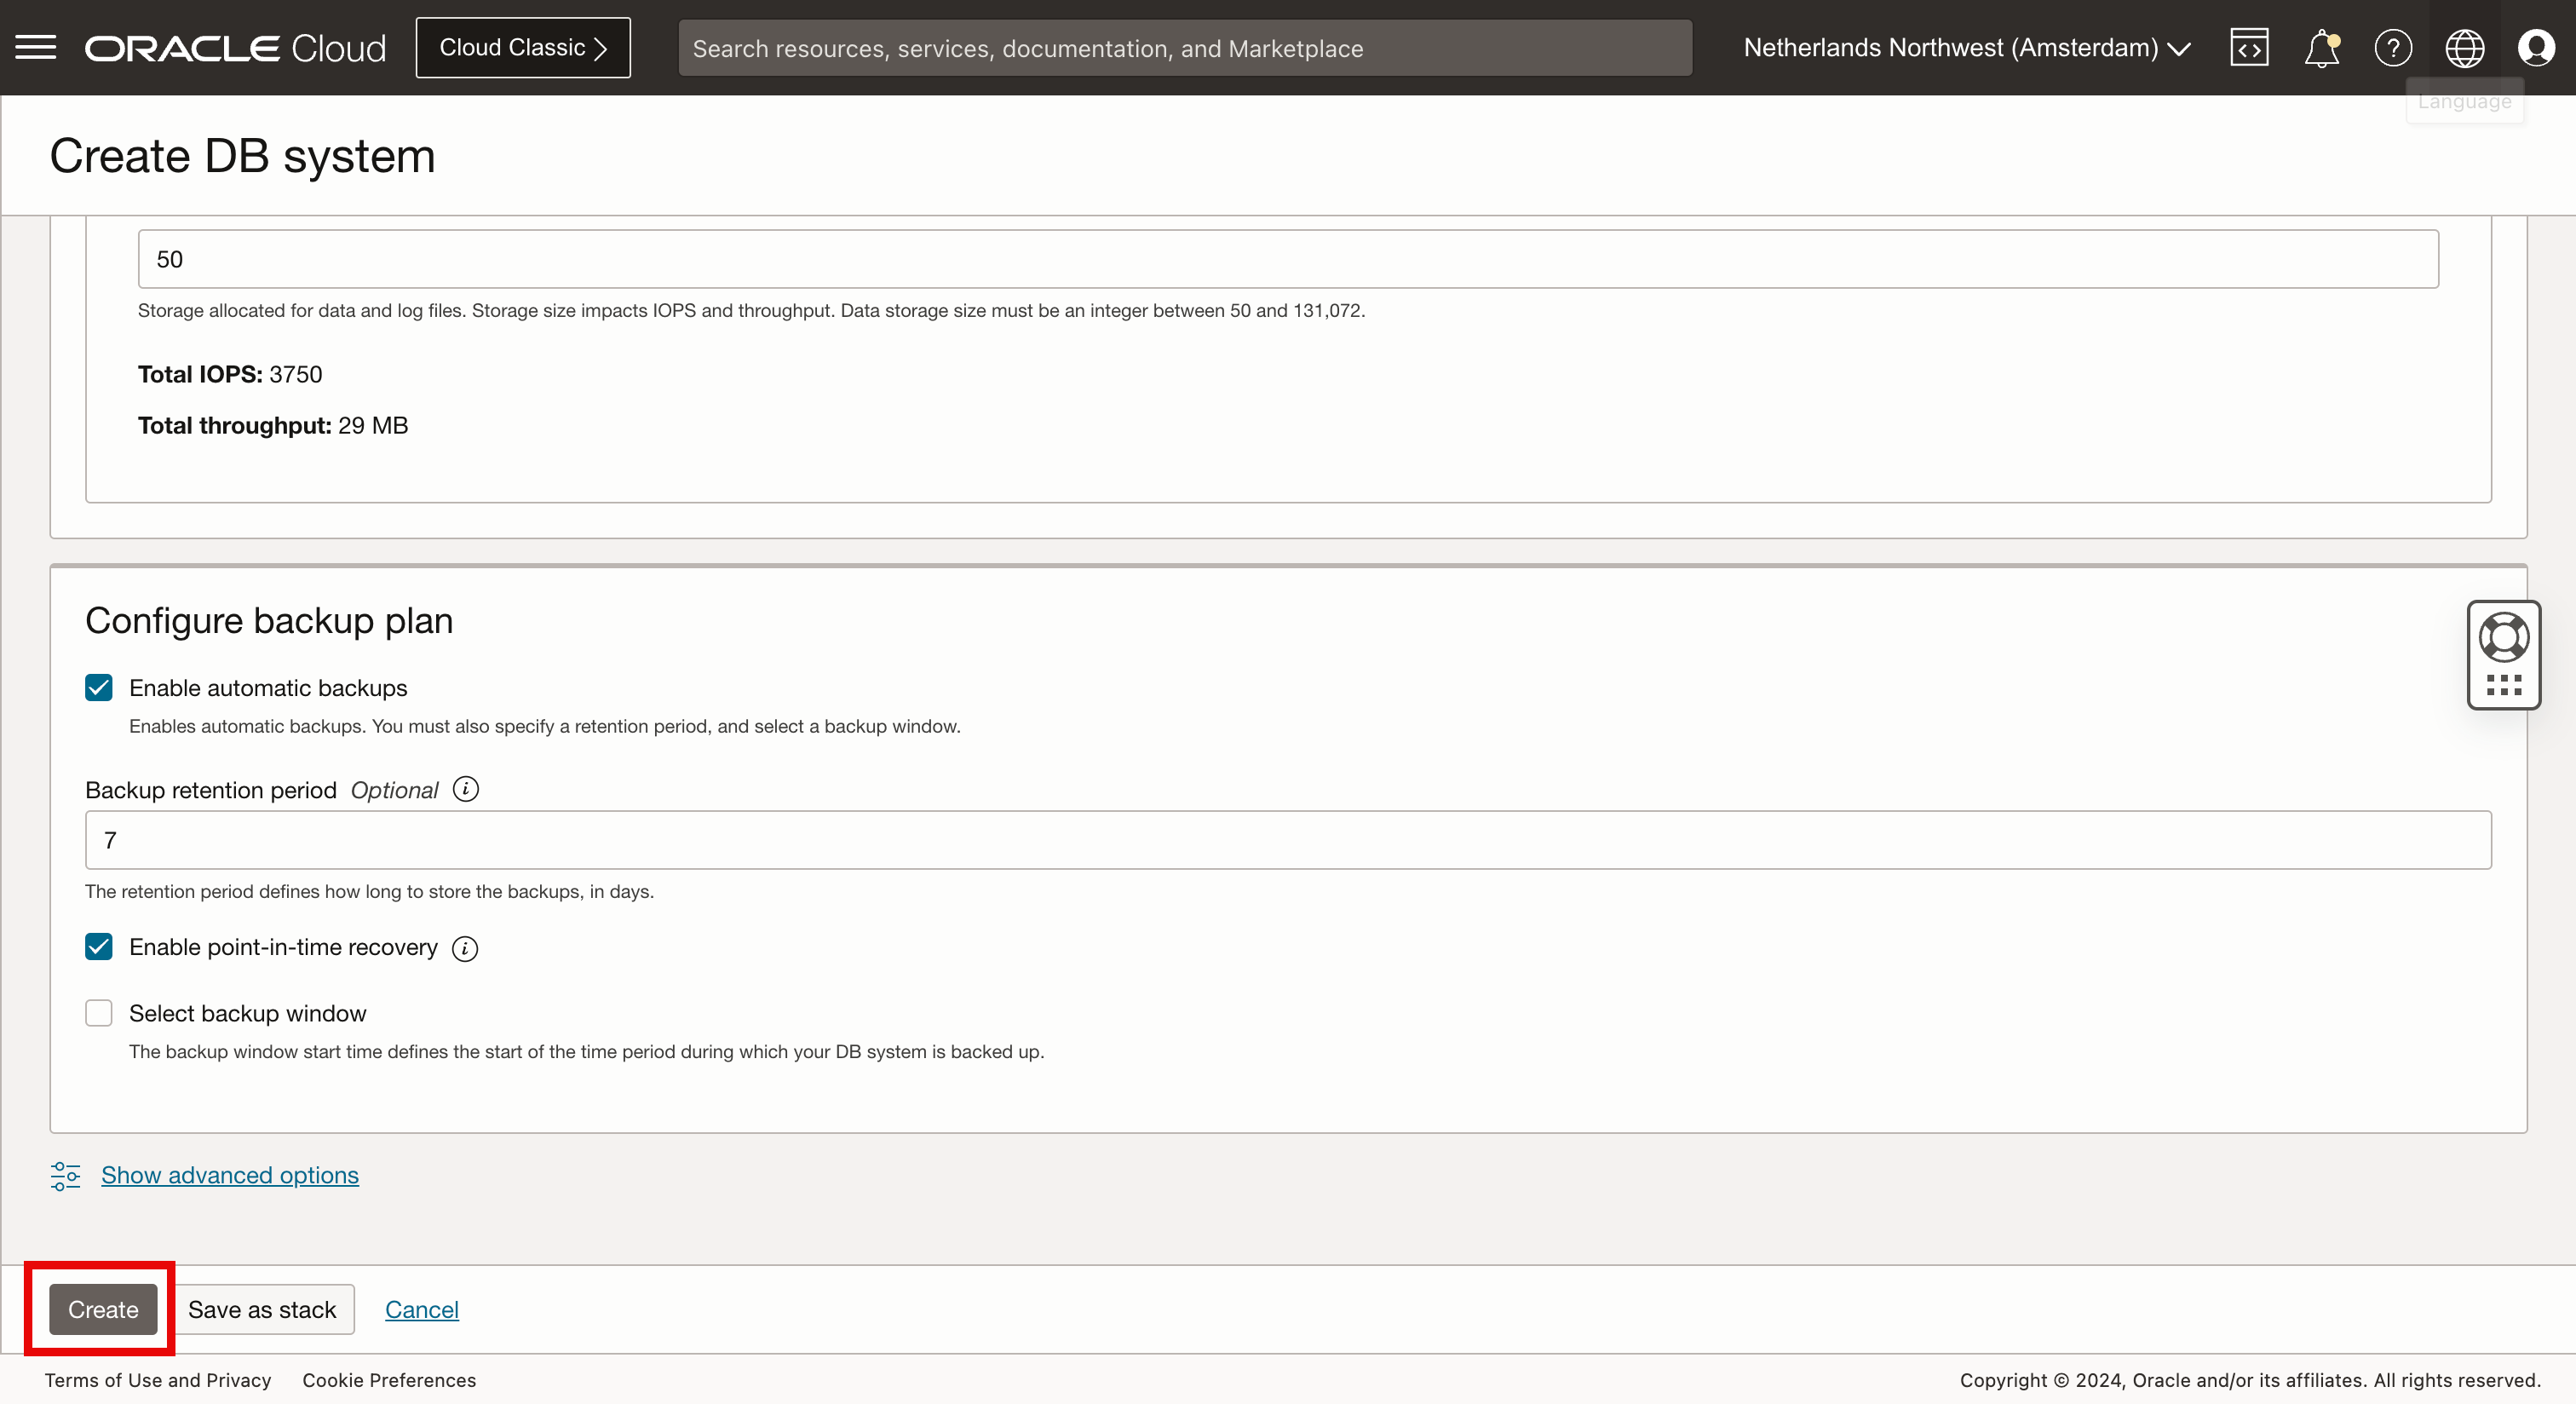
-
Review that the database status is CREATING.
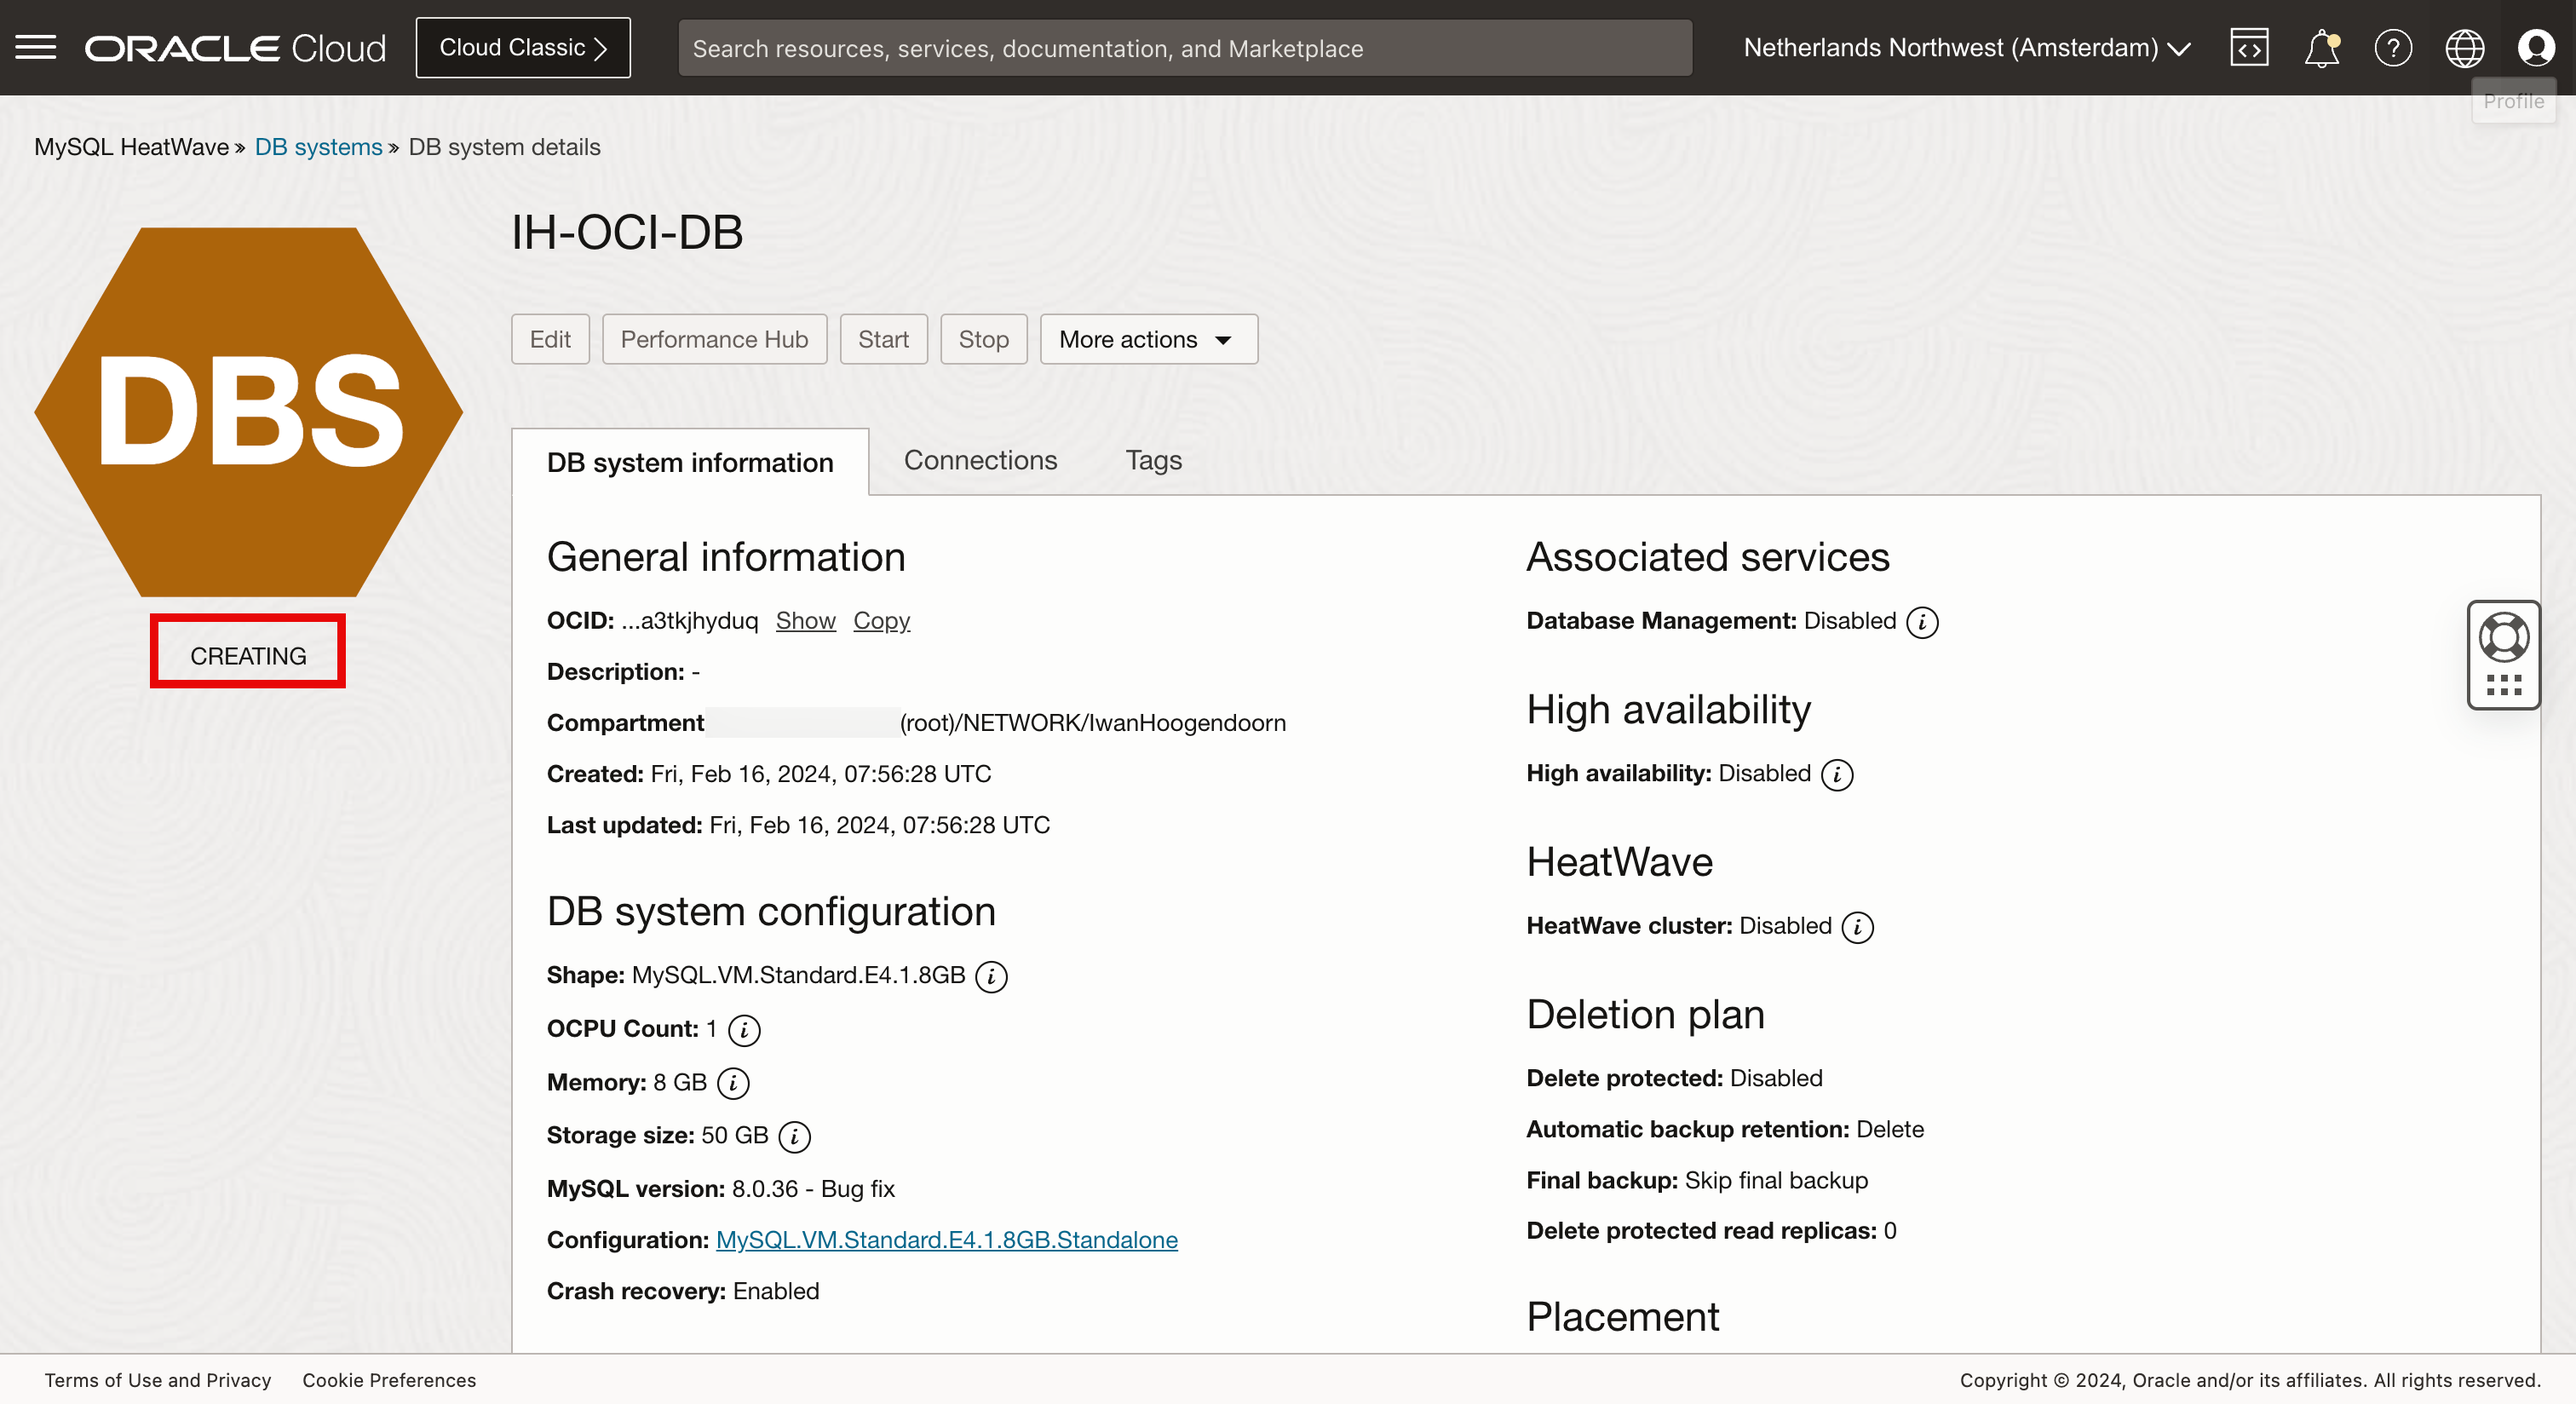
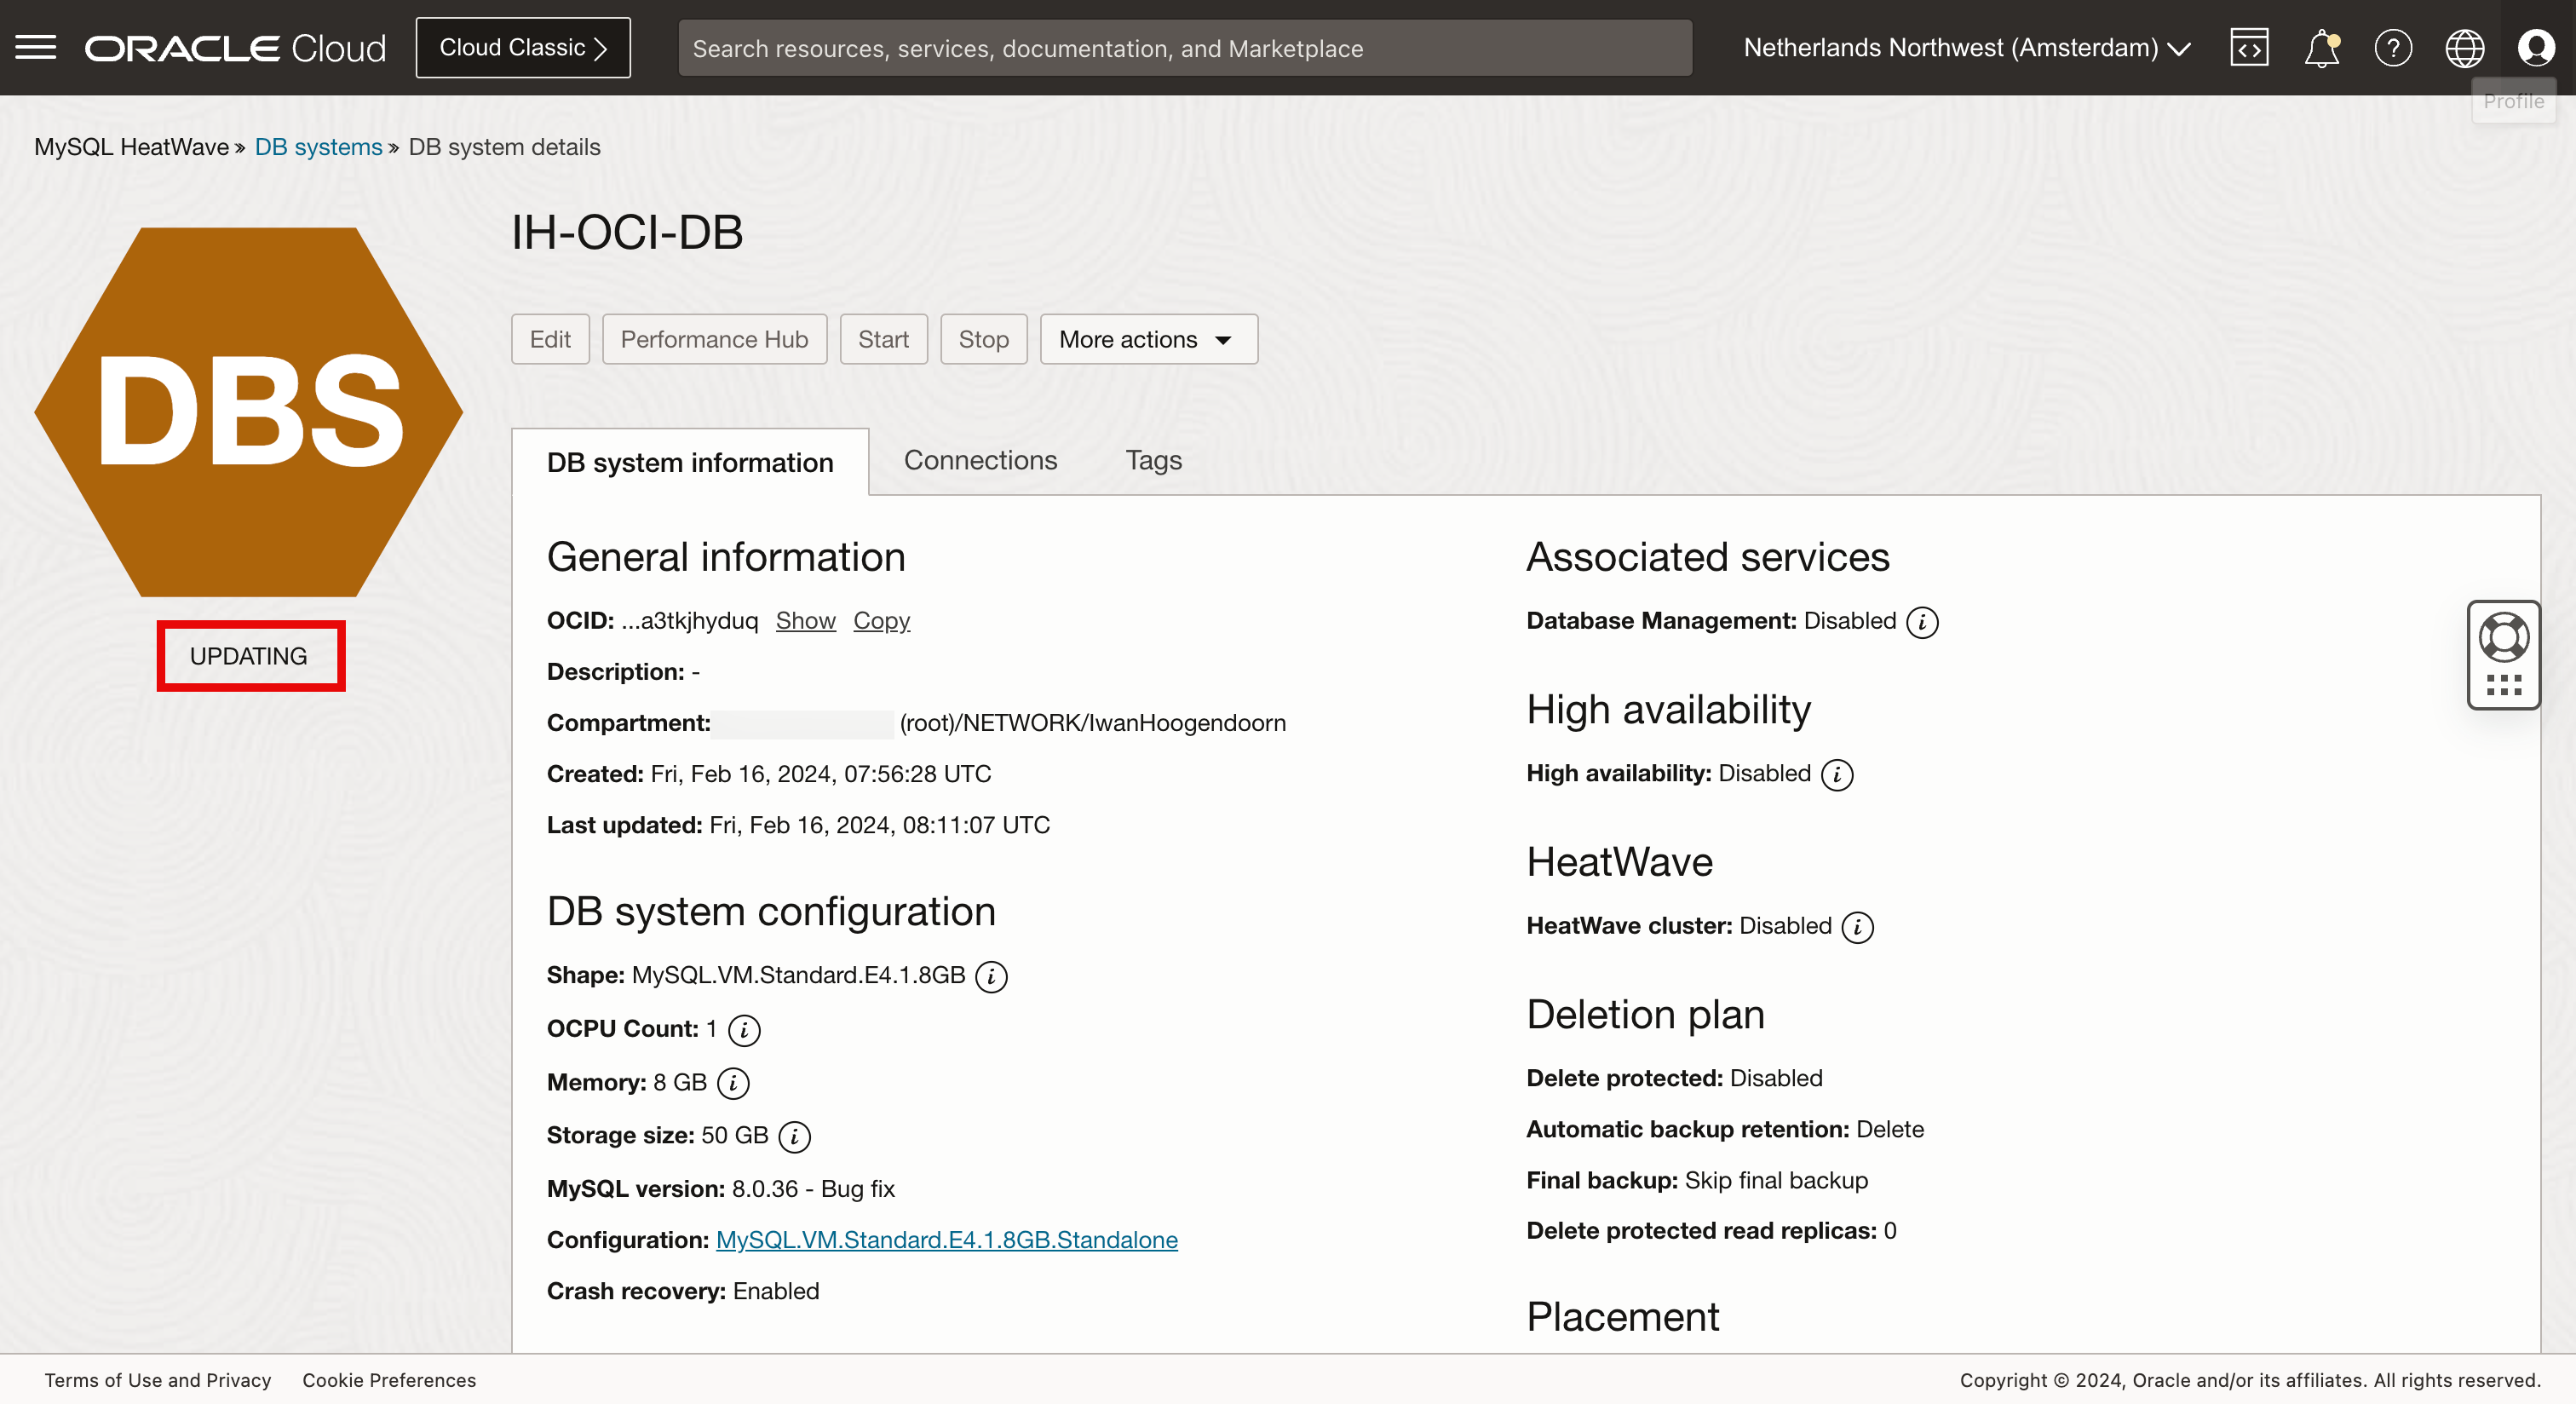
Review that the database status is UPDATING.
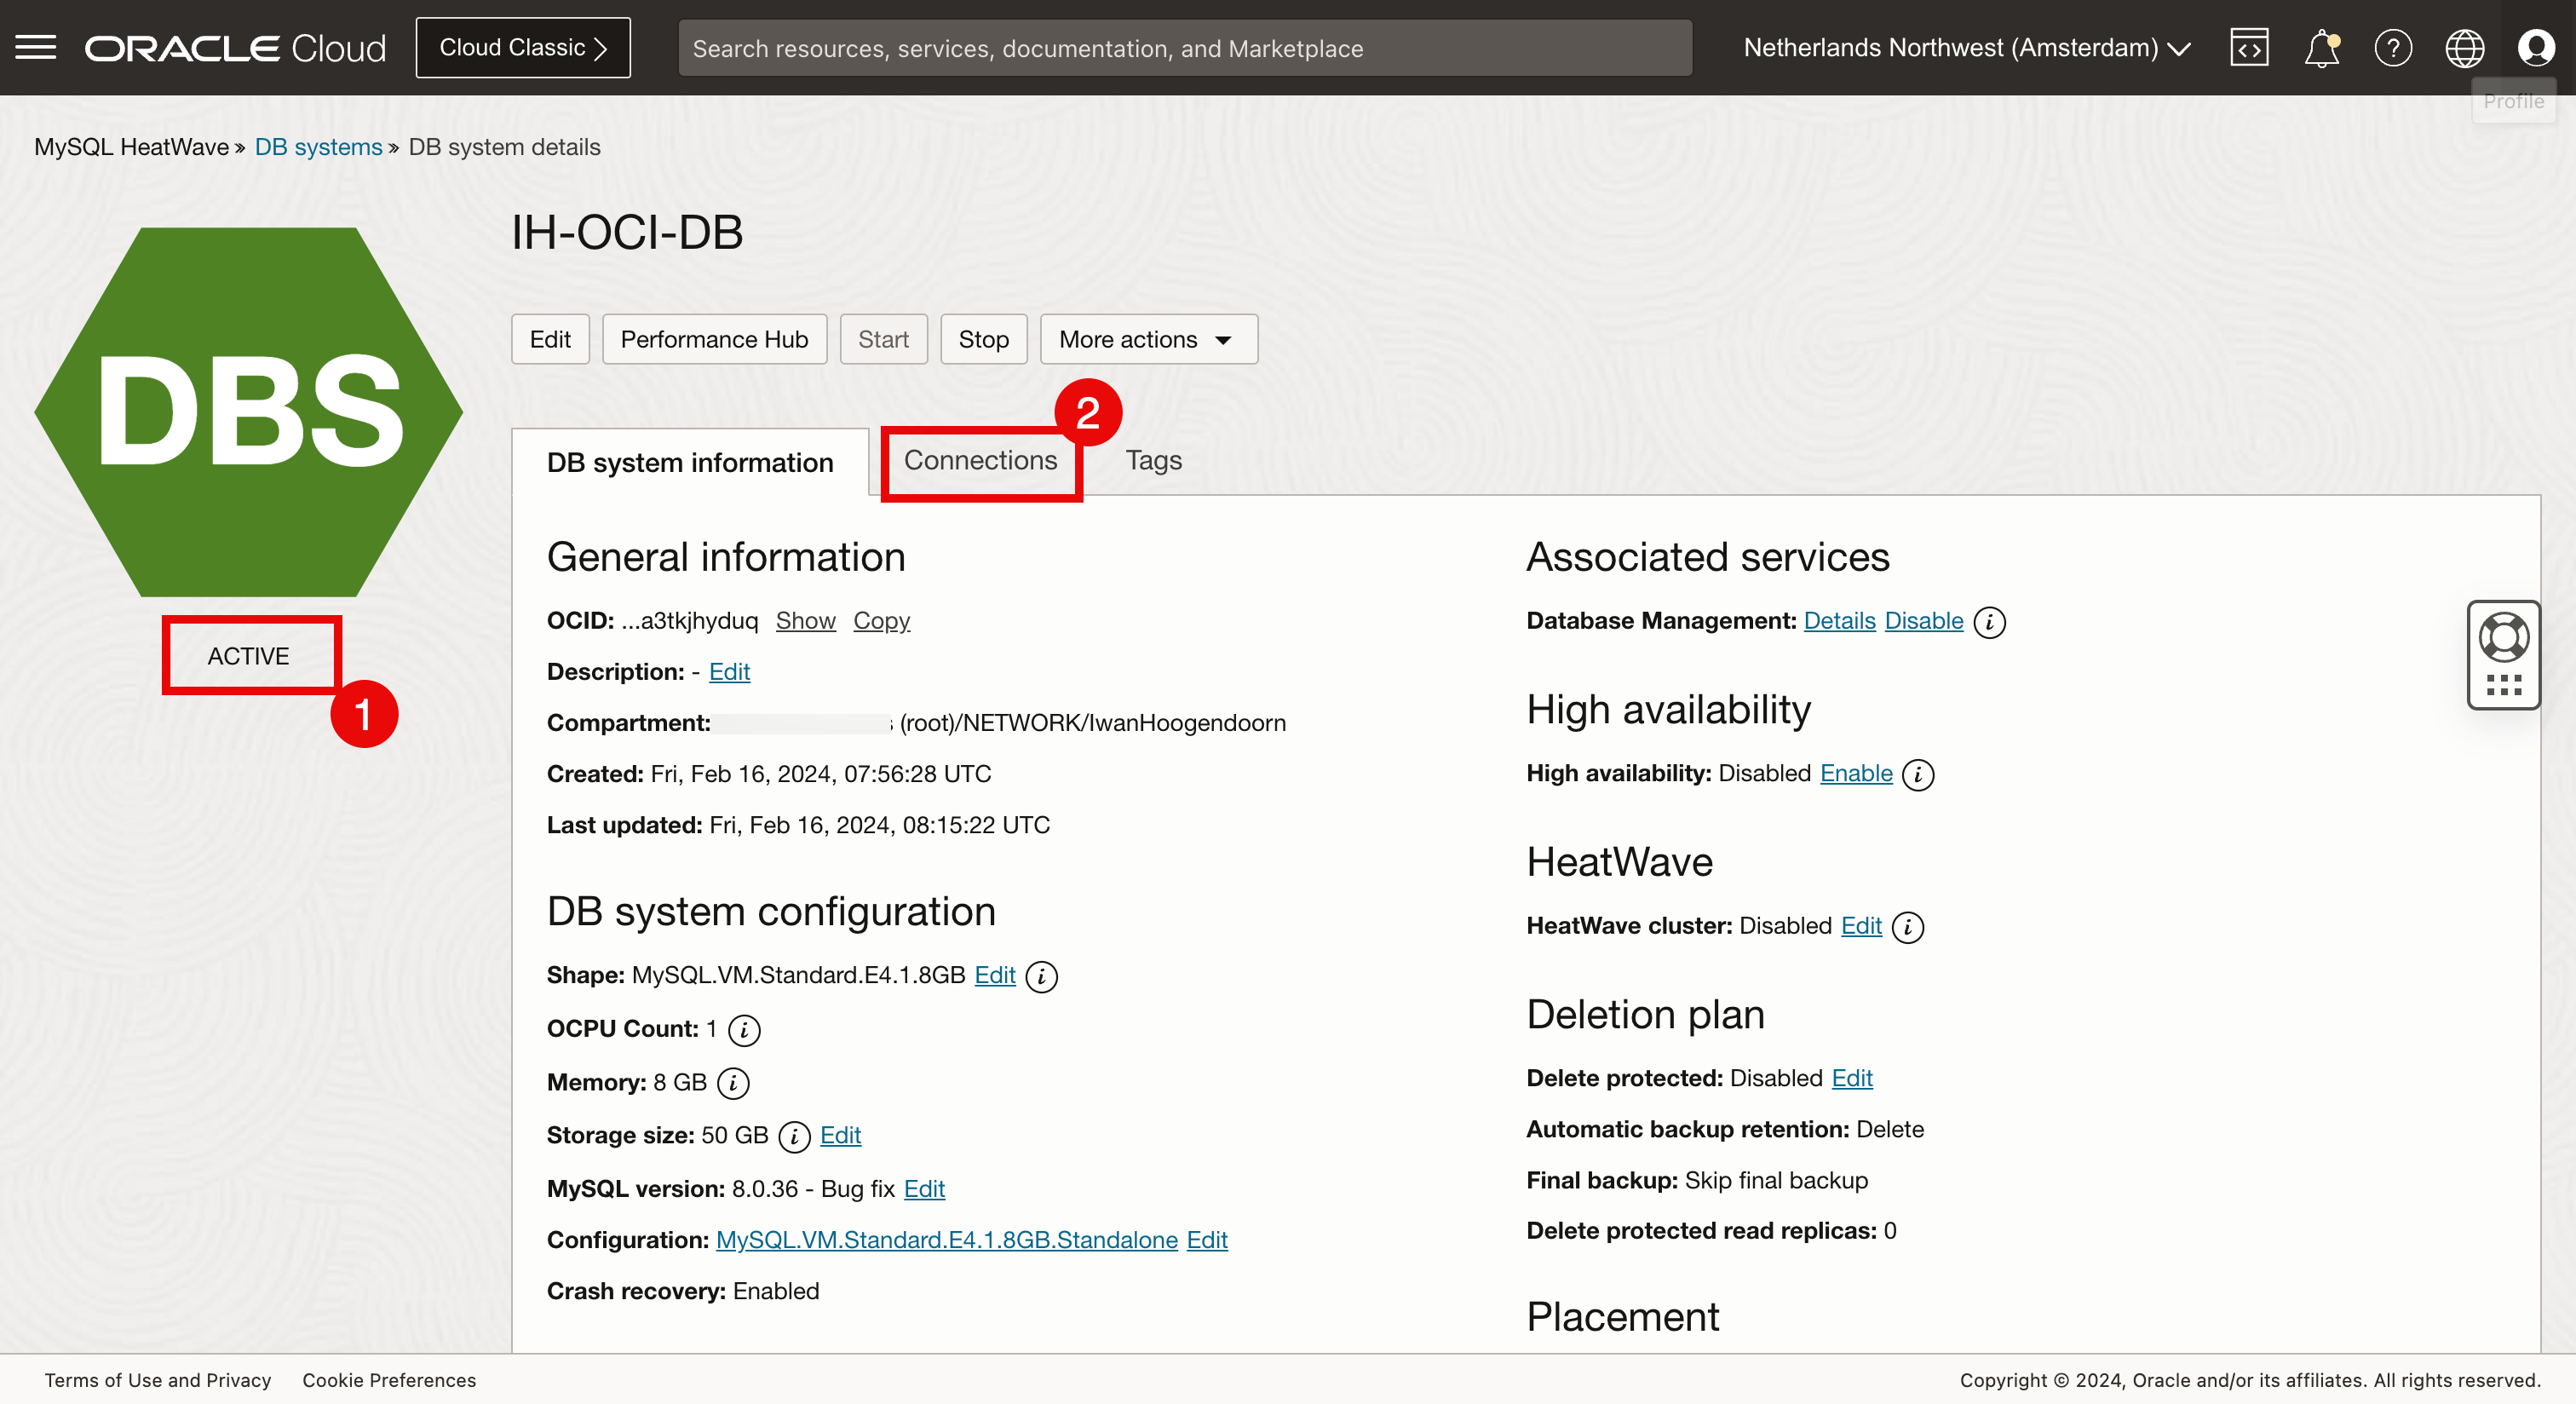
- Review that the database status is ACTIVE.
- Click the Connections tab.
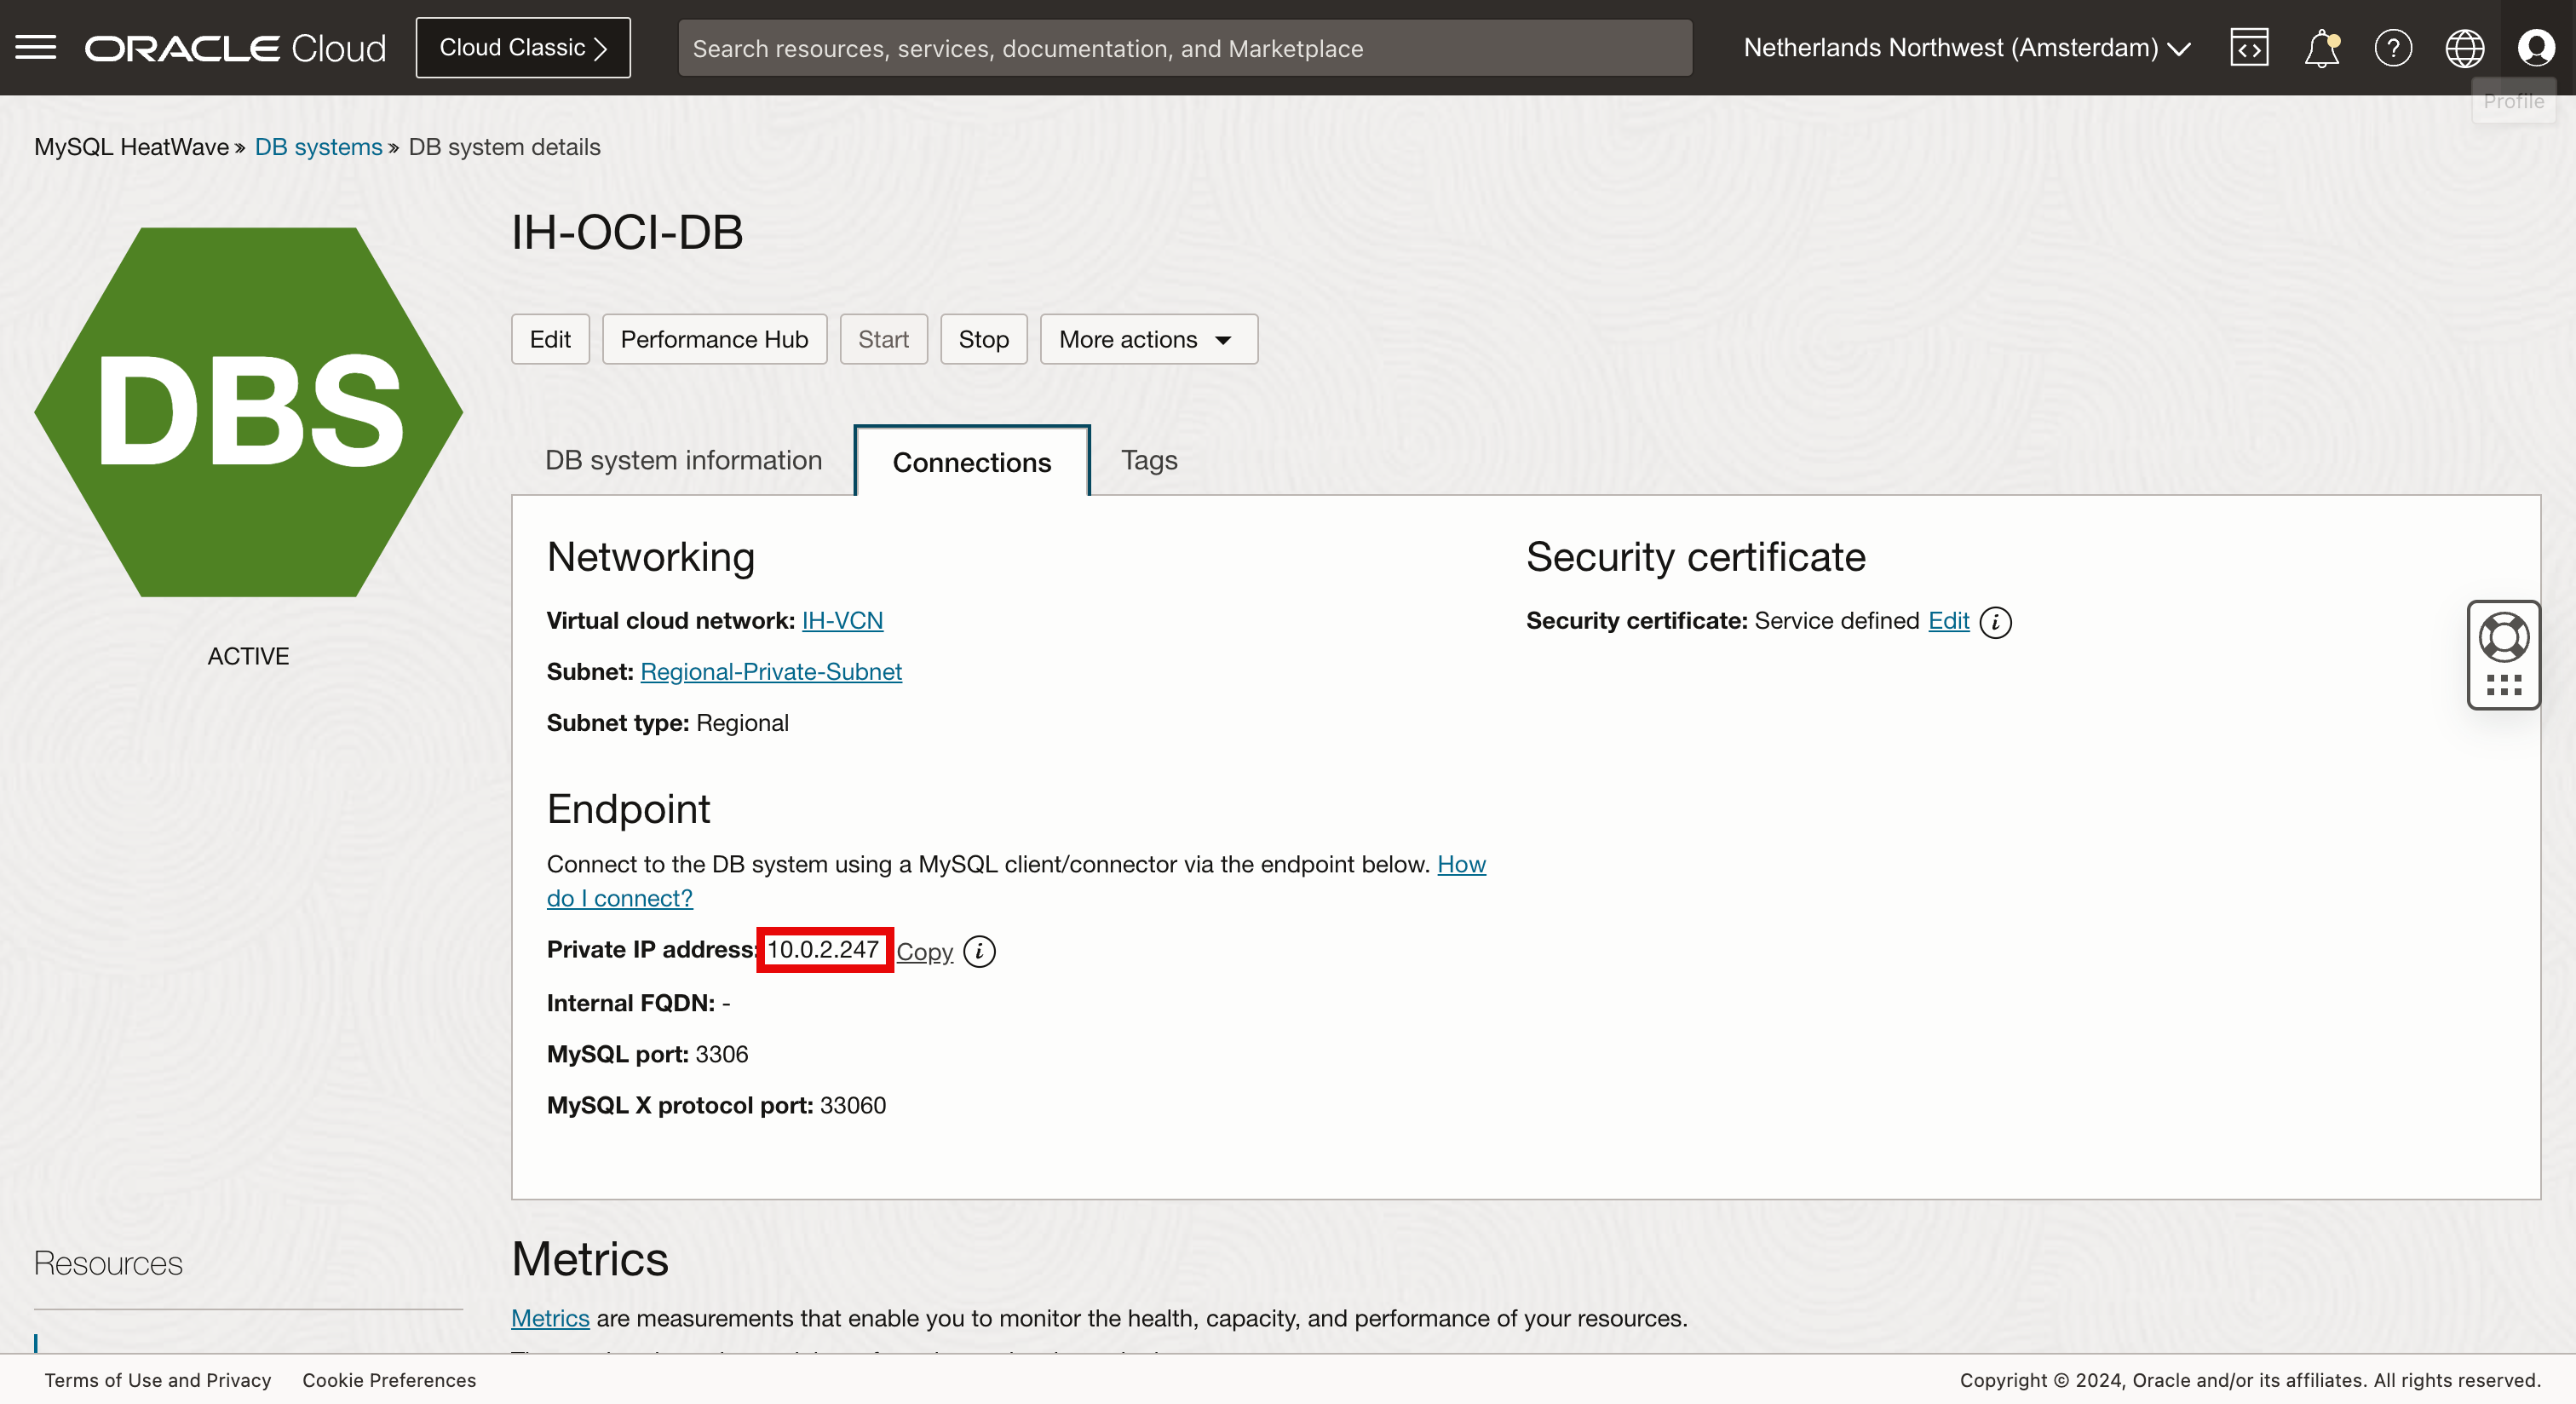
Review the private IP address 10.0.2.247 that will be used later to configure and access the MySQL Database.
Task 5: Create a new Database with Sample Data (1 Table with 2 Records)
-
To access and configure the MySQL Database, we need to install the MySQL Shell. Run the following command to install.
[opc@ih-webserver-01 ~]$ sudo yum install mysql-shell -
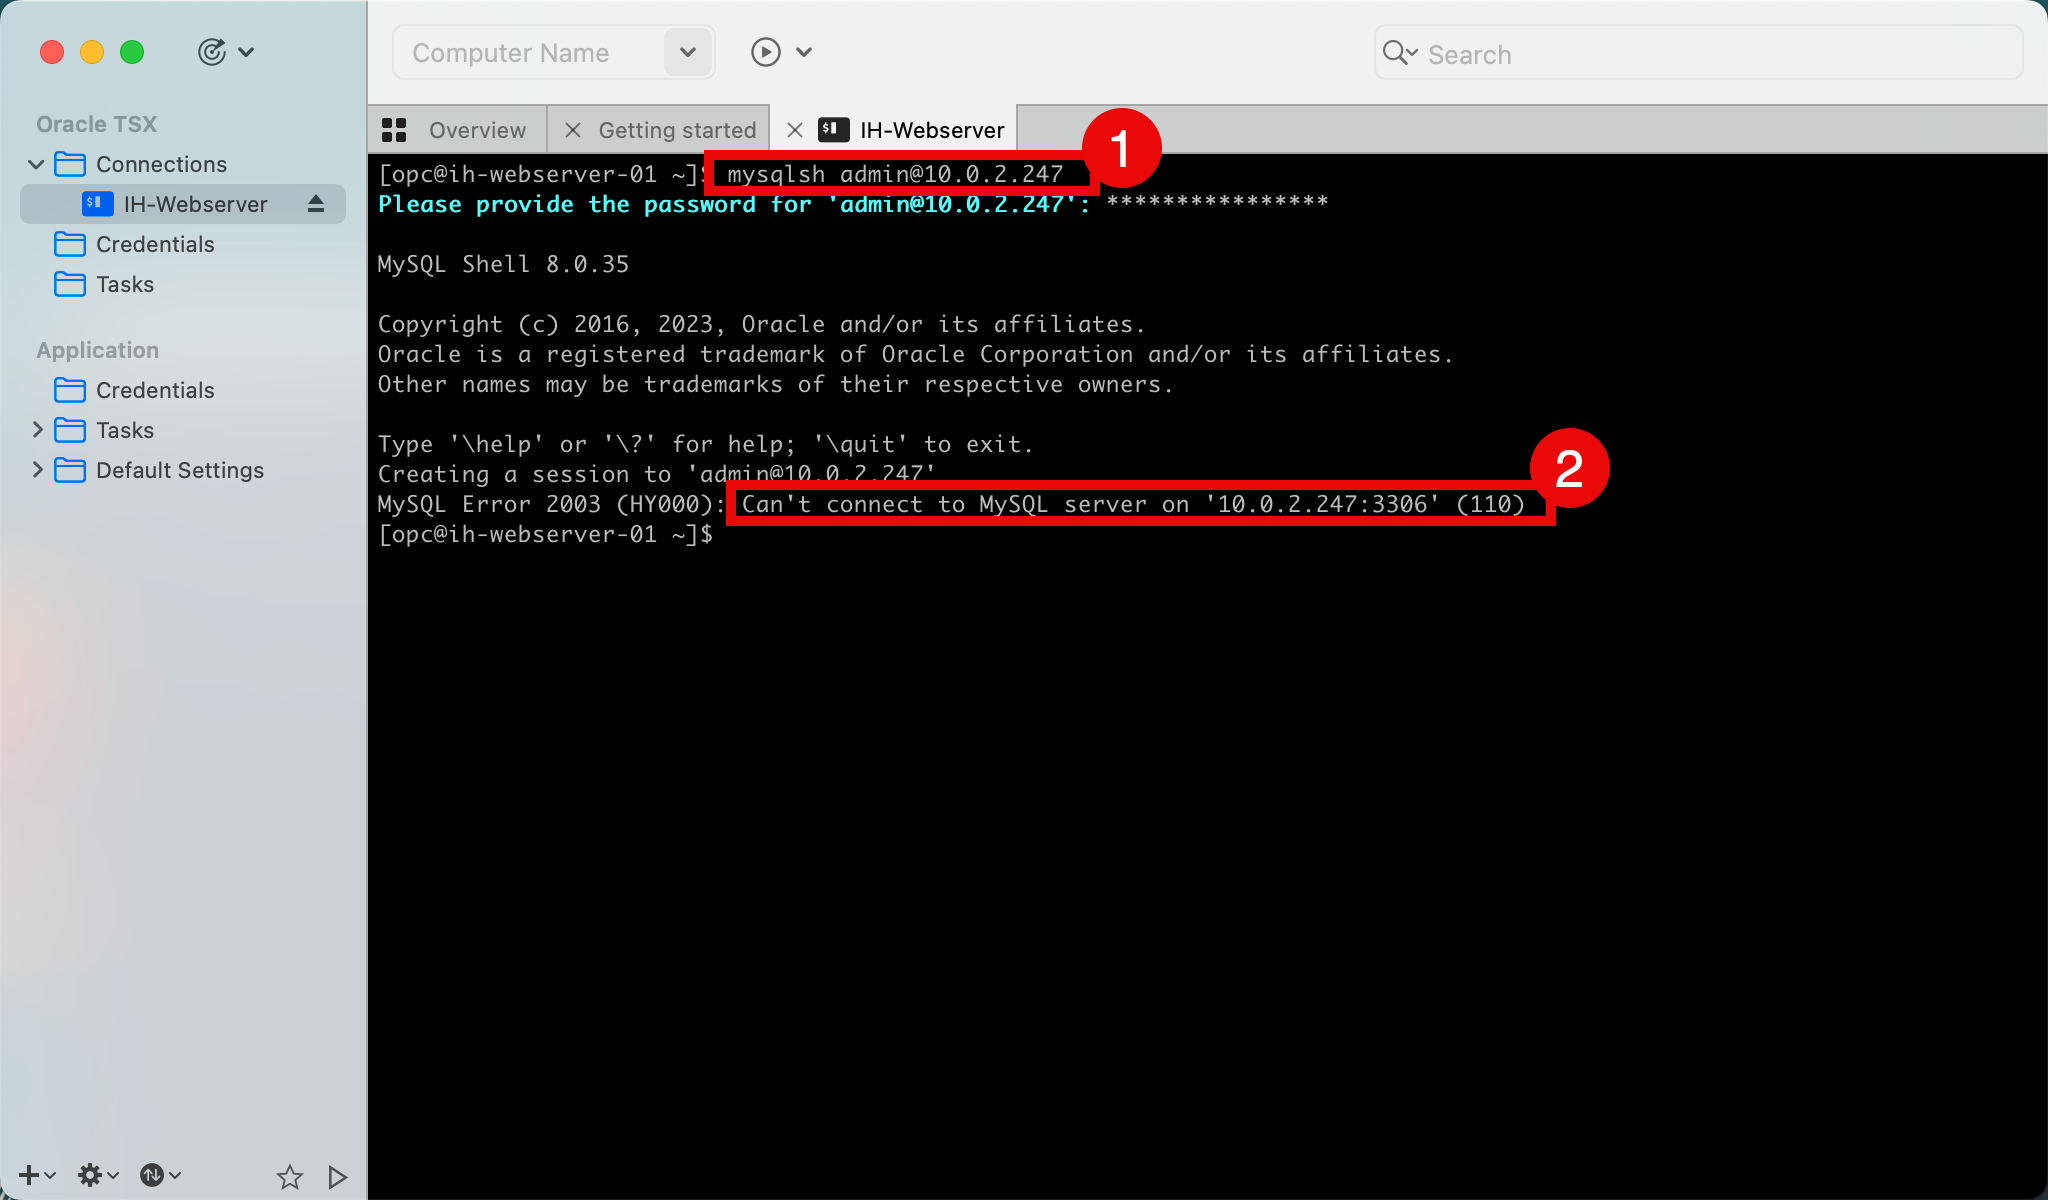
To access the MySQL Database, use the following command.
Note: We cannot connect to the MySQL Database and the reason for this is that we have not allowed the database ports on the default security list.
-
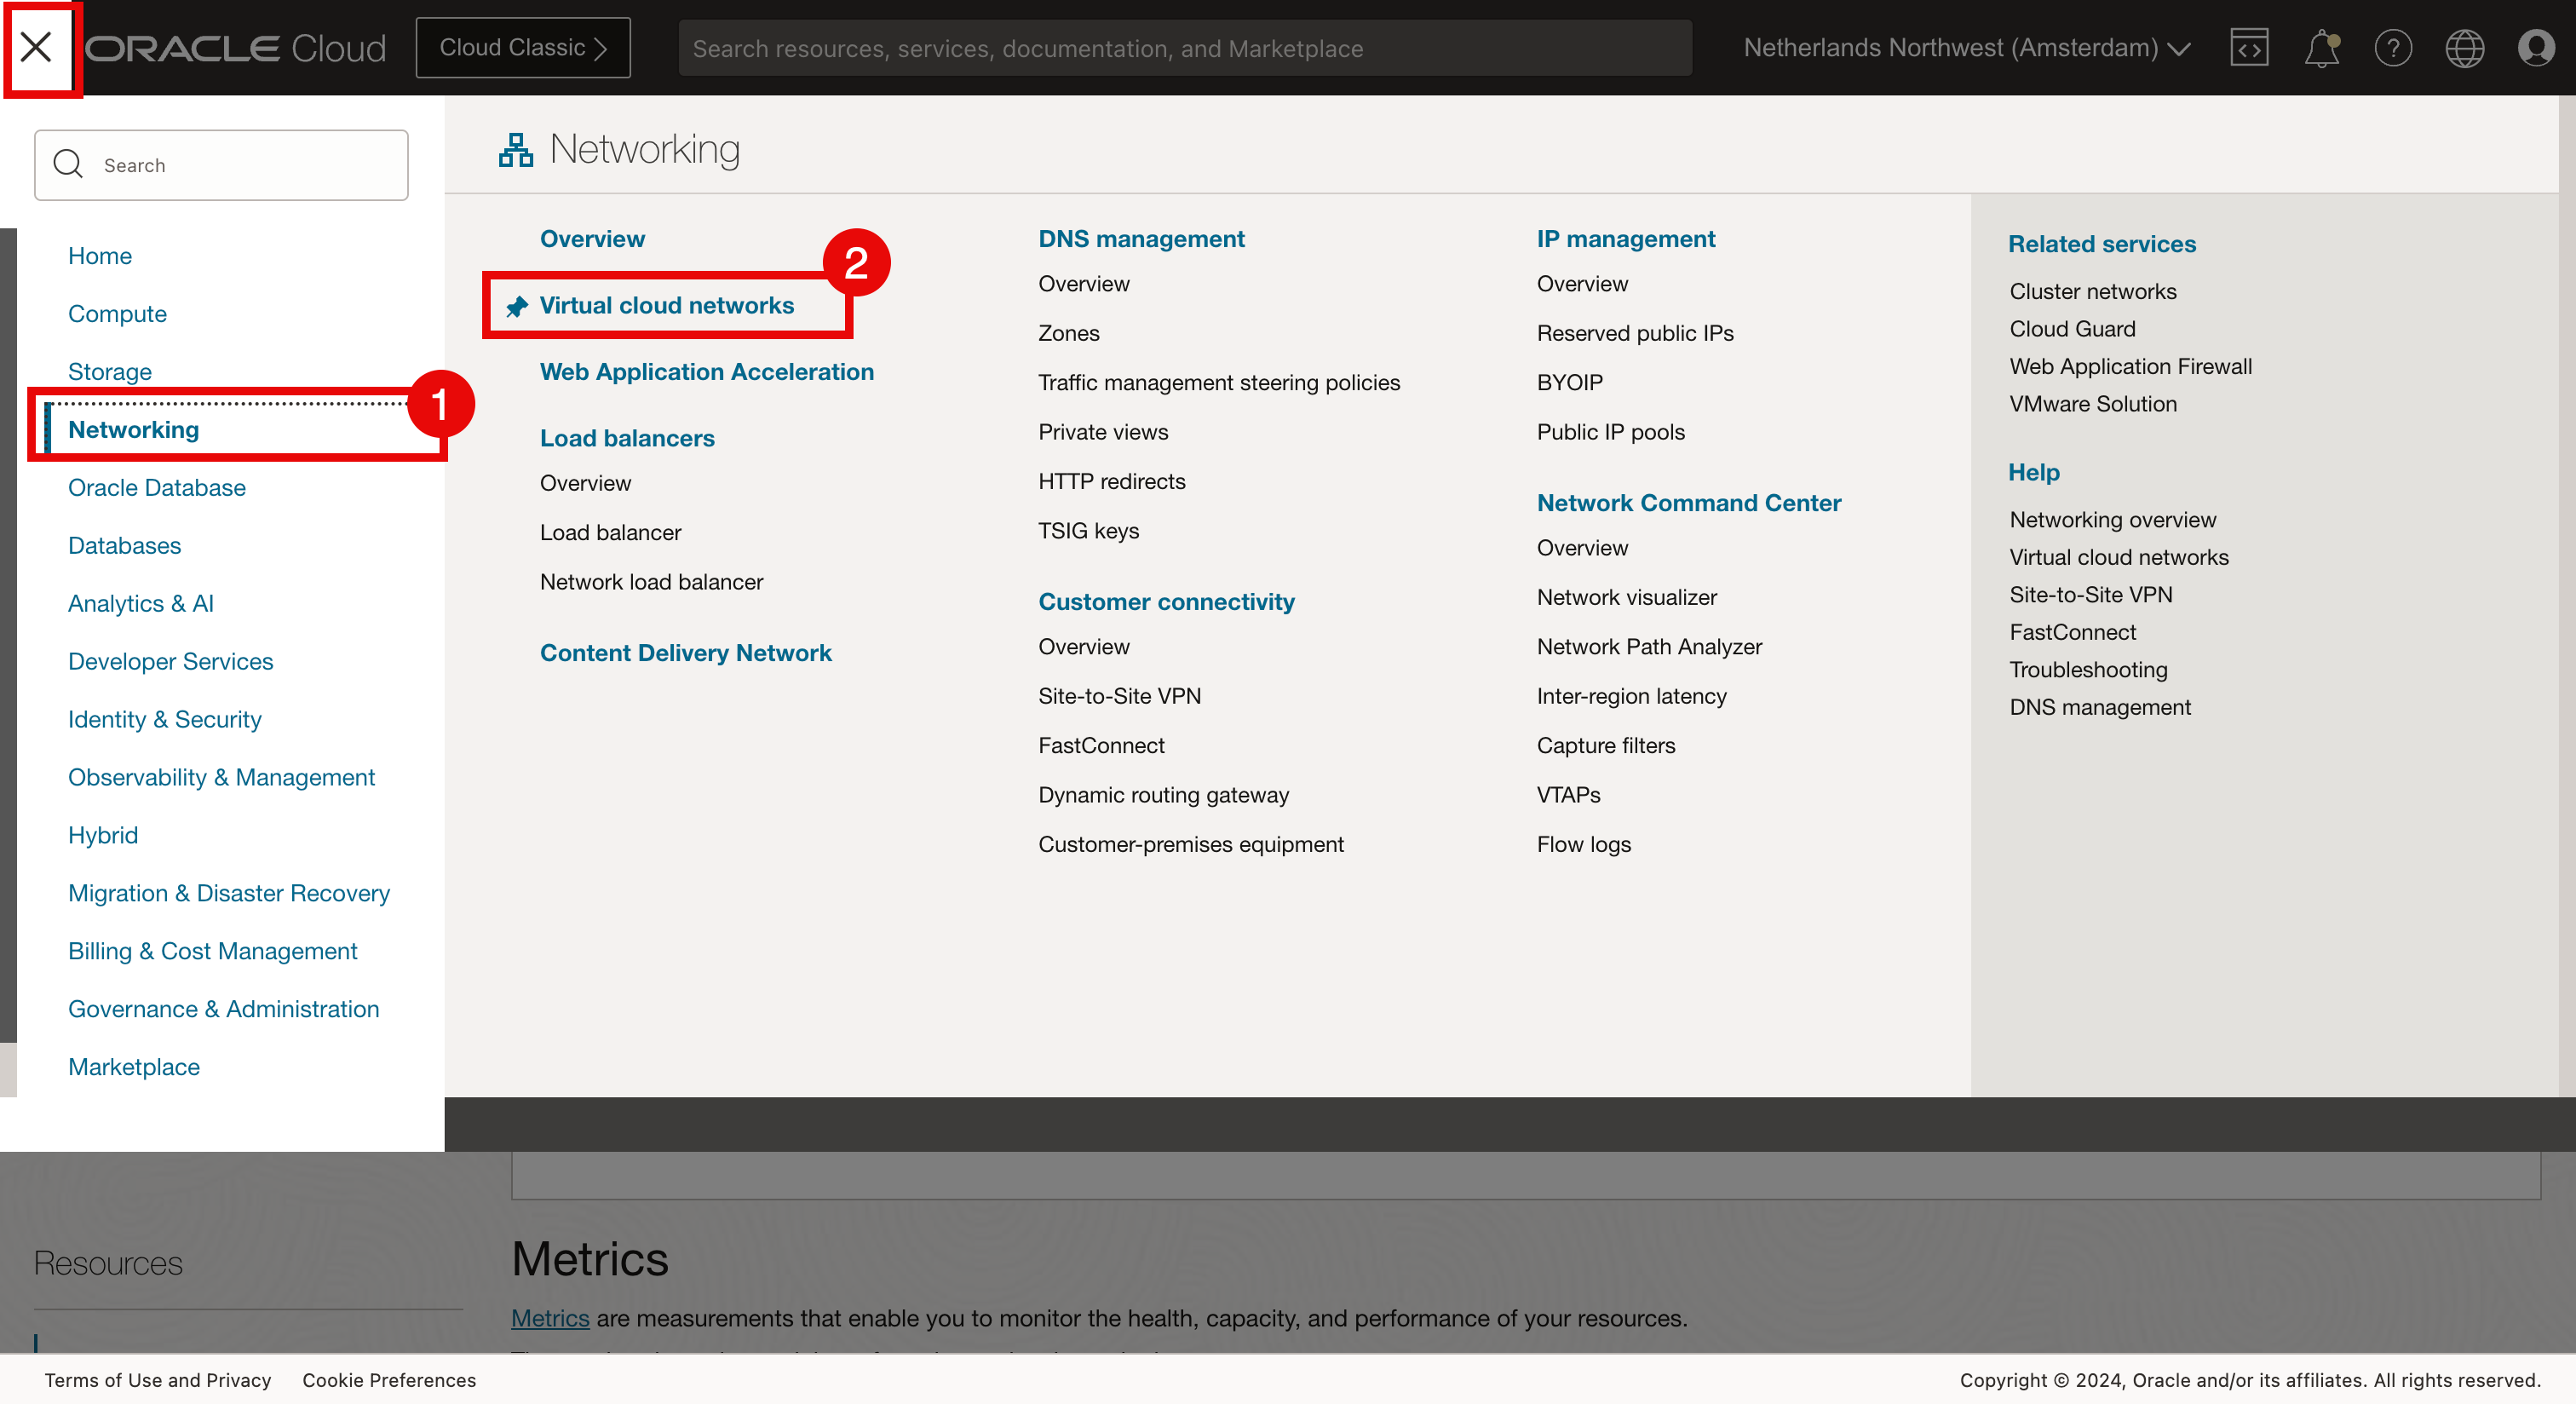
Click the hamburger menu in the OCI Console.
- Click Networking
- Click Virtual cloud networks.
-
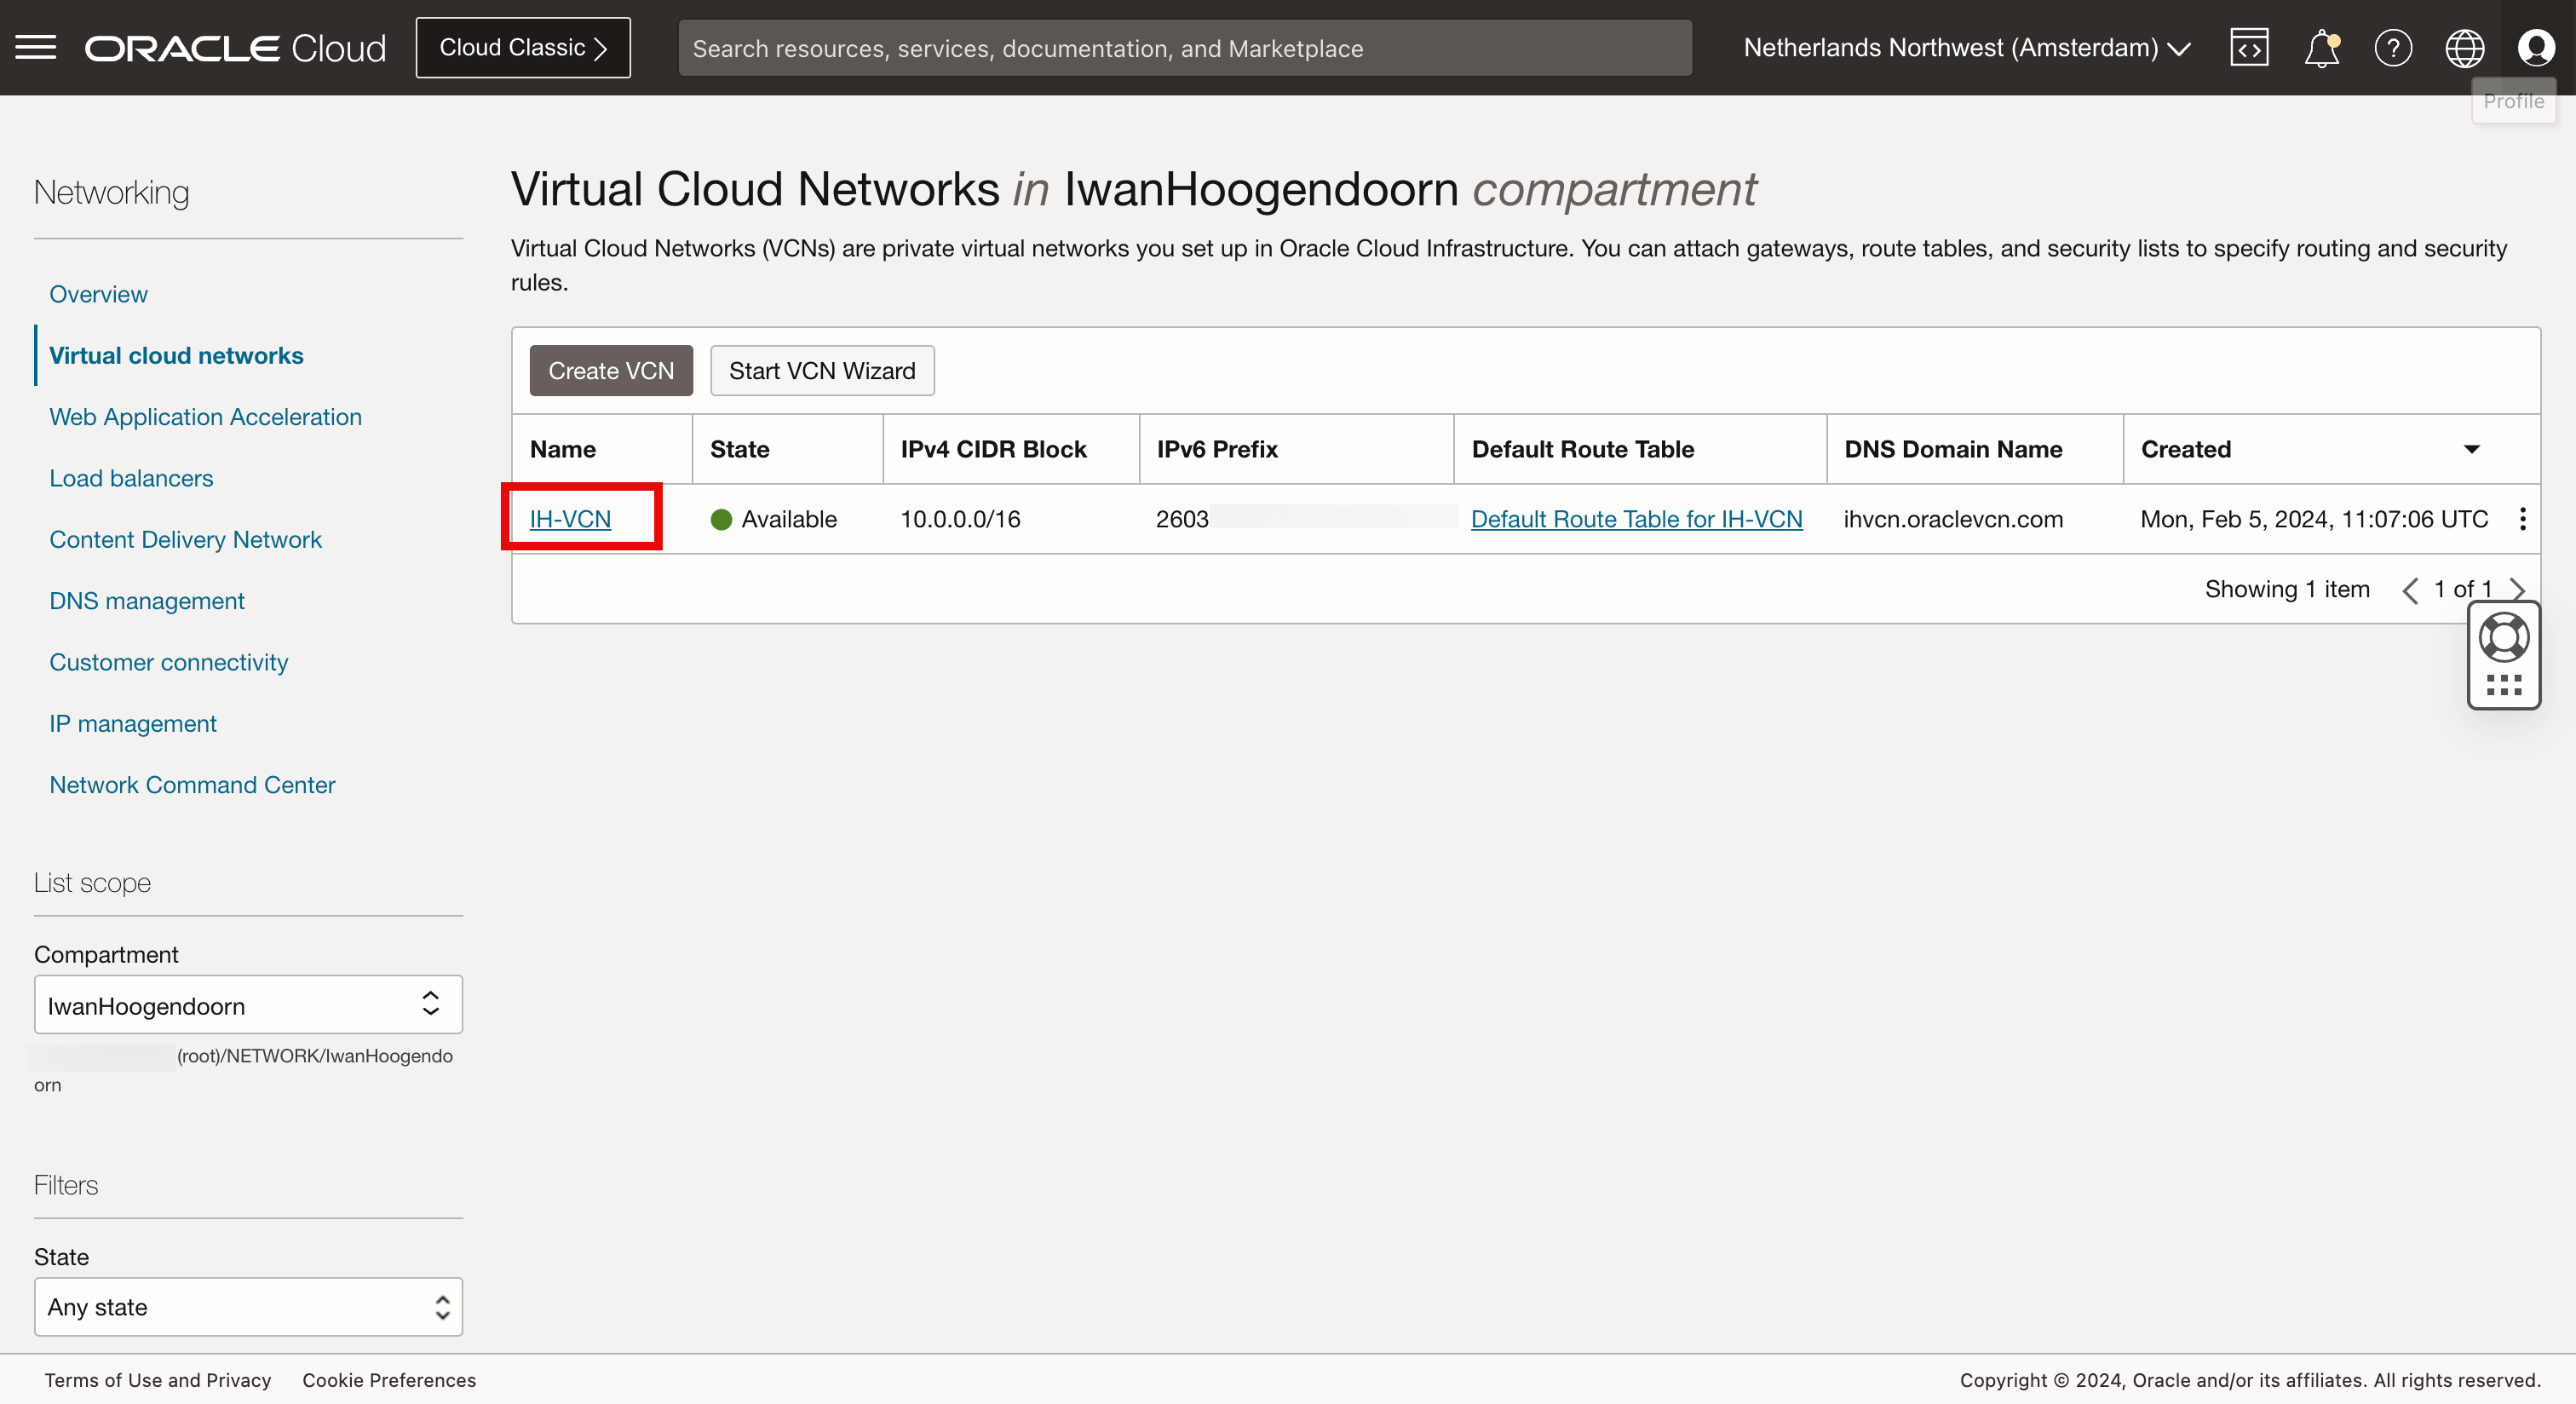
Click the VCN.
-
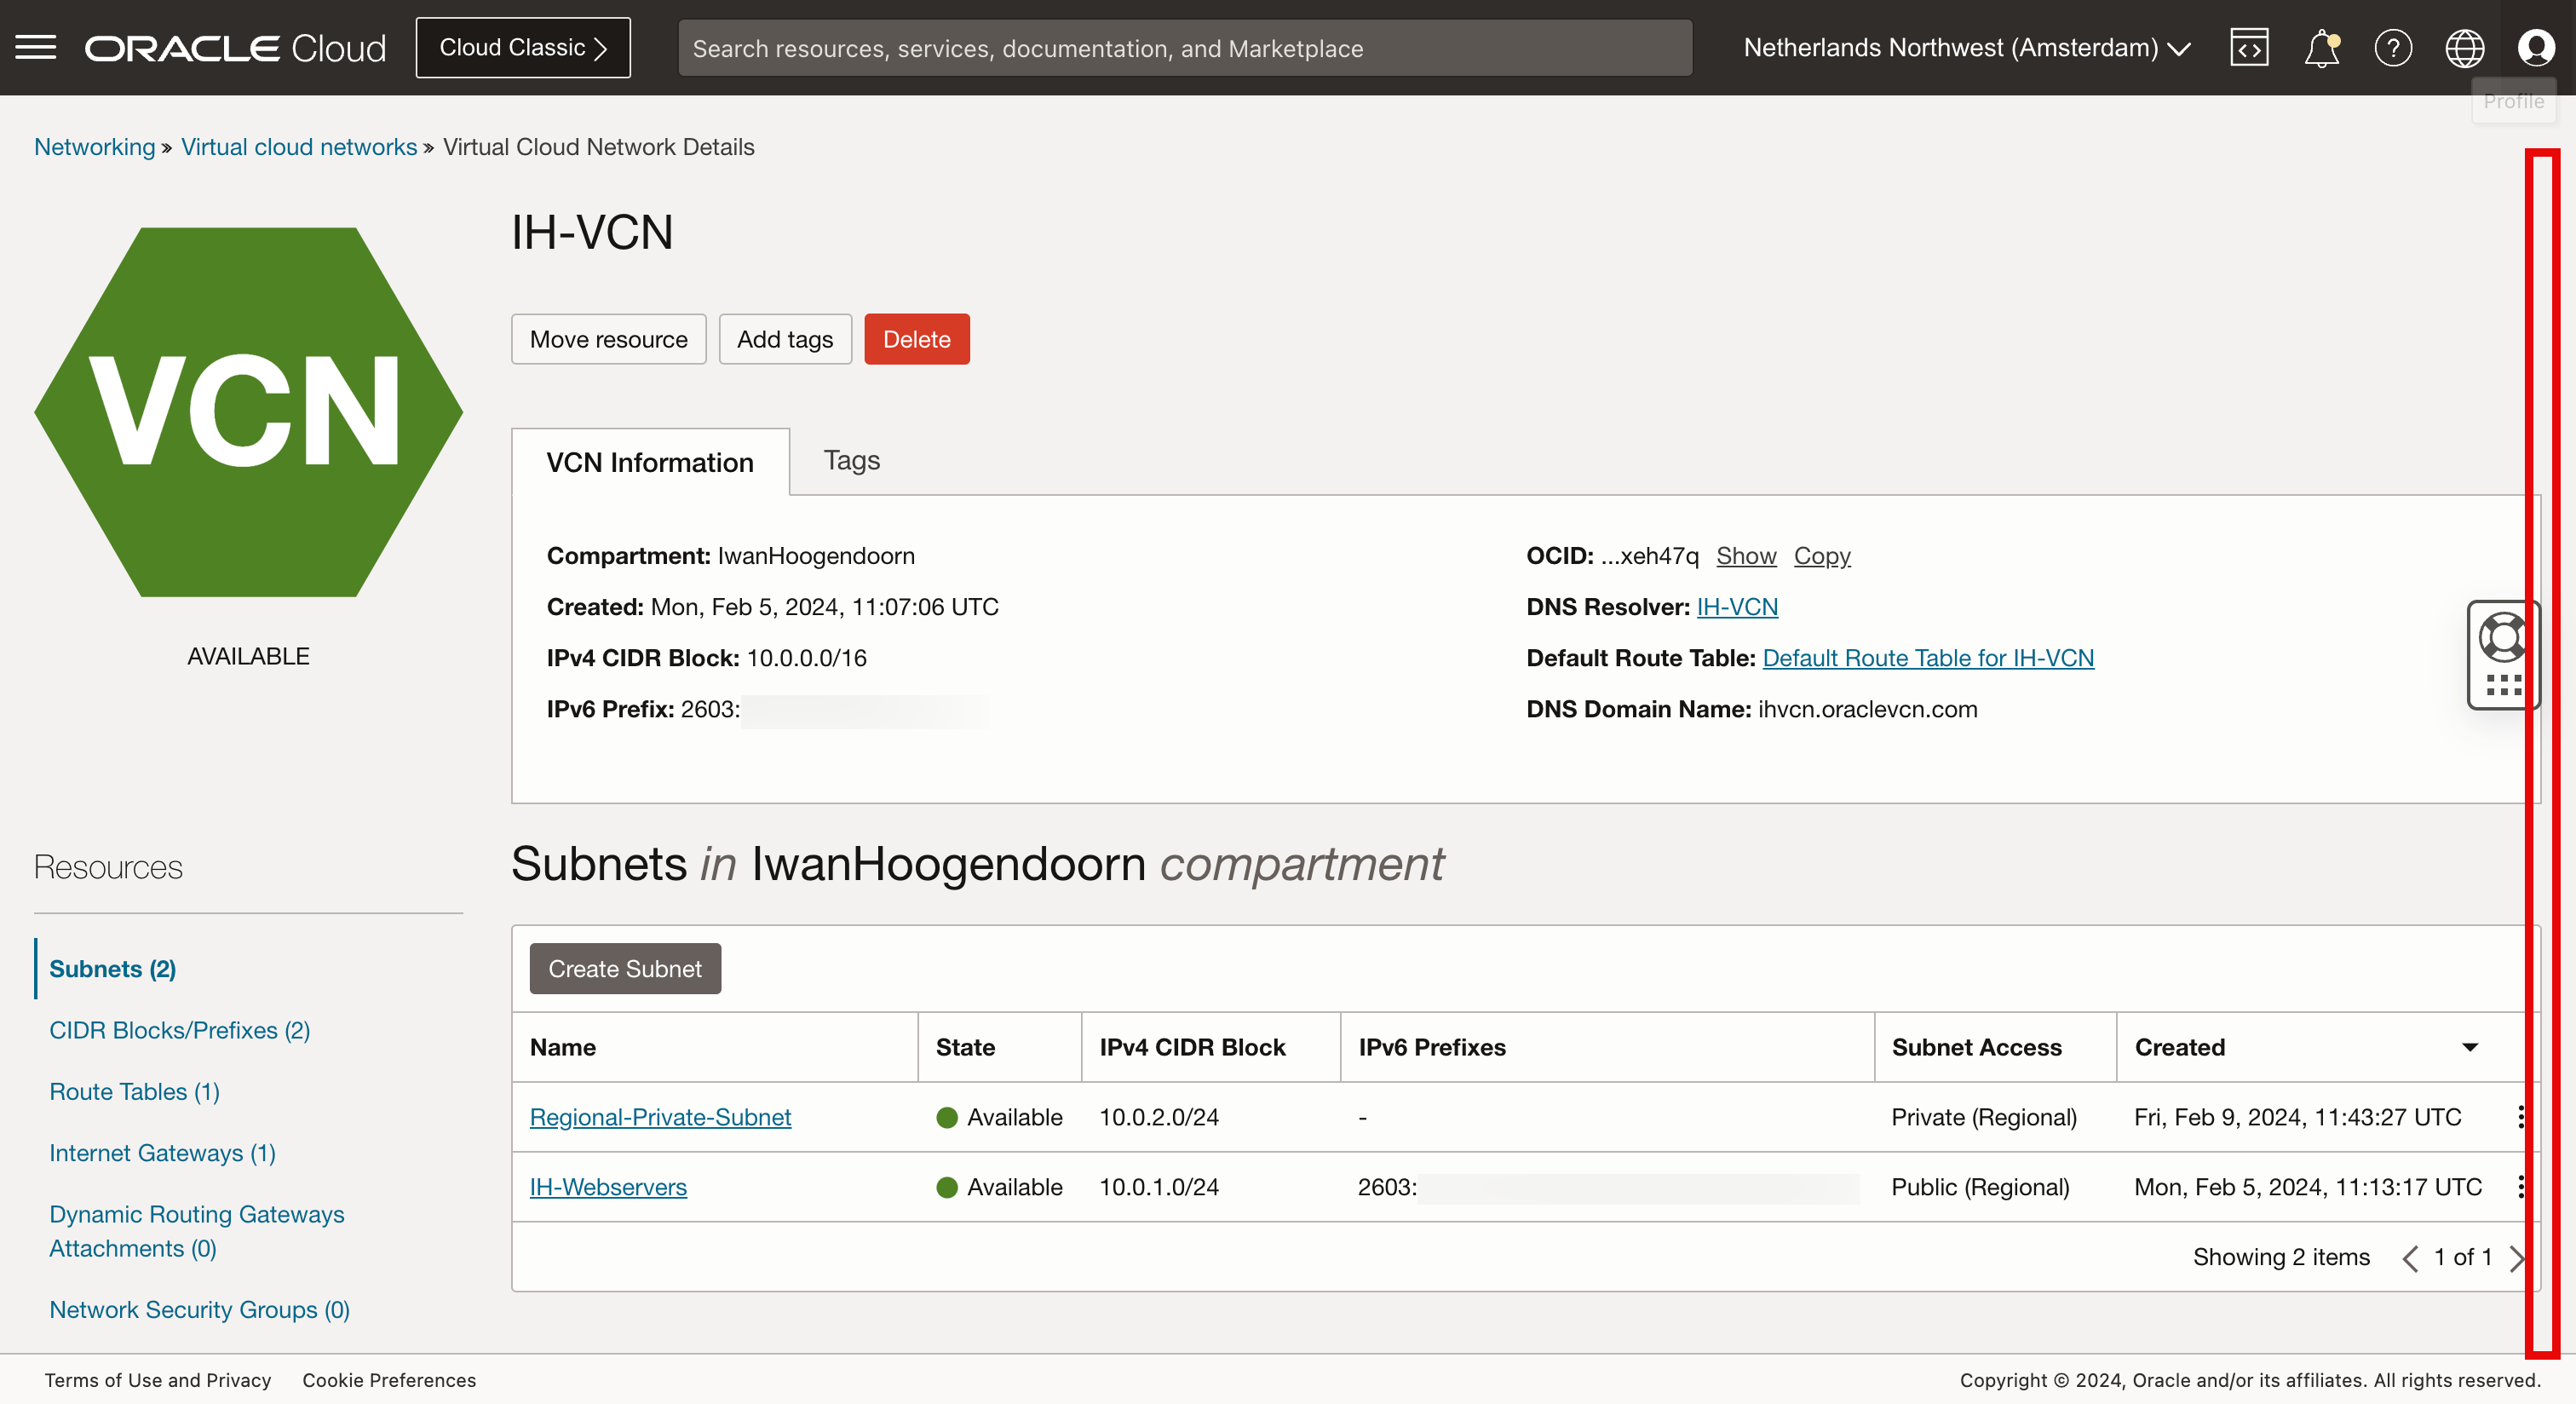
Scroll down.
-
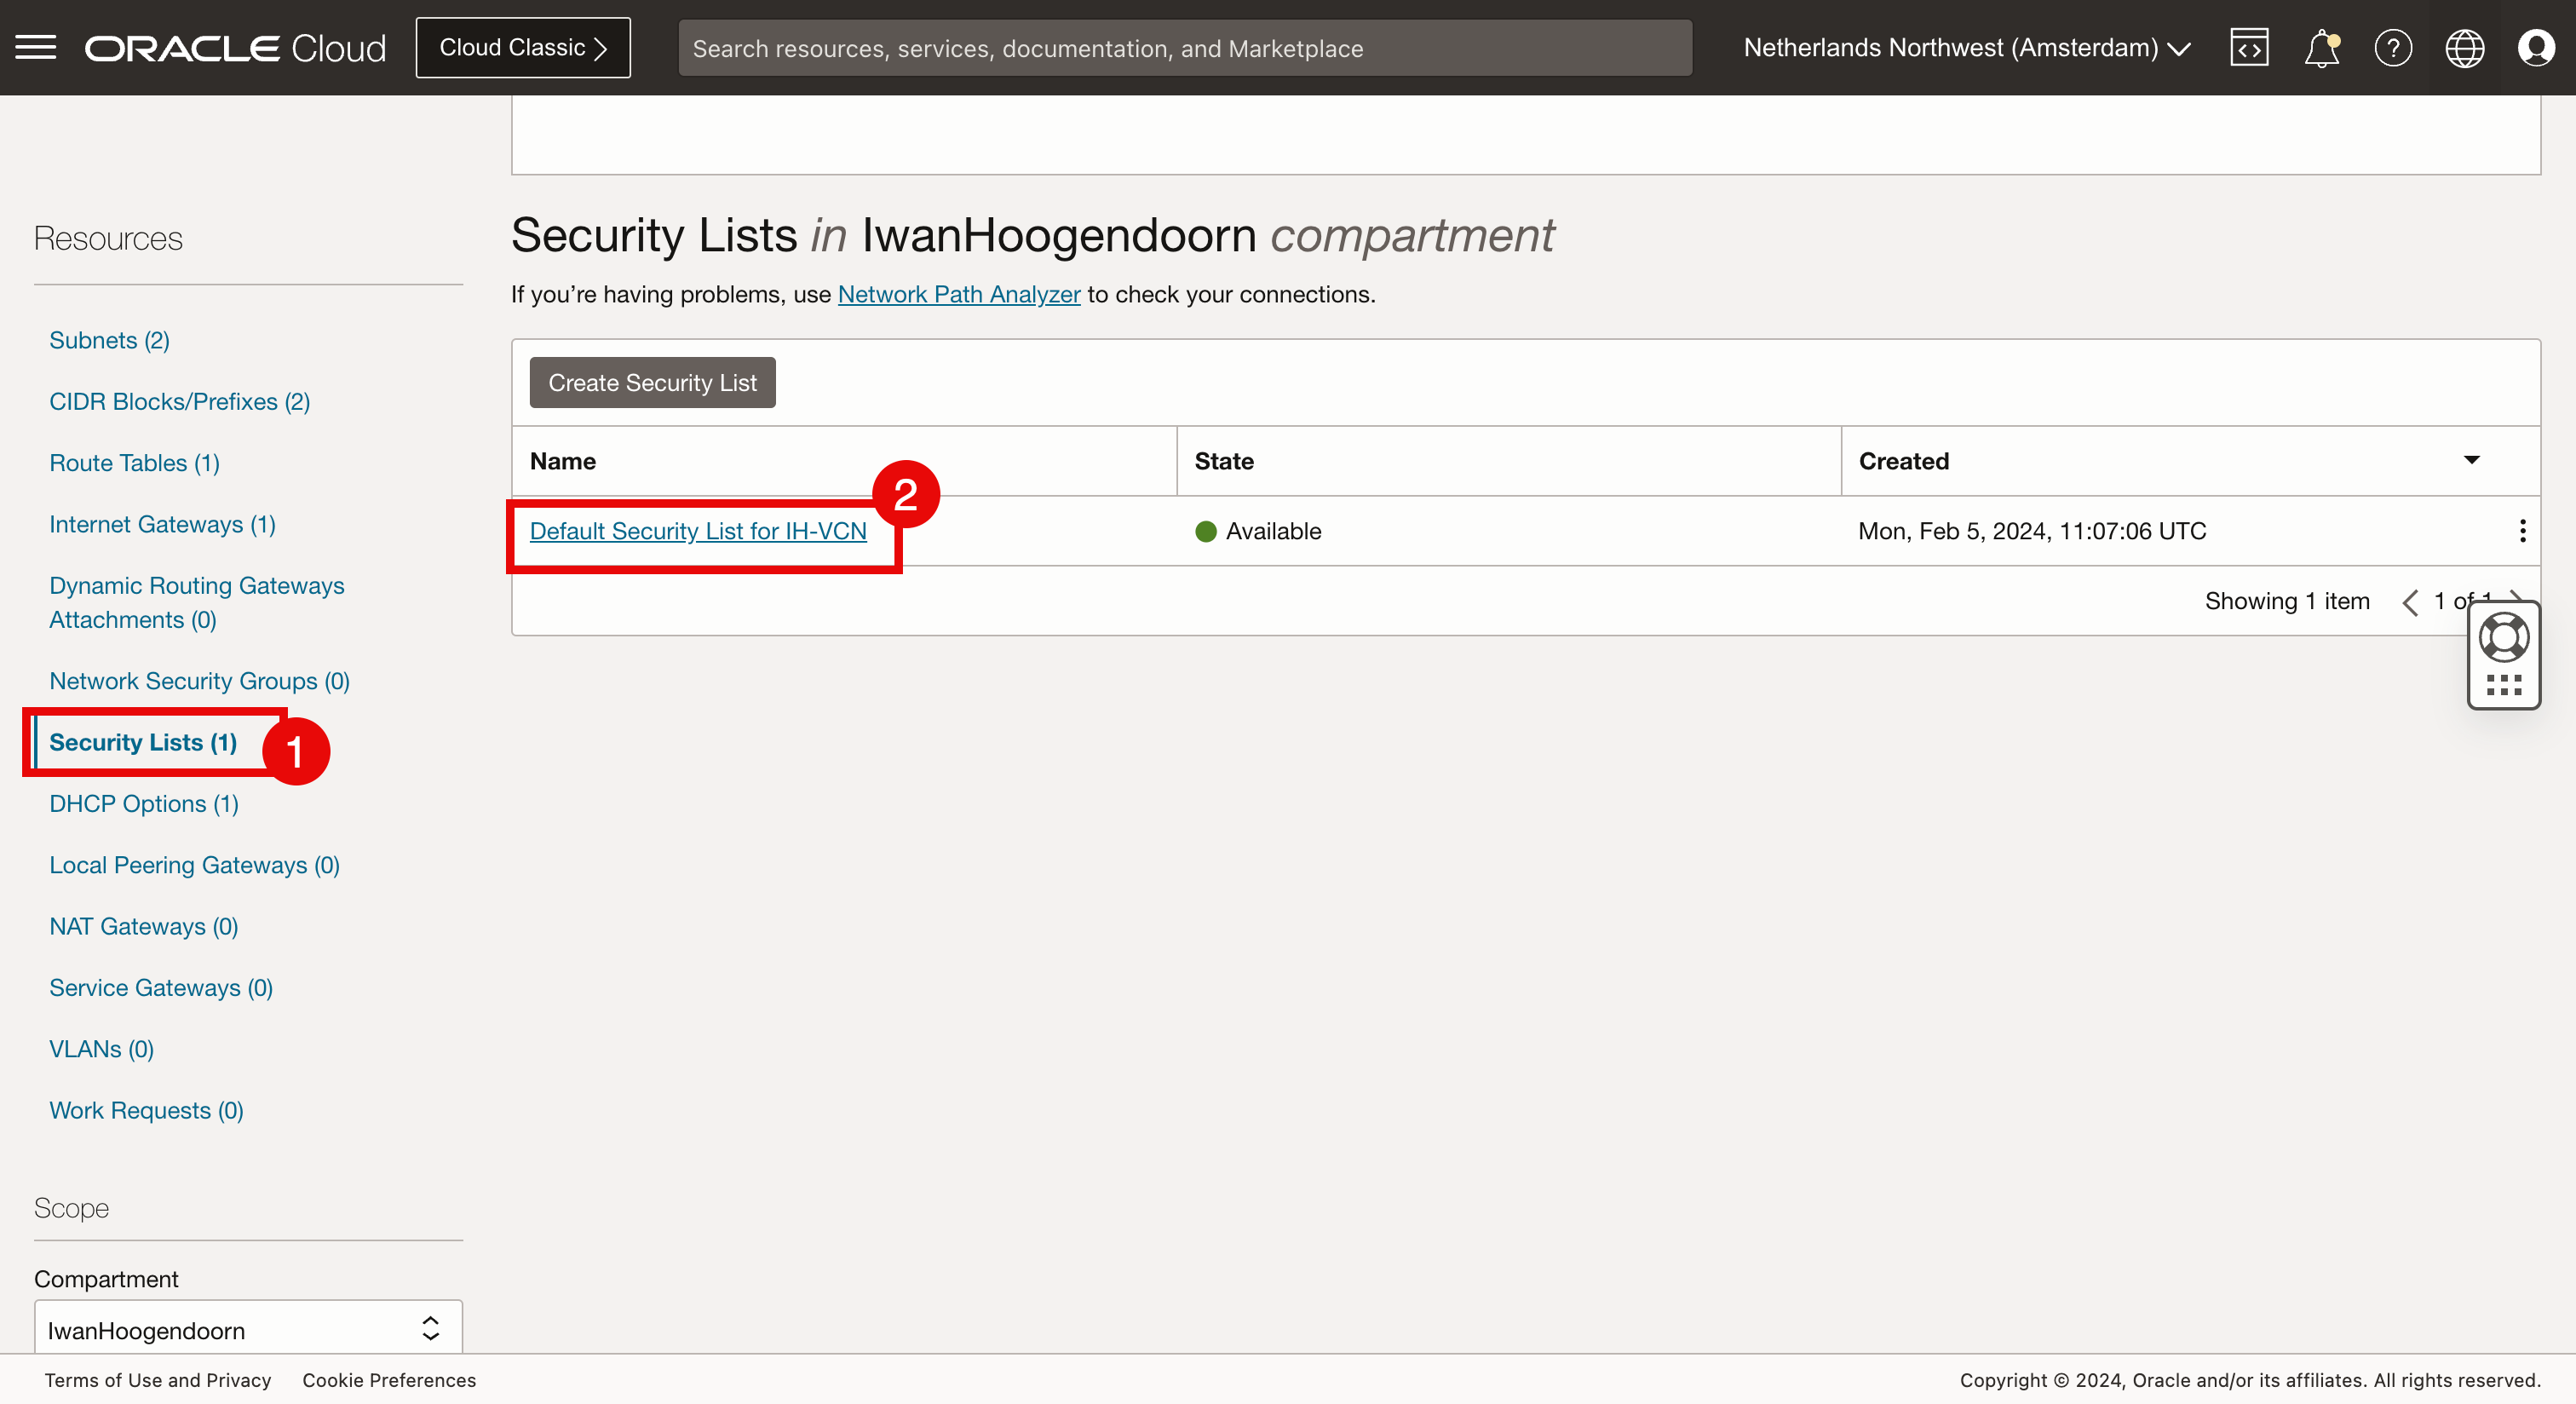
Click Security Lists and the default security list.
-
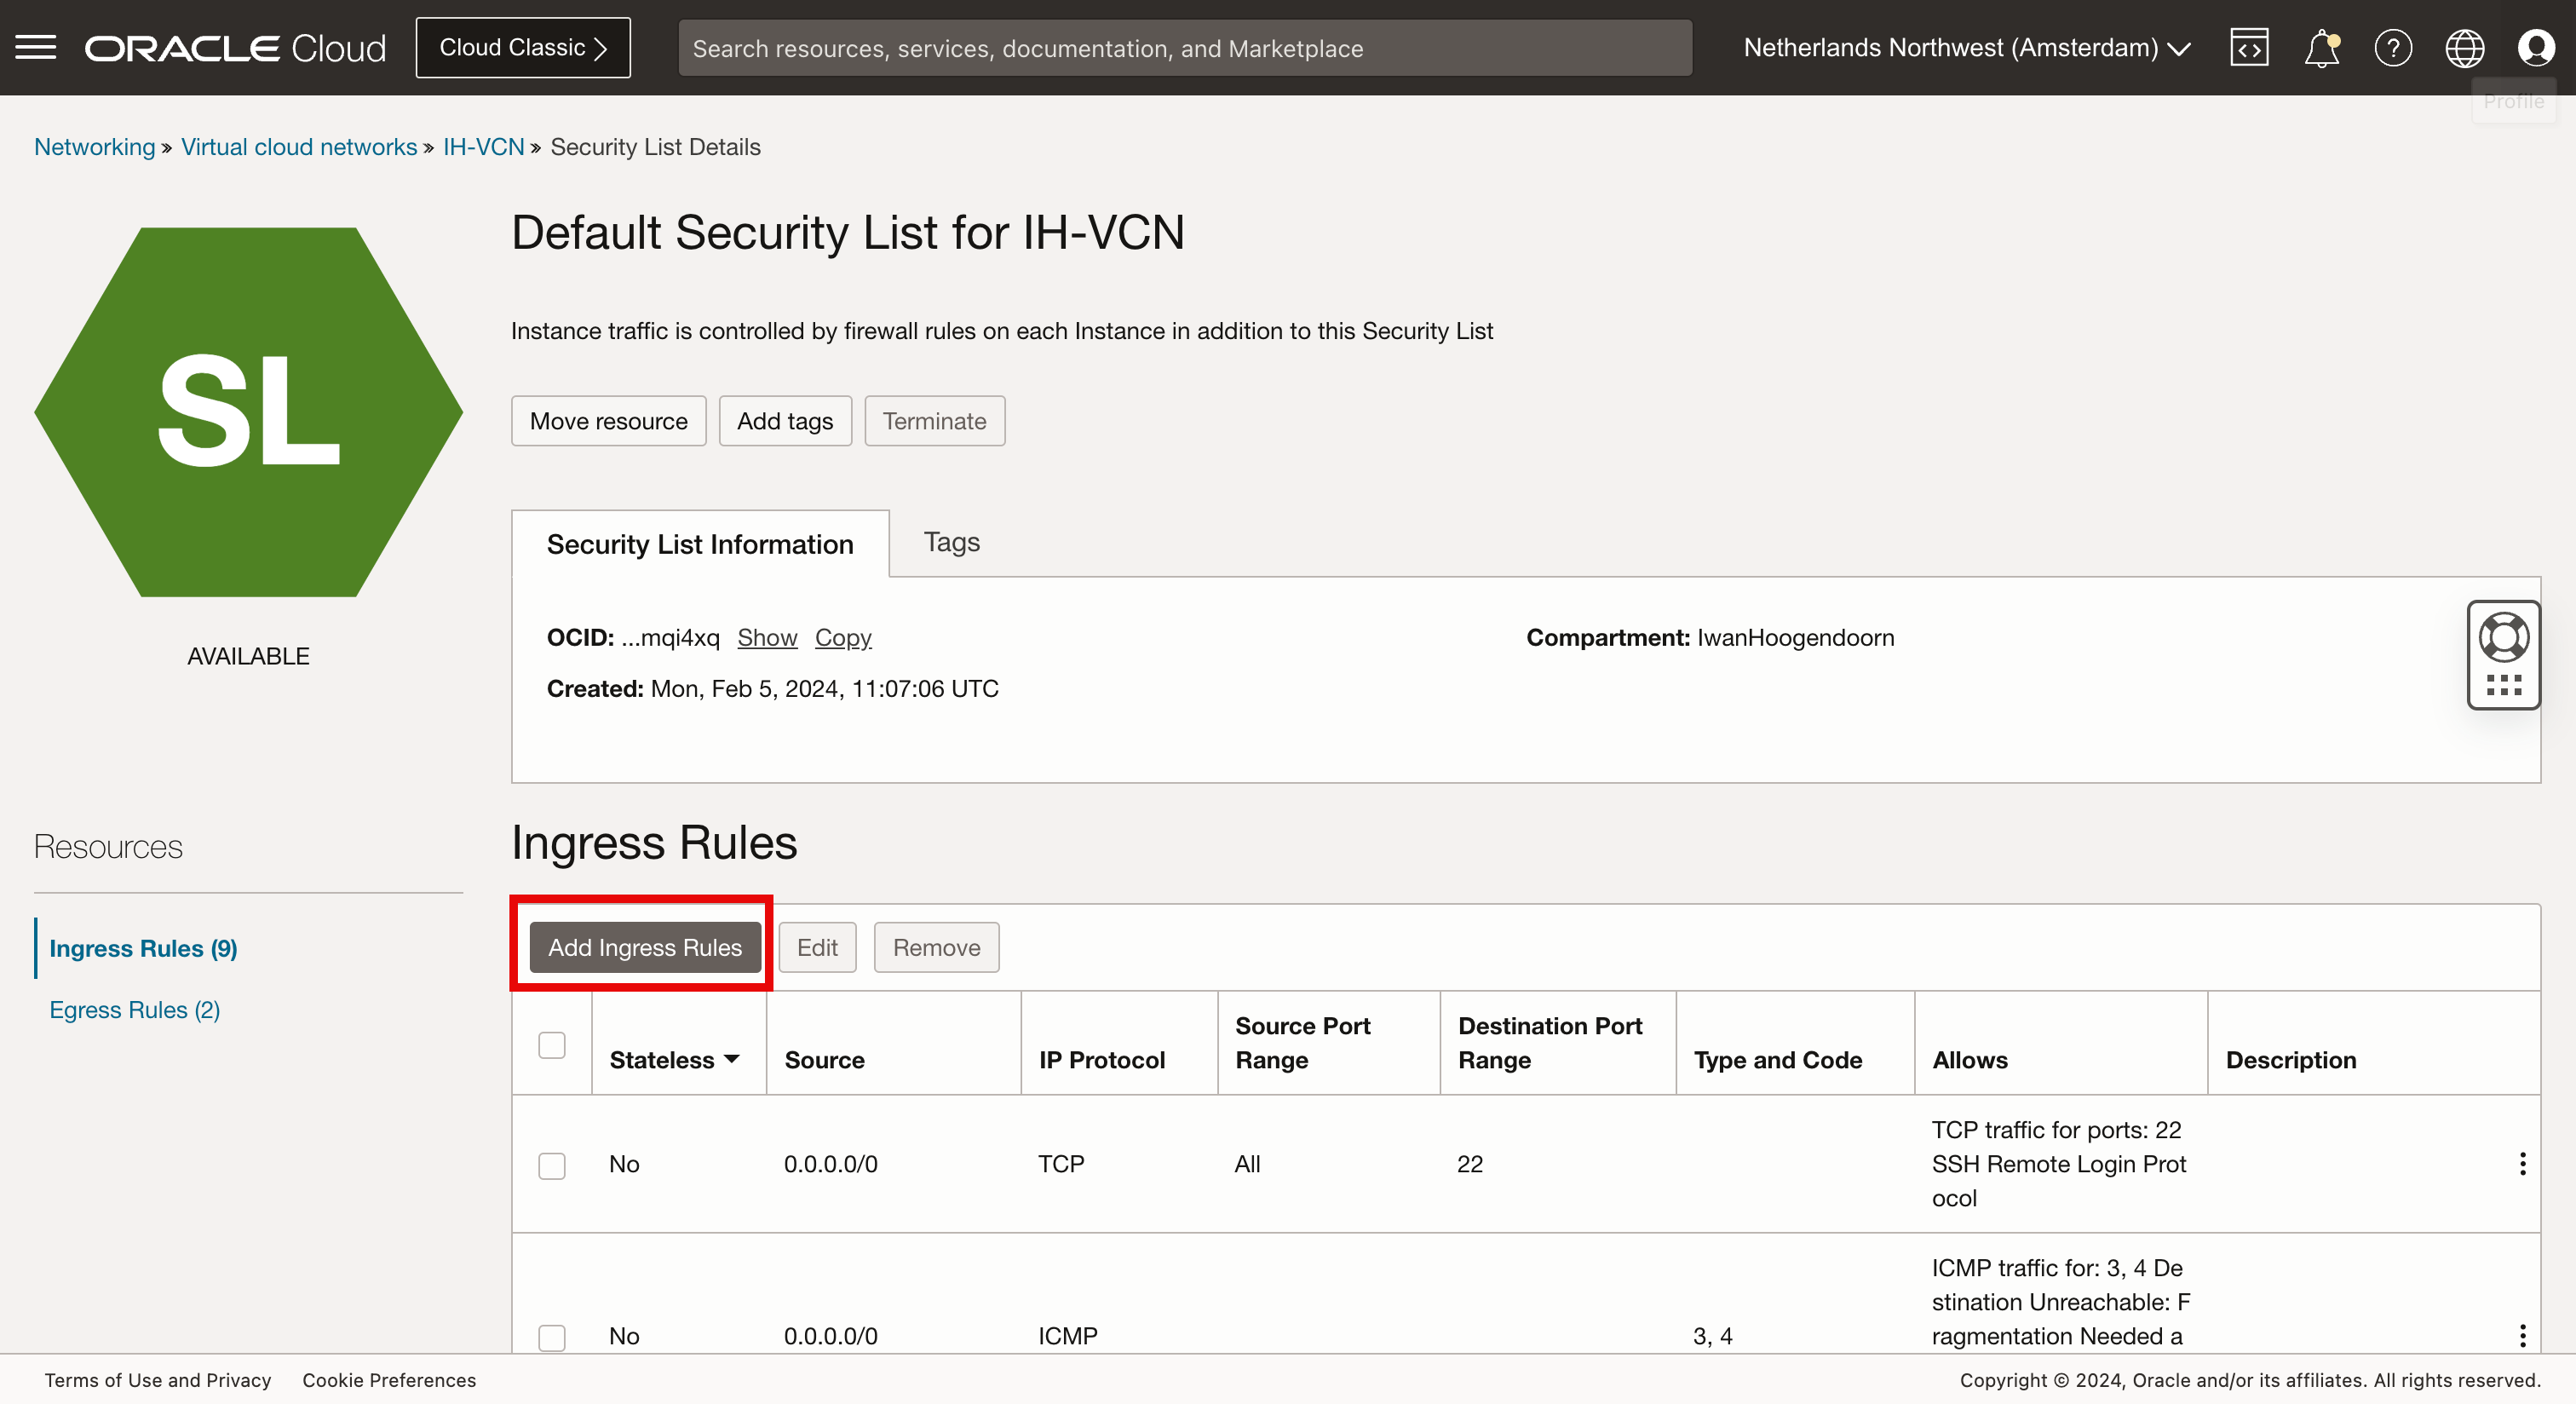
Click Add Ingress Rules.
-
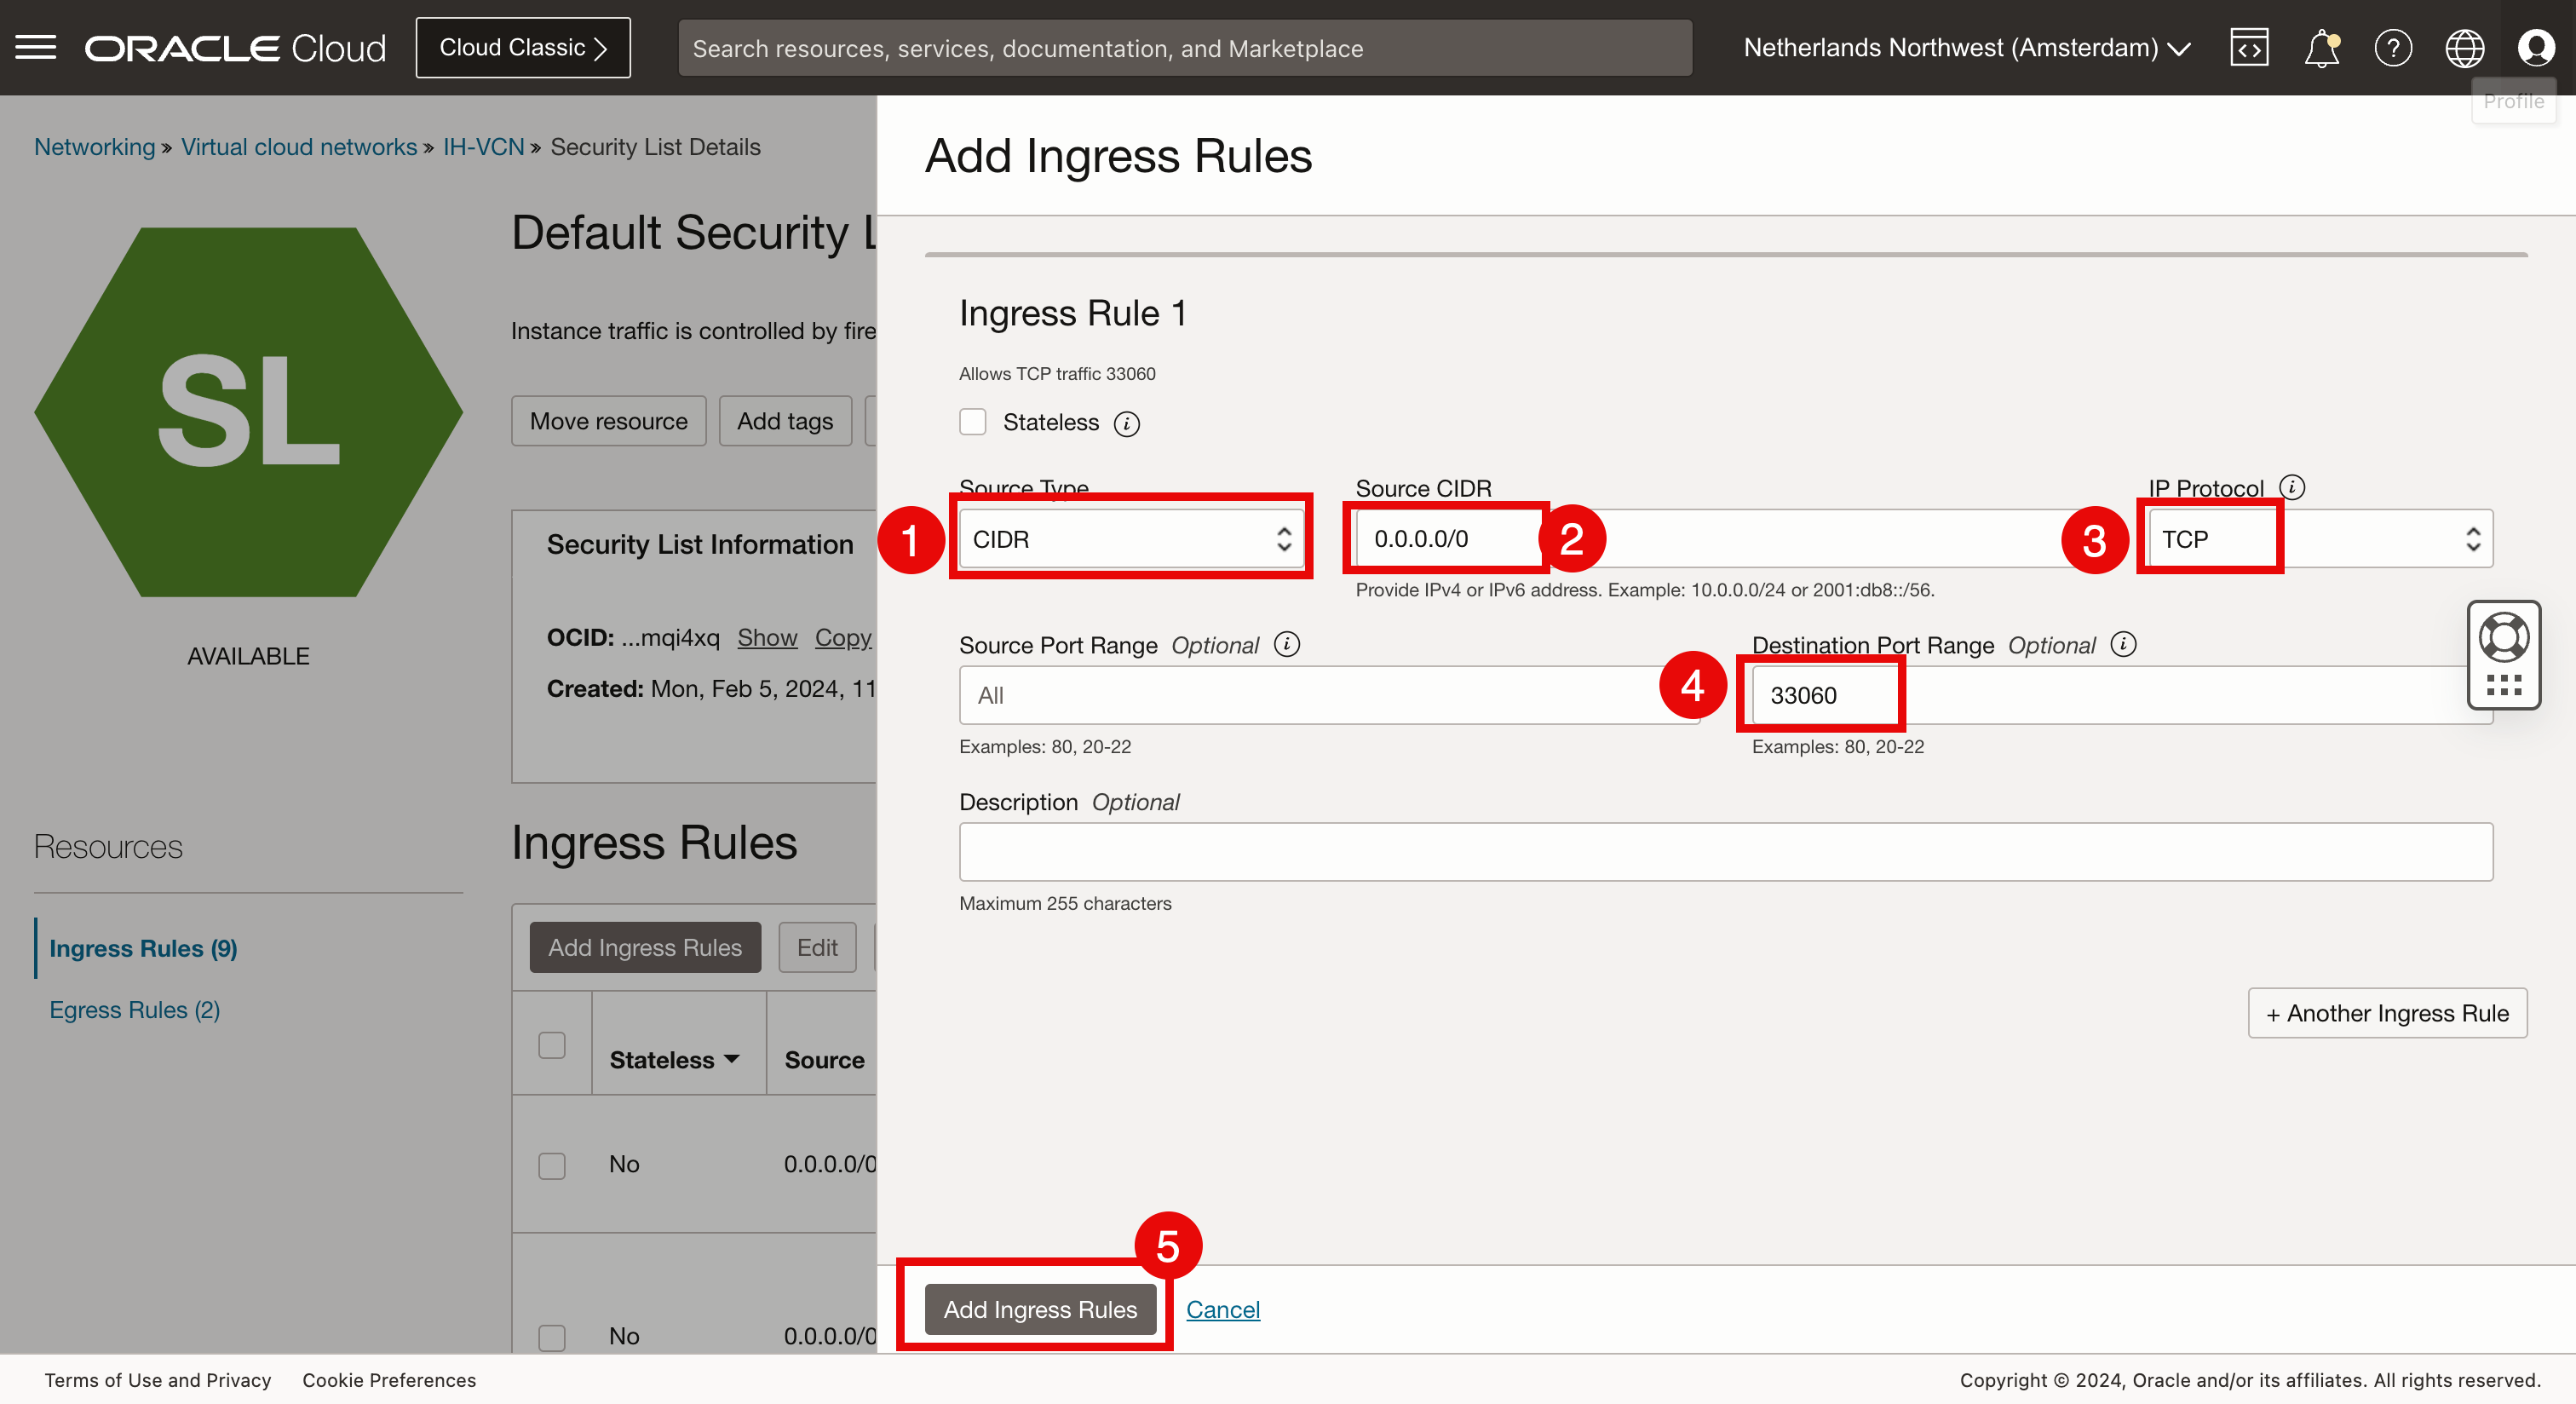
In Add Ingress Rules, enter the following information.
- Source Type: Select CIDR.
- Source CIDR: To allow traffic coming from all sources, enter
0.0.0.0/0. - IP Protocol: Select TCP.
- Destination Port Range: Enter 33060.
- Click Add Ingress Rules.
-
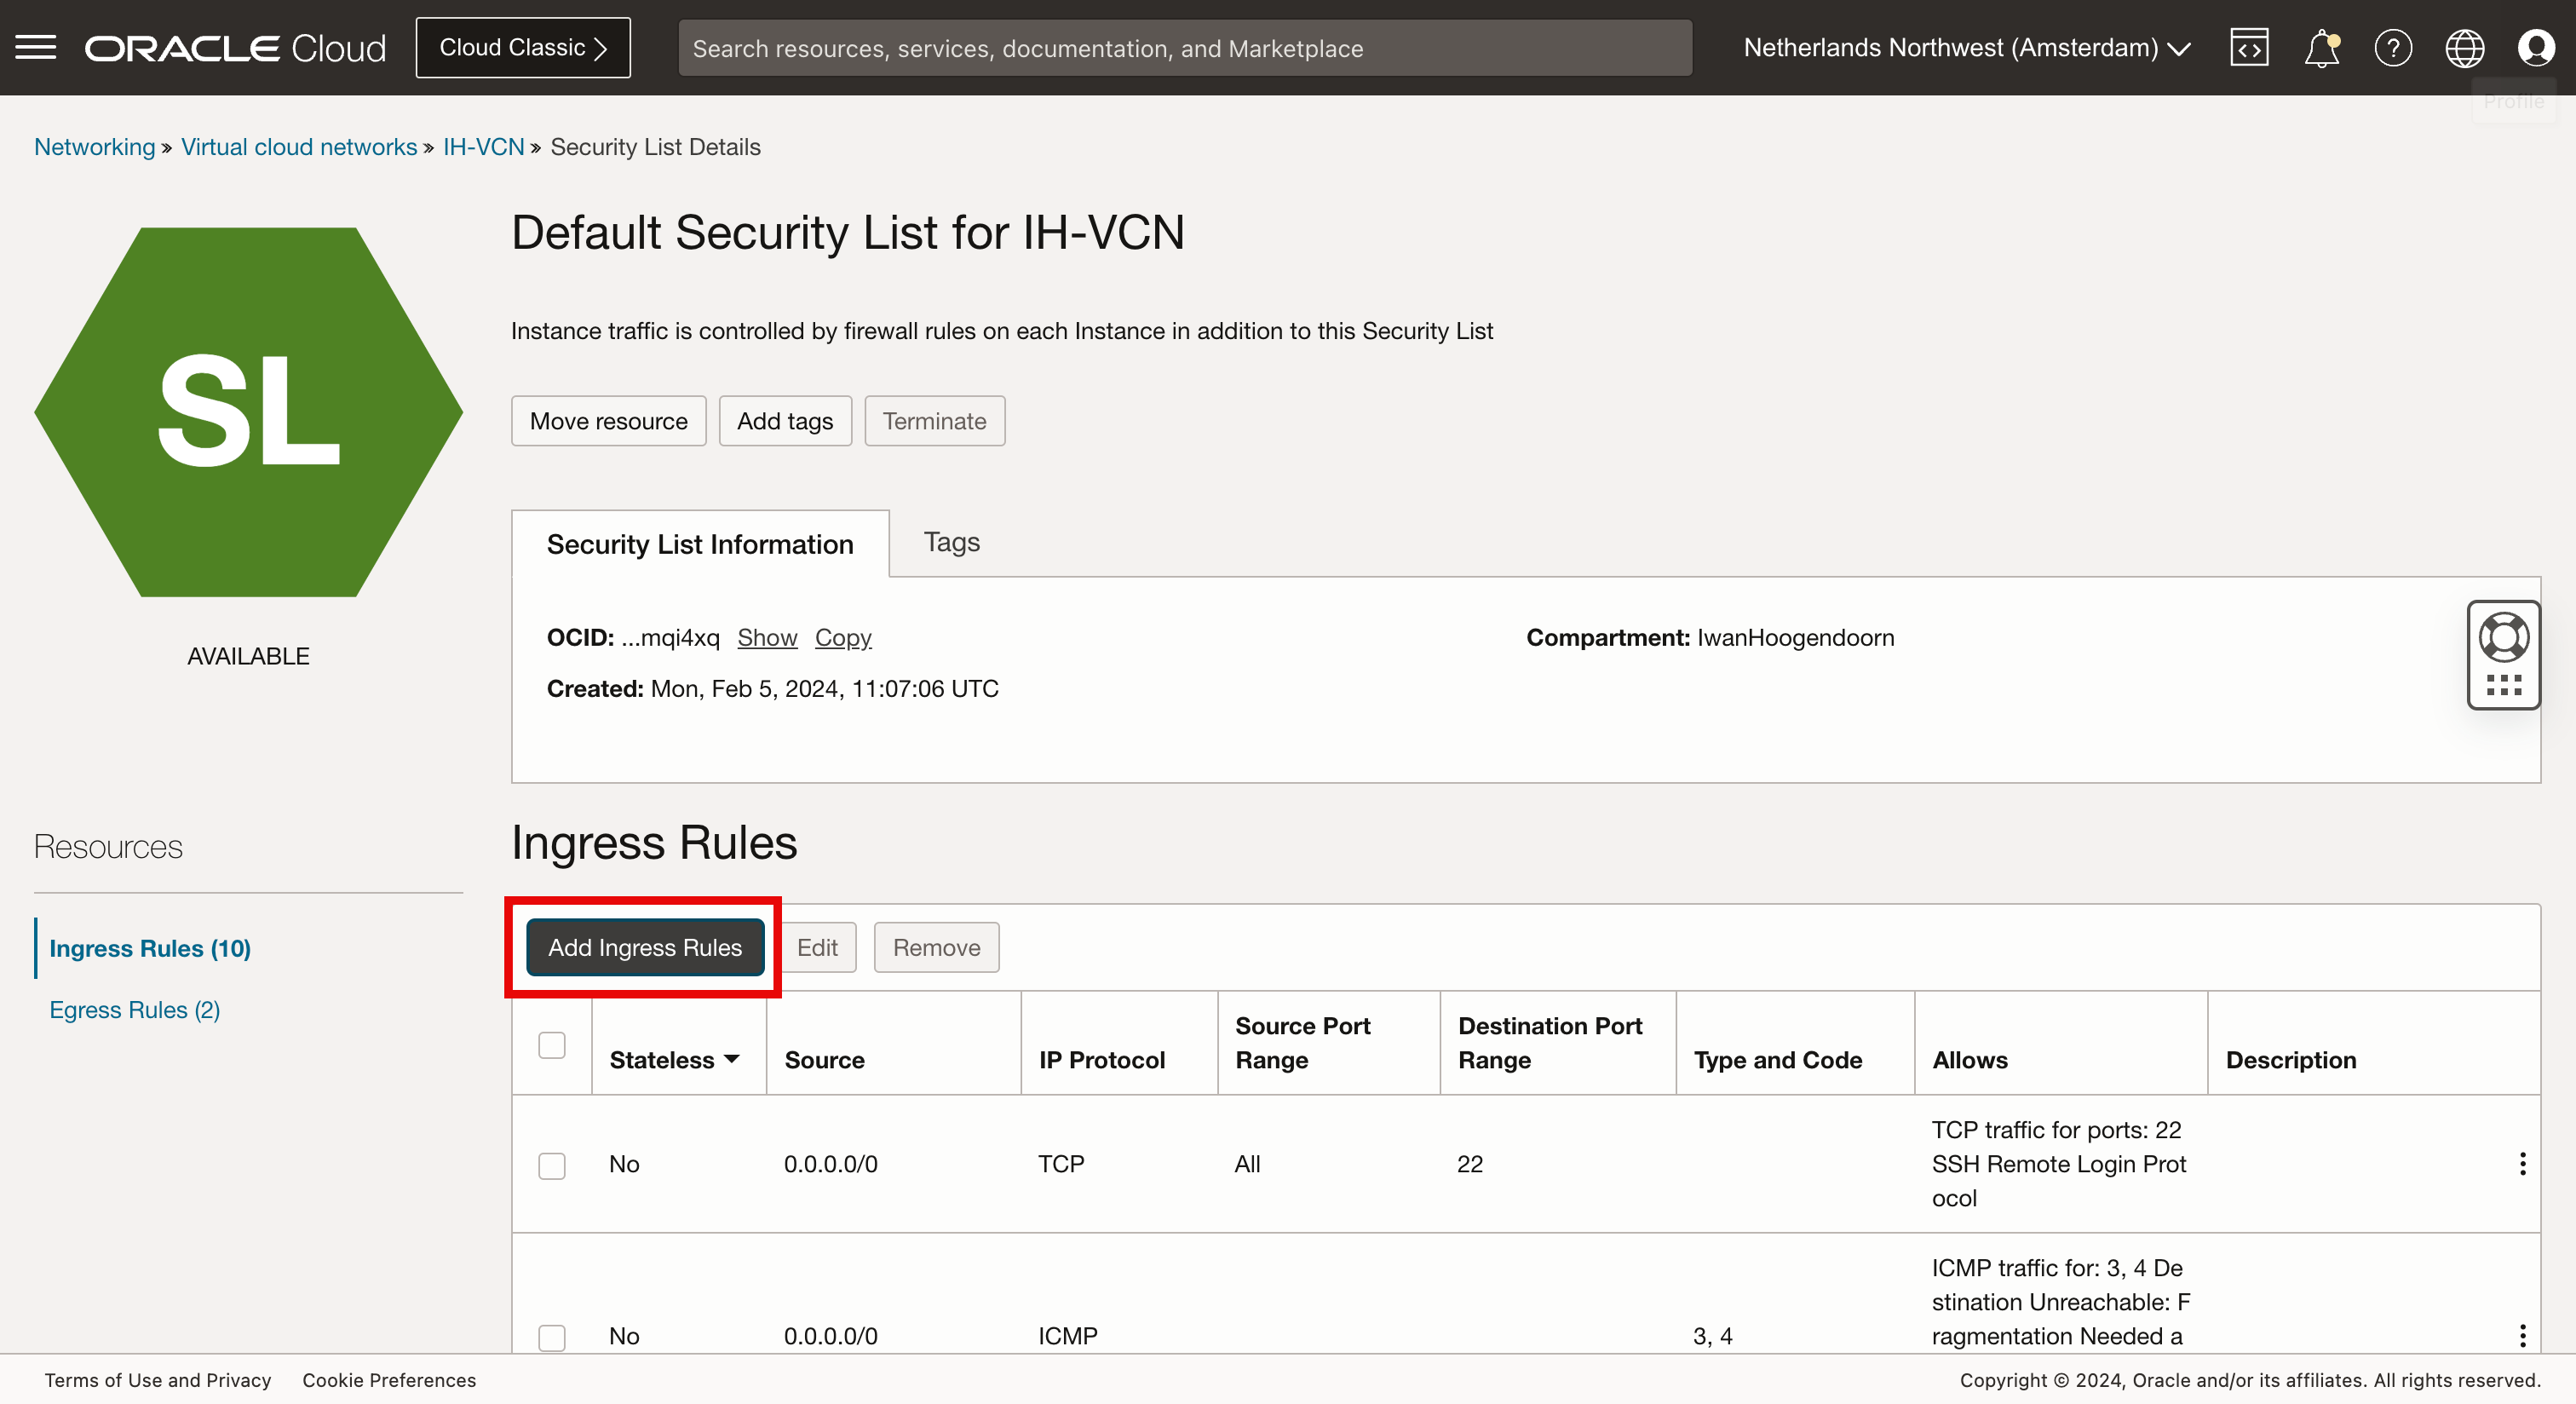
Click Add Ingress Rule.
-
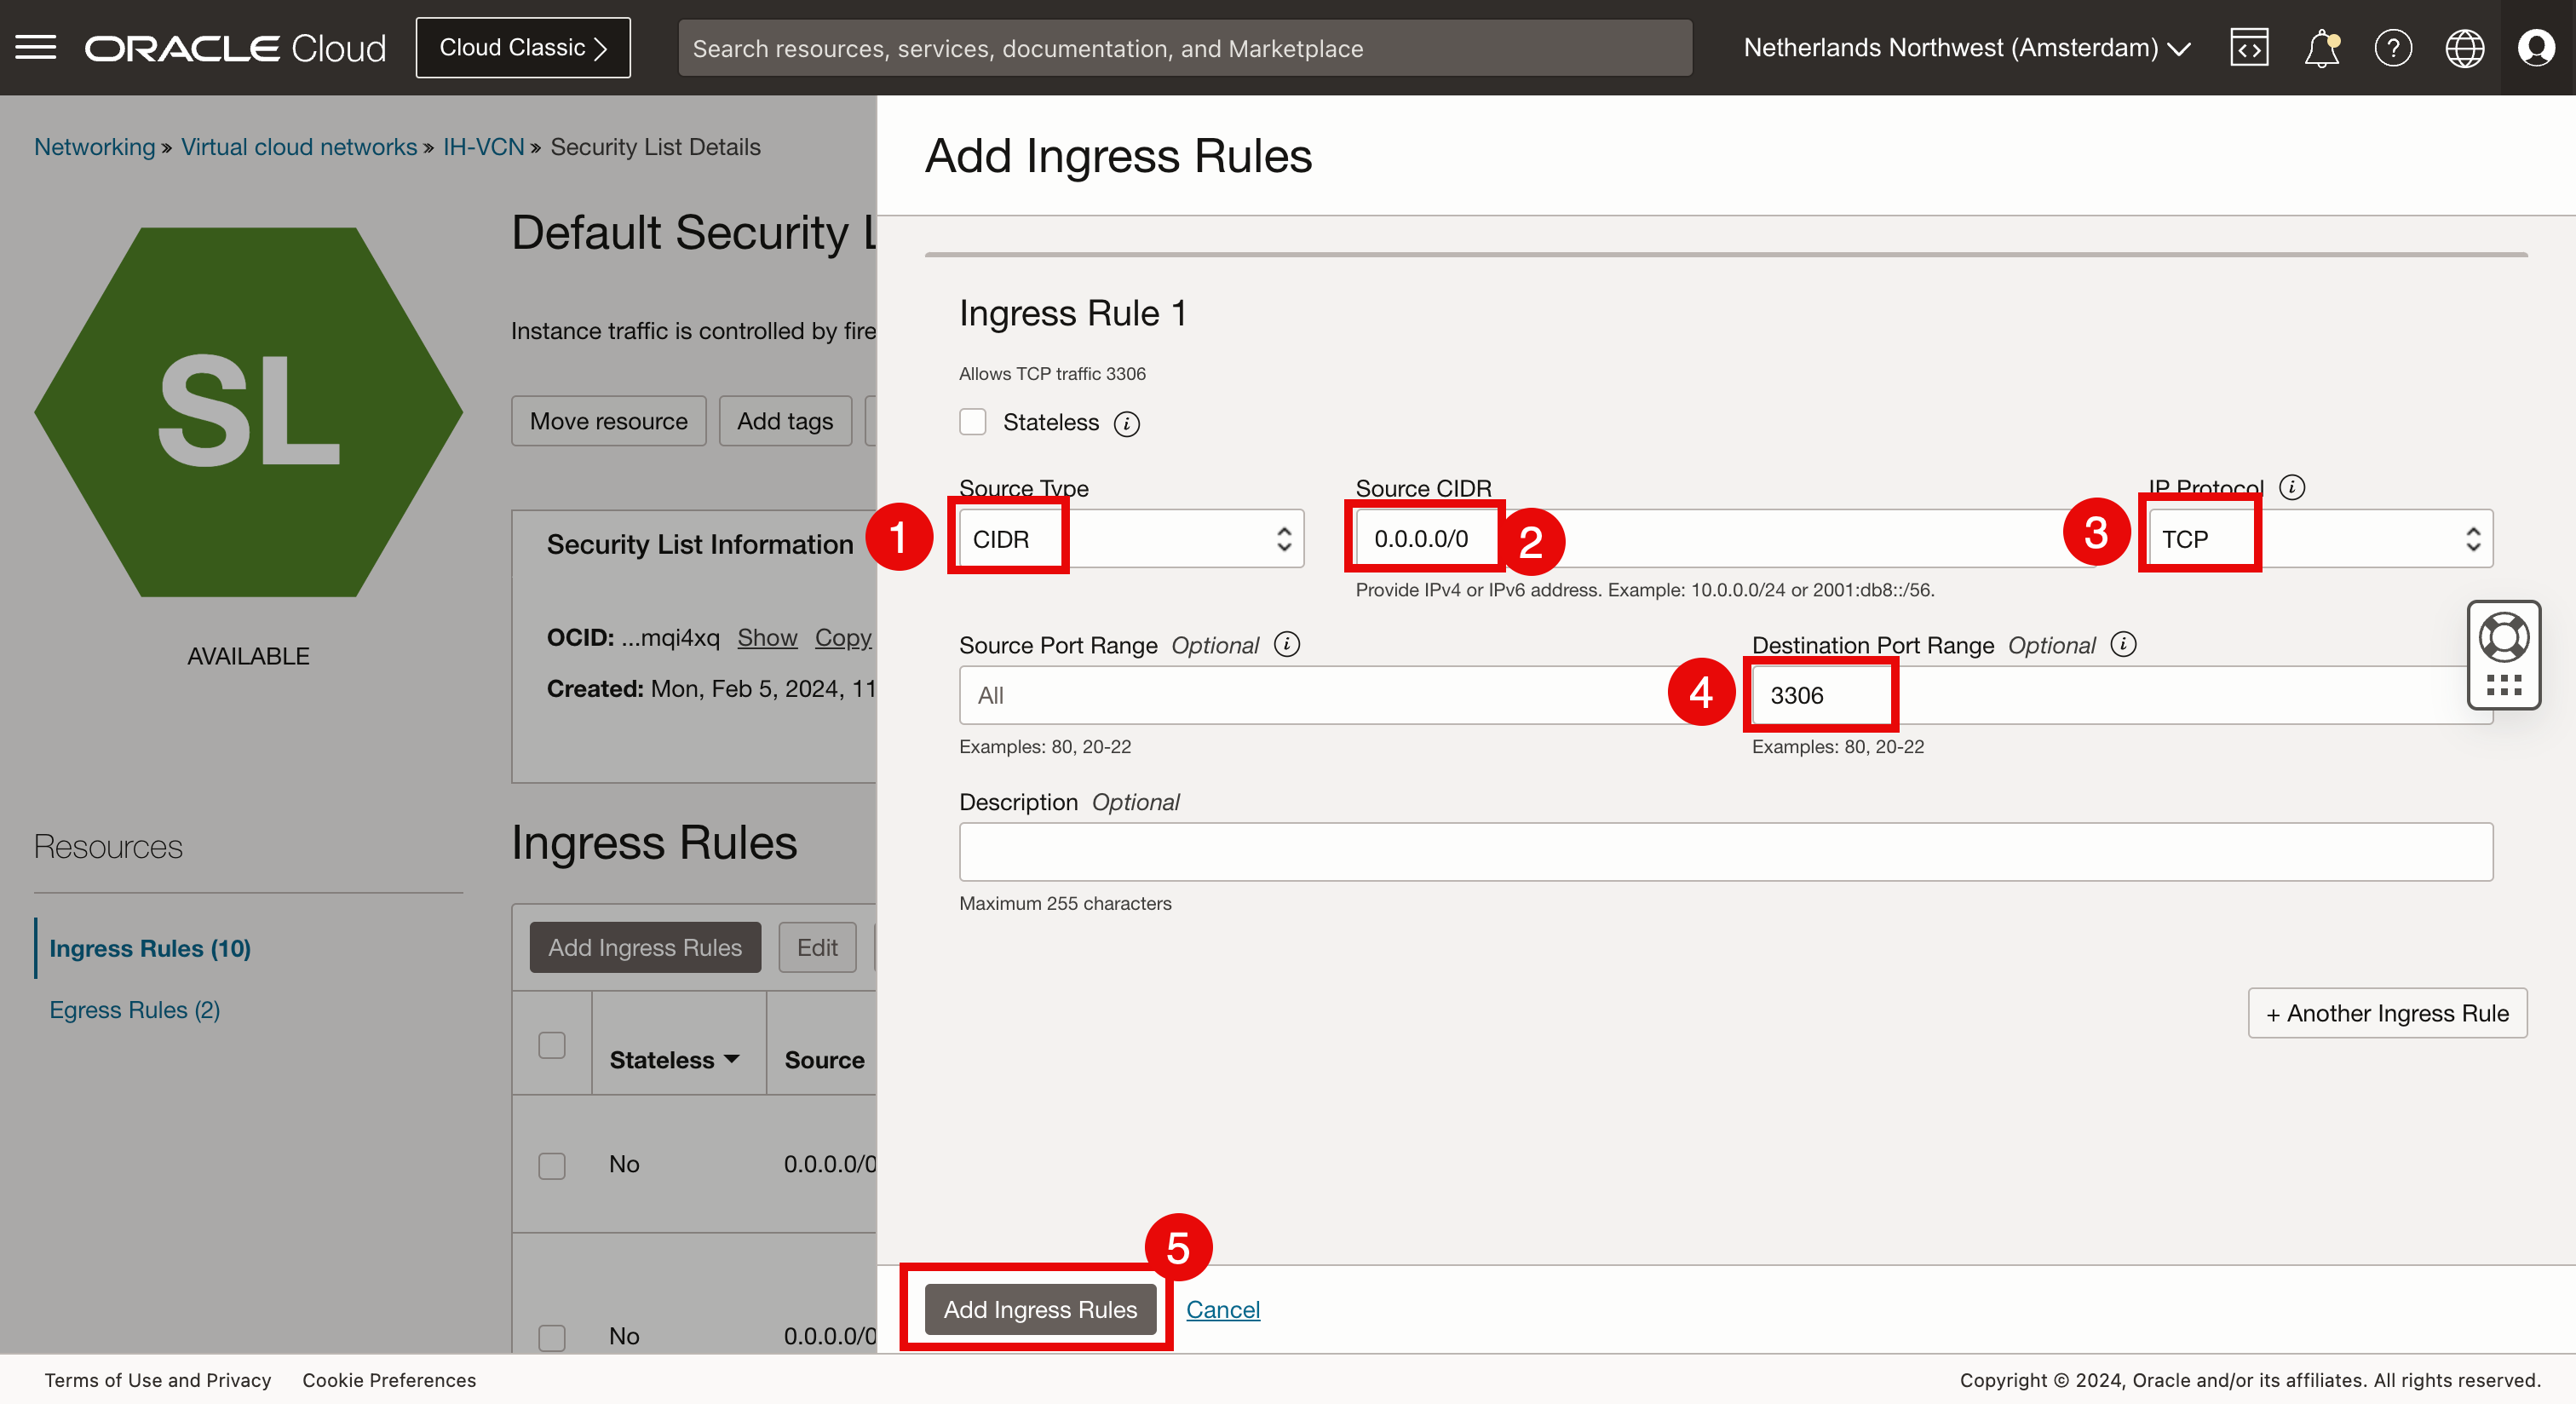
In Add Ingress Rules, enter the following information.
- Source Type: Select CIDR.
- Source CIDR: To allow traffic coming from all sources, enter
0.0.0.0/0. - IP Protocol: Select TCP.
- Destination Port Range: Enter 33060.
- Click Add Ingress Rules.
- Scroll down.
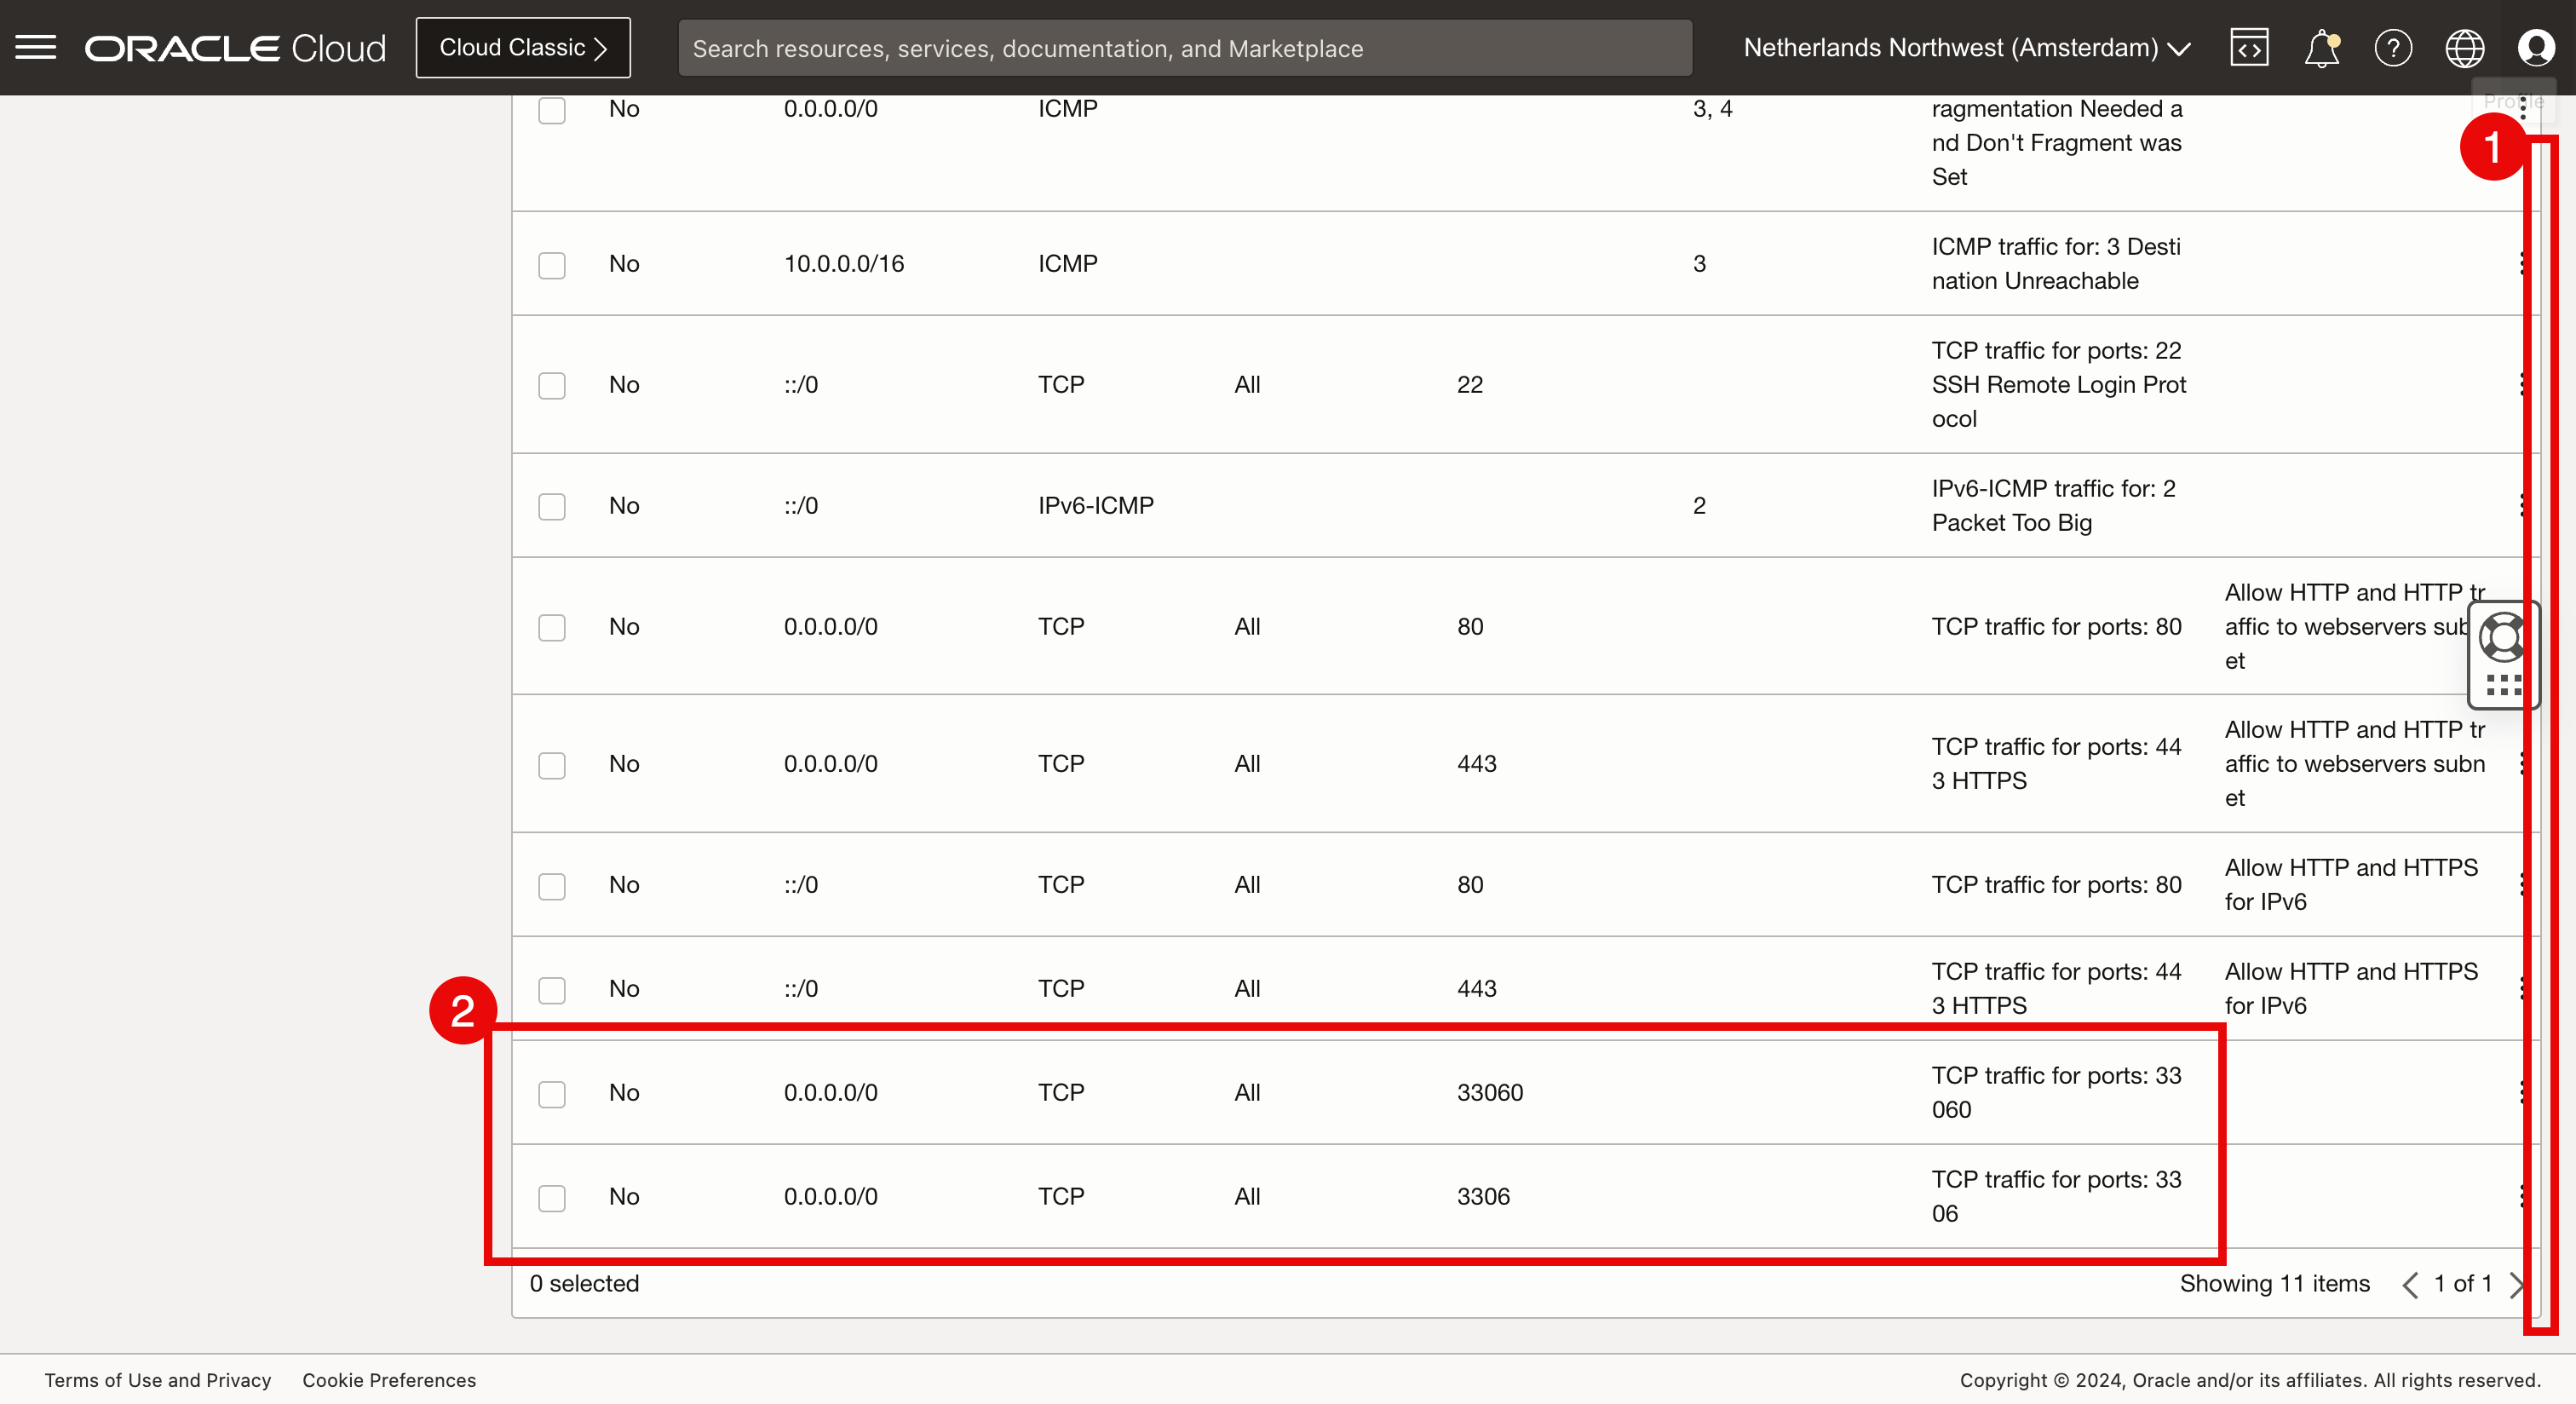
- Review if the rules for TCP ports
33060and3306are configured.
-
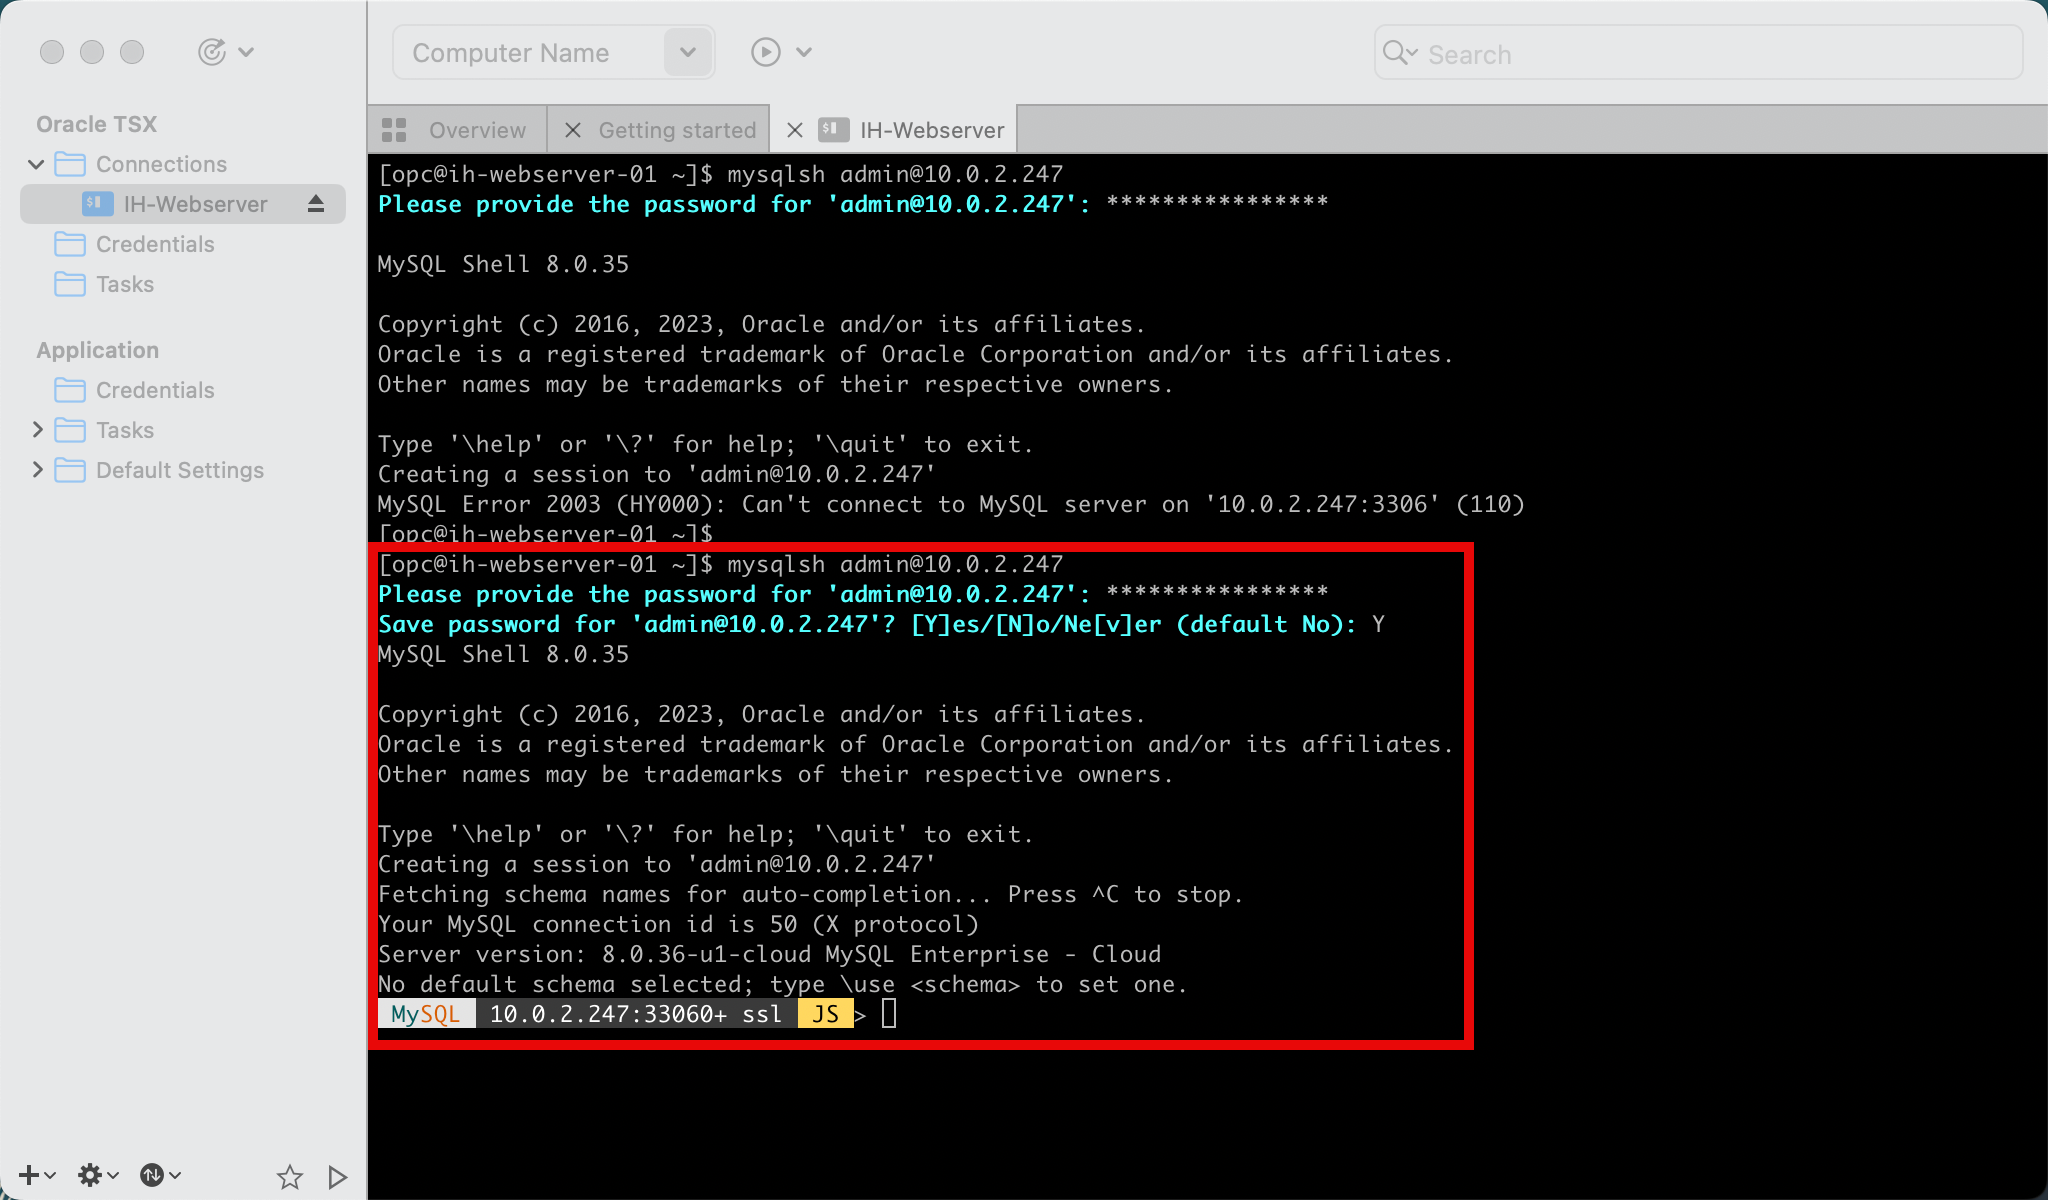
After the ingress rules are added to the default security list, we are able to access the OCI Database using the MySQL Shell with the the following command.
[opc@ih-webserver-01 ~]$ mysqlsh admin@10.0.2.247
Please provide the password for 'admin@10.0.2.247': ****************
Save password for 'admin@10.0.2.247'? [Y]es/[N]o/Ne[v]er (default No): Y
MySQL Shell 8.0.35

Copyright (c) 2016, 2023, Oracle and/or its affiliates.
Oracle is a registered trademark of Oracle Corporation and/or its affiliates.
Other names may be trademarks of their respective owners.

Type '\help' or '\?' for help; '\quit' to exit.
Creating a session to 'admin@10.0.2.247'
Fetching schema names for auto-completion... Press ^C to stop.
Your MySQL connection id is 50 (X protocol)
Server version: 8.0.36-u1-cloud MySQL Enterprise - Cloud
No default schema selected; type \use <schema> to set one.
MySQL  10.0.2.247:33060+ ssl  JS >
We are now able to access the OCI Database successfully.
-
After accessing the OCI Database with MySQL Shell, the following command will make it easier to use by enabling autosave, command history, and the mode.
MySQL 10.0.2.247:33060+ ssl JS > shell.options.setPersist('history.autoSave', 1) MySQL 10.0.2.247:33060+ ssl JS > shell.options.setPersist('history.maxSize', 5000) MySQL 10.0.2.247:33060+ ssl JS > shell.options.setPersist('defaultMode', 'sql') -
To display all the existing databases, use the following command.
MySQL 10.0.2.247:33060+ ssl SQL > SHOW DATABASES; +--------------------+ | Database | +--------------------+ | information_schema | | mysql | | mysql_audit | | performance_schema | | sys | +--------------------+ 5 rows in set (0.0015 sec) MySQL 10.0.2.247:33060+ ssl SQL > -
To create a new database, use the following command.
MySQL 10.0.2.247:33060+ ssl SQL > CREATE DATABASE F1; Query OK, 1 row affected (0.0066 sec) -
To verify the database has been created, use the following command.
MySQL 10.0.2.247:33060+ ssl SQL > SHOW DATABASES; +--------------------+ | Database | +--------------------+ | F1 | | information_schema | | mysql | | mysql_audit | | performance_schema | | sys | +--------------------+ 6 rows in set (0.0010 sec) MySQL 10.0.2.247:33060+ ssl SQL > -
To use the new database (to create tables and records), use the following command.
MySQL 10.0.2.247:33060+ ssl SQL > USE F1 Default schema set to `F1`. Fetching global names, object names from `F1` for auto-completion... Press ^C to stop. MySQL 10.0.2.247:33060+ ssl F1 SQL > -
To display all the existing tables in the database, use the following command.
MySQL 10.0.2.247:33060+ ssl F1 SQL > SHOW TABLES; Empty set (0.0013 sec) MySQL 10.0.2.247:33060+ ssl F1 SQL > -
To create a new table with some columns, use the following command.
MySQL 10.0.2.247:33060+ ssl F1 SQL > CREATE TABLE drivers(First_Name VARCHAR(50) NOT NULL,Last_Name VARCHAR(50) NOT NULL,PRIMARY KEY(Last_Name)); Query OK, 0 rows affected (0.0207 sec) MySQL 10.0.2.247:33060+ ssl F1 SQL > -
To verify all the tables in the database, use the following command.
MySQL 10.0.2.247:33060+ ssl F1 SQL > DESCRIBE drivers; +------------+-------------+------+-----+---------+-------+ | Field | Type | Null | Key | Default | Extra | +------------+-------------+------+-----+---------+-------+ | First_Name | varchar(50) | NO | | NULL | | | Last_Name | varchar(50) | NO | PRI | NULL | | +------------+-------------+------+-----+---------+-------+ 2 rows in set (0.0022 sec) MySQL 10.0.2.247:33060+ ssl F1 SQL > -
To create two new records inside the table, use the following commands.
MySQL 10.0.2.247:33060+ ssl F1 SQL > INSERT INTO drivers VALUE ("Max", "Verstappen"); Query OK, 1 row affected (0.0048 sec) MySQL 10.0.2.247:33060+ ssl F1 SQL > INSERT INTO drivers VALUE ("Sergio", "Pérez"); Query OK, 1 row affected (0.0024 sec) MySQL 10.0.2.247:33060+ ssl F1 SQL > -
To verify that two new records are created inside the table, use the following command.
MySQL 10.0.2.247:33060+ ssl F1 SQL > SELECT * FROM drivers; +------------+------------+ | First_Name | Last_Name | +------------+------------+ | Sergio | Pérez | | Max | Verstappen | +------------+------------+ 2 rows in set (0.0006 sec) MySQL 10.0.2.247:33060+ ssl F1 SQL > -
To create a new user and provide the proper privileges for the new database, use the following command.
MySQL 10.0.2.247:33060+ ssl SQL > CREATE USER 'iwan'@'%' IDENTIFIED WITH mysql_native_password BY 'XXX'; Query OK, 0 rows affected (0.0035 sec) MySQL 10.0.2.247:33060+ ssl SQL > GRANT ALL ON F1.* TO 'iwan'@'%'; Query OK, 0 rows affected (0.0037 sec) MySQL 10.0.2.247:33060+ ssl SQL > -
To verify the new user has the proper privileges on the database, use the following command.
MySQL 10.0.2.247:33060+ ssl SQL > SHOW GRANTS FOR 'iwan'; +----------------------------------------------+ | Grants for iwan@% | +----------------------------------------------+ | GRANT USAGE ON *.* TO `iwan`@`%` | | GRANT ALL PRIVILEGES ON `F1`.* TO `iwan`@`%` | +----------------------------------------------+ 2 rows in set (0.0006 sec) MySQL 10.0.2.247:33060+ ssl SQL > -
To close the the MySQL Shell, run
\qcommand.MySQL 10.0.2.247:33060+ ssl F1 SQL > \q Bye! [opc@ih-webserver-01 ~]$
Now, we have a sample database with some sample tables and sample data running inside OCI using the OCI Database MySQL service. The next task is to retrieve this data using a PHP website.
Task 6: Install and Configure an NGINX Webserver with PHP
We already have a compute instance with NGNIX and PHP created but if you still need to create a new instance with NGNIX and PHP, follow the tutorial: Task 6: Install a Webserver on Instance.
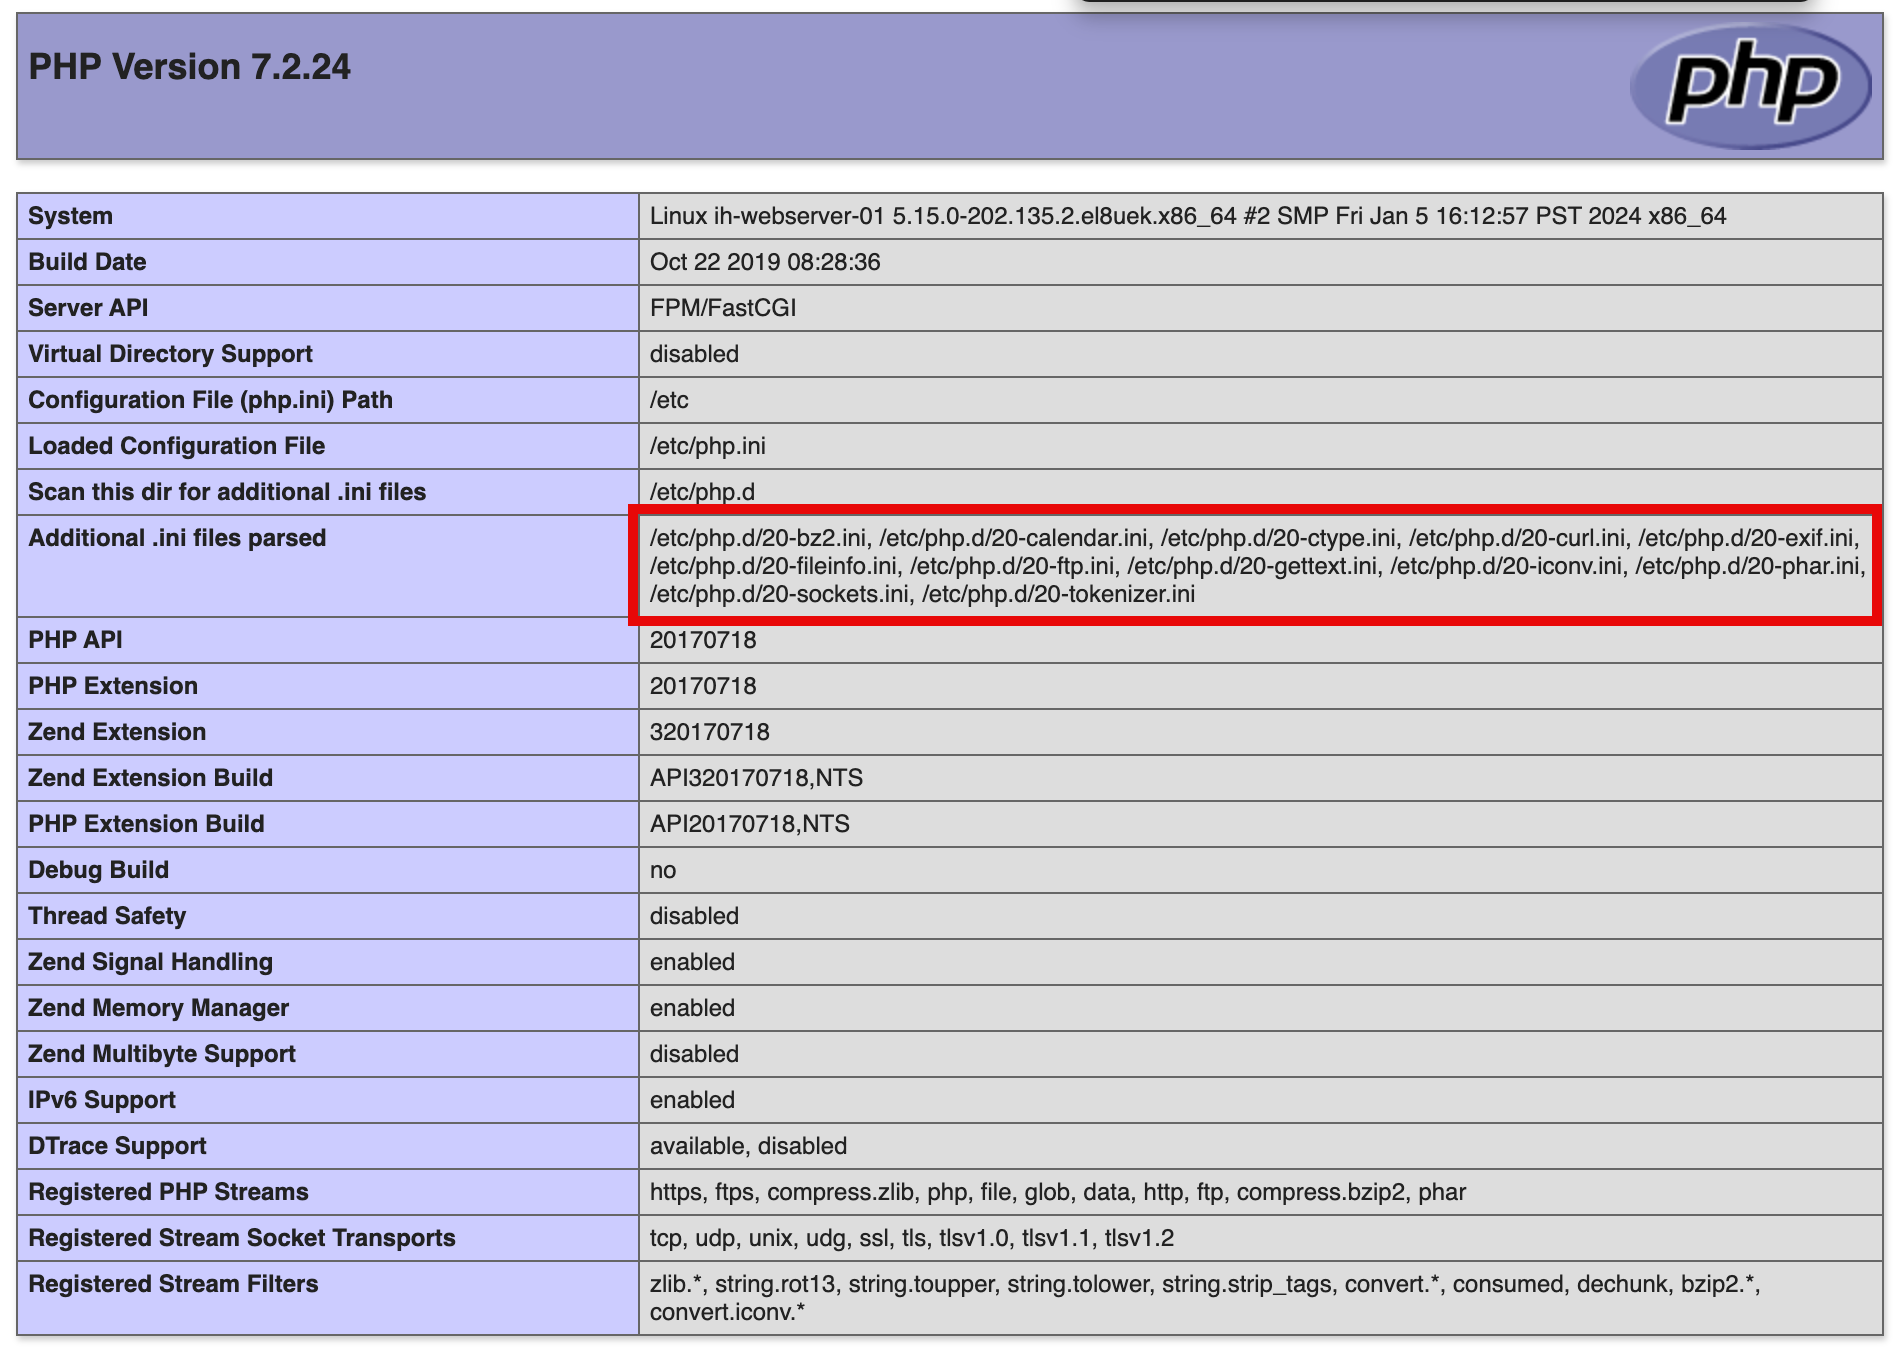
In the previous NGINX with PHP setup, we did not install any PHP MySQL modules. A quick check on PHP Info page will confirm this.
-
Use the following command to install the PHP MySQL modules so that NGINX and PHP can work together with MySQL.
[opc@ih-webserver-01 html]$ sudo dnf install php php-common php-mysqlnd php-pecl-zip php-gd php-mbstring php-xml php-soap Last metadata expiration check: 2:28:09 ago on Fri 16 Feb 2024 08:40:17 AM GMT. Package php-7.2.24-1.module+el8.2.0+5510+6771133c.x86_64 is already installed. Package php-common-7.2.24-1.module+el8.2.0+5510+6771133c.x86_64 is already installed. Dependencies resolved. ====================================================================================================================== Package Architecture Version Repository Size ====================================================================================================================== Installing: php-gd x86_64 7.2.24-1.module+el8.2.0+5510+6771133c ol8_appstream 84 k php-mbstring x86_64 7.2.24-1.module+el8.2.0+5510+6771133c ol8_appstream 581 k php-mysqlnd x86_64 7.2.24-1.module+el8.2.0+5510+6771133c ol8_appstream 191 k php-pecl-zip x86_64 1.15.3-1.module+el8+5148+a558e3ee ol8_appstream 51 k php-soap x86_64 7.2.24-1.module+el8.2.0+5510+6771133c ol8_appstream 177 k php-xml x86_64 7.2.24-1.module+el8.2.0+5510+6771133c ol8_appstream 189 k Installing dependencies: gd x86_64 2.2.5-7.el8 ol8_appstream 144 k jbigkit-libs x86_64 2.1-14.el8 ol8_appstream 55 k libXpm x86_64 3.5.12-9.el8_7 ol8_appstream 58 k libjpeg-turbo x86_64 1.5.3-12.el8 ol8_appstream 157 k libtiff x86_64 4.0.9-29.el8_8 ol8_appstream 189 k libwebp x86_64 1.0.0-9.el8_9.1 ol8_appstream 273 k libzip x86_64 1.5.1-2.module+el8.2.0+5510+6771133c ol8_appstream 63 k php-pdo x86_64 7.2.24-1.module+el8.2.0+5510+6771133c ol8_appstream 123 k Transaction Summary ====================================================================================================================== Install 14 Packages Total download size: 2.3 M Installed size: 6.1 M Is this ok [y/N]: y Downloading Packages: (1/14): libXpm-3.5.12-9.el8_7.x86_64.rpm 253 kB/s | 58 kB 00:00 (2/14): jbigkit-libs-2.1-14.el8.x86_64.rpm 232 kB/s | 55 kB 00:00 (3/14): libjpeg-turbo-1.5.3-12.el8.x86_64.rpm 13 MB/s | 157 kB 00:00 (4/14): libtiff-4.0.9-29.el8_8.x86_64.rpm 19 MB/s | 189 kB 00:00 (5/14): gd-2.2.5-7.el8.x86_64.rpm 571 kB/s | 144 kB 00:00 (6/14): libwebp-1.0.0-9.el8_9.1.x86_64.rpm 22 MB/s | 273 kB 00:00 (7/14): libzip-1.5.1-2.module+el8.2.0+5510+6771133c.x86_64.rpm 846 kB/s | 63 kB 00:00 (8/14): php-gd-7.2.24-1.module+el8.2.0+5510+6771133c.x86_64.rpm 963 kB/s | 84 kB 00:00 (9/14): php-mbstring-7.2.24-1.module+el8.2.0+5510+6771133c.x86_64.rpm 3.9 MB/s | 581 kB 00:00 (10/14): php-pdo-7.2.24-1.module+el8.2.0+5510+6771133c.x86_64.rpm 1.9 MB/s | 123 kB 00:00 (11/14): php-mysqlnd-7.2.24-1.module+el8.2.0+5510+6771133c.x86_64.rpm 1.2 MB/s | 191 kB 00:00 (12/14): php-soap-7.2.24-1.module+el8.2.0+5510+6771133c.x86_64.rpm 1.1 MB/s | 177 kB 00:00 (13/14): php-pecl-zip-1.15.3-1.module+el8+5148+a558e3ee.x86_64.rpm 308 kB/s | 51 kB 00:00 (14/14): php-xml-7.2.24-1.module+el8.2.0+5510+6771133c.x86_64.rpm 1.8 MB/s | 189 kB 00:00 ---------------------------------------------------------------------------------------------------------------------- Total 3.9 MB/s | 2.3 MB 00:00 Running transaction check Transaction check succeeded. Running transaction test Transaction test succeeded. Running transaction Preparing : 1/1 Installing : libjpeg-turbo-1.5.3-12.el8.x86_64 1/14 Installing : libXpm-3.5.12-9.el8_7.x86_64 2/14 Installing : php-pdo-7.2.24-1.module+el8.2.0+5510+6771133c.x86_64 3/14 Installing : libzip-1.5.1-2.module+el8.2.0+5510+6771133c.x86_64 4/14 Installing : libwebp-1.0.0-9.el8_9.1.x86_64 5/14 Installing : jbigkit-libs-2.1-14.el8.x86_64 6/14 Running scriptlet: jbigkit-libs-2.1-14.el8.x86_64 6/14 Installing : libtiff-4.0.9-29.el8_8.x86_64 7/14 Installing : gd-2.2.5-7.el8.x86_64 8/14 Running scriptlet: gd-2.2.5-7.el8.x86_64 8/14 Installing : php-gd-7.2.24-1.module+el8.2.0+5510+6771133c.x86_64 9/14 Installing : php-pecl-zip-1.15.3-1.module+el8+5148+a558e3ee.x86_64 10/14 Installing : php-mysqlnd-7.2.24-1.module+el8.2.0+5510+6771133c.x86_64 11/14 Installing : php-xml-7.2.24-1.module+el8.2.0+5510+6771133c.x86_64 12/14 Installing : php-soap-7.2.24-1.module+el8.2.0+5510+6771133c.x86_64 13/14 Installing : php-mbstring-7.2.24-1.module+el8.2.0+5510+6771133c.x86_64 14/14 Running scriptlet: php-mbstring-7.2.24-1.module+el8.2.0+5510+6771133c.x86_64 14/14 Verifying : gd-2.2.5-7.el8.x86_64 1/14 Verifying : jbigkit-libs-2.1-14.el8.x86_64 2/14 Verifying : libXpm-3.5.12-9.el8_7.x86_64 3/14 Verifying : libjpeg-turbo-1.5.3-12.el8.x86_64 4/14 Verifying : libtiff-4.0.9-29.el8_8.x86_64 5/14 Verifying : libwebp-1.0.0-9.el8_9.1.x86_64 6/14 Verifying : libzip-1.5.1-2.module+el8.2.0+5510+6771133c.x86_64 7/14 Verifying : php-gd-7.2.24-1.module+el8.2.0+5510+6771133c.x86_64 8/14 Verifying : php-mbstring-7.2.24-1.module+el8.2.0+5510+6771133c.x86_64 9/14 Verifying : php-mysqlnd-7.2.24-1.module+el8.2.0+5510+6771133c.x86_64 10/14 Verifying : php-pdo-7.2.24-1.module+el8.2.0+5510+6771133c.x86_64 11/14 Verifying : php-pecl-zip-1.15.3-1.module+el8+5148+a558e3ee.x86_64 12/14 Verifying : php-soap-7.2.24-1.module+el8.2.0+5510+6771133c.x86_64 13/14 Verifying : php-xml-7.2.24-1.module+el8.2.0+5510+6771133c.x86_64 14/14 Installed: gd-2.2.5-7.el8.x86_64 jbigkit-libs-2.1-14.el8.x86_64 libXpm-3.5.12-9.el8_7.x86_64 libjpeg-turbo-1.5.3-12.el8.x86_64 libtiff-4.0.9-29.el8_8.x86_64 libwebp-1.0.0-9.el8_9.1.x86_64 libzip-1.5.1-2.module+el8.2.0+5510+6771133c.x86_64 php-gd-7.2.24-1.module+el8.2.0+5510+6771133c.x86_64 php-mbstring-7.2.24-1.module+el8.2.0+5510+6771133c.x86_64 php-mysqlnd-7.2.24-1.module+el8.2.0+5510+6771133c.x86_64 php-pdo-7.2.24-1.module+el8.2.0+5510+6771133c.x86_64 php-pecl-zip-1.15.3-1.module+el8+5148+a558e3ee.x86_64 php-soap-7.2.24-1.module+el8.2.0+5510+6771133c.x86_64 php-xml-7.2.24-1.module+el8.2.0+5510+6771133c.x86_64 Complete! [opc@ih-webserver-01 html]$ -
Run the following command to edit the
php.inifile.[opc@ih-webserver-01 testocidb]$ sudo nano /etc/php.ini -
Make sure this line is uncommented, so that the
mysqli.somodule can be loaded.extension=/usr/lib64/php/modules/mysqli.so -
Use the following commands to restart the NGINX and PHP services.
[opc@ih-webserver-01 testocidb]$ sudo systemctl start php-fpm [opc@ih-webserver-01 testocidb]$ sudo systemctl restart nginx -
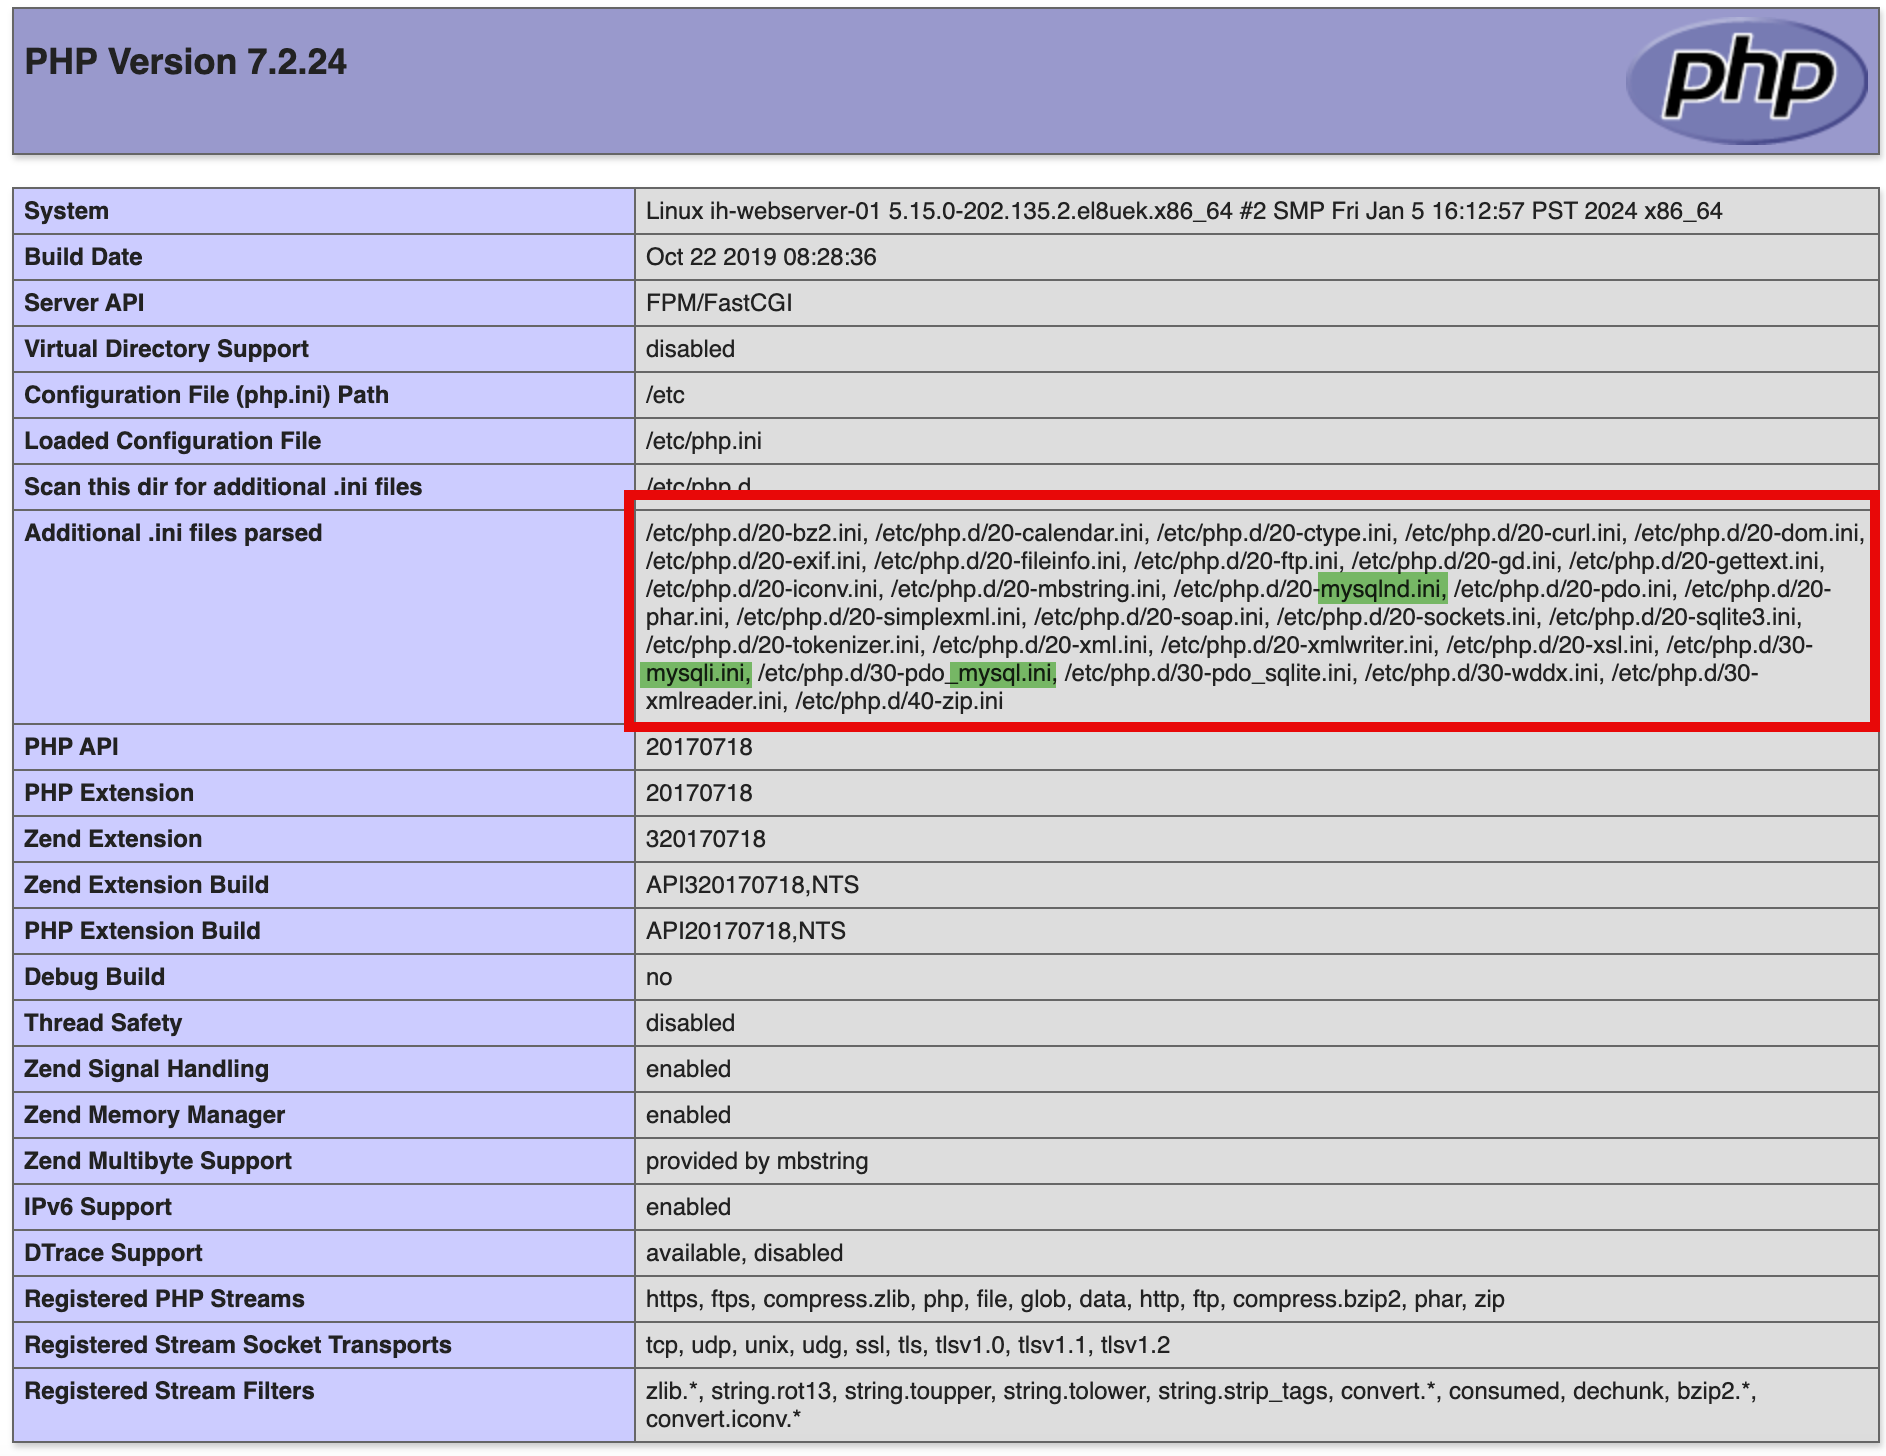
The PHP Info page is now confirming the PHP MySQL modules are installed.
-
For this tutorial, we are using Oracle Linux 8 and this is based on SE Linux, we need to run the following command to allow webserver (NGINX) to connect and access the MySQL Database.
[opc@ih-webserver-01 testocidb]$ sudo setsebool -P httpd_can_network_connect_db=1Note: Do not run the above command on the PHP website, that may give you an error: Could not connect: Can’t connect to MySQL server.
Task 7: Create a Website that Connects to the Database and Displays the Records on a Webpage
-
To change the directory on the webserver to the default path for the web server files, use the following command.
[opc@ih-webserver-01 ~]$ cd /usr/share/nginx/html/ [opc@ih-webserver-01 html]$ ls -l total 60 -rw-r--r--. 1 root root 168 Feb 8 07:47 404.php -rw-r--r--. 1 root root 497 Oct 24 16:50 50x.html -rw-r--r--. 1 root root 7 Feb 8 09:54 Color -rw-r--r--. 1 root root 9731 Feb 8 10:18 Iwan-hoogendoorn.logo.png -rw-r--r--. 1 root root 15406 Feb 8 10:07 favicon.ico drwxr-xr-x. 2 root root 101 Feb 8 09:59 files -rw-r--r--. 1 root root 8 Feb 8 09:52 health.html -rw-r--r--. 1 root root 622 Feb 7 18:13 index.html.original -rw-r--r--. 1 root root 6504 Feb 8 10:23 index.php -rw-r--r--. 1 root root 18 Feb 7 19:28 info.php [opc@ih-webserver-01 html]$ -
To create a new directory for the new test webpage, use the following command.
[opc@ih-webserver-01 html]$ sudo mkdir testocidb [opc@ih-webserver-01 html]$ ls -l total 60 -rw-r--r--. 1 root root 168 Feb 8 07:47 404.php -rw-r--r--. 1 root root 497 Oct 24 16:50 50x.html -rw-r--r--. 1 root root 7 Feb 8 09:54 Color -rw-r--r--. 1 root root 9731 Feb 8 10:18 Iwan-hoogendoorn.logo.png -rw-r--r--. 1 root root 15406 Feb 8 10:07 favicon.ico drwxr-xr-x. 2 root root 101 Feb 8 09:59 files -rw-r--r--. 1 root root 8 Feb 8 09:52 health.html -rw-r--r--. 1 root root 622 Feb 7 18:13 index.html.original -rw-r--r--. 1 root root 6504 Feb 8 10:23 index.php -rw-r--r--. 1 root root 18 Feb 7 19:28 info.php drwxr-xr-x. 2 root root 6 Feb 16 09:47 testocidb [opc@ih-webserver-01 html]$ -
Change the directory to the newly created directory and create a new
index.phpfile.This file will be the testing website to connect to the OCI Database, pull the data from the database and display it on the website.
[opc@ih-webserver-01 html]$ cd testocidb/ [opc@ih-webserver-01 testocidb]$ sudo nano index.php -
The HTML and PHP code for the testing website can be found below. If you are using this webpage, make sure you change the database IP, name, username, and password details.
Depending on your database table and data structure, you can change the code to reflect your example.
[opc@ih-webserver-01 testocidb]$ sudo more index.php
<!DOCTYPE html>
<html lang="en">
<head>
    <meta charset="UTF-8">
    <meta http-equiv="X-UA-Compatible" content="IE=edge">
    <meta name="viewport" content="width=device-width, initial-scale=1.0">
    <title>Database Records</title>
    <style>
        table{
            width: 70%;
            margin: auto;
            font-family: Arial, Helvetica, sans-serif;
        }
        table, tr, th, td{
            border: 1px solid #d4d4d4;
            border-collapse: collapse;
            padding: 12px;
        }
        th, td{
            text-align: left;
            vertical-align: top;
        }
        tr:nth-child(even){
            background-color: #e7e9eb;
        }
    </style>
<body>

<?php
    //storing database details in variables.
    $hostname = "10.0.2.247";
    $username = "iwan";
    $password = "XXX";
    $dbname = "F1";

    //creating connection to database
    $con = mysqli_connect($hostname, $username, $password, $dbname);
    //checking if connection is working or not
    if(!$con)
    {
        die("<p><center>Connection failed! <br></center></p>" . mysqli_connect_error());
    }
    else
    {
        echo "<p><center>Successfully Connected! <br></center></p>";
    }

    //Output Form Entries from the Database
    $sql = "SELECT First_Name, Last_Name FROM drivers";
    //fire query
    $result = mysqli_query($con, $sql);
    if(mysqli_num_rows($result) > 0)
    {
    echo '<table> <tr> <th> First Name </th> <th> Last Name </th> </tr>';
    while($row = mysqli_fetch_assoc($result)){
        // to output mysql data in HTML table format
        echo '<tr > <td>' . $row["First_Name"] . '</td>
        <td>' . $row["Last_Name"] . '</td>';
    }
    echo '</table>';
    }
    else
    {
        echo "0 results";
    }
    // closing connection
    mysqli_close($con);

?>
</body>
</html>
[opc@ih-webserver-01 testocidb]$
When we connect to the website /testocidb/index.php, we are able to access the website successfully and most importantly we will see the data stored in the database.

Acknowledgments
- Author - Iwan Hoogendoorn (OCI Network Specialist)
More Learning Resources
Explore other labs on docs.oracle.com/learn or access more free learning content on the Oracle Learning YouTube channel. Additionally, visit education.oracle.com/learning-explorer to become an Oracle Learning Explorer.
For product documentation, visit Oracle Help Center.
Create an Oracle Cloud Infrastructure Compute Instance Webserver using an OCI Database as the main Backend
F94432-01
March 2024
Copyright © 2024, Oracle and/or its affiliates.