Note:
- This tutorial requires access to Oracle Cloud. To sign up for a free account, see Get started with Oracle Cloud Infrastructure Free Tier.
- It uses example values for Oracle Cloud Infrastructure credentials, tenancy, and compartments. When completing your lab, substitute these values with ones specific to your cloud environment.
Protect Websites and Applications with Oracle Cloud Infrastructure Network Firewall
Introduction
Oracle Cloud Infrastructure (OCI) Network Firewall is a next generation managed network firewall and intrusion detection and prevention service for Oracle Cloud Infrastructure VCN, powered by Palo Alto Networks®.
The OCI Load Balancer service provides automated traffic distribution from one entry point to multiple servers reachable from virtual cloud network (VCN). The service offers a load balancer with choice of a public or private IP address, and provisioned bandwidth.
A Dynamic Routing Gateway (DRG) acts as a virtual router, providing a path for traffic between on-premises networks and VCNs, and can also be used to route traffic between VCNs. Using different types of attachments, custom network topologies can be constructed using components in different regions and tenancies.
By using the OCI Network Firewall with OCI Load Balancers connected with Dynamic Routing Gateway, you can protect north-south traffic directed to websites or applications deployed inside a private VPN.
Architecture
A new environment to try and test OCI Network Firewall and OCI Load Balancer capabilities will be created in this tutorial. This is the final architecture we will be using.
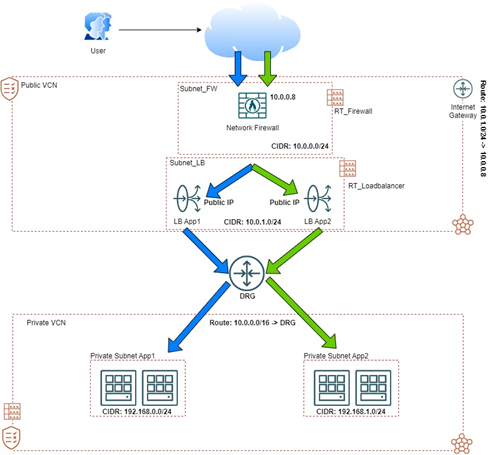
Note that we have separate VCNs: a public VCN and a private VCN. These two VCNs will host our network firewall and load balancer infrastructure and, in a private environment, the backend servers with our websites.
Objective
- Protect traffic directed to multiple websites and applications deployed in multiple backends using OCI Network Firewall and OCI Load Balancers.
Prerequisites
-
Access to an OCI tenancy.
-
A Virtual Cloud Network set up in the tenancy.
-
All the policy setups for OCI Logs, Network Firewall, Networking and Compute.
Task 1: Create the Networking Elements
Create the public and private VCNs, subnets, and DRG.
Task 1.1: Create the Public and Private VCNs
-
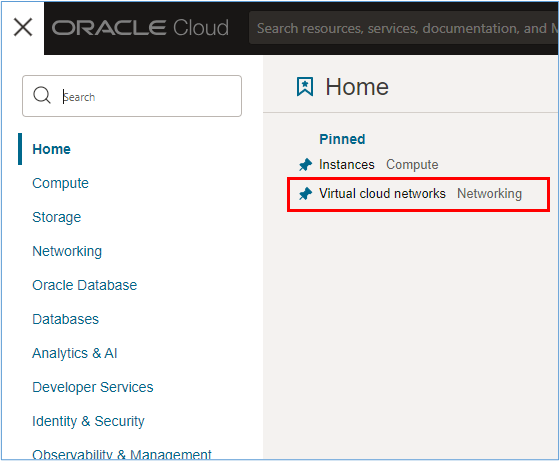
To create a VCN, go to the OCI Console and click Virtual Cloud Networks.
-
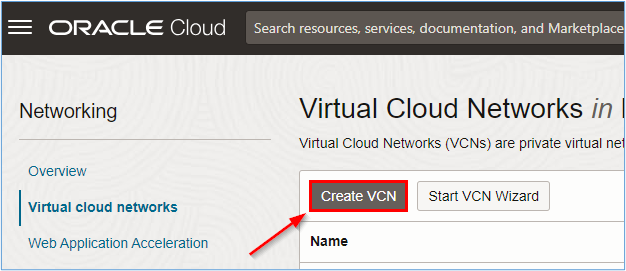
Click Create VCN.
-
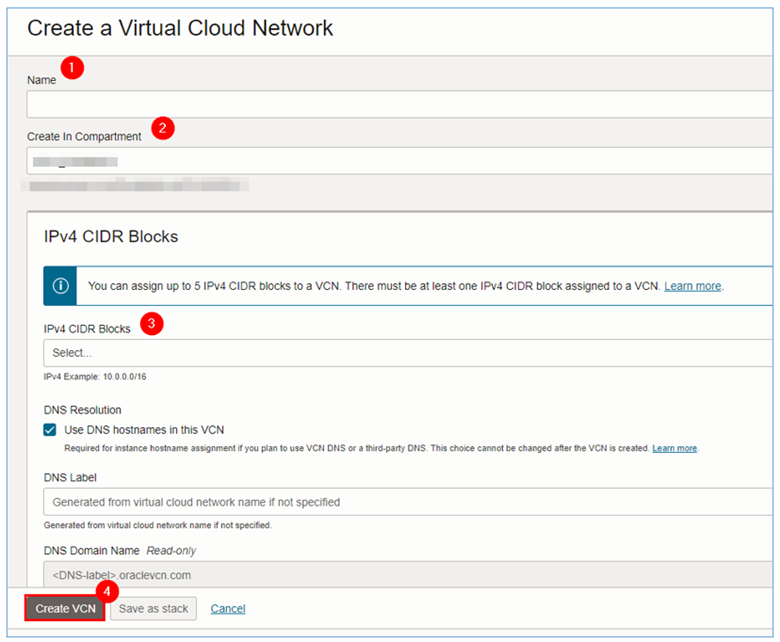
In the Create a Virtual Cloud Network page, enter the required information.
-
Repeat steps 1 to 3 for each of the VCNs to be created in the environment.

Task 1.2: Create the Subnets
Once the two VCNs are created, subnets must be created within each VCN so that they host the OCI Network Firewall, Load Balancers and the servers that will host the websites to be accessed.
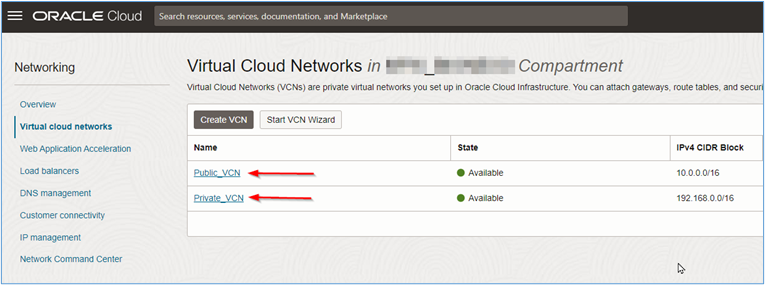
For each VCN, we will have the following subnets:
- VCN Public:
- Subnet_FW: Subnet where the OCI Network Firewall with CIDR
10.0.0.0/24will be deployed. - Subnet_LB: Subnet where OCI Load Balancers with CIDR
10.0.1.0/24will be deployed.
- Subnet_FW: Subnet where the OCI Network Firewall with CIDR
- VCN Private:
- Subnet_App1: Subnet where the servers that host the App1 site will be deployed with CIDR
192.168.0.0/24. - Subnet_App2: Subnet where the servers that host the App2 site will be deployed with CIDR
192.168.0.0/24.
- Subnet_App1: Subnet where the servers that host the App1 site will be deployed with CIDR
-
Click each VCN name to create the subnets.
-
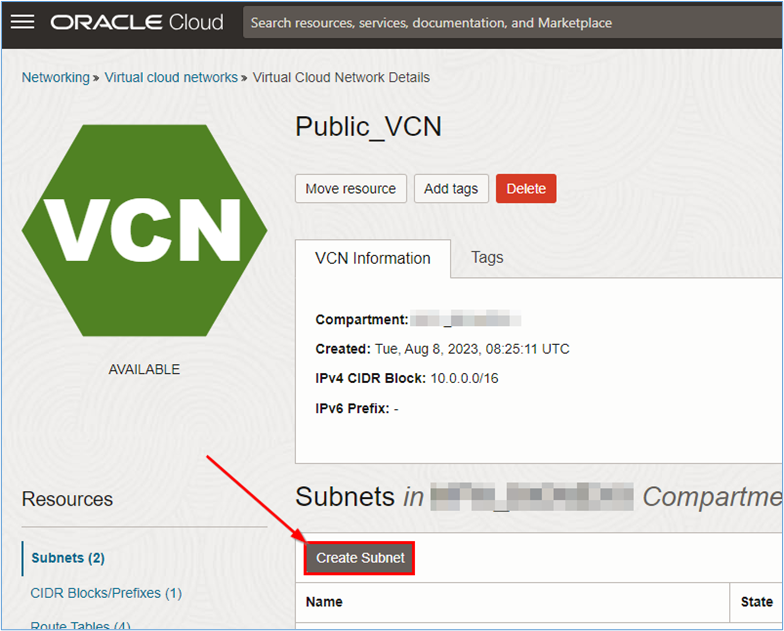
Click Create Subnet.
-
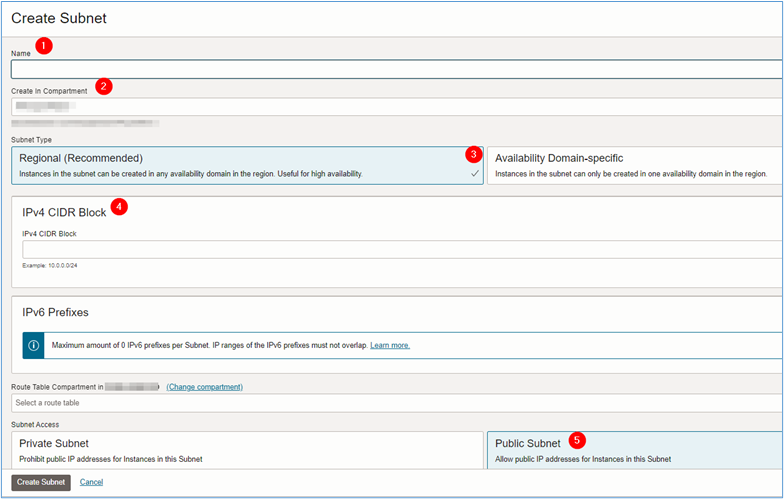
In the Create Subnet page, enter the required information.
- Name: Enter the subnet name.
- Compartment: Select the compartment where the subnet will be created.
- Subnet Type: Select Regional according to the recommendation.
- IPv4 CIDR Block: Enter the CIDR you want for the subnet. For this tutorial, we defined the address in Task 1.2.
- Subnet Access: For subnets where firewall and load balancers will be installed, select Public Subnet. For the subnets where the application or website servers will be installed.
-
Once all the necessary information has been entered, click Create Subnet.
Note: Do not forget to check if the security lists of the created VCNs allow the traffic to be used in the environment. For example, If you are going to allow HTTP access via network firewall, the security lists must allow this inbound traffic on the VCNs.
Task 1.3: Create the Dynamic Routing Gateway (DRG)
The DRG is the router that will interconnect the public VCN which contains the OCI Network Firewall and OCI Load Balancers with the private VCN which will contain the servers to be accessed via the Internet.
-
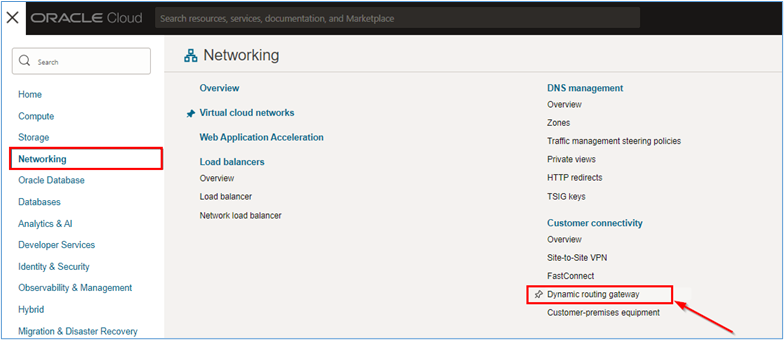
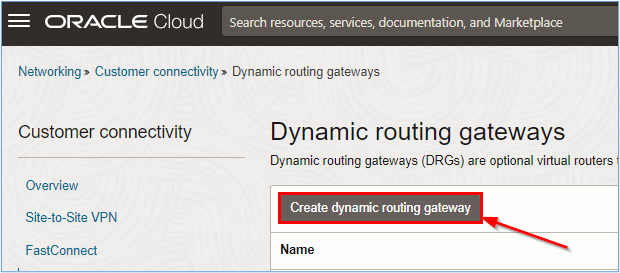
To create the DRG, go to the OCI Console, click Networking and Dynamic Routing Gateway.
-
In the Dynamic routing gateways page, click Create dynamic routing gateway.
-
Enter the name for the DRG and click Create dynamic routing gateway.
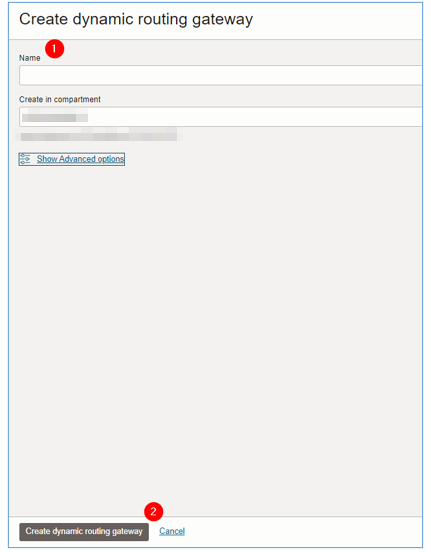
Wait till the creation finishes and the DRG lifecycle state displays Available:

-
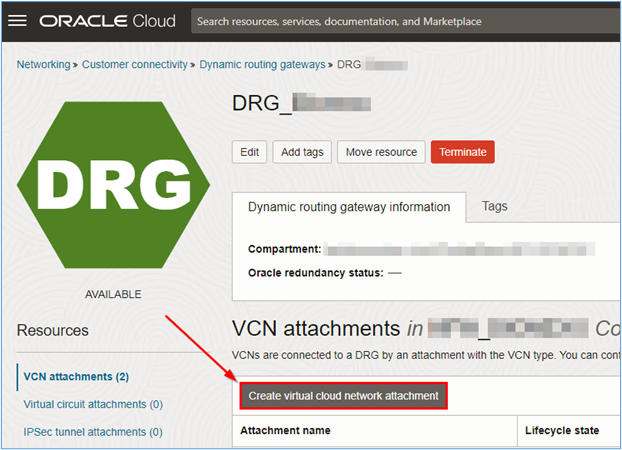
Once the creation is finished, click the DRG to view its details and create the necessary attachments for the connectivity between the VCNs to be created.
-
Creating DRG routing tables and DRG route distributions allows you to define routing policies that route traffic between attachments.
-
You can attach multiple VCNs to a single DRG and through these attachments, route traffic between the VCNs using the DRG routing capabilities.
-
-
To attach the VCNs created in Task 1.1, click Create virtual cloud network attachment.
-
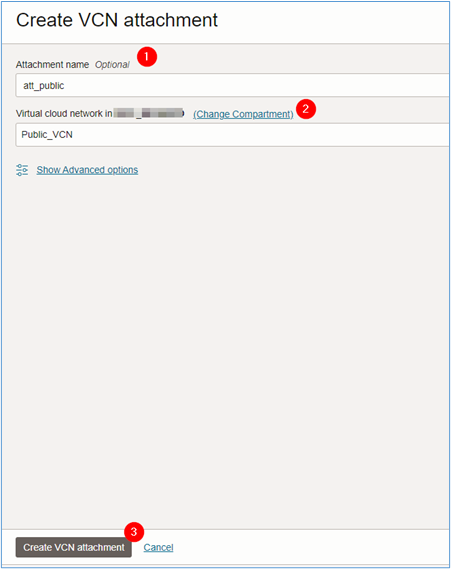
A new window will open. Enter the name of the attachment and select which VCN should be attached to the DRG by the attachment you are creating. Click Create VCN attachment to complete the creation.
- Attachment name:
att_public. - Virtual cloud network:
Public_VCN.
- Attachment name:
-
Repeat steps 1 to 5 for the VCN Private_VCN.
Task 2: Create the OCI Network Firewall
Before creating the OCI Network Firewall, it is necessary to create the policy that we will use in the firewall. In this task, the policy creation will be simple, allowing only HTTP traffic. However, the OCI Network Firewall is capable of inspecting encrypted traffic and has advanced L7 Firewall features.
For more information regarding the capabilities of the OCI Network Firewall service, see OCI Network Firewall.
Task 2.1: Create the Network Firewall Policy
Note: It is recommendeded that for production environments, the rules are as specific as possible, where the least-access policy is always respected. The examples used in this tutorial are purely educational and should never be reproduced in real production environments.
-
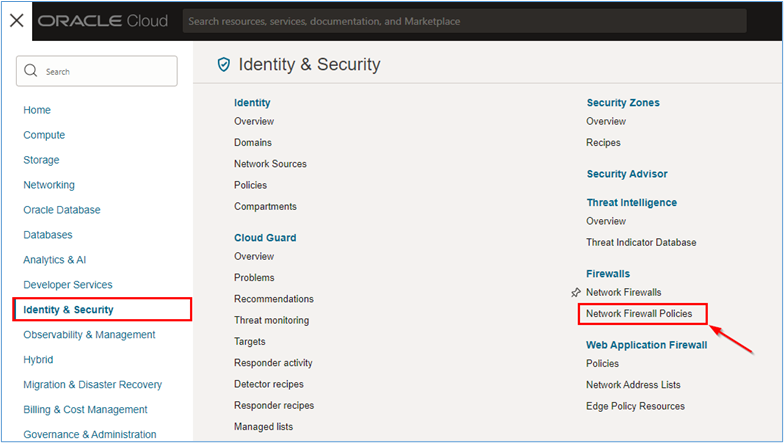
To create the policy that will be deployed in the network firewall, go to the OCI Console, click Identity & Security and Network Firewall Policies.
-
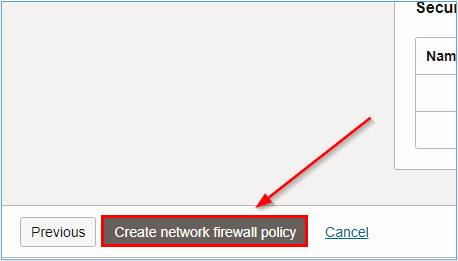
In the Network firewall policies page, click Create network firewall policy to start creating the firewall rule.

-
Enter the information as the wizard requests and click Create network firewall policy.
Note: For more information about which parameters are configurable within an OCI Network Firewall policy, see Policies and Creating a Network Firewall Service Policy.
After the policy is created, you will need to create the resources within the policy. The resources will detail how the policy will protect the environment.
A simple version of a policy will be used in this tutorial. We will only allow HTTP and HTTPS inbound traffic. For more information about creating OCI Network Firewall policies, see Creating a Network Firewall Service Policy and Creating Network Firewall Service Policy Components.
To create the policy used in this tutorial, you will need the following network firewall policy resources.
- Address List
- Service
- Service List
- Security Rule
-
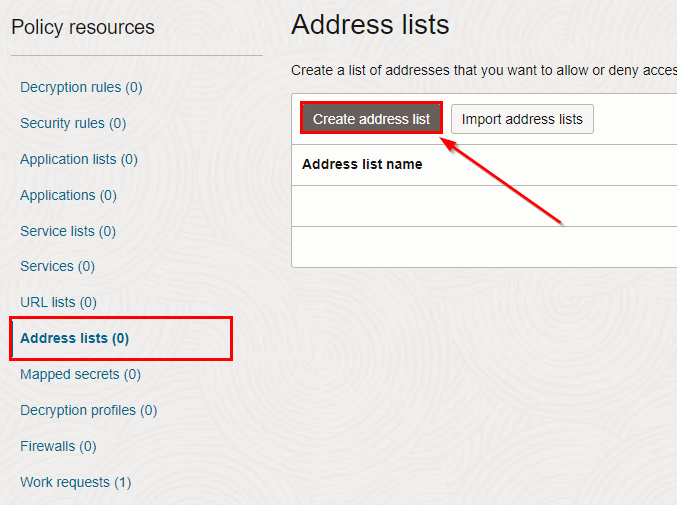
Create the Address List Resource.
-
Click Address List and Create address list.
-
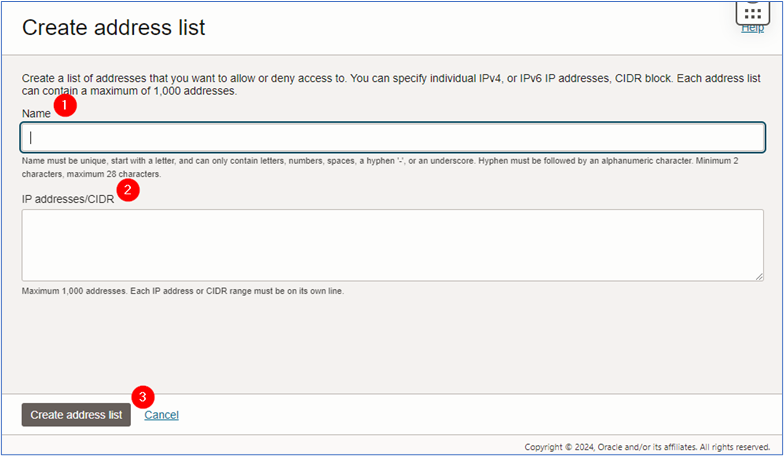
In the Create address list page, enter the required information and click Create address list.
- Name:
Frontend_Web(enter the name that best fits the environment). - IP addresses/CIDR: Enter the load balancer private CIDR.
- Name:
Once you have finished creating the address list, you can now create the service resource.
-
-
Create the Service Resource.
-
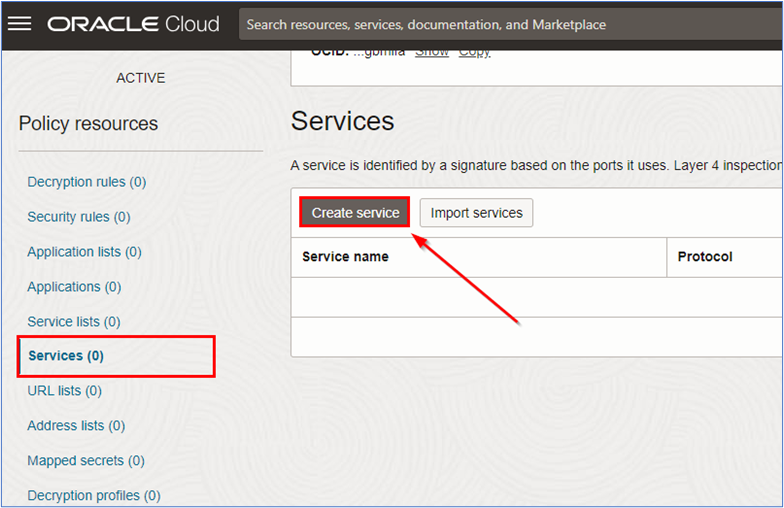
Click Services and Create service.
-
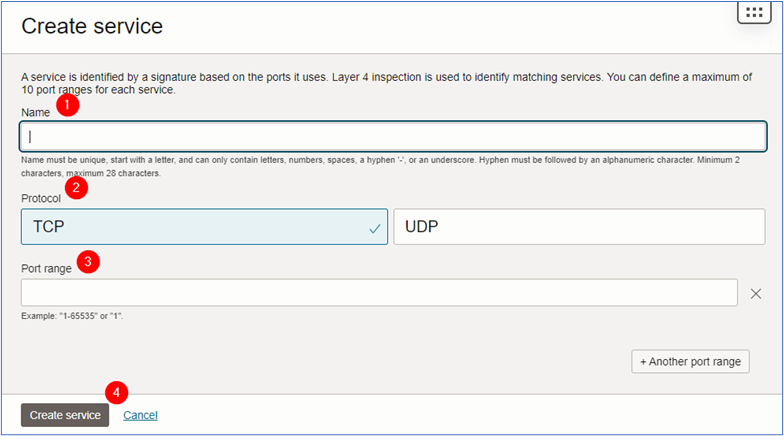
In the Create service page, enter the required information and click Create service.
- Name:
HTTP-HTTPS(enter the name that best fits the environment). - Protocol: Select
TCP. - Port Range: Enter
80-80. To add another range click the +Another range and add443-443.
- Name:
Once you have finished creating the service, you can now create the service list resource.
-
-
Create the Service List Resource.
-
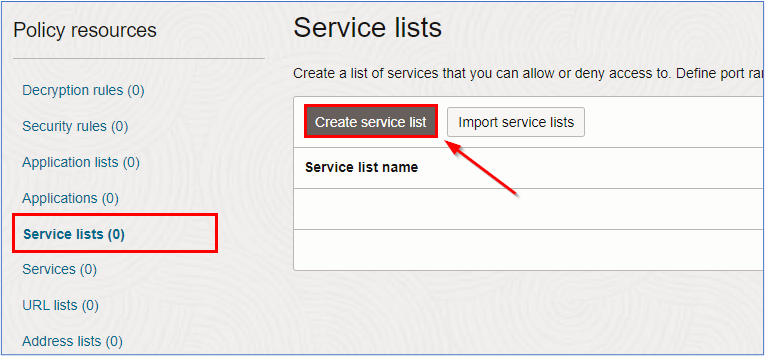
Click Services and Create service list.
-
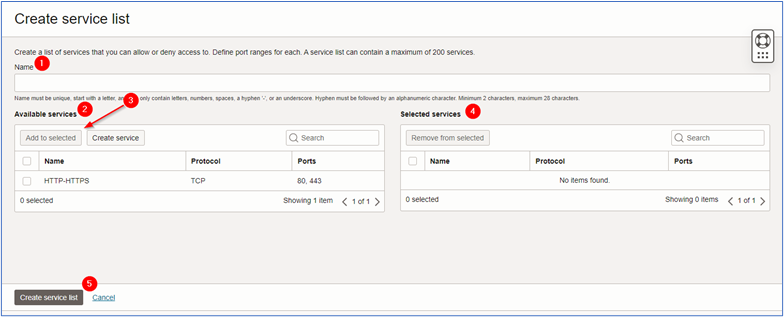
In the Create service list page, enter the required information and click Create service list.
- Name: Enter the name that best fits the environment.
- Available Services: Select the service created in the Step 2 and click Add to selected.
- Selected Services: Check if the needed services were imported to the Selected Services.
Once you have finished creating the service list, you can now create the security rule of the network firewall.
-
-
Create the Security Rule.
-
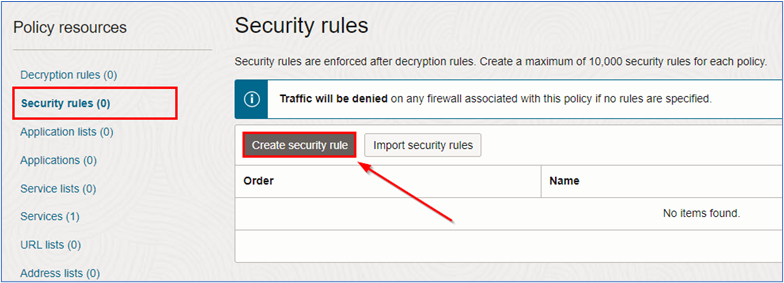
Click Security rules and Create security rule.
-
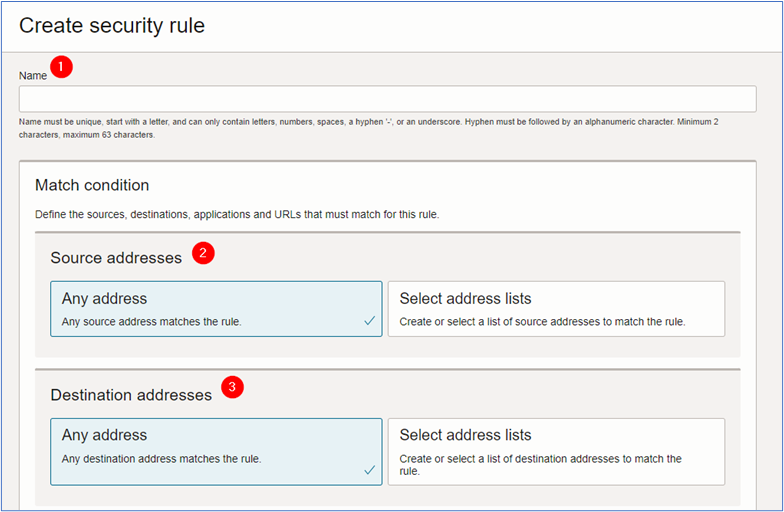
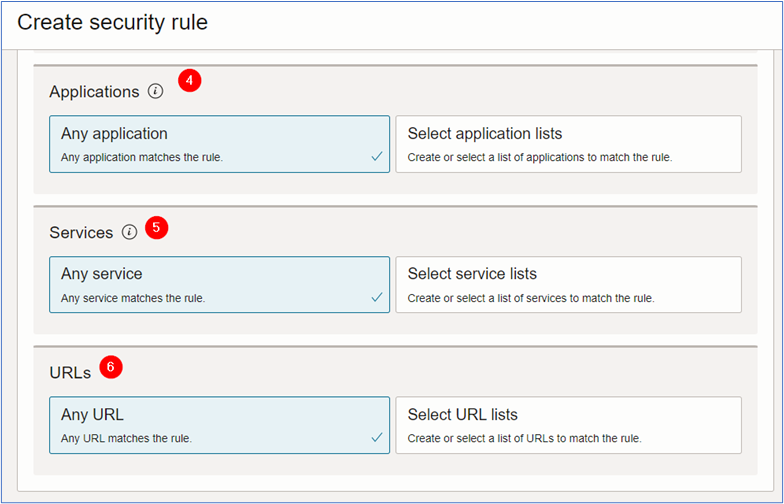
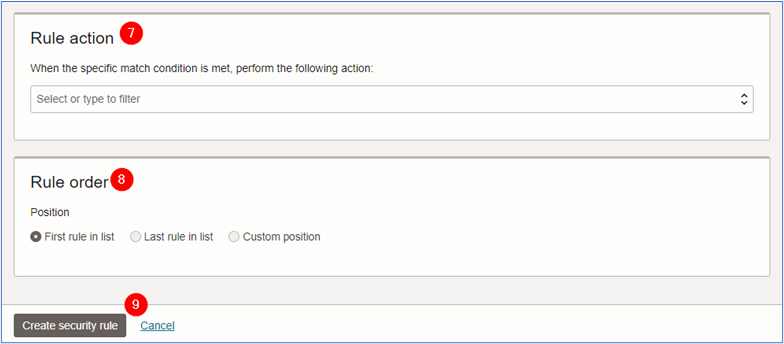
In the Create security rule page, enter the required information and click Create security rule.
- Name: Enter the name of the policy.
- Source address: Default. The source value is Any address.
- Destination address: Select the address list created in Step 1. Click Select address lists and select the created address list.
- Application: Default. The application value is Any application.
- Services: Select the service list created in the Step 3. Click Select service lists and select the created service list.
- URLs: Default. The URL value is Any URL.
- Rule action: Select the rule action for the environment. For this tutorial, we will use Allow traffic.
- Rule order: Select the order for the policy.
-
Once you have finished creating the policy, you will be able to access its details.
Note: Create the policy according to the environment access needs. The examples used in this tutorial are purely educational.
After creating the OCI Network Firewall policy you can now proceed to create the OCI Network Firewall instance itself.
Task 2.2: Create the OCI Network Firewall
-
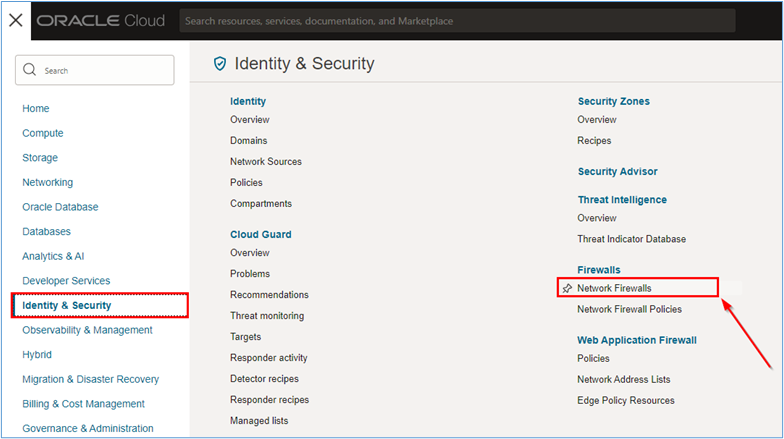
We have created the access policy that we will use in the environment, we must create the OCI Network Firewall. Go to the OCI Console, click Identity & Security and Network Firewalls.
-
In the Network firewalls page, click Create network firewall to create network firewall.

-
In the Create network firewall page, enter the required information and click Create network firewall.
- Name:
NFW_INBOUND(enter the name that best fits the environment). - Compartment: Select the compartment where network firewall will be created.
- Network firewall policy in (compartment): Select the policy created in Task 2.1.
- Virtual cloud network in (compartment): Select the VCN where network firewall will be installed. For this tutorial, we will select the VCN called
VCN_Publicas shown in the topology of Task 1. - Subnet in (compartment): Select the subnet where network firewall will be installed. For this tutorial, we will select the subnet called
Subnet_FWas described in Task 1.2 of this document.
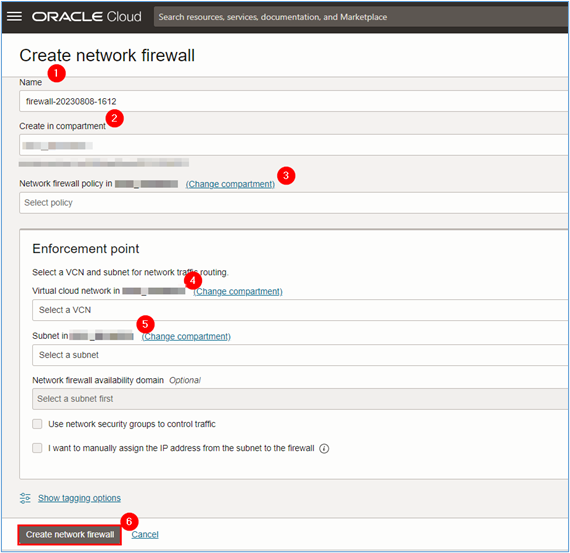
Note: The network firewall creation takes approximately 40 to 50 minutes to complete.
- Name:
-
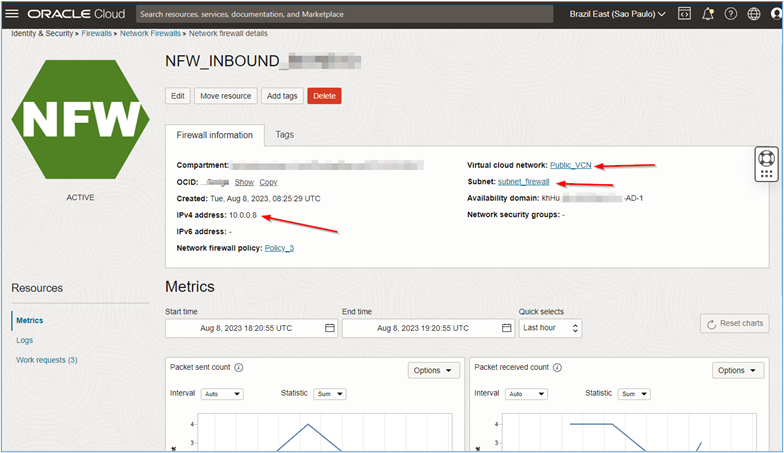
Click the network firewall name and see the details about the resource.
Note:
-
Note down the private IP created for network firewall. It will be used in the future for configuring
intra-vcnandinter-vcnrouting using the DRG so that all communication in the environment can be sent and inspected by the firewall. -
The private IP of the OCI Network Firewall may be different from the
10.0.0.8shown in this tutorial. In this way, all routes to be created in the environment must take into account the OCI Network Firewall IP created during the implementation.
-
Task 3: Create the Virtual Servers and Load Balancers
We have the entire network environment, DRG, policy and network firewall created, we can start creating the load balancers and servers that will host our test website.
Task 3.1: Create the Virtual Servers or Web servers
-
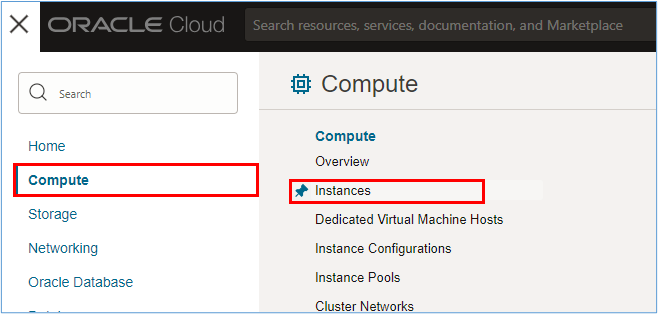
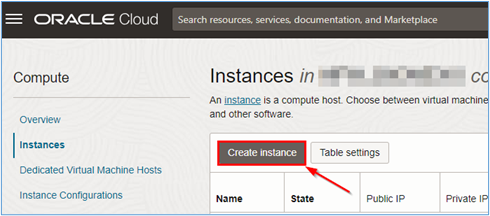
Virtual servers creation is simple and fast. To create virtual servers, go to the OCI Console, click Compute and Instances.
-
In the Instances page, click Create instance.
-
Enter the required information in the instance creation page. For this tutorial, we have created the following instances.
- srv1_app1: Server #1 for hosting website #1. It was created in
VCN_Private, inside the subnetsubnet_app1. - srv2_app1: Server #2 for hosting website #1. It was created in
VCN_Private, inside the subnetsubnet_app1. - srv1_app2: Server #1 for hosting website #1. It was created in
VCN_Private, inside the subnetsubnet_app2. - srv2_app2: Server #2 for hosting website #1. It was created in
VCN_Private, inside the subnetsubnet_app2.
For our servers, we have used Oracle Linux 9.x hosting. In order to get the servers ready for running, during the server creation, we have used a
Cloud-initscript to address the installation of the httpd server, creation of a simpleindex.htmlfile and disabling the firewalld daemon. For more information aboutCloud-initscripts, see Using Custom Cloud-init Initialization Scripts to Set Up Managed Nodes. Use the following script.#!/bin/bash echo "############################################" > /etc/motd echo "# OCI NETWORK FIREWALL LAB #" >> /etc/motd echo "############################################" >> /etc/motd # Installing nginx on Oracle Linux sudo yum install httpd -y # Starting httpd sudo systemctl start httpd # Opening HTTP port in Firewalld sudo firewall-cmd --zone=public --add-service=http # Configuring a simple webpage to our server sudo touch /var/www/html/index.html sudo chown apache:apache /var/www/html/index.html export HOSTNAME=`hostname` sudo cat <<EOF > /var/www/html/index.html <html> <center><img src="https://estuary.dev/static/638f52fd4afa2f02e6d522065f7268f4/26ce8/thumbnail_Group_22548_cda168ff12.png"></img></center> <center> <h1>Welcome to the OCI Network Firewall Lab webpage!</h1> <h2>CONGRATULATIONS!</h2><P> <h3>if you are seeing this page it is because the OCI Network Firewall lab worked! <p>refresh the browser and see the server hostname changing below (because of the Round-Robin policy placed at the OCI LoadBalancers).</h3> </center> <br> <center><img src="https://upload.wikimedia.org/wikipedia/commons/thumb/8/84/Eo_circle_green_arrow-down.svg/2048px-Eo_circle_green_arrow-down.svg.png" width="100" height="100"></center> <h1><center>This is server $HOSTNAME!</center></h1> </html> EOF - srv1_app1: Server #1 for hosting website #1. It was created in
The topology of the environment will help to understand where the servers should be installed.
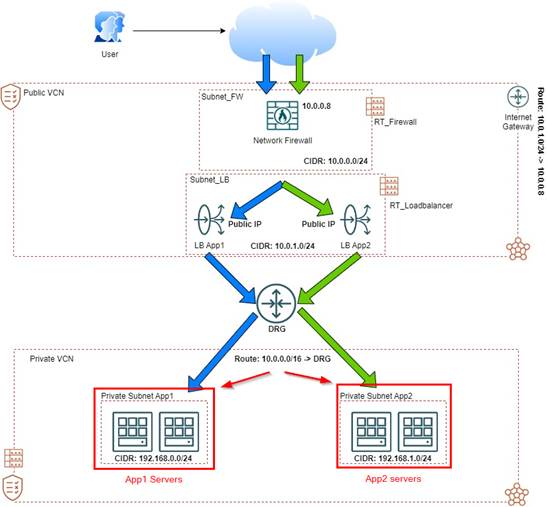
The Apache web server (httpd) was installed on these servers and a simple page was created in its documentRoot to be accessed from the Internet.
Details regarding the creation and configuration of instances in OCI are beyond the scope of this tutorial. For more information, see Creating an Instance.
Task 3.2: Create the OCI Load Balancers
Once the virtual servers have been created, it is necessary to create the OCI Load Balancers that will do the load balancing via Round-Robin for access to the newly created web servers.
-
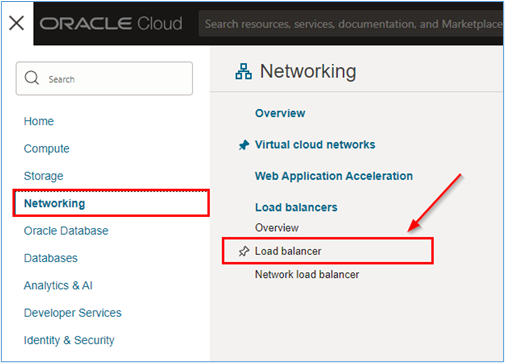
To create OCI Load Balancers, go to the OCI Console, click Networking and Load Balancer.
-
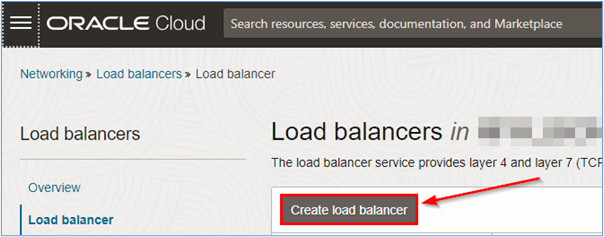
In the Load balancers service page, click Create load balancer to start creating the two load balancers in this tutorial.
-
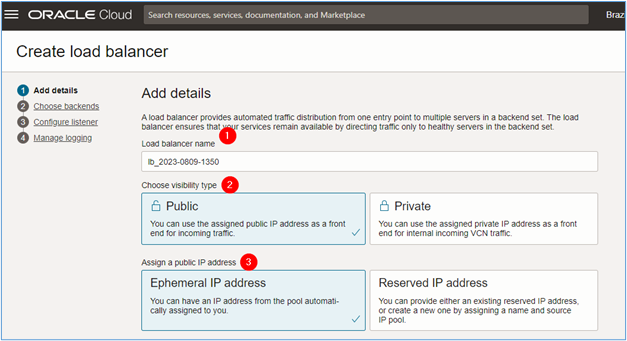
In the Create load balancer page, enter the required information so that the creation can be started and click Next.
- Load balancer name: Enter the name of the load balancer.
- Visibility: Select
Public, since the load balancer will be accessed via the Internet. - Assign a public IP address: Select
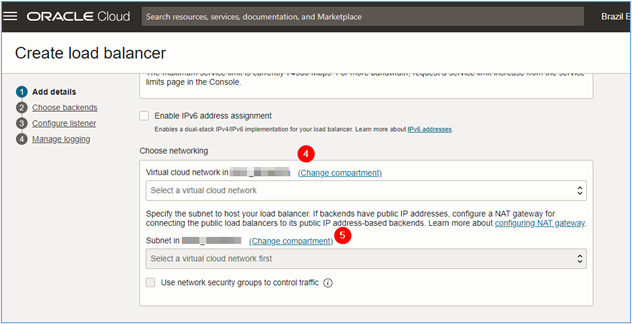
Ephemeral IP address. If you have a reserved IP, you can use the optionReserve IP address. - Choose networking: Select the VCN where the load balancer will be deployed. In this tutorial, the VCN will be
Public_VCN. - Subnet in (compartment): Select the subnet where the load balancer will be deployed. In this tutorial, the subnet will be
subnet_loadbalancer.
-
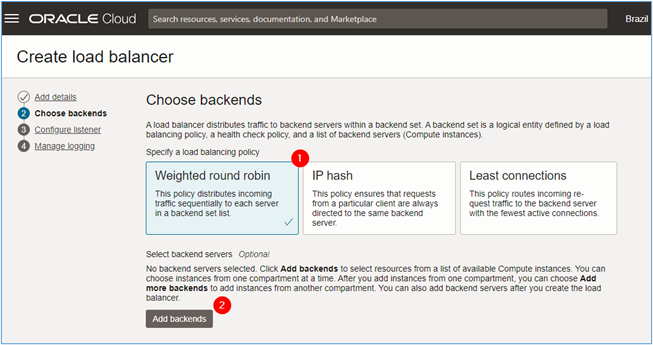
In the Choose backend page, enter the required information and click Next.
- Specify a load balancing policy: Select a policy for load balancer. In this tutorial, we will use the
Round-Robin. - Add backends: If you have already created the servers that will host the pages in the environment. To add them, click Add backends.
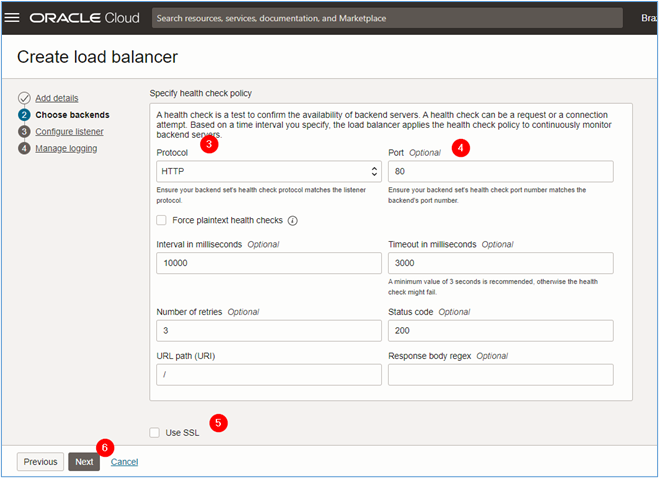
- Protocol: As we are going to upload a simple website, select HTTP as the protocol for the backend health check.
- Port: As we are going to use HTTP, the health check must look for connectivity on port 80/TCP.
- Use SSL: If you want to put a health check on HTTPS, select the
Use SSLitem to configure which certificate will be used. This type of health check is beyond the scope of this tutorial. For more information, see SSL Certificate for Load Balancers.
- Specify a load balancing policy: Select a policy for load balancer. In this tutorial, we will use the
-
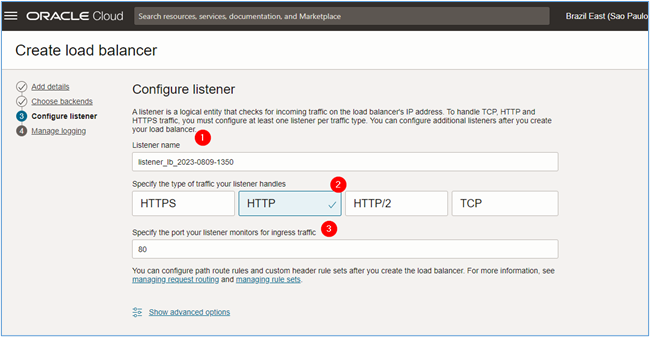
In the Configure listener page, enter the following information and click Next.
- Listener name: Enter the name of the listener.
- Specify the type of traffic your listener handles: Select the type of traffic that will pass through the listener. For this tutorial, we will use HTTP.
- Specify the port your listener monitors for ingress traffic: Select which port the listener should listen on to capture ingress traffic directed to the web servers. For this tutorial, we will use port 80/TCP.
-
Enable the OCI Load Balancer logs and click Submit to start its creation.
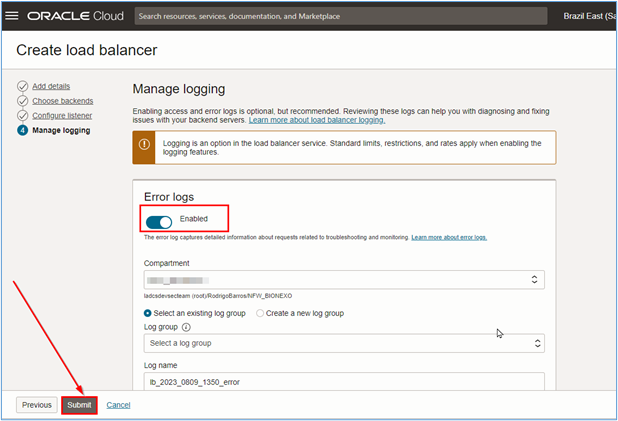
Note: You must create different load balancers for each website or application. In this tutorial, we are creating two load balancers (one per site to be tested).
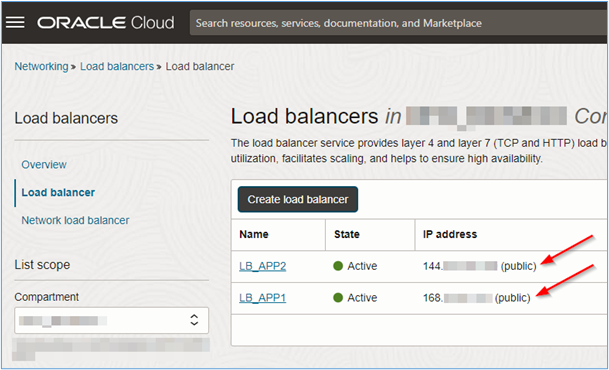
Note that each OCI Load Balancer has a distinct public IP. So each website can be accessed through a separate address.
-
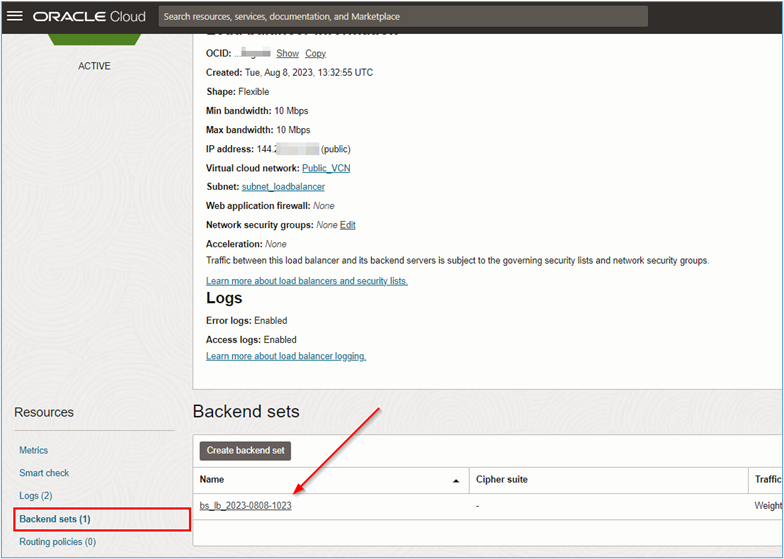
Once the OCI Load Balancers are created, you can manually insert the backend servers into each of the load balancer instances. Click on the name of the load balancer to be configured and on the Backend sets, as shown in the following image.
-
When viewing the backend set, click its name to be able to insert the backends. In the backend set information page, click Backends and Add backends.
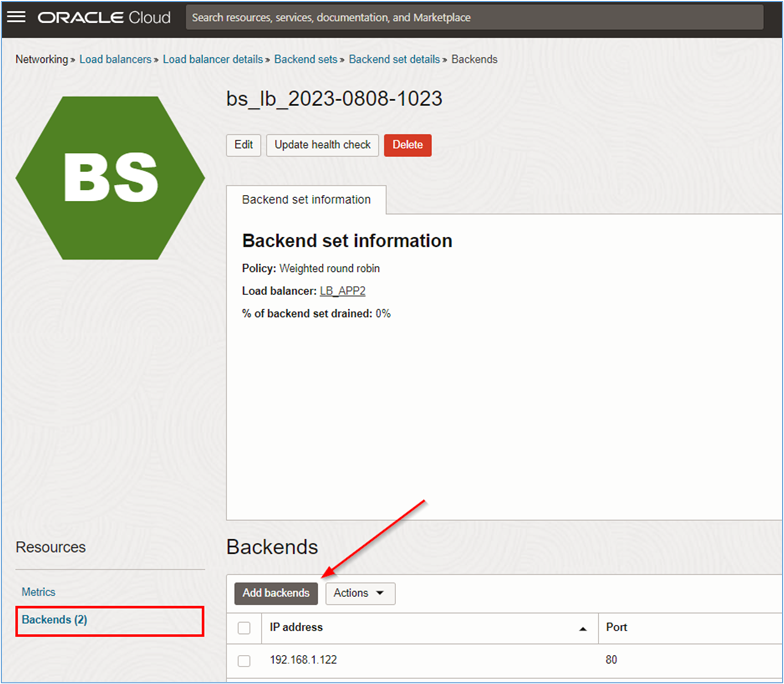
-
Select the servers that will be part of the backend for the website or application you are configuring. Click Add to finish.
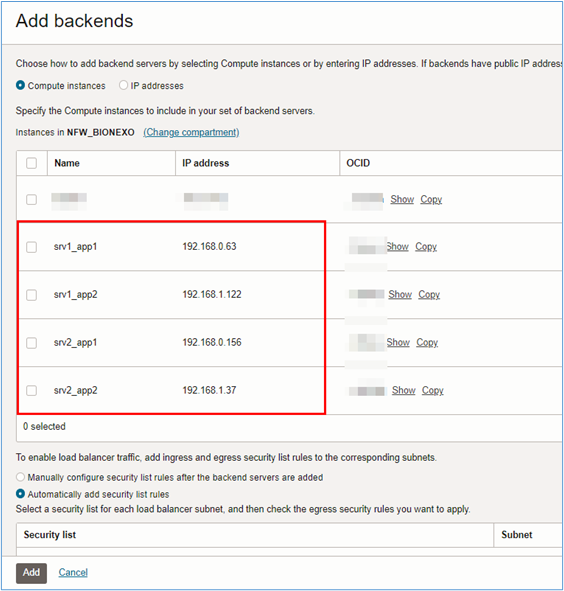
Note: At this point the OCI Load Balancer will be configured, but the backend will go into critical mode because the intra-vcn and DRG routing have not been configured yet.
Task 4: Create the DRG and Intra-VCN routing
Configure the routing so that the websites can be accessed via the Internet and the access traffic can be analyzed by the OCI Network Firewall.
Task 4.1: Create routing in the Public VCN
-
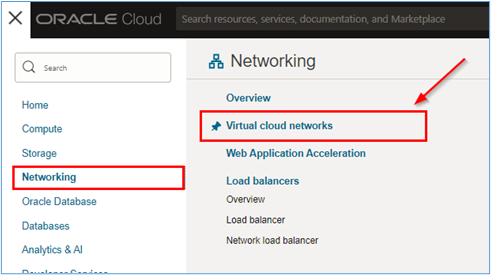
To access the VCN routing configuration pages, go to the OCI Console, click Networking and Virtual cloud networks.
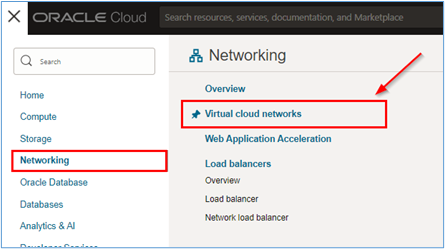
-
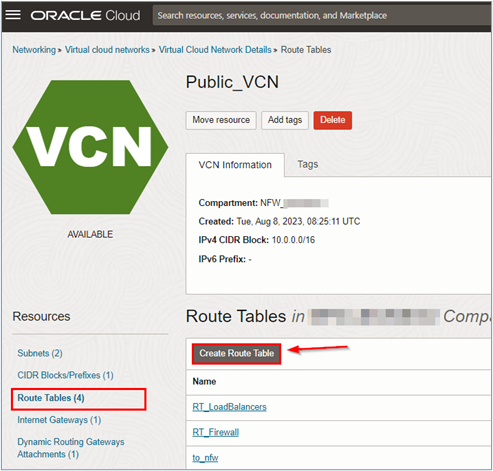
Click Public_VCN.
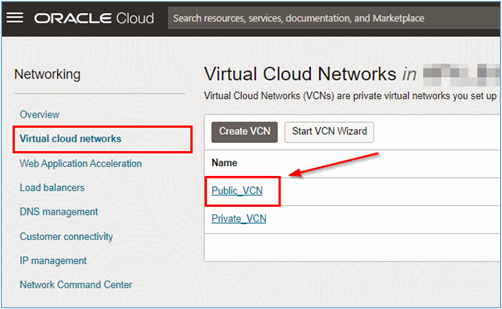
-
Click Route Tables menu and Create Route Table to start creating the routing tables.
-
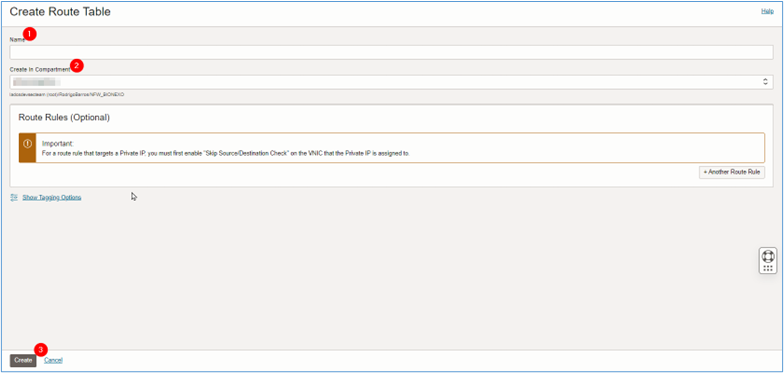
In the Create route table page, enter the required information and click Create.
- Name: Enter the name of the routing table.
- Create in compartment: Select the compartment where the routing table can be created.
Note: We will not use the VCN default routing table.
-
Repeat this process for the following routing tables in Public_VCN.
- RT_Firewall: Routing table that should be attached to the OCI Network Firewall subnet for intra-vcn connectivity.
- RT_LoadBalancers: Routing table that should be appended to the load balancers subnet for intra-vcn connectivity.
- RT_to_nfw: Routing table that must be attached to the Internet Gateway of the Public_VCN network.
- Create the routes in RT_Firewall for the Subnet_Firewall.
After creating the routing tables, create the following routes in each of the tables.
The RT_Firewall table must be used by the Subnet_Firewall. Replace subnet default routing table with this custom one.
Table: RT_Firewall
CIDR Next Hop 0.0.0.0/0 IGW - IGW: Internet Gateway.
- Create the routes in RT_LoadBalancers for the Subnet_LoadBalancers.
The RT_LoadBalancers table must be used by Subnet_Loadbalancers. Replace subnet default routing table with this custom one.
CIDR Next Hop 0.0.0.0/0 <OCI_NETWORK_FIREWALL_IP> 192.168.0.0/24 DRG 192.168.1.0/24 DRG - DRG: Dynamic Routing Gateway.
- 192.168.0.0/24: This is the private network of the subnet of the VCN Private_VCN where the servers of our website #1 are installed.
- 192.168.0.0/24: This is the private network of the VCN subnet Private_VCN where our website servers are installed #2.
- Create the routes in RT_to_nfw for the Internet Gateway
The RT_to_nfw table must be attached to the VCN_Public Internet Gateway.
CIDR Next Hop 10.0.1.0/24 <OCI_NETWORK_FIREWALL_IP>
Task 4.2: Create the routing in the Private VCN
-
To access the VCN routing configuration pages, go to the OCI Console, click Networking and Virtual cloud networks.
-
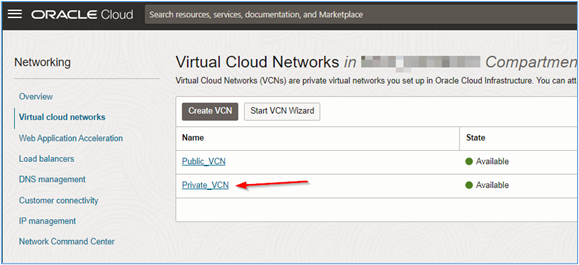
Click Private_VCN.
-
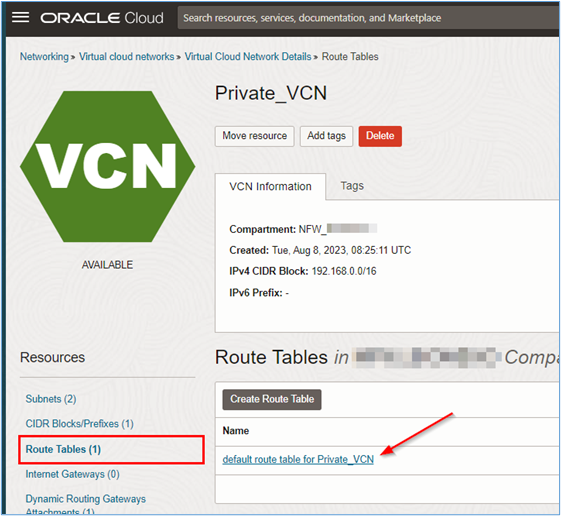
Click Route Tables menu and default route table for Private_VCN.
-
For Private_VPN we will just create a route pointing the path from the
10.0/16network to the DRG.CIDR Next Hop 10.0.0.0/16 DRG Once the routes are created everything should work correctly. The intra-vcn routing of VCN_Public will forward all traffic to the OCI Network Firewall and in turn connectivity between VCNs (VCN_Public and VCN_Private) will be handled by the DRG.
-
Go back to the OCI Load Balancers configuration and see if the backend is OK. If so, open a browser and access the IP of one of the load balancers.

Task 5: Access the Webpage
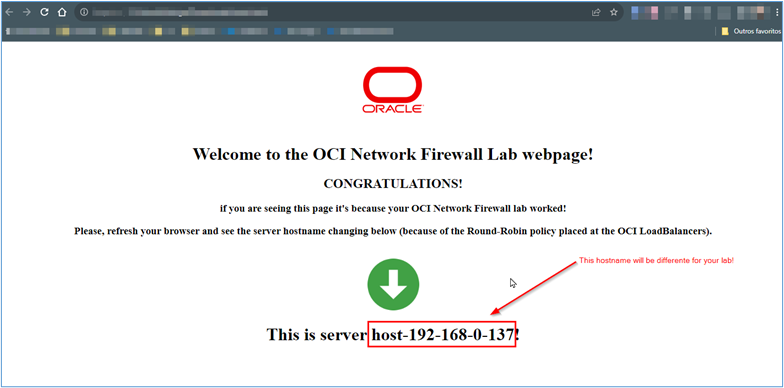
Once the environment routing has been configured correctly and the OCI Load Balancer instances can reach the servers hosting the test site at the backend (within the private network), you will be able to access the addresses of the load balancers and ultimately access the test webpages.
Capture the valid IP addresses of load balancers and place them in the browser. If everything is set up correctly, you should see the following page.
Related Links
Acknowledgments
- Author - Rodrigo Pace de Barros (Oracle LAD A-Team Cloud Security Solution Engineer)
More Learning Resources
Explore other labs on docs.oracle.com/learn or access more free learning content on the Oracle Learning YouTube channel. Additionally, visit education.oracle.com/learning-explorer to become an Oracle Learning Explorer.
For product documentation, visit Oracle Help Center.
Protect Websites and Applications with Oracle Cloud Infrastructure Network Firewall
F86470-02
February 2024
Copyright © 2024, Oracle and/or its affiliates.