Note:
- This tutorial requires access to Oracle Cloud. To sign up for a free account, see Get started with Oracle Cloud Infrastructure Free Tier.
- It uses example values for Oracle Cloud Infrastructure credentials, tenancy, and compartments. When completing your lab, substitute these values with ones specific to your cloud environment.
Implement Single Sign-On in Oracle Fusion Cloud Transportation Management 6.4.3
Introduction
You can integrate applications with Oracle Cloud Infrastructure Identity and Access Management (OCI IAM) domains to enable authentication and Single Sign-On (SSO) through various methods. While many applications support standard protocols like SAML and OAuth, Oracle Fusion Cloud Transportation Management (Oracle Transportation Management) supports HTTP-header based authentication for SSO.
The app gateway acts as an authentication proxy between OCI IAM and Oracle Transportation Management. It is available in two deployment options: a Docker image and a virtual appliance image. This tutorial focuses on deploying and using the Docker-based version.
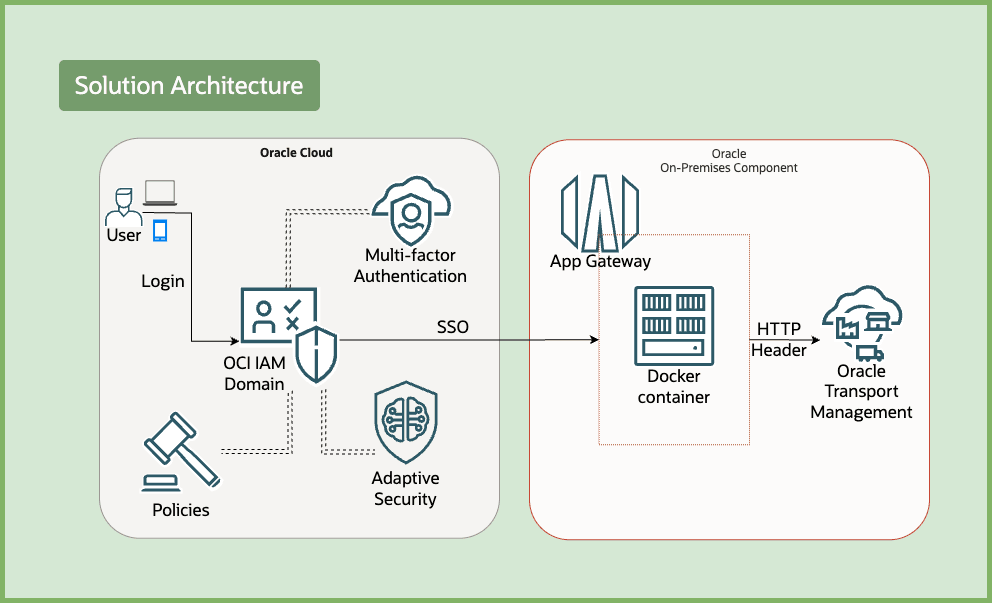
Implementing SSO helps in leveraging the security capabilities of OCI IAM including MFA, adaptive security, sign-on policies, and so on. This helps in enforcing an additional layer of access control to further protect your Oracle Transportation Management instance.
Objectives
-
Create an enterprise application in your OCI domain that represents Oracle Transportation Management.
-
Create an app gateway in your OCI domain & associate it with the enterprise application.
-
Download the requisite files for setting up the Docker image.
-
Create an OCI Compute instance & update network configurations to allow ingress.
-
Setup the Docker image to run app gateway.
-
Update SSO configuration of Oracle Transportation Management server configuration.
-
Validate login flow to ensure SSO authentication works.
Prerequisites
-
Access to an OCI tenancy. For more information, see Oracle Cloud Infrastructure Free Tier.
-
Identity domain administrator role for the OCI IAM identity domain. For more information, see Understanding Administrator Roles.
-
An Oracle Transportation Management instance.
-
Administrator access to the application layer of Oracle Transportation Management.
Task 1: Set up an Enterprise Application
The following details are required about Oracle Transportation Management before proceeding:
-
List of resources and level of protection: For example,
/home,/jobsor/*. Also if these require public access or user authentication. -
Host/IP with port where Oracle Transportation Management application is running, such as the origin server.
-
The HTTP header that Oracle Transportation Management is expecting OCI IAM to pass, which will be reconciled against a user in Oracle Transportation Management database. We are using
appuidin this tutorial.
Follow the steps:
-
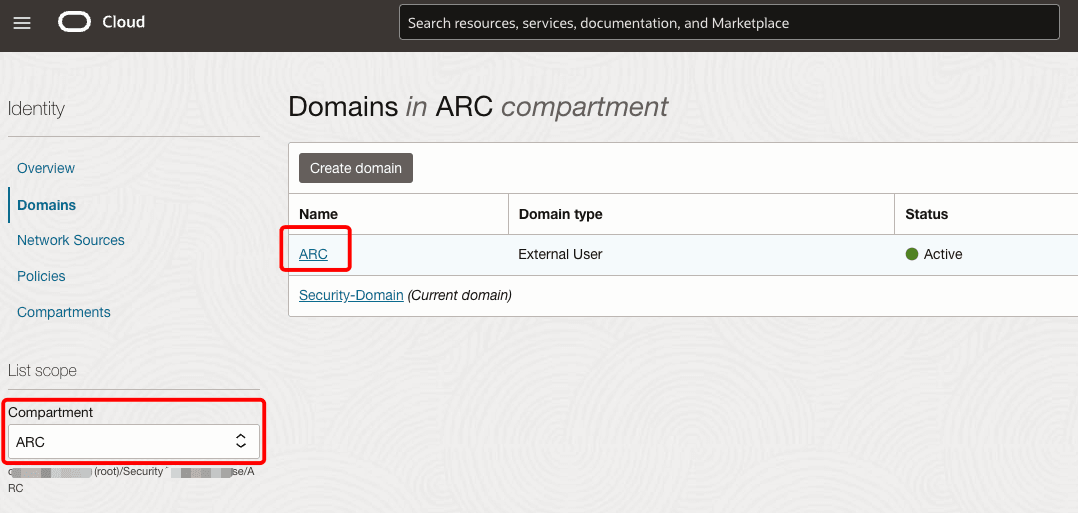
Open the Oracle Cloud Console navigation menu, and click Identity & Security. Under Identity, click Domains. Choose the compartment to find your domain.
-
Click the name of your domain, and under Integrated applications, click Add application.

-
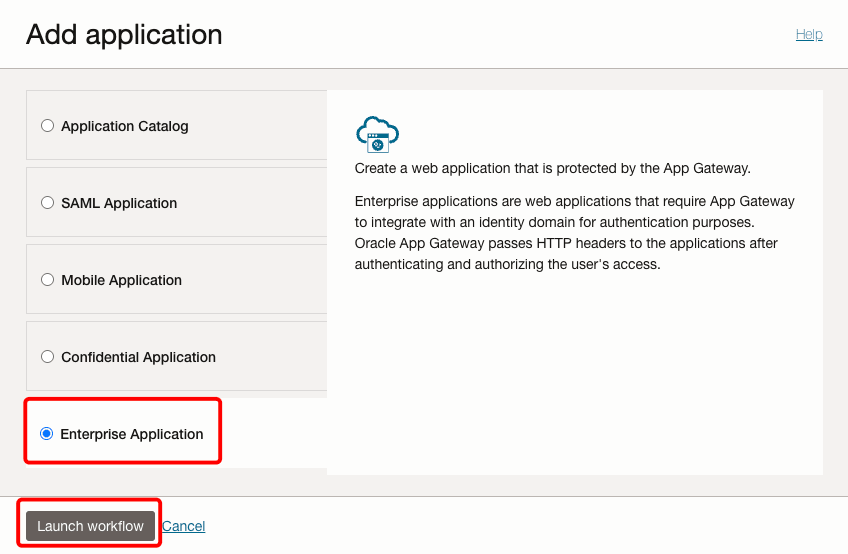
Select Enterprise Application, and click Launch workflow.
-
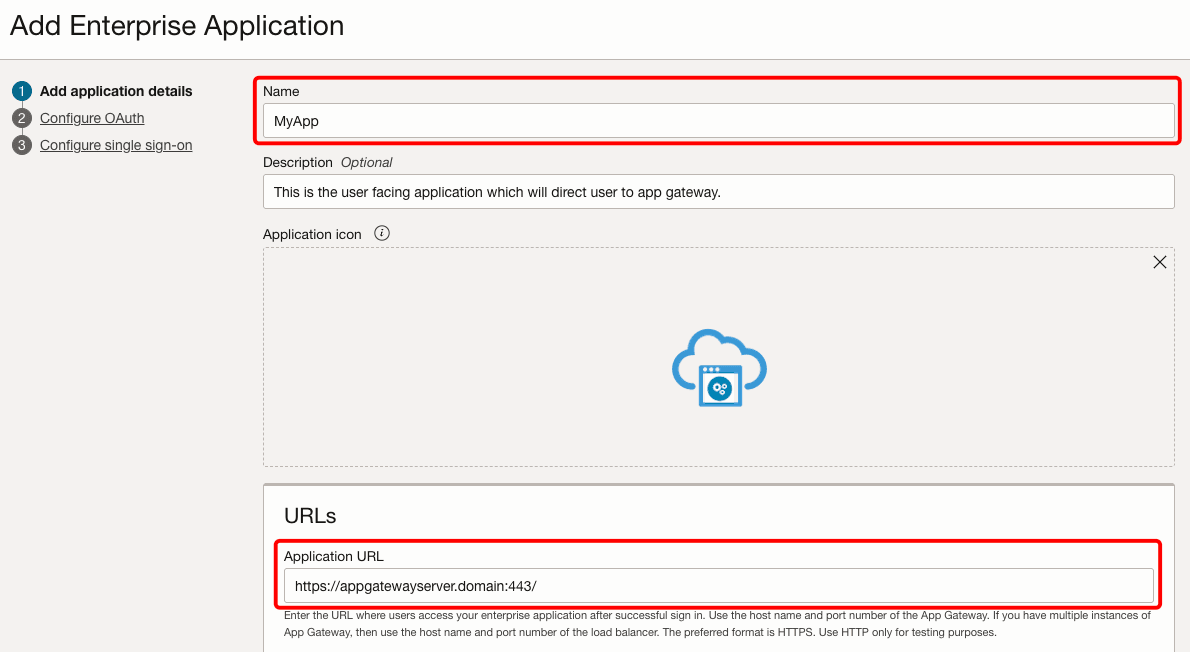
Enter a name for the application. The Application URL is the host and port of the app gateway server. This can also be a URL that has a redirect to the app gateway. Put a check on Display in My Apps. If you want to restrict this app to authorized users only, put a check on User must be granted this app.
-
Click Next and then Next again to skip the OAuth configuration screens.
-
Click Add Resource to add the GTM resources. Provide a name & resource URL. In our case it will be
/.*as we are protecting all resources. Place a check on Use regex expressions.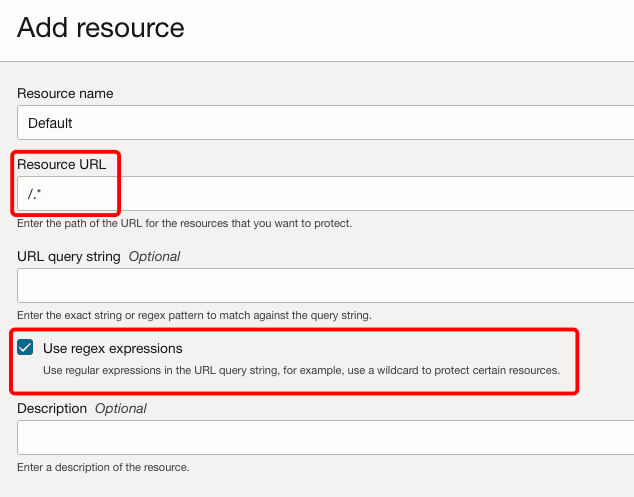
-
Click the Add managed resource button, and select the resource from previous Step 6 in the Resource menu. Select the Authentication method as Form or Access token. Under Headers enter
appuidas the Name andUser Nameas the Value.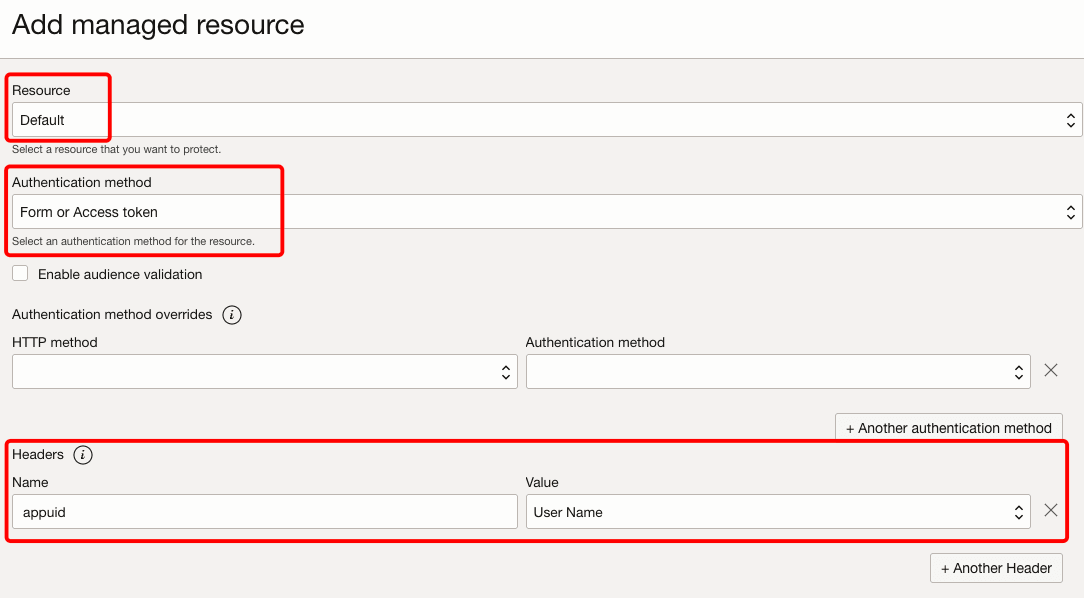
Note: In our example, we selected
Defaultas the only resource andForm or Access tokenas our authentication method to protect all resources. This ensures that only authenticated users are allowed access. Oracle Transportation Management also needs a headerappuidwith the username as the value. We have identified this as part of our initial task of collecting details. -
Click Finish, and then activate the application by clicking the Activate option.
-
Assign some users/groups to the application under Resources. You can choose both local & federated users, but ensure that these users exist in the Oracle Transportation Management database.
Task 2: Register App Gateway in OCI IAM
App Gateway sits in front of your application, intercepts requests, authenticates users, and then allows access to the resources.
Collect Server Details:
The following details are required about app-gateway server before proceeding:
-
Host/IP address of the App Gateway server. This can be an OCI Compute instance or any other server running in a cloud or on-premises.
-
The App Gateway server needs internet connectivity to access the OCI IAM domain URL. It also needs connectivity to the upstream Oracle Transportation Management application.
-
Details of the Oracle Transportation Management origin server (host and port) where your upstream application is running.
Follow the steps:
-
Under Identity, select Domains and then click the domain you used before.
-
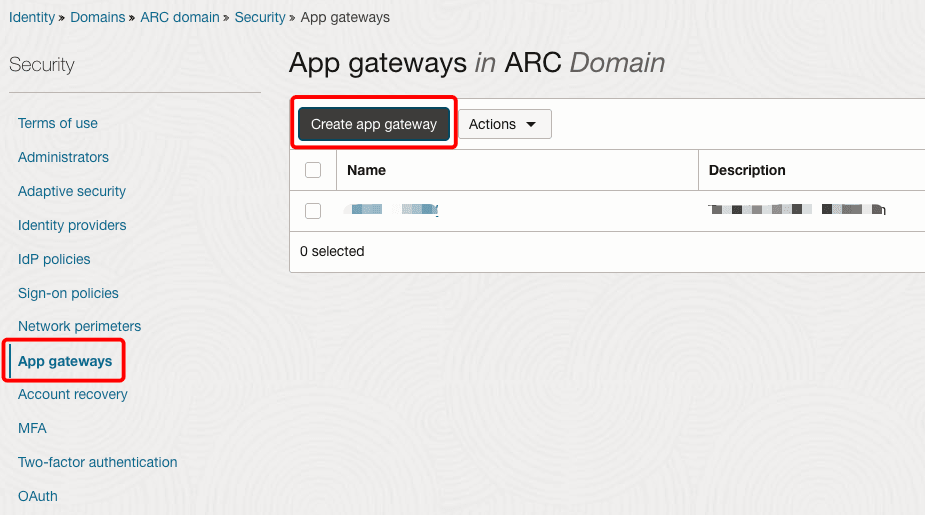
Under Security, select App gateways and click Create app gateway. Enter a name and click Add app gateway.
-
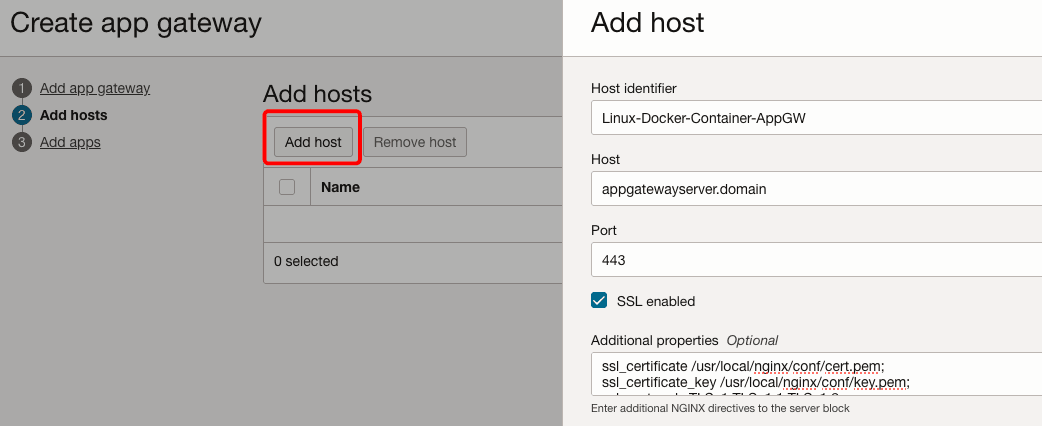
Click Add Host. Provide a name in Host identifier and add the app gateway server details under Host and Port. If you do not have the details yet, add placeholder values & revisit this step after finishing Task 4.
-
Click the SSL enabled check box, enter the below in Additional properties, and click Add host.
ssl_certificate /usr/local/nginx/conf/cert.pem;
ssl_certificate_key /usr/local/nginx/conf/key.pem;
ssl_protocols TLSv1 TLSv1.1 TLSv1.2;
ssl_ciphers HIGH:!aNULL:!MD5;
Note: We are not terminating SSL at the load balancer. So, we must select the SSL checkbox to enable app gateway server access through SSL. The filenames and path for the certificate & the key are based on the actual path in the container.
-
Click Next to add the enterprise application and origin server details that you created in Task 1.
-
Click Add app & select the enterprise app from the Application menu. Under Select a host choose the host from Step 3. In Resource prefix enter
/to proxy the enterprise application. Finally, in Origin server enter the Oracle Transportation Management application server hostname/IP. Click Close.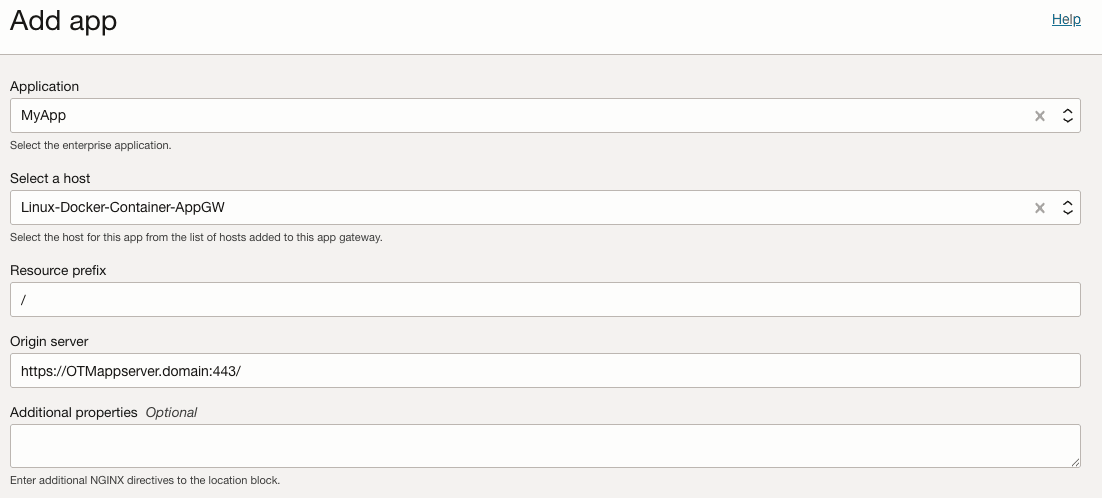
Note: When you use
/as a resource prefix, every request past/is forwarded to the enterprise application. -
Click Activate app gateway. Make note of the Client ID and Client Secret, as this will be required later.

Task 3: Download the requisite files to setup the container & generate wallet
-
In the OCI Console, Go to Identity, Domains, your domain, Settings and click Downloads.
-
Download the Docker image from App Gateway Unified Docker Package for Identity Cloud Service.
-
Next, download the AppGateway Wallet tool which will be used to generate a wallet.
-
Unzip the downloaded zip files. The docker image will be in
.tar.gzformat.
-
You will need to copy the image file and the wallet folder from your local machine to your app gateway server. Below is an example that shows how to use the scp command from your local bash shell to send the contents of the wallet tool folder to the files directory in the server.
scp -i /Users/mac/ssh_private.key -r /Users/mac/idcs-appgateway-wallet-tool-23.2.92-2301160723 opc@xxx.xxx.xxx.xxx:files
Task 4: Create an OCI compute instance and update the Network Security Lists
Note: If you are setting up a local server/virtual machine in your own environment, or in another cloud provider, you can use the following steps as a reference for the configurations.
-
In the OCI Console, Go to Compute and click Instances. Select the right compartment.
-
Click Create Instance. Enter Name and select an availability domain.
-
Select OS image as Oracle Linux 8 and select an appropriate shape. We are using
E5 Flex/1 OCPU/8GBmemory. -
Select the VCN and public subnet where you would like to place this.
-
Generate an SSH key pair to connect to the instance using a Secure Shell (SSH) connection, or upload a public key that you already have.
-
Click Create and make a note of the IPv4 address.
-
Open the subnet and click the security list associated with it.
-
Click Add Ingress Rules & add the below to allow ingress of HTTPS over TCP and SSH.
Source Type: CIDR
Source CIDR: 0.0.0.0/0
IP Protocol: TCP
Source Port Range: All
Destination Port Range: 443
Source Type: CIDR Source CIDR: 0.0.0.0/0 IP Protocol: SSH Source Port Range: All Destination Port Range: 22
Task 5: Configure the App Gateway Server using the Docker Image
-
SSH into the compute instance created in Task 4 using your private key.
ssh -i /Users/mac/ssh_private.key opc@xxx.xxx.xxx.xxx -
Run the following command to install Docker and other libraries, and start the service. Then, validate that the docker service is running.
sudo yum install -y yum-utils
sudo yum-config-manager --add-repo https://download.docker.com/linux/centos/docker-ce.repo
sudo yum install -y docker-ce docker-ce-cli containerd.io
sudo dnf install libnsl*
sudo systemctl enable docker
sudo systemctl start docker
sudo systemctl status docker -
Next, add the logged in user (
opcin this case) to the sudoers list.sudo usermod -a -G docker $USER -
Open firewall port for enabling communication. We are using port
443here.sudo firewall-cmd --zone=public --permanent --add-port=443/tcp sudo systemctl stop firewalld sudo systemctl start firewalld -
Create a directory & start consolidating the files required to create the container. We are using
/home/opc/filesfor this tutorial.mkdir files cd files -
Generate a self-signed certificate using openSSL.
openssl req -x509 -nodes -days 365 -newkey rsa:2048 -keyout server-key.pem -out server-cert.pemNote: Use of self-signed certificates is not recommended in a production environment. Use certificates issued by your CA instead.
-
Create the
appgatewayenvironment file that contains the domain information.vi appgateway-envCG_APP_TENANT=idcs-XXX IDCS_INSTANCE_URL=https://idcs-XXX.identity.oraclecloud.com:443 NGINX_DNS_RESOLVER=<resolver IP>Note: Replace
XXXwith your OCI IAM domain details. For DNS resolver IP, refer to the nameserver details found in the file/etc/resolv.conf.
-
Generate the wallet file
cwallet.ssousing the tool. This is done by running the following command. ReplaceClient IDwith the app gateway client ID noted earlier. Click Return and enter the client secret when prompted.env LD_LIBRARY_PATH=./lib ./cgwallettool --create -i <Client ID> -
Now that all the files are ready, update the permissions for each file. This ensures that owner can read, write, and execute; while groups and others can only read and execute.
chmod -R 755 <filename> -
Load the image into local repository and validate.
sudo docker load -i appgateway-aarch64-25.1.03-2501230623.tar.gz docker images -
Create the container based on the files and validate. After executing the following command, the status for your container should be UP.
sudo docker run -p 443:443 -d --name appgateway --env-file /home/opc/files/appgateway-env --env HOST_MACHINE=`hostname -f` --volume /home/opc/files/cwallet.sso:/usr/local/nginx/conf/cwallet.sso --volume /home/opc/files/server-key.pem:/usr/local/nginx/conf/key.pem --volume /home/opc/files/server-cert.pem:/usr/local/nginx/conf/cert.pem local.local/idcs-appgateway-docker_linux_arm64_v8:25.1.03-2501230623docker ps
Task 6: Update SSO Configuration in Oracle Transportation Management
Note: This tutorial is specific to Oracle Transportation Management 6.4.3. For more details on setting the various parameters, checkout the security guide for Oracle Transportation Management here: Security Guide. For other versions, see Transportation and Global Trade Management On-Premise Documentation Web Library.
-
For SSO access to Oracle Transportation Management, the invoking code needs to pass in the following parameter as part of the HTTP request (where username is the user’s GID in the database). The
appuidheader will be passed in the HTTP header, the value of this header should match the User Name in the database.appuid=username -
Log in to the Oracle Transportation Management admin console and navigate to User Manager. Create/update the user to ensure that there is a valid username that matches with the OCI user.

-
The SSO configuration needs to be updated on
glog.propertiesfile. Log in to the server and navigate to/app/appgtmdevl/Oracle/gtm643/glog/config. Update the following parameters.
glog.security.sso=true
glog.security.sso.app0idName=appuid
glog.security.sso.appUidLoCation=3
glog.security.sso.logoutButton=true
glog.security.sso.logoutUrl-https://idcs-XXX.identity.oraclecloud.com/sso/vl/user/logout
-
Next, the OHS configuration needs to be updated. See the following examples of the path to locate your
httpd.conffile.cd /app/OTMappserver/Oracle/Middleware/Oracle_Home/user_projects/domains/otmweb/config/fmwconfig/components/OHS/OTMappservercd /app/OTMappserver/Oracle/Middleware/Oracle_Home/user_projects/domains/otmweb/config/fmwconfig/components/OHS/instances/OTMappserver -
Take a backup of the file, then set the following parameters in the configuration.
SimulateHttps On
AddCertHeader HTTPS
Example:
Listen 1234 NameVirtualHost *:1234 <VirtualHost *:1234> ServerName XXX.XXX DocumentRoot /app/XXX/Oracle/gtm643/web/htdocs DirectoryIndex index.htm <IfModule ossl_module> SSLEngine off </IfModule> <Directory "/app/XXX/Oracle/gtm643/web/htdocs"> Options Indexes FollowSymLinks AllowOverride None Require all granted </Directory> Header set Cache-Control maxage=21600 ExpiresActive On ExpiresDefault "access plus 6 hours" SimulateHttps On AddCertHeader HTTPS </VirtualHost> -
Restart the application and web tier to ensure that changes take effect.
-
Ensure network ingress/egress from app gateway server to your Oracle Transportation Management instance is allowed. Use Task 4.8 for reference.
Task 7: Log in through SSO and Validate
-
Access the servlet URL from a browser. Example URL:
https://appgatewayserver.domain:443/GC3/glog.webserver.util.FrameGC3Servlet. -
Notice that there should be a redirection to OCI IAM log in. Enter the credentials of the user and login.
-
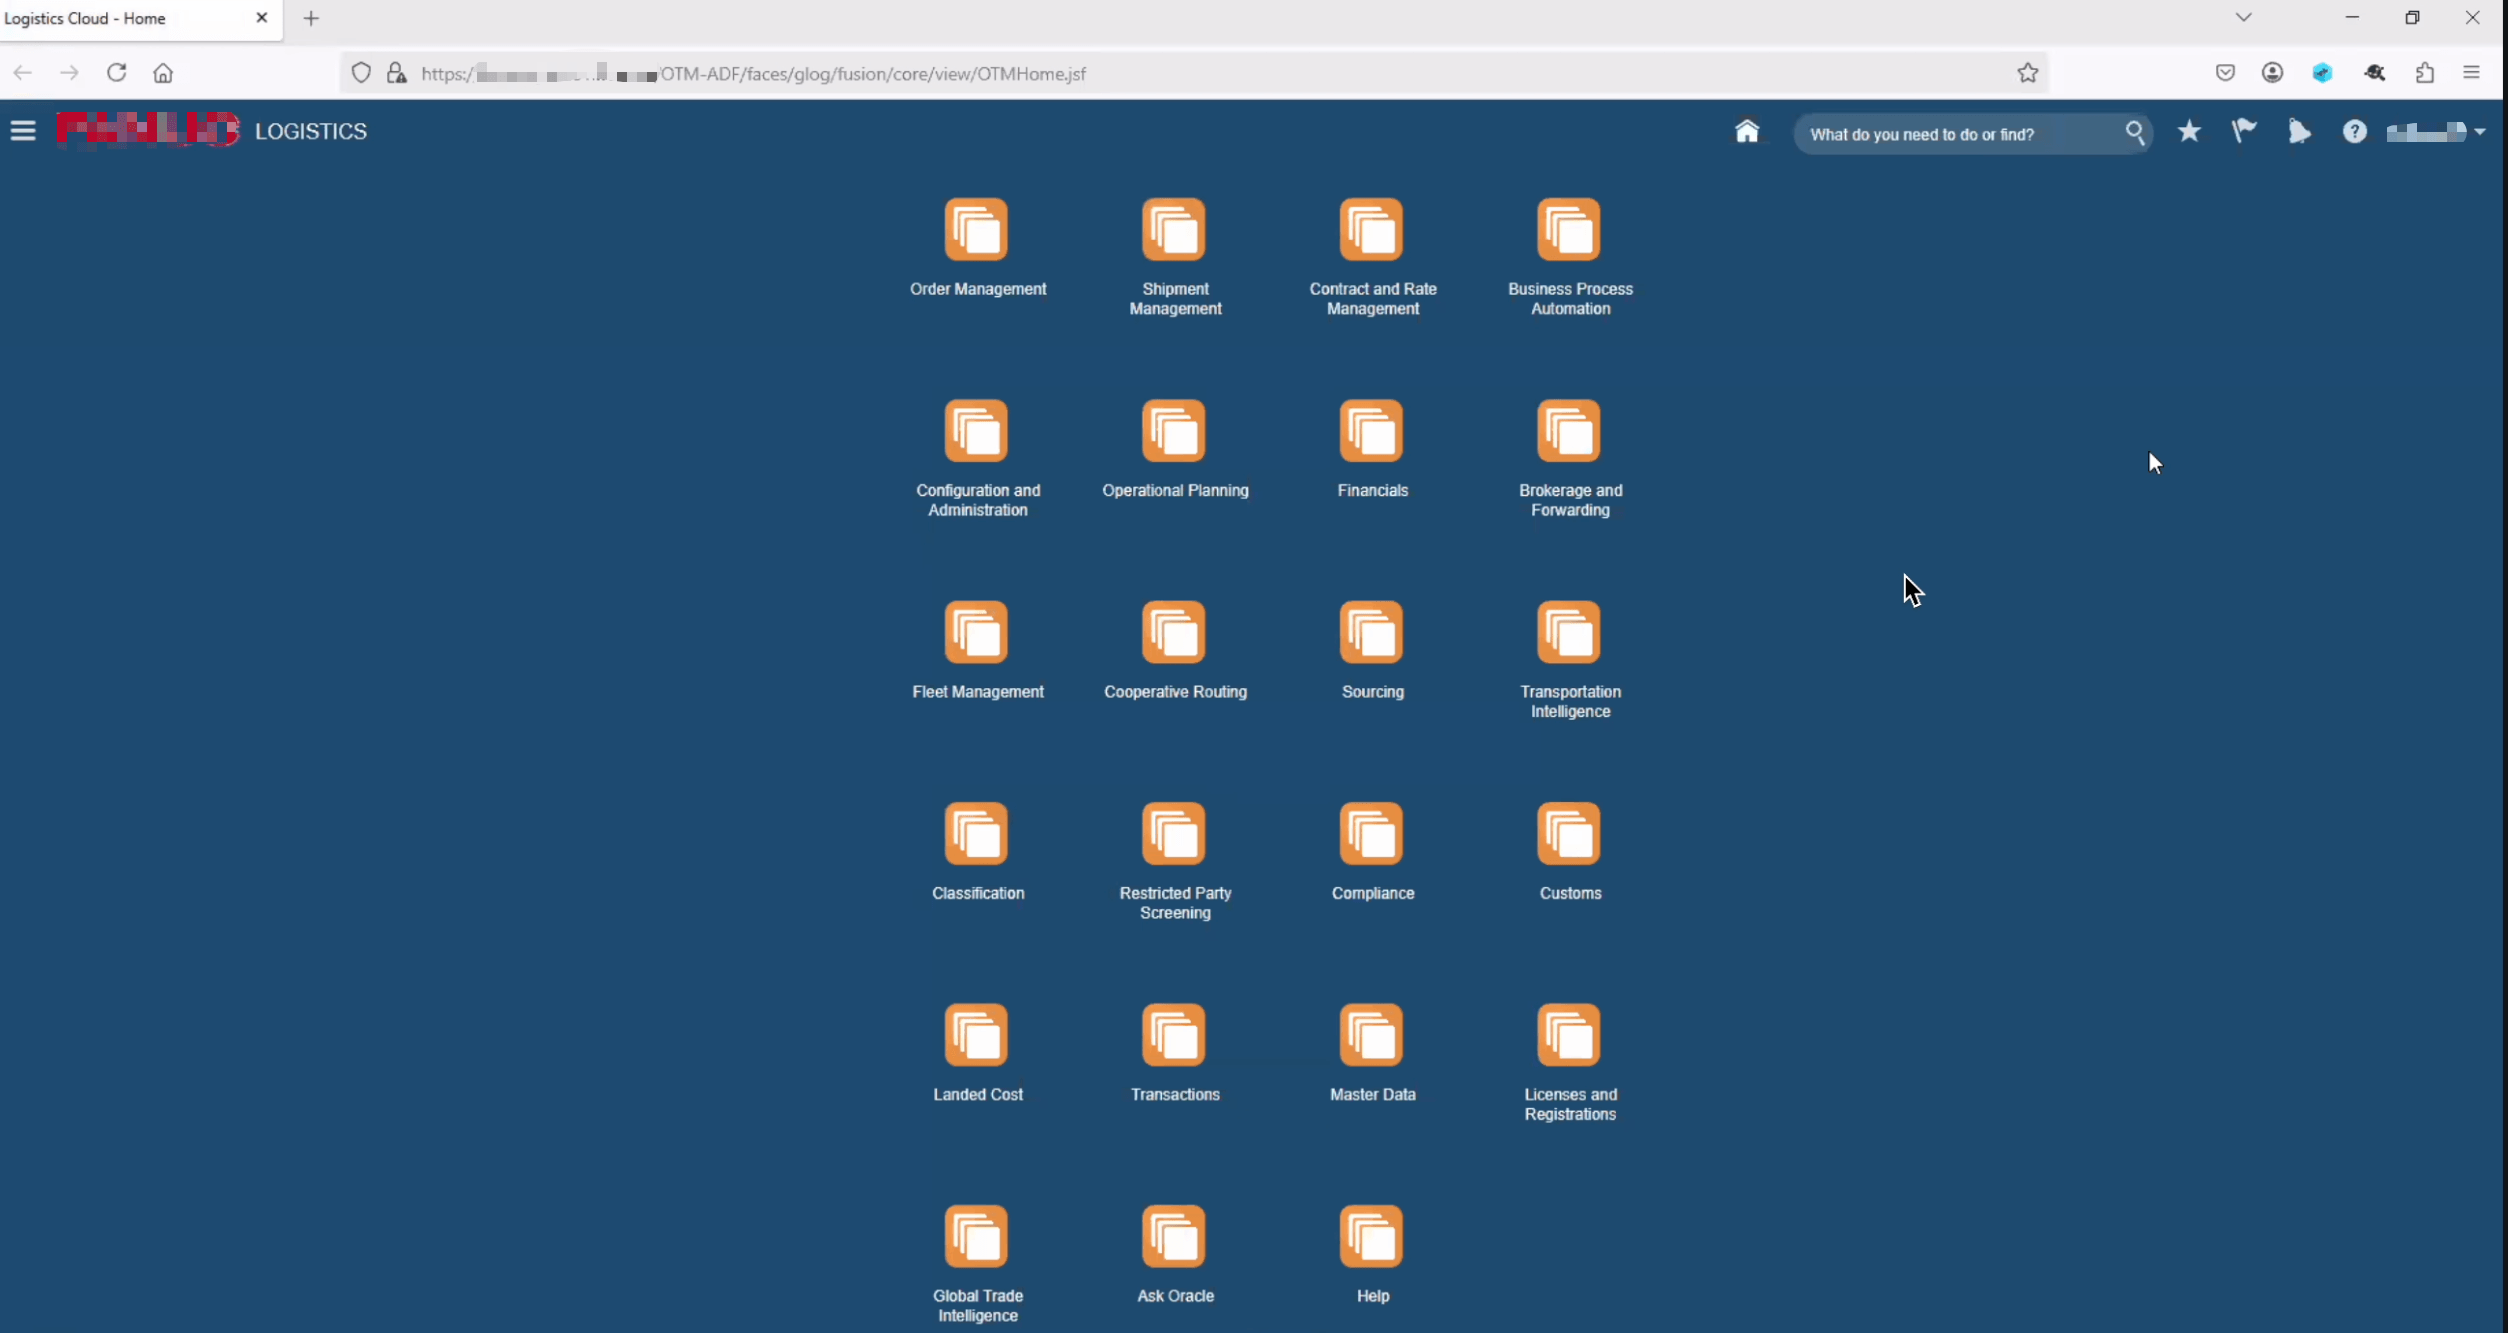
Upon successful authentication you will be logged in to Oracle Transportation Management.
Related Links
Acknowledgments
- Author - Tonmendu Bose (Senior Cloud Engineer)
More Learning Resources
Explore other labs on docs.oracle.com/learn or access more free learning content on the Oracle Learning YouTube channel. Additionally, visit education.oracle.com/learning-explorer to become an Oracle Learning Explorer.
For product documentation, visit Oracle Help Center.
Implement Single Sign-On in Oracle Fusion Cloud Transportation Management 6.4.3
G36529-01
Copyright ©2025, Oracle and/or its affiliates.