Note:
- This tutorial requires access to Oracle Cloud. To sign up for a free account, see Get started with Oracle Cloud Infrastructure Free Tier.
- It uses example values for Oracle Cloud Infrastructure credentials, tenancy, and compartments. When completing your lab, substitute these values with ones specific to your cloud environment.
Replace SSH Keys for Oracle Cloud VMware Solution ESXi hosts
Introduction
Oracle Cloud VMware Solution provides a customer-managed, native VMware-based cloud environment, offering complete control using familiar VMware tools. However, if the SSH keys used to access the ESXi hosts are lost, you will need an alternative method to regain access. This tutorial outlines the tasks involved in enabling password-based login to the ESXi host and replacing the SSH keys.
SSH access to Oracle Cloud VMware Solution (OCVS) SDDC compute instances and ESXi hosts is typically achieved using a private key corresponding to the public key supplied during provisioning. However, if the private SSH key is lost or unavailable, direct SSH access to the ESXi host becomes impossible. In such cases, the workaround solution is to access the Direct Console User Interface (DCUI) of the ESXi host, enable password-based login, and then SSH into the ESXi host to replace the Public key in the authorized keys section. After validating the new public key is working as expected, you can disable the password-based login for better security.
Objective
- Replace lost SSH keys for Oracle Cloud VMware Solution ESXi hosts by temporarily enabling password based login.
Prerequisites
-
Create a new SSH Key Pair (Public Key and Private Key) for your ESXi hosts and save it securely as per your requirements.
-
Configure the required permissions to access the Oracle Cloud VMware Solution SDDC.
-
Configure the appropriate permissions for managing compute instances to create instance console connections.
-
Install PuTTY or plink.exe (a Command Line Interface to the PuTTY backend).
-
Install VNC viewer.
Task 1: Create a Console connection to the ESXi host
-
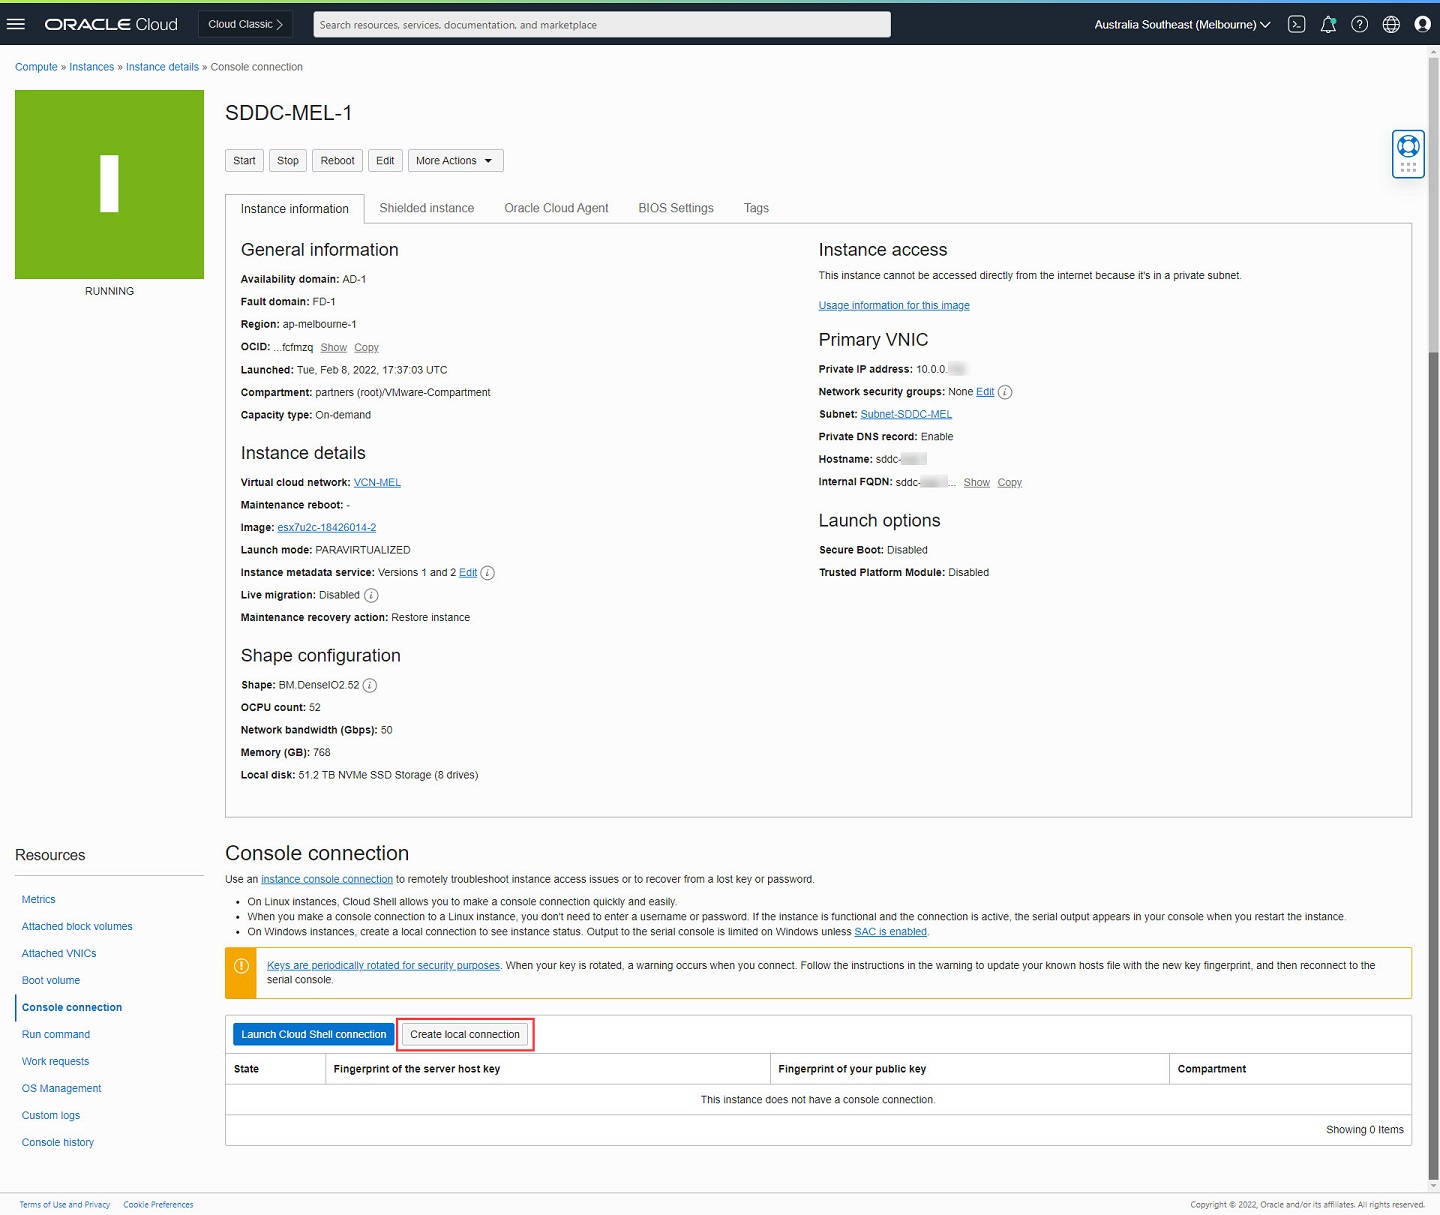
Open the Oracle Cloud Console navigation menu, click Compute and then click Instances.
-
Select the first ESXi host of the Oracle Cloud VMware Solution SDDC.
-
Click Console Connection.
-
Click Create local connection.
-
Generate an SSH key pair or upload your own public key for the Console Connection, in this example we will create a new key pair.

-
Click Create console connection and wait for the state of the connection to change to Active.
Task 2: Access Console connection or DCUI of the ESXi host
Once the console connection has changed to active state, complete the following steps.
-
Click on the kebab icon on the right of the connection and then click Copy VNC connection for Windows.
Note: If you are using a Linux/Mac machine, follow the appropriate steps.

-
Paste the copied command to a text editor.
Start-Job { Echo N | plink.exe -i $env:homedrive$env:homepath\oci\console.ppk -N -ssh -P 443 -l ocid1.instanceconsoleconnection.oc1.ap-melbourne-1.anwwkljxyzxyzxyzxyzhatrpp5gdhi75lunwazur6vlkost37m2rxa -L 5905:ocid1.instance.oc1.ap-melbourne-1.anwwkljrxyzxyzxyzxyzoua6cxxfbtqbg2tvhkogyusd6scnb2wfdnfcfmzq:5905 instance-console.ap-melbourne-1.oci.oraclecloud.com }; sleep 5; plink.exe -i $env:homedrive$env:homepath\oci\console.ppk -N -L 5900:localhost:5900 -P 5905 localhost -l ur6vlkost37m2rxa -
Replace the two
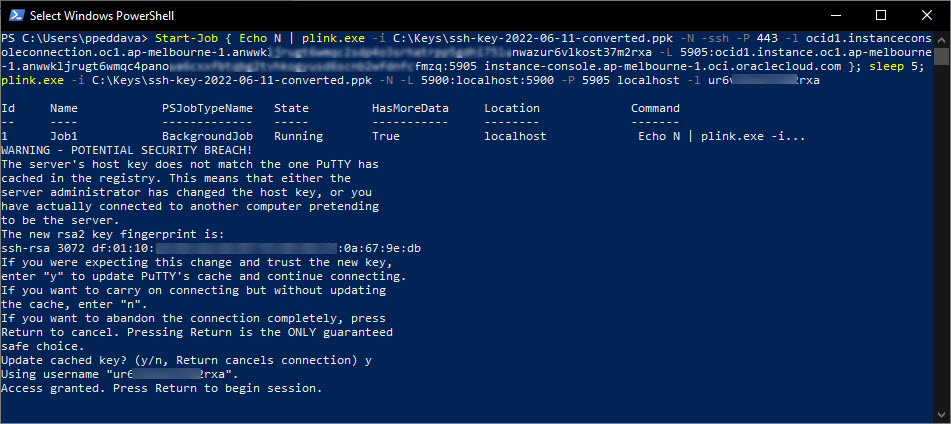
$env:homedrive$env:homepath\oci\console.ppksections in the following command to point to your private key.Start-Job { Echo N | plink.exe -i C:\Keys\ssh-key-2022-06-11-converted.ppk -N -ssh -P 443 -l ocid1.instanceconsoleconnection.oc1.ap-melbourne-1.anwwkljxyzxyzxyzxyzhatrpp5gdhi75lunwazur6vlkost37m2rxa -L 5905:ocid1.instance.oc1.ap-melbourne-1.anwwkljrxyzxyzxyzxyzoua6cxxfbtqbg2tvhkogyusd6scnb2wfdnfcfmzq:5905 instance-console.ap-melbourne-1.oci.oraclecloud.com }; sleep 5; plink.exe -i C:\Keys\ssh-key-2022-06-11-converted.ppk -N -L 5900:localhost:5900 -P 5905 localhost -l ur6vlkost37m2rxa -
Start Windows PowerShell or Terminal, run the following command and follow the prompts to begin the session.
-
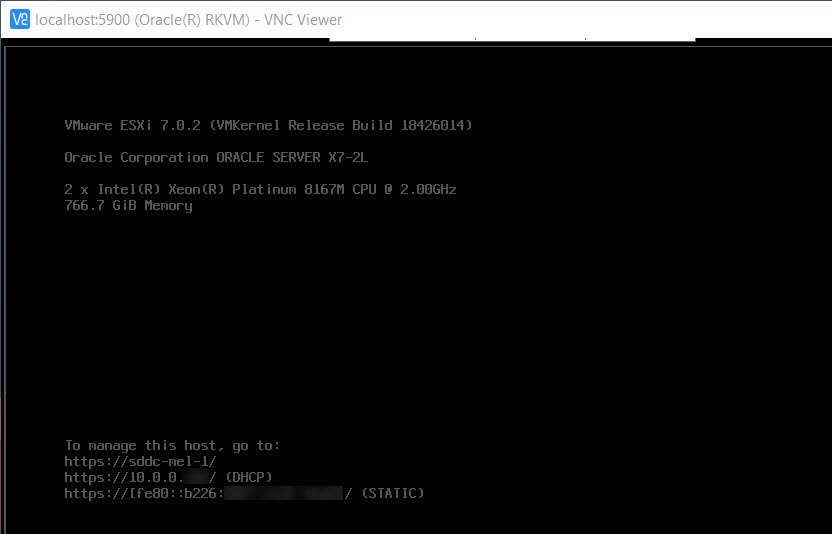
Once the connection has started, open VNC Viewer and establish a connection to the Console using the command
localhost:localport. For this tutorial, we will use localhost:5900. -
Once the connection is established, you can see the DCUI.
-
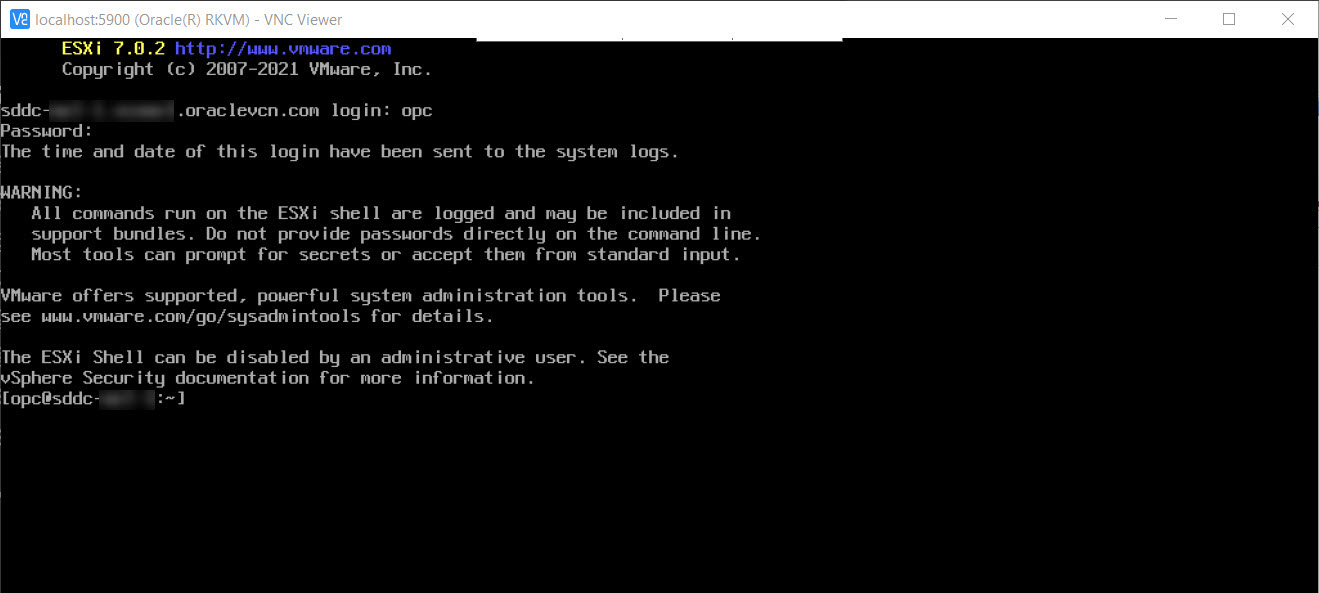
Press ALT+F1 to access the Console, log in using opc user and SDDC password.
Task 3: Enable password based authentication for the ESXi host
-
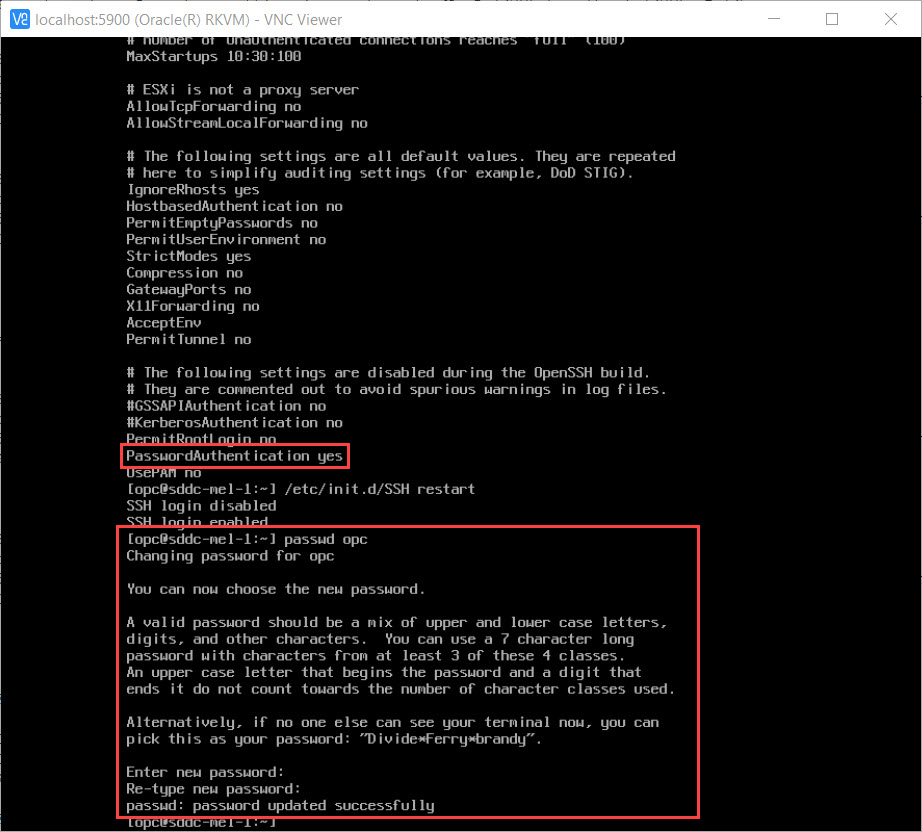
To enable password based login for the opc user, edit the
/etc/ssh/sshd_configfile. -
Change the PasswordAuthentication setting to yes and save the file.
-
Reload the SSH service by running the command:
/etc/init.d/SSH restart. -
Configure a password for the opc user.
Task 4: Add the new Public Key on ESXi host
-
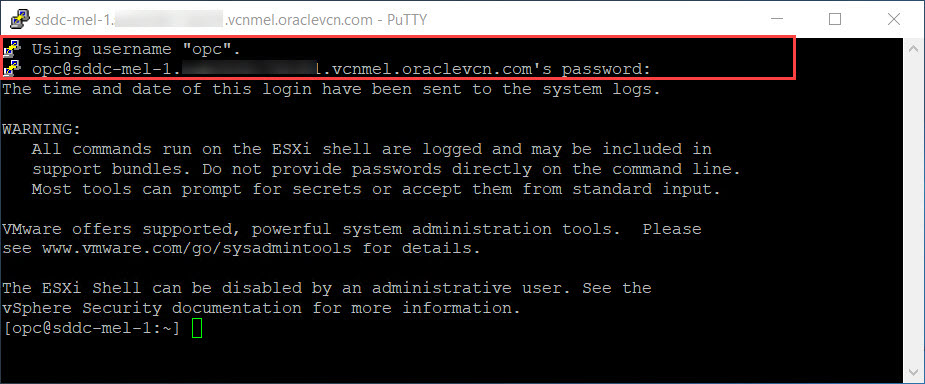
SSH into the ESXi host using the password you have configured in the previous step.
-
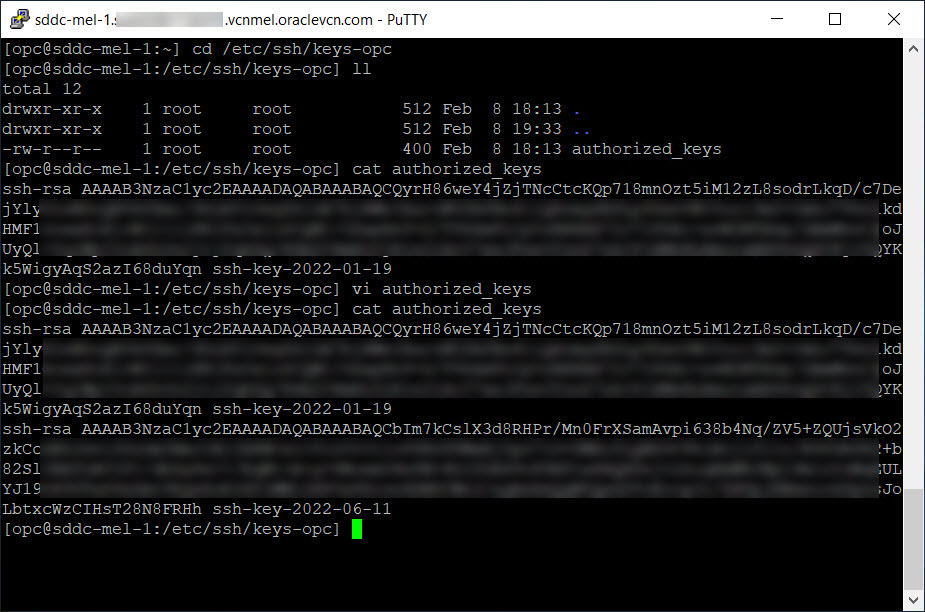
Edit the
authorized_keysfile located at/etc/ssh/keys-opc/.
-
Replace the existing public key or add a new public key.
Task 5: Test access using the new SSH key pair
-
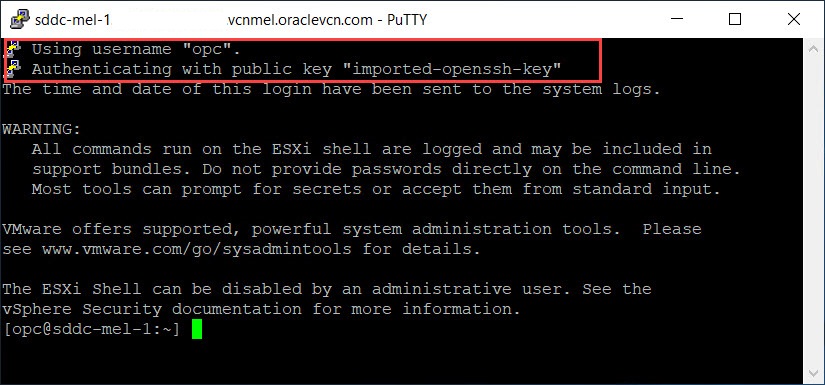
Establish a new SSH session to the ESXi host using the new SSH key pair.
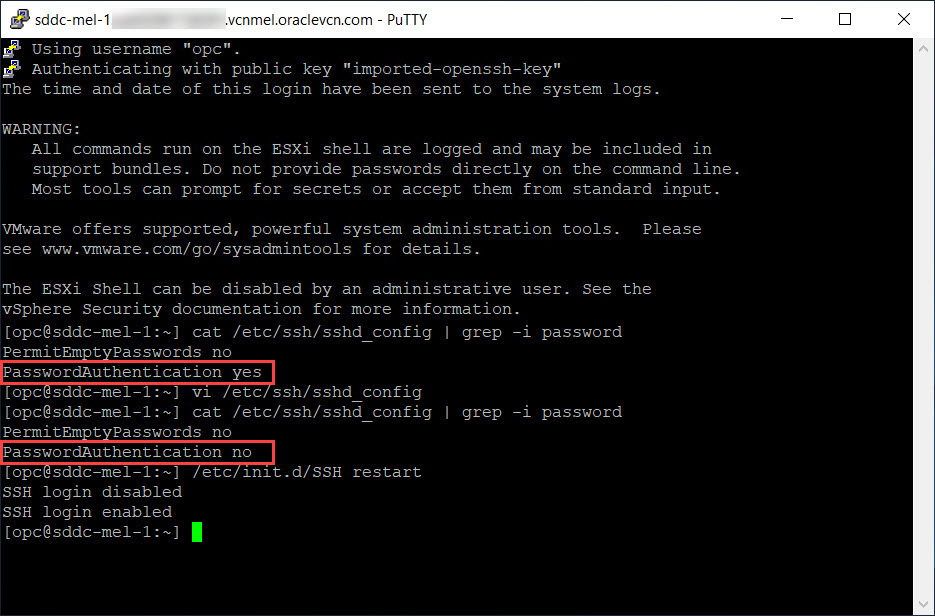
Task 6: Disable password based login
After testing access with the new SSH keys in Task 5, you must disable the password based login for security reasons.
-
Edit the
/etc/ssh/sshd_configfile and change the PasswordAuthentication setting to no. -
Restart the SSH service.
-
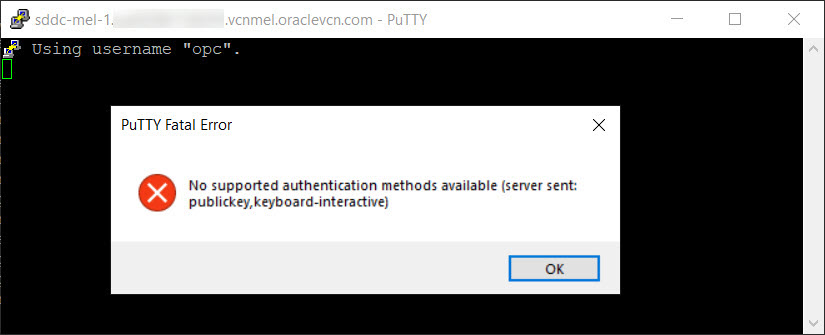
Validate that the password-based log in does not work.
Task 7: Enable Persistent SSH Public Keys
To ensure that the configuration persists even after the ESXi host reboots, follow these steps to add the new public key to the authorized_keys file:
-
Prior to continuing, establish an SSH connection to the ESXi host, if you have not already done so.
-
Copy the new public key to a variable.
NEW_PUB_KEY = "Paste New Public Key here" -
Append the new public key to the
authorized_keysfile on the ESXi host.echo "<$NEW_PUB_KEY>" >> /etc/ssh/keys-root/authorized_keys -
Enable the sticky bit for the
authorized_keysfile to prevent unintentional modifications.chmod +t /etc/ssh/keys-root/authorized_keys -
Execute the auto-backup script to make the
authorized_keysfile persistent./sbin/auto-backup.sh
Next Steps
Perform Tasks 1 to 7 consecutively on all ESXi hosts in the Oracle Cloud VMware Solution SDDC.
Related Links
Acknowledgments
- Author - Praveen Kumar Pedda Vakkalam (Principal Solution Architect)
More Learning Resources
Explore other labs on docs.oracle.com/learn or access more free learning content on the Oracle Learning YouTube channel. Additionally, visit education.oracle.com/learning-explorer to become an Oracle Learning Explorer.
For product documentation, visit Oracle Help Center.
Replace SSH Keys for Oracle Cloud VMware Solution ESXi hosts
F59851-03
December 2023
Copyright © 2023, Oracle and/or its affiliates.