Note:
- This tutorial requires access to Oracle Cloud. To sign up for a free account, see Get started with Oracle Cloud Infrastructure Free Tier.
- It uses example values for Oracle Cloud Infrastructure credentials, tenancy, and compartments. When completing your lab, substitute these values with ones specific to your cloud environment.
Use Oracle Marketplace Images on Oracle Roving Edge Infrastructure and Oracle Compute Cloud@Customer
Introduction
Oracle Roving Edge Infrastructure enables customers to distribute their cloud workloads beyond their Oracle Cloud Infrastructure (OCI) tenancy to deliver cloud services and run application workloads at retail, satellite, and other edge locations. As a result, customers can process data faster and closer to their users and at the points of data ingestion to generate timely insights from their data.
Oracle Compute Cloud@Customer (OC3) is fully managed, rack-scale infrastructure that lets organizations consume common OCI services at customer sites,on-premises and sattelite locations. Gain the benefits of cloud automation and economics in your data center by running OCI Compute with storage and networking services on Compute Cloud@Customer. It’s the simplest way for you to run applications on cloud infrastructure while meeting your needs for data residency, security, and low-latency connections to existing resources and real-time operations.
Oracle Marketplace is an online store that offers you images, stacks, container images and helm charts listings solutions from Oracle and its trusted partners. The Oracle Marketplace catalog includes preconfigured compute images that can be deployed as compute instances on Oracle Roving Edge Infrastructure and Oracle Compute Cloud@Customer. These preconfigured images accelerate your hybrid cloud deployment at the near and far edge.
Audience
Oracle Roving Edge Infrastructure and Oracle Compute Cloud@Customer administrators, developers, and users.
Objective
- Export an Oracle Marketplace Image on Oracle Roving Edge Infrastructure or Oracle Compute Cloud@Customer and launch a compute instance from the Oracle Marketplace image on Oracle Roving Edge Infrastructure node.
Prerequisites
-
Access to the Oracle Roving Edge Infrastructure node WebUI or Oracle Compute Cloud@Customer Console.
-
An OCI Account.
-
User permissions in OCI, Oracle Roving Edge Infrastructure, Oracle Compute Cloud@Customer to Oracle Marketplace, OCI Object Storage, Compute (launch instances, create custom image, export custom image), and Oracle Roving Edge manage permissions in OCI. For more information, see Policies for Managing Roving Edge Infrastructure, Permissions for Roving Edge Infrastructure, Oracle Compute Cloud@Customer IAM Overview, Oracle Compute Cloud@Customer IAM Policy Reference, Common Policies and Policy Reference.
Task 1: Launch an OCI Compute Instance using an Oracle Marketplace Image
-
Navigate to the Oracle Marketplace and find images exportable to Oracle Roving Edge Infrastructure/ Oracle Compute Cloud@Customer: In the OCI Console, navigate to Marketplace, All Applications and select the Filters drop-down list for “Compute Cloud@Customer/Roving Edge Compatible”.
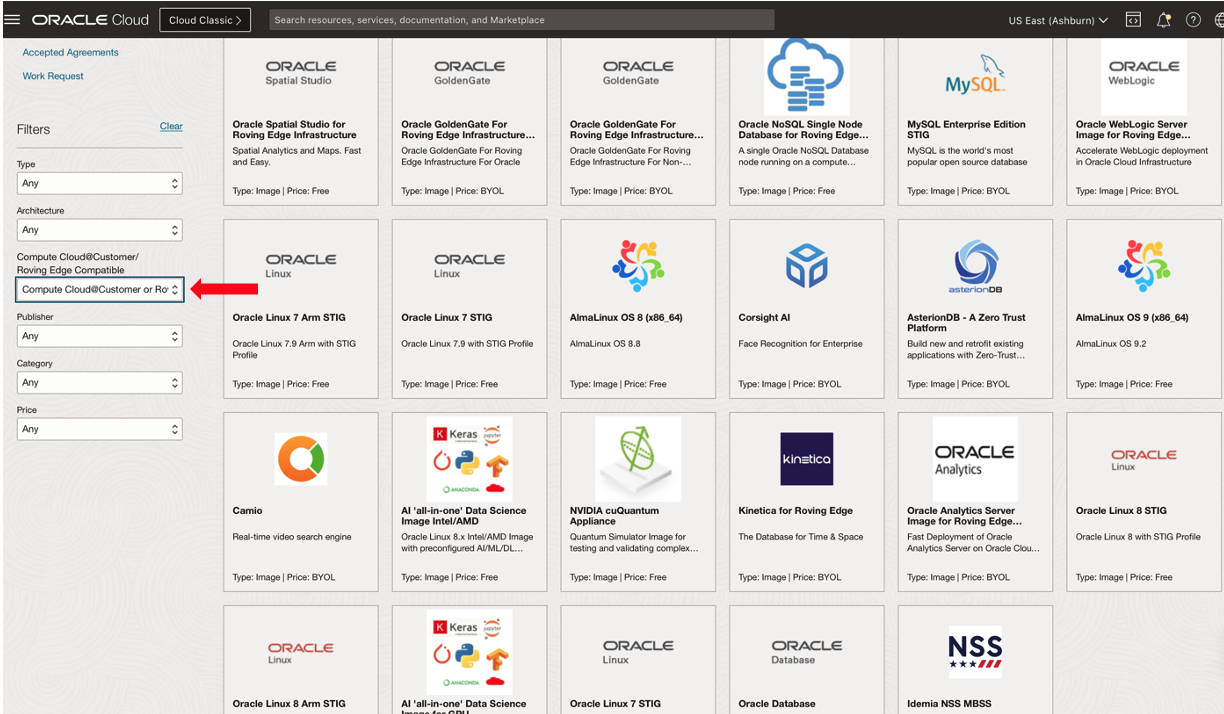
Note: Verify the image selected matches the desired platform, images should be designated either “For Roving Edge” or “For Compute Cloud@Customer”
-
Select an image and click Launch Instance.

-
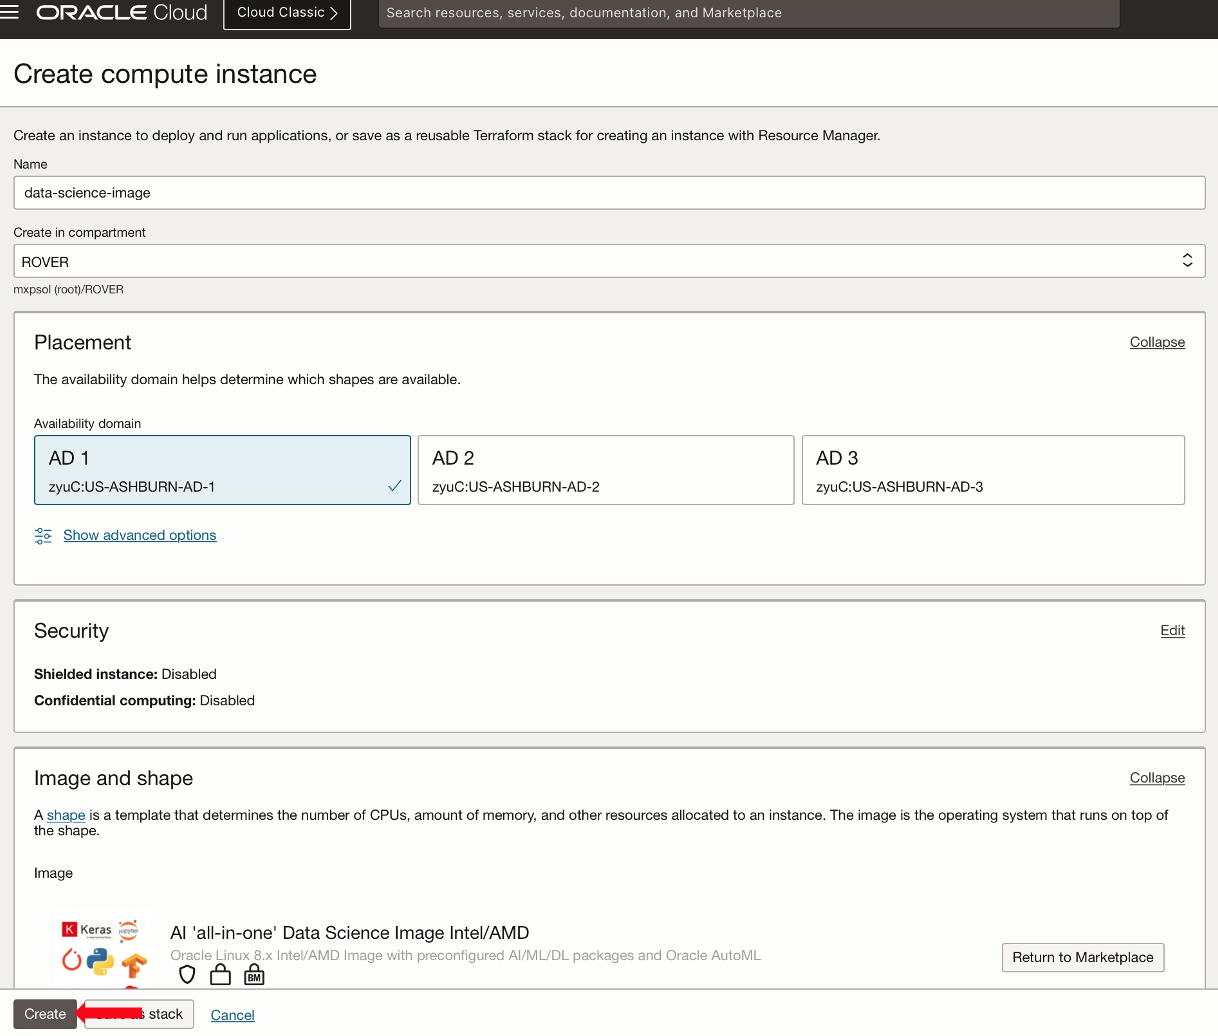
Complete the details in the Create compute instance details page and then click Create.
-
(Optional) Once the instance is launched,
sshinto the instance, and apply any customizations you would like to have on the image.
Task 2: Create and Export a Custom Image
-
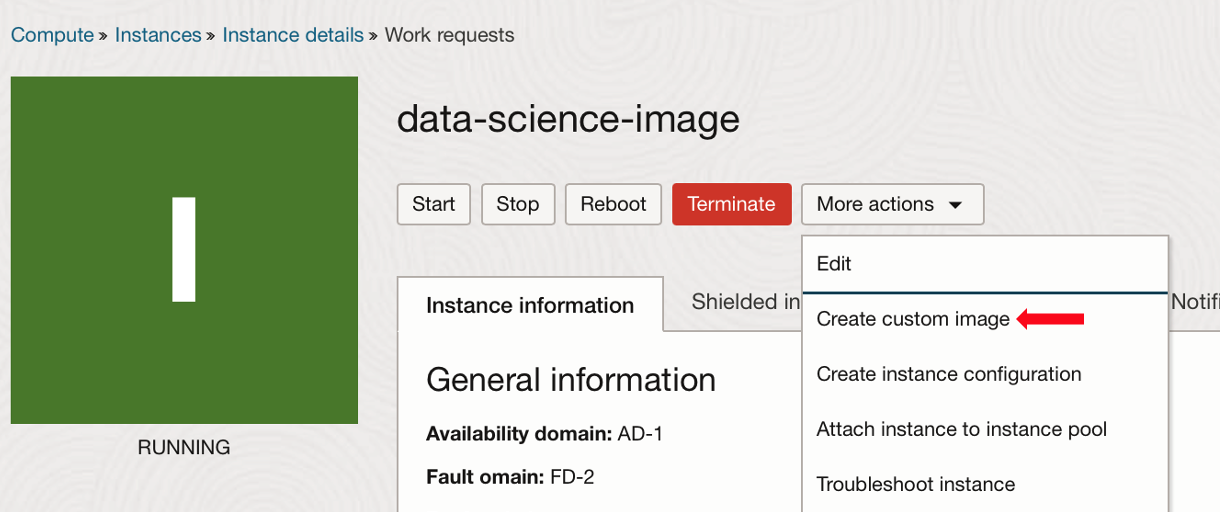
Once the instance is finished provisioning and is in a “Running” state, go to the More actions drop-down list and select Create custom image.
-
In the Create custom image pop-up dialog, enter an image name and click Create custom image.
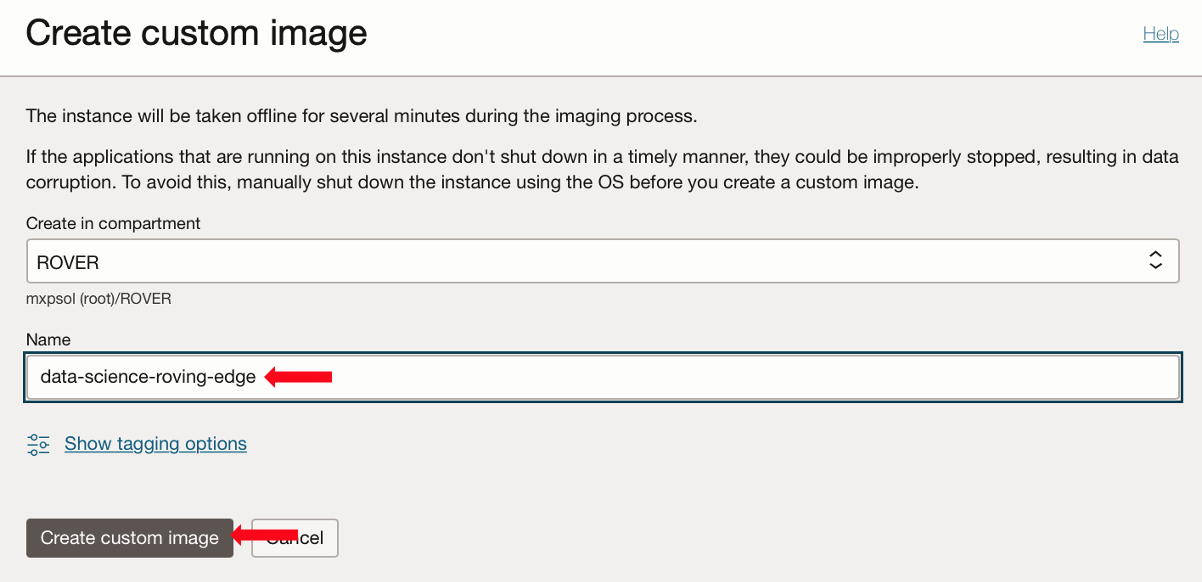
Note: Many examples in this tutorial use “roving-edge” in the example names, set the names that make sense for your image and platform.
-
Navigate to Compute, Custom Images, select the image just created and click Export.
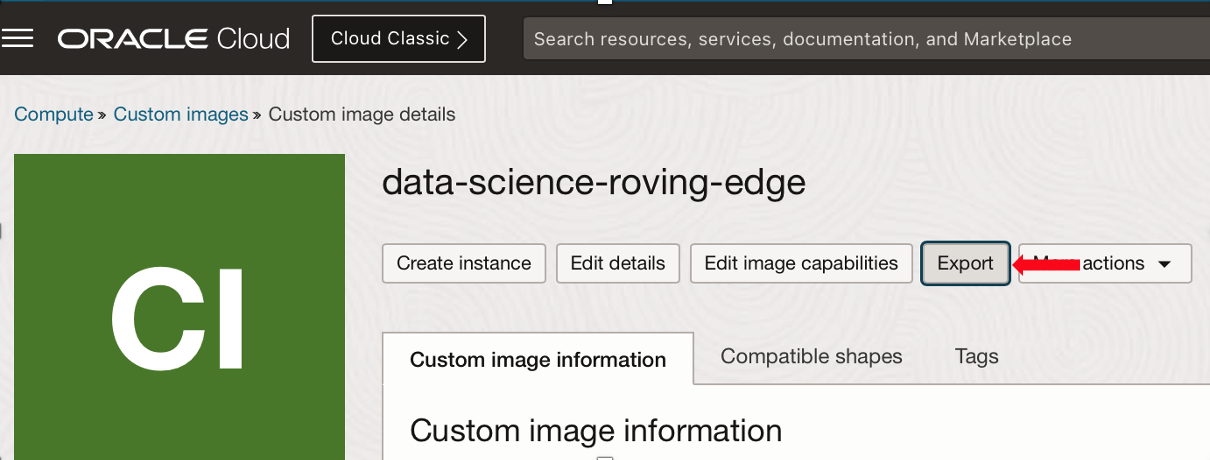
Note: Custom images can also be attached to Oracle Roving Edge Infrastructure nodes at provisioning, see Attaching a Workload to a Roving Edge Infrastructure Device Node.
-
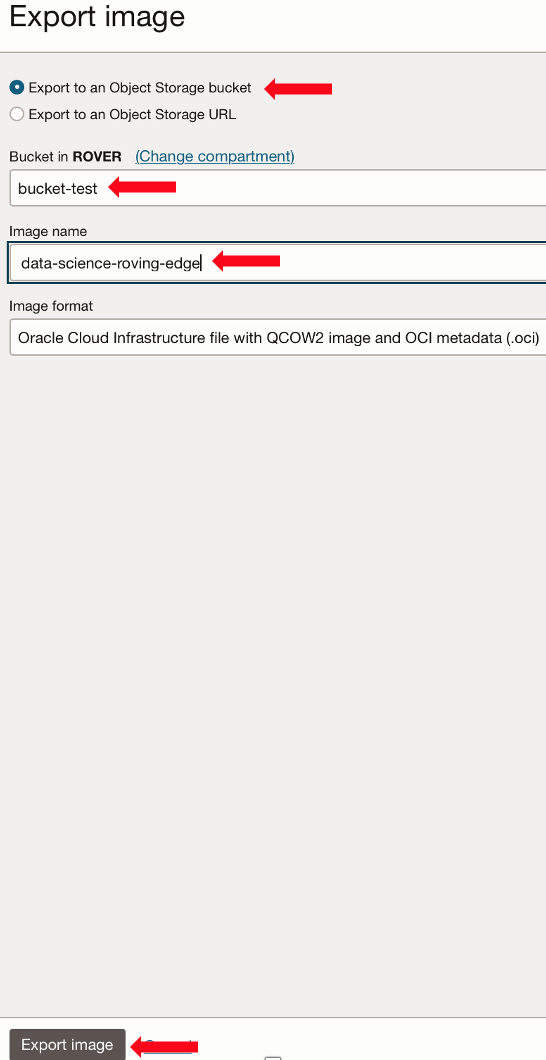
In the Export image form, select Export to an Object Storage bucket, select a Bucket, give the image a name and click Export image.
-
When the export is finished, navigate to Storage, Object Storage & Archive, Buckets and select the bucket you entered for the export. Scroll to the custom image name you exported, click on the 3 dots on the right and select Create Pre-Authenticated Request.

-
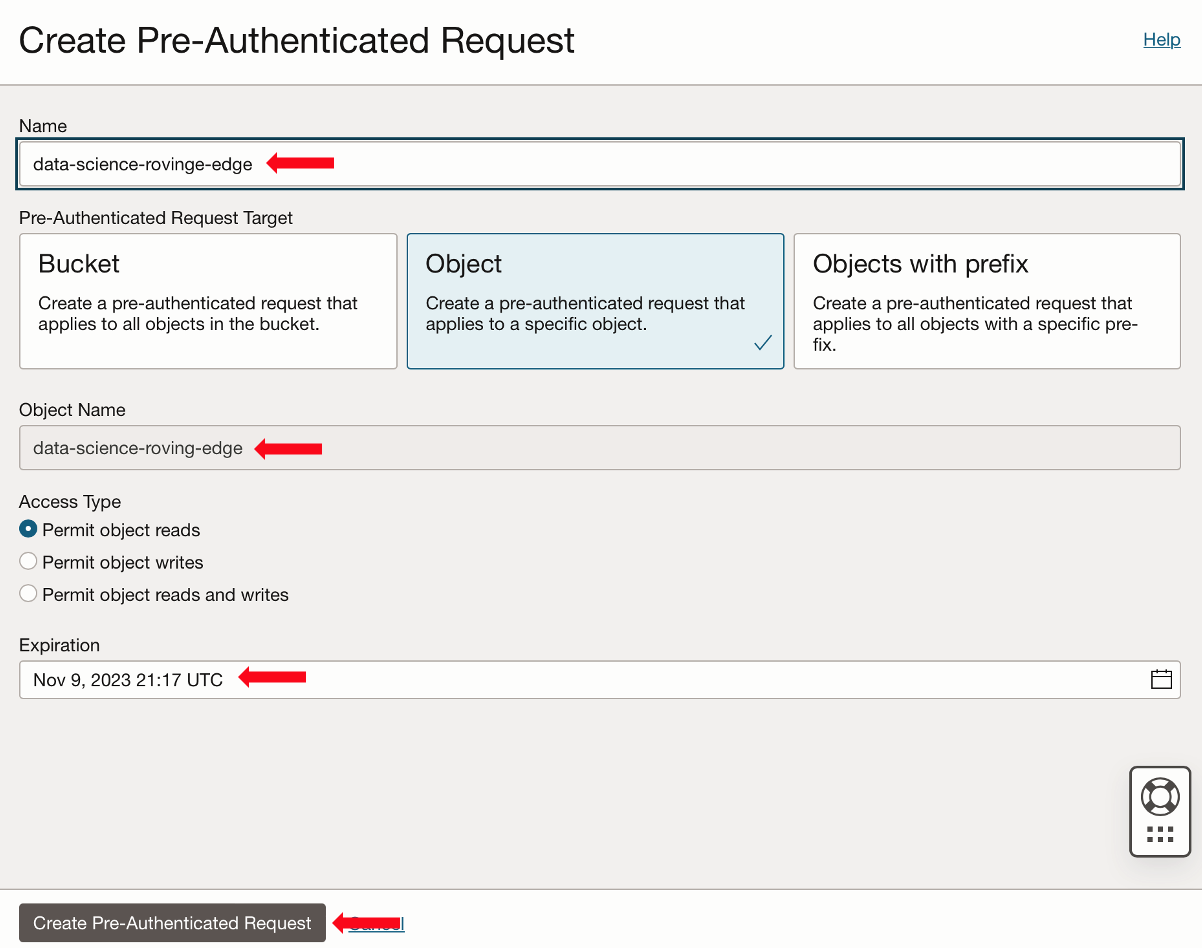
In the Create Pre-Authenticated Request form, enter a Name, expiration date and click Create Pre-Authenticated Request.
-
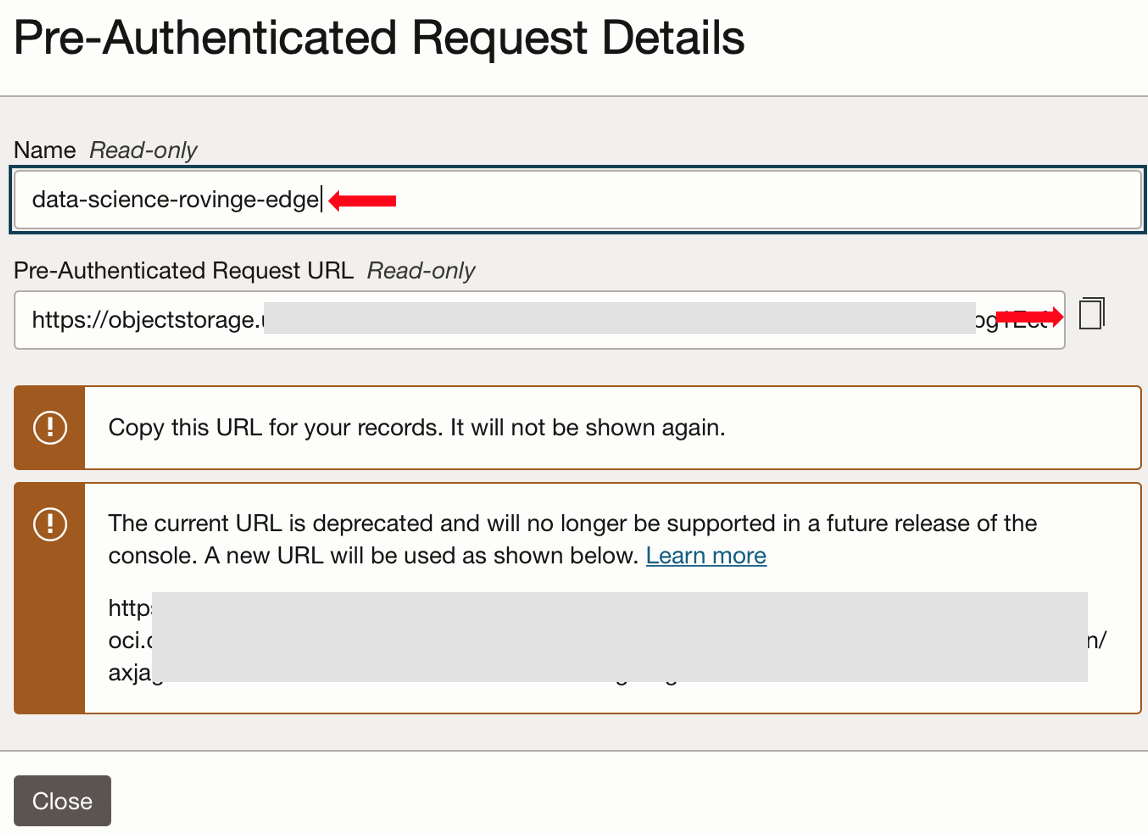
In the Pre-Authenticated Request Details dialog, copy the URL in the Pre-Authenticated Request URL field and save it in Notepad as a text file.
Task 3: Import the Custom Image into Oracle Roving Edge Infrastructure Node or Oracle Compute Cloud@Customer
-
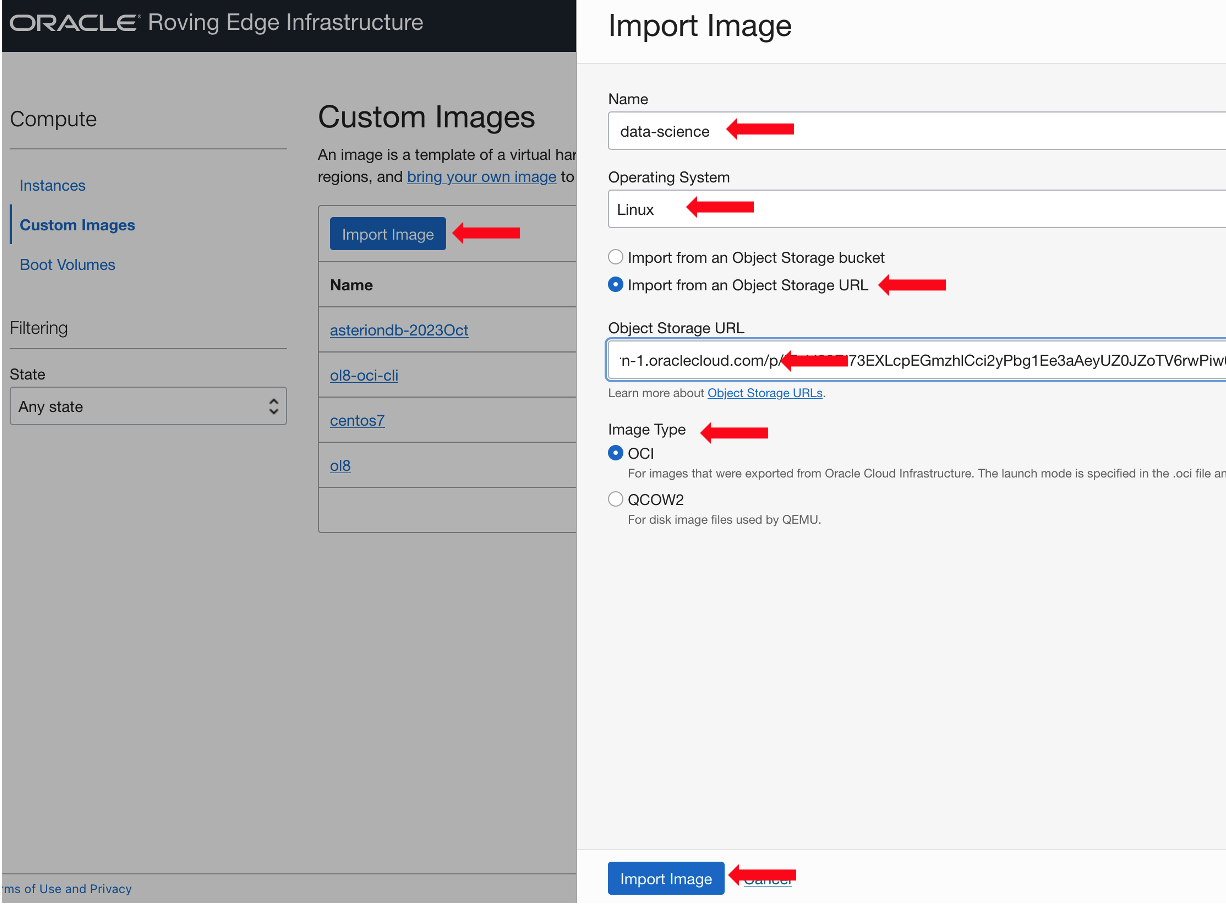
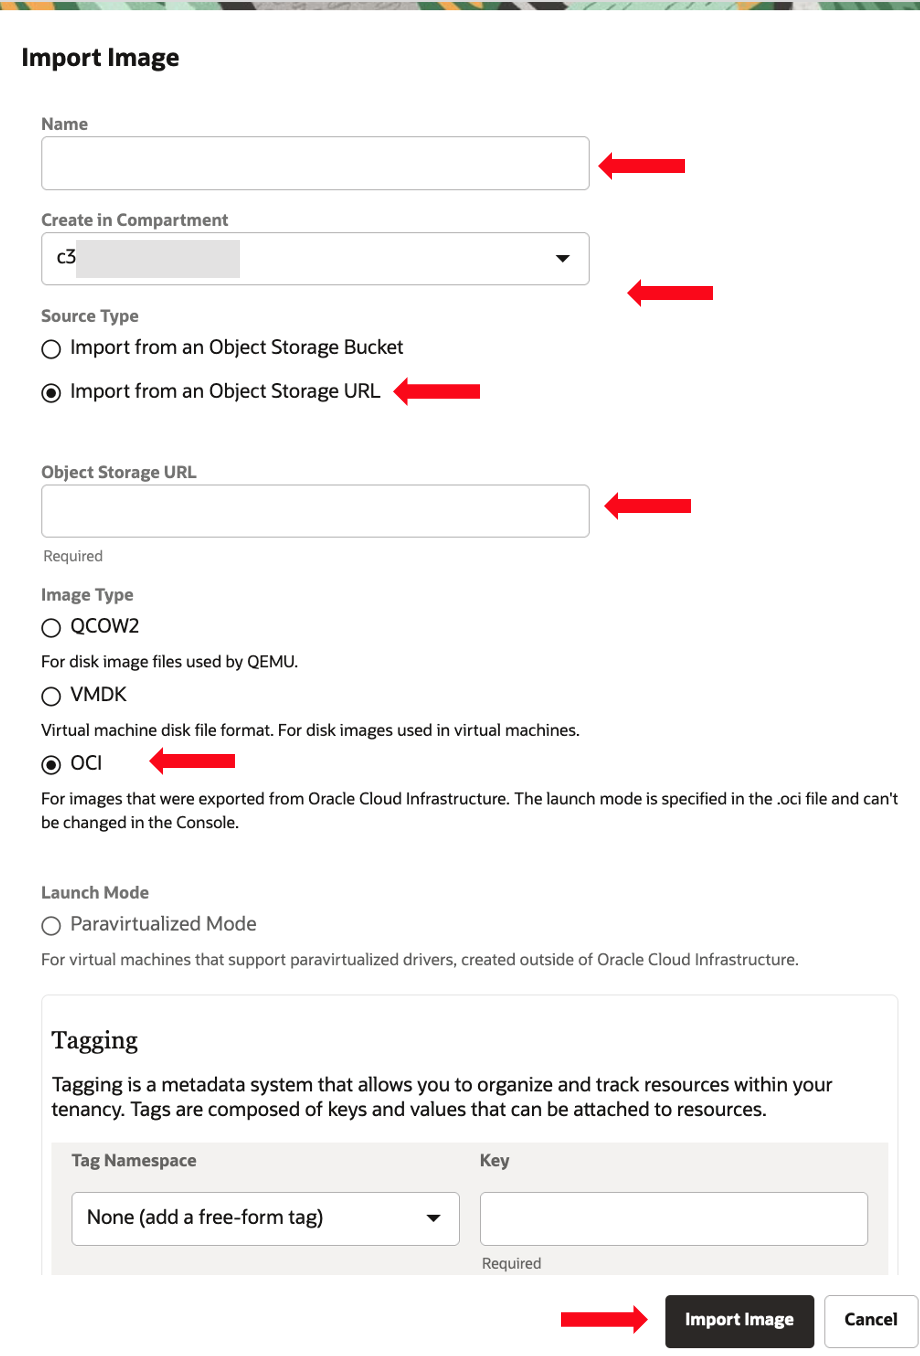
Log in to the Oracle Roving Edge Infrastructure WebUI or Oracle Compute Cloud@Customer Console and navigate to Compute, Custom Images and click Import Image. When the form appears, enter the Name, Operating System, Pre-Authenticated Request URL, select the Image Type, and for Oracle Compute Cloud@Customer also select the Compartment, click Import Image.
-
On Oracle Roving Edge Infrastructure.
-
On Oracle Compute Cloud@Customer.
-
-
When the import is complete, navigate to Compute, Instance and click Create Instance.
-
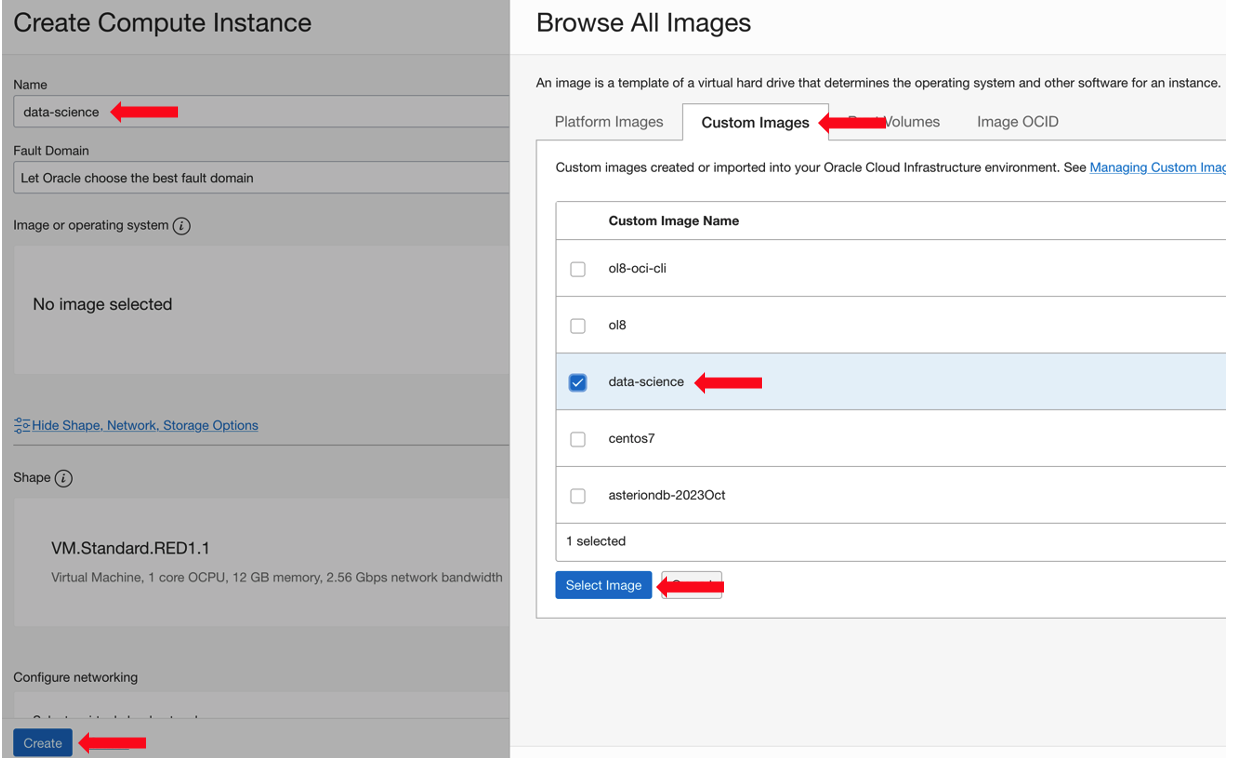
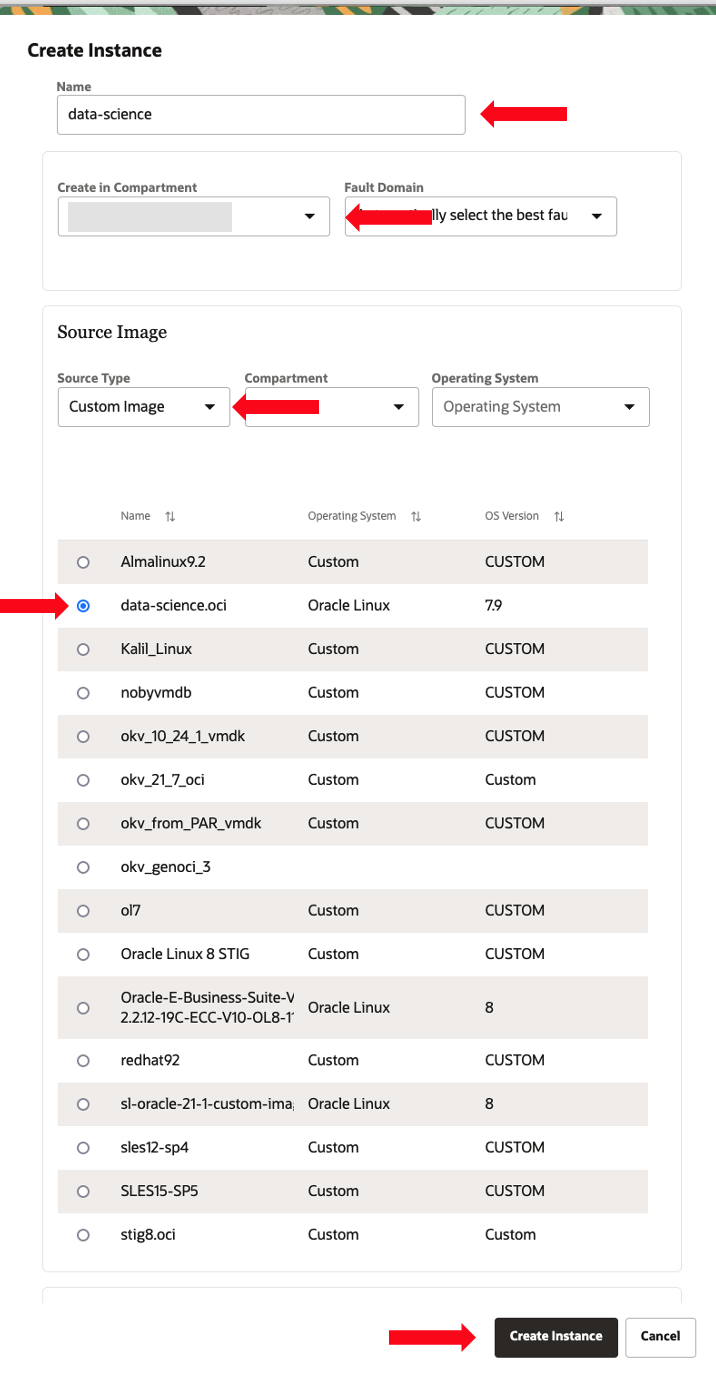
Fill out the Create Compute Instance form. Include instance name, select the imported custom image and other instance details (Shape, Configure networking,
sshkeys and so on) and click Create.-
On Oracle Roving Edge Infrastructure.
-
On Oracle Compute Cloud@Customer.
-
-
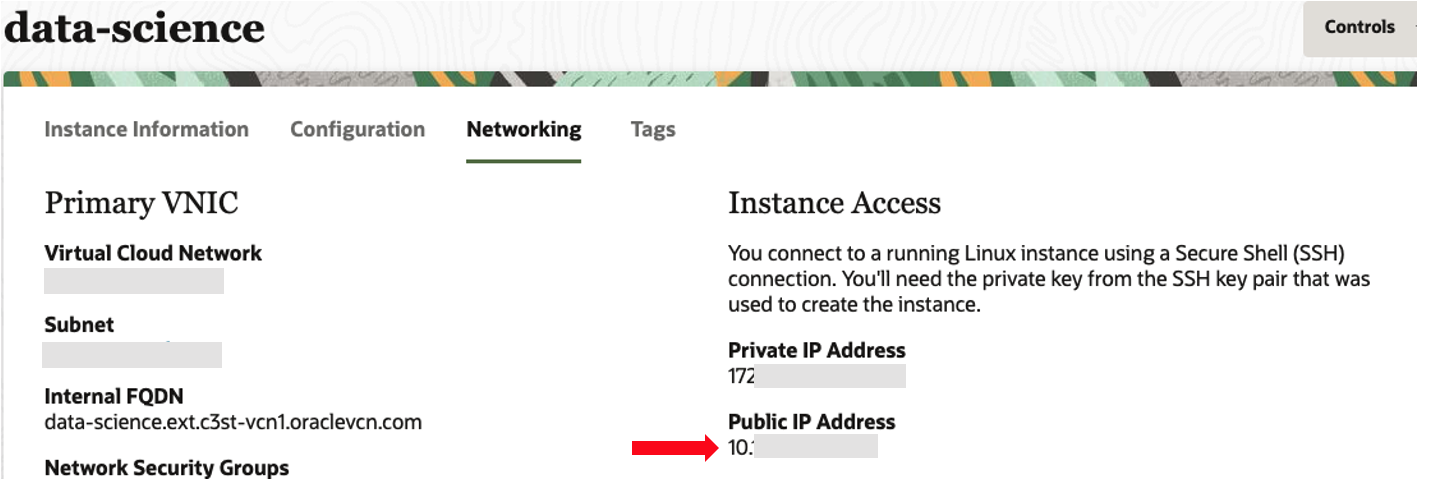
Once your instance is launched, copy the public IP address and login via
sshto finish any customization or application configuration and start using your application at the edge.-
On Oracle Roving Edge Infrastructure.

-
On Oracle Compute Cloud@Customer.
-
Related Links
Acknowledgments
- Author - Melinda Graham (Senior Principal Product Manager)
More Learning Resources
Explore other labs on docs.oracle.com/learn or access more free learning content on the Oracle Learning YouTube channel. Additionally, visit education.oracle.com/learning-explorer to become an Oracle Learning Explorer.
For product documentation, visit Oracle Help Center.
Use Oracle Marketplace Images on Oracle Roving Edge Infrastructure and Oracle Compute Cloud@Customer
F88927-02
December 2023
Copyright © 2023, Oracle and/or its affiliates.