16 Creating ADF RESTful Web Services with Application Modules
This chapter includes the following sections:
About RESTful Web Services and ADF Business Components
ADF Business Components view object instances can be exposed as web services using REST. Client developers interact with these resources through the REST API enabled by the ADF REST runtime.
REpresentational State Transfer (REST) supports a stateless client-server architecture in which the web services are viewed as resources identified by their URL. HTTP Request methods such as GET and POST are the verbs that the developer can use in a web service client request message to describe the necessary create, read, update, and delete (CRUD) actions to be performed on the resource represented by the HTTP URL. REST prescribes the use of standards such as HTTP, URL, URI, XML, HTML, as well as Resource Types and MIME Types. Therefore, REST is not a standard but a proposed architectural style for web services.
Web services conforming to the REST design constraints are referred to as being RESTful. This type of web service allows the HTTP client and the HTTP server to exchange information about resources identified by using a URL. The request and response contain a representation of the resource, in a specific format, which defines the state of the actual resource.
In the Fusion web application, ADF REST resources acted on by RESTful web services are backed by view object instances exposed in the data model of the ADF Business Components Model project. ADF Business Components developers working in the ADF Model project can decide on the set of attributes to expose from backing view objects, the actions to make available CRUD operations, and the view link relationships to preserve for the resulting resource.
Note:
When you create view objects that you intend to expose as ADF REST resources, use the Declarative option on the Query page of the Create View Object wizard to create view objects with declarative SQL mode option enabled. View objects created in declarative SQL mode at design time support an ADF REST framework runtime optimization that allows resource collections to be efficiently filtered by client requests made with the URL query parameter fields.
The design-time choices made by ADF Business Components developers are captured in REST resource definition XML files. Web service client developers may interact with these resource definitions through the REST API enabled by the ADF REST runtime. As a result, the consuming service client may invoke CRUD operations to interact with the REST resources and ADF business objects. The data is shaped by the resource's backing view object instance, with the parent-child relationships intact.
When you create the first REST resource in the ADF Business Components project, JDeveloper also generates a separate RESTful web service project to register the ADF REST servlet. Figure 16-1 shows the web.xml file that JDeveloper generates. You use this project to run and deploy the RESTful web service.
Figure 16-1 Applications Window Displays RESTful Web Service Project
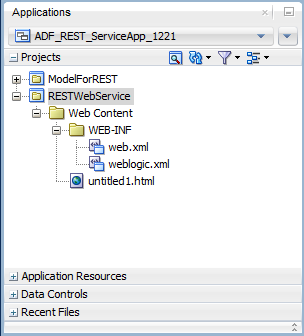
Description of "Figure 16-1 Applications Window Displays RESTful Web Service Project"
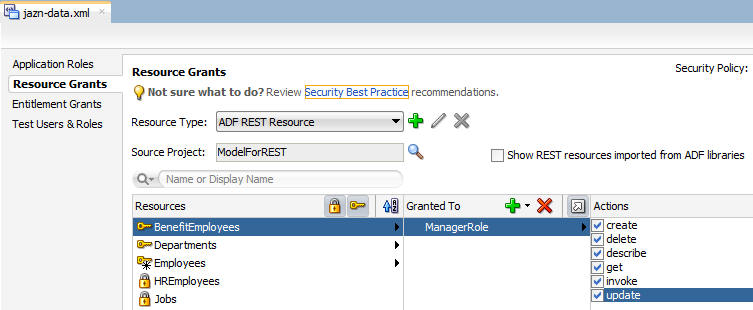
Security for ADF REST resources is enforced in RESTful web services similar to the way you secure the Fusion web application. In JDeveloper, you run the Configure ADF Security wizard to enforce security on the ADF Model project. After you run the wizard, the REST resources of the deployed RESTful web service will be protected by default and will require that you grant access to the operations of the service.
You can test security in JDeveloper by creating test users and granting them access privileges to the resources. The security policies that confer these access rights, may then be migrated from the application level to a domain-level security policy store, where enterprise users are provisioned with access rights.
RESTful Web Services Use Cases and Examples
Any development team can publish an ADF REST resource to contribute to the Fusion web application. ADF REST application developers can manage the functionality that they expose to the service client using these version features:
-
Registering REST resources with an application-specific resource version name (or number) to support versioning of REST resources.
-
Declaring a default ADF REST framework version for REST resources allows service clients to utilize new features and enhancements at runtime, such as the advanced query capabilities offered in version 2 of the ADF REST runtime framework. By declaring a default framework version to process requests, REST application developers may opt into the features introduced by a specific ADF REST framework when they are ready. In JDeveloper starting with release 12.2.1.2.0, versions 1, 2, and 3 exist. In the release 12.2.1.4.0 and later, versions 1, 2, 3, 4, 5, 6, and 7 exist.
Specific runtime features of the ADF REST framework that support the exchange of resource information by client and server include:
-
Interacting with the REST resource is supported by separate JSON-based media type structures for the resource, action execution, and the results of action execution.
-
Passing a custom header to specify the version of the ADF REST runtime framework that will be used to process requests. The version header allows service clients to override the default version declaration defined by the REST application. In JDeveloper starting with release 12.2.1.2.0, versions 1, 2, and 3 exist. In the release 12.2.1.4.0 and later, versions 1, 2, 3, 4, 5, 6, and 7 exist.
-
Interacting with the REST resource using standard HTTP request methods, including GET, POST, PATCH, and DELETE.
-
Executing an HTTP method using an
X-HTTP-Method-Overrideheader on a POST request method when client restrictions prevent the use of standard HTTP methods to interact with the REST resource. -
Merging payload content with the REST resource using a POST method in combination with a header
Upsert-Modeset to true. This action implements create if the record does not exist or update if the record exists. -
Locating a REST resource item (such as a specific employee) or REST resource collection (such as an collection of all employees) is supported by REST-compliant URI path names based on resource names defined in the ADF Business Components Model project.
-
Obtaining a description of the REST resource, including the resource attributes and available actions, is supported by a specific media type and describe action.
-
Obtaining a error responses in the form of a JSON payload with exception detail when ADF REST framework version 4 or later is enabled. Alternatively, with framework version 3 or earlier, error responses are in the form of a simple message string.
-
Linking to a canonical REST resource is supported when a resource with a super set of updatable entities is defined. The canonical link supports alternate links for the backing view object.
-
Filtering of the REST resource is supported by query string parameters on the URI specified by the client to access the specific resource.
-
Encoding formats are supported on the REST resource to enable compression and decompression.
-
Content streaming of BLOB and CLOB attributes exposed by the REST resource is supported by the ADF REST framework.
-
Performing data consistency checks while invoking the RESTful web service is supported by the ADF REST framework. This capability uses version history in the database to enable clients to manage HTTP payloads according to updates in the resource itself.
-
Authorizing users to access the REST resource is enabled by ADF Security permission grants.
Additional Functionality for RESTful Web Services
You may find it helpful to understand other Oracle ADF features before you start working with RESTful web services. Following are links to supporting functionality that may be of interest.
-
For details about creating view objects with the recommended declarative SQL mode enabled to support efficient resource collection filtering at runtime, see Working with View Objects in Declarative SQL Mode,
-
For details about enabling change indicator attributes to entity objects when you want to support data consistency checking on the service client, see How to Protect Against Losing Simultaneously Updated Data.
-
For details about creating row finders on view object when you want to expose finders in ADF REST resource, see Working with Row Finders.
-
For details about creating LOV-enabled view object attributes when you want to expose LOV links in the ADF REST resource, see Working with List of Values (LOV) in View Object Attributes.
-
For information about creating polymorphic view objects to expose subtype view rows in the ADF REST resource, see Working with Polymorphic View Rows.
-
For information about the ADF REST framework that enables runtime access to ADF REST resources using a REST API, see Consuming ADF RESTful Web Services.
-
For details about using the ADF REST data control to design the user interface, see Creating ADF REST Data Controls from ADF RESTful Web Services.
-
For information about creating ADF REST resources using Create Business Components from Tables wizard, see How to Create a Data Model Project for ADF REST Web Applications.
Creating ADF REST Resources Using the Application Module
You can use view object instances that you expose on the ADF application module to create the ADF REST resource.
The application module is an ADF Business Components framework component that encapsulates business logic as a set of related business functions exposed as view object instances. You may map one or more view object instances that appear in the application module data model to ADF REST resources. You use the overview editor for your application module to create the ADF REST resource. The REST resource that you add to the ADF Model project may be published as a web service that follows the REST architectural style.
Note:
When you create view objects that you intend to expose as ADF REST resources, use the Declarative option on the Query page of the Create View Object wizard to create view objects with declarative SQL mode option enabled. View objects created in declarative SQL mode at design time support an ADF REST framework runtime optimization that allows resource collections to be efficiently filtered by client requests made with the URL query parameter fields.
How to Create ADF REST Resources Using the Create Business Components from Tables Wizard
In the New Gallery, in the ADF Business Components category, JDeveloper offers a wizard to create each kind of business component. Each wizard allows you to specify the component name for the new component and to select the package into which you'd like to organize the component. If the package does not yet exist, the new component becomes the first component in that new package.
The Create Business Components from Tables wizard is particularly useful in JDeveloper because it is the only wizard that combines generating the various business components along with creating REST resources in a single end to end process. This wizard lets you create REST resources quickly and easily. You can create entity objects based on an online or offline database, then you can create either entity-based view objects or query-based view objects, and an application module to contain the view instances of the data model, and then create the ADF REST resources.
Before you begin:
It may be helpful to have an understanding of the various ADF business components. For more information, see About ADF Business Components.
You will need to complete this task:
- Create the data model project that will contain the business components, as described in How to Create a Data Model Project for ADF REST Web Applications.
To create REST resources from Business Components from Tables wizard in one pass:
How to Create ADF REST Resources from View Object Instances
View object instances are the business objects on which the Fusion web application operates. The ADF application module exposes these business objects in the data model it defines to specify the data that the service client can display and manipulate. After you have created the Model project, optionally using the application template for ADF REST, you may create additional ADF REST resources using the overview editor for the application module. In this case, any view object instance that the application module defines may have an ADF REST resource defined.
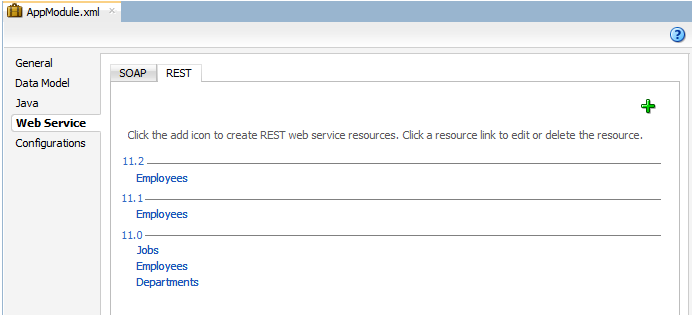
Adding an ADF REST resource is an option that appears in the Web Service page of the application module overview editor. Figure 16-2 shows how the editor displays the REST resources that have been created for view object instances on the AppModule application module. Notice that the editor organizes REST resources on the application module by their assigned release-specific version names (in this example, named 11.0, 11.1, and 11.2).
Figure 16-2 ADF REST Resources Defined on the Application Module
Description of "Figure 16-2 ADF REST Resources Defined on the Application Module"
Note:
When you create an ADF REST resource JDeveloper prompts you to specify a version release name for the resource. The version is an alphanumeric identifier that helps you to manage the current and subsequent versions of resources that you add to the ADF Model project across multiple releases.
After you select the view object instance, name the REST resource, and select a version, JDeveloper opens the resource in the overview editor for the REST resource. You use the overview editor to edit the REST resource representation by exposing view object accessors and available operations as payload objects and actions of RESTful web services. JDeveloper saves the REST resource definition files as subpackages of the ADF application module organized by their assigned release version names.
For details about customizing the REST resource, see How to Edit the ADF REST Resource Definition.
Before you begin:
It may be helpful to have an understanding of how the ADF REST framework supports application modules and enables web service clients to access rows of data and perform service operations. For more information, see About RESTful Web Services and ADF Business Components.
You may also find it helpful to understand other Oracle ADF features that depend on ADF REST resources. For more information, see Additional Functionality for RESTful Web Services.
You will need to complete these tasks:
-
Create the application module data model that contains the view object instances that you want the REST resource to expose, as described in How to Create an Application Module.
-
Create a release version identifier in the
adf-config.xmlfile to associate ADF REST resources you create with a specific version. Each REST resource must be associated with a release version to help manage the current and subsequent versions of ADF REST resources that you add to the ADF Model project, as described in Versioning the ADF REST Resource.
To create the ADF REST resource:
-
In the Applications window, double-click the application module that contains the view instance for which you want to create the ADF REST resource.
-
In the overview editor, click the Web Service navigation tab, then click the REST tab, and then click the Enable Support for REST Service add icon.
When you create the first REST resource, JDeveloper also generates a separate RESTful web service project to register the ADF REST servlet.
-
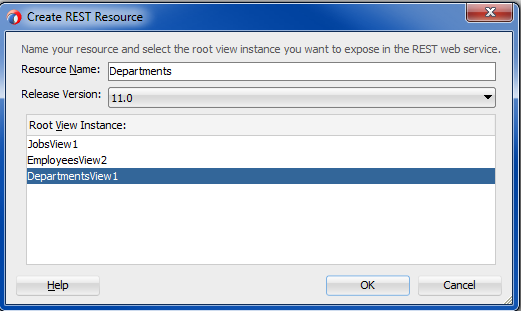
In Create REST Resource dialog, select the root view instance to expose in a RESTful web service.
The dialog displays view instances defined in the application module data model. Only the root view instance of a master-detail hierarchy may be selected.
-
Enter the Resource Name of the REST resource collection and select a release version from the dropdown list, and then click OK.
The resource name is the identifier that service clients use to interact with view instance. For example, as the following figure shows, to name a collection based on a
DeptView1view instance, you might name enterDepartmentsto indicate the full collection name. For more information about naming, see What You May Need to Know About Naming ADF REST Resources.The release version is an identifier that you must create in the
adf-config.xmlfile to manage the creation of resources in JDeveloper. The version will be part of the URL that service clients use to invoke operations on a specific REST resource, as described in Versioning the ADF REST Resource.Figure 16-3 Assigning the ADF REST Resource to a Release Version
Description of "Figure 16-3 Assigning the ADF REST Resource to a Release Version" -
In the overview editor for the REST resource, you can proceed to edit the resource and its structure by performing any of the following tasks:
-
Add and remove child resources defined by view link accessors. For details, see How to Edit the ADF REST Resource Definition.
-
Add and remove resources defined by the same backing view instance. For details, see How to Add and Remove Resources Based on the Same View Instance.
-
Add and remove attributes. For details, see How to Hide and Expose Attributes in the ADF REST Resource.
-
Modify access to standard operations defined by HTTP methods, canonical links, row finder filters, and subtype view usages. For details, see Customizing the ADF REST Resource Representation and Methods.
-
-
Click File and then Save All to save the selections on this resource.
JDeveloper saves the REST resource selections that you make in the overview editor in the resource definition file for the resource, as described in What Happens When You Create REST Resources in the ADF Business Components Project.
What Happens When You Create REST Resources in the ADF Business Components Project
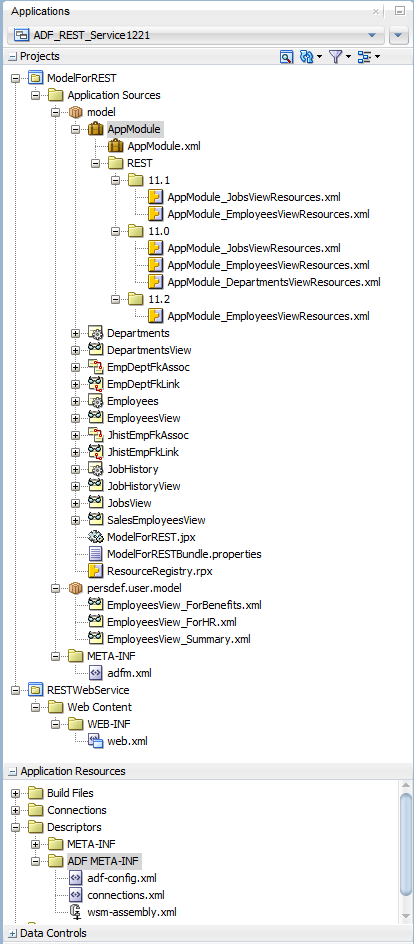
JDeveloper generates the REST resources and displays them in the Applications window organized in the model project by their version release names, as shown in Figure 16-4.
JDeveloper also generates a separate RESTful web service project (RESTWebService) to register the ADF REST servlet. Figure 16-4 shows the web.xml file that JDeveloper generates. You use this project to run and deploy the RESTful web service.
The ResourceRegistry.rpx file that appears in the model project uses metadata annotations to specifies the list of REST resources that will be exposed as a RESTful web service.
The adf-config.xml file is updated when you create the version release names. This file appears in the Applications window in the Application Resources panel, under the Descriptors and ADF META-INF nodes. The connections.xml file in the same folder is created when you first create the ADF Business Components.
Figure 16-4 REST Resources Appear Below Application Module Node
How to Edit the ADF REST Resource Definition
After you add an ADF REST resource definition to the ADF Model project, the REST section of the application module overview editor displays the names of the resources you have created. You can open the REST resource definition in its own editor by clicking the resource name in the list (as shown in Figure 16-2 ).
The overview editor for REST resources displays the options for editing the structure of the resource. From the standpoint of the RESTful web service, the REST resource structure determines the available data that may be invoked by REST calls at runtime.
At design time, you can edit the REST resource definition to select only the resources that you want to expose from the view object hierarchy backing the resource. When you first create a REST resource, you are required to select a view object exposed by the data model of the application module to back the resource. This original view object selection defines the root resource of the REST resource. You may optionally expose additional child view objects if present.
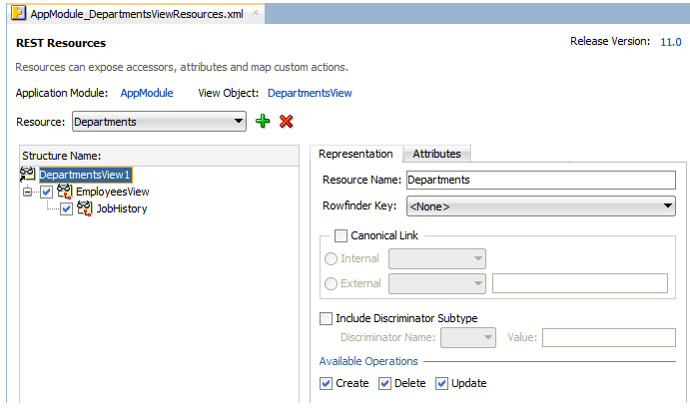
For example, the left side of the REST resource editor shown in Figure 16-5 displays the default structure of the resource, Departments. The resource structure appears as a tree with the root node representing the root resource (in this case DepartmentsView1). The leaf nodes of the tree represent child resources. In this example, the Departments resource is comprised of a root resource DepartmentsView1 and various child resources, including Employees and JobHistory. Because the DepartmentsView1, Employees, and JobHistory resources are related as view instances in the data model, they appear in the hierarchy. You use the checkboxes beside leaf nodes to add and remove child resources from the resource structure.
Figure 16-5 Overview Editor Displays Resource Structure
Note:
The right side of the REST resource editor displays the available options corresponding to the node selections that you make in the Structure tree.
Table 16-1 summarizes the nodes of the resource structure tree:
Table 16-1 Nodes of the Resource Structure Tree
| Node | Description | Editing Options |
|---|---|---|
|
Root resource node:  |
Represents the view object instance that backs the root resource selection. |
The backing view object instance of the root resource cannot be altered or removed. You may select this node to select options on the root resource. For details about these options, see Customizing the ADF REST Resource Representation and Methods. |
|
Child resource node:  |
Represents a view link accessor used in the data model to define master-details relationships defined for the view object instance that backs the root resource selection. Note: Child nodes are not displayed when the view object instance of the root resource is not included in a master-detail relationship. |
Child resources are disabled by default. Select the checkbox to expose a child resource in the resource representation. To remove a child resource from the resource representation, deselect the checkbox. You may select a child resource node to select options on the child resource. For details about these options, see Customizing the ADF REST Resource Representation and Methods. |
Before you begin:
It may be helpful to have an understanding of how ADF REST supports application modules and enables web service clients to access rows of data and perform service operations. See About RESTful Web Services and ADF Business Components.
You may also find it helpful to understand other Oracle ADF features that depend on ADF REST resources. See Additional Functionality for RESTful Web Services.
You will need to complete this task:
-
Create the desired REST resource, as described in Creating ADF REST Resources Using the Application Module.
To edit the ADF REST resource structure:
How to Expose Child Resources in the ADF REST Resource
Child resources may be exposed in the ADF REST resource when the application module data model specifies one or more hierarchical, master-detail relationships. For each master-detail relationship in the data model, the ADF Business Components Model project must define a view link accessor that names the related parent and child view objects, thereby nesting the child or detail view object instance within the parent or master view object instance.
At runtime, a REST resource that exposes nested view instances supports returning collections for the master and detail in a single roundtrip. Thus, exposing child resources at design-time is useful for service clients with the requirement to manipulate master-detail data.
In JDeveloper, the overview editor for REST resources displays master-detail relationships as a resource structure tree with child resources displayed as leaf nodes of the root resource. For example, Figure 16-6 shows the Departments resource in the overview editor with the following nested resource structure:
-
DepartmentsView1is the master view instance and backs the root resource. -
Employeesis a detail view instance, nested belowDepartmentsView1and the checkbox for the tree node appears selected, indicating theDepartmentsresource exposes the child resource. -
JobHistoryis another detail view instance, nested belowEmployeesViewand the checkbox for the tree node appears selected, indicating theDepartmentsresource exposes the child resource.
By default, JDeveloper creates the REST resource based on the selected backing view instance, but does not include child resources. In the resource structure tree, child resources appear unselected by default to indicate that these resources are not exposed. You may expose or hide child resources, by selecting or unselecting its checkbox.
Figure 16-6 Child Resources Enabled in the Overview Editor

Description of "Figure 16-6 Child Resources Enabled in the Overview Editor"
Note:
By default, child resources are not exposed and must be selected in the overview editor to expose them in the resource.
Before you begin:
It may be helpful to have an understanding of how ADF REST supports application modules and enables service clients to access rows of data and perform service operations. For more information, see About RESTful Web Services and ADF Business Components.
You may also find it helpful to understand other Oracle ADF features that depend on ADF REST resources. For more information, see Additional Functionality for RESTful Web Services.
You will need to complete this task:
-
Create the desired REST resource, as described in Creating ADF REST Resources Using the Application Module.
To expose nested resources:
What You May Need to Know About Optimizing Child Resource Database Queries
REST requests where M-1 or 1-1 child resources render as nested objects can result in a high number of database queries, based on the number of resource items. For example, child Department resources rendered for an Employee object result in a database roundtrip for each employee. However, if the REST nested object request is made and the ADF REST framework discovers a M-1 or 1-1 child relationship involving the child’s primary key under the following additional conditions, then lookup of child resources is optimized by finding a row in the view object’s entity cache. If these conditions do not exist, a database query will be performed for the row fetches.
To ensure that the primary key lookup is used to improve the execution time for fetching a one-side view link, nested entity-backed view objects must meet the following conditions:
-
The view object has an entity reference to a child view object and includes the attributes that the child resource exposes. For example, the employee's department name or manager name.
-
The view link must be based on an association.
-
The association attributes for the other side are primary keys.
-
The association does not have any custom where clauses.
-
The view object for the other side does not have any custom where clauses or applied database-only view criteria.
How to Add and Remove Resources Based on the Same View Instance
In JDeveloper, you can use the overview editor for REST resources to define multiple resources for the same view instance. You might add a resource when a single resource definition does not support all of the use cases of your service client. After you add a resource you will be able to modify the operations, list of attributes, and other items of the resource structure to support the desired use cases. Because each resource you define represents a unique resource collection to the service client, resource names should reflect the differences.
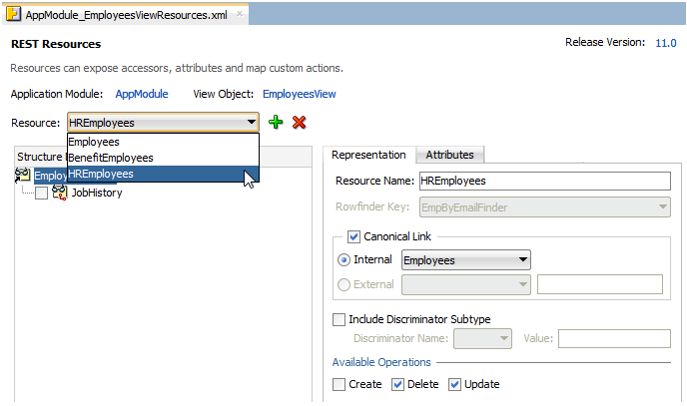
The overview editor for REST resources displays the list of resources you add in the Resource dropdown. For example, Figure 16-7 shows the Employees resource and the EmployeesAllAttrs resource in the overview editor for the same backing view object EmployeesView.
Figure 16-7 Resource List Supports Multiple Resource in the REST Resource Definition
Description of "Figure 16-7 Resource List Supports Multiple Resource in the REST Resource Definition"
Note:
JDeveloper lets you remove resource definitions that have been added in the overview editor for REST resources. However, the empty definition file will appear in the Applications window.
Before you begin:
It may be helpful to have an understanding of how the ADF REST framework supports application modules and enables service clients to access rows of data and perform service operations. For more information, see About RESTful Web Services and ADF Business Components.
You may also find it helpful to understand other Oracle ADF features that depend on ADF REST resources. For more information, see Additional Functionality for RESTful Web Services.
You will need to complete this task:
-
Create the REST resource for which you want to add or remove a resource, as described in Creating ADF REST Resources Using the Application Module.
To add and remove resources in the overview editor:
-
In the Applications window, double-click the resource definition file that defines the ADF REST resource for which you want to add or remove resources.
-
In the overview editor for the REST resource, choose the resource from the Resource dropdown and then click Delete Resource to delete a resource that has already been defined for the view object.
If you delete the root resource definition using Delete Resource, the resource is deleted, but the empty definition file will appear in the Applications window.
-
In the overview editor for the REST resource, to add a resource that you will create for the view object, click Add Resource.
-
In the Add Resource for View Object dialog, enter the Resource Name of the REST resource collection that you want to add for the selected root view instance and then click OK.
-
In the overview editor for the REST resource, select the new resource from the Resource dropdown to edit its resource definition:
-
Add and remove child resources defined by view link accessors. For details, see How to Edit the ADF REST Resource Definition.
-
Add and remove attributes. For details, see How to Hide and Expose Attributes in the ADF REST Resource.
-
Modify access to standard operations defined by HTTP methods, canonical links, row finder filters, and subtype view usages. For details, see Customizing the ADF REST Resource Representation and Methods.
-
How to Hide a Resource from the Catalog Describe
You can hide a top-level resource from the ADF REST catalog describe by setting the Visibility attribute within the ServiceConfiguration tag in the resource definition as shown in the following code example.
<tree..>
  <ServiceConfiguration Visibility="unlisted"/>
   ...
</tree>
You can set the Visibility attribute to unlisted or public. You can use the include query parameter to include the description of resources of a certain visibility. For more information, see Retrieving the Catalog Describe Based on Resource Visibility Declaration.
How to Rename the ADF REST Resource
During development of ADF REST resources you may use the overview editor for REST resources to change the name of a resource in the resource definition file. Because service clients use the resource names to interact with the desired REST resource collections, it is important that you finalize the names of ADF REST resources before deploying the service to a production environment.
When you need to change the name of an ADF REST resource after deployment, this is best handled by creating an entirely new version of the resource, as described How to Version the ADF REST Resource.
Before you begin:
It may be helpful to have an understanding of how the ADF REST framework supports application modules and enables service clients to access rows of data and perform service operations. For more information, see About RESTful Web Services and ADF Business Components.
You may also find it helpful to understand other Oracle ADF features that depend on ADF REST resources. For more information, see Additional Functionality for RESTful Web Services.
You will need to complete this task:
-
Create the REST resource, as described in Creating ADF REST Resources Using the Application Module.
To rename a resource before production deployment:
What You May Need to Know About Naming ADF REST Resources
The REST resource name is the way service clients identify and interact with exposed resource collections. REST resource names typically identify the view object the consuming client is to access. As such, REST resource names are nouns, not verbs.
How to Hide and Expose Attributes in the ADF REST Resource
In JDeveloper, you can use the overview editor for REST resources to define multiple resources for the same view instance. You might add a resource when a single resource definition does not support all of the use cases of your service client. After you add a resource, you can modify the list of exposed attributes, and other items of the resource structure, as needed to support the desired use cases.
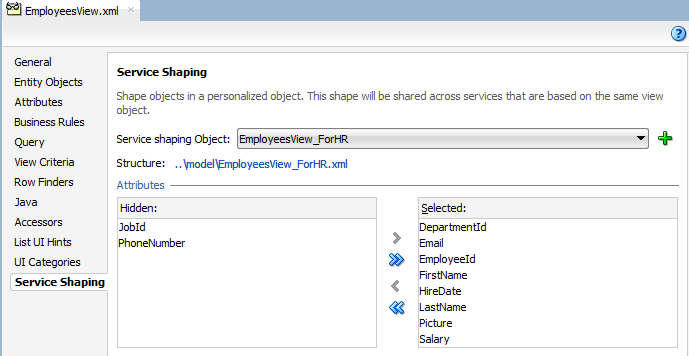
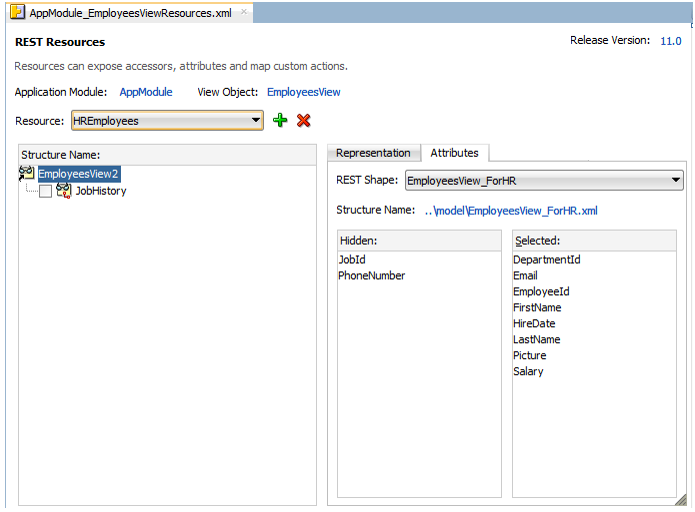
The overview editor for REST resources displays the list of exposed attributes in the Attributes tab. The list is populated by a REST service shape selection that you define on the view object backing the root resource. For example, Figure 16-8 shows the service shape definition EmployeesView_ForHR that exposes all but two of the attributes for the EmployeesView view object.
Figure 16-8 Attributes Exposed By REST Service Shape Definition Selection
Description of "Figure 16-8 Attributes Exposed By REST Service Shape Definition Selection"
Note:
You do not directly modify the list of exposed attributes in the overview editor for REST resources. Rather, you must create service shape definitions on the backing view object, and you then apply the desired REST Shape definition to the current Resource dropdown selection.
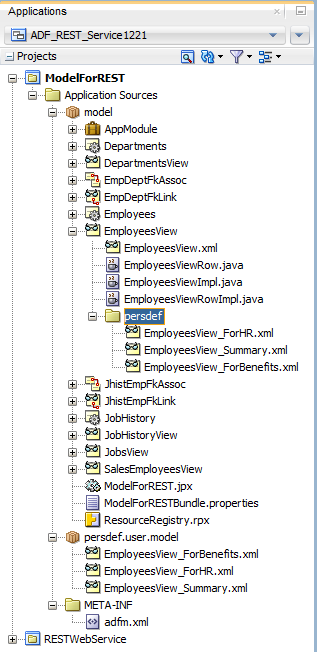
To support the use cases of service clients, you can define as many service shape definitions for each view object as required. The Applications window displays service shape definitions that you create for the view object in the persdef folder under the view object node. For example, Figure 16-9 shows two service shape definition files EmployeesView_forHR.xml and EmployeesView_ForBenefits.xml beneath the EmployeesView view object.
Figure 16-9 REST Service Shape Definition Files in the Applications Window
Before you begin:
It may be helpful to have an understanding of how the ADF REST framework supports application modules and enables service clients to access rows of data and perform service operations. For more information, see About RESTful Web Services and ADF Business Components.
You may also find it helpful to understand other Oracle ADF features that depend on ADF REST resources. For more information, see Additional Functionality for RESTful Web Services.
You will need to complete this task:
-
Create the REST resource, as described in Creating ADF REST Resources Using the Application Module.
To apply a REST service shape definition to a REST resource:
What You May Need to Know About ADF REST Attribute Hints
In JDeveloper, you can use the overview editor to set ADF REST attribute hints.
Setting the attribute hints effects the REST service describe payload. They appear as attribute properties in the json payload.
Figure 16-11 UI Hints Editor
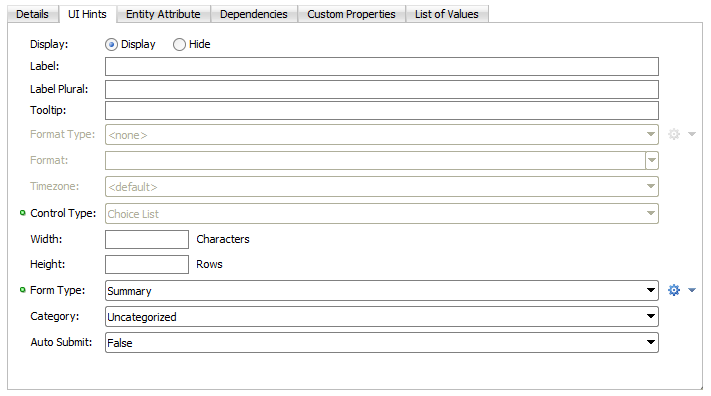
As Figure 16-11 shows, in the overview editor for the view object, you can set UI Hints for the attributes. If you set the Form Type property to Summary, the includeInCompactView=true hint will be surfaced on the attribute. After you have set the From Type hint for the attribute, it will suggest as a hint to metadata driven UIs to include the attribute in a compact view.
How to Control the ADF REST Response Payload Fields
The fields returned in a response payload for a GET request are limited by using the ?fields URL parameter. If you do not specify the ?fields URL parameter, it might result in a response of larger size. You can control the fields that are returned in the response payload by setting the Form Type hint of an attribute either to Detail or Summary. The default value is Detail.
When you set the Form Type hint of an attribute to Summary, the includeInCompactView=true hint will be surfaced on the attribute. See What You May Need to Know About ADF REST Attribute Hints.
prefer HTTP header either to return all the fields in the response payload or only the most common fields by using one of the following return options:
- minimal: returns only a minimal response to a successful request. This option returns only those attributes in the payload for which
includeInCompactView=trueis set. The minimal response is at the discretion of the server. - representation: returns the current state of the resources in the response to a successful request. This option returns all the fields irrespective of the attributes set. A POST or PATCH request with
return=representationwill return all fields.
Content-Type: application/vnd.oracle.adf.resourceitem+json
Prefer: return=representation/minimal
What You May Need to Know About Response Payload When a Shape is Defined on a Resource
When you define a compact shape to a REST resource and do not specify ?fields in the URL, then only those attributes for which the Form Type hint is set to Summary are returned in the payload.
For example, if you define a REST service shape on a root or child resource, only the fields that support Form Type=summary in the REST service shape are returned when you do not specify the ?fields parameter.
The response payload for a REST resource is controlled at the resource level only if a resource has the EnableCompactview=view configuration property set.
<tree IterBinding="EmpIter" id="employees" AccessorFolder="Always">
    <ServiceConfiguration EnableCompactView="true"/>
<nodeDefinition .../>
</tree>
A REST client can expand or contract the default set of fields by using the + and - operators in the fields parameter.
The following example returns the PhoneNumber field in the response in addition to all fields in the default shape.
/employees?fields=+PhoneNumber
The following example returns all the fields in the default shape in response, except the email field.
/employees?fields=-Email
Use the Prefer REST HTTP header to toggle between full set of fields and the default set. See How to Control the ADF REST Response Payload Fields.
What You May Need to Know About Modifying the ADF REST Resource Structure
As shown in Figure 16-12, after you create the resource and assign a version identifier, the overview editor for the REST resource displays the version in the top, right corner of the editor to help you identify which version you are editing.
Figure 16-12 REST Resource Editor Displays Version

Changes that you make to ADF REST resources during the development cycle can be made without the need to version the resource. However, once you have deployed the RESTful web service, service clients that access the ADF REST resources rely on the stability of the resource collection to satisfy their use cases.
Over time, as use cases change or the backing view objects of the REST resources change, you may need to modify the resource structure of already deployed resources. At that time, modifications to existing ADF REST resources may become backward-incompatible with the deployed REST service and may necessitate creating a new version identifier and ADF REST resource for that version. For details about when to version the REST resource, see What You May Need to Know About Versioning ADF REST Resources.
JDeveloper lets you manage resource versions in the Release Versions page of the overview editor for the adf-config.xml file in the ADF META-INF folder. For details about how to create a new version of ADF REST resources, see Versioning the ADF REST Resource.
What You May Need to Know About ADF REST Resources and LOB Attributes
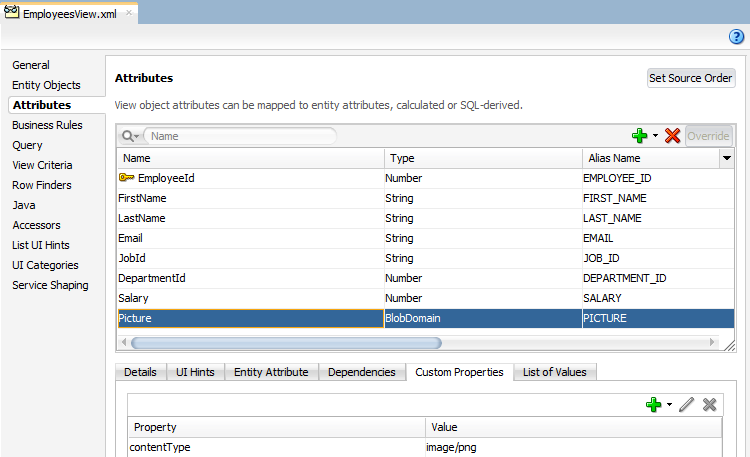
A resource that exposes a BLOB or CLOB type attribute will be accessible at runtime as streaming media. By default, the view object attribute will be handled by the ADF REST runtime using the generic content type application/octet-stream. When you want to support a specific content type, you can configure the special property contentType as a custom property of the LOB-type attribute. For example, when working with PNG image files, the following content type can be configured at design time.
-
Custom Property:
contentType -
Value:
image/png
As Figure 16-13 shows, the custom property contentType has been added to the view object definition for the Picture attribute in the overview editor for the view object.
Figure 16-13 Custom Content Type Configured for LOB Attributes
Description of "Figure 16-13 Custom Content Type Configured for LOB Attributes"
As Figure 16-14 shows, in the overview editor for the view object, you can set UI Hints for the attributes. If you set the Form Type hint to Summary, the includeInCompactView=true hint will be surfaced on the attribute. After you have set the Form Type hint for the attribute, it will suggest as a hint to metadata driven UIs to include the attribute in a compact view.
What You May Need to Know About LOV Accessors in the ADF REST Resource
A list of value (LOV) attribute is any attribute of a view object that relies on another view object as its data source. Typically, the data source view object specifies a fixed list of possible values for the LOV-enabled attribute. When you explicitly define an LOV-enabled attribute on a view object, ADF Business Components defines an LOV view accessor that the ADF REST runtime will automatically expose in the ADF REST resource as a LOV child resource. Thus, at runtime when an LOV-enable attribute is detected on a resource, service clients may invoke LOV view accessors to obtain the data source of an LOV-enabled attribute and present selection choices to the end user.
Note that the LOV attribute must not rely on an LOV view accessor that references an entity object attribute. Only LOV view accessors based on a view object attribute will be visible to the REST service. At runtime, ADF REST knows nothing about attributes and links defined at the level of entity objects and will return an HTTP error code 500 when the resource contains an LOV attribute defined by an LOV view accessor that references an entity object attribute.
Note:
By default, LOV accessor resources are exposed on resources and are not displayed in the structure tree of the resource overview editor. For details about creating LOV-enabled attributes, see Working with List of Values (LOV) in View Object Attributes.
What You May Need to Know About Mandatory Attributes in the ADF REST Resource
A mandatory attribute is any attribute of a view object that must be supplied in a query and if not supplied, will trigger a validation error at runtime. The ADF REST resource describe identifies whether or not an attribute is mandatory using the property “mandatory”: true or “mandatory”:false. The mandatory property of the resource describe is based on the view object attribute metadata specified at design time. When the attribute is set as mandatory and the setting is determined at runtime, using a Groovy expression to evaluate to true or false, then the describe will return “isMandatoryConditional”:true in the attribute properties list.
What You May Need to Know About Case Sensitivity in Resource Collection Query Operations
The ADF REST framework supports case insensitive search when using a q query parameter to filter search results. The flag named restV1QueryCaseSensitive in the adf-config.xml file can be set to false if you want to perform case insensitive search. The default value of the flag is true which implies case sensitive search.
Customizing the ADF REST Resource Representation
JDeveloper allows you to edit the ADF REST resource definition. You can enable HTTP actions, expose a row finder, enable a canonical resource link for nodes of the tree, expose subtype view objects in the resource, and configure the resource cache duration.
You use the overview editor for the ADF REST resource to edit the ADF REST resource definition. For example, selections that you make in the resource structure tree let you enable HTTP actions, expose a row finder, and enable a canonical resource link for each node of the tree.
The customization choices that you make for REST resources in your ADF Model project ultimately affect the ability of service clients to interact with these resources at runtime. Therefore it is important to understand the requirements of the service client use cases to support the desired ADF REST runtime features though the various design time customizations described in this section.
For details about the ADF REST runtime, see Consuming ADF RESTful Web Services.
Note:
Custom properties defined for a resource attribute are included in the describe. However, custom properties whose name begins with INTERNAL, internal, or __ (double underscore), are hidden from the describe.
How to Expose Canonical Resources in the ADF REST Resource
The ADF REST resource representation limits the attributes returned in a runtime response to the attributes queried by the resource's backing view object. When defining the view object query at design time, it is therefore important to expose only the attributes required to support specific use cases of the service client. However, in order to allow the service client to navigate from the partial REST resource representation to the full representation of the same data, you can configure a link to a canonical resource.
Typically, the canonical resource is considered as the source of truth and therefore specifies the full representation of a given data source. An example of a canonical resource, can be illustrated by the employees resource with a link to a resource that describes a manager instance. In this scenario, where typical use cases may require only the manager name, the non-canonical manager resource includes only the name attribute. And, for cases where the name is not sufficient to identify the manager, the non-canonical resource may link to a canonical resource that exposes all attributes of the manager instance, including name, id, department, hire date, and so on. Thus, the canonical resource and the non-canonical resource exist as follows:
-
Non-canonical resources and the canonical resource expose different representations of the same data source.
-
Non-canonical resources expose only a representation of the data source needed to support service client use cases and are therefore a partial representation.
-
Non-canonical resources include a link to its canonical, full representation when defined.
In the overview editor for the resource, for each resource node in the resource structure tree, you may choose a canonical resource from an existing REST resource defined by the ADF Model project or you may choose an external resource defined by an existing URL connection in the connections.xml file of the application.
The internal canonical resource that you can select in the overview editor for REST resources, must meet the following criteria:
-
Your ADF Model project must define a view object that accesses the same data source backing the existing, partial representation resource. The view object may or may not be entity-based.
-
The view object must query a superset of available attributes queried by the non-canonical resources.
-
The superset representation view object must be specified as a view instance on the data model of the application module.
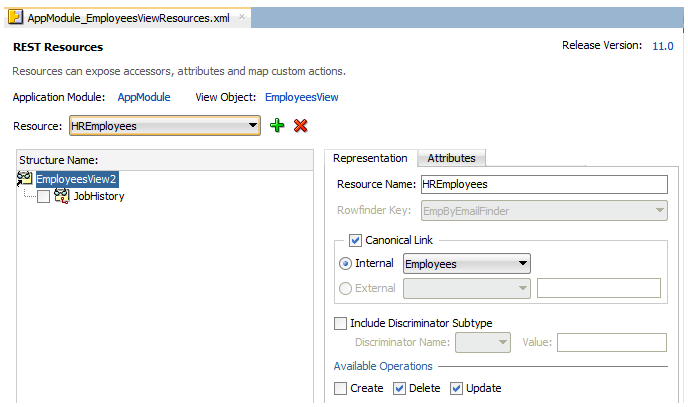
Figure 16-15 shows the EmployeesView root resource node selection in the overview editor and the Resource dropdown selection HREmployees, with the internal canonical resource Employees enabled. In this case, the database table specified by each backing view object is the same for both the HREmployees and the Employees resource. In this example, Employees is the canonical resource and contains all attributes from the backing view object whereas the HREmployees resource is backed by the same view object but queries only the attributes required to support a specific use case.
Figure 16-15 Canonical Resource Enabled in the Overview Editor
Note:
A resource (resource_partial) can only select another resource as canonical (resource_full) as long as the resource_full contains all the attributes that resource_partial exposes.
Before you begin:
It may be helpful to have an understanding of how the ADF REST framework supports application modules and enables service clients to access rows of data and perform service operations. For more information, see About RESTful Web Services and ADF Business Components.
You may also find it helpful to understand other Oracle ADF features that depend on ADF REST resources. For more information, see Additional Functionality for RESTful Web Services.
You will need to complete these tasks:
-
Create the desired REST resource, as described in Creating ADF REST Resources Using the Application Module.
-
When you want the REST resource's canonical link to expose an internal canonical resource, create a view object definition that queries the superset of available attributes from the data source (must be the same data source as the non-canonical REST resource) and expose that view object in the data model, then create a resource for the internal canonical resource. For details about creating a resource, see How to Create ADF REST Resources from View Object Instances.
-
When you want the REST resource's canonical link to expose an external canonical resource, create a URL connection in the application connection file (
connections.xml), as described in the “Create URL Connection Dialog” topic in the JDeveloper Online Help.
To expose a canonical resource link:
How to Support Create Operations on ADF REST Resources with LOV Attributes
When you want the ADF REST resource to support resource operations that require a list of values (LOV) without a row context to populate the list, you must create a LOV resource. For example, a service client may invoke a resource item create operation on the REST resource, in which case no row context will be available for the LOV list. In this situation, the LOV resource does not exist as a child resource and must instead be accessed at runtime by the service client independent from resource items that they attempt to create.
Note:
No design time changes are required to support resources with LOV-enabled attributes when the service client needs to access existing resource items. It is only necessary to create an LOV resource at design time when you want to enable service clients to create new resource items and the resource item is backed by an LOV-enabled attribute. In the case of existing resource items, the resource item provides a row context within the resource collection that allows the ADF REST runtime to automatically generate LOV links as a child resource. For more information about LOV child resources, see What You May Need to Know About LOV Accessors in the ADF REST Resource.
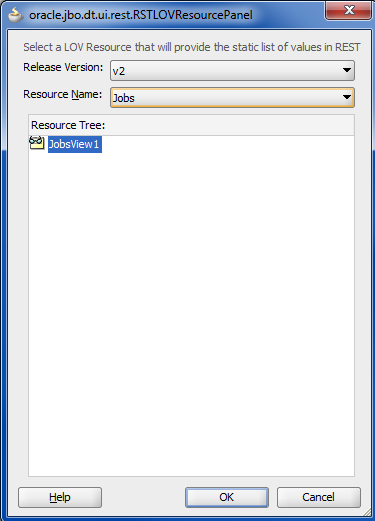
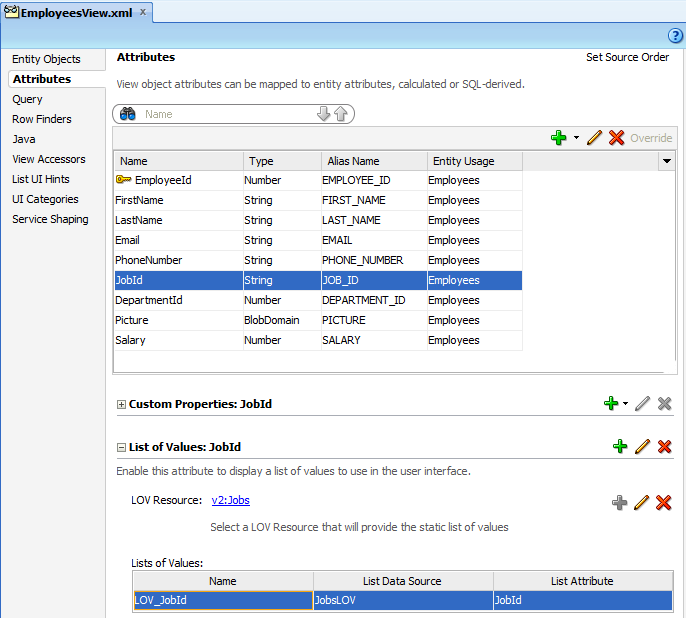
In JDeveloper, you use the overview editor for view objects to create LOV definitions for individual attributes in the Attributes page of the editor. The same page is used to define the static LOV resource. For example, Figure 16-16 shows the EmployeesView view object and the LOV-enabled attribute JobId in the overview editor for the view object backing the Employees resource. The static LOV resource is identified by the specific ADF REST resource that it supports: in this case, v2 (the internal version identifier of the Jobs resource). Below the static LOV resource is the LOV definition used by the LOV-enabled attribute of the view object.
Figure 16-16 Static LOV Resource Supports Create Operations on the REST Resource
Description of "Figure 16-16 Static LOV Resource Supports Create Operations on the REST Resource"
Before you begin:
It may be helpful to have an understanding of how the ADF REST framework supports application modules and enables service clients to access rows of data and perform service operations. For more information, see About RESTful Web Services and ADF Business Components.
You may also find it helpful to understand other Oracle ADF features that depend on ADF REST resources. For more information, see Additional Functionality for RESTful Web Services.
You will need to complete this task:
-
Enable an LOV for the attribute of the view object, as described in Creating ADF REST Resources Using the Application Module.
-
Create the REST resource for the view object with the LOV-enabled attribute for which you want to expose a create operation, as described in Creating ADF REST Resources Using the Application Module.
Caution:
When the view object defines an LOV resource, the view object service shape definition must not hide attributes that are required by the LOV-enabled attribute's LOV definition. Required LOV attributes include attributes mapped to the LOV data source, as well as LOV display attributes. For more information about service shaping and ADF REST resources, see How to Hide and Expose Attributes in the ADF REST Resource.
To define a static LOV resource for use with ADF REST resources:
How to Enable Row Finder Keys in the ADF REST Resource
When you do not want service clients to be able to query resources using the primary key for the resource (often a numeric value), the business components developer can create a row finder that specifies a row finder key based on a view object attribute with values that can be uniquely identified by name. One such example may find employees by the first letters of the email attribute.
When a row finder has been explicitly defined on the view object named in the ADF REST resource, the overview editor for the ADF REST resource gives you the option to enable the row finder to filter the resource collection. Row finders are not enabled by default; you must the select the row finder key by name to apply it the current node selection in the resource structure.
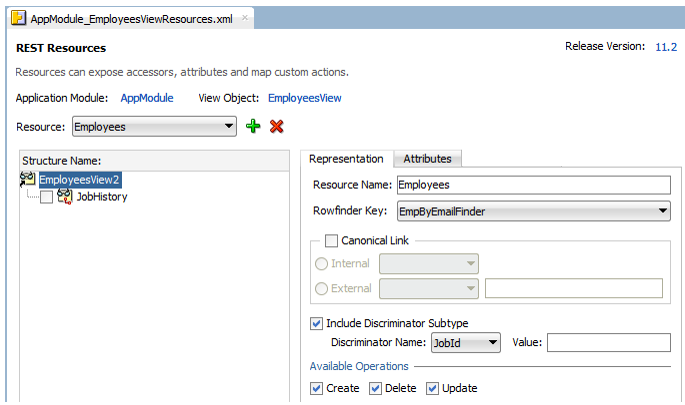
In JDeveloper, the overview editor for ADF REST resources displays the list of available row finders in the Rowfinder Key dropdown. The list is populated by the row finders that have been defined on the view object definition backing the node selection in the resource structure tree. For example, Figure 16-18 shows the EmpByEmailFinder row finder key where Employees is the node defining the view instance with the row finder EmpByEmailFinder.
Figure 16-18 Row Finder Key Enabled on the Root of the ADF REST Resource
Before you begin:
It may be helpful to have an understanding of how the ADF REST framework supports application modules and enables service clients to access rows of data and perform service operations. For more information, see About RESTful Web Services and ADF Business Components.
You may also find it helpful to understand other Oracle ADF features that depend on ADF REST resources. For more information, see Additional Functionality for RESTful Web Services.
You will need to complete these tasks:
-
Create the desired REST resource, as described in Creating ADF REST Resources Using the Application Module.
-
Create the application module data model that contains the view object instances that you want the REST resource to expose, as described in How to Create an Application Module.
-
Create the row finders on the view instances that you want the REST resource to expose, as described in Working with Row Finders.
To expose row finder filters:
What You May Need to Know About Configuring LOV Resources for Row Finders
When you want service clients to be able to query resources using a LOV resource, the business components developer can create a finder that specifies a finder key based on a view object attribute with a finder value that can be uniquely identified by name. A link between a regular resource and an LOV resource is configured using the resource description. You must configure a resource that has the LOV definition in order to use the LOV resource. Nested resources are exposed in an order to represent some cascading LOVs that follow a tree structure.
For example, consider there are LOVs for State and City named LOV_City and LOV_State. LOV_City filters the value that is already selected in State. Let us assume there is a resource named Cities that has all possible cities in the countries grouped by State. The LOV_City must filter the Cities resource with a State value already selected. For that you need to define a Cities view object with a finder with the value ByStateFinder that accepts a parameter State. The LOV URL would be /Cities?finder=ByStateFinder;stateVar={State}, where State points to the State attribute in the address object that has the master LOV.
The following view object definition shows the metadata for the view object that provides the LOV source for the cities and states example.
<ViewAttribute
  Name="City"
  IsNotNull="true"
  PrecisionRule="true"
  EntityAttrName="CityName"
  EntityUsage="Address"
  AliasName="CITYNAME"
  LOVName="LOV_City">
  <Properties>
    <SchemaBasedProperties>
      <LOVResource name="Cities" finder="ByStateFinder"/>
    </SchemaBasedProperties>
  </Properties>
</ViewAttribute>
<ViewAttribute
  Name="State"
  IsNotNull="true"
  PrecisionRule="true"
  EntityAttrName="StateCode"
  EntityUsage="Address"
  AliasName="STATECODE"
  LOVName="LOV_State">
  <Properties>
    <SchemaBasedProperties>
      <LOVResource name="States"/>
    </SchemaBasedProperties>
  </Properties>
</ViewAttribute>
In the above example, the cascading LOV is being handled by the LOV with a finder class.
Note that the custom property LOVResource identifies the source of that the LOV resource uses for its data. The property name LOVResource is specific to ADF REST framework version 5 and later and serves to distinguish the parametrized row finder URL usage to obtain the LOV list from the usage associated with earlier framework versions, where the LOV list URL does not use a row finder. The view object metadata for the LOV source attribute identifies framework versions 1 though 4 by using the property name ResourceLOV.
The resource describe associated for these two usages also differs. Compare the static LOV resource associated with the regular view object-backed resource with framework version 5 enabled (attribute metadata property identified as LOVResource) to the same resource describe with framework version 4 enabled (attribute metadata property identified as ResourceLOV).
Here is the describe with version 5 enabled. The LOVResource is added to the lov element section of the regular resource (Address) and the childRefForCreate property identifies the URL name that appears in the item - links element section .
{
  "Resources" : {
    "Address" : {
      "discrColumnType" : false,
      "attributes" : [ {
       ...
        }, {
          "name" : "City",
          "type" : "string",
          "updatable" : true,
          "mandatory" : true,
          "queryable" : true,
          "precision" : 32,
          "controlType" : "choice",
          "maxLength" : "32",
          "lov" : {
            "childRef" : "CityLOV",
            "childRefForCreate" : "CityLOVForCreate",
            "attributeMap": [ {
              "source" : "CityName",
              "target" : "City"
            }],
            "displayAttributes" : [ "CityName" ],
          }
        }, {
          "name" : "State",
          "type" : "string",
          "updatable" : true,
          "mandatory" : true,
          "queryable" : true,
          "precision" : 2,
          "controlType" : "choice",
          "maxLength" : "2",
          "lov" : {
            "childRef" : "StateLOV",
            "childRefForCreate" : "StateLOVForCreate",
            "attributeMap": [ {
              "source" : "StateCode",
              "target" : "State"
            }],
            "displayAttributes" : [ "StateCode" ],
          }
        }, {
      ...
      },
      "item" : {
        "links" : [ {
          ...
        }, {
          "rel": "lov",
          "href": "http://server/demo/rest/11.0/Address/{id}/lov/CityLOV",
          "name": "CityLOV",
          "kind": "collection"},
        }, {
          "rel" : "lov",
          "href" : "http://server/demo/rest/11.0/Cities?finder=ByStateFinder%3BstateVar%3D{State}",
          "name" : "CityLOVForCreate",
          "kind" : "collection"
        }, {
        }, {
          "rel": "lov",
          "href": "http://server/demo/rest/11.0/Address/{id}/lov/StateLOV",
          "name": "StateLOV",
          "kind": "collection"},
        }, {
          "rel" : "lov",
          "href" : "http://server/demo/rest/11.0/States",
          "name" : "StateLOVForCreate",
          "kind" : "collection"
        }, {
...
Here is the describe with version 4 enabled. The ResourceLOV is added to the lov element section of the regular resource (Address) and the lovResourcePath array identifies the URL name that appears in the links element section
{
  "Resources" : {
    "Address" : {
      "discrColumnType" : false,
      "attributes" : [ {
       ...
        }, {
          "name" : "City",
          "type" : "string",
          "updatable" : true,
          "mandatory" : true,
          "queryable" : true,
          "precision" : 10,
          "controlType" : "choice",
          "maxLength" : "10",
          "lov" : {
            "childRef" : "CitiesLOV",
            "attributeMap" : [ {
              "source" : "CityName",
              "target" : "City"
            } ],
            "displayAttributes" : [ "CityName" ],
            "lovResourcePath" : [ {
                  "resource" : "Cities",
                  "filter" : "?finder=FilterByState%3BVStateName%3D{State}"
            } ]
          }
        }, {
      ...
      },
      "links" : [ {
        ...
          "rel" : "lov",
          "href" : "http://server/demo/rest/11.0/Cities",
          "name" : "Cities",
          "kind" : "collection"
        }, {
...
What You May Need to Know About Row Finders in ADF REST Resource Requests
At runtime, an ADF REST resource with a row finder key enabled must be accessed in the service client by the row finder key attribute. The row finder supports returning a collection or instance for the row finder-enabled resource using only the row finder key attribute. Thus, service clients may access REST resources without requiring knowledge of database primary key values to end users. For example, compare these two GET requests to retrieve a specific employee in the Employees resource collection:
No row finder:
http://localhost:7101/RESTSample_App/rest/11.1/Employees/101
With row finder
http://localhost:7101/RESTSample_App/rest/11.1/Employees/NSMITH
The first URL, with no row finder key defined, requires the ID of the employee to locate the employee resource item. The second URL uses the row finder key value (employee's email address) in the resource path. Once the row finder key has been enabled on the resource at design time, service clients may access the resource by row finder key values using links generated in the request payload by the ADF REST runtime.
You can optionally apply the row finder to a canonical resource that your ADF REST resource defines. If a canonical resource with row finder key is defined on the ADF REST resource with a row finder key enabled, then both sides must be defined by the same key structure. The key attributes must be of the same type and in the same sequence. When you create a canonical resource with a row finder key and then create a partial resource with a canonical link, the overview editor for ADF REST resources will disable the row finder key field and automatically reflect the row finder key on the partial resource. For details about canonical resources, see How to Expose Canonical Resources in the ADF REST Resource.
How to Expose Subtype View Objects in the ADF REST Resource
A subtype view object is a view object that extends a base view object in an inheritance hierarchy. The subtype view object inherits its list of attributes from the base view object and contributes its own attributes that are specific to the subtype. Such subtype view objects are called polymorphic view objects. At runtime, polymorphic view objects define subtype view rows comprised of attributes from the base view object and attributes from the defining subtype view object.
In order to query subtype view rows, the subtype view object must specify a discriminator attribute that determines the specific type. For example, an EmployeesView base view object with a discriminator attribute JobId may instantiate subtype view rows based on the available jobs (Accountant, Sale Representative, and so on), where the attributes of subtype view rows are determined by the specified job ID value. For example, a Sales Representative with the job ID SA_REP might contribute the subtype view row attribute CommissionPct, whereas the subtype view rows for the other job types would omit this attribute.
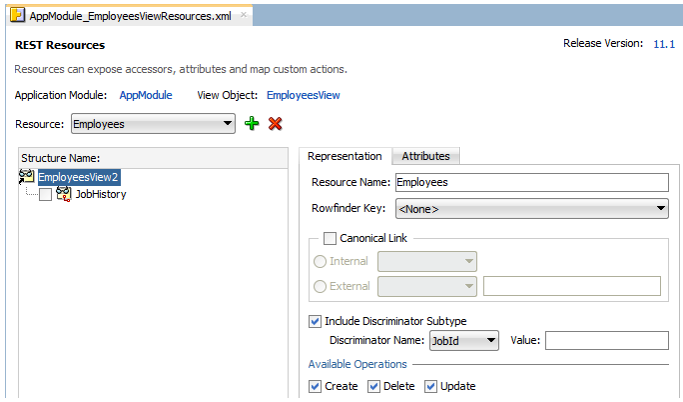
The overview editor for REST resources lets you expose subtype view objects for each node of the Structure tree when the view object backing the node defines a discriminator attribute. For example, Figure 16-7 shows the Employees resource and the EmployeesView2 resource node selected in the overview editor. The backing view object EmployeesView defines the discriminator attribute JobId and the subtype view object SalesEmployeeView defines the subtype SA_REP. The editor exposes the SalesEmployeesView subtype view object by enabling Include Discriminator Subtype, specifying the Discriminator Name and omitting the discriminator attribute value. Omitting the JobId discriminator attribute value ensures that subtype attributes will be returned in service client requests for Employees based on the JobId value of the requested employee.
Figure 16-19 Defining a Discriminator Attribute in the REST Resource Definition
Description of "Figure 16-19 Defining a Discriminator Attribute in the REST Resource Definition"
Note:
Discriminator attributes are defined on the backing view object and support subtype view rows. Subtype view objects are not exposed in the design time as ADF REST resources. The subtype definition is specified on the application module and by the ADF REST runtime.
Before you begin:
It may be helpful to have an understanding of how the ADF REST framework supports application modules and enables service clients to access rows of data and perform service operations. For more information, see About RESTful Web Services and ADF Business Components.
You may also find it helpful to understand how view objects support subtype view rows. For more information, see Working with Polymorphic View Rows.
You may also find it helpful to understand other Oracle ADF features that depend on ADF REST resources. For more information, see Additional Functionality for RESTful Web Services.
You will need to complete these tasks:
-
Create the polymorphic view objects, as described in How to Create a View Object with Polymorphic View Rows.
-
Create the REST resource for which you want to add or remove a resource, as described in Creating ADF REST Resources Using the Application Module.
To expose subtype view rows in the resource definition:
How to Expose Standard HTTP Actions in the ADF REST Resource
Standard data manipulation operations that you expose on the ADF REST resource correspond to actions on the backing view instance of the resource. At runtime, the service client invokes these operations as HTTP actions on the RESTful web service.
Table 16-2 lists the standard operations that are exposed by default in the overview editor for the REST resource. You can expose a different set of operations by deselecting operations from the list for each resource selection you make in the resource tree. Note that the GET method is always exposed for a resource.
Table 16-2 Standard View Instance Data Manipulation Operations
| Operation Selection | HTTP Method Name | Operation Description |
|---|---|---|
|
Create |
POST |
Creates an ADF Business Components view row or view row set. |
|
Create and Update (combined equals Upsert) |
POST |
Merges payload content with the REST resource using a POST method in combination with a header |
|
Update |
PATCH |
Updates the specified items of an ADF Business Components view row. The view row must exist for this operation to succeed. |
|
Delete |
DELETE |
Deletes an ADF Business Components view row or view row set. |
|
not applicable |
GET |
Reads an ADF Business Components view row or view row set. Note that this operation is available by default when you create a resource. |
Note:
Note that Oracle has deprecated the functionality for executing HTTP PUT methods on ADF REST resource requests. In the current release, the describe for ADF REST resources continues to display PUT actions when the backing view object has the Update operation enabled (the operation enables both PUT and PATCH methods); however, ADF REST service clients should avoid making PUT requests (replace all items of the view row) as this functionality will be desupported in a future release.
Before you begin:
It may be helpful to have an understanding of how the ADF REST framework supports application modules and enables service clients to access rows of data and perform service operations. For more information, see About RESTful Web Services and ADF Business Components.
You may also find it helpful to understand other Oracle ADF features that depend on ADF REST resources. For more information, see Additional Functionality for RESTful Web Services.
You will need to complete this task:
-
Create the desired REST resource, as described in Creating ADF REST Resources Using the Application Module.
To expose HTTP actions:
What You May Need to Know About Optimizing ADF REST Resource Get Operations
All ADF REST resources support read operations by service clients. To support efficient read operations (HTTP GET requests), the backing view object definition of ADF REST resources should define access mode set to support paging of the collection in an HTTP Request payload. For more information about range paging, see How to Enable Range Paging for a View Object.
How to Control Caching of ADF REST Resources
When you want fine control over the cache duration of ADF REST resource payload resulting from an ADF REST resource request, you can configure cache control in seconds on the root of the resource in the REST resource overview editor. At runtime, the cache setting can help to avoid intermediate proxies to cache/store the resource payload in the HTTP response.
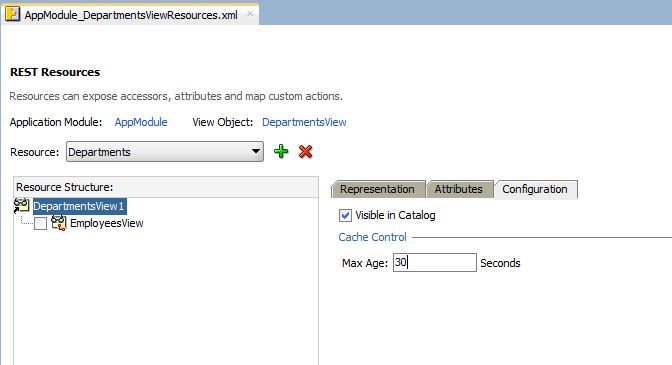
In JDeveloper, the overview editor for REST resources displays the resource cache control setting in the Configurations tab for the root node of the resource. When this setting is made on the root resource, it overrides the application-level cache setting that may be configured in the web.xml file. For example, the following figure shows the cache maximum age set to 30 seconds on the root of the Departments resource. The option Visible in Catalog if selected enables the cache setting to appear in the describe for ADF REST resource requests.
Figure 16-20 Cache Maximum in Seconds Set on the Root of the REST Resource
From release 12.1.1.4.0, REST framework supports additional configuration options for Cache-Control. See Header Field Definitions - Cache Control. You can specify these additional configuration options in the source editor. When you specify one of the valid values, then that Cache-Control header will be added in the payload response.
The valid values are:
- Cacheability: indicates if a response can be cached or not. Valid values are:
public,private, andno-cache.The value
publiccache indicates that the response can be cached by any cache irrespective of the cache status. This value is useful for requests that include anauthorizationheader, because requests with authorization header prevents a shared cache from caching the response.The value
no-cachedoes not mean not to cache the response, but instructs the browser to re-validate before returning the response. - NoStore: indicates that the response should not be cached irrespective of the cacheability setting. It is a boolean flag with values
trueandfalse. When set totrue,no-storeis added to theCache-Controlheader in the response, separated by comma if other settings are present. - Revalidation: indicates that the response must be revalidated if a cache is configured to return a stale response. If you configure
MaxAgeto 0, the response becomes stale immediately, thus forcing the cache to revalidate every time. Valid value ismust-revalidate.
See, What You May Need to Know About the Cache-Control Header.
Before you begin:
It may be helpful to have an understanding of how the ADF REST framework supports application modules and enables service clients to access rows of data and perform service operations. For more information, see About RESTful Web Services and ADF Business Components.
You may also find it helpful to understand other Oracle ADF features that depend on ADF REST resources. For more information, see Additional Functionality for RESTful Web Services.
You will need to complete this task:
-
Create the REST resource for the view object, as described in Creating ADF REST Resources Using the Application Module.
To configure the cache control maximum age setting:
What You May Need to Know About the Cache-Control Header
The following table lists few example use cases that REST framework supports with selected subset of options in any valid combination. The developer can choose any combination to generate the desired Cache-Control header in the response.
| Cache-Control Value | Category | Explanation | Example |
|---|---|---|---|
 <CacheControl>
      <Cacheability>no-cache</Cacheability>
      <NoStore>true</NoStore>
      <Revalidation>must-revalidate</Revalidation>
</CacheControl> |
Sensitive data |
Response is not cached. |
Bank account info |
 <CacheControl>
      <Cacheability>public</Cacheability>
      <MaxAge>30</MaxAge>
</CacheControl> |
Public shared data |
Response can be cached by browser and any intermediary caches for up to the specified number of seconds. |
LOV. For example country codes |
 <CacheControl>
      <Cacheability>private</Cacheability>
      <MaxAge>30</MaxAge>
</CacheControl> |
Private data |
Response can be cached by the client’s browser only for up to the specified number of seconds. |
Order history |
For example, the following service configuration is defined on DeptAM_DeptVOResources.xml:
<tree IterBinding="DeptIter" id="departments" AccessorFolder="Always">
  <ServiceConfiguration>
    <CacheControl>
      <Cacheability>private</Cacheability>
      <MaxAge>600</MaxAge>
    </CacheControl>
  </ServiceConfiguration>
  <nodeDefinition .../>
</tree>
Any requests against the departments resource have the following Cache-Control header:
REQUEST
GET http://example.com/demoApi/resources/1.0/departments
RESPONSE
200 OK
Cache-Control: private,
max-age=600
{
  ...
How to Control the Format of the ADF REST Response
You can use REST-Pretty-Print header to remove extra whitespace in the response payload. You can set this attribute for describe and GET, PATCH, and POST payload responses. You must set this property in the adf-config.xml under the startup Properties element.
<adf-adfm-config xmlns="http://xmlns.oracle.com/adfm/config">
    <startup>
      <Properties>
        <adf-property name="ORACLE.BC.REST.PRETTYPRINTJSON" value="true"/>
      </Properties>
    </startup>
</adf-adfm-config>
In the case of describe, this header reduces the size of the response by nearly 50%.
Versioning the ADF REST Resource
JDeveloper allows you to version the ADF REST resource. It helps create new versions of the ADF REST resource if use cases or backing view objects of ADF REST resource change.
Changes that you make to ADF REST resources during the development cycle can be made without the need to version the resource. However, once you have deployed the RESTful web service, service clients that access the ADF REST resources rely on the stability of the resource collection to satisfy their use cases.
Over time, as use cases change or the backing view objects of the REST resources change, you may need to modify the resource structure of already deployed resources. At that time, modifications to existing ADF REST resources may become backward-incompatible with the deployed REST service and may necessitate creating a new version identifier and ADF REST resource for that version.
How to Version the ADF REST Resource
You use the overview editor for the adf-config.xml file to create new version identifiers and to update the lifecycle status of existing versions. Lifecycle status can be either active, deprecated, or desupported. If the service client requests a resource that does not exist for the requested version, the ADF REST runtime will fallback to a previous version with status active or deprecated
Note that the order of the release name identifiers in the release version list is significant. The ADF REST runtime recognizes the top-most release name as the most recent version. Subsequent release names below the top name in the list form a sequential list of versions. As Figure 16-21 shows, 11.0 is the first version and must appear at the bottom of the list, with subsequent versions, listed above, where 11.2 is the latest version.
Figure 16-21 Managing ADF REST Resource Versions
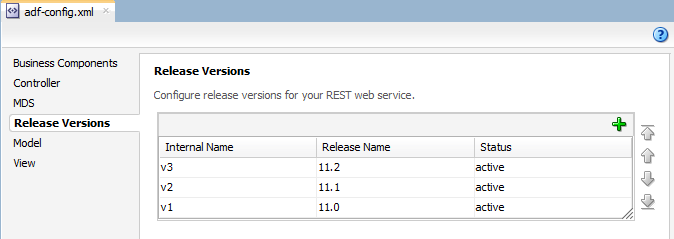
Description of "Figure 16-21 Managing ADF REST Resource Versions"
Note:
To alter the position of a release identifier in the sequential list of versions, you can use the arrows in the Release Versions page of the overview editor to move the identifier up (more recent version) or down (previous version) in the list.
Before you begin:
It may be helpful to have an understanding of how the ADF REST framework supports application modules and enables service clients to access rows of data and perform service operations. For more information, see About RESTful Web Services and ADF Business Components.
You may also find it helpful to understand when editing a resource may introduce backward-incompatible changes that require creating a resource with a new version. For more information, see What You May Need to Know About Versioning ADF REST Resources.
You may also find it helpful to understand how requests by service clients depend on the version identifier of the resource. For more information, see What Happens At Runtime: Invoking ADF REST Resource Versions.
You may also find it helpful to understand other Oracle ADF features that depend on ADF REST resources. For more information, see Additional Functionality for RESTful Web Services.
To manage ADF REST versions:
What You May Need to Know About Versioning ADF REST Resources
The following are examples of changes to the ADF REST resource structure that should be considered backward-incompatible with already deployed RESTful web services:
-
Renaming exposed attributes
-
Removing or hiding previously exposed attributes
-
Removing previously exposed child resources
-
Disabling standard operations
-
Disabling LOV view accessors or changing an LOV to a different view object
Under certain circumstances, you may modify the ADF REST structure without versioning the resource. The following changes are considered to be backward compatible and therefore do not necessitate creating a new version of the already deployed ADF REST resource.
-
Exposing new attributes and the backing view object does not define the attributes as mandatory
Note that exposing mandatory-defined attributes requires versioning the resource.
-
Exposing standard operations
-
Exposing new child resources
-
Defining a LOV view accessor for already exposed attributes
What Happens At Runtime: Invoking ADF REST Resource Versions
Version identifiers that you specify will form the URL that the service client uses to invoke operations of the REST resource. For example, the following GET request specifies the URL parameters 11.0 and 11.1 to access two different versions of the Departments resource:
http://localhost:7101/RESTSample_App/rest/11.0/Departments
http://localhost:7101/RESTSample_App/rest/11.1/Departments
When you use the overview editor for the adf-config.xml file to update the lifecycle status of existing versions, you tag each version as either active, deprecated, or desupported. The status deprecated has no runtime impact and is provided for documentation purposes, but the status desupported will cause the deployed resource to become inaccessible.
Note that the order of the release name identifiers in the adf-config.xml file's release version list is significant. The ADF REST runtime recognizes the top-most release name as the most recent version. Release names below the top name in the list form a sequential list of versions. For example, the following GET request retrieves version 11.1 of the Departments resource, where 11.1 is at the top of the release versions list:
http://localhost:7101/RESTSample_App/rest/11.1/Departments
If the service client requests a resource that does not exist for the requested version, the ADF REST runtime will fallback to a previous version with status active or deprecated. Thus, if the Departments resource versions 11.0 and 11.1 exist but 11.2 does not, the request for version 11.2 will return the next more recent resource, version 11.1.
Versioning the ADF REST Runtime Framework
JDeveloper allows you to specify the default ADF REST runtime framework that you want the service client to use when processing requests on ADF REST resources. Declaring a default framework version ensures that clients interact with the appropriate level of functionality.
Oracle JDeveloper 12c releases, starting with release 12.2.1.2.0, will introduce ADF REST framework enhancements to support new runtime functionality on service clients. Whether or not your application will benefit from these enhancements depends on the use cases of your application. To support your ability to evaluate framework enhancements before exposing them to service clients, each iteration of the ADF REST framework is identified by a version number, such as version 1, 2, and 3, where version 1 is associated with your application by default. Your application can either remain at the current framework version (for example, the base framework version 1) or you can decide to opt into a newer version (for example, framework version 2) to enhance your application use cases. This ensures that the ADF REST runtime will process the request using the framework version that offers the desired level of functionality for your service clients. Being able to specify a framework version to process requests on your application, allows you to opt into those features when you are ready.
As new ADF REST runtime framework versions are introduced, you may want to update your application to make use of runtime functionality offered in a later framework. To accomplish this, the ADF REST design time allows you to associate a restFrameworkVersion property in the adf-config.xml file to define the default framework version for each version of your application’s ADF REST resources. For example, you may have a resource version 11.0, which is by default associated with the base functionality of framework version 1. Then starting with Oracle JDeveloper 12.2.1.2.0 and ADF REST framework version 2, you can choose to create a new resource version 11.1 and associate it with framework version 2. Alternatively, you can opt into framework version 2 on your existing resource version instead of creating a new resource version. By specifying a default framework version that you associate with individual resource versions, you ensure that your application will expose the appropriate level of functionality to service clients.
Note:
Starting in JDeveloper release 12.2.1.2.0, versions 1, 2, and 3 of the ADF REST runtime framework exist, where version 1 is the base version and includes the ability to support multiple framework versions on the ADF REST service client. Starting in JDeveloper release 12.2.1.4.0, versions 4, 5, 6, and 7 also exist. For complete details about versions of the framework, see What You May Need to Know About Versioning the ADF REST Runtime Framework.
How to Version the ADF REST Runtime Framework
You use the overview editor for the adf-config.xml file in Source view to declare the default ADF REST framework versions for the resource versions of the ADF REST application. When the service client requests a resource, the ADF REST runtime will process the request using the declared framework version that is associated with the resource version specified on the request URL.
Before you begin:
It may be helpful to have an understanding of how the ADF REST framework supports application modules and enables service clients to access rows of data and perform service operations. See About RESTful Web Services and ADF Business Components.
You may find it helpful to understand the role of release versions that you create to manage the release iterations of your application’s ADF REST resources. For more information, see Versioning the ADF REST Resource.
You may also find it helpful to understand how an ADF REST framework version may introduce backward-incompatible changes that will require creating a new resource version and declaring a default framework version for it. See What You May Need to Know About Versioning ADF the REST Framework.
You may also find it helpful to understand how the processing of requests by service clients is affected by the ADF REST framework declared for the resource version. See What Happens At Runtime: Invoking an ADF Rest Framework Version.
You may also find it helpful to understand other Oracle ADF features that depend on ADF REST resources. See Additional Functionality for RESTful Web Services.
To declare default ADF REST framework versions:
What You May Need to Know About Versioning the ADF REST Framework
One reason that you may want to version the ADF REST framework for your ADF REST application is to opt into new functionality offered by a later version of the ADF REST runtime framework. Currently, Oracle offers the following framework versions.
Note:
Each ADF REST framework version after version 1 introduces functionality that the previous framework versions does not support. Thus, when you choose to opt into a later framework version, the REST API of your application may introduce backward incompatible changes on the service client consuming the REST API. This topic explains the changes for each framework version.
Framework Version 1
The ADF REST framework identified as version 1 is available starting with JDeveloper release 12.2.1.0.0, when ADF REST was initially introduced. This is the base version which specified a particular JSON payload format. In this release and all subsequent releases, the ability to support multiple framework version was included, by allowing the restFrameworkVersion property in the adf-config.xml file.
Version 1 is the default version that the ADF REST runtime will use to process requests for service clients when no other version is specified. Therefore, when you want to support service clients at the base level of functionality, your application does not need to declare the version using the restFrameworkVersion property in the adf-config.xml file.
Note that the query-by-example resource query syntax supported in the base framework version (version 1) is not compatible with later versions of the ADF REST framework. Beginning with version 2 of the ADF REST framework, a more advanced query syntax is offered instead.
Framework Version 2
The ADF REST runtime framework identified as version 2 is available starting with JDeveloper release 12.2.1.2.0. The purpose of this new version is to introduce an expanded query expression syntax for ADF REST requests. Version 2 of the ADF REST framework will interpret the q query parameter value differently than the way framework version 1 does, and therefore introduces a backward incompatible change to service clients that rely on framework version 1. Only when framework version 2 (or later) is specified for the resource request will the ADF REST runtime support the use of the expanded expression syntax to process the request.
In version 1, filtering resource collections using the q query parameter is limited to a query-by-example syntax, as follows.
GET /rest/11.0/Departments?q=Dname SA*;Loc BOSTON
Whereas, starting in version 2, the new advanced query syntax supports filtering resource collections using rowmatch query expressions, as follows.
GET /rest/11.1/Departments?q=Dname like 'SA*' or Loc = 'BOSTON'
Note:
To support both rowmatch expressions (offered in framework version 2 and later) and the query-by-example syntax (version 1 only), you would need to associate framework version 2 (or later) with a new release version identifier that you define for the REST resources in the adf-config.xml file. For example, in the above URL samples, you can preserve the original functionality for release version 11.0 and expose the new functionality for version 11.1. This assumes that the adf-config.xml file for the application has declared framework version 2 the default using the restFrameworkVersion=”2” property on release version 11.1. Alternatively, if your service clients will no longer require the functionality of your current framework version, you may associate the new framework version with your existing release version identifier. Therefore, you are not required to increment the release version to make use of a new framework version.
For an explanation of the enhanced query syntax offered by rowmatch expressions, see What You May Need to Know About the Advanced Query Syntax in ADF REST Framework Version 2.
Framework Version 3
The ADF REST runtime framework identified as version 3 is available starting with JDeveloper release 12.2.1.2.0. The purpose of this version is to add support for retrieving nested child resources with payload attributes that may be used by the service client to determine whether more resource items would be returned in a subsequent ADF REST request. To support this functionality, the payload structure in framework version 3 now represents nested child resources as a resource collection, instead of an array of items, as was true in version 1 and 2. Therefore, version 3 introduces a backward incompatible change to service clients that rely on framework version 1 or version 2. If you decide to opt into version 3, you will expose functionality that allows GET operations to use the ?expand and ?fields query parameter to return a nested child resource as a resource collection with the hasMore attribute. In affect, this change supports pagination of nested child resources that would otherwise require more than one request to fetch.
When you want to add support for framework version 3 to your application, the same guidelines described for framework version 2 (see above section) apply for preserving the existing level of functionality using the restFrameworkVersion property in the adf-config.xml file.
For an example of the new payload structure for nested child resources introduced in version 3, see Fetching Nested Child Resources and Querying With Filtering Attributes (Partial Get). For details about paginating a resource collection using the hasMore attribute, see Paging a Resource Collection.
Framework Version 4
The ADF REST runtime framework identified as version 4 is available starting with JDeveloper release 12.2.1.4.0. In addition to HTTP status codes and error messages, it is possible to obtain exception details in the response when your request is enabled to use ADF REST framework version 4 and the request is made for either application/vnd.oracle.adf.error+json or application/json media types. With framework version 4, the response will be in the form an exception detail payload which provides the following benefits to the service client:
-
If multiple errors occur in a single request, the details of each error are presented in a hierarchical structure.
-
An application-specific error code may be present that identifies the ADF exception corresponding to each error.
-
An error path may be present that identifies the location of each error in the request payload structure.
Note:
The exception detail may or may not present certain details, such as the application-specific error code and the request payload’s error path.
For example, compare the error response for a POST submitted with a payload that contains the following incorrectly formatted date field when framework version 3 (or earlier) is enable and when framework version 4 (or later) is enabled.
{    "EmpNum" : 5027,
     "EmpName" : "John",
     "EmpHireDate" : "not a date"
}
Standard Error Response
Without framework version 4, no response payload is generated and instead only a single error message that does not reference the request payload will be returned in the response.
"An instance of type oracle.jbo.domain.Date cannot be created from string not a date. The string value must be in format YYYY-MM-DDTHH:MI:SS.sss+hh:mm."
Exception Payload Error Response
With framework version 4 (or later) enabled, the following exception detail payload is generated for the response. The payload includes the usual HTTP status code and formats the details of one or more exceptions in an array structure.
{    "title" : "Bad Request",
    "status" : "400",
    "o:errorDetails" : [ {
     "detail" : "An instance of type oracle.jbo.domain.Date cannot be created from string not a date.
               The string value must be in format YYYY-MM-DDTHH:MI:SS.sss+hh:mm.",
       "o:errorCode" : "26099",
       "o:errorPath" : "/EmpHireDate"
    } ]
 }
Framework Version 5
The ADF REST runtime framework identified as version 5 is available starting with JDeveloper release 12.2.1.4.0. In versions 4 and earlier you might pick a nested resource as an LOV target. For example: /rest/v1/States/California/Cities. In versions 5 and later you use filtering to access the nested LOV resource instead, for example: /rest/v1/Cities?finder=ByState;name=California. With this framework version, the row context LOV URLs are no longer returned in the payload and in the describe. Only LOV resource URLs that point to top-level resources are described and included in the payloads.
See What You May Need to Know About Configuring LOV Resources for Row Finders and Retrieving LOV-Enabled Attribute Values with Framework Version 5 and Later.
This framework version 5 also provides support for request and response parameters beyond the current supported types of string, number, date, and boolean. The supported Java types include java.util.List and java.util.Map. For the ADF REST catalog describe, if the response parameter is java.util.List, then specify the request parameter as array and if the response parameter is java.util.Map then specify the request parameter as object.
{
  "name" : "sales",
  "parameters" : [ {
    "name" : "prices",
    "type" : "array",
    "typeProperties": {
      "itemType": "number"
    },
    "mandatory" : false
  }, {
    "name" : "quantities",
    "type" : "object",
    "typeProperties": {
      "itemType": "array",
      "typeProperties": {
        "itemType": "integer"
      }
    },
    "mandatory" : false
  } ],
  "resultType" : "object",
  "typeProperties": {
    "itemType": "number"
  },
  "method" : "POST",
  "requestType" : [ "application/vnd.oracle.adf.action+json" ],
  "responseType" : [ "application/vnd.oracle.adf.actionresult+json", "application/json" ]
}
Framework Version 6
The ADF REST runtime framework identified as version 6 is available starting with JDeveloper release 12.2.1.4.0. The purpose of this framework version is to easily differentiate between the resource fields and the item context information like links and headers. A new element @context is introduced in this version and all the information for an item is moved under @context section. The changeIndicator value is moved to ETag, which is under headers. A new context information key is included under @context that contains the unique identifier of the specific resource item as a string. The @context section also contains warnings in the response payload for create/upsert and update actions. See Fetching a Resource with Grouped Context Information.
The new payload for a resource item in a response payload and collection response payload will be similar to the one below:
{
   "field1": "value1",
   "field2": "value2",
     ...
   "@context" : {
      "key" : "AB8765BCD",
      "headers" : {
         "ETag" : "ACED..."
       ...
      },
      "links": [ {
         "rel": "self",
         "href":
          ...
      } ]
      "warnings": [ {
         "detail": "Warning from overridden validateEntity method in DeptImpl : DeptName = ABC"
      }, {
         "detail": "Attribute set with value 92 for DeptNum in Dept failed",
         "o:errorCode": "27011",
         "o:errorPath": "/DeptNum"
      }, {
        "detail": "Warning from overridden afterCommit method in DeptViewImpl"
      }, {
        "detail": "Warning from overridden afterCommit method in DeptViewImpl"
      } ]
  }
}
Framework Version 7
The ADF REST runtime framework identified as version 7 is available starting with JDeveloper release 12.2.1.4.0. This framework version supports top-level LOVs, and fully removes row-level LOV resource descriptions in the ADF REST describe. Framework versions earlier than framework version 5 support nested LOVs in the context of a row in the REST resource. With framework version 7 enabled, use instead static LOV resources and row finder URL links in the describe, as described in Retrieving LOV-Enabled Attribute Values with Framework Version 5 and Later.
Additionally, version 7 removes LOV links from the resource item payload links section of the response. The goal is to enforce the use of parametrized row finders as implemented by version 5 and later by removing LOV links. For example, compare this response for a resource item request made with version 7 enabled to the same request with an earlier version.
{
   "EmpId" : 101,
   "EmpName" : "Bob",
   "@context" : {
      "key" : "1",
      "links" : [ {
        "rel" : "self",
        "href" : "http://server/demo/rest/12.0/Employees/101",
        "name" : "Employees",
        "kind" : "item"
      }, {
        "rel" : "canonical",
        "href" : "http://server/demo/rest/12.0/Employees/101",
        "name" : "Employees",
        "kind" : "item"
      } ]
   }
}
Here is the same response with an earlier version with the LOV resource link returned.
{
   "EmpId" : 101,
   "EmpName" : "Bob",
   "@context" : {
      "key" : "1",
      "links" : [ {
        "rel" : "self",
        "href" : "http://server/demo/rest/12.0/Employees/101",
        "name" : "Employees",
        "kind" : "item"
      }, {
        "rel" : "canonical",
        "href" : "http://server/demo/rest/12.0/Employees/101",
        "name" : "Employees",
        "kind" : "item"
      }, {
        "rel" : "lov",
        "href" : "http://server/demo/rest/12.0/Employees/10/lov/JobsLOV",
        "name" : "JobsLOV",
        "kind" : "collection"
      } ]
   }
}
What You May Need to Know About the Advanced Query Syntax in ADF REST Framework Version 2
The ADF REST runtime framework identified as version 2 was offered starting with JDeveloper release 12.2.1.2.0. The purpose of this framework version is to introduce an expanded query expression syntax for ADF REST requests. This version will interpret the q query parameter value differently than the way framework version 1 does, and therefore introduces a backward incompatible change to service clients that rely on framework version 1.
When you decide to opt into framework version 2 (or later), the ADF REST runtime will process fetch requests for the q query parameter using the expanded expression syntax, whereas requests using the query-by-example syntax will become invalid and will return an error. However, you may decide not to opt into the functionality offered in framework version 2 by leaving the default for your release version set to framework version 1. Or, you may preserve the base functionality by creating a new release version identifier that you associate with framework version 2, while leaving the existing release identifier in the adf-config.xml file as framework version 1.
In version 1, filtering resource collections using query parameters is limited to a query-by-example syntax, which separates expressions using a semi-colon, as follows:
GET /rest/11.0/Departments?q=Dname SA*;Loc BOSTON
Whereas, starting in version 2, a new advanced query syntax supports filtering resource collections using rowmatch expressions, as follows:
GET /rest/11.1/Departments?q=Dname like 'SA*' or Loc = 'BOSTON'
Such rowmatch expressions include the case-sensitive name of a resource item, followed by an operator and one or more operand values (depending on the operator used). The filter can be as simple as a single expression, or it can combine expressions using the and and or conjunctions with matching sets of parentheses for grouping.
Benefits of the Advanced Query Syntax Offered in Framework Version 2 and Later
The advantages of rowmatch expression include the following.
-
They may use supported operators:
DepartmentNumber = 20
DepartmentNumber <> 20
DepartmentNumber <= 20
DepartmentNumber < 20
DepartmentNumber >= 20
DepartmentNumber >20
DepartmentNumber between 20 and 40
DepartmentNumber not between 20 and 40
DepartmentNumber in (20, 30, 40)
DepartmentName like '%S%'
DepartmentName like 'RE%'
DepartmentName not like 'RE%'
Location is null
Location is not null
-
They may involve multiple attributes:
DepartmentNumber = 10 or DepartmentName like 'RESEARCH'
DepartmentNumber > 10 and DepartmentNumber < 40
DepartmentNumber < 20 or DepartmentNumber > 30
(DepartmentNumber = 10 or DepartmentNumber = 30) and (DepartmentName like 'SALES')
DepartmentNumber BETWEEN 20 and 40) and (Location like 'DAL%')
(DepartmentNumber > 0 and DepartmentNumber < 100) and (DepartmentName <> 'SALES') and (Location not like 'NEW%')
(DepartmentNumber = 10 or DepartmentNumber = 30) and (DepartmentName = 'ACCOUNTING' or DepartmentName = 'SALES')
(DepartmentNumber = 10 and DepartmentName like 'ACC%') or (DepartmentNumber = 20 and DepartmentName like 'RES%')
DepartmentName='ACCOUNTING' or (DepartmentName like 'R%' and Location like '%ALLA%')
(DepartmentName like 'R%' and Loc like '%ALLA%') or DepartmentName='ACCOUNTING'
(DepartmentName like 'R%' or Loc like '%ALLA%') or DepartmentName='ACCOUNTING'
(DepartmentNumber between 20 and 40) and DepartmentNumber is not null
-
They may involve attributes of nested child resources:
Deptno > 5 and Emps.Job = 'MANAGER'
Emps.Job = 'MANAGER' and Deptno > 5
Deptno > 5 and (Emps.Job = 'MANAGER')
(Emps.Job = 'MANAGER') and Deptno > 5
(Deptno > 5) and (Emps.Job = 'MANAGER')
(Deptno = 10 and Emps.Job = 'PRESIDENT') or (Deptno = 20 and Emps.Job = 'MANAGER')
Deptno > 5 and Emps.Job = 'MANAGER' and Emps.Sal >= 2500
Deptno > 5 and (Emps.Job = 'ANALYST' or Emps.Sal >= 4000)
(Deptno > 5 and Emps.Job = 'ANALYST') or Emps.Sal >= 4000
Emps.Job = 'ANALYST' or Emps.Job = 'SALESMAN'
Deptno > 5 and (Emps.Job = 'ANALYST' or Emps.Job = 'SALESMAN')
Deptno > 5 and Emps.Job = 'MANAGER' and Emps.DirectReports.Sal >= 2000
Deptno > 5 and (Emps.Job = 'MANAGER' or Emps.DirectReports.Sal >= 2000)
Deptno > 10 and (Emps.Job = 'MANAGER' and (Loc = 'NEW YORK' or Emps.Mgr=7698))
Deptno > 10 and (Emps.Job = 'MANAGER' or (Loc = 'NEW YORK' or Emps.Mgr=7698))
Deptno > 10 and (Emps.Job = 'MANAGER' or (Loc = 'NEW YORK' or Emps.Mgr=7698)) or Deptno = 40
Deptno > 10 and (Emps.Job = 'MANAGER' or (Loc = 'NEW YORK' or Emps.Mgr=7698)) or (Deptno = 40)
Deptno > 10 and (Emps.Job = 'MANAGER' or (Emps.DirectReports.Sal > 2000 and (Emps.DirectReports.Comm = 500 or Emps.DirectReports.Deptno > 10)))
Deptno > 10 and (Emps.Job = 'MANAGER' and (Emps.DirectReports.Sal >= 2000 and (Emps.DirectReports.Comm = 500 or Emps.DirectReports.Deptno > 10)))
-
They may involve the UPPER function:
UPPER(DepartmentName) = 'RESEARCH'
UPPER(DepartmentName) = UPPER('research')
UPPER(DepartmentName) like 'RES%' and UPPER(Location) like 'DAL%'
UPPER(DepartmentName) like UPPER('research')
Overview of the Advanced Query Syntax Offered in Framework Version 2 and Later
The following are some examples of rowmatch expressions.
-
To test whether a value is
nullyou must use theis nullor theis not nullkeywords:AssignedToId is nullAssignedToId is not null
-
For equality use the
=sign, and for inequality use either the!=or the<>operators.AssignedToId = 100000000089003Priority != 1Priority <> 1ActivityType != 'RS'ActivityType <> 'RS'
-
For relational comparisons, use the familiar
<,<=,>, or<>operators, along withbetweenornot between.Priority <= 2Priority < 3Priority <> 1Priority > 1Priority >= 1TotalLoggedHours >= 12.75Priority between 2 and 4Priority not between 2 and 4
-
For string matching, you can use the
likeoperator, employing the percent sign%as the wildcard character to obtain "starts with", "contains", or "ends with" style filtering, depending on where you place your wildcard(s):RecordName like 'TT-%'RecordName like '%-TT'RecordName like '%-TT-%'
-
To test whether a field's value is in a list of possibilities, you can use the
inoperator:ActivityType in ('OC','IC','RS')
-
You can combine expressions using the conjunctions
andandoralong with matching sets of parentheses for grouping to create more complex filters like:(AssignedToId is null) or ( (Priority <= 2) and (RecordName like 'TT-99%'))(AssignedToId is not null) and ( (Priority <= 2) or (RecordName like 'TT-99%'))When using the
betweenorinclauses, you must surround them by parentheses when you join them with other clauses usingandororconjunctions.
What Happens At Runtime: Invoking an ADF REST Framework Version
After Oracle JDeveloper introduces a new ADF REST framework version (such as framework version 2 offered in JDeveloper release 12.2.1.2.0 and later), you may want to create a new resource version and associate it with the new framework version to ensure that service clients make use of the appropriate level of functionality.
For example, the following URL specifies resource version 11.2, where the application’s adf-config.xml file associates this resource version with version 2 of the ADF REST framework. Because ADF REST framework version 2 supports rowmatch filter expressions, as a result, the ADF REST runtime will process the request with the appropriate functionality and fetch the departments with names that begin with SA (for example, SALES) or have a Location of BOSTON.
http://server/demo/rest/11.2/Departments?q=DepartmentName like 'SA*' or Location = 'BOSTON'
Note that a service client may override the default framework version and process individual requests using a specified framework version that gets passed in a custom header, REST-Framework-Version. In this case, the ADF REST runtime will ignore the application default framework version declaration. If the custom header is omitted on the request, then the ADF REST runtime always uses the application’s default framework version, as defined in the adf-config.xml file. When the application does not define a default framework version and the request on the service client omits the version header, then version 1 of the ADF REST framework is assumed. For information about processing requests using the framework versions, see Working with ADF REST Framework Versions.
The following table contrasts what happens at runtime when a request uses functionality supported (or not supported) by a particular ADF REST framework version. In particular, note the URLs that contrast the query-by-example syntax supported only in version 1 with rowmatch expressions supported in version 2 (and later). The column for the REST-Framework-Version header specifies whether the request passes a version header on the request. When the request includes the version header, the ADF REST runtime processes the request with the passed framework value and overrides the default adf-config.xml file declaration.
Table 16-3 Example Requests Processed By ADF REST Framework Versions
| URI | REST-Framework-Version Header | Resolved Version | Success / Error Notes |
|---|---|---|---|
|
GET /rest/11.0/Departments |
1 |
Success. Uses default framework version for resource version 11.0. |
|
|
GET /rest/11.0/Departments |
1 |
1 |
Success. Uses the requested framework version, which matches the default declaration in the |
|
GET /rest/11.0/Departments |
2 |
2 |
Success. Uses the requested framework version, which overrides the default declaration in the |
|
GET /rest/11.1/Departments |
2 |
Success. Uses the default framework version for resource version 11.1. |
|
|
GET /rest/11.0/Departments?q=Dname SA*;Loc BOSTON |
1 |
Success. Uses the default framework version for resource version 11.0, which is defined as version 1. Query by example syntax is supported in framework version 1. |
|
|
GET /rest/11.1/Departments?q=Dname SA*;Loc BOSTON |
2 |
Error is returned. Uses the default framework version for resource version 11.1, which is defined a version 2. Query by example syntax is not supported in framework version 2. |
|
|
GET /rest/11.0/Departments?q=Dname LIKE 'SA*' OR Loc = 'BOSTON' |
2 |
2 |
Success. Uses the requested framework version, which overrides the default declaration in the Rowmatch expressions are supported in framework version 2. |
|
GET /rest/11.0/Departments?q=Dname LIKE 'SA*' OR Loc = 'BOSTON' |
1 |
Error is returned. Uses the default framework version for resource version 11.1, which is defined as version 1. Rowmatch expressions are not supported in framework version 1. |
|
|
GET /rest/11.1/Departments?q=Dname LIKE 'SA*' OR Loc = 'BOSTON' |
1 |
1 |
Error is returned. Uses the requested framework version, which overrides default declaration in the Rowmatch expressions are not supported in framework version 1. |
Granting Client Access to the ADF REST Resource
Use the Configure ADF Security wizard and in the wizard select RESTWebService.jpr as the web project in the wizard to manage ADF REST resource security.
You can enable security for the ADF REST resources when you want to require user authentication to invoke actions on the REST request. Security is handled like all Fusion web applications and is enabled when you run the Configure ADF Security wizard and select the RESTWebService.jpr as the web project in the wizard. Enabling ADF Security on the web service project, means the deployed service will be inaccessible by default and users will require security grants to application roles that confer specific access permission.
Permission that you can grant to users of the RESTful web service is defined by the following classes:
-
oracle.adf.share.security.authorization.RestServicePermissionwhich defines the authorization grants to the standard actions defined in a REST resource.
Table 16-4 lists the actions defined by the ADF REST permission class that you may grant to your defined application roles.
Table 16-4 Secured Actions of ADF REST Resources
| Grantable Action | Effect on the REST Resource |
|---|---|
|
|
Grants describing the collections and instances of the REST resource. |
|
|
Grants returning the collection or instance for the REST resource. |
|
|
Grants updating a collection or instance for the REST resource. |
|
|
Grants deleting a collection or instance for the REST resource. |
|
|
Grants creating a collection or instance for the REST resource. |
The general process to authorize users to invoke actions of the ADF REST resource is as follows.
-
Enable the desired standard actions on the REST resource.
-
Run the ADF Security wizard on the RESTWebService project.
-
Create one or more application roles and test users to test security in JDeveloper.
-
Create a resource grant for the REST resource that you associate with the desired application role.
-
Map the application roles and their resource grants to your test users.
How to Create a Resource Grant for ADF REST Resources
You can use the overview editor for security policies to create a grant that will secure operations that you have exposed on the resource. JDeveloper will match your resource type definition to the OPSS permission class oracle.adf.share.security.authorization.RestServicePermission, as described in Table 16-4.
Before you begin:
It may be helpful to have an understanding of how the ADF REST framework supports application modules and enables service clients to access rows of data and perform service operations. See About RESTful Web Services and ADF Business Components.
You may also find it helpful to understand other Oracle ADF features that depend on ADF REST resources. For more information, see See Additional Functionality for RESTful Web Services.
You will need to complete these tasks:
-
Create the desired REST resource, as described in How to Create ADF REST Resources from View Object Instances.
-
Enable the standard operations that you want the REST resource to secure, as described in How to Expose Standard HTTP Actions in the ADF REST Resource.
-
Run the Configure ADF Security wizard to enforce security and make the REST resource methods protected by default. In the Authentication Type page of the wizard instead of selecting ViewController, as described in Enabling ADF Security, select the default generated RESTWebService project from the Web Project dropdown to configure ADF Security for a ADF Business Components model project that defines the ADF REST resources.
-
Create one or more test users and map them to application roles that you create for the purpose of granting resource permissions, as described in How to Associate Test Users and Application Roles.
To create the ADF REST resource grant:
Deploying the ADF REST Resource
You can deploy the RESTful web service to either the Integrated Oracle WebLogic Server of JDeveloper or to the standalone Oracle WebLogic Server.
You can deploy the RESTful web service to either JDeveloper's Integrated WebLogic Server or to standalone Oracle WebLogic Server.
How to Deploy the ADF REST Resource to Integrated WebLogic Server
You can deploy the RESTful web service to JDeveloper's Integrated WebLogic Server using the default Run option that you select on the RESTWebService project, as shown in Figure 16-23.
Figure 16-23 Using the Default Run Option on RESTWebService Project
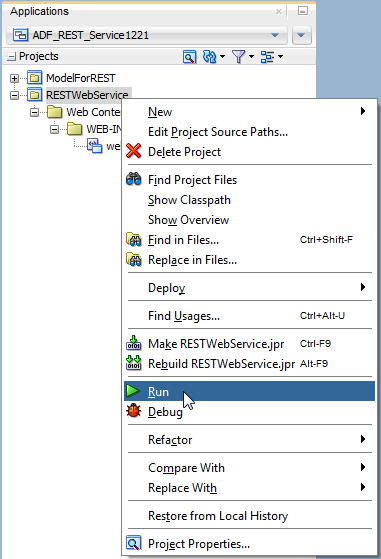
Once you have deployed the service to Integrated WebLogic Server, you can click the target URL in the Log window to access the service in the HTTP Analyzer tool in JDeveloper and to perform testing using the syntax that establishes the request (GET or POST, for example). For details about testing RESTful web services, see Testing the ADF REST Resources Using Integrated WebLogic Server.
Before you begin:
It may be helpful to have an understanding of how the ADF REST framework supports application modules and enables service clients to access rows of data and perform service operations. For more information, see About RESTful Web Services and ADF Business Components.
You may also find it helpful to understand other Oracle ADF features that depend on ADF REST resources. For more information, see Additional Functionality for RESTful Web Services.
You will need to complete these tasks:
-
Create the desired REST resource, as described in Creating ADF REST Resources Using the Application Module.
-
Optionally, create an Integrated WebLogic Server connection and configure the default domain, as described in Working with the Default Domain. If you do not create the connection, JDeveloper will prompt you to do so.
-
Optionally, edit the REST servlet's URL pattern and context root as you want it to appear in the target URL used to access the deployed RESTful web service. For more information about editing the URL pattern, see What You May Need to Know About Modifying the Target URL Used by Service Clients.
To deploy the web service to Integrated WebLogic Server:
How to Configure the ADF REST Resources Deployment Profile For Standalone Oracle WebLogic Server Deployment
Before you can deploy the RESTful web service to standalone Oracle WebLogic Server, you must configure the ADF REST resources deployment profile to declare the RESTWebService project as a dependent module of the ADF REST application EAR file. This project contains a web.xml file and a weblogic.xml file that ensure access to the REST resources by service clients.
In JDeveloper, you use the Application Assembly page of the Edit EAR Deployment Profile Properties dialog to add the module dependency to the application. Then, when you deploy the ADF REST application, the two files of the selected RESTWebService project will be assembled as a WAR file in the deployed EAR file.
Before you begin:
It may be helpful to have an understanding of how the ADF REST framework supports application modules and enables service clients to access rows of data and perform service operations. For more information, see About RESTful Web Services and ADF Business Components.
You may also find it helpful to understand other Oracle ADF features that depend on ADF REST resources. For more information, see Additional Functionality for RESTful Web Services.
You will need to complete these tasks:
-
Create the desired REST resource, as described in Creating ADF REST Resources Using the Application Module.
To configure the deployment profile:
-
Add the RESTWebService project as a dependency for the application's EAR deployment profile:
-
In the Applications window, select the application and then choose Application - Application Properties from the main menu.
-
In the Application Properties dialog, choose Deployment and select the application module deployment profile and click Edit Profile.
-
In the Edit EAR Deployment Profile Properties dialog, choose Application Assembly and expand the RESTWebService.jpr module and then select the project as shown in Figure 16-26 and click OK.
Figure 16-26 Adding a Deployment Dependency on RESTWebService Project
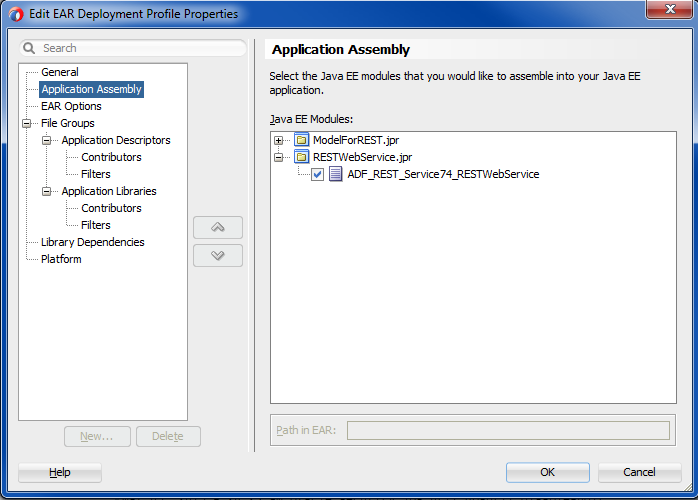
-
How to Deploy the ADF REST Resource to Standalone Oracle WebLogic Server
You can deploy the RESTful web service to standalone Oracle WebLogic Server.
Before you begin:
It may be helpful to have an understanding of how the ADF REST framework supports application modules and enables service clients to access rows of data and perform service operations. For more information, see About RESTful Web Services and ADF Business Components.
You may also find it helpful to understand other Oracle ADF features that depend on ADF REST resources. For more information, see Additional Functionality for RESTful Web Services.
You will need to complete these tasks:
-
Create the desired REST resource, as described in Creating ADF REST Resources Using the Application Module.
-
Modify the deployment profile to add the RESTWebService project as a dependency and deploy the web service, as described in How to Configure the ADF REST Resources Deployment Profile For Standalone Oracle WebLogic Server Deployment.
-
When the application uses the customization features provided by Oracle Metadata Services (MDS) framework and shaping definitions are applied to ADF REST resources, it is necessary to modify the MAR profile for the customization features, as described in What You May Need to Know About Deploying ADF REST Resources With MDS Customization Support.
-
Optionally, edit the REST servlet's URL pattern and context root as you want it to appear in the target URL used to access the deployed RESTful web service. For more information about editing the URL pattern, see What You May Need to Know About Modifying the Target URL Used by Service Clients.
To deploy the web service to standalone Oracle WebLogic Server:
What You May Need to Know About Modifying the Target URL Used by Service Clients
You can edit the REST servlet's URL pattern as you want it to appear in the URL that service clients use to access the service. By default the servlet mapping uses rest in the URL pattern:
http://localhost:7101/RESTSample_App-context-root/rest/11.1/Departments
To edit the servlet mapping pattern, in the Applications window, expand the RESTWebService project and double-click the web.xml file, and then in the editor for the web.xml file, edit the URL pattern for the REST servlet, as shown in Figure 16-27.
Figure 16-27 Editing the URL Pattern for the REST Servlet Mapping
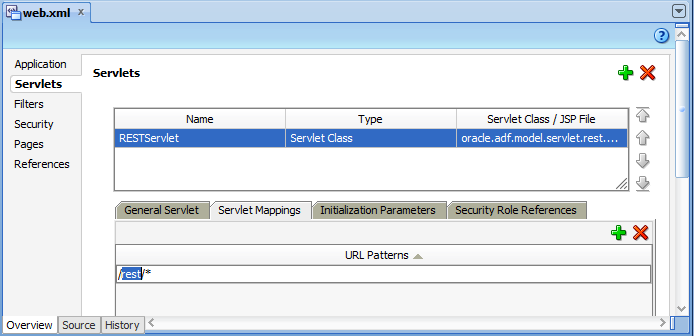
Description of "Figure 16-27 Editing the URL Pattern for the REST Servlet Mapping"
You may also edit the context root as you want it to appear in the URL to access the service. By default, the context root is based on the application name and may be shortened as desired. To edit the context root, in the Applications window, right-click the RESTWebService project and choose Project Properties, and then, in the Project Properties dialog, click Java EE Application and edit the Java EE Context Root as shown in Figure 16-28 and click OK.
Figure 16-28 Editing the Default Context Root on the RESTWebService Project
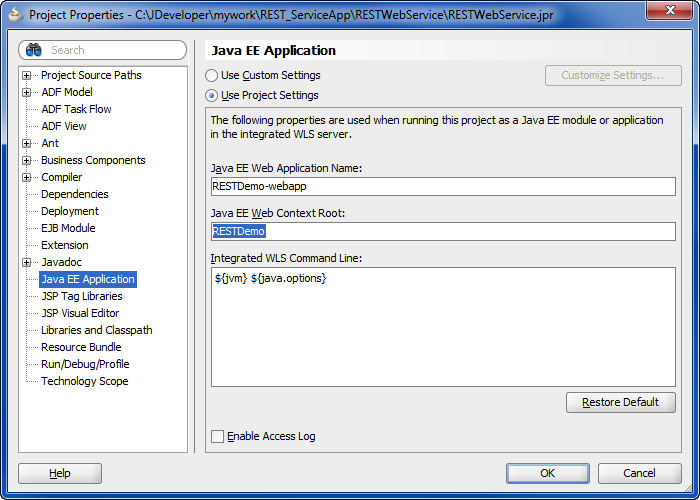
What You May Need to Know About Deploying ADF REST Resources With MDS Customization Support
If your Model project defines view object shaping definitions and the application supports end user customizations using features of the Oracle Metadata Services (MDS) framework, it is necessary to create a MAR profile that includes the /persdef/ name in the user directory.
This is necessary because MDS customizations define the namespace path shared by the ADF REST shaping definitions:
<namespace path="/persdef/" metadata-store-usage="reposX"/>
In this case, the adf-config.xml file should define deploy-target="true" for the corresponding metadata-store-usage element.
For details about how to package the customized metadata, see How to Package and Deploy Customized Applications.
Testing the ADF REST Resources Using Integrated WebLogic Server
JDeveloper allows you to test an ADF REST resource deployed on the Integrated WebLogic Server. Use the HTTP Analyzer to create an HTTP request, web browser for GET requests, or cURL command line tool.
You use JDeveloper to deploy the RESTful web service to Integrated WebLogic Server and then access the ADF REST resources using the target URL generated by the deployment process. Using the generated URL, you can make requests to test the ADF REST resources of the ADF Model project.
You can use any of the following techniques to test the deployed RESTful web service by modifying the URL of the deployed service to return an expected payload:
-
In the HTTP Analyzer in JDeveloper, using the Create HTTP Request option
-
In a web browser (typically limited to GET requests)
-
In the cURL command line tool from a command window
Note that cURL is a third-party tool that you can install and configure to make REST requests using a command window.
Testing the ADF resource using the deployed RESTful web service requires knowledge of the REST API syntax enabled by the ADF REST runtime. However, you can use the instructions in this document to make a basic GET request to view a resource collection.
For example, a GET request that returns all versions of all resources looks like this:
http://<server>/<context-root>/rest
For example, a GET request that returns all resources of a specific version looks like this:
http://<server>/<context-root>/rest/<versionID>/describe
For example, a GET request that returns a specific version of a specific resource collection looks like this:
http://<server>/<context-root>/rest/<versionID>/<resourceName>
Before you begin:
It may be helpful to have an understanding of how the ADF REST framework supports application modules and enables service clients to access rows of data and perform service operations. See About RESTful Web Services and ADF Business Components.
You may also find it helpful to understand the ADF REST framework and the syntax for making API calls using HTTP methods. See Consuming ADF RESTful Web Services.
You may also find it helpful to understand other Oracle ADF features that depend on ADF REST resources. See Additional Functionality for RESTful Web Services.
You will need to complete these tasks:
-
Create the desired REST resource, as described in Creating ADF REST Resources Using the Application Module.
-
Deploy the ADF REST resources to Integrated WebLogic Server, as described in How to Deploy the ADF REST Resource to Integrated WebLogic Server.
-
Download the command line tool cURL when you want to use the tool to test the RESTful web service operations against REST resources.
To test the web service using HTTP GET:
