21 Creating ADF REST Data Controls from ADF RESTful Web Services
This chapter includes the following sections:
About Data Controls for RESTful Web Services Based on Application Modules
ADF Business Components can be configured to publish RESTful web services. This enables you to develop applications that use such services published by other parts of the application or by a different application entirely. Therefore, when you use these services, you do not have to package the underlying business components with your application.
To simplify the consumption of RESTful web services that are based on ADF Business Components, you can use JDeveloper to create connections to these services and then generate data controls based on the resources encompassed by those connections. You can then build a client for the RESTful web service by using the Data Controls panel to create UI components to represent the REST resources and methods. You do not need to write any code to parse the web service or create a client web application that implements the service.
Though the web services exposed by application modules are based on REST principles, when you consume the services using data controls, you interact with them in much the same way that you would directly with an application module. The underlying implementation of the pages' data operations are based on REST methods, but you can build the pages with the same types of data control objects and built-in operations that you use when creating databound UI components based on application module data controls.
Though RESTful web services are stateless between requests, applications created with data controls based on RESTful web services published by application modules behave in a stateful manner. However, because the information about the state of the application is contained within the exchanged messages and not on the server, the application is stateless. User CRUD actions corresponding to HTTP methods (GET, PATCH, POST, and DELETE) are cached until the user invokes the Commit or Rollback operation, at which point the cache is cleared (and the data is committed to the data source or the changes are discarded).
Note:
This chapter concerns the creation of data controls that are based on RESTful web services that expose functionality developed with ADF Business Components. It is also possible to create data controls based on SOAP-based web services and RESTful web services that are not based on ADF Business Components. For more information, see "Exposing Web Services Using the ADF Model Layer" in Developing Applications with Oracle ADF Data Controls.
REST Web Service Data Control Use Cases and Examples
You can create a data control to consume RESTful web services that are exposed by ADF Business Components. You then use the data controls to create databound UI components on a web page to access the service's functionality.
Typically you consume such web services as a way to obtain functionality for an application without having to develop that functionality yourself. In addition, you do not need to package the base application modules directly in your application. These RESTful web services that you consume might be published by a partner, a service provider, or another development team, or they might be part of a cloud-based service.
Additional Functionality for REST Web Service Data Controls
You may find it helpful to understand other data access features before you start working with RESTful web services based on ADF Business Components. Following are links to other functionality that may be of interest.
-
For further details on how ADF data controls and data binding work, see Using ADF Model in a Fusion Web Application.
-
For information on designing databound user interfaces by dragging items from the Data Controls panel and dropping them on pages as UI components, see Creating a Basic Databound Page.
-
For information about publishing RESTful web services based on ADF Business Components, see Creating RESTful Web Services with Application Modules.
Consuming Business Components as REST Resources with a REST Data Control
The REST data control enables you to access and consume data streams from specified URIs defined by running RESTful web services that have been published by ADF Business Components. There are two ways of creating the connections that consumes RESTful web services that are based on the ADF Business Components:
-
Create an IDE connection to the
describeresource of the RESTful web service that has been published by the application module and then create a data control that is based on that connection. -
Create a REST connection and the data controls together by using the Web Service Data Control wizard.
How to Create a REST Connection
You use the Create REST Connection dialog to create an IDE connection to a describe resource for a RESTful web service based on an ADF Business Components application module. You can access this wizard through the New Gallery or the Resources window. Any connection that you create with this wizard is added to the Resources window and can be used to create a data control in any application workspace.
Before you begin:
It may be helpful to have a general understanding of REST data controls. For more information, see Consuming Business Components as REST Resources with a REST Data Control.
You may also find it helpful to understand additional functionality that can be added using other RESTful web services features. For more information, see Additional Functionality for REST Web Service Data Controls.
- Make sure you have access to the RESTful web service that the data control will access. To use the describe feature to create a REST connection, the RESTful web service must be based on an ADF Business Components application module.
To create a REST connection:
What Happens When You Create a REST Connection
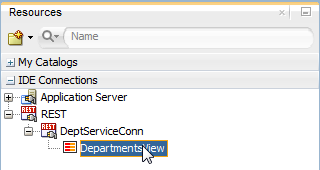
The REST connection is created as an IDE connection in JDeveloper and is available for use in any application that you are developing in the IDE. You can view the connection in the IDE Connections panel of the Resources window as shown in Figure 21-1.
Figure 21-1 Resources Window with a REST Connection
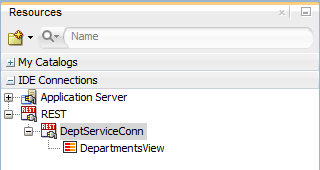
Description of "Figure 21-1 Resources Window with a REST Connection"
How to Create a Data Control From ADF REST Resources
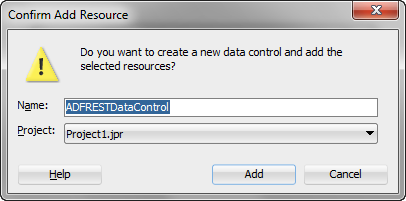
You can create a REST data control by dragging a resource listed under a REST connection from the Resources window to the Data Controls panel. Unlike with the creation of REST data controls based on other types of RESTful web services, you do not need to go through a complex wizard to configure how the data control exposes individual resources.
Before you begin:
It may be helpful to have a general understanding of REST data controls. For more information, see Consuming Business Components as REST Resources with a REST Data Control.
You may also find it helpful to understand additional functionality that can be added using other RESTful web services features. For more information, see Additional Functionality for REST Web Service Data Controls.
You need to complete these tasks:
-
Create an application workspace and a project in that workspace. Depending on how you decide to organize your projects, you can use an existing application workspace and project or create new ones. For information on creating an application workspace, see "Creating Applications and Projects" in Developing Applications with Oracle JDeveloper.
-
Create a REST connection as described in How to Create a REST Connection.
To create a REST data control:
How to Create an ADF Data Control Using the Web Service Data Control Wizard
You can use the Web Service Data Control wizard to create a REST connection and the data controls together. The REST connection you create will consume the RESTful web services that are based on the ADF Business Components. Creating a data control in this way does not require any manual configuration, because the necessary metadata is provided in the REST service’s describe endpoint.
Before you begin:
It may be helpful to have an understanding of how web service data controls are used in ADF applications. For more information, see About Web Service Data Controls in ADF Applications.
It may be helpful to have an understanding of RESTful web services based on ADF Business Components. For more information, see Creating RESTful Web Services with Application Modules.
You may also find it helpful to understand additional functionality that can be added using other web services features. For more information, see Additional Functionality for Web Service Data Controls in ADF Applications.
You will need to complete these tasks:
-
Create the ADF REST resource and deploy it as a RESTful web service, as described in Creating RESTful Web Services with Application Modules.
To create a REST connection and data control for a RESTful web service using the Data Control Wizard:
-
In the Applications window, right-click the project in which you want to create a web service data control and choose New > From Gallery.
-
In the New Gallery, select All Items, scroll down, select Web Service Data Control (SOAP/REST) (Data Controls), and then click OK.
-
In the Create Web Service Data Control wizard, on the Data Source page, specify a name for the data control and select the REST radio button.
You can either create Describe-Based ADF Data Control or Generic Data Control with manually described features.
-
Select Describe-Based ADF Data Control.
-
Click the Create a new REST connection icon to open the Create REST Connection dialog.
-
Enter a name for the connection and a describe URI, which is the RESTful web service that is based on the ADF Business Components. Do not include any resources or parameters in the URL.
This URI is composed of the host, port, resource path, and the describe resource. The resource path typically consists of the context root of the web service project plus the URL pattern specified in the servlet mapping in the REST project's
web.xmlfile. Do include the version name and resource name, but do not include any URL parameters. For example, you can enter something like the following:http://service.example.com:7101/WebServiceProjectContextRoot/rest/VersionName/ResourceName/describe -
Select the level of authentication from the Authentication Type dropdown list. None is the default authentication type and disables authentication. Use Digest when security is desired. In this way, the password will be transmitted across the network as an MD5 digest of the user's password and cannot be determined by sniffing network traffic. Basic authentication is primarily only useful when service access over the network does not require high security.
Note:
In the Create REST Connection dialog, you can click Test Connection to verify that you can connect to the URI. However, the URI's server may be configured to not accept requests on the base URI, meaning that the test will fail. Regardless of that fact, you can click OK to create the connection. If you have such a base URI and would like to make sure that you can connect to the service, you can temporarily add a resource to the URL, test the connection, and then remove the resource before clicking OK.
-
Click Next.
-
On the OWSM Policies page, you can optionally set policies for the web service client as required, and click Next
-
Based on the web service connection that you specified, the Select Resources page displays the list of resources. You can either select all the resources to add to the data control, which is the default selection, or select a specific set of resources to add to the data control.
-
Click Next, and click Finish.
What Happens When You Create a Data Control Based on a REST Connection
When you create a data control based on a resource encompassed by a REST connection, JDeveloper creates a data control definition file (DataControls.dcx), opens the file in the overview editor, and displays the data control's hierarchy in the Data Controls panel.
The DataControls.dcx overview editor is populated with collection nodes for each resource. The Data Controls panel displays those same collection nodes in addition to subnodes for attributes and operations for those collections.
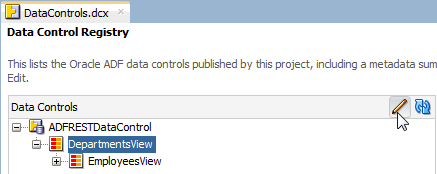
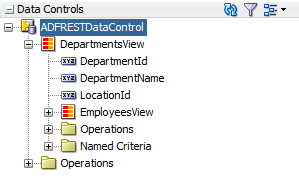
For example, Figure 21-4 shows a data control with collection object called DepartmentsView that corresponds with a resource exposed by the RESTful web service. Its subnodes include attributes of that collection and a nested collection, which can be used to create a list-of-values (LOV) component. In addition, it exposes a combination of data control methods and built-in data control operations that are mapped to standard REST methods.
Figure 21-4 Data Controls Panel with REST Data Control Displayed
For operations that take a parameter of a complex data type, a structured attribute node also appears.
For more information on the objects displayed in the Data Controls panel, see Using REST Data Controls.
Using REST Data Controls
As with other kinds of data controls, you can design a databound user interface by dragging an item from the Data Controls panel and dropping it on a page as a specific UI component. For information on general use of the Data Controls panel, see How to Use the Data Controls Panel.
In the Data Controls panel, each data control object is represented by an icon. Table 21-1 describes what each icon represents, where it appears in the Data Controls panel hierarchy, and what components it can be used to create.
Note:
You can also create data controls based on REST web services that are not based on ADF Business Components. However, such data controls have some differences in the exposed methods and resources. For example, the Commit and Rollback operations are not exposed for REST data controls that are not based on ADF Business Components. For information on creating and using REST data controls not based on business components, see Consuming Web Services Using the ADF Model Layer in Developing Applications with Oracle ADF Data Controls.
Table 21-1 Data Controls Panel Icons and Object Hierarchy for REST Data Control
| Icon | Name | Description | Used to Create... |
|---|---|---|---|
|
|
Data Control |
Represents a data control. You cannot use the data control itself to create UI components, but you can use the child objects listed under the data control. There may be more than one data control, each representing a logical grouping of data functions. |
Serves as a container for the other objects. Not used to create anything. |
|
|
Method |
Represents any custom non-HTTP methods that are exposed as part of the web service.
Note: When you specify a HTTP payload method, the Web Services Data Control generates a schema and displays the specified operations (GET, POST, PATCH, or DELETE) in the Data Controls panel. These payload operations are represented as Method. If a Method accepts arguments, those arguments appear in a Parameters node as parameters, nested inside the method's node.Note: While designing a page, you can use these payload operation methods on a form as a command button or link. When you drop an operation on a form, the operation takes the corresponding input parameters that is already dropped as input. You can then bind the form to this button. |
Command components. For methods that accept parameters: command components and parameterized forms. See Using Command Components to Invoke Functionality in the View Layer. |
|
|
Method Return |
Represents an object that is returned by a web service method. The returned object can be a single value or a collection. A method return appears as a child under the method that returns it. The objects that appear as children under a method return can be attributes of the collection, other methods that perform actions related to the parent collection, and operations that can be performed on the parent collection. When a single-value method return is dropped, the method is not invoked automatically by the framework. You should either drop the corresponding method as a button to invoke the method, or if working with task flows you can create a method activity for it. For more information about executables, see Executable Binding Objects Defined in the Page Definition File. |
The same components as for collections and attributes and for query forms. For more information on query forms, see Creating ADF Databound Search Forms . |
|
|
Collection |
Represents a data collection returned by an operation on the URL service. Collections appear as children under method returns, other collections, or structured attributes. The children under a collection may be attributes, other collections, custom methods, and built-in operations that can be performed on the collection. |
Forms, tables, graphs, trees, range navigation components, and master-detail components. See Creating a Basic Databound Page, Creating ADF Databound Tables , Displaying Master-Detail Data , and Creating Databound Chart and Gauge Components.. |
|
|
Structured Attribute |
Represents a returned object that is a complex type but not a collection. For example, a structured attribute might represent a single user assigned to the current service request.
Note: If you specify a HTTP payload method, the data control generates a schema for specified operations (GET, POST, PATCH, or DELETE) and displays the input parameters for each operation separately in the Data Controls panel. While designing a page, you can use these input parameters for the operations and can drop on a page as an editable form. |
Label, text field, date, list of values, and selection list components For more information, see Creating Text Fields Using Data Control Attributes and Creating Databound Selection Lists and Shuttles .. |
|
|
Attribute |
Represents a discrete data element in an object (for example, an attribute in a row). Attributes appear as children under the collections or method returns to which they belong. |
Label, text field, and selection list components. For more information, see Creating Text Fields Using Data Control Attributes. |
|
|
Operation |
Represents a built-in data control operation that performs actions on the parent object. Data control operations are located in an Operations node under collections and under the data control's root node. The following navigation operations are supported: Because REST data controls based on business components are transactional, any data operations that a user performs are batched together and not committed to the data source until the user issues the |
UI command components, such as buttons, links, and menus. See Creating Command Components Using Data Control Operations and Creating an Input Form. |
|
|
Parameter |
Represents a parameter value that is declared by the method under which it appears. Parameters appear in a node under a method or operation. |
Label, text, and selection list components. |
Note:
In order to use the Data Controls panel for a service based on a REST connection, the service needs to be running and accessible through the connection. Otherwise the Data Controls panel will not have the information necessary to display the structure of the service and enable you to create UI components based on those elements.
Configuring REST Data Controls Published by Application Modules
After you create a REST data control based on a RESTful web service that is published by an ADF Business Components application module, you can use declarative metadata to configure some aspects the default appearance and behavior of the UI components created from the data control. The things that you can configure this way include:
-
Attribute default value
-
UI hints for labels, tooltips, number formats, and so on
-
List of Value (LOV) objects
-
Validation rules
The mechanism for setting this metadata is similar to what is provided for configuring entity objects and view objects.
How to Configure a REST Data Control
You can make a data control configurable by using the overview editor for the DataControls.dcx file to create data control structure files that correspond to objects encompassed by the data control. You can then edit the individual data control structure files.
Before you begin:
It may be helpful to have a general understanding of data control configuration. For more information, see Configuring REST Data Controls Published by Application Modules.
You will need to complete this task:
- Create a REST data control, as described in How to Create a Data Control From ADF REST Resources.
To configure a REST data control:
What Happens When You Edit a Data Control
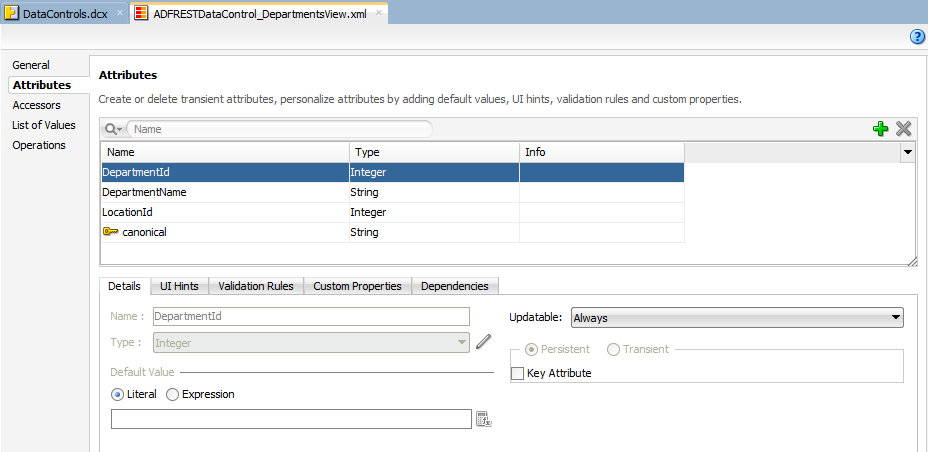
When you edit a data control, JDeveloper creates a data control structure file that contains metadata for the affected collection and opens that file in the overview editor, as shown in Figure 21-6. This file stores configuration data for the data control that is specific to that resource, such as any UI hints or validators that you have specified for the data object.
Figure 21-6 Overview Editor for a Data Control Structure File
Description of "Figure 21-6 Overview Editor for a Data Control Structure File"
Note:
REST data controls based on services published by application modules also inherit some of the UI hints that the developer of those application modules may have set on the base entity objects and view objects. If you set a UI hint on the REST data control, that definition takes precedence over any conflicting ones set at the entity object or view object level.
For more information on UI hints, validation rules, and LOVs, see the following sections:
What You May Need to Know About Primary Keys in REST Data Controls
Because a unique REST resource is identified by a specific resource URI rather than a data attribute, the key for a REST data control based on a service published by an application module is represented by a generated attribute called canonical. You can see this indicated by the key icon on the Attributes page of the overview editor for the data control structure file, as shown in Figure 21-6.
This is important to note if you want to use the setCurrentRowWithKey and setCurrentRowWithKeyValue operations. These operations require a parameter (rowKey) that identifies the row you want to set as current. So, rather than using the primary key of the entity object as you would when configuring an application module data control, you use the generated canonical attribute.
