1 Get Started with Oracle JavaScript Extension Toolkit (JET)
Oracle JET is a collection of Oracle and open source JavaScript libraries engineered to make it as simple and efficient as possible to build client-side web apps based on JavaScript, HTML5, and CSS.
To begin using Oracle JET, you do not need more than the basics of JavaScript, HTML, and CSS. Many developers learn about these related technologies in the process of learning Oracle JET.
-
Add interactivity to an existing page.
-
Create a new end-to-end client-side web app using JavaScript, HTML5, CSS, and best practices for responsive design.
View videos that provide an introduction to Oracle JET in the Oracle JET Videos collection.
The Oracle JET Model-View-ViewModel Architecture
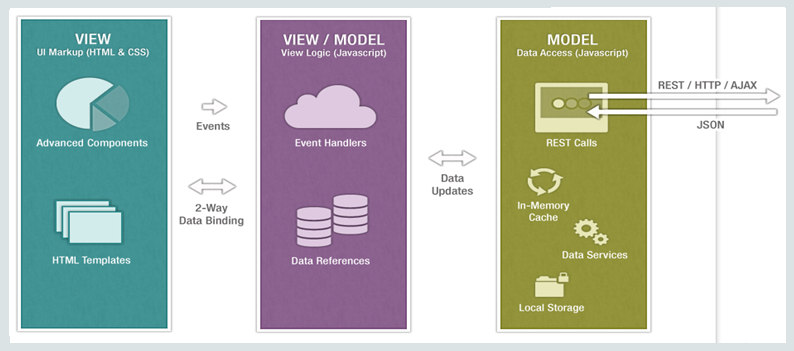
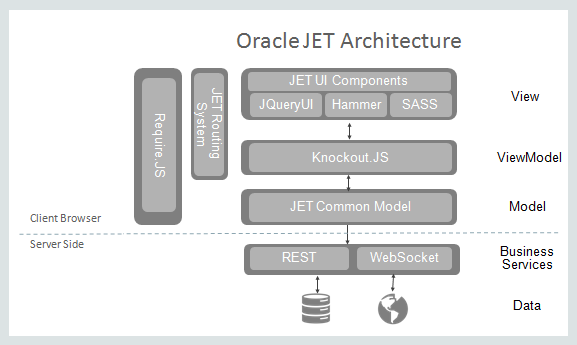
Oracle JET supports the Model-View-ViewModel (MVVM) architectural design pattern.
In MVVM, the Model represents the app data, and the View is the presentation of the data. The ViewModel exposes data from the Model to the view and maintains the app's state.
To support the MVVM design, Oracle JET is built upon a modular framework that includes a collection of third-party libraries and Oracle-provided files, scripts, and libraries.
The Oracle JET Common Model and Collection Application Programming Interface (API) implements the model layer. The API includes the following JavaScript objects:
-
Model: Represents a single record data from a data service such as a RESTful web service -
Collection: Represents a set of data records and is a list ofModelobjects of the same type -
Events: Provides methods for event handling -
KnockoutUtils: Provides methods for mapping the attributes in anModelorCollectionobject to Knockout observables for use with component view models.
To implement the View layer, Oracle JET provides a collection of UI components implemented as HTML5 custom elements, ranging from basic buttons to advanced data visualization components such as charts and data grids.
Knockout.js implements the ViewModel and provides two-way data binding between the view and model layers.
Oracle JET Features
Oracle JET features include:
-
Messaging and event services for both Model and View layers
-
Validation framework that provides UI element and component validation and data converters
-
Caching services at the Model layer for performance optimization of pagination and virtual scrolling
-
Filtering and sorting services provided at the Model layer
-
Connection to data sources through Web services, such as Representational State Transfer (REST) or WebSocket
-
Management of URL and browser history using Oracle JET
CoreRouterandoj-modulecomponents -
Integrated authorization through OAuth 2.0 for data models retrieved from REST Services
-
Resource management provided by RequireJS
-
API compatibility with Backbone.js Model, Collection, and Events classes, except for Backbone.js Underscore methods.
-
JavaScript logging
-
Popup UI handling
Oracle JET Visual Component Features
Oracle JET visual components include the following features and standards compliance:
-
Compliance with Oracle National Language Support (NLS) standards (i18n) for numeric, currency, and date/time formatting
-
Built-in theming supporting the Oracle Redwood theme style specifications and implementing the Oracle Redwood Design System
-
Support for Oracle software localization standards, l10n, including:
-
Lazy loading of localized resource strings at run time
-
Oracle translation services formats
-
Bidirectional locales (left-to-right, right-to-left)
-
-
Web Content Accessibility Guidelines (WCAG) 2.1. In addition, components provide support for high contrast and keyboard-only input environments.
-
Gesture functionality by touch, mouse, and pointer events where appropriate
-
Support for Oracle test automation tooling
-
Responsive layout framework
What's Included in Oracle JET
The Oracle JET zip distribution includes Oracle JET libraries and all third party libraries that the toolkit uses.
Specifically, Oracle JET includes the following files and libraries:
-
CSS and CSS files for the Redwood theme
-
Minified and debug versions of the Oracle JET libraries
-
Data Visualization Tools (DVT) CSS and JavaScript
-
Knockout and Knockout Mapping libraries
-
jQuery libraries
-
RequireJS, RequireJS
textplugin, and RequireJS CSS plugin -
js-signals
-
es6-promisepolyfill -
Hammer.js
Oracle JET components use Hammer.js internally for gesture support. Do not add to Oracle JET components or their associated DOM nodes.
-
Oracle JET
dnd-polyfillHTML5 drag and drop polyfill -
proj4js library
-
webcomponentsjs polyfill
Third Party Libraries Used by Oracle JET
To begin using Oracle JET, you do not need to understand more than the basics of JavaScript, HTML, and CSS or the third party libraries and technologies that Oracle JET uses. In fact, many developers learn about these related technologies in the process of learning Oracle JET.
| Name | Description | More Information |
|---|---|---|
|
CSS |
Cascading Style Sheets |
|
|
HTML5 |
Hypertext Markup Language 5 |
|
|
JavaScript |
Programming language |
https://developer.mozilla.org/en-US/docs/Web/JavaScript/About_JavaScript |
| TypeScript | Typed superset of JavaScript that enables you to support typechecking against the TypeScript API of JET elements and non-element classes. | http://www.typescriptlang.org |
|
jQuery |
JavaScript library designed for HTML document traversal and manipulation, event handling, animation, and Ajax. jQuery includes an API that works across most browsers. |
|
|
Knockout |
JavaScript library that provides support for two-way data binding |
|
|
RequireJS |
JavaScript file and module loader used for managing library references and lazy loading of resources. RequireJS implements the Asynchronous Module Definition (AMD) API. |
RequireJS: http://www.requirejs.org |
|
SASS |
SASS (Syntactically Awesome Style Sheets) extends CSS3 and enables you to use variables, nested rules, mixins, and inline imports to customize your app’s themes. Oracle JET uses the SCSS (Sasy CSS) syntax of SASS. |
If you will be using Oracle JET tooling, you may also want to familiarize yourself with the following technology.
| Name | Description | More Information |
|---|---|---|
|
Node.js |
Open source, cross-platform runtime environment for developing server-side web apps,
used by Oracle JET for package management. Node.js includes the
|
Choose a Development Environment for Oracle JET
You can decide what development environment you want to use before you start developing Oracle JET apps. If you will use Oracle JET tooling to develop web apps, you must install the Oracle JET packages.
Choose a Development Environment
You can develop Oracle JET apps in virtually any integrated development environment (IDE) that supports JavaScript (or TypeScript), HTML5, and CSS3. However, an IDE is not required for developing Oracle JET apps, and you can use any text editor to develop your app.
You can use an IDE in conjunction with the Oracle JET command-line tooling, where you scaffold web apps by using one of the provided starter templates. You can proceed to develop the scaffolded app in the IDE of your choice by opening the project that was created using the JET tooling, in that IDE. After saving changes your app files in the IDE, you use the JET tooling to build and run the JET app.
If you are using Microsoft Visual Studio Code (VS Code) as your editor, you can add the Visual Studio Code Extension of Oracle JET Core to support developing Oracle JET apps. Specifically, the Oracle JET extension for VS Code improves developer productivity for creating clientside JavaScript or TypeScript web apps by providing:
-
Code completion against the JET API and JET component metadata.
-
Ability to work with code snippets for the most commonly used Oracle JET components.
-
Capability to diagnose app source (JavaScript, HTML, CSS, and JSON files) by running Oracle JET audit reports.
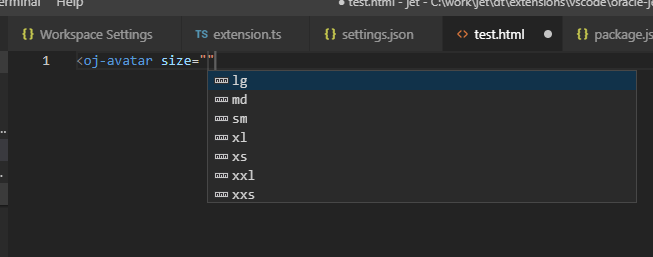
This custom HTML data support for JET components support means that when you are editing HTML files, VS Code will prompt you with Oracle JET tags and attributes. As you start typing your Oracle JET HTML tag, a dropdown will show a list of matching choices:
For more examples of Oracle JET support for VS Code, visit the Oracle JET Core Extension download page in the Visual Studio Marketplace.
Install Oracle JET Tooling
If you plan to use Oracle JET tooling to develop web apps, you must install
Node.js and the Oracle JET command-line interface (CLI),
ojet-cli.
If you already have Oracle JET tooling installed on your development platform, check that you are using the minimum versions supported by Oracle JET and upgrade as needed. For the list of minimum supported versions, see Oracle JET Support.
Note:
If you do not want to install the Oracle JET CLI, you can use the Node.js package runner (npx) to create and manage Oracle
JET apps.
Install Node.js
Install Node.js on your development machine.
From a web browser, download and install one of the installers appropriate for your OS from the Node.js download page. Oracle JET recommends that you install the latest LTS version. Node.js is pre-installed on macOS, but is likely an old version, so upgrade to the latest LTS version if necessary.
After you complete installation and setup, you can enter npm
commands from a command prompt to verify that your installation succeeded. For
example, enter npm config list to show config settings for
Node.js.
If your computer is connected to a network, such as your company's, that requires you to use a proxy server, run the following commands so that your npm installation can work successfully. This task is only required if your network requires you to use a proxy server. If, for example, you connect to the internet from your home, you may not need to perform this task.
npm config set proxy http-proxy-server-URL:proxy-port
npm config set https-proxy https-proxy-server-URL:proxy-port
Include the complete URL in the command. For example:
npm config set proxy http://my.proxyserver.com:80
npm config set https-proxy http://my.proxyserver.com:80
Install the Oracle JET Command-Line Interface
Use npm to install the Oracle JET command-line interface (ojet-cli).
Use the npx Node.js Package Runner
If you do now want to install the Oracle JET CLI NPM package on your
development computer, you can use the npx Node.js package runner as
an alternative to create and manage Oracle JET apps.
You may also find this alternative useful if you frequently change releases of the Oracle JET CLI, which requires you to uninstall and reinstall the NPM packages that deliver the Oracle JET CLI.
To use npx, you must install Node.js and you must
uninstall any globally installed instances of the Oracle JET CLI from your
computer. To list globally-installed packages, run the npm list
--depth=0 -g command in a terminal window. To uninstall a
globally installed instance of the Oracle JET CLI, run the npm -g un
@oracle/ojet-cli command.
Once you have installed Node.js, you can use npx and
the version of the Oracle JET CLI NPM package that you want use, plus the
appropriate command. The following examples demonstrate how you create
Oracle JET apps using different releases of the CLI and then serve them on
your local development computer.
// Create and serve an Oracle JET 12.0.0 app
$ npx @oracle/ojet-cli@12.0.0 create myJET12app --template=navdrawer
$ cd myJET12app
$ npx @oracle/ojet-cli@12.0.0 serve

// Create and serve an Oracle JET 14.0.0 app
$ npx @oracle/ojet-cli@14.0.0 create myJETapp --template=navdrawer
$ cd myJETapp
$ npx @oracle/ojet-cli@14.0.0 serve
You can use all the Oracle JET CLI commands (create,
build, serve,
strip, restore, and so on) by
following the syntax shown in the previous examples (npx
package
command).
The npx package runner fetches the necessary package (for
example, @oracle/ojet-cli@14.0.0)
from the NPM registry and runs it. The package is installed in a temporary
cache directory, as in the following example for a Windows computer:
C:\Users\JDOE\AppData\Roaming\npm-cache\_npx
No NPM packages for the releases of the Oracle JET CLI shown in the previous examples are installed on your computer, as you will see if you run the command to list globally installed NPM packages:
$ npm list --depth=0 -g
C:\Users\JDOE\AppData\Roaming\npm
+-- json-server@0.16.3
+-- node-gyp@9.0.0
+-- typescript@4.2.3
`-- yarn@1.22.18
To learn more about npx, see the Node.js documentation. For
more information about the commands that the Oracle JET CLI provides, see
Understand the Web App Workflow.
Yarn Package Manager
Oracle JET CLI supports usage of the Yarn package manager.
You must install Node.js as Oracle JET uses the npm package manager by default.
However, if you install Yarn, you can use it instead of the default npm
package manager by specifying the --installer=yarn
parameter option when you invoke an Oracle JET command.
The --installer=yarn parameter can be used with the
following Oracle JET commands:
ojet create --installer=yarnojet build --installer=yarnojet serve --installer=yarnojet strip --installer=yarn
Enter ojet help at a terminal prompt to get additional help with
the Oracle JET CLI.
As an alternative to specifying the --installer=yarn parameter
option for each command, add "installer": "yarn" to your
Oracle JET app's oraclejetconfig.json file, as follows:
{
. . .
  "generatorVersion": "14.0.0",
  "installer": "yarn"
}
The Oracle JET CLI then uses Yarn as the default package manager for the Oracle JET app.
For more information about the Yarn package manager, including how to install it, see Yarn's website.
Configure Oracle JET Apps for TypeScript Development
If you plan to build an Oracle JET app or Oracle JET Web Component in TypeScript, your app project requires the TypeScript type definitions that Oracle bundles with the Oracle JET npm package.
When you install Oracle JET from npm, the TypeScript type definitions for version 4.8.4 get installed with the JET bundle and are available for use when you develop apps. To begin app development using TypeScript, Oracle JET tooling supports scaffolding your app by using a variety of Oracle JET Starter Templates that have been optimized for TypeScript development, with the default ES6 implementation. For details, see Scaffold a Web App.
If you have already created an app and you want to switch to developing with
TypeScript, you can use the Oracle JET tooling to add support for type definitions
and compiler configuration. To add TypeScript version 4.8.4 to an existing app, use ojet add typescript from
your app root.
ojet add typescriptWhen you add TypeScript support to an existing app, Oracle JET tooling installs
TypeScript locally with an npm install. The tooling also creates the
tsconfig.json compiler configuration file at your app root.
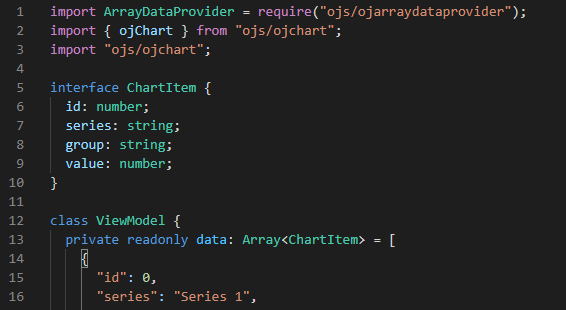
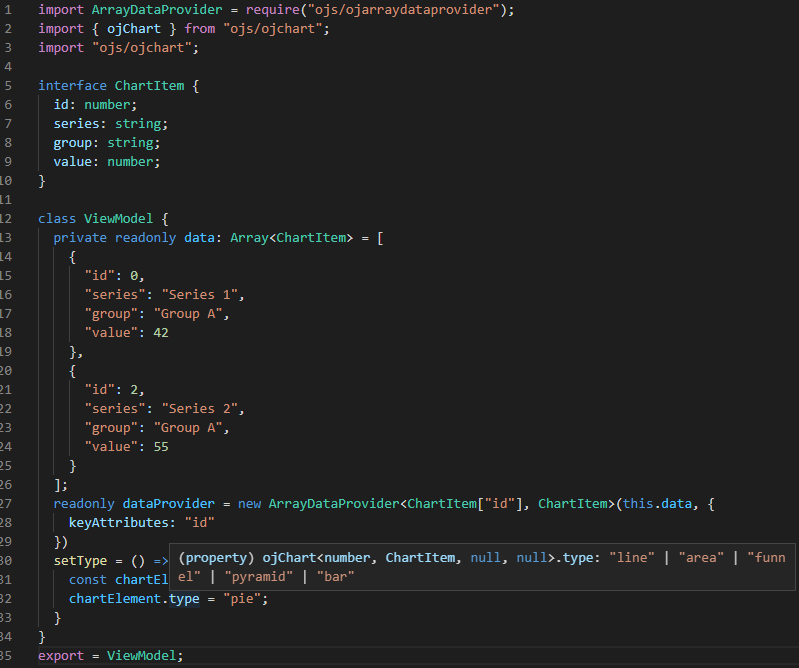
When you begin development with TypeScript, you can import TypeScript definition modules for Oracle JET custom elements, as well as non-element classes, namespaces, and interfaces. For example, in this Oracle JET app, the oj-chart import statement supports typechecking against the element’s TypeScript API.
And, your editor can leverage the definition files for imported modules to display type information.
Note that the naming convention for JET custom element types is changing. The type name that you specify within your TypeScript project to import a JET component's exported interface will follow one of these two naming conventions:
-
componentName +
Element(new "suffix" naming convention)For example,
oj-input-searchand theoj-stream-listhave the type nameInputSearchElementandStreamListElement, respectively.or
-
oj+ componentName ("oj" prefix naming convention of not yet migrated components)For example,
oj-chartandoj-tablecontinue to adhere to the old-style type naming with "oj" prefix:ojChartandojTable, respectively.
Until all JET component interface type names have been migrated to follow the new standard, suffix naming convention, some JET core components will continue to follow the old "oj" prefix naming convention (without the "Element" suffix). To find out the type name to specify in your TypeScript project, view the Module Usage section of the API documentation for the component.
For more information about working with TypeScript in JET, see API Reference for Oracle® JavaScript Extension Toolkit (Oracle JET) - JET In Typescript Overview.
Work with the Oracle JET Starter Templates
The Oracle JET Starter Templates provide everything you need to start working with code immediately. Use them as the starting point for your own app or to familiarize yourself with the JET components and basic structure of an Oracle JET app.
Each template is designed to work with the Oracle JET Cookbook examples and follows current best practice for app design.
You can also view a video that shows how to work with the Oracle JET Starter Templates in the Oracle JET Videos collection.
About the Starter Templates
Each template in the Starter Template collection is a single page app that is structured for modular development. The collection of available Starter Templates supports JavaScript or TypeScript development and will depend on the template type you add to your app.
Instead of storing all the app markup in the index.html file, the
app uses the oj-module component to bind either a view template containing
the HTML markup for the section or both the view template and JavaScript or TypeScript file
that contains the viewModel for any components defined in the section.
The following code shows a portion of the index.html file in the Web Nav Drawer Starter Template that highlights the oj-module component definition. For the sake of brevity, most of the code and comments are omitted. Comments describe the purpose of each section, and you should review the full source code for accessibility and usage tips.
<!DOCTYPE html>
<html lang="en-us">
  <head>
    <title>Oracle JET Starter Template - Web Nav Drawer</title>
       ... contents omitted
  </head>
  <body class="oj-web-applayout-body">

    ... contents omitted

     <oj-module role="main" class="oj-web-applayout-max-width oj-web-applayout-content" config="[[moduleAdapter.koObservableConfig]]">
     </oj-module>

     ... contents omitted

    <!-- This injects script tags for the main javascript files -->
		<!-- injector:scripts -->
		<!-- endinjector -->
  </body>
</html>
The main page’s content area uses the Oracle JET oj-web-applayout-* CSS classes to manage the responsive layout. The main page’s content uses the HTML oj-module element with its role defined as main (role="main") for accessibility.
The oj-module component’s config.view attribute
tells Oracle JET that the section is only defining a view template, and the view will be bound
to the existing viewModel. When the oj-module element’s
config.view-model attribute is defined, the app will load both the
viewModel and view template with the name corresponding to the value of the
config.view-model attribute.
oj-module element’s view and view-model attributes are missing, as in this example, the behavior will depend on the parameter specified in the config attribute’s definition.
-
If the parameter is an Oracle JET router’s
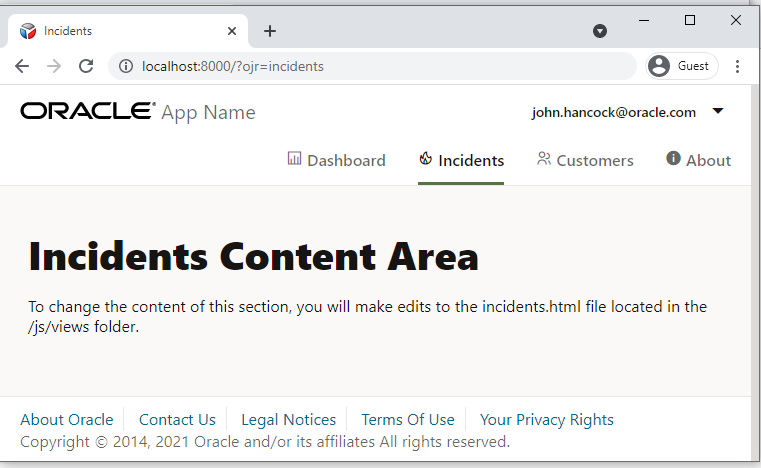
moduleConfigobject as in the above example, thenoj-modulewill automatically load and render the content of the viewModel script and view template corresponding to the router’s current state.The Web Nav Drawer Starter Template uses
CoreRouterto manage navigation when the user clicks one of the app’s navigation items. The routes includedashboard,incidents.customers, andabout. If the user clicks Incidents, for example, the main content area changes to display the content in theincidentsview template. -
If the parameter is a Knockout observable containing the name of the viewModel, the app will load both the viewModel and view template with the indicated name.
The /js/views folder contains the view templates for the app and the
/js/viewModels contains the viewModel scripts. The image below shows the
Web Nav Drawer Starter Template file structure.
For additional information about working with single page apps,
oj-module, CoreRouter, and Knockout templates, see Create Single-Page Apps.
For details about the oj-web-applayout-* CSS classes, see Web Application Patterns. For additional information about working with responsive design, see Design Responsive Apps.
About Modifying Starter Templates
The Starter Template is the starting point for creating your apps. You can modify any Oracle JET starter template to provide a customized starting point.
You can obtain the Starter Template from the Oracle JET app that you create when you Scaffold a Web App. Load the starter template into your favorite IDE, or extract the zip file into a development folder.
Tip:
If you used the command line tooling to scaffold your app, you can still use an IDE like Visual Studio Code for editing. For example, in Visual Studio Code, choose File –> Open Folder and select the folder containing the app you created. Edit your app as needed, but use the tooling commands in a terminal window to build and serve your app.To modify the template you can remove unneeded content and add new content. Content that you add can be your own or you can reuse content from Oracle JET Cookbook samples. When you copy markup from a Cookbook sample, you copy the desired HTML and the supporting JavaScript.
Included in the code you add will be the RequireJS module dependency for the code.
The app's main.js file contains the list of RequireJS modules currently
included in the app. If you are using the Cookbook sample, you can determine modules
that you need to add by comparing list of libraries in the app's
main.js file to the list in the Cookbook sample. You will add any
missing modules to the define() function in the JavaScript file for
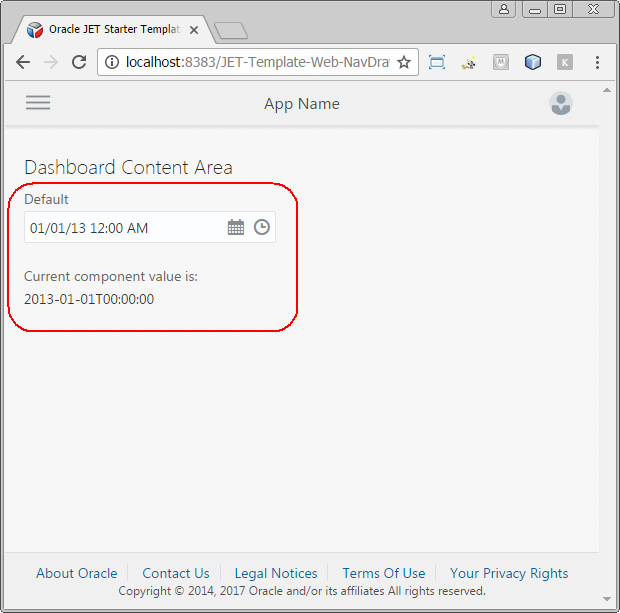
your app. For example, to add the oj-input-date-time component from the
Cookbook, you would need to add the ojs/ojdatetimepicker module to the
dashboard.js viewModel file since it's not already defined in
dashboard.js.
To familiarize yourself with the RequireJS module to add for a Cookbook sample or for your own code, see the table at About Oracle JET Module Organization.
If you add content to a section that changes its role, then be sure to change the role associated with that section. Oracle JET uses the role definitions for accessibility, specifically WAI-ARIA landmarks. For additional information about Oracle JET and accessibility, see Develop Accessible Oracle JET Apps.
Modify Starter Template Content
To add content, modify the appropriate view template and ViewModel script (if it exists) for the section that you want to update. Add any needed RequireJS modules to the ViewModel’s define() definition, along with functions to define your ViewModel.
The example below uses the Web Nav Drawer Starter Template, but you can use the same process on any of the Starter Templates.
Before you Begin:
- See the Date and Time Pickers demo in the Oracle JET Cookbook. This task uses code from this sample.
To modify the Starter Template content:
Work with the Oracle JET Cookbook
The Oracle JET Cookbook is a valuable resource for you to use as you develop apps. It includes an implementation of each JET component, along with samples that demonstrate how to implement common usage patterns using one or more of the JET components.
Each Oracle JET Cookbook demo includes a brief introduction, the demo implementation, and, following the implementation, tabs (Info, demo.html, and so on) that describe how to implement the demo, show the source HTML, JavaScript/TypeScript, and, where applicable, the CSS and JSON.
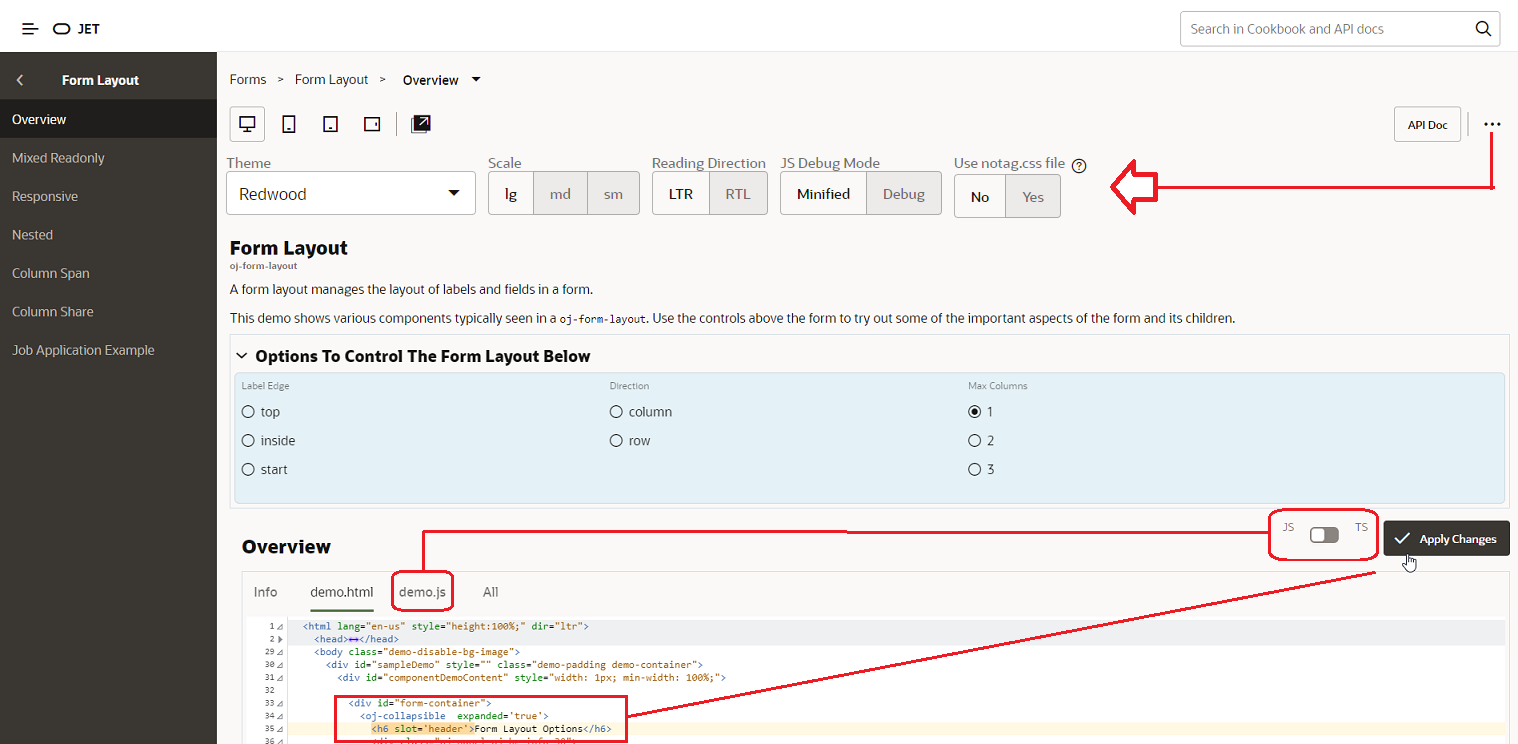
Effective use of the cookbook will make your development task easier. You can, for example, copy code from the cookbook to your own apps, or you can modify code directly in your browser and click Apply Changes to preview changes in your browser.
- API Doc: Navigates to the API doc for the components that are used in the demo.
 (Setting button): Displays additional controls that allow
you to change the theme, the font size, reading direction, and debug
mode of the demo code in the browser. Note that these changes affect
only the portion of the browser that renders the demo
implementation.
- JS/TS: Toggle this button to view the demo implementation in JavaScript or TypeScript.
- Apply Changes: You can edit the HTML and JS/TS of the demo in the browser and click Apply Changes to see your changes in the browser. This is useful if you want to test the behavior or a component when you change an attribute value, for example.
Optimize App Startup Using Oracle CDN and Oracle JET Libraries
You can configure the Oracle JET app to minimize the network load at app startup through the use of Oracle Content Delivery Network (CDN) and the Oracle JET distributions that the CDN supports.
When your production app supports users who access the app from diverse
geographical locations, you can perform a significant performance optimization by
configuring the Oracle JET app to access Oracle CDN as its source for loading the
required Oracle JET libraries and modules. Oracle maintains its CDN with the libraries
and modules that are specific to a given Oracle JET release. The CDN support for each
release is analogous to the way Oracle JET tooling also supports copying these files
into the local src folder of the app for a particular release. In both
cases, access to the appropriate libraries and modules is automated for the app
developer. You configure the app to determine where you want the app to load the
libraries and modules from.
After you create your app, the app is configured by default to load the needed
libraries and modules from the local src folder. This allows you to
create the app without the requirement for network access. Then, when you are ready to
test in a staging environment or to move to production, you can configure the Oracle JET
app to use CDN server replication to reduce the network load that occurs when users
access the app at the start of a browser session. When the user initially starts the app
in their browser, Oracle CDN ensures a distributed server closest to the geographic
location of the user is used to deliver the app's needed third party libraries and
Oracle JET modules to the user's browser.
Configuring the app to load from CDN offers these advantages over loading from the
app src folder:
-
Once loaded from a CDN distribution server, the required libraries and modules will be available to other apps that the user may run in the same browser session.
-
Enables the option to load bundled libraries and modules using a bundles configuration file that Oracle maintains on CDN. The bundles configuration file groups the most commonly accessed libraries and modules into content packages that are specific to the release and makes them available for delivery to the app as a bundle.
Tip:
Configuring your app to reference the bundles configuration on Oracle CDN is recommended because Oracle maintains the configuration for each release. By pointing your app to the current bundles configuration, you will ensure that your app runs with the latest supported library and module versions. For information about how to enable this bundle loading optimization, see About Configuring the App for Oracle CDN Optimization.
