2 Getting Started with MAF Application Development
This chapter includes the following sections:
Introduction to Declarative Development for MAF Applications
Use the overview editors and wizards that MAF provides to develop an application, define its features, add content to features, and deploy the application to a test environment or a device.
The Oracle Mobile Application Framework (MAF) extension in JDeveloper provides a number of overview editors and other wizards to facilitate the development, testing, and deployment of MAF applications. Using these wizards, you can create a MAF application, define one or more application features, add content to an application feature, and deploy the MAF application to a test environment or device in a relatively short amount of time.
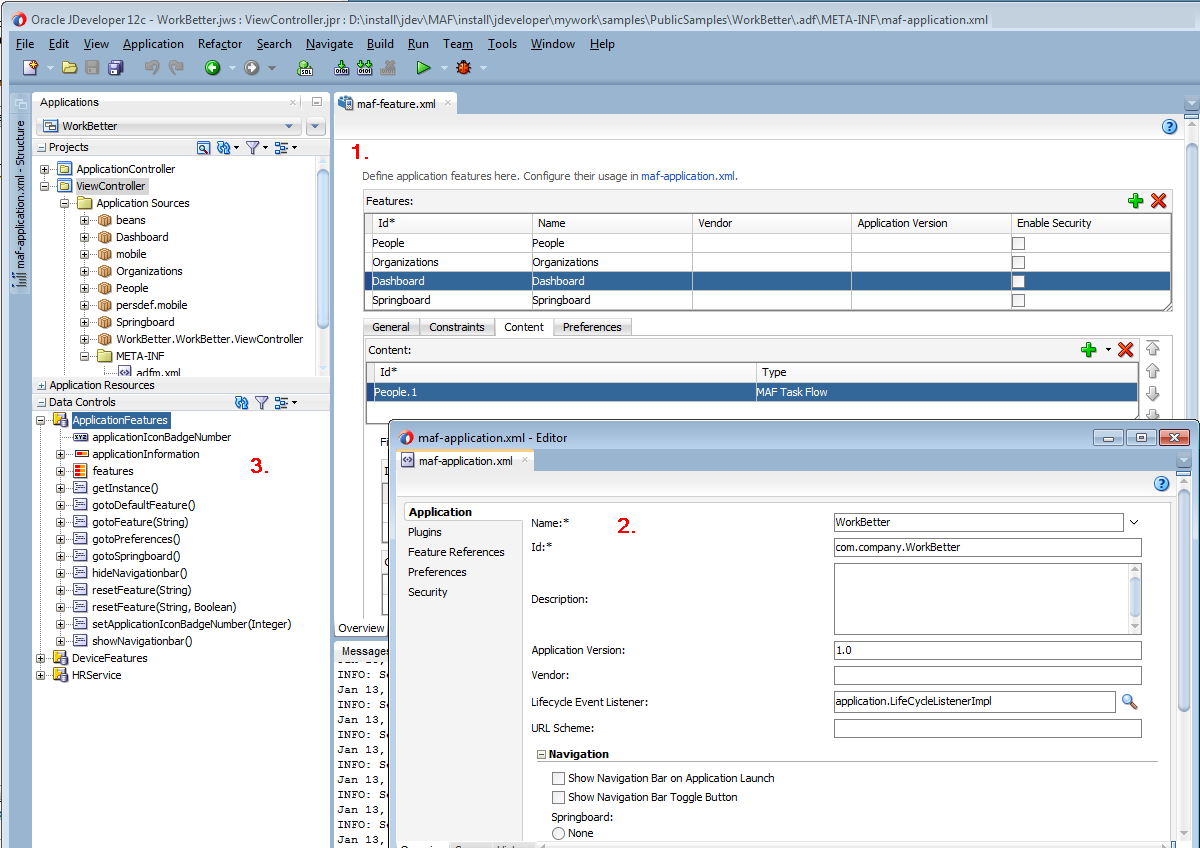
The following figure shows the WorkBetter sample application in the JDeveloper Applications window where a number of the items that you use to develop MAF applications are identified:
-
The overview editor for the
maf-features.xmlfile opens by default when you create a new MAF application. Use this overview editor to define the application features that your MAF application contains. -
Use the overview editor for the
maf-application.xmlfile used to, among other things, specify the name of the MAF application, the default navigation menus (navigation bar or springboard) that the application renders, security, and device access options for the application. -
By default, JDeveloper creates a MAF application with two data controls (ApplicationFeatures and DeviceFeatures). These data controls expose operations that you can drag to a MAF AMX page where JDeveloper displays context menus to complete configuration of the operation when you drop it on the page. For example, dragging the
hideNavigationBar()operation to a page prompts JDeveloper to display a context menu where you configure a control for users to hide the navigation bar of an application.
The WorkBetter sample application is one of a number of sample applications that MAF provides to demonstrate how to create mobile applications using MAF. See MAF Sample Applications.
JDeveloper proposes default options in the wizards so that you can create a MAF application with one application feature displaying one MAF AMX page as follows:
-
Create a MAF application, as described in Creating a MAF Application.
-
Define an application feature for the MAF application, as described in Defining Application Features for a MAF Application.
-
Add content to the application feature, as described in Adding Content to an Application Feature.
Figure 2-1 Overview Editors for Application Features and Application
Description of "Figure 2-1 Overview Editors for Application Features and Application"
Creating a MAF Application
Access and use the Create Mobile Application Framework Application wizard from the Mobile Application Framework Application option in the Applications category in New Gallery to get started with application development in MAF.
Before you can create a MAF application, download, install, and configure the MAF extension in JDeveloper.
See Installing Mobile Application Framework with JDeveloper in Installing Oracle Mobile Application Framework. Once you have completed this task, create a MAF application using the creation wizards in JDeveloper.
How to Create a MAF Application
You create a MAF application in JDeveloper using the application creation wizard.
To create a MAF application:
- In the main menu, select File and then Application > New.
- In the New Gallery, in the Items list, double-click Mobile Application Framework Application.
- In the Create Mobile Application Framework Application wizard, enter application and project details like name, directory, and default packages. For help with the wizard, press F1 or click Help.
- Click Finish.
What Happens When You Create a MAF Application
JDeveloper creates a MAF application with two projects (ApplicationController and ViewController) and two data controls (ApplicationFeatures and DeviceFeatures). It also creates files that you use to configure your MAF application and files that your MAF application needs when you deploy it to the supported platforms.
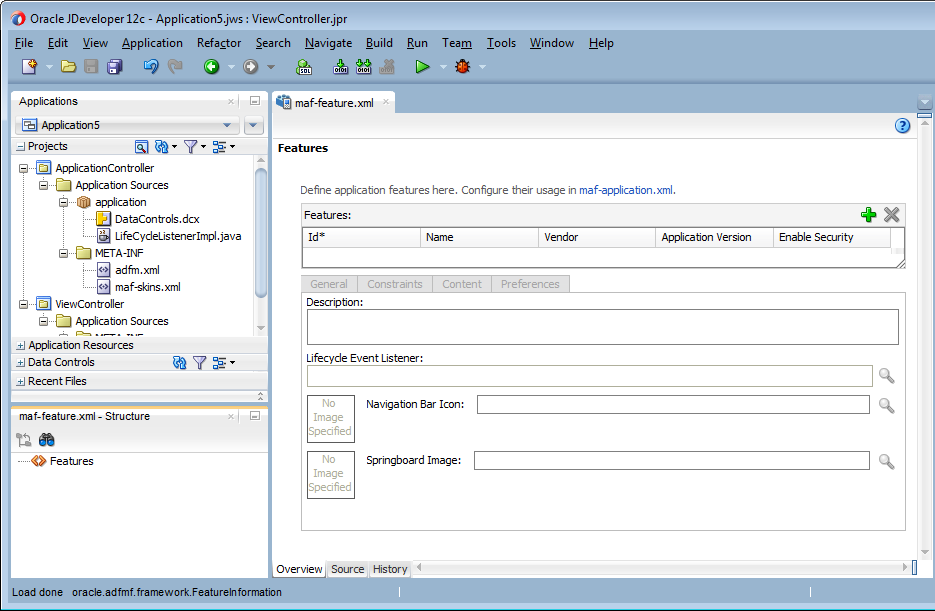
By default, JDeveloper opens the overview editor for the maf-features.xml file in the ViewController project of the newly-created MAF application, as shown in the figure. Use this overview editor to add one or more application features to your MAF application. A MAF application must have at least one application feature. See Defining Application Features for a MAF Application.
For information about the files and artifacts that JDeveloper generates when you create a MAF application, see MAF Application and Project Files.
Figure 2-2 Overview Editor for Application Features in Newly-Created MAF Application
Description of "Figure 2-2 Overview Editor for Application Features in Newly-Created MAF Application"
Defining Application Features for a MAF Application
You must define at least one application feature for a MAF application.
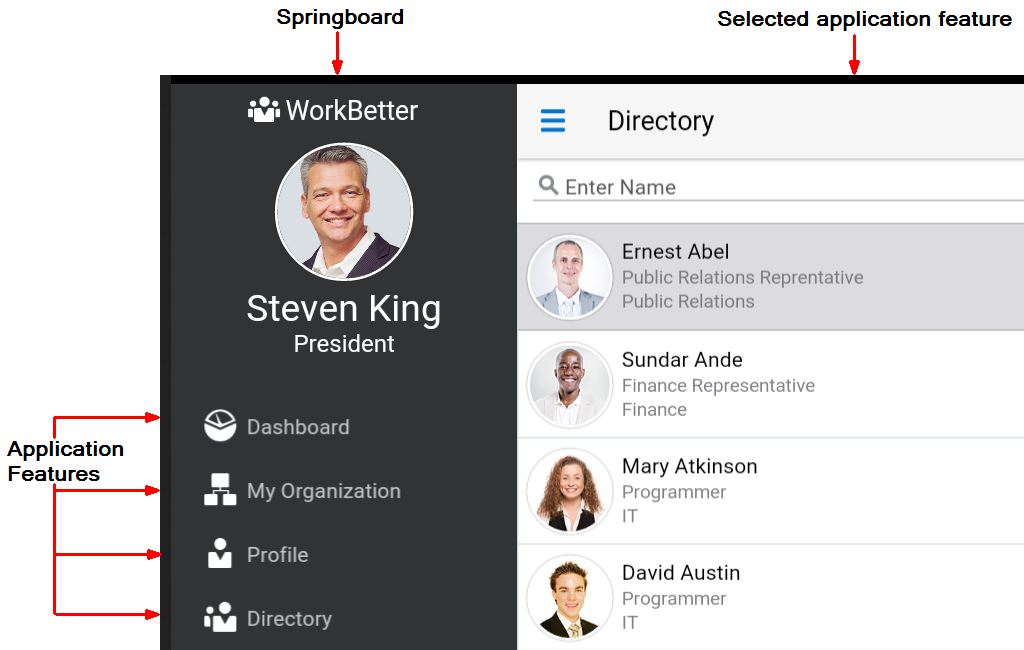
A MAF application must have at least one application feature. The WorkBetter sample application, for example, includes four application features (Dashboard, People, Organizations, and Springboard). The figure shows three of these application features displaying in the custom springboard of that application.
Figure 2-3 Application Features in the Springboard of the WorkBetter Application
Description of "Figure 2-3 Application Features in the Springboard of the WorkBetter Application "
How to Define an Application Feature
Use the procedure to define an application feature for a MAF application using the Create MAF Feature dialog of the overview editor for the maf-features.xml file.
You define an application feature for a MAF application using the overview editor for the maf-features.xml file.
To define an application feature for a MAF application:
Adding Content to an Application Feature
After you define an application feature, you can add MAF AMX pages, MAF Task Flows, Local HTML, or Remote HTML as content for the feature.
One of the tasks to do after you define an application feature is to add content to the application feature. Select from among the following types to render content in your application feature:
-
MAF AMX Page: Select this content type if you want the application feature to render MAF AMX pages.
-
MAF Task Flow: Select this content type if you want the application feature to render a collection of activities that make up a task flow. Examples of activities that you can include in a task flow are views (to display MAF AMX pages), method calls (to invoke managed bean methods), and task flow calls (to call other task flows).
-
Local HTML: Select if you want the application feature to render HTML page.
-
Remote URL: Select if you want the application feature to render content from a remote URL.
The general steps to add a content type to an application feature are the same for all content types. That is, you select the type of content to add to the application feature in the Content tab of the Features page of the overview editor of the maf-features.xml file. For the specific steps for each content type, see Defining the Content Type of MAF Application Features .
Adding Application Features to a MAF Application
Add a feature to a MAF application that you create or import. A feature can be added to an application as you create it, or after you have created the application.
You can automatically add an application feature to a MAF application when you define it by selecting the Add a corresponding feature reference to maf-application.xml checkbox in the Create MAF Feature dialog, as described in How to Define an Application Feature.
Use the Feature References page of the overview editor of the maf-application.xml file if you want to add an application feature that you did not add to the MAF application when you created it, you use the Feature References page of the overview editor of the maf-application.xml file.
You can also add application features to your MAF application that you import from Feature Archive (FAR) files. You must import the application feature into your MAF application before you can add an application feature to the MAF application. See Reusing MAF Application Content .
The figure shows the Feature References page where you add application features to a MAF application.
Figure 2-4 Adding Application Features Using the Feature References Page

Description of "Figure 2-4 Adding Application Features Using the Feature References Page"
How to Add an Application Feature to a MAF Application
Use the procedure to access and use the Feature References page in the overview editor of the maf-application.xml file to add application features to a MAF application.
You use the Feature References page in the overview editor of the maf-application.xml file to add application features to a MAF application.
To add an application feature to a MAF application:
- In the Applications window, expand the Application Resources panel.
- In the Application Resources panel, expand Descriptors and then ADF META-INF.
- Double-click the maf-application.xml file and in the overview editor that appears, click the Feature References navigation tab.
- In the Feature References page, click the Add icon.
- In the Insert Feature Reference dialog, select the ID of the application feature from the drop-down list.
- Click OK.
What You May Need to Know About Feature Reference IDs and Feature IDs
Application feature IDs must be unique, and must match feature reference IDs.
JDeveloper writes an entry in the maf-application.xml file to reference the application feature that you add to the MAF application.
In the maf-application.xml file, the refId attribute of an <adfmf:featureReference> element identifies the corresponding application feature in the maf-feature.xml file. For this reason, the value of the refId attribute for a <adfmf:featureReference> element in the maf-application.xml file must match the value of the id attribute defined for the <adfmf:feature> element in the maf-feature.xml file.
Use a naming convention consistently to make sure that application feature IDs are unique. Application feature IDs must be unique across a MAF application.
Example 2-1 shows the entries for the People application feature in the maf-application.xml and maf-feature.xml files of the WorkBetter sample application .
Example 2-1 Feature Reference and Feature ID for an Application Feature in WorkBetter Application
<!-- Feature Reference ID in maf-application.xml File -->
<adfmf:featureReference id="fr2" refId="People"/>
...
<!-- Feature ID in maf-feature.xml File -->
<adfmf:feature id="People" name="People" icon="images/people.png" image="images/people.png">
...
Configuring the Development Environment for Form Factors
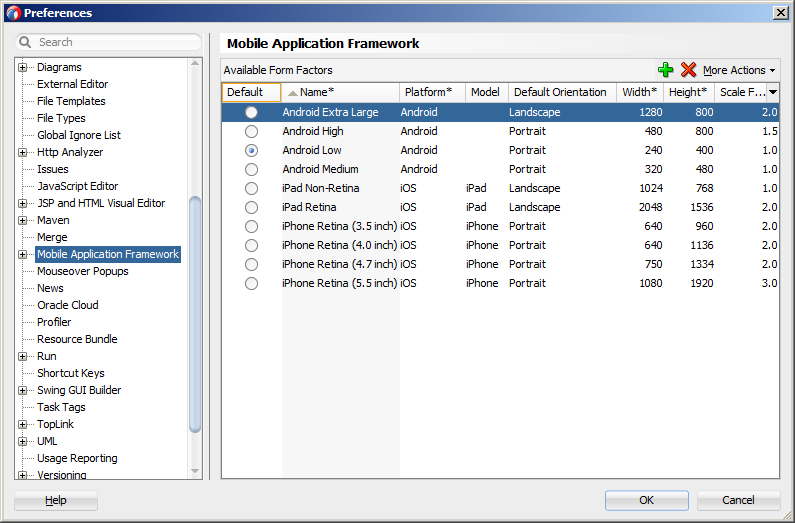
A form factor is a specific device configuration. Each form factor is identified by a name that you specify for it, and contains information on the specified resolution denoted by pixel width and pixel height.
Since form factors that are defined in preferences are used in the MAF AMX page Preview tab (see Using the Preview in Developing Mobile Applications with Oracle Mobile Application Framework), you may choose to perform this configuration if you are planning to include a MAF AMX application feature as part of your MAF application and you do not want to accept the default settings. During development, you can select or switch between various form factors to see how a MAF AMX page is rendered. You can also see multiple form factors applied to the same page using the split screen view.
To configure the form factors:
Creating MAF AMX Pages and MAF Task Flows
Construct the user interface of an application with MAF AMX pages that can be used by a feature or the whole application. Navigate between AMX pages with MAF task flows that organize MAF AMX view pages and other activities into sequences.
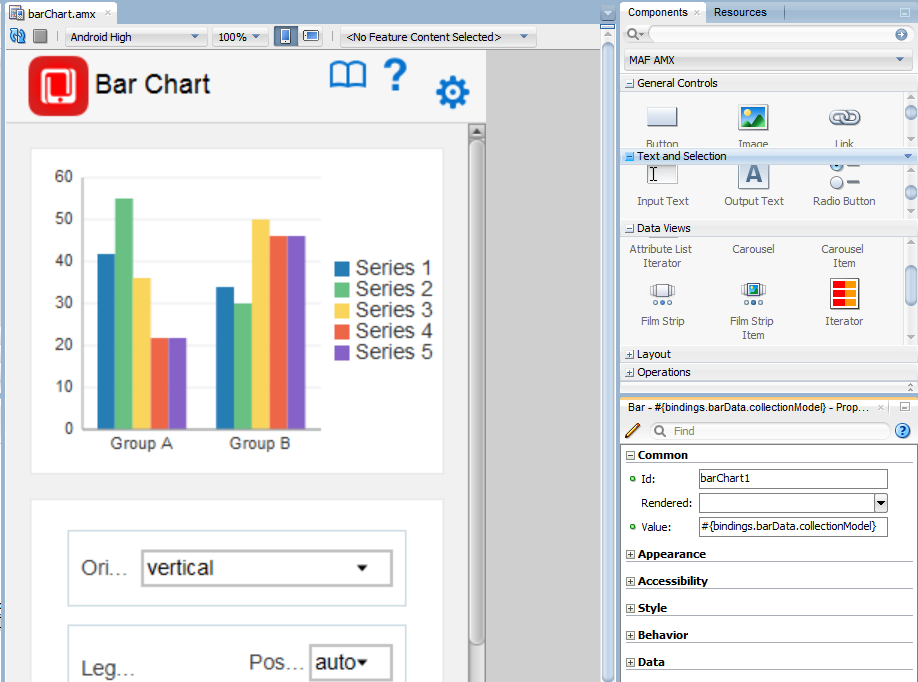
As described in Creating MAF AMX Pages , the MAF AMX components enable you to build pages that run identically to those authored in a platform-specific language. MAF AMX pages enable you to declaratively create the user interface using a rich set of components. The figure illustrates the declarative development of a MAF AMX page.
These pages may be created by the application assembler, who creates the MAF application and embeds application features within it, or they can be constructed by another developer and then incorporated into the MAF application either as an application feature or as a resource to a MAF application.
The project in which you create the MAF AMX page determines if the page is used to deliver the user interface content for a single application feature, or be used as a resource to the entire MAF application. For example, a page created within the application controller project would be used as an application-wide resource.
Tip:
To make pages easier to maintain, you can break it down in to reusable segments known as page fragments. A MAF AMX page may be comprised one or more page fragments.
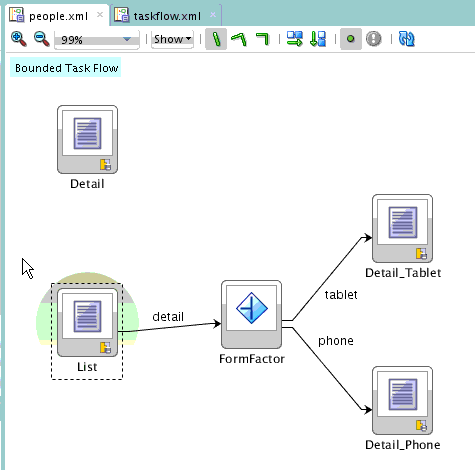
MAF enables you to arrange MAF AMX view pages and other activities into an appropriate sequence through the MAF task flow. As described in Creating Task Flows, a MAF task flow is visual representation of the flow of the application. It can be comprised of MAF AMX-authored user interface pages (illustrated by such view activities, such as the default List page of the WorkBetter sample application and the Detail page in the following figure) and nonvisual activities that can call methods on managed beans. The non-visual elements of a task flow can be used to evaluate an EL expression or call another task flow. As illustrated by in the figure, MAF enables you to declaratively create the task flow by dragging task flow components onto a diagrammer. MAF provides two types of task flows: a bounded task flow, which has a single point of entry, such as the List page in the WorkBetter sample application, and an unbounded task flow, which may have multiple points of entry into the application flow. The WorkBetter sample application is located in the PublicSamples.zip file within the jdev_install/jdeveloper/jdev/extensions/oracle.maf/Samples directory on your development computer.
The following figure shows wizards that MAF provides to add MAF task flows, AMX pages, reusable portions of MAF AMX pages called MAF page fragments, and application features. To access these wizards, select a view controller or application controller project within the Applications window and select File > New. Select one of the wizards after selecting Mobile Application Framework within the Client Tier.
Figure 2-8 Wizards for Creating Resources for Application Features
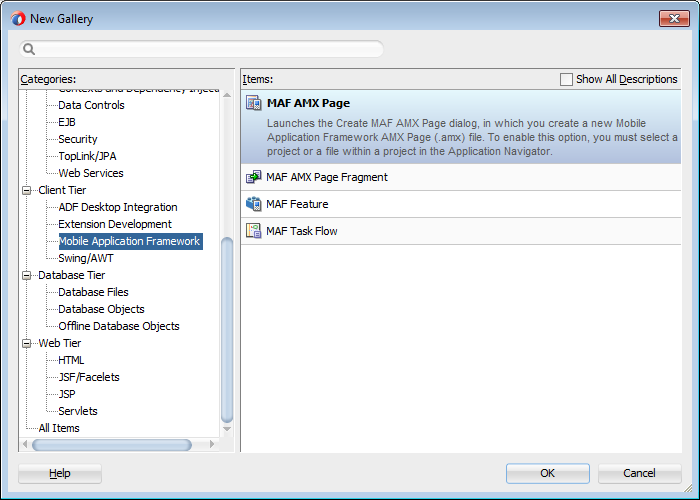
Description of "Figure 2-8 Wizards for Creating Resources for Application Features"
How to Create a MAF AMX Page
You can use the MAF AMX Page wizard to create AMX pages used for the user interface for an application feature, or as an application-level resource (such as a login page) that can be shared by the application features that comprise the MAF application.
For information about application feature content, see Defining the Content Type of MAF Application Features .
To create a MAF AMX page as content for an application feature:
-
In the Applications window, right-click the view controller project.
-
Select File and then New.
-
From the Client Tier node in the New Gallery, select MAF AMX Page and then click OK.
-
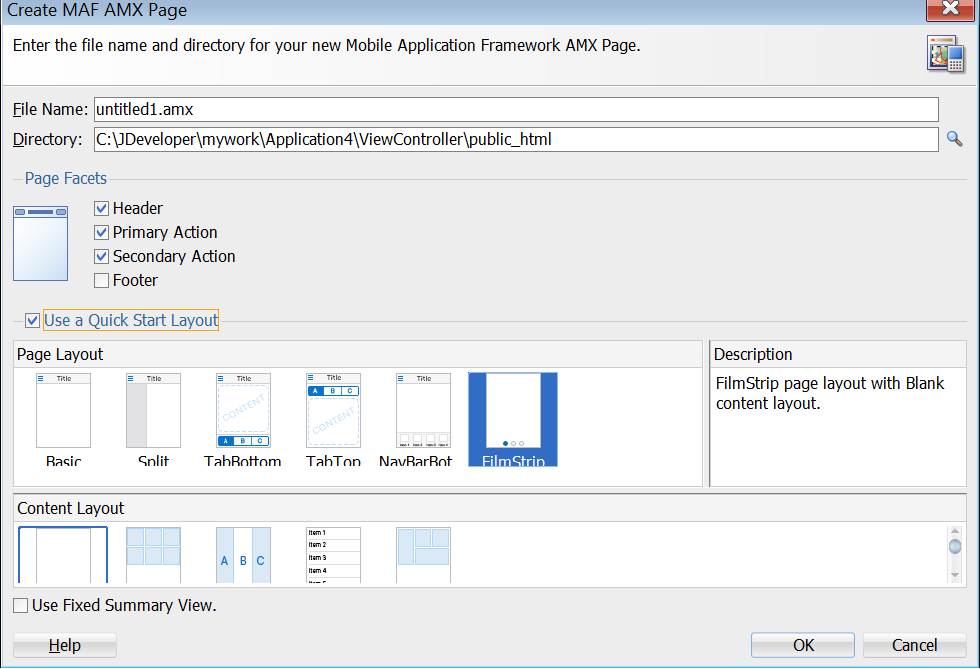
Complete the Create MAF AMX Page dialog by entering a name in the File Name field. In the Directory field, enter the file location, which must be within the
public_htmlfolder of the view controller project. -
Select (or deselect) the Facets within the Panel Page that are used to create a header and footer. Click OK.
-
Select the Use a Quick Start Layout checkbox to enable page layout and the associated content layout options.
The options in the Content Layout list depend on the Page Layout option you select. MAF generates an AMX page using the layout options you select.
-
Select the Select Use Fixed Summary View checkbox to include a Summary Section in the generated AMX page.
Entries, similar to the following, appear in the generated AMX page to render this section.
<amx:facet name="top"> <amx:panelGroupLayout styleClass="summary-section-style" layout="horizontal" halign="center" id="pgl1"> <amx:outputText value="Summary Section" id="ot11"/> </amx:panelGroupLayout> </amx:facet> -
Build the MAF AMX page. For information about using the AMX components, see Creating MAF AMX Pages. See also Defining the Application Feature Content as a MAF AMX Page or Task Flow.
To create a MAF AMX page as a resource to a MAF application:
How to Create MAF Task Flows
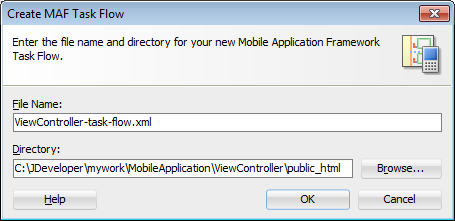
The content for an application feature can be delivered as a MAF task flow. Use the procedure to access and use the Create MAF Task Flow window to define a task flow for an application feature.
To create a MAF Task Flow as content for an application feature:
What Happens When You Create MAF AMX Pages and Task Flows
When you create MAF AMX pages and task flows, JDeveloper adds them to the web content of the application controller and the view controller projects. JDeveloper generates the adfc-mobileconfig.xml file which you can use to create or update a task flow.
JDeveloper places the MAF AMX pages and task flows in the Web Content node of the view controller project, as shown by custom_springboard.amx and ViewController-task-flow.xml (the default name for a task flow created within this project) in the figure. These artifacts are referenced in the maf-feature.xml file. To manage the unbounded task flows, JDeveloper generates the adfc-mobile-config.xml file. Using this file, you can declaratively create or update a task flow by adding the various task flow components, such as a view (a user interface page), the control rules that define the transitions between various activities, and the managed beans to manage the rendering logic of the task flow.
Figure 2-12 MAF AMX Pages and Task Flows within Application Controller and View Controller Projects
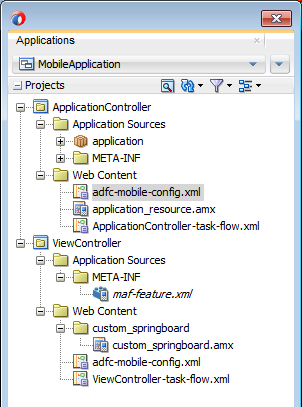
Description of "Figure 2-12 MAF AMX Pages and Task Flows within Application Controller and View Controller Projects"
JDeveloper places the MAF AMX page and task flow as application resources to the MAF application in the Web Content node of the application controller project. As illustrated in Figure 2-12, the file for the MAF AMX page is called application_resource.amx and the task flow file is called ApplicationController-task-flow.xml (the default name).
