C About the Reduced Downtime Upgrade Process
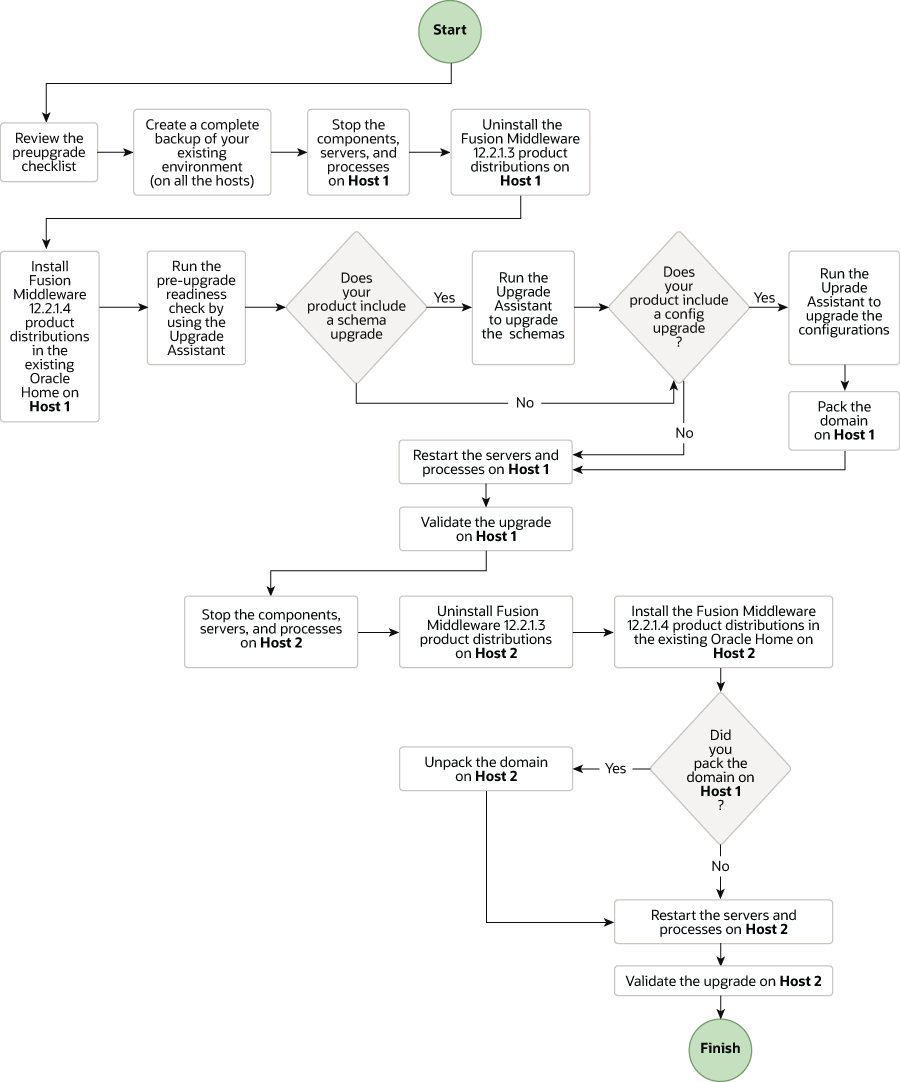
Review the flowchart and roadmap for an overview of the upgrade process for Oracle Fusion Middleware if you are performing a reduced downtime upgrade.
A reduced downtime upgrade process is different from a standard Fusion Middleware upgrade process. This type of upgrade requires at least a two-node cluster environment and is performed in a rolling fashion so that one node is always up to accomplish the reduced downtime upgrade. In the standard upgrade flow, all servers and processes are stopped prior to initiating the upgrade.
- Back up the database schemas.
- Back up the domain directory and the application directory.
- Back up the UI /similar customizations.
For details about backing up, see Creating a Complete Backup.
After taking the required back ups, uninstall the previous version of the software to ensure that an empty Oracle Home is available to install the new product distributions. This is the key difference between the two upgrade processes. In addition, if your product requires a schema and/or a config upgrade, you will need to run the Upgrade Assistant twice, once each for schema upgrade and for config upgrade.
Note:
For a managed/collocated Oracle HTTP Server, if the WebLogic Server and OHS binaries are installed in the same Oracle Home, ensure that this directory is empty before you install the new binaries in the same directory.Note:
Oracle Fusion Middleware 12c (12.2.1.3) is the only supported starting point for a reduced downtime upgrade. You cannot perform a reduced downtime upgrade if you are upgrading from a supported Fusion Middleware 11g or 12c (12.2.1.2.0 or earlier) release, or if you do not have a multi-node environment. To perform a reduced downtime upgrade from 12c (12.1.3 or 12.2.1.2), you must first upgrade to 12.2.1.3 using the standard upgrade process. See Upgrading Oracle HTTP Server from a Previous 12c Release.Figure C-1 Process Flowchart for a Reduced Downtime Upgrade

Description of "Figure C-1 Process Flowchart for a Reduced Downtime Upgrade "
Table C-1 Tasks for Performing a Reduced Downtime Upgrade of Oracle Fusion Middleware 12c (12.2.1.3.0) Release
| Task | Description |
|---|---|
|
Required Before you begin a reduced downtime upgrade, you must complete the required pre-upgrade tasks. |
The pre-upgrade tasks include reviewing the pre-upgrade checklists; backing up the Oracle home, domain directory, and component schemas; and using the appropriate JDK version. For a complete list of the pre-upgrade tasks, see Required Tasks that Must be Completed Before You Begin. |
|
Required Create a complete backup of your existing environment, on all hosts. |
|
|
Required Stop the servers and processes on Host 1. |
Before starting the upgrade process, stop all the servers, components, and processes on Host 1. |
|
Required Uninstall the Fusion Middleware 12c (12.2.1.3.0) product distributions on Host 1. |
Uninstall the Fusion Middleware 12c
(12.2.1.3.0) product distributions from the exisiting
|
|
Required Install 12c (12.2.1.4.0) product distributions into the existing Oracle Home on Host 1. |
Install Oracle Fusion Middleware Insfrastructure
12c (12.2.1.4.0) by using the Oracle Universal
Installer. You must install 12c (12.2.1.4.0) product
distributions into the same |
|
Optional Run the Readiness Check. |
Running the Readiness Check by using the Upgrade Assistant helps you determine whether your pre-upgrade environment is ready for upgrade. |
|
Required If applicable to your product, perform the schema and config upgrade separately on Host 1, by using the Upgrade Assistant. |
Note: Schema and configuration upgrade is not applicable for upgrading Oracle HTTPS Server. |
|
Required Restart the servers and processes on Host 1. |
The upgrade process is complete. You can now restart the servers, components, and processes. See Restarting Node Manager, Administration Server, Managed Servers and Components on Host 1. |
|
Required Validate the upgrade on Host 1. |
After you complete the upgrade, perform the upgrade validation tasks. |
|
Required Stop the servers and processes on Host 2. |
Before starting the upgrade, you must stop the system components, managed servers and node manager on Host 2. See Stopping the Components, Servers and Processes on Host 2. |
|
Required Uninstall Fusion Middleware Insfrastructure 12 c (12.2.1.3.0) on Host 2. |
Uninstall Fusion Middleware Infrastructure
12c (12.2.1.3.0) from the exisiting
|
|
Required Install Fusion Middleware Insfrastructure 12c (12.2.1.4.0) and any other product distributions that you run in your domain on Host 2. |
See Installing the Software into the Existing Middleware Home |
|
Required Restart the servers and processes on Host 2. |
After the upgrade is complete, restart the servers and processes. |
|
Required Validate the upgrade on Host 2. |
After restarting the servers and processes, perform the upgrade validation tasks. |
- Performing a Reduced Downtime Upgrade
If you are upgrading from Fusion Middleware 12c (12.2.1.3) release, you can use this process to upgrade your multi-node domain without shutting down all of the servers at the same time.