1 Using ODI Studio
This chapter helps you to configure and use ODI Studio on Oracle Cloud Marketplace.
For detailed information on the terminologies associated with ODI Studio and their respective functions, see Terminology Information.
It contains the following sections:
1.1 Accessing ODI Studio
- Install a VNC viewer on your local computer.
Note:
In order to access the ODI instance using VNC, perform the following:
- Log in to the provisioned ODI instance on Oracle Cloud Marketplace using SSH as opc user:
ssh –i <private_key> opc@<<IP Address> - Execute the following firewall commands to open the VNC ports:
sudo firewall-cmd --permanent --new-service=odissh
sudo firewall-cmd --permanent --service=odissh --set-description="ODI SSH
server"
sudo firewall-cmd --permanent --service=odissh --add-port=5901-5905/tcp
sudo firewall-cmd --permanent --add-service=odissh
sudo firewall-cmd --reload
- Log in to the provisioned ODI instance on Oracle Cloud Marketplace using SSH as opc user:
- Use SSH to connect to the compute instance running the Oracle Data Integrator Image, as described in Connecting to ODI Compute Instance .
- On your local computer, connect to your instance and create a ssh tunnel for port 5901 (for display number 1):
$ ssh -L 5901:localhost:5901 –i id_rsa oracle@<IP Address> - On your local computer, for the VNC to work, add an Ingress rule as follows:
No 0.0.0.0/15 TCP All 5901 TCP traffic for ports: 5901 - On your local computer, start a VNC viewer and establish a VNC connection to
localhost:1. - Enter the VNC password that you had provided during the stack creation.
- For connecting multiple users, after the vncpasswd utility exits, start the VNC server by typing
vncserver. This will start a VNC server with display number 1 for the oracle user, and the VNC server starts automatically if your instance is rebooted. For examplevncserver@:2orvncserver@:3.
To launch the ODI instance,
- From the Applications menu, navigate to Programming -> ODI Studio
or
Double click the short icon for ODI Studio present in your Desktopor
Navigate to the location$MW_HOME/oracle/odi/studio/bin/odiin the VNC. -
Connect to the repository with already populated login credentials. The Login Name value varies based on the selected repository. For ADB repostiory, the Login Name is
ODI_ADW_REPOand for MySQL Embedded repository it isODISA_MYSQL. -
Post successful configuration, check if the newly created data server is available in the
Topology navigator -> Technologies -> Oracle.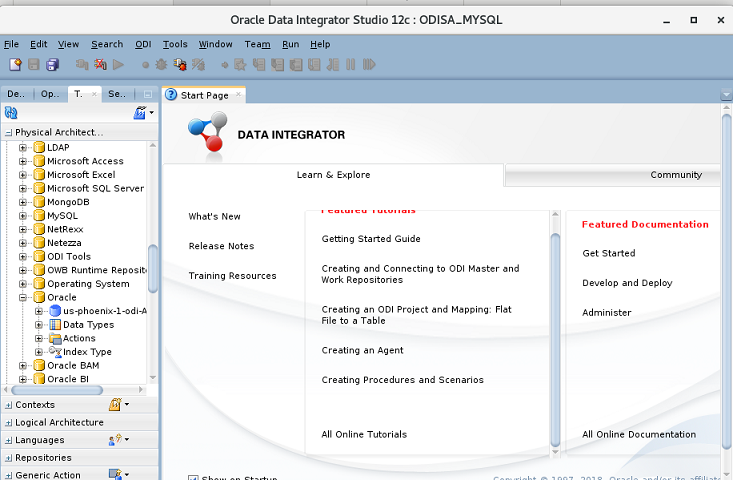
Description of the illustration data-server.pngFor more details on MySQL services, refer to Troubleshooting ODI on OCI
. -
In ODI studio, navigate to
Topology -> Physical Architecture -> Agent -> OracleDIAgent1and click Test, to check if the Standalone Agent is working. -
Depending on your network, you may need to provide proxy details for the database server JDBC connection.
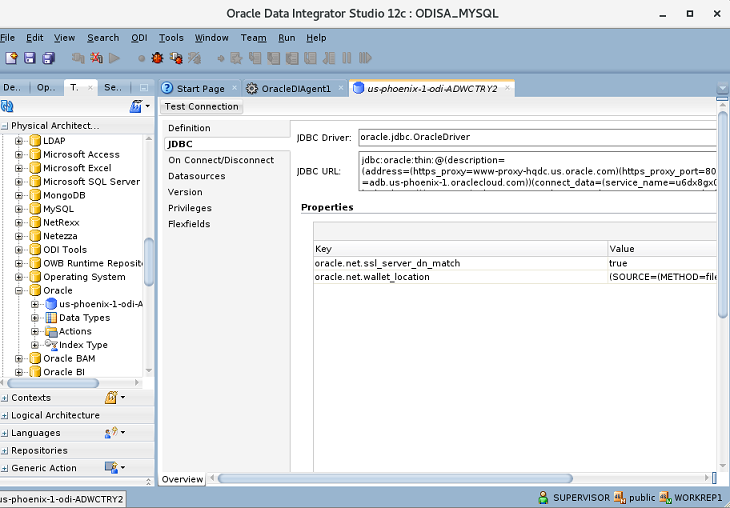
Description of the illustration jdbc_connection_url.png -
Click Test connection, to check if the created ADB Dataserver is working.
-
Depending on your network, you can setup a proxy for ODI. In ODI Studio, navigate to Tools, Preferences, Web Browser and Proxy, to setup a proxy for your network. Proxy may be required for accessing certain hosts, for example - Oracle Object Storage.
Note:
Depending on your OCI network configurations, you may or may not require access through proxy-hosts. While you are connecting through proxy, make sure that the proxy address/port or the source dataserver is allowed through OCI VCN configurations.Note:
If you are using a BI Cloud Connector Dataserver, you may need to add the BI Cloud Connector host to the Proxy Exclusion field.
1.2 Using Autonomous Databases in ODI
The newly created ODI repository will be pre-populated with Oracle Data Servers representing all accessible Autonomous Databases based on defined policies. If you aim to use any of these as a part of your ODI transformations, then you have to add the username and password to the Data Server properties in the Topology tab in ODI Studio.
If, at a later date, more Autonomous Databases become available to you, you can use the "Discover ADB's" feature available in Create New Dataserver on Oracle Technology of ODI Studio, to quickly setup the additional instances that were not available at the time when the instance was created. When you select the required ADB instance from displayed instance list, the wallet gets auto downloaded and once you provide the dataserver name, credentials and then select connection details/service profiles and save, the new Oracle Dataserver for the selected ADB instance is created.
To create an Autonomous (ADB) Dataserver in ODI repository,
- Connecting to the Pre-created ADB Dataservers in ODI Repository
- Using Dataserver Setup in ODI Studio
Connecting to the Pre-created ADB Dataservers in ODI Repository
Connect to the readily available or pre-created ADB dataservers in ODI studio. You have to add actual username and password by connecting to the dataserver, do a test connection and continue with your data integration project in ODI studio.
Note:
You need to provide the username and password for the created instance as prepopulated login credentials may not work.Using Dataserver Setup in ODI Studio
You can create additional ADB Dataservers using the Oracle technologies Dataserver setup in ODI Studio.
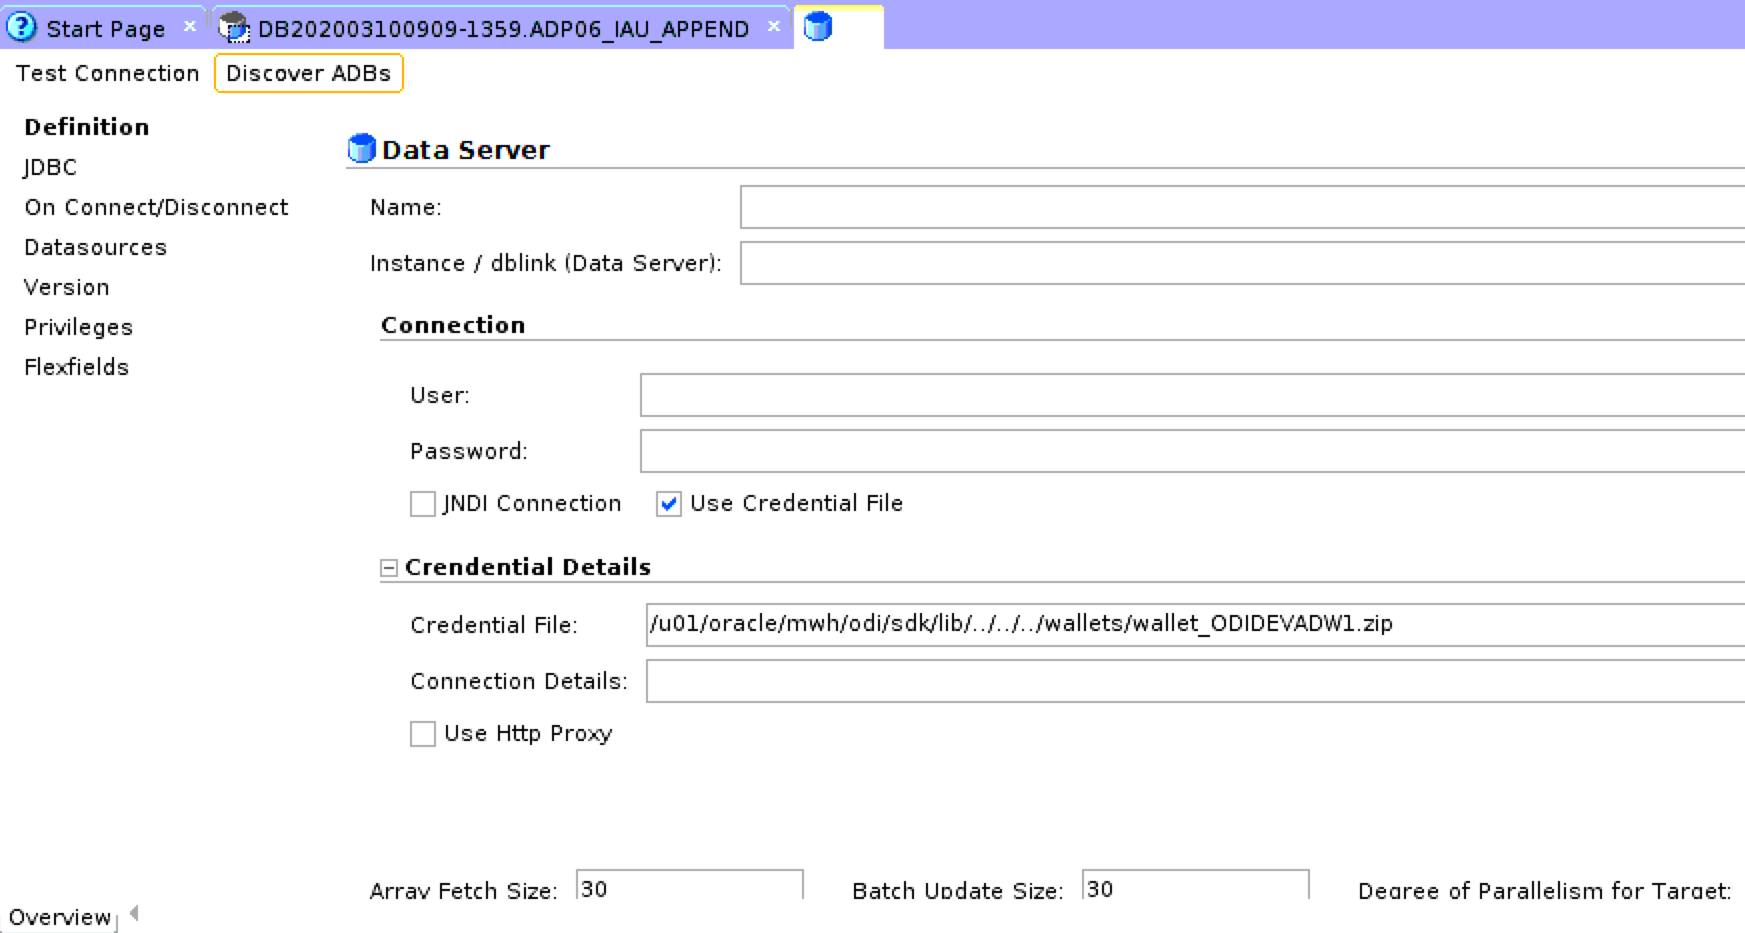
- In the Definition tab, click Discover ADBs. The list of available ADB instances are displayed.
- Select the required ADB instance from the Discover Autonomous
Databases drop-down list.
Upon selection, Use Credential File checkbox is auto-selected in the connection node.
In the Credential Details node, Credential File text box is auto-populated with the respective mapped credential file. - In the Data Server node,
- Name: Enter the name of the newly created data server.
- Instance/dblink(Data Server): TNS Alias used for this Oracle instance. It will be used to identify the Oracle instance when using database links and SQL*Loader.
- In the Connection node,
- User/Password: Oracle user (with its password), having select privileges on the source schemas, select/insert privileges on the target schemas and select/insert/object creation privileges on the work schemas that will be indicated in the Oracle physical schemas created under this data server.
- JNDI Connection: Select this check-box to configure the JNDI connection settings. Navigate to the JNDI tab, and fill in the required fields.
- In the Credentials Details node,
- Connection Details - Click the Connection Details drop down arrow to choose the required connection URL from the list of available connection URLs retrieved from tnsnames.ora.
- Click Test Connection.
Upon successful test connection, the new Dataserver gets created in the ODI repository.
1.3 Working with ODI Instance
This chapter guides you to connect and work with the ODI instance.
It contains the following sections:
1.3.1 Configuring Data Sources and Targets
The physical components that store and expose structured data in Oracle Data Integrator (ODI) are defined as data servers. Each data server is always linked to a single technology. It stores information according to a specific technical logic, which is declared in the physical schemas attached to it.
For example -

Description of the illustration topology.png
For more information, refer to Overview of Oracle Data Integrator Topology chapter in Developing Integration Projects with Oracle Data Integrator guide.
1.3.2 Reverse Engineering Data Models
To automatically populate datastores into the model, you reverse-engineer the model. A standard reverse-engineering uses the capacities of the JDBC driver used to connect the data server to retrieve the model metadata. A customized reverse-engineering uses a reverse-engineering Knowledge Module (RKM), to retrieve metadata for a specific type of technology and create the corresponding datastore definition in the data model.
For example -
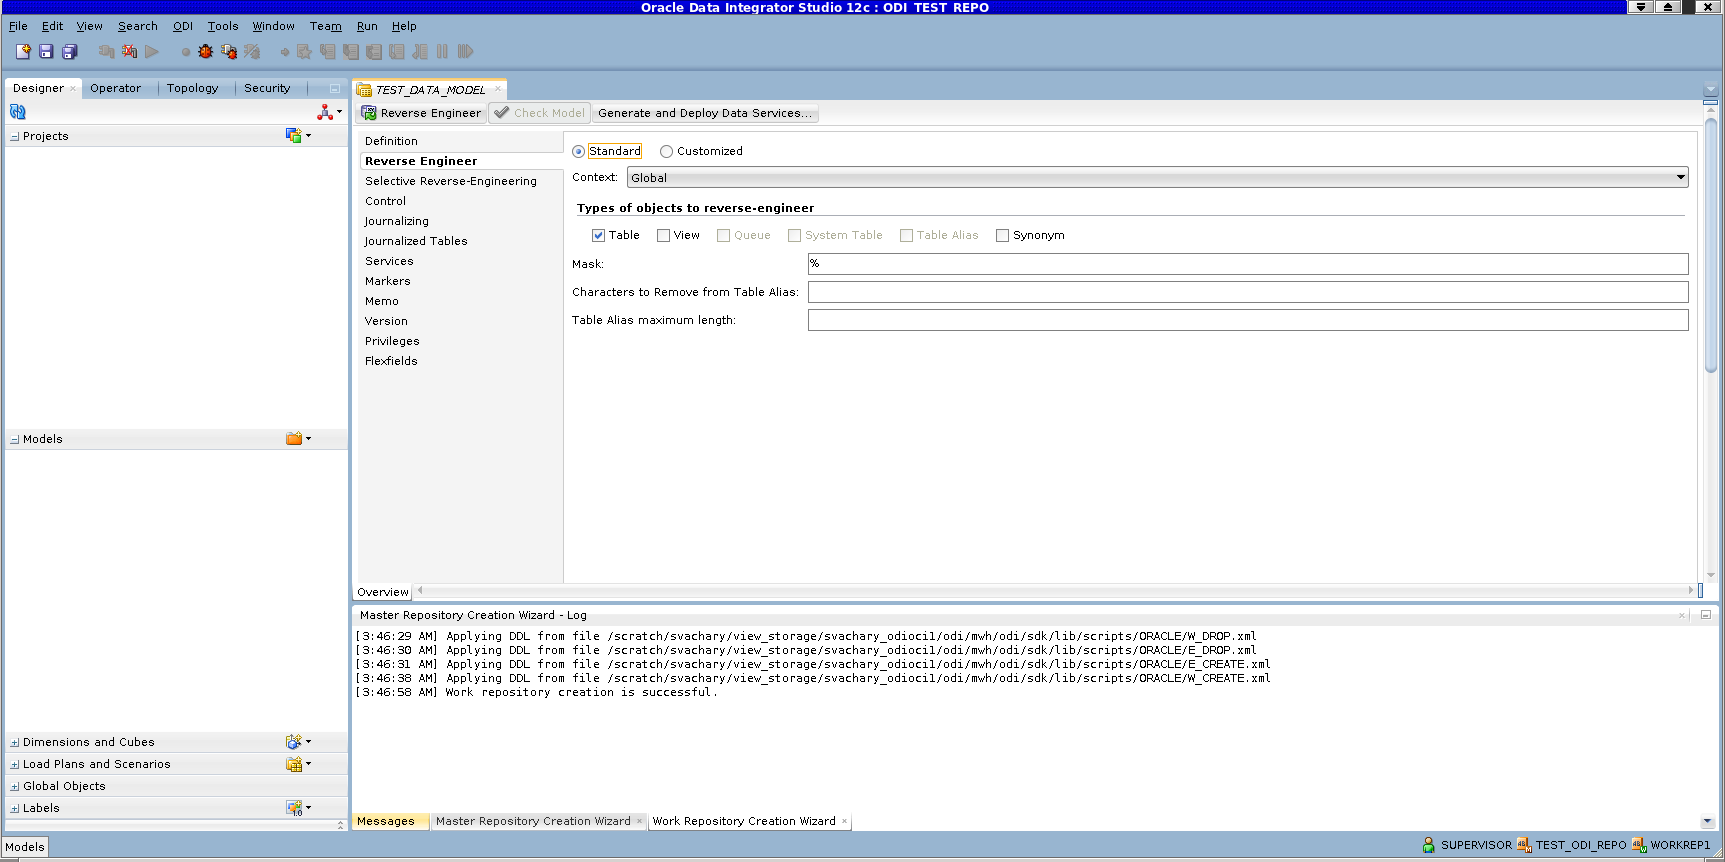
Description of the illustration reverse-engineer.png
For more information, refer to Creating and Reverse-Engineering a Model chapter in Developing Integration Projects with Oracle Data Integrator guide.
1.3.3 Creating Mappings
Mappings in Oracle Data Integrator (ODI) are the logical and physical organization of your data sources, targets, and the transformations through which the data flows from source to target. Mappings are made up of several parts, datastores, datasets, re-usable mappings, connectors, knowledge modules, variables, sequences, user functions, and other components. Optionally, you can specify a staging schema. You create and manage mappings using the mapping editor, which opens whenever you open a mapping. Mappings are organized in folders under individual projects, found under Projects in the Designer Navigator.
For example -
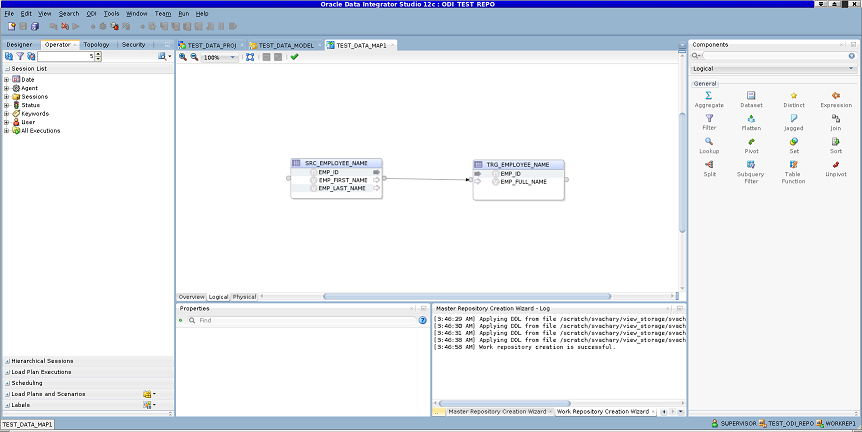
Description of the illustration mappings.png
For more information, refer to Creating and Using Mappings in Developing Integration Projects with Oracle Data Integrator guide.
1.3.4 Monitoring ODI Executions
Monitoring your development executions consists of viewing the execution results and managing the development executions when the executions are successful or in error. Through Operator Navigator, you can view your execution results and manage your development executions in the sessions, as well as the Scenarios and Load Plans in production. Operator navigator stores this information in a work repository, while using the topology defined in the master repository.
For example -
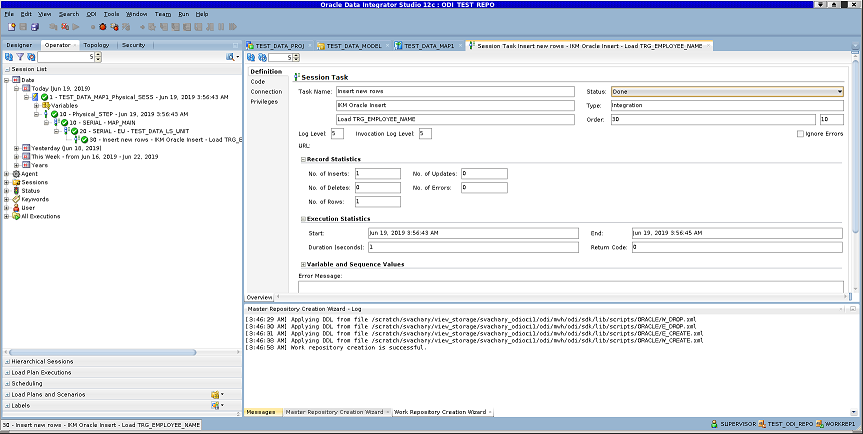
Description of the illustration monitoring-odi.png
For more information, refer to Monitoring Integration Processes chapter in Administering Oracle Data Integrator guide.
