4 Configuring the Plug-In for Microsoft IIS Web Server
To install and configure the Oracle WebLogic Server Proxy Plug-In for Microsoft IIS Web Server, download the Oracle WebLogic Server Proxy Plug-In for IIS Web Server, as described in Availability of Oracle WebLogic Server Proxy Plug-In. The zip file contains the following files:
Table 4-1 Files Included in the Microsoft IIS Plug-In Zip
| (path)/filename | Description |
|---|---|
|
README.txt |
Information specific to the distribution, late-breaking updates, and other errata. |
|
bin/orapki.bat |
orapki tool for configuring Oracle wallets |
|
jlib/*.jar |
orapki helper Java libraries |
|
iisproxy.dll |
WebLogic proxy module |
|
lib/*.dll |
Helper libraries |
WebLogic Server Proxy Plug-in 12.2.1.0.0 and later version builds are moved from Intel compiler to MSVC Compiler. When Microsoft IIS Web Server is used as a front end with WebLogic Server Proxy Plug-in, the plug-in library depends on the two dlls — msvcp110.dll and msvcr110.dll, provided by Microsoft. These dlls are available with Microsoft Visual C ++ 2012 Redistributable Package for x64.
For information about the specific versions of Microsoft IIS Web Server that are supported, see the Oracle Fusion Middleware Supported System Configurations page on the Oracle Technology Network.
Installing and Configuring the Plug-In for Microsoft Internet Information Server
Microsoft Internet Information Server (IIS) plug-in is supported on Microsoft Windows client and Microsoft Windows server OS.
Refer to the following topics based on your use case:
Installing and Configuring the Plug-In for Microsoft IIS on Windows Client OS
Follow these steps to install and configure the Plug-In for Microsoft Internet Information Server (IIS) on Windows client OS:
-
Install Microsoft IIS.
-
Ensure that all of the necessary features of Microsoft IIS are enabled.
-
In the Start menu, select Control Panel, and then select Programs and Features.
-
Select Internet Information Services (IIS) Manager.
-
Click Turn Windows features on or off.
-
Expand the entire tree beneath Internet Information Services and ensure all of the sub-features are selected.
Figure 4-1 Windows Features for Internet Information Services
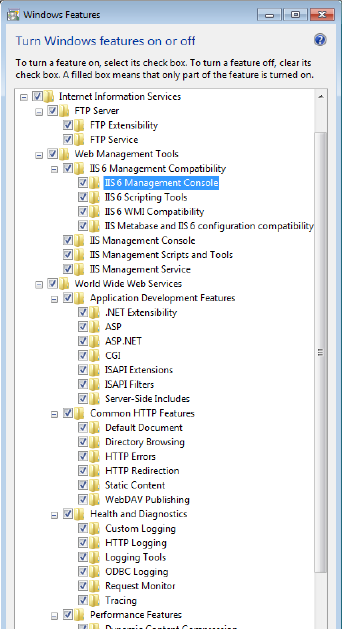
Description of "Figure 4-1 Windows Features for Internet Information Services"
-
-
Download and install the latest Oracle WebLogic Server Proxy Plug-In zip file.
-
Create an
iisproxy.inifile with the following content in the%PLUGIN_HOME%\lib\folder:WebLogicHost=
URL_of_WebLogic_HostWebLogicPort=WebLogic_PortDebug=ALL DebugConfigInfo=ON WLLogFile=C:\Temp\wl-proxy.log -
Ensure that the
%PLUGIN_HOME%\libfolder is included in the systemPATH. (Select Control Panel, select System select System Properties, select Environment Variables, select System Properties, and then select PATH. -
Open IIS Manager. Select Start, select All Programs, select Administrative Tools, and then select Internet Information Services Manager.
-
Create a new Web Site in IIS. See the IIS Help system for more information.
-
Click the site name, open Handler Mappings and add a script map (set the Request Path to a value such as
.jsp, set Executable to%PLUGIN_HOME%\lib\iisproxy.dll, and assign a value to Name). -
Click MIME Types and ensure a MIME type has been defined for the extension. Add the MIME type and its definition if it is not present.
-
Click the site name, open Directory browsing and enable the feature.
-
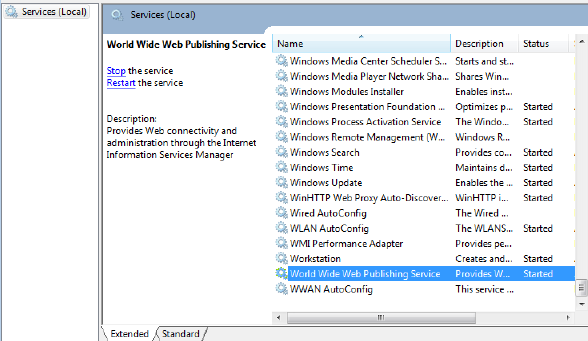
Start IIS. Enter
services.mscat the command prompt and go to "World Wide Web Publishing Services" at the bottom and restart it. Also restart the web site. -
Test your configuration by sending a request to
http://iishost:iisport/application_name/from the browser and validate the response.Here,
iishostis the URL of the IIS server andiisportis the port number. Note that theiisportnumber should be different from the port number of the WebLogic Server.
Serving Static Files with IIS
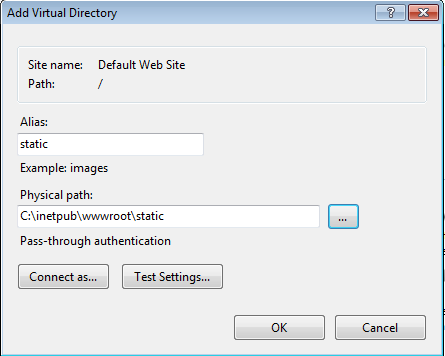
After configuring the WLS plug-in and confirming it works (see Installing and Configuring the Plug-In for Microsoft Internet Information Server) complete the following steps to serve static files:
Serving Static Files and Dynamic Content From the Same Request with IIS
Suppose you want to serve the static files such as *.gif , *.png images for the request http://localhost:80/console from the IIS and other dynamic content from the backend WebLogic Server. Follow these steps in addition to Serving Static Files with IIS.
-
Complete the steps described in the Serving Static Files with IIS.
-
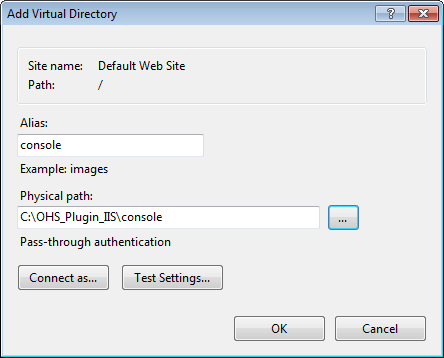
Right-click the Default web site, then click Add Virtual Directory, and then enter the following in the Add Virtual Directory dialog box.
-
Alias—
console -
Physical Path—
C:\path_to_the_wls_plug-in\console
In this example, the physical path to the console is
C:\OHS_Plugin_IIS\console.Click OK. You will see a
consoleentry in the left pane under the Default Web Site. -
-
Click console under Default Web Site. A console Home opens on the right side.
-
Click Handler Mappings on the console Home pane.
-
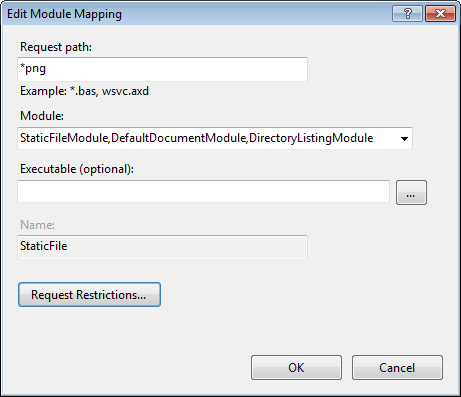
Right-click StaticFile and select Edit. Update the fields as follows in the Edit Module Mapping dialog box:
-
Request Path—*.png (that is, change "*" to "*.png")
-
Module— StaticFileModule, DefaultDocumentModule, DirectoryListingModule (should be the default)
-
Executable—not required. Leave it blank.
-
Name—StaticFile (it is not possible to change Name here)
-
-
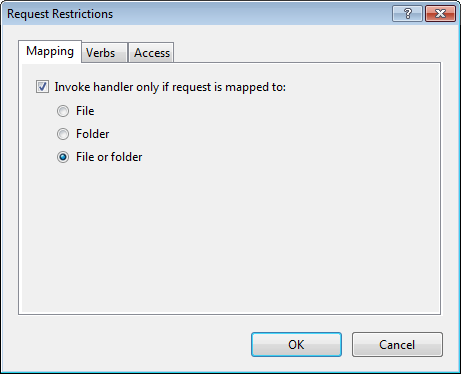
Click Request Restrictions. In the Mapping tab of the Request Restrictions dialog box, ensure that Invoke Handler only if the request is mapped to is selected, then select File or Folder. Click OK and OK to dismiss the dialog boxes.
The above step is to serve the *.png from the IIS server.
-
To serve other image files, such as *.gif files, do the following.
-
Under "Console Home" click "Handler Mappings", then click on "Add Module Mapping" on the right side and then enter the following.
Request Path—*.gif
Module—StaticFileModule, DefaultDocumentModule, DirectoryListingModule
Executable—not required. Keep it blank
Name—StaticFileForGIF
-
Click "Request Restrictions". Under "Mapping" make sure the "Invoke Handler only if the request is mapped to" is selected and then select the "File or Folder" and then click "OK" and "OK"
-
-
Arrange the order of the handlers.
-
Click on "console" under "Default web site" and then click on "Handler Mappings" and then "View Ordered List" on the right side
-
Select "proxy" and move it down till the "proxy" is below the "StaticFile" and "StaticFileForGIF. That is, the order should be like below.
StaticFile
StaticFileForGIF
proxy
-
-
Copy all of the static files that belong to
http://loclhost:<iis-port>/consolerequest from WebLogic Server to IIS. -
Restart the service, then restart the web site.
The images (*.png and *.gif) are now served by IIS and dynamic content by Weblogic server.
For example, for the request http://localhost:80/console the images for console are served by the IIS and all other requests other than *.png and *.gif are served by Weblogic Server.
Using Wildcard Application Mappings to Proxy by Path
You can configure a website or virtual directory to run an Internet Server API (ISAPI) application at the beginning of every request to that website or virtual directory, regardless of the extension of the requested file. You can use this feature to insert a mapping to iisproxy.dll and thereby proxy requests by path to WebLogic Server.
Adding a Wildcard Script Map for IIS
The following steps summarize the instructions available at "Add a Wildcard Script Map" for IIS (http://technet.microsoft.com/en-us/library/cc754606(WS.10).aspx) to add a wildcard script map to do proxy-by-path with ISAPI in IIS:
Note:
If you are proxying a request to multiple IIS applications within the same IIS site, to prevent the subsequent request from proxying to the first website only, create each IIS application and assign a unique application pool to each IIS application.
With IIS 7.x, you cannot assign application pools to virtual directories.
Proxying Requests from Multiple Virtual Web Sites to Different WebLogic Servers
A virtual directory is a directory name (also referred to as path) that you specify in IIS and map to a physical directory on a local or remote server. Virtual directory name becomes a part of URI. Different URI can be mapped to different WebLogic back end server by providing back server details in iisproxy.ini file.
To proxy requests from multiple websites (defined as virtual directories in IIS) to different WebLogic Servers, do the following:
Note:
You need one Virtual Directory for each context root, for example,/console, /ShoppingCart, /forms, /reports, /ords, and /i. IIS filters the request by the alias of the Virtual Directory.
Sample iisproxy.ini File
The following sample iisproxy.ini file can be used with a single, non-clustered WebLogic Server. Comment lines are denoted with the "#" character.
# This file contains initialization name/value pairs
# for the IIS/WebLogic plug-in.
WebLogicHost=localhost
WebLogicPort=7001
ConnectTimeoutSecs=20
ConnectRetrySecs=2
The following sample iisproxy.ini file can be used with clustered WebLogic Servers. Comment lines are denoted with the "#" character.
# This file contains initialization name/value pairs
# for the IIS/WebLogic plug-in.
WebLogicCluster=myweblogic.com:7001,yourweblogic.com:7001
ConnectTimeoutSecs=20
ConnectRetrySecs=2
Note:
If you are using SSL between the plug-in and WebLogic Server, the port number should be defined as the SSL listen port.
