Create pipelines

Learn to create a data replication process using pipelines and recipes.

About pipelines

A pipeline is an instance of a recipe. It enables you to select your source connection, the type of replication action(s) to apply, and the target connection. After a pipeline starts, you can observe the replication process in real time.

If you're familiar with Oracle GoldenGate Extract and Replicats, then pipelines are an abstraction of the Oracle GoldenGate replication process. When you start a pipeline, GoldenGate Free:
  • Prepares the database objects for extraction
  • Creates a Heartbeat Table
  • Creates and runs the Extract process
  • Performs an Initial Load using Oracle Data Pump
  • Creates the Checkpoint Table
  • Creates and runs the Replicat process

These steps can be observed during the pipeline's Initialization phase on the Pipeline Details page.

You can view pipelines on the Home page, as well as the Pipelines page. Before you create a pipeline, ensure that you have source and target connections created.

Create a pipeline

Learn to create a pipeline by following a recipe.

Watch this short video to learn how to create a pipeline.

Tip:

Ensure that you have a source and target connection before creating a pipeline.
To create a pipeline:
  1. From the GoldenGate Free Home page, click Create pipeline.

    You can also select Pipelines from the navigation menu, and then click Create pipeline on the Pipelines page.

  2. The Create Pipeline process consists of three pages. On the Recipe page, select a recipe, and then click Next.
  3. On the Overview page, enter a Name for the pipeline, and optionally, a Description, and then click Next.
  4. On the Connections page, select your source and target connections from their respective dropdowns, and then click Save & configure.
After your pipeline is created, you're brought to the Pipeline Configuration screen. Learn how to configure a pipeline.

Configure a pipeline

After you create a pipeline, you're brought to its Configuration screen. If you're revisiting a pipeline after you created it, you can select the pipeline from the Pipelines page to view its details, and then click Configuration to return to the Configuration screen.
You must have a pipeline created before you can configure it.
To configure a pipeline:
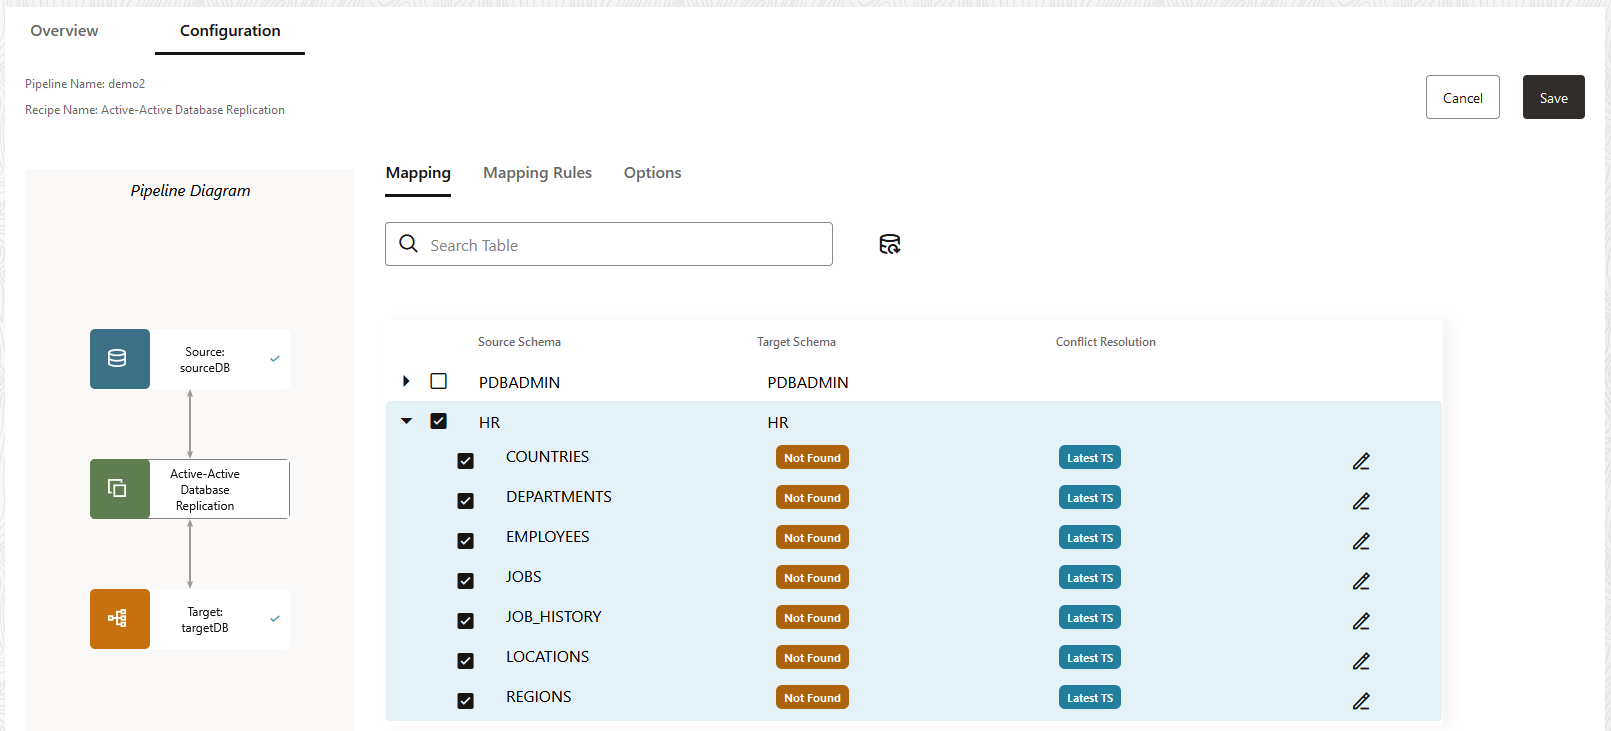
  1. Under Mapping, you can review and select the source database schemas and tables to replicate.
    Description of pipeline-mapping-23c.png follows
    Description of the illustration pipeline-mapping-23c.png

    Note:

    In One-way database replication, target schemas and tables show only when they exist in the target, otherwise they show as Not found.

    You can:

    • Click Edit (pencil icon) to rename a target schema or table. This redirects the replication to the renamed schemas and tables.
    • Include a schema and all its tables. This also ensures that any tables added to the schema in the future are also implicitly included and replicated.
    • Include a schema but not all its tables. Tables not included will not be replicated, however, future tables added to the schema are implicitly included and replicated to the target.
    • Exclude the schema but include its tables. Any tables added to the schema in the future are not included.
    • Exclude an entire schema and all its tables.
    As you select or deselect source schemas and tables, or edit target schemas or tables, rules are added to Mapping Rules.

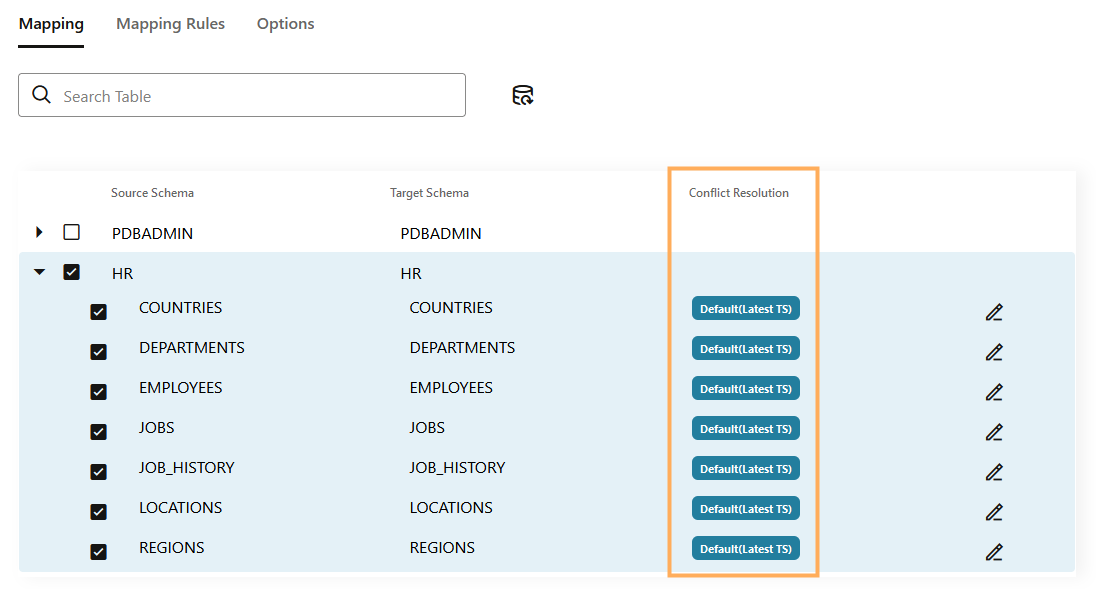
    For Active-Active replications, a Conflict Resolution column appears in the Mapping screen.

    Description of active-active-mapping.png follows
    Description of the illustration active-active-mapping.png

    To configure Automatic Conflict Detection and Resolution (ACDR):

    1. Click Edit next to the schema for whom you want to configure ACDR.
    2. In the Edit table mapping panel, select Automatic Conflict Detection and Resolution.
    3. For Timestamp, select whether the Latest change or Earliest change takes precedence.
    4. Select Delta Resolution if the changes made must be combined to resolve the conflict, and then select the columns to use. For example, updates made to product inventory.
    5. Click Apply.

    WARNING:

    GoldenGate Free doesn't support the addition of new tables, nor the change of ACDR type, after the active-active pipeline starts. Unless absolutely necessary, you can either:
    • Create, configure, and start a new pipeline with the new tables added.
    • In the GoldenGate Free console:
      1. Stop the pipeline.
      2. Create a new table externally, such as sqlplus or sqldeveloper.
      3. Under Mapping, expand the schema and select new tables.
      4. Under Options, in Advanced Options and under Replicat, select DISCARD for Actions upon DML Error.
      5. Save the pipeline configuration and then restart the pipeline.

    ACDR isn't automatically enabled for tables without keys.

    Learn more about Automatic Conflict Detection and Resolution.

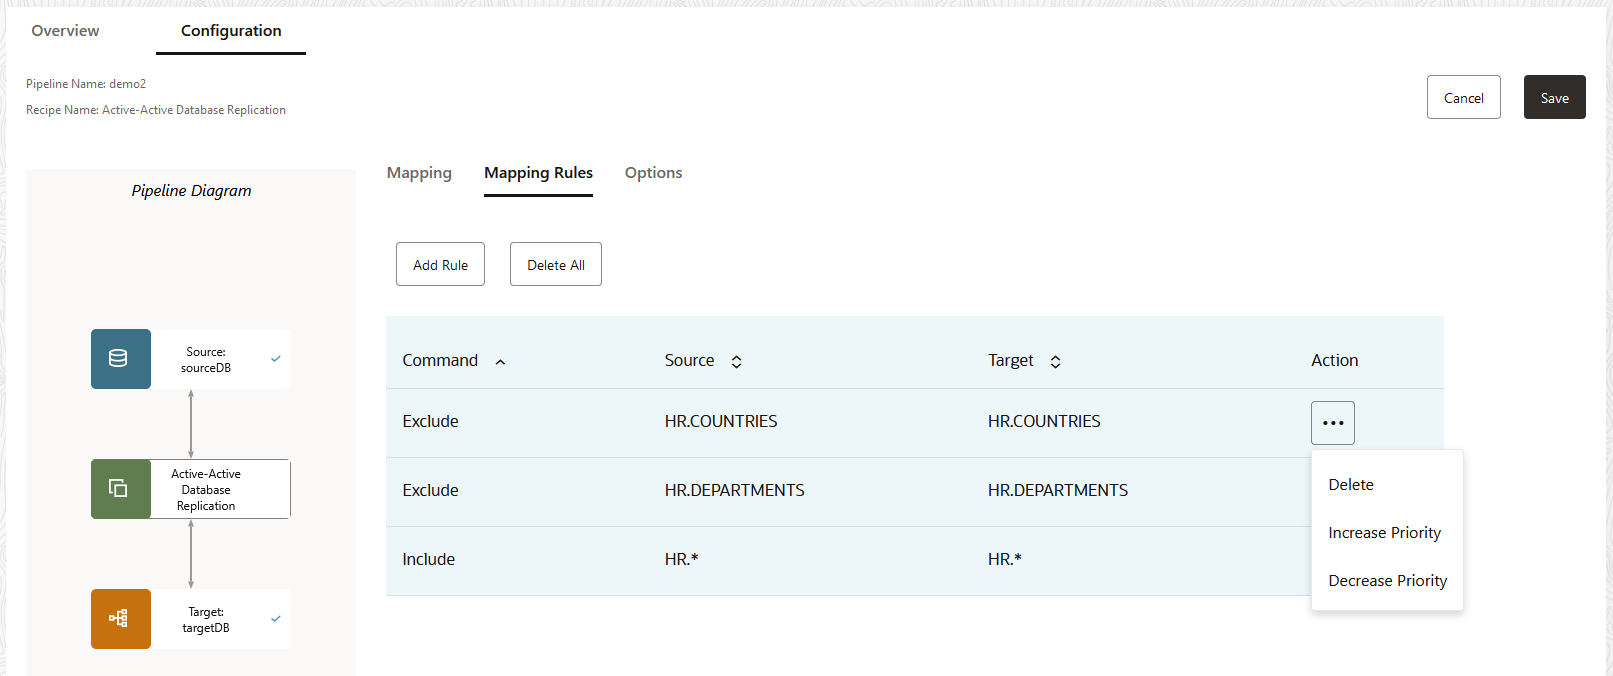
  2. Under Mapping Rules, you can review, add, delete, and reorder rules.
    Description of pipeline-mapping-rules-23c.png follows
    Description of the illustration pipeline-mapping-rules-23c.png

    Keep in mind:

    • Exclude rules take precedence over Include rules.
    • To delete a rule, click Actions (ellipsis icon) and select Delete.
    • To reorder a rule, click Actions (ellipsis icon) and then select either Increase priority or Decrease priority.
    • To add a new rule, click Add rule. You can use the following special characters when constructing rules:
      • Asterisk (*) as a wildcard for any number of characters
      • Underscore (_)
      • Space ( )
      • Double quotes (") to enclose schema or table names that include spaces or when case sensitivity is required.
    • Individual rules take precedence over group rules.
    • Delete all removes all rules in the list.
  3. Under Options, you can configure a limited set of GoldenGate parameters:
    • Initial Load of existing schemas and/or tables
    • Replicate Data Definition Language (DDL)
    • Advanced options for Initial Load (Data Pump), Extract, or Replicat

      Note:

      Refrain from making changes to the underlying parameter file as it affects the ability to manage the pipeline in GoldenGate Free. Likewise, if using the Oracle GoldenGate console, refrain from changing the Replicat type.
  4. Click Save to save your configuration settings.
  5. After configuring your pipeline, click Start to run it.
    You can review the initialization procedure, the status and progress of each step in the replication process, and how much time it takes for each step to complete.
  6. After the initialization completes, you're brought to the Runtime view where you can observe data capture operations on the source database replicated to the target.
The pipeline runs continually until it's stopped.

Next steps

After your pipeline is created, configured, and running, learn to manage pipelines.