2 Using the Interface
Topics:
2.1 Understanding the User Interface Basics
Oracle GoldenGate provides a highly optimized user interface for easy creation, modification, and deployment of Oracle GoldenGate replication solutions.
There are two visible sections that appear when Oracle GoldenGate Studio is started. The Projects Navigator is visible on the left and the Start Page is visible on the right.
Screens shown in this guide may differ from your implementation, depending on the skin and icons used. Any differences are cosmetic.
Figure 2-1 Oracle GoldenGate Studio Main Window
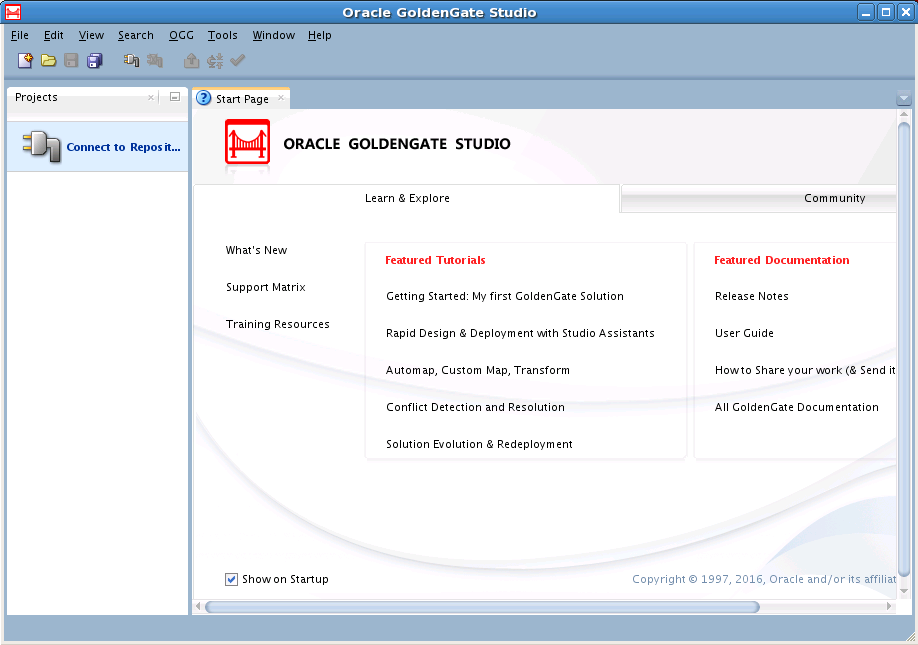
The interface includes the tabbed editor area with a selection of other windows. The primary windows that are used with the editor area when you design and deploy Oracle GoldenGate replication solutions are:
-
Projects Navigator
-
Resources Navigator
-
Properties Inspector
-
Components Window
-
Log Messages Window
-
Security Navigator
You can also use the Tab key to change focus within a component and the keyboard shortcut Ctrl+Tab to change focus between different components.
2.1.1 Oracle GoldenGate Studio Repository Login
Use the Oracle GoldenGate Studio Repository login to connect to Oracle GoldenGate Studio. The required connection details are:
Studio Connection
-
LoginName: Oracle GoldenGate Studio login name defined in the repository.
-
User: Oracle GoldenGate Studio user name.
-
Password: Oracle GoldenGate Studio user password.
Database Connection
-
User: The name of the repository.
-
Password: The password for the repository.
-
Driver List: The name of the selected driver.
-
Driver Name: Name of the login defined to the repository.
-
URL: For Oracle database, this is the URL of the driver. For MySQL database, this is the repository name which is same as User.
For example, if the User is
TEST_REPO, the URL should also beTEST_REPO.
You can click New to create a new Oracle GoldenGate Studio login. You save your first repository connection definition by using a secure wallet. The secure wallet is password protected, see Deleting a Secure Wallet.
Click Edit to modify the existing Oracle GoldenGate Studio login with the Repository Connection Information Editor.
Click Copy to copy a current login definition.
Click Delete to delete an existing Oracle GoldenGate Studio login.
For more information on repository database tables, see description of repository tables.
Note:
-
To improve performance, the repository database needs to be in the same LAN as the machine using Oracle GoldenGate Studio.
-
Oracle GoldenGate Studio supports Oracle and MySQL database for repository.
-
To create the repository with MySQL 5.7 database, use the following command:
set @@global.show_compatibility_56=ON;
Privileges Required to Create Repository
The following privileges are required for create the repository:
grant dba to oggstd;
GRANT EXECUTE ON DBMS_LOB TO oggstd with grant option;
GRANT EXECUTE ON DBMS_OUTPUT TO oggstd with grant option;
GRANT EXECUTE ON DBMS_STATS TO oggstd with grant option;
grant execute on sys.dbms_aq to oggstd with grant option;
grant execute on sys.dbms_aqadm to oggstd with grant option;
grant execute on sys.dbms_aqin to oggstd with grant option;
grant execute on sys.dbms_aqjms to oggstd with grant option;
grant execute on sys.dbms_aqadm to oggstd with grant option;
grant execute on sys.dbms_aq to oggstd with grant option;
grant execute on utl_file to oggstd with grant option;
grant execute on dbms_lock to oggstd with grant option;
grant select on sys.V_$INSTANCE to oggstd with grant option;
grant select on sys.GV_$INSTANCE to oggstd with grant option;
grant select on sys.V_$SESSION to oggstd with grant option;
grant select on sys.GV_$SESSION to oggstd with grant option;
grant select on dba_scheduler_jobs to oggstd with grant option;
grant select on dba_scheduler_job_run_details to oggstd with grant option;
grant select on dba_scheduler_running_jobs to oggstd with grant option;
grant select on dba_aq_agents to oggstd with grant option;
grant execute on sys.DBMS_SHARED_POOL to oggstd with grant option;
grant select on dba_2pc_pending to oggstd with grant option;
grant select on dba_pending_transactions to oggstd with grant option;
grant execute on DBMS_FLASHBACK to oggstd with grant option;
grant execute on dbms_crypto to oggstd with grant option;
GRANT EXECUTE ON DBMS_REPUTIL TO oggstd WITH GRANT OPTION;
GRANT execute on dbms_job to oggstd with grant option;
grant select on pending_trans$ to oggstd with grant option;
grant select on dba_scheduler_job_classes to oggstd with grant option;
GRANT SELECT ON SYS.DBA_DATA_FILES TO oggstd WITH GRANT OPTION;
GRANT SELECT ON SYS.V_$ASM_DISKGROUP TO oggstd WITH GRANT OPTION;
2.1.2 Menu Options
The menu options available in Oracle GoldenGate Studio are as follows:
2.1.2.1 The File Menu
Use this menu for file related activities, such as:
| Menu option | Description |
|---|---|
|
New: |
Use to create a new project, solution, deployment profile, mapping group, data server connection, Oracle GoldenGate instance connection, and global mapping group. |
|
Open: |
Use to open a file. |
|
Close: |
Use to close the current editor tab. |
|
Close All |
Use to close all the open editor tabs. |
|
Delete: |
Use to delete the currently selected object. If nothing is selected, this is grayed out. |
|
Save: |
Use to save any changes done in the current editor tab. |
|
Save All: |
Use to save the changes in all open editor tabs. |
|
Page Setup, Print, Print Preview, Print Area: |
Use to set up the print options. |
|
Exit: |
Use to quit Oracle GoldenGate Studio. |
2.1.2.2 The Edit Menu
Use the Edit menu for editing locally generated parameter and obey files. Any edits to these files not retained in the repository and are overwritten the next time the files are generated. Functions include:
| Menu Option | Description |
|---|---|
|
Cut: |
Use to cut the selected item. |
|
Copy: |
Use to copy the selected item. |
|
Paste: |
Use to paste the selected item. |
|
Delete: |
Use to delete the selected item. |
|
Duplicate Selection: |
This is grayed out. |
|
Multi-Cursor: |
Use to enable the multi-cursor functionality. This menu is available when a text file is opened in the editor. |
|
Select All: |
Use to select the available on-screen items. |
|
Block Selection: |
Use to select a text block. This menu is available when a text file is opened in the editor. |
|
Properties: |
Use to open the Properties Inspector for an item. |
2.1.2.3 The View Menu
Use the View menu for viewing the toolbar, the status bar, and the related viewing areas. Functions include:
| Menu Option | Description |
|---|---|
|
Editor: |
Use to display the options available for editor. |
|
Show Toolbars: |
Use to view different toolbars such as Main, Code Editor, Properties, and Structure. |
|
Show Status Bar: |
Use to display the status bar. |
|
Refresh: |
Use to refresh the viewing area. If you refresh the editor tab, a dialog box displays to confirm if you wish to revert back to the last saved copy. You can use this method as an alternative to the undo operation. |
|
Full Screen: |
Use to display the product in full screen mode. |
|
Show Only Editor: |
Use to display only the editor area. |
2.1.2.4 The Search Menu
Use the Search menu to find individual items in Oracle GoldenGate Studio. The available options are:
| Menu Option | Description |
|---|---|
|
Find: |
Use to find a particular item. |
|
Find Next: |
Use to find the next instance of a particular item. |
|
Find previous: |
Use to find the previous instance of a particular item. |
2.1.2.5 The Diagram Menu
Use the Diagram menu to view and optimize the diagrams. This menu is visible only when the Solution Editor or the Deployment Profile editor is selected. The options include:
| Menu Option | Description |
|---|---|
|
Upload GoldenGate Files...: |
Use to upload the Oracle GoldenGate files. The specified location must exist to complete this operation. |
|
Generate GoldenGate Files...: |
Use to generate the Oracle GoldenGate files. The specified location must exist to complete this operation. |
|
Deploy: |
Use to deploy the solution. The status of the deployment action is displayed in the messages log. Online deployment is possible at a solution level, Oracle GoldenGate instance level, host level, and processes level. This option is enabled only when an Oracle GoldenGate instance is associated with an actual Oracle GoldenGate instance resource. |
|
Validate Deployment Profile: |
Use to validate the deployment profile. The validation checks if any database specific options were incorrectly used. For example, if you indicate in the Oracle GoldenGate connection that the database is Oracle but try to deploy to SQL Server, the validation connects to the Oracle GoldenGate instance and a warning is displayed in messages log, if any Oracle specific options like integrated capture were used. |
|
Synchronize Profile with solution: |
Use to synchronize the deployment profile with a solution. This option is enabled only when the profile is not synchronized with the solution. |
|
Start: |
Use to start the selected process |
|
Start...: |
Use to start the selected process with additional options. |
|
Stop: |
Use to stop the selected process. |
|
Kill: |
Use to terminate the selected process. |
|
Alter Command: |
Use the Alter command to display either the Use the Alter Extract dialog box to:
Use the Alter Replicat dialog box to change the attributes of a Replicat group that was created with the
|
|
Optimize Graphic Size: |
Use to set the optimal size of the graphic element. |
|
Bring to Front: |
Use to bring the selected graphic to the top layer. |
|
Send to Back: |
Use to send the selected graphic to the bottom layer |
|
Zoom: |
Use to select the selected graphic to the required zoom level. You can select a defined zoom level, zoom in, zoom out, fit window, or zoom to a selected level. |
2.1.2.6 The OGG Menu
Use the Oracle GoldenGate (OGG) menu includes the following options:
| Menu Option | Description |
|---|---|
|
Connect: |
Use to connect to the repository. |
|
Disconnect: |
Use to disconnect from the repository. |
|
Repository Information: |
Use to display detailed information about the Studio connection and Database connection. The Studio connection includes the Studio Login Name and password that was defined while creating the repository. One account can have the |
|
Change Current User’s Password: |
Use to change the password for the current user. User have to type both, the existing and the new password. |
|
Solution: |
Use to synchronize all profiles for a solution. |
|
Deployment: |
Use for online deployment, generate the Oracle GoldenGate parameter and obey files for offline deployment, and to validate the deployment profile. |
2.1.2.7 The Tools Menu
The Tools menu includes the following option:
-
Preferences: Use to set the preferences. See Setting Your Preferences section for more information.
2.1.2.8 The Window Menu
Use the window menu to display different window within the editor. The available options are:
| Menu Option | Description |
|---|---|
|
Projects Navigator: |
Use to display the Projects Navigator window. You can view all the available projects, solutions, deployment profiles, and mapping groups. |
|
Security Navigator: |
Use to display the Security Navigator window. This is greyed out for a non supervisor user. |
|
Components: |
Use to display the Components window. Components are only displayed when the Solution diagram editor is selected. |
|
Extension Diagnostics |
Use to display the extension logs. |
|
Log: |
Use to display the Log Messages Explorer. |
|
Properties: |
Use to display the Properties Navigator window. |
|
Resources: |
Use to display the Resources Navigator window. The main components are Global Mappings, OGG Instances, and Database Connections. |
|
Structure: |
Use to view the structural representation of data of the selected profile. The Structure window is enabled only when the Solution and Deployment Profile diagrams are selected. |
|
Thumbnail: |
Use to display a representation of the current diagram for quick navigation to a specific element on the diagram. |
|
Configure Window |
This menu item consists of a list of sub menu items to set the window behavior such as minimize, maximize, float and so on. |
|
Reset Windows To Factory Settings: |
Use to reset all windows to their default layout. |
|
Assign File Accelerator: |
Use to assign the file accelerators. |
|
Close Profile profile name: |
Use to close the active window. This menu item depends on what is selected. |
|
Close All Documents: |
Use to close all open documents within the editor. |
|
Close other documents: |
Use to close other documents. |
|
Documents |
Use to display the documents window, which lists all available documents. You can switch to a particular document, sort, save, or close a document. |
2.1.2.9 The Help Menu
The help menu includes the following options:
| Menu Option | Description |
|---|---|
|
Search: |
Use to search the online help system. |
|
Table of Contents: |
Use to display the table of contents for the online help system. |
|
Documentation Library: |
Use to open a browser window with a link to the related documentation. |
|
Start Page |
Use to display the Oracle GoldenGate product information page. You can learn and explore the tutorials and help topics from this page. |
|
OGG Studio Forum: |
Use to open a browser window with a link to Oracle GoldenGate studio forum posts. |
|
Oracle Technology Network: |
Use to open a browser window with a link to Oracle Technology Network. |
|
About: |
Use to display the About dialog box with version information. |
2.2 Setting Your Preferences
You can set the preferences for Oracle GoldenGate Studio including the environment, audit behavior, and display.
The main components of this window are:
-
Environment: Use to set the undo level, navigation level, and look and feel. All warning messages can be reset from here.
-
Log: Each activity can be logged. You can set the directory for saving log files, maximum number of log lines, and log color options.
-
-
Audit: This is grayed out.
-
Code Editor: Use to open the editor.
-
Database: Use to configure different database options. You can also select the JDBC driver from the list of registered drivers, add a new driver, or delete an existing driver.
-
Diagrams: Use to set the options for diagrams.
-
Annotation: Use to set the annotation options like color and font.
-
-
Parameter Editor: Use to open the parameter editor.
-
Web Browser and Proxy: Use to configure web browsers, proxy settings and internet files.
-
Web Browsers: Use to set the default web browser.
-
Proxy Settings: Use to configure the proxy settings such as no proxy, system default proxy, automatic proxy settings, and manual proxy settings.
-
Internet Files: Use to enable cookies and clear all existing cookies.
-
2.3 Using the Keyboard Navigation
This section describes the common methods of moving the cursor in Oracle GoldenGate Studio.
-
Cursor control
-
Operate Buttons
-
Select Checkboxes
-
Dropdown Lists and Combo Boxes
-
List Boxes
-
Radio Buttons
-
Shuttles
-
Sliders
-
Spin Controls
-
Text Fields
-
Navigating Complex Controls
2.4 Using the Projects Navigator
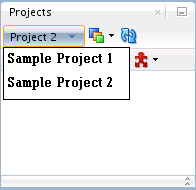
The Projects Navigator to browse and select existing solutions and solution components such as Deployment Profiles and Mapping Groups. The list of all active projects are available through the Project drop-down option. You can refresh the current project by using the Refresh Projects Window button.
Figure 2-2 Projects Navigator
You can perform the following project related tasks by using the Project Menu:
-
Open project: Opens the editor for the selected project. If no project is selected, this is grayed out.
-
New project: Create a new project.
-
Duplicate project: Duplicate an existing project and edit it after duplication.
-
Delete project: Delete an existing project.
-
Import project: Import a project XML file that was exported from Oracle GoldenGate Studio.
-
Export project: Export a project to an XML file.
2.5 Using the Editor Area
The editor area is used to visualize the organization and flow of the logical replication solution with the physical objects for the physical deployment profile. You can add data server and replication path components visually by using the drag-and-drop operation to evolve the solution. The deployment profile architecture can be changed by selecting any part of the replication path in the deployment profile diagram and selecting the desired architecture template from the Properties Inspector.
Both the solution and deployment profile editors have an Overview tab. The Solution Overview tab contains the solution definition and description and deployment summary for all deployment profiles that are associated to that solution. The Deployment Profile Editor Overview tab contains the deployment profile description, deployment history for this profile only, monitoring, and deployment configuration options.
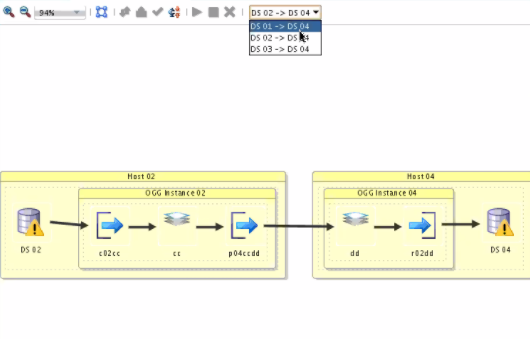
If using a Bidirectional, Consolidation, or Distribution solution template, a single replication path is shown and scaled in the deployment view to improve readability. You can use the drop-down to select the required replication path.
Figure 2-3 Multiple Replication Paths in Design View
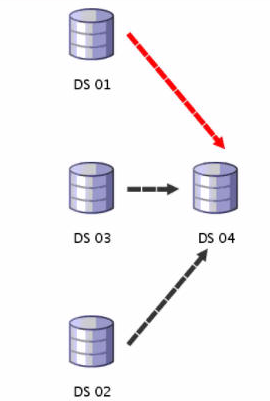
The replication paths are displayed as DS 01 -> DS 04, DS 02 -> DS 04, and DS 03 -> DS 04 in the editor area.
Figure 2-4 Drop Down List in Deployment View
2.6 Using the Resources Navigator
The resources navigator, or the global resource library lists all the available resources such as:
-
Database: All the available databases.
-
Views: Create new views.
-
Global Mapping Group: Global mapping groups can be assigned to any replication path of any solution across all projects. Mapping groups created for a solution in the Projects Navigator can be copied to the global mapping groups or created directly from the Resources Navigator.
-
Oracle GoldenGate Instance: The available Oracle GoldenGate instances.
The Resources Navigator looks like:
Figure 2-5 Resources Navigator

-
If any type of resource is not added then you can add it by selecting the New button in the Resources Navigator toolbar.
-
Add it by select the New button in the Oracle GoldenGate Studio toolbar.
-
You also can select New under File menu, and then select the resource type you want to add.
Figure 2-6 Adding New Resources through Resources Navigator
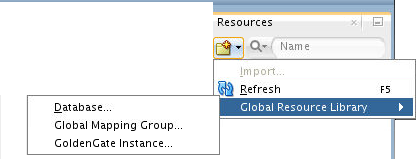
You can change the properties of existing resources by using the Properties context menu. You can also use the keyboard shortcut Ctrl+Tab to navigate to Resources Navigator, use the Tab and arrow keys to select the particular resource, and use Shift + F10 to view the context menu.
2.6.1 Adding a New Database Connection
New database connections are used only for table metadata to facilitate table mapping and are not used to define connections used by capture and apply processes. Capture and apply connections are defined in the Properties Inspector in the Deployment Profile.
A new database connection wizard looks as follows:
Figure 2-7 New Database Connection
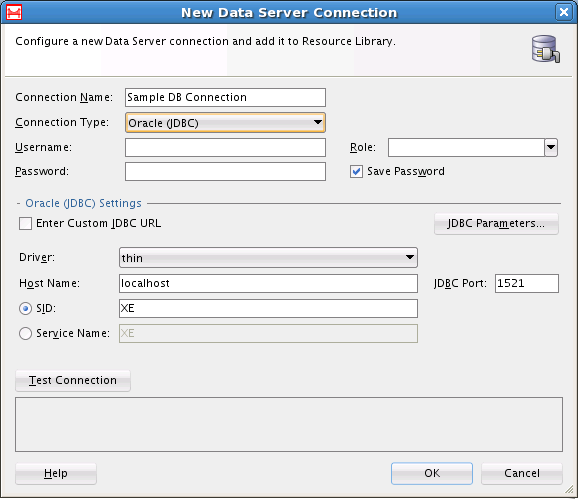
To add a new data server connection:
-
Select the Database resource type in the Resources Navigator window and right-click to select New Database Connection.
-
In the New Data Server Connection window, add the following:
-
Connection Name: The name of the new connection. The resource is listed in the Resources Navigator with the name mentioned here.
-
Connection Type: Connection types are
Oracle (JDBC),Generic JDBC,MySQL,SQLServer,DB2 UDB, andTeradata. Changing of database type is not supported after connection is created. -
The User name and Password to connect to the database. If you uncheck Save Password check box during connection creation and if you want to expand the Database node after reconnecting to repository, Database node expansion asks you to enter the password to show all the nodes for the database connection.
-
The role as
SYSDBAorSYSOPER. This can be left blank when the user is notSYS. Else, you have to select the role. -
The JDBC settings.
By default, Oracle GoldenGate Studio provides drivers for Oracle, MySQL, SQL Server, Informix, Sybase, and DB2 UDB. Additional database drivers that are not provided with the product can be configured by using Tools menu, then Preferences , Database, and JDBC Driver Options. Once a data server connection is created, you can browse objects in the database in the Resources Navigator and you can use the information from the database navigator for mapping the tasks. Currently Oracle, MySQL, and SQLServer drivers are certified.
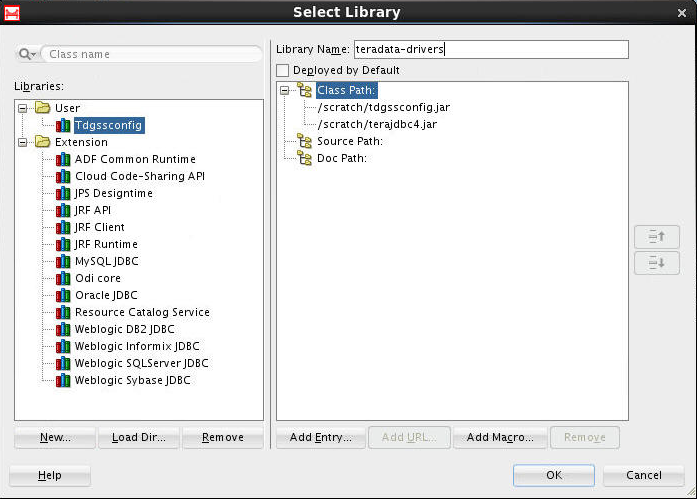
To add the Teradata connection, you have to load the Teradata drivers as follows:
-
In the New Data Server Connection window, select Teradata as the connection type.
-
Click the select Library button.
-
In the Select Library window, click the New... button.
-
In the Create Library window that opens, click on Add Entry... button.
-
In the Select Path Entry window that opens, browse to the location where the Teradata drivers are stored and select the drivers. Click the Open button.
-
Click OK if the drivers are correctly added under Class path.
-
In the Select Library window, you can see the newly added Teradata drivers. Click OK.
-
Provide a valid Username and Password and click Test Connection to perform a connection test or OK to proceed with the connection.
Figure 2-8 The Select Library Dialog
-
-
-
Click OK to create a new Database resource.
You can also test the connection by using Test Connection button before you create the new resource.
Note:
Teradata is supported as a target only database but you can drag-and-drop Teradata tables as a source database in the mapping editor. This is possible as mapping is a logical concept and no check is performed by Oracle GoldenGate Studio.Note:
Thegenerate to function for Teradata and DB2 UDB tables depend on JDeveloper functionality. DB2 UDB to DB2 UDB and Teradata to Teradata are not supported.
2.6.2 Adding a New Big Data System Connection
A new Big Data system can only be used as a target. Properties for the connection can be defined in the Properties Inspector in the Deployment Profile.
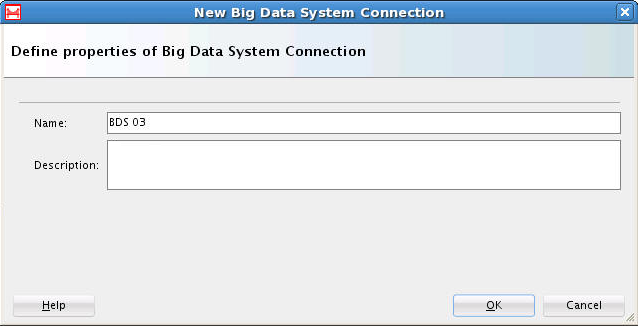
A new Big Data system connection wizard looks as follows:
Figure 2-9 New Big Data System Connection
To add a new Big Data system:
-
Select the Big Data System resource type in the Resources Navigator window and right-click to select New Big Data System Connection.
-
In the New Data Server Connection window, add the following:
-
Name: The name of the new connection. The resource is listed in the Resources Navigator with the name mentioned here.
-
Description: A short description about the new Big Data System.
-
-
Click OK to create a new Big Data System resource.
2.6.3 Adding a New Global Mapping Group
The New Global Mapping Group wizard defines a container for table mappings but does not guide you through the table mapping process. To learn more about defining table mapping see Understanding Mapping Groups.
A new Global Mapping Group wizard looks as follows:
Figure 2-10 New Global Mapping Group
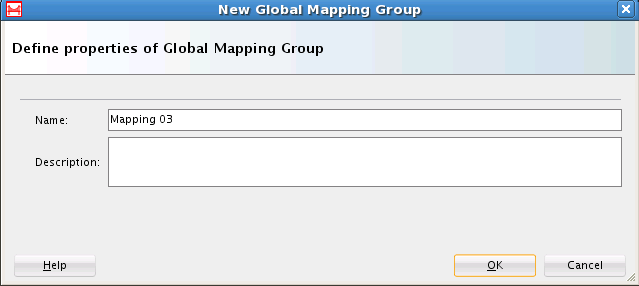
To add a new Global Mapping group:
- Click the New button on the Resources Navigator window or right click on the database icon and select New Global Mapping Group Connection.
- Enter the name of the new connection.
- Enter a short description to identify the resource.
- Click OK.
2.6.4 Adding a New Oracle GoldenGate Instance
The Add a New Oracle GoldenGate Instance dialog defines a connection to an existing Oracle GoldenGate installation. This installation must already have the Oracle GoldenGate manager and jAgent the processes running.
A new Oracle GoldenGate Instance dialog looks as follows:
Figure 2-11 New Oracle GoldenGate Instance Connection
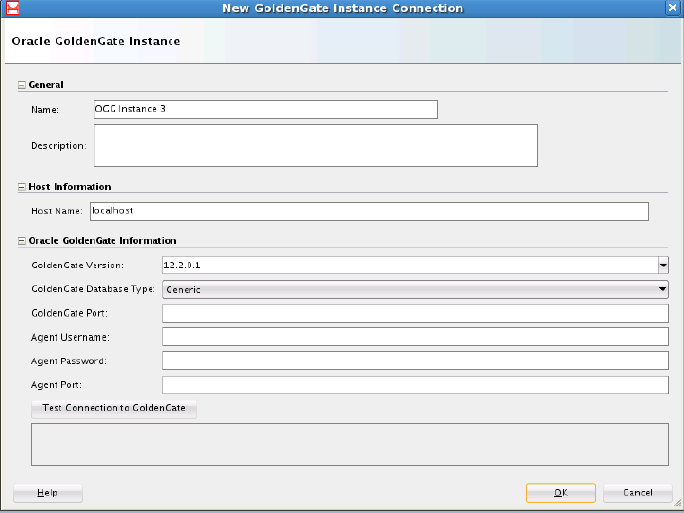
To add a new Oracle GoldenGate connection:
2.7 Using a Custom Parameter File
Use this to upload an already existing or custom parameter files to Oracle GoldenGate Studio.
Oracle GoldenGate Studio supports uploading of existing parameter files for the Extract, Replicat, pump processes, and also for Oracle GoldenGate instance (manager and GLOBALS file).
To upload a parameter file, right-click the Extract or Replicat process and select Upload GoldenGate File menu item. In the Upload GoldenGate File dialog that is displayed, click Browse, select the particular parameter file to be uploaded, and click Open. Click OK to confirm the selection.
The corresponding values from the parameter file are updated in the Properties Inspector. All the values are available in Properties Inspector are parsed when a parameter file is uploaded.
Use this method only for online process and parameter level items xx.prm, and not for initial load process and obey level items xx.oby.
The comments in.prm file are not parsed in this method.
If Oracle GoldenGate Studio is not able to parse a particular parameter, then it does not stop parsing the custom parameter file and moves on to the next parameter. The Messages — Log is updated with the discarded parameter. You can view the Messages — Log by selecting the Window menu and then the Log menu . For errors such as Array Index Out of Bounds and Null Pointer Exception, the Oracle Diagnostic Logging (ODL) is updated instead of the Messages — Log.
Note:
-
Oracle GoldenGate Studio creates a new map whenever a parameter file is uploaded for the replicat process. Multiple new maps are created if you upload an updated version of the parameter file. To avoid this, delete any older maps associated with the particular parameter file before uploading the file again.
-
In Oracle GoldenGate Studio, mapping in Extract side is not supported when using custom parameter file. Do not use the parameter
Target Definitionsin Properties Inspector for any Extract process. Before online deployment, you must follow the steps to create manual map for the online deployment. -
The maximum length for any parameter unit is 20 characters. You may receive an error if it exceeds the maximum length.
-
To view the updated trail file name, you should save the profile and reopen it.
-
Oracle GoldenGate Studio does not parse the
MAPEXCEPTIONparameter.
2.8 Using the Properties Inspector
The Properties Inspector to view and edit the attributes of the selected artifacts in the solution diagram, deployment profile diagram, and mapping editor. You can view a tool tip with a description of that particular parameter with the right-click option in the Properties Inspector of the Deployment Profile. The Properties Inspector is dynamic and the attributes correspond to the different types of items selected in the editor.
Figure 2-12 Properties Inspector
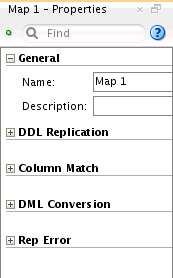
Oracle GoldenGate Commands and Parameters that you can use with the Properties Inspector contains a list of the options that can appear in the Properties Inspector of the Deployment View.
2.8.1 How to Use the Properties Inspector
To use the Properties Inspector, do as follows:
- In Oracle GoldenGate Studio, navigate to Window menu and select Properties to display the Properties Inspector.
- In the Solution Editor, Mapping Editor, or Deployment View select an item for which you want to change the property.
- In the Properties Inspector, change the corresponding properties for that particular item. Some items, such as conflict resolution in the mapping editor, requires clicking a dynamic gear icon
 that appears to the far right when you mouse over the attribute.
 - Save the changes by using the Save button on the toolbar or by using the Save option from File menu. The changes in the process parameters are available only after redeployment or after regeneration of the parameter files.
Note:
Oracle GoldenGate Studio does not validate the values entered by user in the Properties Inspector. You have to ensure correctness of values to avoid abnormal behavior.2.8.1.1 Viewing or Modifying Big Data Properties File
You can now view or modify the Big Data properties file in Oracle GoldenGate Studio.
Note:
This is applicable to process properties only when the Big Dataogginstance is assigned as a resource.
To view or modify the Big Data Properties file:
- In the Property Inspector, click Edit adjacent to the Big Data Property File field to display the content of the property file. Click Browse to select the file and then edit the content of the selected file in a dialog.
- Make the required changes in the Big Data Property File dialog and click OK to save the changes.