42 OAuth Just-In-Time (JIT) User Provisioning
This section provides an overview of OAuth Just-in-Time user provisioning and configurations in OAM.
Just-In-Time user provisioning enables user identity to be provisioned dynamically when the user tries to login for the first time using any social identity providers. User account creation is done directly without the need to provision users in the system, in advance.
- Using Self-Registration for Just-in-Time User Provisioning
If you need more control over user provisioning, based on your proprietary flow, you can choose to redirect the user to your own self-registration page.
- Configuring Just-In-Time User Auto-Provisioning with Password Prompt
If you need the user provisioning to be done automatically during user authentication through OpenIDConnect protocol, then you can choose to configure for user auto-provisioning. The users are created in the configured identity store and automatically provisioned with the user atttribute values such as userID, user name, first name, last name, e-mail, and so on. These values are retrieved from the IDToken received from the Identity Providers (Google, Facebook).
You can also choose to have a password prompt for more control over the newly created user account.
- Configuring Just-In-Time User Auto-Provisioning (No Password Prompt)
You can choose to have no password prompt during JIT Auto-Provisioning. The user created by this flow cannot be used for any other type of authentication.
Using Self-Registration for Just-in-Time User Provisioning
OAM enables you to have more control over user provisioning, based on your proprietary user-provisioning flow. Follow the steps in this section to use self-registration for Just-in-Time user provisioning.
Prerequistes for Just-in-Time Provisioning by Self-Registration
Ensure the following steps are followed before proceeding to the configurations for Just-in-Time user provisioning by self-registration.
About Self-Registration Page
This section provides guidelines for creating the self-registration page.
You can have more control over user provisioning, based on your proprietry user-provisioning flow, by redirecting the users to a self-registration page, owned by you.
Note:
Ensure you have completed all the prerequiste steps before creating your self-registration page. See Prerequistes for Just-in-Time Provisioning by Self-Registration for details.- Call the user info endpoint to get the user attributes required to
create the user. The user
registrationidis received as a query parameter from OAM.For example:
curl -X GET 'http://<ManagedOAMHost>:<ManagedOAMPort>/oamfed/user/regdata?registrationid=<registrationId>The response must look similar to the following example:{ idtoken : "{\"iss\":\"https://accounts.google.com\",\"azp\":\"288915398401-etd60uissja597aed1veoc0hlhist1jg.apps.googleusercontent.com\",\"aud\":\"288915398401-etd60uissja597aed1veoc0hlhist1jg.apps.googleusercontent.com\",\"sub\":\"104056721435364290436\",\"email\":\"johndoe@gmail.com\",\"email_verified\":true,\"at_hash\":\"KVrh2eKbxnhN3fy0jESgNQ\",\"iat\":1570075783,\"exp\":1570079383}, hmac : "<value>" } - HMAC Validation. You can calculate the HMAC of the user data received (contents of parameter ‘idtoken’), using the secret_key configured in the OAuthUserSelfRegistrationPlugin and do the base64url encoding of the calculated HMAC. This value must match with the base64url encoding of the HMAC value received in Step 1, confirming the message integrity. You can fail the requests if the HMAC values do not match.
- Create a user account in the configured OAM user store.
In this step, use your proprietary logic for user account creation in your configured user store.
- Redirect back to OAM on the following URL with the user
registrationid.
http(s)://<ManagedOAMHost>:<ManagedOAMPort>/oam/server/auth_cred_submit
Note:
The Self-Registration page can reside on an external server.Example 42-1 Sample Self-Registration Page
Your self-registration page must be similar to the following sample registration provided:
<!DOCTYPE html>
<%@ page contentType="text/html;charset=UTF-8"%>
<%@ page import="java.util.*, java.net.*, java.io.*"%>
<%@ page import="org.codehaus.jettison.json.JSONObject"%>
<%@ page import="javax.crypto.*, javax.crypto.spec.*"%>
<html>
    <head>
        <meta http-equiv="Content-Type" content="text/html; charset=UTF-8"/>
        <title>Register</title>
    </head>
    <body>
        <h1>Creating User with following Atrributes</h1>
        <%! JSONObject jsonBody=null; %>
        <%! String userdata="text"; %>
        <%! String managedHostName = System.getProperty("managed.host.name"); %>
        <%! String managedPort = System.getProperty("managed.port"); %>
        <%! String managedprotocol = System.getProperty("managed.protocol"); %>
    <%
    String statusCode ="RegistrationFailed";
    try{

    //Step 1 : Get the userinfo from OAM, using the following endpoint

    //Verify and sanitise query parm to avoid XSS attack
    String regRefId = XSSFilter.sanitizeInput("registrationid",request.getParameter("registrationid"));
    String regDataURLPath = "/oamfed/user/regdata?registrationid=" + regRefId;
    URL regDataURL =    new URL(managedprotocol + "://"+ managedHostName +":" + managedPort + regDataURLPath);
    HttpURLConnection connection = (HttpURLConnection)regDataURL.openConnection();
    String data=null;
    String hhmac=null;
    if (connection.getResponseCode() == 200) {
     statusCode ="RegistrationSuccess";
      ByteArrayOutputStream bos = new ByteArrayOutputStream();
      BufferedInputStream bis = new BufferedInputStream(connection.getInputStream());
      byte[] b = new byte[256];
      int i;
      while ((i = bis.read(b)) != -1)
        bos.write(b, 0, i);
      byte[] body = bos.toByteArray();
    userdata=new String(body);
       jsonBody = new JSONObject(new String(body));
      //Save the userinfo as returned from OAM in parameter idtoken
      data = jsonBody.getString("idtoken");
      //Save the hmac of the data , to be used later.
      hhmac = jsonBody.getString("hmac");
      out.println(jsonBody.toString());
      }else{
         out.println("got error");
         out.println(connection.getResponseMessage());
      }

      //End of Step 1

      //Step 2 : (Optional) if you choose to compare the hmac of received data for security purposes
      //Calculate the hmac of the data received in idtoken using your secret_key, as configured in OAuthUserSelfRegistrationPlugin.

      String key= "any_data"; //secret_key value
      String algo ="HmacSHA256";
      SecretKeySpec signingKey = new SecretKeySpec(key.getBytes(), algo);
        Mac mac;
        byte[] calculatedHmac = null;
        try {
            mac = Mac.getInstance(algo);
            mac.init(signingKey);
            calculatedHmac = mac.doFinal(data.getBytes());
        } catch (Exception e) {
        //handle error
           }
        String base64ofcalculatedHmac = java.util.Base64.getUrlEncoder().encodeToString(calculatedHmac);
        if(hhmac.equals(base64ofcalculatedHmac)){
        out.println("/n hmac matches");
        }else{
           out.println("/n hmac verification Failed");
        }
     } catch (Throwable t)
  {
     out.println(t.getMessage());
  }

   //End of Step 2

  //Step 3: Add your proprietary logic for user account creation in your configured UserStore, using the userinfo as retrieved in Step 1
  /**
   * Add User Account creation Logic here
   *
  **/
  //End of Step 3

 %>
        //Step 4: In this example the redirect is triggered by button click action

        <button id="myButton" class="float-left submit-button">Create User</button>
        <script type="text/javascript">
          var url_string = window.location.href;
          var managedprotocol1 = "<%= managedprotocol %>";
          var managedHostName1 = "<%= managedHostName %>";
          var managedPort1 = "<%= managedPort %>";
          var redirect = managedprotocol1 + "://" + managedHostName1 + ":" + managedPort1 + "/oam/server/auth_cred_submit";
              document.getElementById("myButton").onclick = function () {
        location.href = redirect;

        //End of Step 4
    };
</script>
    </body>
</html>
Configuring UserSelfRegistration Authentication Module and Scheme
Just In Time UserSelfRegistration Authentication Module
Create a new Authentication module and configure the following four steps: OpenIDConnectPlugin, UserIdentificationPlugin, OAuthUserSelfRegistrationPlugin, and UserIdentificationPlugin.
- Log into the Oracle Access Management Console as System Administrator.
- From the Application Security Launch Pad, click Authentication Modules under Plug-ins.
- From the Authentication Modules tab, click Create Authentication Module and then Custom Authentication Module.
- Add a name and description for the authentication module under the General tab. For example, UserSelfRegistration.
- Add the UserSelfRegistration authentication module steps as
follows:
- Add OpenIDConnectPlugin and UserIdentificationPlugin steps based on the Identity provider. For details, see Authentication Module and Scheme and Policy Changes
- Add the OAuthUserSelfRegistrationPlugin step and set
the following parameters:
Table 42-1 OAuthUserSelfRegistrationPlugin Step
Step Details Description registration_url Mandatory. The absolute url of the customer owned self-registration page.
secret_key Mandatory. This secret key is used to create hmacof the request payload to be sent touserInformationRestAPI (the custom self-registration page must use the same key value for HMAC verify).If encrypted key is to be used, add the prefix
{AES}to encrypted key value.
- Add the UserIdentificationPlugin step and set the parameters as described in Authentication Module and Scheme and Policy Changes.
JIT UserSelfRegistration Steps Orchestration
Configure the Orchestration steps for the Authorization flow.
- Click the Steps Orchestration subtab
- From the InitialStep list, choose the OpenIDConnectPlugin step.
- Set On Success, On Failure, and On Error for each of the steps as shown in the following example:
Table 42-2 JIT Step Orchestration
| Name | Description | On Success | On Failure | On Error |
|---|---|---|---|---|
| OpenID_Connect | OpenIDConnectPlugin Step | User_Identification1 | Failure | Failure |
| User_Identification1 | First UserIdentificationPlugin Step | Success | OAuth_Self_Registration | Failure |
| OAuth_Self_Registration | OauthUserSelfRegistrationPlugin Step | User_Identification2 | Failure | Failure |
| User_Identification2 | Second UserIdentificationPlugin Step | Success | Failure | Failure |
Just In Time UserSelfRegistration Authentication Scheme
Set the challenge parameter initial_command=NONE in the
authentication scheme.
- From the Application Security Launch Pad, click Authentication Schemes under Access Manager.
- From the Authentication Schemes tab, click Create Authentication Scheme.
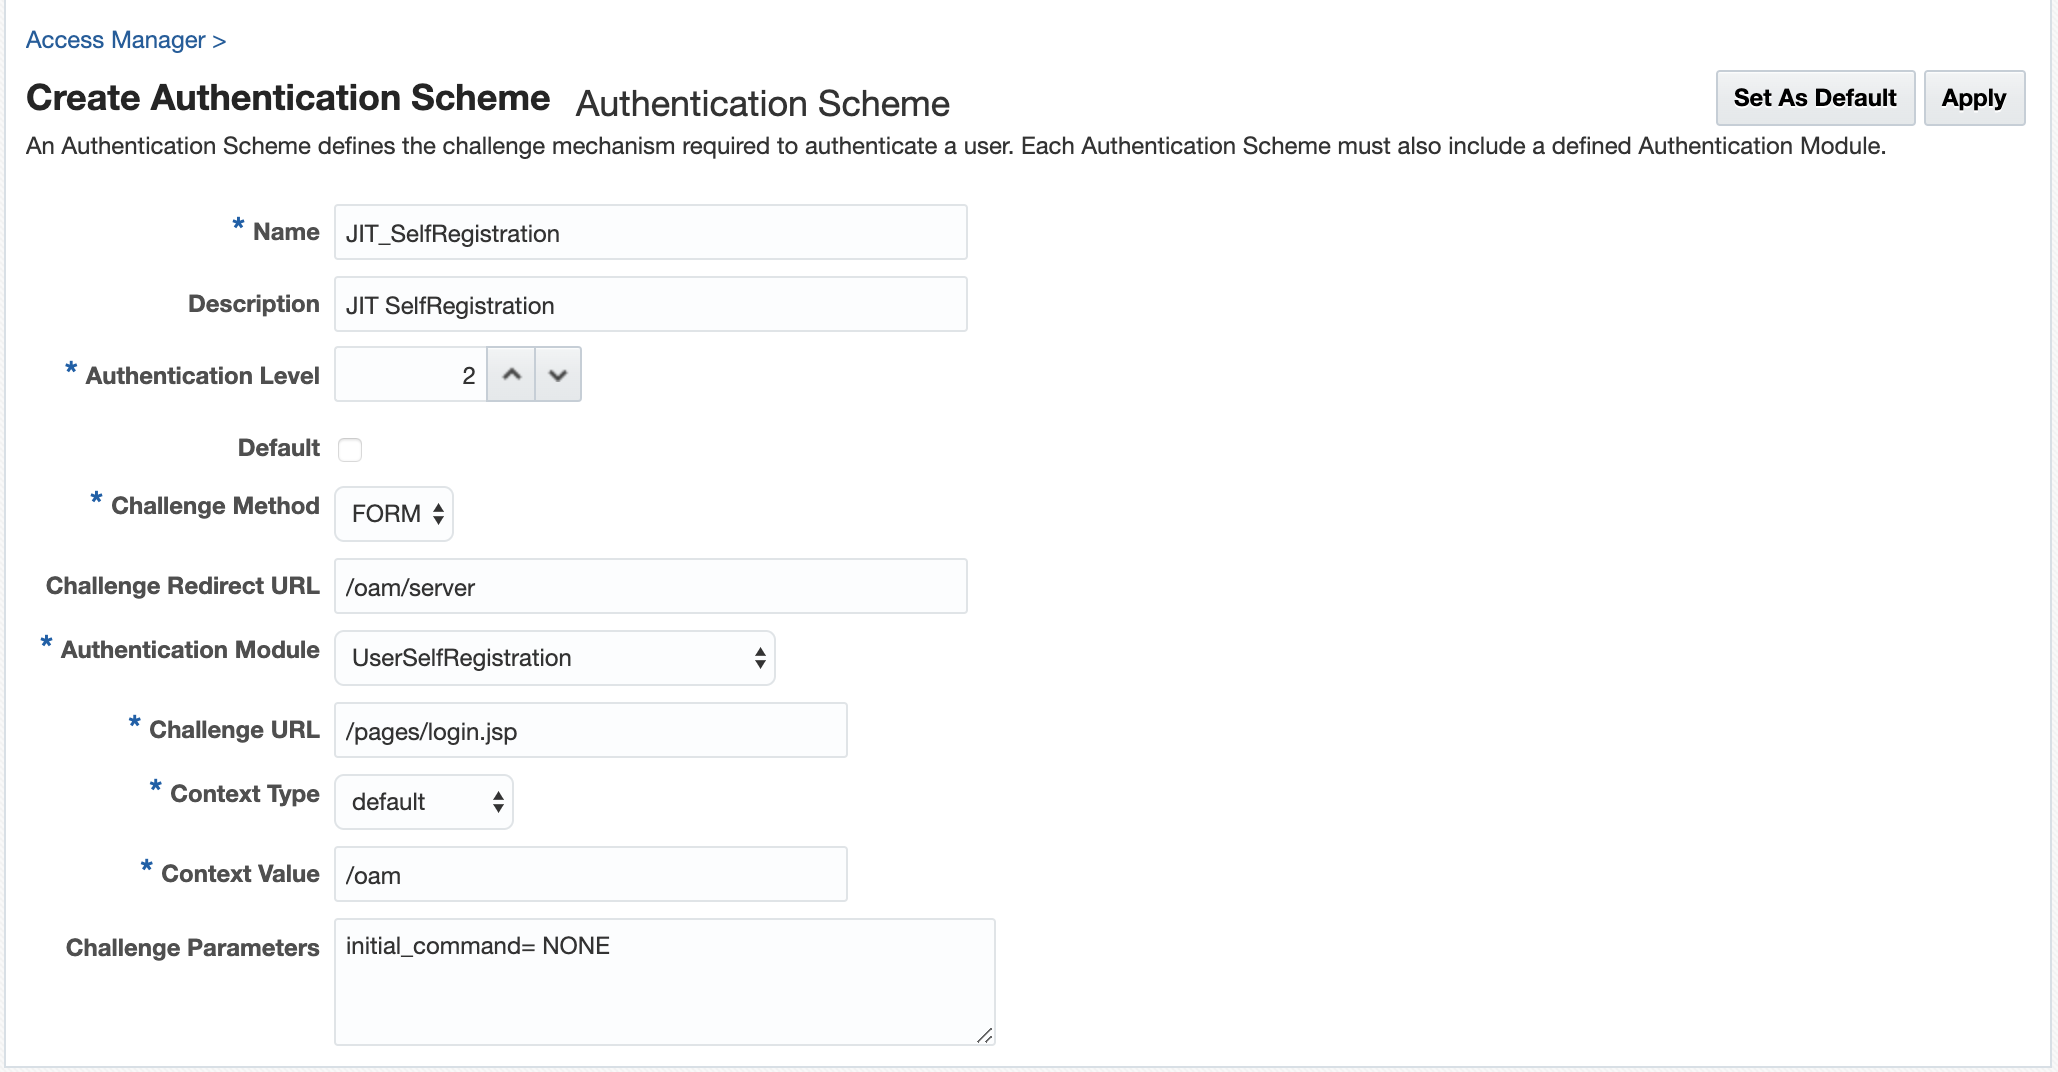
- Set the parameters in the
authentication scheme. For example, the following figure shows a Sample Authentication
Scheme Page:
Figure 42-1 Sample Authentication Scheme Page

For details about the parameters, see Authentication Schemes and Pages
- Under Challenge Parameters, add
initial_command=NONE.
Protecting Resources with UserSelfRegistrationScheme
Complete the configuration for the Just in Time user provisioning by self-registration, by assigning the UserSelfRegistrationScheme authentication scheme to the protected resource policy.
- From the Application Security Launch Pad, select Application Domains under Access Manager.
- Search and open the required Application Domain.
- Open the Authentication Policies tab and click Protected Resource Policy.
- Select the UserSelfRegistrationScheme from the Authentication Scheme dropdown list and click Apply.
Configuring Just-In-Time User Auto-Provisioning with Password Prompt
Follow the steps in this section to configure Just-in-Time user auto-provisioning with password prompt.
Prerequistes for Just-in-Time User Auto-Provisioning
Ensure the following steps are followed before proceeding to the configurations for auto-provisioning.
Configuring AutoProvisioning Authentication Module and Scheme
Just-In-Time User Auto-Provisioning Authentication Module
Create a new Authentication module and configure the following five steps: OpenIDConnectPlugin, UserIdentificationPlugin, OAuthUserSelfRegistrationPlugin, CredentialCollectorPlugin, and UserIdentificationPlugin.
- Log into the Oracle Access Management Console as System Administrator.
- From the Application Security Launch Pad, click Authentication Modules under Plug-ins.
- From the Authentication Modules tab, click Create Authentication Module and then Custom Authentication Module.
- Add a name and description for the authentication module under the General tab. For example, AutoProvisioning_WithPasswd.
- Add the AutoProvisioning authentication module steps as
follows:
- Add the OpenIDConnectPLugin and
UserIdentificationPlugin steps for the Identity Providers, such as
Google and Facebook. For details, see About the OpenIDConnectPlugin and Authentication Module and Scheme and Policy Changes.
Note:
Theusername_attrconfigured in the OpenIDConnect Plugin indicates the attribute to be read from the identity token to get information about the user. This parameter is used as the UserName when creating the new user account - Add the OAuthUserSelfRegistrationPlugin step and set
the following parameters:
Table 42-3 OAuthUserSelfRegistrationPlugin Step for auto-provisioning
Description autoprovisioning Set this to
True(case insensitive) to enable auto-provisioning.If the value is not specified, or set to
Falseauto-provisioning is not enabled, and user provisioning by self-registration is enabled.autoprovision_key_user_record_attribute_list Mandatory
Specify a comma-separated list of attributes from the identity token that must be used to create the user record.
Only the attributes listed here are set in the provisioned user record.
autoprovision_idtoken_to_user_attribute_mapping Optional
The attribute names fetched from the idtoken must be consistent with the attribute names specified in the identity store.
If the attributes names are not consistent, specify a comma-separated list of
key:valuemapping, wherekeyis the attribute name used in Idtoken andvalueis the attribute name used in the identity store.For example, email:mail, firstName:first-name
autoprovision_useridentitystore Optional
Specify the Identity store name. If not provided, the default value is used.
autoprovision_password_policy_regex Optional
Specify a valid regular expression that the password string must follow.
- Add the CredentialCollectorPlugin step and set the following
parameters:
Table 42-4 CredentialCollectorPlugin Step for Auto-Provisioning
actiontype REDIRECT CRED_PARAM_3 {ID=CONFIRM_PASSWORD},{DISPLAY_NAME=CONFIRM_PASSWORD},{TYPE=password} CRED_PARAM_2 {ID=PASSWORD},{DISPLAY_NAME=PASSWORD},{TYPE=password} CRED_PARAM_1 {ID=USERNAME},{DISPLAY_NAME=USERNAME },{TYPE=text_readonly},{VALUE=constant} loginPageURL /CustomReadServlet NO_OF_CREDENTIALS 3 For details about all the remaining parameters in this step, see Table 22-12
- Add the UserIdentificationPlugin step and set the parameters as described in Authentication Module and Scheme and Policy Changes.
- Add the OpenIDConnectPLugin and
UserIdentificationPlugin steps for the Identity Providers, such as
Google and Facebook. For details, see About the OpenIDConnectPlugin and Authentication Module and Scheme and Policy Changes.
JIT User Auto-provisioning Steps Orchestration
Configure the Orchestration steps for the Authorization flow.
- Click the Steps Orchestration subtab
- From the InitialStep list, choose the OpenIDConnectPlugin step.
- Set On Success, On Failure, and On Error for each of the steps as shown in the following example:
Table 42-5 JIT Step Orchestration
| Name | Description | On Success | On Failure | On Error |
|---|---|---|---|---|
| OpenID_Connect | OpenIDConnectPlugin Step | User_Identification1 | Failure | Failure |
| User_Identification1 | First UserIdentificationPlugin Step | Success | Credential_Collector | Failure |
| Credential_Collector | CredentialCollectorPlugin Step | OAuth_Self_Registration | Failure | Failure |
| OAuth_Self_Registration | OauthUserSelfRegistrationPlugin Step | User_Identification2 | Failure | Failure |
| User_Identification2 | Second UserIdentificationPlugin Step | Success | Failure | Failure |
Just-In-Time User AutoProvisioningScheme
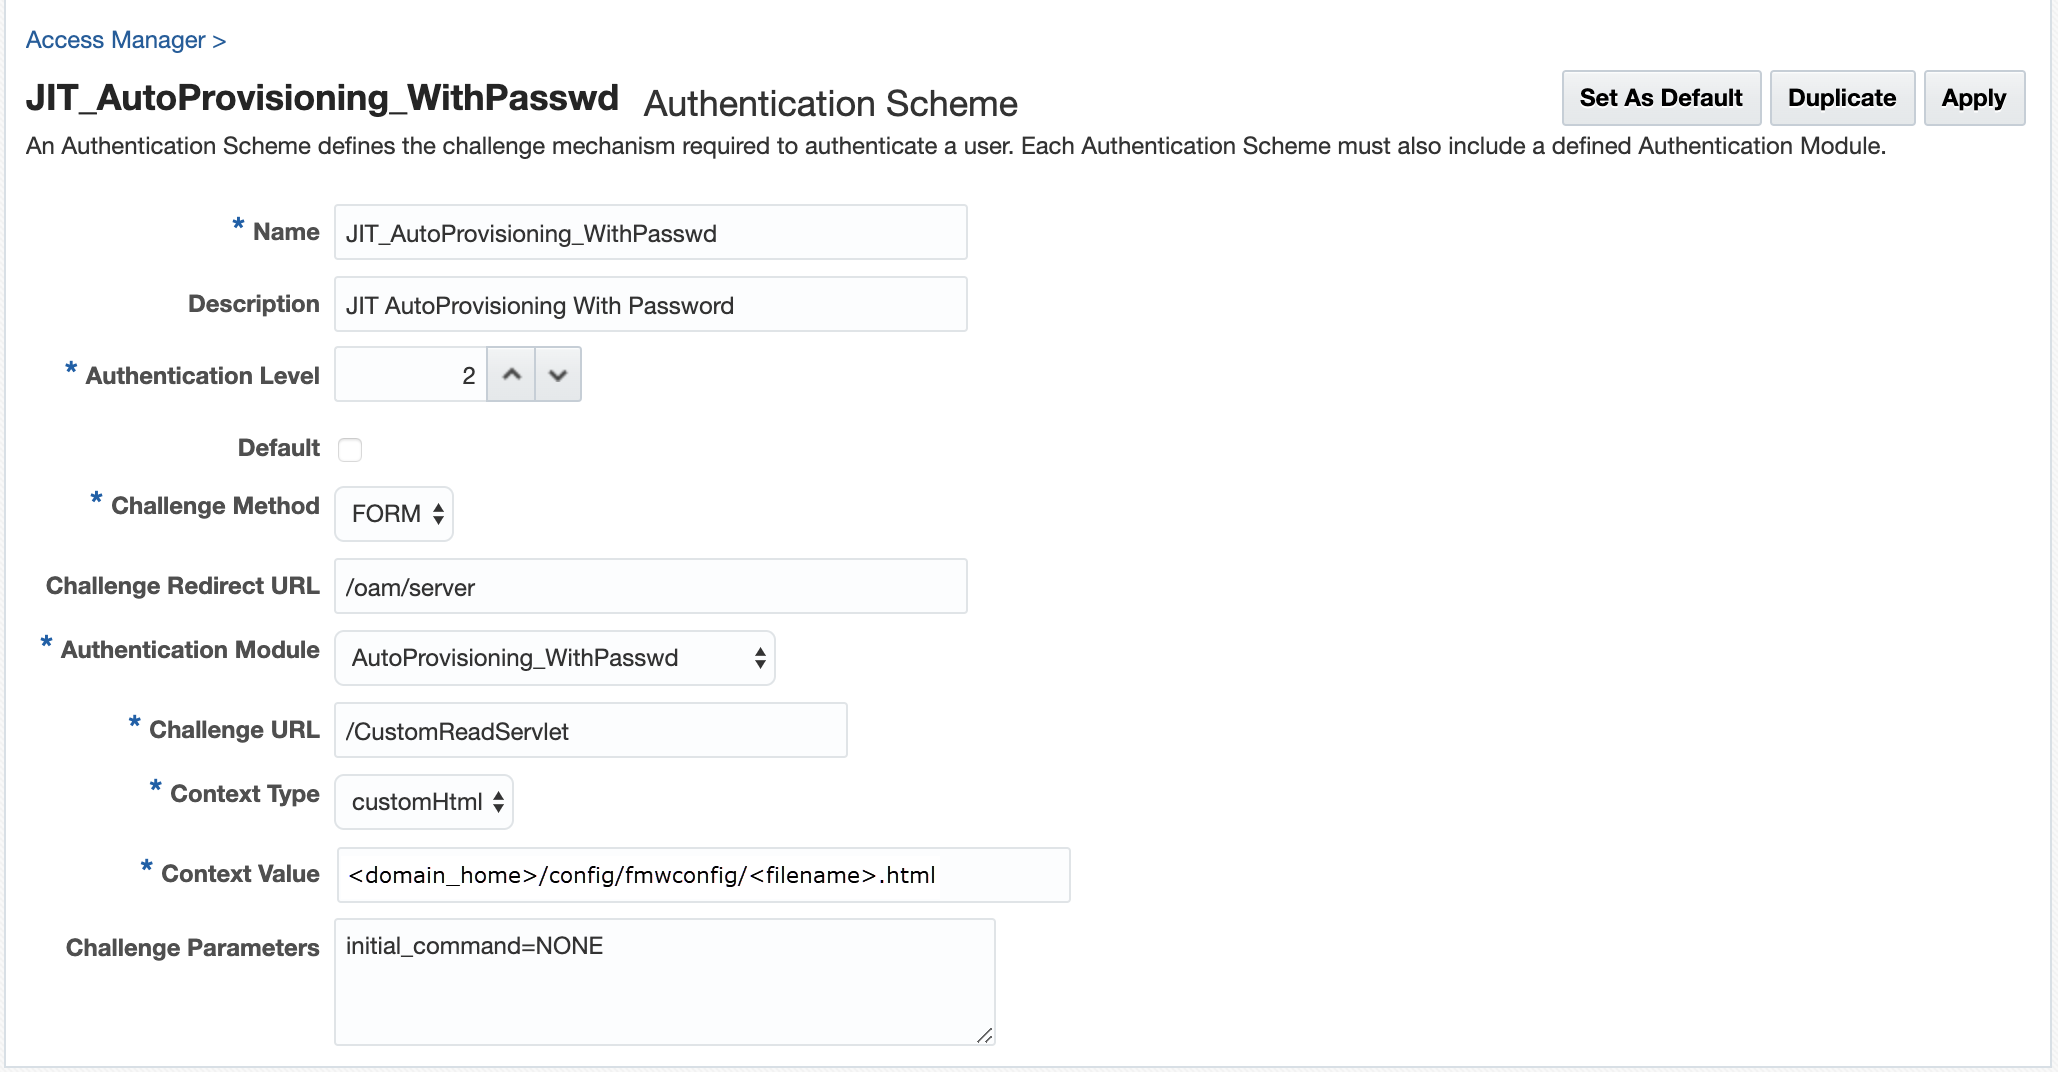
Create a custom HTML page and set the context type and context value in the authentication scheme.
- From the Application Security Launch Pad, click Authentication Schemes under Access Manager.
- From the Authentication Schemes tab, click Create Authentication Scheme.
- Set the Challenge URL to
/CustomReadServlet - Change the Context Type option from default to customHTML.
- In Context Value, specify
the absolute path to the customHTML page.
You must create the custom HTML file with code similar to the following sample:
<h4> Creating User Account with following details </h4>
<form id="loginData" action="/oam/server/auth_cred_submit" method="post" name="loginData">
	<div id="oam_credentials" class="input-row">
		<span class="ctrl"></span>
	</div>
	<div class="button-row">
		<span class="ctrl">
			<input id="login_button" type="submit" value="Login" class="formButton"
				onclick="this.disabled=true;document.body.style.cursor = 'wait';
				this.className='formButton-disabled';form.submit();return false;"/>
		</span>
	</div>
	<div id="ignore_oam_error_codes"></div>
</form>
For globalization, create a properties file in the same directory as the custom html file. The name of the file must be the same as the custom html file with.propertiesextension.USERNAME=Username PASSWORD=Password CONFIRM_PASSWORD=Confirm password - Under Challenge Parameters, add
initial_command=NONENote:
The default number of retries for failed Authentication is5. You can modify this usingOverrideRetryLimitin the challenge parameters. For example,OverrideRetryLimit=1. - Set all the remaining parameters
for this scheme. For example, the following figure shows a Sample Authentication Scheme
Page:
Figure 42-2 Sample Authentication Scheme Page

For details about the parameters, see Authentication Schemes and Pages
Protecting Resources with AutoProvisioningScheme
Complete the configuration for the Just-in-Time Auto-provisioning, by assigning the AutoProvisioningScheme to the protected resource policy.
- From the Application Security Launch Pad, select Application Domains under Access Manager.
- Search and open the required Application Domain.
- Open the Authentication Policies tab and click Protected Resource Policy.
- Select the AutoProvisioningScheme from the Authentication Scheme dropdown list and click Apply.
Configuring Just-In-Time User Auto-Provisioning (No Password Prompt)
Follow the steps in this section to configure Just-in-Time user auto-provisioning with no password prompt.
Prerequistes for JIT User Auto-Provisioning (No Password Prompt)
Ensure the following steps are followed before proceeding with the configurations for auto-provisioning (no password prompt)
Configuring JIT AutoProvisioning Authentication Module and Scheme (No Password Prompt)
Just-In-Time User Auto-Provisioning Authentication Module (No Password Prompt)
Create a new Authentication module and configure the following four steps: OpenIDConnectPlugin, UserIdentificationPlugin, OAuthUserSelfRegistrationPlugin, and UserIdentificationPlugin.
- Log into the Oracle Access Management Console as System Administrator.
- From the Application Security Launch Pad, click Authentication Modules under Plug-ins.
- From the Authentication Modules tab, click Create Authentication Module and then Custom Authentication Module.
- Add a name and description for the authentication module under the General tab. For example, AutoProvisioning_NoPasswd.
- Add the AutoProvisioning authentication module steps as
follows:
- Add the OpenIDConnectPLugin and
UserIdentificationPlugin steps for the Identity Providers, such as
Google and Facebook. For details, see About the OpenIDConnectPlugin and Authentication Module and Scheme and Policy Changes.
Note:
Theusername_attrconfigured in the OpenIDConnect Plugin indicates the attribute to be read from the identity token to get information about the user. This parameter is used as the UserName when creating the new user account - Add the OAuthUserSelfRegistrationPlugin step and set
the following parameters:
Table 42-6 OAuthUserSelfRegistrationPlugin Step for auto-provisioning
Description autoprovisioning Set this to
True(case insensitive) to enable auto-provisioning.If the value is not specified, or set to
Falseauto-provisioning is not enabled, and user provisioning by self-registration is enabled.autoprovision_key_user_record_attribute_list Mandatory
Specify a comma-separated list of attributes from the identity token that must be used to create the user record.
Only the attributes listed here are set in the provisioned user record.
autoprovision_idtoken_to_user_attribute_mapping Optional
The attribute names fetched from the idtoken must be consistent with the attribute names specified in the identity store.
If the attributes names are not consistent, specify a comma-separated list of
key:valuemapping, wherekeyis the attribute name used in Idtoken andvalueis the attribute name used in the identity store.For example, email:mail, firstName:first-name
autoprovision_useridentitystore Optional
Specify the Identity store name. If not provided, the default value is used.
autoprovision_password_policy_regex Not applicable for the JIT User Auto-Provisioning (No Password Prompt) flow. This parameter is ignored.
- Add the UserIdentificationPlugin step and set the parameters as described in Authentication Module and Scheme and Policy Changes.
- Add the OpenIDConnectPLugin and
UserIdentificationPlugin steps for the Identity Providers, such as
Google and Facebook. For details, see About the OpenIDConnectPlugin and Authentication Module and Scheme and Policy Changes.
JIT User Auto-provisioning Steps Orchestration (No Password Prompt)
Configure the Orchestration steps for the Authorization flow.
- Click the Steps Orchestration subtab
- From the InitialStep list, choose the OpenIDConnectPlugin step.
- Set On Success, On Failure, and On Error for each of the steps as shown in the following example:
Table 42-7 JIT Step Orchestration
| Name | Description | On Success | On Failure | On Error |
|---|---|---|---|---|
| OpenID_Connect | OpenIDConnectPlugin Step | User_Identification1 | Failure | Failure |
| User_Identification1 | First UserIdentificationPlugin Step | Success | OAuth_Self_Registration | Failure |
| OAuth_Self_Registration | OauthUserSelfRegistrationPlugin Step | User_Identification2 | Failure | Failure |
| User_Identification2 | Second UserIdentificationPlugin Step | Success | Failure | Failure |
Just-In-Time User AutoProvisioningScheme (No Password Prompt)
Set the challenge parameter initial_command=NONE in the
authentication scheme.
- From the Application Security Launch Pad, click Authentication Schemes under Access Manager.
- From the Authentication Schemes tab, click Create Authentication Scheme.
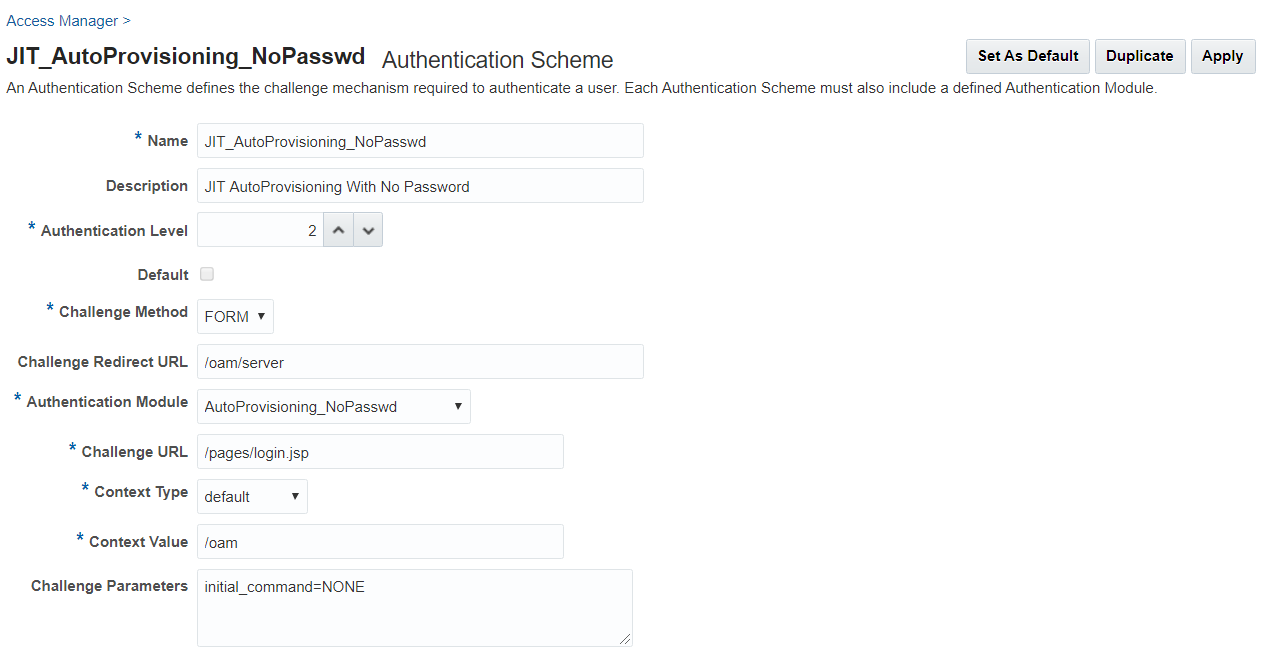
- Set the parameters in the authentication scheme. For example, the
following figure shows a Sample Authentication Scheme Page:
Figure 42-3 Sample Authentication Scheme Page

For details about the parameters, see Authentication Schemes and Pages
- Under Challenge Parameters, add
initial_command=NONE.
Protecting Resources with AutoProvisioningScheme (No Password Prompt)
Complete the configuration for the Just-in-Time Auto-provisioning (no password prompt), by assigning the AutoProvisioningScheme to the protected resource policy.
- From the Application Security Launch Pad, select Application Domains under Access Manager.
- Search and open the required Application Domain.
- Open the Authentication Policies tab and click Protected Resource Policy.
- Select the AutoProvisioningScheme from the Authentication Scheme dropdown list and click Apply.