Key and Certificate Management and Rollover in OIF and OSTS
- Generating new keys and certificates.
- Configuring Oracle Identity Federation (OIF) and Oracle Secure Token Service (OSTS) to use the new keys and certificates.
- Implementing a key rollover on a per partner basis.
- Distributing the new certificates to partners.
Introduction to Key and Certificate Management and Rollover
Oracle Identity Federation (OIF)/Oracle Secure Token Service (OSTS) uses Public Key Infrastructure (PKI) Keys and Certificates as part of the Federation and WS-Trust protocol interaction for providing non-repudiation and integrity through the use of digital signatures, and confidentiality through digital encryption.
- OIF/OSTS uses its own PKI Keys and Certificates to perform
signature and decryption operations on the SAML messages:
- Signing outgoing SAML messages and Assertions is done by using XML Digital signatures or Query String signatures.
- Decryption of incoming SAML Assertions is done by using XML Digital encryption.
- OIF/OSTS uses the partner's signing or encryption certificate to:
- Verify signatures on incoming SAML messages and Assertions (XML Digital encryption)
- Optionally encrypt outgoing SAML Assertions (XML Digital encryption)
<samlp:Response ...>
<saml:Issuer>hUps://idp.com</saml:Issuer>
<samlp:Status>...</samlp:Status>
<saml:Assertion ...>
<saml:Issuer>https://idp.com</saml:Issuer>
<ds:Signature xmlns:ds="http://www.w3.org/2000/09/xmldsig#">
<ds:SignedInfo>
<ds:CanonicalizationMethod Algorithm="http://www.w3.org/2001/10/xml-excc14n#"/>
<ds:SignatureMethod Algorithm="http://www.w3.org/2000/09/xmldsig#rsa-sha1"/>
<ds:Reference URI="#idhmf9KzAhxleuJ-L3vaVr979Ffa0">
<ds:Transforms>
<ds:Transform Algorithm="http://www.w3.org/2000/09/xmldsig#envelopedsignature"/>
<ds:Transform Algorithm="http://www.w3.org/2001/10/xml-exc-c14n#"/>
</ds:Transforms>
<ds:DigestMethod Algorithm="http://www.w3.org/2000/09/xmldsig#sha1"/>
<ds:DigestValue>JGvBqil/NXa6dlMOn5ZhmBbOie8=</DigestValue>
</ds:Reference>
</ds:SignedInfo>
<ds:SignatureValue>VgOrU79ZJO4rzHiFTCDCGNmkb0...Y776QM4vEBBybIpbCCUih7I0aA==
</ds:SignatureValue>
</ds:Signature>
<saml:Subject>
<saml:NameID>alice@acme.com</saml:NameID>
...
</saml:Subject>
...
</saml:Assertion>
</samlp:Response>https://idp.com
/saml20sso?SAMLRequest=hZJRT8IwFIX%2FStP3sW5BTW7YEhRREtQFplHeytZBQ9fW3i7Kv3cUTdAHfL09t985J3eEvFUWxp3f6o
V47wR68tkqjRAeMto5DYajRNC8FQi%2BguX4YQ7pgIF1xpvKKEom%2FZ7U3EujM7r13iLEsaztoDItJVPjKhEQGW24QkHJbJJRWUfPu
LtTFyuuS7bbsLVcpK92OmdN8XYb9SLETsw0eq59RlOWDCOWRikrkytIhsAuV5QU3x6upa6l3pw3vD6KEO7LsoiKp2VJyYtwGGz3ApqP
DrEhgN1JEee%2F5YjCHbKHqC335%2BWHSZ%2B9CVIQ2ku%2Fp%2FlPaxhKG8UnRo6uLDz2i7NJYZSs9mSslPm4cYJ7kVHvOvE%2FPBk
kf%2BCdRisq2UhR0zg%2FQn9fQ%2F4F&RelayState=id--
mAK1whfUGrvoLqqhU2ysXLWSIw-&SigAlg=hUp%3A%2F
%2Fwww.w3.org%2F2000%2F09%2Fxmldsig%23rsa-sha1&
Signature=S5TZ0uwK9SMZUgBfDaipbNhlLqbbSG9t4rgA9n3%2FwxFsK7H66IoK6G%2BDfaIUvc5bLtTrwmxsa2iB2gjFx8p5
Q6%2FgH8OtFbT7mKZ7z8FihgxxTKjHJ2FQocOEn%2FrkcRKAAq%2Blig5xVSlR%2BzLq1vkQzIMNOrfLw%2FM6uk3i%2Fk54EnQ%3D
SAMLRequest: SAML AuthnRequest message
RelayState: SAML 2.0 Relay State parameter
SigAlg: signature algorithm
Signature: signature bytes covering SAMLRequest, RelayState and SigAlg parametersThe OIF/OSTS PKI keys and certificates are stored in the
$DOMAIN_HOME/config/fmwconfig/.oamkeystore Java Keystore file (This
keystore is of type JCEKS, not JKS), and the OIF/OSTS settings reference the key entries
in the .oamkeystore, so that they can be used by the components for
SAML operations.
Generating Keys and Certificates
- The OAM installer creates the
.oamkeystorewith a random password. For more information on how to reset the password, see Setting New Key Entries section. - A new key entry called
stsprivatekeyaliasis created. - RSA Key Pair is created.
- Self signed certificate is created.
- Subject and Issuer is set to:
cn=<MACHINE_HOSTNAME>. - The following two entries are created in the OIF/OSTS
configuration:
osts_signingreferencing thestsprivatekeyaliaskey entry in the.oamkeystore.osts_encryptionreferencing thestsprivatekeyaliaskey entry in the.oamkeystore.
- OIF is set up to use
osts_signingentry for signature operations andosts_encryptionfor decryption operations. - OSTS is set up to use
osts_encryptionfor decryption operations, andosts_signingfor signature operations in the SAML Issuance Templates.
Setting New Key Entries
- Create key entry in
.oamkeystore - Create entry in OIF/OSTS to refer the key entry in
.oamkeystore
Creating New Key Entry in .oamkeystore
.oamkeystore Keystore is unknown to the
administrator and must be reset to make modifications. Use the following WebLogic
Scripting Tool (WLST) commands to reset the password.
- Enter into the WLST environment by
executing:
$IAM_ORACLE_HOME/common/bin/wlst.sh - Connect to the WLS Admin
server:
connect() - Navigate to the Domain Runtime
branch:
domainRuntime() - Reset the .oamkeystore
password:
resetKeystorePassword() - Exit WLST
environment:
exit()
.oamkeystore is to
use the JDK's KeyTool application. In this example, two key entries with self signed
certificates will be created, one with the alias samlsigning and the
other with the alias samlencryption (replace $JDK_HOME
and $DOMAIN_HOME with the correct path; for the keystore password enter
the one you selected during the reset
operation):$JDK_HOME/bin/keytool -genkeypair -alias samlsigning -keyalg RSA -keysize 2048
-sigalg sha1withrsa -dname cn="ACME SAML Signing" -validity 1000 -keystore
$DOMAIN_HOME/conEg/fmwconEg/.oamkeystore -storetype JCEKS$JDK_HOME/bin/keytool -genkeypair -alias samlencryption -keyalg RSA -keysize
2048 -sigalg sha1withrsa -dname cn="ACME SAML Encryption" -validity 1000
-keystore $DOMAIN_HOME/conEg/fmwconEg/.oamkeystore -storetype JCEKSUpdating OIF and OSTS Settings
To use the new key entries created in the .oamkeystore during SAML
protocol exchanges, you have to create new SAML key entries in the Oracle Identity
Federation (OIF)/Oracle Secure Token Service (OSTS).
- Login to the OAM Administration Console:
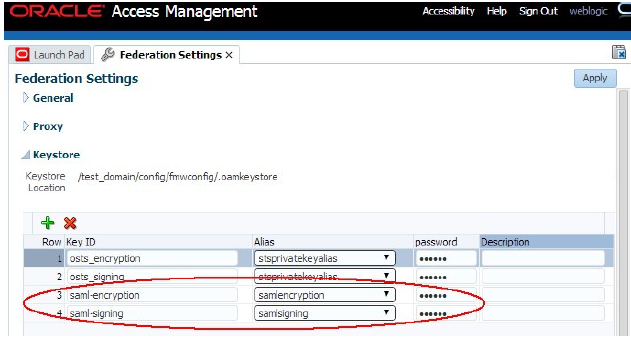
http(s)://oam-admin-host:oam-adminport/oamconsole. - Navigate to Configuration , Federation Settings or Security Token Service Settings.
- In the Keystore section, click the + button.
- Enter a KeyID for the new entry (for example,
saml-signing). - Select the alias for the new key entry from the dropdown, which
lists the key entries in the
.oamkeystore(for example,samlsigning). - Enter the password for the key entry that you set when creating that key.
- Repeat the process for other entries, if needed.
- click Apply.

Note:
Different key IDs can be referenced to the same key entry in the OAM Keystore.
Using New Key Entries to Update Global Settings
- Global Oracle Identity Federation (OIF) Settings
- Global Oracle Secure Token Service (OSTS) Settings
- Oracle Secure Token Service (OSTS) Settings
Updating Global OIF Settings
- Login to the OAM Administration console:
https://oam-admin-host:oam-adminport/oamconsole - Navigate to Configuration , Federation Settings.
- Select the Signing Key from the dropdown list of key entries
(these entries are defined in the Keystore section). For
example, select
saml-signing - Select the Encryption Key from the dropdown list of
key entries (these entries are defined in the Keystore
section). For example, select
saml-encryption - Click Apply.
Note:
After applying the settings, you must Redistribute certificates and/or SAML 2.0 metadata to partners.
Updating Global OSTS Settings
- Login to the OAM Administration
console:
https://oam-admin-host:oam-adminport/oamconsole - Navigate to Configuration , Security Token Service Settings.
- Select the Default Encryption Template from the dropdown list of key entries
(these entries are defined in the Keystore section). For example, select
saml-encryption - Click Apply.
Note:
After applying the settings, you must Redistribute certificates to partners.
Updating OSTS Settings
- Login to the OAM Administration
console:
https://oam-admin-host:oam-adminport/oamconsole - Navigate to Security Token Service , Token Issuance Templates.
- Click SAML Issuance Template that you want to update.
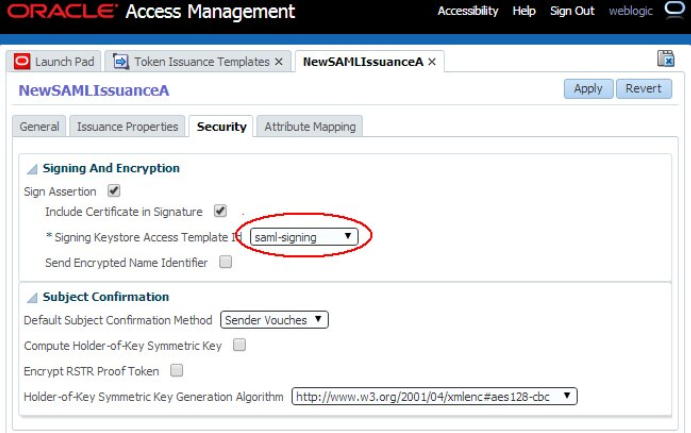
- Click Security tab.
- Select the Signing Keystore Access Template Id from the dropdown
list of key entries (these entries are defined in the Keystore section). For
example, select
saml-signing. - Click Apply.
Note:
After applying the settings, you must redistribute certificates to the partners.
Managing Key Rollover per Partner
Note:
Once the keys/certificates in OIF/OSTS have been updated, the Federation/WS-Trust flows will not work with the partners until they upload the new certificates into their systems.With OIF/OSTS, the administrator can perform key rollovers per partner. This allows them to plan when and how to notify specific partners of key and certificate changes.
- Set up new keys and certificates. For more information on setting up new keys and certificates, see Setting New Key Entries.
- Update the IdP or SP partner configuration in OIF to use the new keys and certificates.
- Notify the partner with new SAML 2.0 Metadata generated specifically for those new keys/certificates or new certificates corresponding to the new key entries.
- Set up new keys and certificates. For more information on setting up new keys and certificates, see Setting New Key Entries.
- If not already one:
- Create a new Relying Party Profile, which is a copy of the current Relying Party Profile of the Relying Party partner.
- Create a new SAML Issuance Template, which is a copy of the SAML Issuance Template referenced by the current relying party Profile used by the relying party partner.
- Update the new Relying Party Profile to use a new SAML Issuance Template instead of the current one.
- Update the new SAML Issuance Template to use the new keys/certificates.
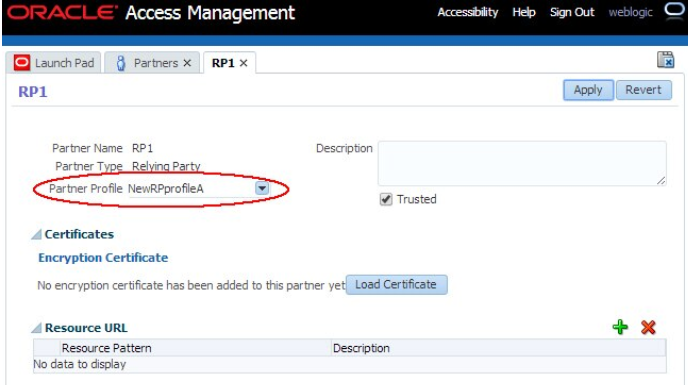
- Assign the Relying Party partner to the new Relying Party Profile.
Note:
Partner Profiles in the OIF configuration can be used to rollover OIF keys across a group of partners.Managing OIF Key Rollover
- Update the Identity Provider (IdP) or Service Provider (SP) partner configuration in OIF via WebLogic Scripting Tool (WLST) commands.
- Use the SAML 2.0 metadata or certificate information.
- Enter the WLST environment:
$IAM_ORACLE_HOME/common/bin/wlst.sh - Connect to the WLS Admin server:
connect() - Navigate to the Domain Runtime branch:
domainRuntime() - Update the partner configuration to set the Signing Key property
(referenced by
signingkeystoreaccesstemplateid) to the key entry ID defined in the Federation Settings, Keystore section.In this example,
saml-signingis the key entry ID.Replace
<PARTNER_NAME>by the name of the partner in OIF.Replace<IDP_OR_SP>by IDP or SP, the type of partner.updatePartnerProperty("<PARTNER_NAME>", "<IDP_OR_SP>", "signingkeystoreaccesstemplateid", "saml-signing", "string") - Update the partner configuration to set the Encryption Key property
(referenced by
encryptionkeystoreaccesstemplateid) to the key entry ID defined in the Federation Settings, Keystore section.In this example,
saml-encryptionis the key entry ID.Replace
<PARTNER_NAME>by the name of the partner in OIF.Replace<IDP_OR_SP>by IDP or SP, the type of partner.updatePartnerProperty("<PARTNER_NAME>", "<IDP_OR_SP>", "encryptionkeystoreaccesstemplateid", "saml-encryption", "string") - Exit the WLST environment:
exit()
Note:
With this release, a secure API is introduced to handle updates to both signing and encryption keys, thereby easing the admin activity during the certificate update without any service disruptions. For more information, see REST API for Federation Management in Oracle Access Manager.After the partner configuration has been updated, the partner must generate SAML 2.0 metadata or certificate information.
- Open a new browser and use the following URL to generate
metadata.
http://oam-runtime-host:oam-runtime-port/oamfed/idp/metadata?signid=
                            <SIGN_KEYENTRY_ID>&encid=<ENC_KEYENTRY_ID>
The signid query parameter contains the key entry ID for the signing certificate. Replace
<SIGN_KEYENTRY_ID>.The encid query parameter contains the key entry ID for the encryption certificate. Replace
<SIGN_KEYENTRY_ID>.An example would be:
http://oam.com/oamfed/idp/metadata?signid=saml-signing&encid=samlencryption
- Open a new browser and use the following URL to generate
certificate in PEM format.
http://oam-runtime-host:oam-runtime-port/oamfed/idp/cert?id=<KEYENTRY_ID>The id query parameter contains the key entry ID for the certificate. Replace
<KEYENTRY_ID>.An example would be:
http://oam.com/oamfed/idp/cert?id=saml-signing
Note:
You can first generate the SAML 2.0 Metadata/Certificate and provide it to the partner before updating the partner configuration.Managing OSTS Key Rollover
- Three Relying Party Partners:
RP1,RP2, andRP3 - Two Relying Party Profiles:
RPprofileAandRPprofileB, withRP1andRP2usingRPprofileAandRP3usingRPprofileB - Two SAML 2.o Issuance Templates:
SAMLIssuaneAreferenced byRPprofileAandSAMLIssuanceBreferenced byRPprofileB
The rollover consists of switching the RP1 first then followed by
RP2 and RP3.
RP1 perform the following steps.
- Login to the OAM Administration Console:
https://oam-admin-host:oam-adminport/oamconsole. - Navigate to Security Token Service, Partner Profiles, Relying Party Profiles.
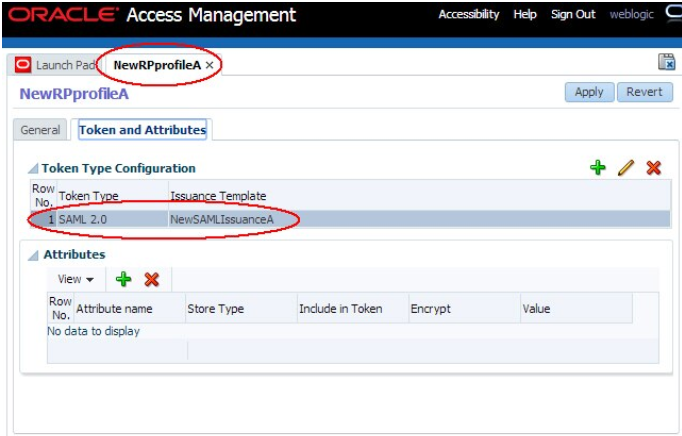
- Create a new Relying Party Profile called
NewRPprofileA, a copy ofRPprofileA. - Navigate to Security Token Service, Token Issuance Templates.
- Create a new SAML Issuance Template called
NewSAMLIssuanceA, a copy ofSAMLIssuanceA. - Update
NewRPprofileAto referenceNewSAMLIssuanceASAML 2.0 Issuance Template.
- Update
NewSAMLIssuanceASAML 2.0 Issuance Template in the Security tab to use the new key entry.
- Navigate to Security Token Service, Partners,
Relying Parties.
As a result, OSTS uses the new key entry
saml-signingfor signing outgoing SAML 2.0 Assertions for the RP1 Relying Party partner.
- Download the new certificates from OSTS by opening a browser and
use the following URL to generate the certificate in PEM format:
http://oam-runtime-host:oam-runtime-port/sts/servlet/samlcert?id=<KEYENTRY_ID>The id query parameter contains the key entry ID for the certificate. Replace
<KEYENTRY_ID>.An example would be:
http://oam.com/sts/servlet/samlcert?id=saml-signing - Provide the certificate to the partner.
The process of switching RP2 to a new certificate will be easier since
the new Relying Party profile and SAML Issuance Template already exist.
RP2 perform the following steps.
- Login to the OAM Administration Console:
https://oam-admin-host:oam-adminport/oamconsole. - Navigate to Security Token Service, Partners, Relying Parties.
- Open
RP1and configure it to use theNewRPprofileARelying Party Profile.As a result, OSTS uses the new key entry saml-signing for signing outgoing SAML 2.0 Assertions for the
RP1Relying Party partner. - Provide the certificate to the partner.
RP3
have not been created yet, switching RP3 to the new certificate
requires repeating the previously executed operations for RP1.
Note:
You can first provide the new certificate to the partner before updating the OSTS configuration.