23 Understanding Credential Collection and Login
This chapter includes the following topics:
Note:
Unless explicitly stated, information in this chapter is the same for all agent types and Access Manager credential collectors.
Overview of Access Manager Credential Collection
Access Manager provides two mechanisms for credential collection during authentication processing.
-
The default Embedded Credential Collector (ECC) is installed with the Access Manager Server and can be used as-is with no additional installation or set up steps (except the global password policy configuration described in "Managing Global Password Policy").
The mechanism that redirects the user from the Policy Enforcement Point to the Credential Collector is a proprietary front channel protocol over HTTP. This protocol currently provides a context of the request and the authentication response on the query string.
-
The OAM WebGate provides a single switch for the optional Detached Credential Collector (DCC). The DCC allows termination of end-user requests in the Web Tier as opposed to the Application Tier.
Note:
- It is recommended that you use ECC for the new features introduced in OAM 12c. Some of the new features introduced in OAM 12c do not support DCC. For example, OpenIDConnect with DCC is not supported.
- ECC and DCC both allow for a secure deployment where a Defense in Depth approach requires that security vulnerabilities (DDOS, Throttling, Application Firewalling) be handled in the upstream application delivery tier. For typical Enterprise deployments, robust upstream capabilities exist, making any potential benefit of terminating unauthenticated connections on the Web Tier very minimal, given the limitations with DCC.
For a detailed comparison of the two mechanisms for credential collection, see Understanding Authentication Methods and Credential Collectors.
Single Sign On login processing determines whether the user is a valid user and whether the session state is active or inactive (either a first time user or the user session has expired). Session management support locates, persists, and cleans up the session context and user token. Details are in the following sections.
Overview of the Login process with Self-Service Provisioning Applications
Provisioning does not create the session in Access Manager. When a new user uses a self-service provisioning application to create an account, he is prompted for his userID and password again when accessing an application.
The protected application is directed to Access Manager, which requests the user's credentials. For example, if Oracle Identity Governance is protected by Access Manager, the user request is redirected to Access Manager from which a request to enter credentials is made.
Note:
Success and failure results are the same as described in "Overview of the Login Process with Access Manager-Protected Resources".
Overview of the Login Process with Access Manager-Protected Resources
The first time a user attempts to access a protected resource, she is prompted for her credentials based on the authentication scheme and authentication level for the resource. Typically a userID and password are needed.
Failure: Authentication fails if the wrong userID or password is entered. The user is not authenticated and another prompt for credentials appears.
With Oracle Access Manager, only the ECC in the OAM server was available. Access Manager supports the ECC by default. However, Access Manager also enables you to configure an OAM WebGate to use as a detached credential collector (DCC). A DCC-enabled WebGate can be separate from (or combined with) a Resource WebGates.
Both the ECC and DCC provide an authentication flow that includes form login, error, and login retries. They provide SecurID and server affinity as well as password policy enforcement and a dynamic, multi-step, iterative, and variable (multi-step authentication) where the credentials are not supplied all at one time. A customizable authentication flow can include authentication plug-ins with contracts between the plug-in, OAM Proxy, and Credential Collector; a contract between the plug-in and login application; and between the Credential Collector and login application.
When deciding whether to use one credential collector or both, consider:
-
Co-existence: Allowing both the ECC and DCC to co-exist enables you to use authentication schemes and policies configured for either the ECC or the DCC. This enables a fallback mechanism for resources that rely on the ECC ( Oracle Access Management Console, for instance).
-
Disabling ECC: Disabling the ECC entirely prohibits access to resources that rely on the ECC mechanism ( Oracle Access Management Console, for instance).
Table 23-1 provides links to more information.
Table 23-1 Login Processing with Access Manager-Protected Resources
| Login Processing Topic | See |
|---|---|
|
With OAM Agents and ECC |
|
|
With OAM Agents and DCC |
|
|
With Other Agents or Mixed Agent Types |
Mixed agent types are supported. Processing is the same for each agent type. |
|
Login and Auto Login for Applications Using Oracle ADF Security |
Oracle Platform Security Services (OPSS) comprise Oracle WebLogic Server's internal security framework. On the Oracle WebLogic Server, you can run a Web application that uses Oracles Application Development Framework (Oracle ADF) security, integrates with Access Manager SSO, and uses OPSS SSO for user authentication. For more information, see Integrating Oracle ADF Applications with Access Manager SSO. |
Overview of the SSO Login Process with OAM Agents and ECC
Access Manager authenticates each user with a customer-specified authentication method to determine the identity and leverages information stored in the user identity store.
This topic is based on using the default Embedded Credential Collector with OAM Agents (Resource WebGates) protecting resources.
Access Manager authentication supports several authentication methods and a number of authentication levels. Resources with varying degrees of sensitivity can be protected by requiring higher levels of authentication that correspond to more stringent authentication methods.
When a user tries to access a protected application, the request is received by Access Manager which checks for the existence of the SSO cookie.
After authenticating the user and setting up the user context and token, Access Manager sets the SSO cookie and encrypts the cookie with the SSO Server key (which can be decrypted only by the SSO Engine).
Depending on the actions (responses in Access Manager 11g) specified for authentication success and authentication failure, the user may be redirected to a specific URL, or user information might be passed on to other applications through a header variable or a cookie value.
Based on the authorization policy and results of the check, the user is allowed or denied access to the requested content. If the user is denied access, she is redirected to another URL (specified by the Administrator in WebGate registration).
Figure 23-1 shows the processes involved in evaluating policies, validating a user's identity, authorizing the user for a protected resource, and serving the protected resource. This example shows the OAM Agent flow. There are slight variations with 12c WebGates/Access Clients.
Figure 23-1 SSO Log-in with Embedded Credential Collector and OAM Agents
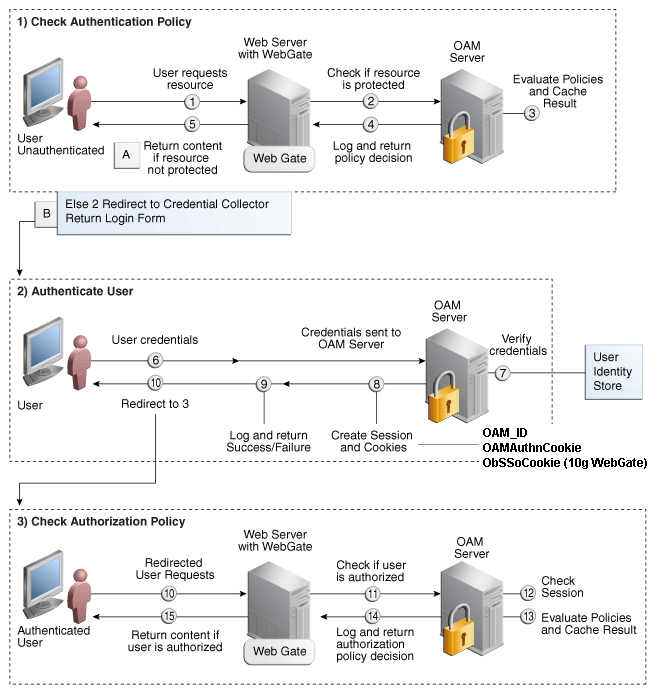
Description of "Figure 23-1 SSO Log-in with Embedded Credential Collector and OAM Agents"
Process overview: SSO Login Processing with Embedded Credential Collector and OAM Agents
-
The user requests a resource.
-
WebGate forwards the request to Access Manager for policy evaluation.
-
Access Manager:
-
Checks for the existence of an SSO cookie.
-
Checks policies to determine if the resource protected and if so, how?
-
-
Access Manager Server logs and returns decisions.
-
WebGate responds as follows:
-
Unprotected Resource: Resource is served to the user.
-
Protected Resource:
Request is redirected to the credential collector.
The login form is served based on the authentication policy.
Authentication processing begins
-
-
User sends credentials.
-
Access Manager verifies credentials.
-
Access Manager starts the session and creates the following host-based cookies:
-
One per Agent: OAMAuthnCookie set by OAM WebGates using the authentication token received from the OAM Server after successful authentication.
Note: A valid cookie is required for a session.
-
One for OAM Server: OAM_ID
-
-
Access Manager logs Success or Failure.
-
Credential collector redirects to WebGate and authorization processing begins.
-
Webgate prompts Access Manager to look up policies, compare the user's identity, and determine the user's level of authorization.
-
Access Manager logs policy decision and checks the session cookie.
-
OAM Server evaluates authorization policies and cache the result.
-
OAM Server logs and returns decisions
-
WebGate responds as follows:
-
If the authorization policy allows access, the desired content or applications are served to the user.
-
If the authorization policy denies access, the user is redirected to another URL determined by the Administrator.
-
Overview of the SSO Login Process with OAM Agents and DCC
The detached credential collector is simply a WebGate configured to use the additional Credential Collection capability in your deployment.
There are two deployment types depending on whether the DCC WebGate is also protecting the applications or not.
Table 23-2 identifies the DCC-supported deployments.
Table 23-2 DCC Deployment Support
| Deployment Type | Description |
|---|---|
|
Separate DCC and Resource Webgate |
A distributed deployment where WebGates protecting applications are managed independently from the centralized DCC. You can have:
Enable HTTPS between the user-agent and the DCC (but not with some or all Resource WebGates). When credential collection is externalized and centralized in the DCC, the user-agent connections with other WebGates never carry user credentials, nor session tokens that could be used to obtain access to resources protected by any other WebGate. This significantly reduces exposure caused by lack of SSL on these links and may be an acceptable tradeoff in some deployments.
See Also: Figure 23-2 |
|
Combined DCC and Resource Webgate |
A streamlined deployment minimizing configuration and processing overhead. A DCC WebGate can function as both a resource WebGate (Policy Enforcement Point) that protects application resources and a DCC. In this case, there is no front-channel redirection or processing:
See Also: Figure 23-3 |
Separate DCC and Resource Webgates: A sample deployment with segregated DCC is shown in Figure 23-2.
Figure 23-2 Example: Separate Resource WebGate and DCC WebGate Deployment
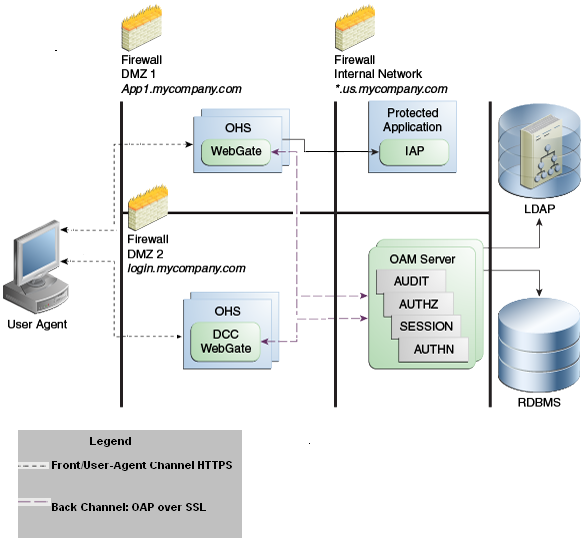
Description of "Figure 23-2 Example: Separate Resource WebGate and DCC WebGate Deployment "
This topology (Figure 23-2) showcases choices appropriate for scenarios with maximum security sensitivity. Both centralized and externalized credential collection are used: Resource WebGates protecting applications are segregated from the DCC WebGate performing credential collection.
The user accesses the Access Manager-protected resource from the public network. A WebGate protecting the application is deployed within a DMZ. The DCC WebGate is also deployed within a DMZ. The protected application and OAM Server instances are located within the private network and not directly accessible from the public network.
Using the DCC in the DMZ, only authenticated network connections are allowed to reach the server itself. The DCC inherits all back-channel communication characteristics available to OAM WebGates (network connection using the Oracle Access Protocol). The OAP offers:
-
SSL between the client and the server, optionally using 3rd party signed certificates
-
mutual authentication at the application level using client id and password
-
request multiplexing and full-duplex communication at the application level
-
built-in connection load balancing and failover capability
The DCC receives an authentication request from the Agent and checks for the presence of the DCC cookie. If the cookie does not exist, credential collection is initiated; checks are made, and user-supplied credentials are passed for validation.
Note:
Encryption occurs only from resource WebGate to the DCC. The channel is not encrypted for communication between resource WebGate and DCC; this is in clear text.
Figure 23-3 Combined DCC and WebGate Configuration
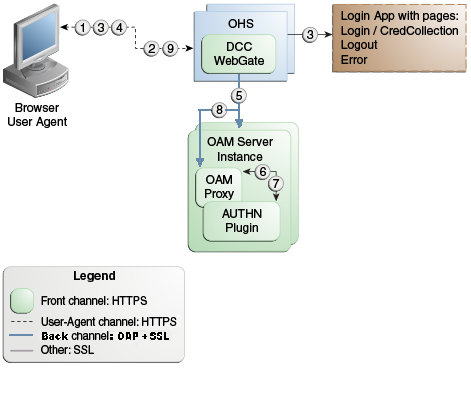
Description of "Figure 23-3 Combined DCC and WebGate Configuration"
Process overview: Authentication with the combined DCC and Resource Webgate
-
The user requests access to a resource which initiates the authentication process.
-
The DCC redirects through the front channel to the login page.
-
The login page is returned to the user.
-
User enters credentials, which are posted to the action URL (a user-defined parameter in an authentication scheme, Table 22-25).
-
Authentication occurs using the back channel (OAP) and OAM Proxy.
-
The Authentication Plug-in is activated.
-
The Plug-in requests redirect to a URL to collect additional credentials.
-
The Plug-in request is returned to the DCC.
-
The DCC redirects to the URL and expects specified credentials.
-
The Browser follows the redirect.
-
Credentials are posted to the Action URL.
Configuring OAM WebGate and Authentication Policy for DCC
Administrators can enable DCC credential operations, update DCC forms for password policy, add PasswordPolicyValidationScheme to Authentication Policy, and use DCC for converged Federation flows.
The following steps describe configuring a WebGate and Authentication Policy for use with the DCC. The appropriate sub sections are linked within each step.
Note:
If your environment uses the ECC, See Completing Password Policy Configuration.
Enabling DCC Credential Operations
Whether you are using a separate DCC or combined DCC and Resource WebGate, you must enable Allow Credential Collector Operations in the DCC's OAM Agent registration page.
With a separate DCC and Resource WebGate, you must also edit the Resource WebGate registration page to set the Logout Redirect URL to the DCC's logout.pl, as described in Step 3.
The following procedure presumes your deployment uses Open mode communication. If your deployment uses Simple or Cert mode communication, be sure to copy the appropriate artifacts when you perform Step 4.
Prerequisites
Locating and Updating DCC Forms for Password Policy
Access Manager provides several dynamic pages for user interactions with the DCC.
Prerequisites
- Locate the DCC forms in the WebGate host (Table 24-3)
: $WEBGATE_HOME/webgate/ohs/oamsso/*,$WEBGATE_HOME/webgate/ohs/oamsso-bin/*pl, and$WEBGATE_HOME/webgate/ohs/oamsso-bin/templates/*. - Customize their location, depending on the desired topology of the authentication scheme being developed.
- Update Perl Location: Update the Perl location to be consistent with the actual location, in the first line of the login, logout, and securid scripts on Webgate host in
$WEBGATE_HOME/webgate/ohs/oamsso-bin/*pl(Table 24-3). - Customize the default pages for your enterprise, or replace them entirely with custom pages. For example, you can design, implement, and deploy a custom page that displays a different version of the login form for a mobile browser than is used for a desktop browser.
- Proceed to "Adding PasswordPolicyValidationScheme to Authentication Policy for DCC".
Adding PasswordPolicyValidationScheme to Authentication Policy for DCC
You can use your DCC Authentication Scheme in a Protected Resources Authentication Policy.
The steps you perform depend on the type of deployment you have:
-
Combined DCC/Resource WebGate: Perform Step 1 to add your DCC Authentication Scheme to the Protected Resources Authentication Policy of the combined DCC/Resource WebGate Application Domain.
-
Separate Resource WebGate: Perform Step 3 to add your DCC Authentication Scheme to the Protected Resources Authentication Policy of the separate Resource WebGate Application Domain.
Perform Step 2 regardless of your DCC deployment type. By default, login and logout forms are excluded through OHS /httpd.conf/webgate.conf so that you do not need to exclude them through policies. However, with the Chrome browser, you must explicitly exclude the async favicon.ico request (which overrides the DCCCtxCookie).
Note:
This example refers to the PasswordPolicyValidationScheme set for the DCC in Configuring Password Policy Authentication.
Prerequisites
Locating and Updating DCC Forms for Password Policy
-
Combined DCC/Resource WebGate: Open the DCC application domain:
- Policy Configuration
- Application Domains
- DCCDomain
-
Locate and open the Authentication Policy, Protected Resource Policy (see "Searching for an Authentication Policy").
-
Add your DCC Authentication Scheme to this policy (see "Defining Authentication Policies for Specific Resources").
- PasswordPolicyValidationScheme (DCC Authentication Scheme)
-
Perform Step 2 if you have the Chrome Browser. Otherwise, go to Step 4.
-
Chrome Browser: Add and exclude resource
/favicon.icoin the DCCDomain, as follows.-
From DCCDomain, click the Resources tab.
-
Find and open the HTTP resource
/favicon.ico(or click the New Resource button and then add this resource). -
Confirm or edit the Resource URL to:
/favicon.ico -
In the Protection section, Protection Level list, select Excluded, then click Apply.
-
Proceed to Step 4.
-
-
Separate Resource Webgate: Open the Resource Webgate application domain.
- Policy Configuration
- Application Domains
- ResourceWGDomain
-
Locate and open the Authentication Policy, Protected Resource Policy (see "Searching for an Authentication Policy").
-
Add your DCC Authentication Scheme and an optional Failure URL (when not specified, Failure URL displays the default error page) to this policy (see "Defining Authentication Policies for Specific Resources"):
- DCC Authentication Scheme
- Failure URL (optional)
-
Perform Step 2 if you have the Chrome Browser. Otherwise, go to Step 4.
-
Restart your Web server and proceed to "Completing Password Policy Configuration".
Supporting Federation Flows With DCC
The DCC is enhanced to work as a public end-point to the Access Manager server. HTTP requests to the DCC are tunneled through NAP to the proxy module of the Access Manager server. Only requests defined in the TunneledUrls parameter of the DCC Profile will be tunneled. The JSP pages and servlets are executed in the Access Manager server and the response is tunneled back to the DCC. The end user effectively communicates only to the DCC.
Note:
If a WebGate is configured as a DCC and federated flows are in use, the DCC WebGate cannot be used to protect the resource. A separate WebGate must be configured and used to protect the resource. Authentication and authorization requests will be tunneled to the OAM Server, and the ECC login form will be tunneled and displayed in the user's browser.
To use DCC for converged Federation flows, perform the following manual steps.
Tunneling from DCC to Access Manager Over Oracle Access Protocol
Access Manager supports HTTP communication over the Oracle Access Protocol (OAP). In this case, a WebGate configured as a DCC uses the ECC servlets for credential collection during Access Manager authentication.
The following sections contain more details.
Note:
For details on the DCC, see Embedded Credential Collector Versus Detached Credential Collector.
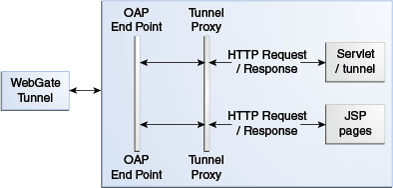
How DCC Tunneling with OAP Works
The tunneling process works for DCC WebGates only.
Figure 23-4 illustrates how the tunneling process works.
The following steps provide more details in regards to the OAP Tunneling process.
-
The URL to be tunneled is configured in the DCC WebGate profile.
-
This same URL is mapped to a servlet or JSP page in the Access Manager server.
-
On accessing the tunneled URL, the WebGate intercepts the HTTP request and converts it to an OAP request.
-
The OAP request is forwarded to the Access Manager server.
-
The Access Manager server (OAM proxy) receives the OAP request and passes it to the tunnel proxy.
-
The tunnel proxy will convert the OAP request to an HTTPServletRequest and invoke the corresponding servlet (or compiled servlet in the case of a JSP).
-
The response is converted back to an OAP message and passed to the OAP end point.
-
The OAM end point responds to the WebGate with the converted OAP message.
-
The WebGate converts the OAP message back to an HTTP response.
-
The WebGate provides the HTTP response to the caller (browser).
Configuring OAP Tunneling
To configure OAP Tunneling, a WebGate must be installed and configured to work with the Access Manager server as a DCC.
The Access Manager endpoint must be deployed on the Access Manager Server. After ensuring these prerequisites have been met, add a user-defined parameter to the WebGate profile that defines all URLs to be tunneled using the form TunneledUrls=<URL>,<URL1>. For example:
TunneledUrls=/oam,/sampleapp
Lastly, protect the Tunneled URLs with an Authentication Policy. For details, see Managing Authentication and Shared Policy Components.
Configuring a DCC WebGate for X509 Authentication
Configure a WebGate for DCC and convert it to SSL for using it with X509 authentication.
Configuring the WebLogic Server
Use the procedures in the following sections to configure a WebLogic Server for X509 authentication.
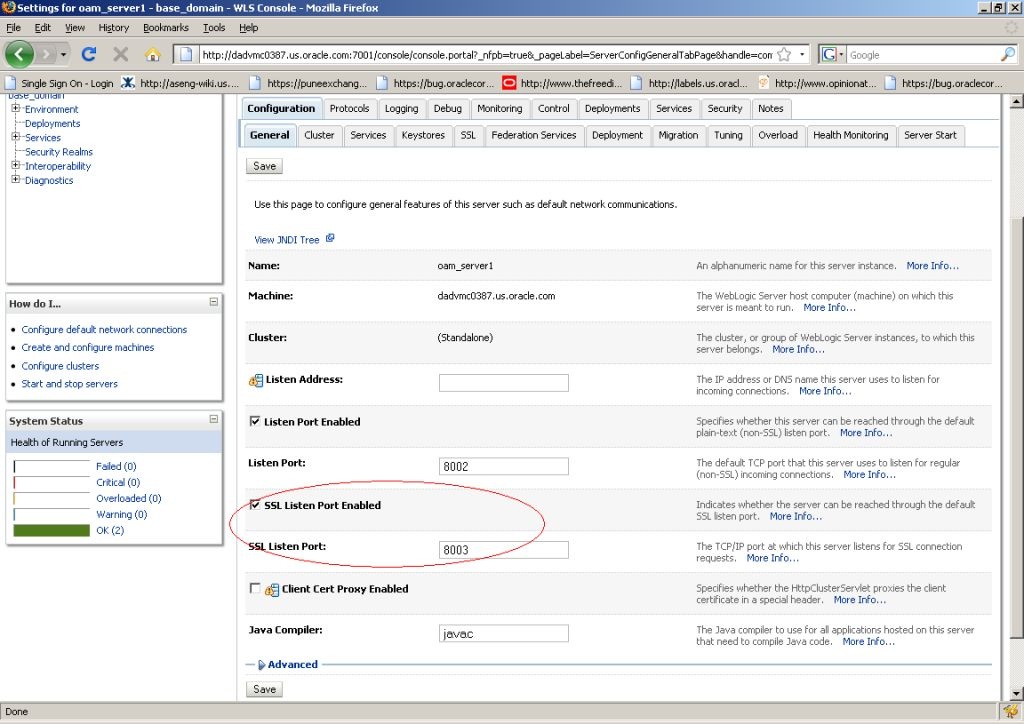
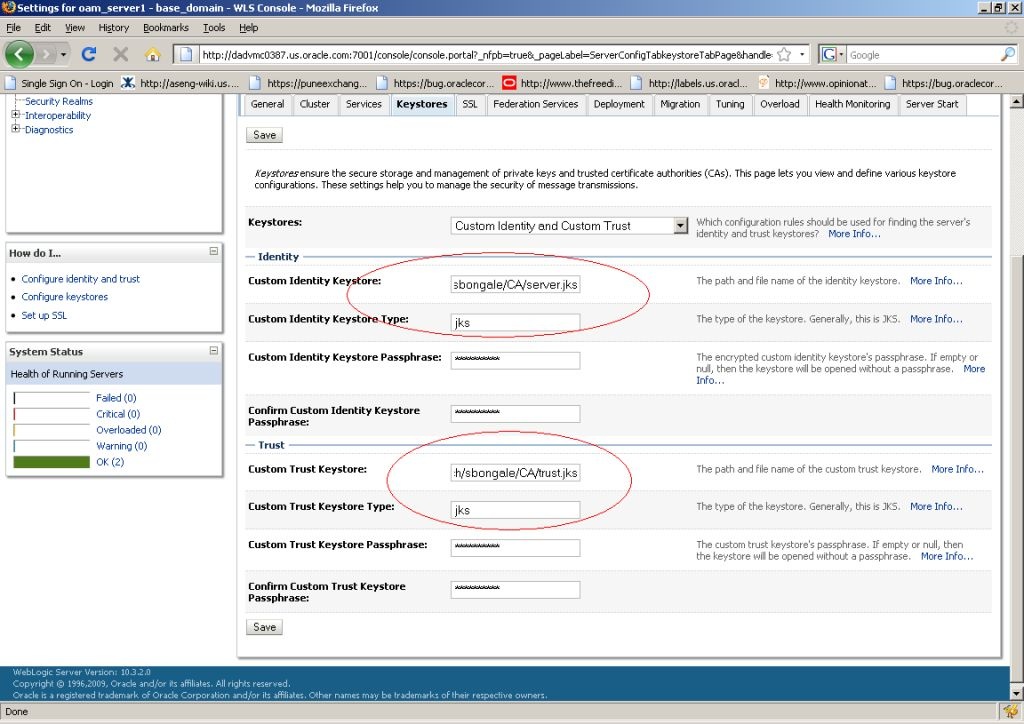
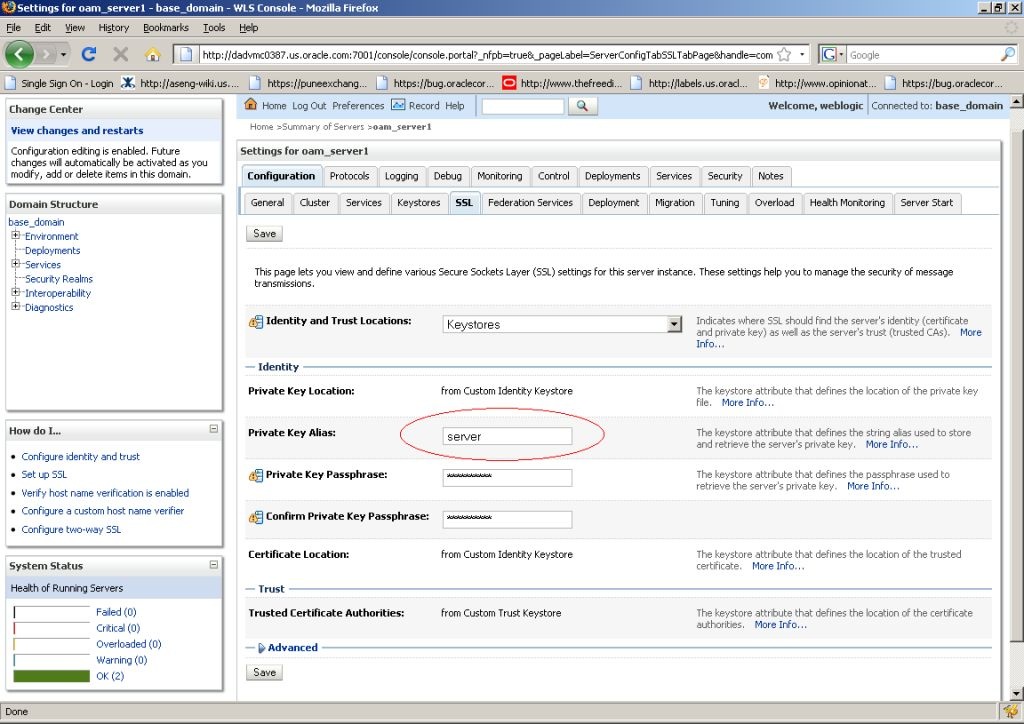
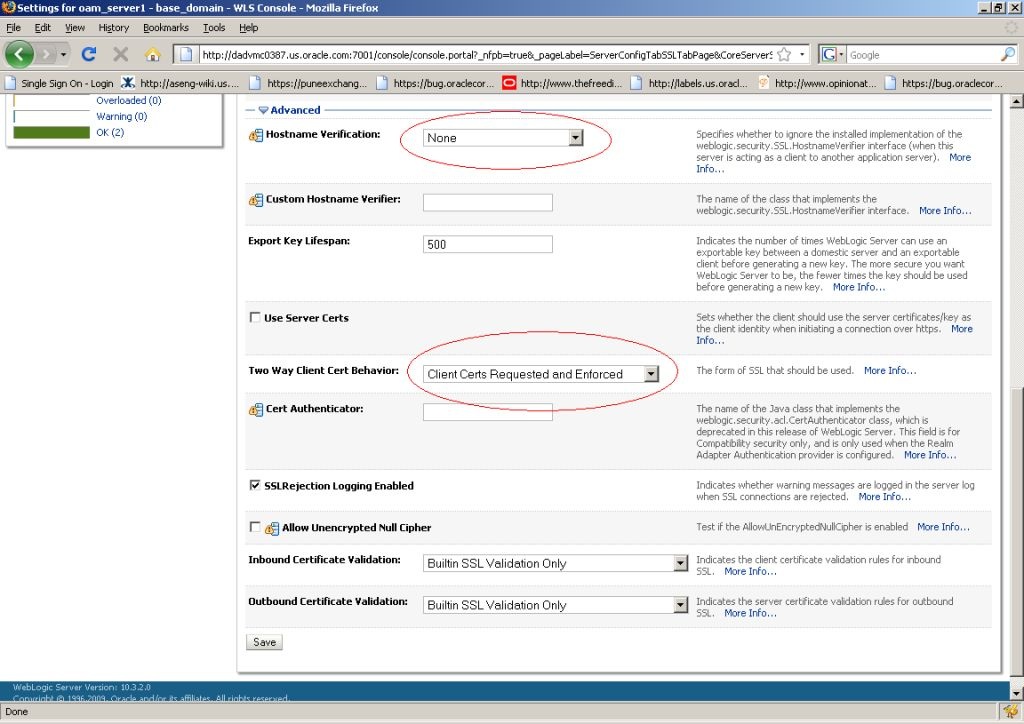
Configuring the WebLogic Server Instance
Use the WebLogic console to configure the instance of the WebLogic Server to be SSL and client certificate enabled.
Creating the User Certificate
You can create a user certificate in the .p12 format and install it in your browser.
Run the following OpenSSL commands:
Adding the Root CA Certificate
You can add the Root CA certificate of the certificate utility used to SSL enable the WebLogic server.
(In this example, the OpenSSL certificate utility is used.) The Root CA certificate must be added to the .oamkeystore and amtruststore files located in the following WebLogic directory:
$DOMAIN_HOME/base_domain/config/fmwconfig
-
Retrieve the password for the
.oamkeystoreandamtruststorefiles in WebLogic.-
Navigate to $MIDDLEWARE_HOME/Oracle_IDM1/common/bin/.
-
Run wlst.sh.
-
Run connect() in the WLST shell.
-
Run domainRuntime() in the WLST shell.
-
Run listCred(map="OAM_STORE",key="jks") in the WLST shell to display the password.
-
-
Add the Root CA certificate to the
.oamkeystoreandamtruststorefiles using thekeytoolcommand.The value of –storepass is the password retrieved in the previous step. For example:
./keytool -importcert -alias ROOT_CA -file /scratch/CA/ca.pem -keystore /scratch/Oracle/Middleware/user_projects/domains/base_domain/config/fmwconfig/.oamkeystore -storepass oru8nd3hhd4t4nrmh6unhv825b -storetype jceks

./keytool -importcert -alias ROOT_CA -file /scratch/CA/ca.pem -keystore /scratch/Oracle/Middleware/user_projects/domains/base_domain/config/fmwconfig/amtruststore -storepass oru8nd3hhd4t4nrmh6unhv825b -storetype jks
Configuring a WebGate For DCC
You can configure a WebGate for DCC. As part of this procedure you will also create the LDAPScheme_DCC Authentication Scheme.
You will use the Oracle Access Management Console for the configuration steps. This procedure assumes you have already installed the WebGates for which you will be creating profiles.
-
Configure an OAM WebGate profile named, for example, ABC_WG1 on http://<host>:7778/index.html.
-
Configure an OAM WebGate profile named, for example, XYZ_WG1_DCC on http://<host>:7779/index.html.
This WebGate will act as the authentication WebGate.
-
Navigate to the XYZ_WG1_DCC WebGate profile and Select Allow Credential Collector Operations Option.
This configures the WebGate for use as a DCC.
-
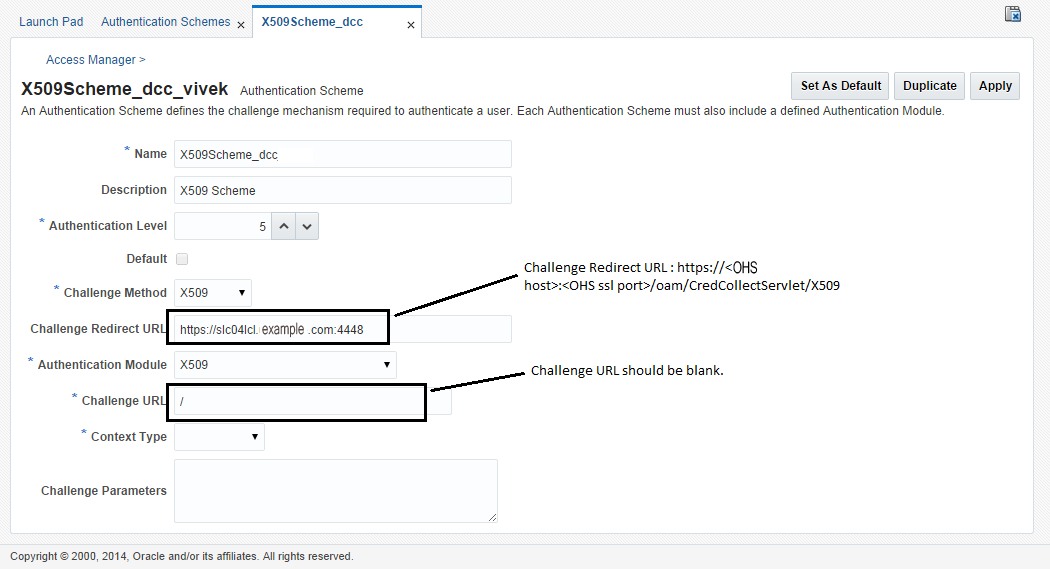
Create a new Authentication Scheme by making a copy of the LDAPScheme Authentication Scheme and modifying the following values.
Only modify the following values; leave the other parameters untouched.
-
Name as LDAPScheme_DCC
-
Challenge redirect URL is http://<host>:<port>/ (http://<host>:7779/)
-
Challenge URL : /oamsso-bin/login.pl
-
-
Navigate to the ABC_WG1 Application Domain and do the following.
-
Go to Authentication Policy.
-
Select Authentication Policy (Protected Resource Policy).
-
Select the newly created Authentication Scheme LDAPScheme_DCC.
-
-
Restart the Oracle HTTP Server with port 7779 in use.
-
Access the protected resource at http://<host>:7778/index.html.
You should get challenge page from the authenticating WebGate server (port 7779). After providing valid credentials, the resource on the port 7778 server should be displayed.
Converting the DCC WebGate to SSL
You can convert the DCC WebGate instance to SSL.
The following sections have details.
Generating Server Certificates
You can generate server certificates using Oracle Wallet Manager (OWM).
-
Create a Wallet using OWM.
-
Start OWM.
$ <webtier>/bin/owm
-
Select Wallet > New and follow the on screen instructions to create a Certificate Request.
-
Save the created Wallet in an accessible location and write down the path for future reference.
-
Select the Auto Login option and save the Wallet again.
-
-
Create and export the server request file as server.csr using OWM.
-
Select Operations > Export Certificate Request.
-
Save as server.csr
-
-
Sign server.csr to generate user certificate server.pem.
You can use the OpenSSL utility as follows:
openssl x509 -req -md5 -CAcreateserial -in ohs_server.csr -days 3656 -CA /
  <path>/ca.pem -CAkey /<path>/ca-key.pem -out server.pem
The values of ca.pem and ca-key.pem should be the same ones used when generating the client certificate.
-
Import the CA certificate (ca.pem) into OWM.
-
Select Operations > Import Trusted Certificate.
-
Point to ca.pem, your CA certificate.
-
Import the CA certificate and save the wallet.
-
-
Import server.pem as user cert
-
Select Operations > Import User Certificate.
-
Point to the server.pem certificate generated in step 3.
-
Import the server certificate and save the wallet.
-
-
Edit the Oracle HTTP Server (OHS) ssl.conf file to point to this wallet as follows.
#Path to the wallet
SSLWallet "/<path to wallet>/wallet"
SSLVerifyClient require
ssl.conf is located at <webtier>/<instance_home>/config/ohs/ssl.conf.
-
Restart the OHS instance.
