2 Creating an Application by Using the SAP SuccessFactors Connector
Learn about onboarding applications using the connector and the prerequisites for doing so.
2.1 Process Flow for Creating an Application By Using the Connector
From Oracle Identity Governance release 12.2.1.3.0 onward, connector deployment is handled using the application onboarding capability of Identity Self Service.
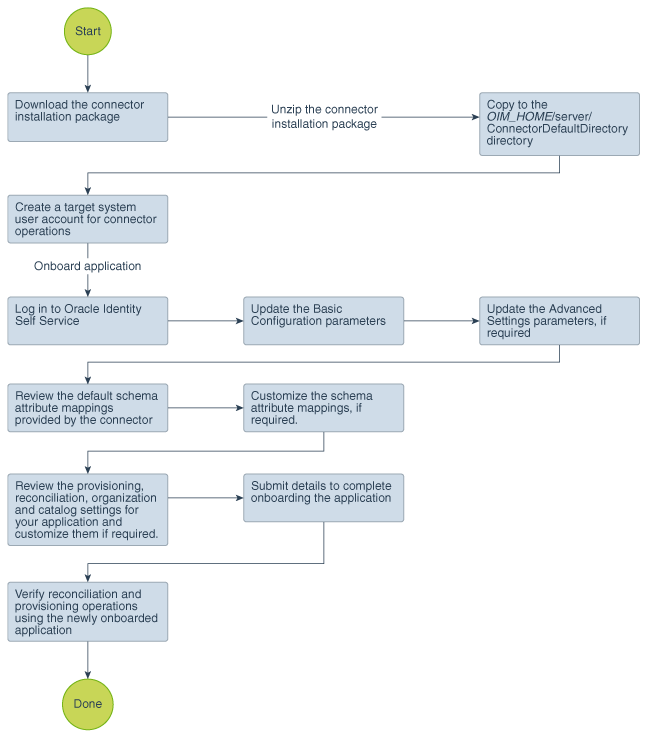
Figure 2-1 is a flowchart depicting high-level steps for creating an application in Oracle Identity Governance by using the connector installation package.
Figure 2-1 Overall Flow of the Process for Creating an Application By Using the Connector

Description of "Figure 2-1 Overall Flow of the Process for Creating an Application By Using the Connector"
2.2 Prerequisites for Creating an Application By Using the Connector
Learn about the tasks that you must complete before you create the application.
2.2.1 Registering the Client Application
Registering the client application (that is, the SuccessFactors connector) with the target system is a step that is performed so that the connector can access the REST APIs. The step includes client application registration, certificate generation, and obtaining clientid and client secret attributes.
Registering the client application involves performing the following tasks on the target system:
Note:
The detailed instructions for performing these preinstallation tasks are available in SuccessFactors product documentation at https://support.sap.com/documentation.html/- Register your client application with SuccessFactors to provide a secure sign in and authorization of your services. You can register your client application by creating an application in the SuccessFactors Manage OAuth2 Client Applications page.
- While creating an application, ensure that you provide information in the mandatory fields. Fields such as Application Name, Description, Application URL, Common Name (CN), and Validity (Days) are mandatory fields required for the SuccessFactors connector. As a best practice, SuccessFactors recommends to use your company ID as the Common Name (CN) field information. As part of registering your client application, a
Certificate.pemfile gets generated. - Make a note of the clientId and client secret information. Post application registration, from the Manage OAuth2 Client Application page you can view the clientId and client secret information. The clientId and client secret info is required while configuring the Basic Configuration parameters at the time of application creation.
2.3 Creating an Application By Using the Connector
You can onboard an application into Oracle Identity Governance from the connector package by creating a Target application. To do so, you must log in to Identity Self Service and then choose the Applications box on the Manage tab.
Note:
For detailed information on each of the steps in this procedure, see Creating Applications of Oracle Fusion Middleware Performing Self Service Tasks with Oracle Identity Governance.
- Create an application in Identity Self Service. The high-level steps are as follows:
- Verify reconciliation and provisioning operations on the newly created application.
See Also:
-
Configuring the SAP SuccessFactors Connector for details on basic configuration and advanced settings parameters, default user account attribute mappings, default correlation rules, and reconciliation jobs that are predefined for this connector
-
Configuring Oracle Identity Governance for details on creating a new form and associating it with your application, if you chose not to create the default form