2 Creating an Application By Using the SAP User Management Connector
Learn about onboarding applications using the connector and the prerequisites for doing so.
Process Flow for Creating an Application By Using the Connector
From Oracle Identity Governance release 12.2.1.3.0 onward, connector deployment is handled using the application onboarding capability of Identity Self Service.
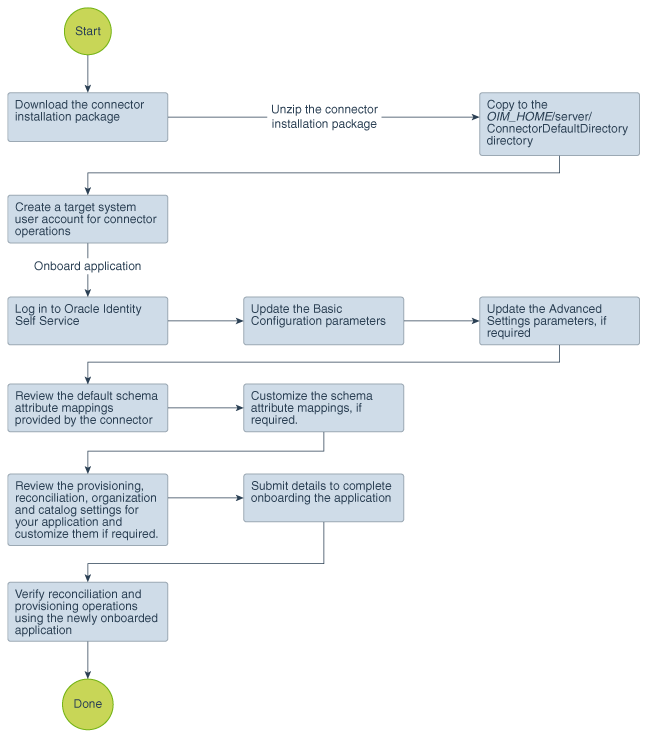
Figure 2-1 is a flowchart depicting high-level steps for creating an application in Oracle Identity Governance by using the connector installation package.
Figure 2-1 Overall Flow of the Process for Creating an Application By Using the Connector

Description of "Figure 2-1 Overall Flow of the Process for Creating an Application By Using the Connector"
Prerequisites for Creating an Application by Using the Connector
Learn about the tasks that you must complete before you create the application.
Downloading the Connector Installation Package
You can obtain the installation package for your connector on the Oracle Technology Network (OTN) website.
Downloading and Installing the SAP JCo
The SAP Java Connector file is a middleware component that enables the development of SAP-compatible components and applications in Java. This component is required to support inbound and outbound SAP server communication during runtime.
Note:
-
Ensure that you are using version 3.0.2 or later of the sapjco3.jar file.
-
To download files from the SAP Web site, you must have access to the SAP service marketplace with Software Download authorization.
To download and copy the external code files to the required locations:
-
Download and save the SAP JCo release file from the SAP website.
-
Extract the contents of the file that you download.
-
Copy the sapjco3.jar file into the OIG_HOME/server/ThirdParty directory. Then, add its path to the DOMAIN_HOME\bin\startWebLogic file as follows:
Note:
In an OIG cluster, copy the sapjco3.jar file to each node of the cluster and set the CLASSPATH.-
On Microsoft Windows:
In a text editor, open the DOMAIN_HOME/bin/startWebLogic.cmd file and add the following path:
Set
CLASSPATH=MIDDLEWARE_HOME_PATH\idm\server\ThirdParty\sapjco3.jar;%SAVE_CLASSPATH%Save and close the file. Restart the server for the changes in the CLASSPATH variable to take effect.
-
On Linux:
In a text editor, open the DOMAIN_HOME/bin/startWebLogic.sh file and add the following path:
Set
CLASSPATH=MIDDLEWARE_HOME_PATH/idm/server/ThirdParty/sapjco3.jar:"${SAVE_CLASSPATH}"For example,
CLASSPATH=/home/oracle/12cPS3/Middleware/idm/server/ThirdParty/sapjco3.jar:"${SAVE_CLASSPATH}"Save and close the file. Restart the server for the changes in the CLASSPATH variable to take effect.
-
-
Copy the RFC files into the required directory on the Oracle Identity Governance host computer, and then modify the appropriate environment variable so that it includes the path to this directory:
-
On Microsoft Windows:
Copy the sapjco3.dll file into the winnt\system32 directory. Alternatively, you can copy these files into any directory and then add the path to the directory in the PATH environment variable.
-
On Solaris and Linux:
Copy the libsapjco3.so file into the /usr/local/jco directory, and then add the path to this directory in the LD_LIBRARY_PATH environment variable.
-
-
On a Microsoft Windows platform, ensure that the msvcr80.dll and msvcp80.dll files are in the c:\WINDOWS\system32 directory. If required, both files can be downloaded from various sources on the Internet.
-
Restart the server for the changes in the environment variable to take effect.
Note:
You can either restart the server now or after the connector is installed.
-
To check if SAP JCo is correctly installed, in a command window, run one of the following commands:
java –jar JCO_DIRECTORY/sapjco3.jar
java –classpath JCO_DIRECTORY/sapjco3.jar com.sap.conn.jco.rt.About
The JCo classes and JCo library paths must be displayed in this dialog box.
Creating a Target System User Account for Connector Operations
The connector uses a target system account to connect to the target system during each connector operation.
This target system account must be one of the following:
-
If you are using a target system in which the SAP HRMS module is enabled, then the target system account must be a user to whom you assign a customized role (for example, ZHR_ORG_UM) with the PLOG and P_ORIGIN authorization objects. Note that the P_ORIGIN authorization object is related to the SAP HRMS module. Therefore, you can assign a customized role with the P_ORIGIN authorization object only if the SAP HRMS module is enabled.
-
If you are using a target system in which the SAP HRMS module is not enabled, then the target system account must be a user to whom you assign a customized role (for example, ZHR_ORG_UM) with the following authorization objects:
-
PLOG
-
Authorization objects that run BAPIs corresponding to each provisioning function.
For example, consider a provisioning function that adds a multivalued attribute (such as role) to a user. If you want the connector to perform this provisioning operation, then you must create a target system user account to which you assign a customized role with the PLOG authorization object and an authorization object that runs the BAPIs to create, modify, or display roles.
-
This section provides information on the following topics:
Creating a Target System User Account for the SAP UM (SAP ERP or SAP CUA) Target
Oracle Identity Governance requires a target system user account to access the target system during connector operations.
To create a target system user account for the SAP UM target:
Creating a Target System User Account for the SAP HR Target
The connector uses a target system account to connect to the target system during reconciliation. This target system account must be a CPIC user to whom you assign a customized role with the S_IDOC_ALL profile, S_RFC authorization object, and PLOG authorization object.
Create user of type CPIC with the following privileges:
Note:
You must configure the PLOG authorization object so that the values assigned to this object match the ones shown in Step 2 through 6. Only the Plan Version (PLVAR) object can be set according to your requirements.Assigning Roles to a User Account in a SAP GRC System for Connector Operations
You can perform connector operations such as Access Request Management and Access Risk Analysis through the SAP GRC system.
Note:
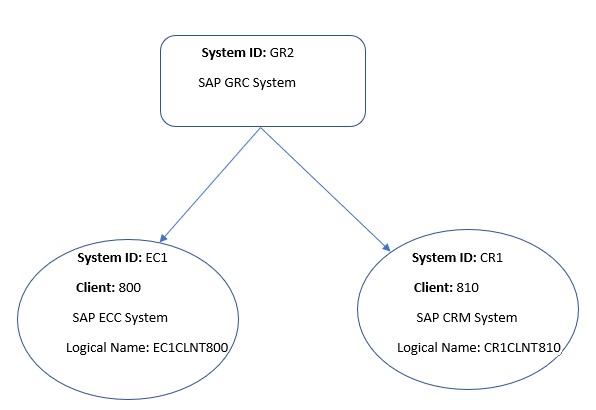
The naming convention of the connector name created in SAP GRC should be synchronized with the logical name of the system to be integrated. To achieve this, a standard naming convention like <SID>CLNT<XXX> can be followed.
The below figure illustrates an example of the naming convention to be followed. According to this example, when a connector is created while integrating any system like ECC, CRM, SRM, or S/4 HANA with SAP GRC, ensure to create an RFC destination of the system by following the standard naming convention which is synchronized with the logical name of the system.
Figure 2-2 Naming Convention For Connector Created in SAP Business Objects Access Control System

If you want to perform connector operations such as Access Request Management and Access Risk Analysis through the SAP GRC system, then assign the following minimum set of roles to a user account in SAP GRC:
| Role Name | Description |
|---|---|
|
SAP_BC_WEBSERVICE_CONSUMER |
Web Service Consumer |
|
SAP_GRC_NWBC |
Governance, Risk, and Compliance |
|
SAP_GRAC_ACCESS_APPROVER |
Role for Access Request Approver |
|
SAP_GRAC_RISK_OWNER |
Risk Maintenance and Risk Analysis |
|
SAP_GRAC_ROLE_MGMT_ROLE_OWNER |
Role Owner |
Apart from the default roles provided by SAP in the preceding table, you must add the additional authorizations to the user.
-
Add the following authorizations along with the corresponding default parameter values:
-
GRFN_CONN
-
GRAC_SYS
-
GRAC_ROLER
-
GRAC_RISK
-
GRAC_REQ
-
GRAC_RA
-
S_USER_GRP
-
GRFN_USER
-
GRAC_ROLED
-
GRAC_ROLEP
-
GRAC_EMPLY
-
GRAC_USER
-
S_CTS_ADMI
-
S_CTS_SADM
-
GRAC_ACTN
-
GRAC_FFOWN
-
-
Modify the parameter values as follows:
For GRFN_CONN-
ACTVT:
16 -
GRCFN_CONN:
*
For GRAC_SYS-
ACTVT:
01, 02, 03, 78 -
GRAC_APPTY:
* -
GRAC_ENVRM:
* -
GRAC_SYSID:
*
For GRAC_ROLER-
ACTV:
16 -
GRAC_OUNIT:
* -
GRAC_ROLE:
* -
GRAC_ROTYP:
* -
GRAC_SYSID:
*
For GRAC_RISK-
ACTVT:
16 -
GRAC_BPROC:
* -
GRAC_RISK:
* -
GRAC_RLVL:
* -
GRAC_RSET:
* -
GRAC_RTYPE:
*
For GRAC_REQ-
ACTVT:
01, 02, 03 -
GRAC_BPROC:
* -
GRAC_FNCAR:
* -
GRAC_RQFOR:
* -
GRAC_RQINF:
* -
GRAC_RQTYPE:
*
For GRAC_RA-
ACTVT:
16, 70 -
GRAC_OTYPE:
* -
GRAC_RAMOD:
1, 2, 3, 4, 5 -
GRAC_REPT:
01, 02, 03, 04, 05
For S_USER_GRP-
ACTVT:
03 -
CLASS:
*
For GRFN_USER_GRP-
ACTVT:
*
For GRAC_ROLED-
GRAC_ACTRD:
03, FS -
GRAC_BPROC:
* -
GRAC_LDSCP:
* -
GRAC_RLSEN:
* -
GRAC_RLTYP:
* -
GRAC_ROLE:
*
For GRAC_ROLEP-
ACTVT:
78 -
GRAC_BPROC:
* -
GRAC_OUNIT:
* -
GRAC_RLTYP:
* -
GRAC_ROLE:
* -
GRAC_SYSID:
*
For GRAC_USER-
ACTVT:
01, 02, 03 -
GRAC_CLASS:
* -
GRAC_OUNIT:
* -
GRAC_SYSID:
* -
GRAC_USER:
* -
GRAC_UTYPE:
*
For GRAC_EMPLY-
ACTVT:
01, 02, 03 -
GRAC_COMP:
* -
GRAC_COSTC:
* -
GRAC_DEPT:
* -
GRAC_LOCTN:
*
For GRAC_FFOWN-
ACTVT:
* -
GRAC_OWN_T:
* -
GRAC_SYSID:
* -
GRAC_USER:
*
For GRAC_ACTN-
GRAC_ACTN:
HOLD -
GRFNMW_PRC:
*
For S_CTS_SADM-
CTS_ADMFC:
* -
DESTSYS:
* -
DOMAIN:
*
For S_CTS_ADMI-
CTS_ADMFCT:
*
-
Creating an Application By Using the Connector
You can onboard an application into Oracle Identity Governance from the connector package by creating a Target application. To do so, you must log in to Identity Self Service and then choose the Applications box on the Manage tab.
Note:
For detailed information on each of the steps in this procedure, see Creating Applications of Oracle Fusion Middleware Performing Self Service Tasks with Oracle Identity Governance.
- Create an application in Identity Self Service. The high-level steps are as follows:
- Verify reconciliation and provisioning operations on the newly created application.
See Also:
-
Configuring the SAP User Management Connector for details on basic configuration and advanced settings parameters, default user account attribute mappings, default correlation rules, and reconciliation jobs that are predefined for this connector
-
Configuring Oracle Identity Governance for details on creating a new form and associating it with your application, if you chose not to create the default form