2 Creating an Application By Using the Google Apps Connector

Learn about onboarding applications using the connector and the prerequisites for doing so.

2.1 Process Flow for Creating an Application By Using the Connector

From Oracle Identity Governance release 12.2.1.3.0 onward, connector deployment is handled using the application onboarding capability of Identity Self Service.

Figure 2-1 is a flowchart depicting high-level steps for creating an application in Oracle Identity Governance by using the connector installation package.

Figure 2-1 Overall Flow of the Process for Creating an Application By Using the Connector
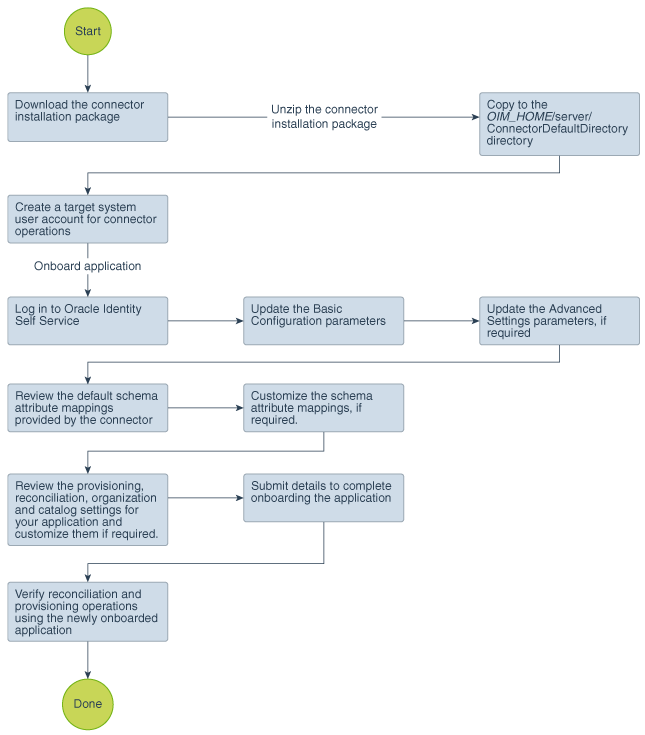
Description of Figure 2-1 follows
Description of "Figure 2-1 Overall Flow of the Process for Creating an Application By Using the Connector"

2.2 Prerequisites for Creating an Application By Using the Connector

Learn about the tasks that you must complete before you create the application.

2.2.1 Downloading the Connector Installation Package

You can obtain the installation package for your connector on the Oracle Technology Network (OTN) website.

To download the connector installation package:
  1. Navigate to the OTN website at http://www.oracle.com/technetwork/middleware/id-mgmt/downloads/connectors-101674.html.
  2. Click OTN License Agreement and read the license agreement.
  3. Select the Accept License Agreement option.
    You must accept the license agreement before you can download the installation package.
  4. Download and save the installation package to any directory on the computer hosting Oracle Identity Governance.
  5. Extract the contents of the installation package to any directory on the computer hosting Oracle Identity Governance. This creates a directory named CONNECTOR_NAME-RELEASE_NUMBER.
  6. Copy the CONNECTOR_NAME-RELEASE_NUMBER directory to the OIG_HOME/server/ConnectorDefaultDirectory directory.

2.2.2 Downloading the Third-Party Libraries

You can download the third-party libraries for the Google Apps connector by performing the procedure mentioned here.

To do so:
  1. Download the following JAR files to a temporary location:
    • httpclient-4.5.2.jar

    • httpcore-4.4.6.jar

    • jackson-core-2.9.4.jar

  2. Navigate to the Google Developers website at https://developers.google.com/.
  3. Search for and download the ZIP for Admin Directory API directory_v1 Client Library for Java, and then extract the following libraries to the temporary location used in Step 1:
    • google-api-client-1.23.0.jar

    • google-api-services-admin-directory_v1-rev91-1.23.0

    • google-http-client-1.23.0.jar

    • google-http-client-jackson2-1.23.0.jar

    • google-oauth-client-1.23.0.jar

  4. Similarly, search for and download the ZIP for Groups Settings API Client Library for Java, and then extract the google-api-services-groupssettings-v1-rev67-1.23.0.jar library to the temporary location in Step 1.

Note:

You can either use the specified JAR file versions mentioned in the preceding procedure or any latest, stable, and secure version.

2.2.3 Copying the Third-Party Libraries

Copy the third-party libraries for the Google Apps connector to the computer hosting Oracle Identity Governance.

To do so:
  1. Create a directory named googleapps-RELEASE_NUMBER under the following directory:

    OIM_HOME/server/ConnectorDefaultDirectory/targetsystems-lib/

    For example, if you are using release 12.2.1.3.0 of this connector, then create a directory named googleapps-12.2.1.3.0 in the OIM_HOME/server/ConnectorDefaultDirectory/targetsystems-lib/ directory.

  2. Copy the third-party libraries downloaded in Downloading the Third-Party Libraries to the OIG_HOME/server/ConnectorDefaultDirectory/targetsystems-lib/googleapps-RELEASE_NUMBER directory.

2.2.4 Configuring the Target System

This is a high-level summary about the tasks to be performed on the target system before you create the application.

The preinstallation process involves performing the following tasks:

Note:

The detailed instructions for performing each of these tasks are available in the Google Cloud Platform Documentation at https://cloud.google.com/docs/

  1. Create a project and register your client application with the Google Apps Cloud platform in the Google Developers Console.
  2. Activate the associated API services such as adding custom information, enable billing, and page monitoring services, for your client application. While activating the associated API services ensure that the statuses of the Admin SDK and Group Settings APIs are set to ON.
  3. Create a service account and enable your client application to access the activated APIs. Additionally, create a Client ID, Public/Private key pair, and password for the earlier created service account. After the service account creation, note down the Client ID, Public/Private key pair and password information. This information is required while adding scopes and also while configuring the Basic Configuration parameters.
  4. Add scopes and authorize the registered client application. To do so:
    1. Login to the Google Admin Console using the https://admin.google.com link with an account that has administrative privileges in the Google instance.
    2. Choose Security and click Advanced Settings.
    3. Next to the Authentication option, click Manage API client access.
    4. In the Client Name field, enter the multi-digit Client Number that was provided during the Google Service Account creation.
    5. In the One or More API Scopes field, enter the scopes listed in the Google Applications Scope field. These scope values must be separated by commas, but ensure that the double quotes (") are removed.
    6. Click Authorize.

    Once this is completed, the Test Application button will successfully run and connect to the Google Application instance.

  5. Create a user account on the target system. The connector uses this account to connect to the target system during each connector operation. Post account creation, assign the Groups Admin and User Management Admin admin roles to the newly created account.
  6. Enable access to various Google administrative APIs available in the Google Apps Business Domain. The administrative API allows you to manage user accounts and synchronizes Google Apps user accounts with your own user account
  7. Enable external user access to groups in Google Apps. Perform this step only if you want external users to access groups in Google Apps.

2.3 Creating an Application By Using the Connector

You can onboard an application into Oracle Identity Governance from the connector package by creating a Target application. To do so, you must log in to Identity Self Service and then choose the Applications box on the Manage tab.

The following is the high-level procedure to create an application by using the connector:

Note:

For detailed information on each of the steps in this procedure, see Creating Applications of Oracle Fusion Middleware Performing Self Service Tasks with Oracle Identity Governance.

  1. Create an application in Identity Self Service. The high-level steps are as follows:
    1. Log in to Identity Self Service either by using the System Administration account or an account with the ApplicationInstanceAdministrator admin role.
    2. Ensure that the Connector Package option is selected when creating an application.
    3. Update the basic configuration parameters to include connectivity-related information.
    4. If required, update the advanced setting parameters to update configuration entries related to connector operations.
    5. Review the default user account attribute mappings. If required, add new attributes or you can edit or delete existing attributes.
    6. Review the provisioning, reconciliation, organization, and catalog settings for your application and customize them if required. For example, you can customize the default correlation rules for your application if required.
    7. Review the details of the application and click Finish to submit the application details.
      The application is created in Oracle Identity Governance.
    8. When you are prompted whether you want to create a default request form, click Yes or No.
      If you click Yes, then the default form is automatically created and is attached with the newly created application. The default form is created with the same name as the application. The default form cannot be modified later. Therefore, if you want to customize it, click No to manually create a new form and attach it with your application.
  2. Verify reconciliation and provisioning operations on the newly created application.

See Also:

  • Configuring the Google Apps Connector for details on basic configuration and advanced settings parameters, default user account attribute mappings, default correlation rules, and reconciliation jobs that are predefined for this connector

  • Configuring Oracle Identity Governance for details on creating a new form and associating it with your application, if you chose not to create the default form