2 Deploying the Connector
The procedure to deploy the connector can be divided into the following stages:
2.1 Preinstallation
Preinstallation for the connector involves performing the procedures described in the following sections:
2.1.1 Deploying the SPML-DSML Service
Note:
Perform the procedure described in this section only if you are using Oracle Identity Manager release 11.1.1, 11.1.2.x, or 12c.
If you are using Oracle Identity Governance 12c, perform the steps in Setting up the SPML-DSML.ear for Password Synchronization after deploying the SPML-DSML.ear.
If you are using Oracle Identity Manager release 9.1.0.x, then skip this section and deploy the SPML Web Service. See Oracle Identity Manager Tools Reference for detailed information.
Before you deploy the connector, deploy the SPML-DSML Service on the Oracle WebLogic Application Server on which Oracle Identity Manager is running:
2.1.2 Setting up the SPML-DSML.ear for Password Synchronization
Note:
This procedure is applicable only for Oracle Identity Governance 12c.
After deploying SPML-DSML ear, perform the following steps in the WebLogis Server (WLS) console to enable the Web Service test tool which is disabled by default:
- In the WLS console, click the domain name you want to modify.
- On the General tab, open the Advanced section and select Enable Web Service Test Page.
- Click Save.
- Restart all the servers.
2.1.3 Testing the SPML Web Service and SPML-DSML Service
Note:
You can use the information in this section to test the SPML Web Service on Oracle Identity Manager release 9.1.0.x, or the SPML-DSML Service on Oracle Identity Manager release 11.1.1 or 11.1.2.x.
To test whether the SPML Web service is deployed successfully on Oracle Identity Manager, navigate to the following URL:
-
For IBM WebSphere Application Server:
http://IP ADDRESS:PORT NUMBER/spmlws/HttpSoap11
https://IP ADDRESS:SSL PORT NUMBER/spmlws/HttpSoap11
-
For JBoss Application Server:
http://IP ADDRESS:PORT NUMBER/spmlws/services/HttpSoap11
https://IP ADDRESS:SSL PORT NUMBER/spmlws/services/HttpSoap11
-
For Oracle Application Server:
http://IP ADDRESS:PORT NUMBER/spmlws/HttpSoap11
https://IP ADDRESS:SSL PORT NUMBER/spmlws/HttpSoap11
-
For Oracle WebLogic Server:
http://IP ADDRESS:NON-SSL PORT NUMBER/spmlws/OIMProvisioning
https://IP ADDRESS:SSL PORT NUMBER/spmlws/OIMProvisioning
2.1.4 Determining the Release Number of the Connector
Note:
Perform the procedure described in this section only if you are using Oracle Identity Manager Microsoft Active Directory Password Synchronization Connector release 9.1.1.5.13 (patch 21492223 ) or later. The following procedure is not applicable to prior releases of the connector.
You might have a deployment of an earlier release of the connector. While deploying the latest release, you might want to know the release number of the earlier release. To determine the release number of the connector that has already been deployed, perform the following procedure:
2.1.5 Configuring the Connector for Oracle Identity Governance 12c (12.2.1.4.0)
Note:
Perform the procedure described in this section only if you are using Oracle Identity Governance 12c (12.2.1.4.0).
To configure the connector:
-
Configure a new administrative user in the connector. For example, admin1.
Note:
-
Be sure not to create XELSYSADM as the new user.
-
Ensure that the new user exists in Oracle Identity Governance with appropriate permissions, including
Admin Role.
-
-
Log in to the Design Console and perform the following steps:
-
Search for and open the Lookup.AD.Users lookup definition.
-
Add the following new values:
For Code Key, enter the value of the new administrative user configured in connector.
For Decode, enter the application instance name for Active Directory.
-
-
Save the lookup definition.
2.2 Installation
Note:
Skip the procedures described in this section and install the connector manually if any of the following conditions are true:-
You are unable to install or reconfigure release 9.1.1.5.0 of the connector using GUI-based installation or reconfiguration.
-
You are using Microsoft Active Directory 2019 or 2022 as your target system.
This section discusses the following topics:
2.2.1 Installing the Connector
Installing the connector is described in the following topics:
2.2.1.1 Installation Procedure
To install the connector:
-
On the Microsoft Active Directory host computer, run the installer as follows:
-
Copy the contents of the installation media to a temporary directory.
-
In the temporary directory, run the setup.exe file to start the installer.
-
-
On the Welcome page, click Next.
-
On the next page, click Next.
-
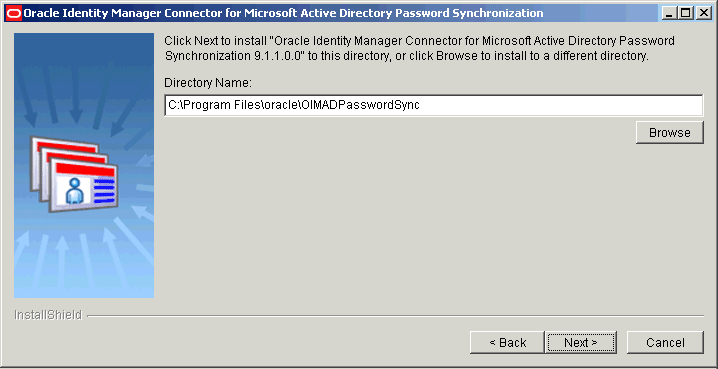
On the Installation Directory page, you can either accept the default installation directory or use the Browse button to specify the directory in which you to want install the connector.
Figure 2-1 shows the Installation Directory page.
Figure 2-1 Installation Directory Page (Installation)
Description of "Figure 2-1 Installation Directory Page (Installation)" -
Click Next.
If the installation directory that you specify (in the preceding step) exists, then the installer confirms if you want to overwrite the directory. Otherwise, the installer creates the installation directory.
-
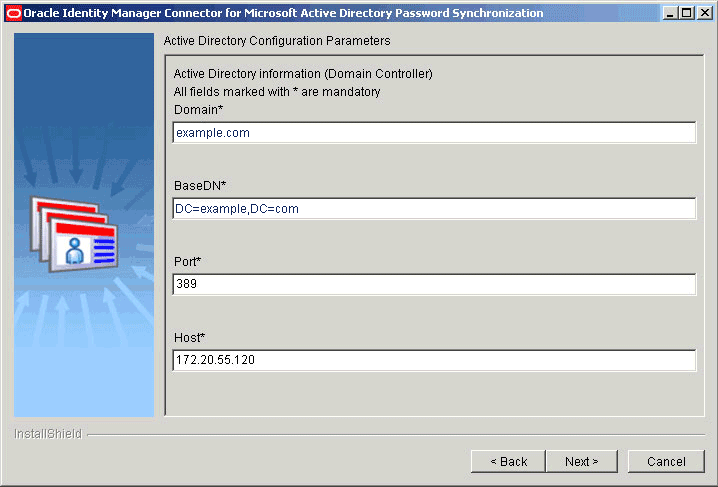
On the Active Directory Configuration Parameters page, which displays the configuration parameters for Microsoft Active Directory, verify the values displayed in all fields.
If the values displayed on this page do not match the values for your current installation of Microsoft Active Directory, then change these values accordingly. Otherwise, you can proceed to the next step.
Figure 2-2 shows the Active Directory Configuration Parameters page on which sample values have been specified.
Figure 2-2 Active Directory Configuration Parameters Page (Installation)
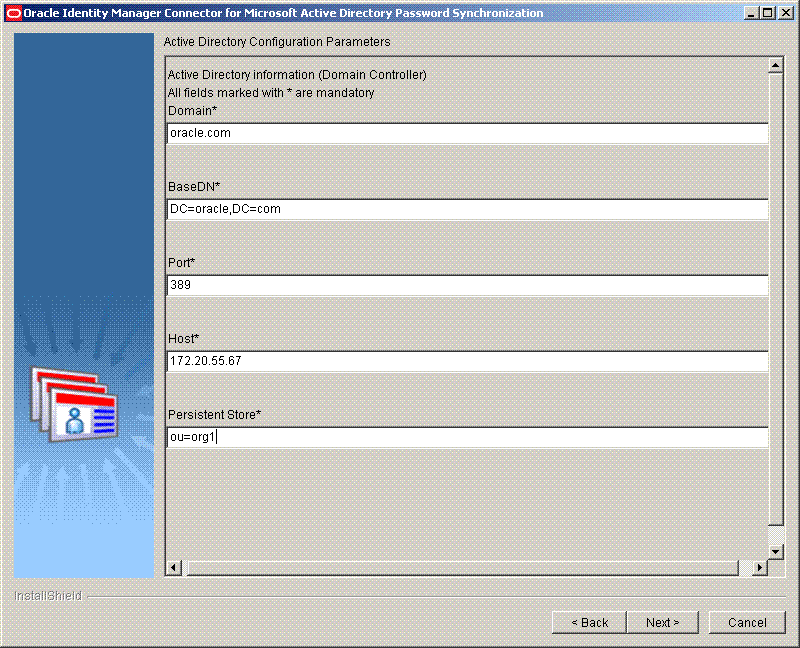
Description of "Figure 2-2 Active Directory Configuration Parameters Page (Installation)"See Microsoft Active Directory Configuration Parameters for information about the Active Directory configuration parameters.
-
Click Next.
-
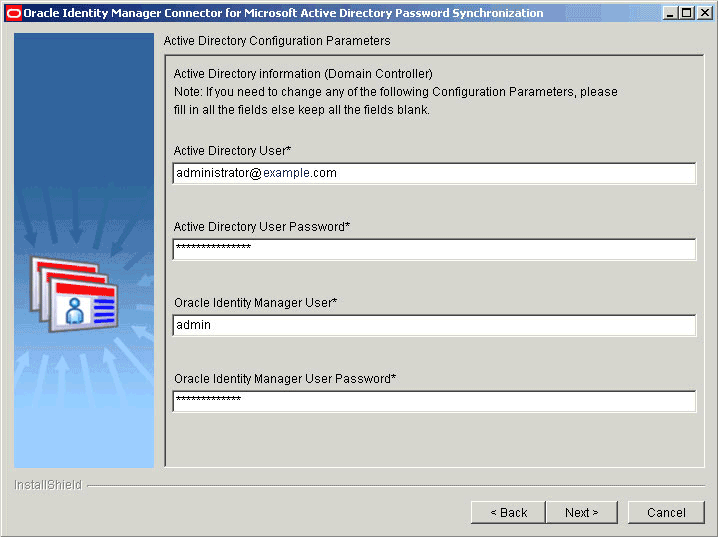
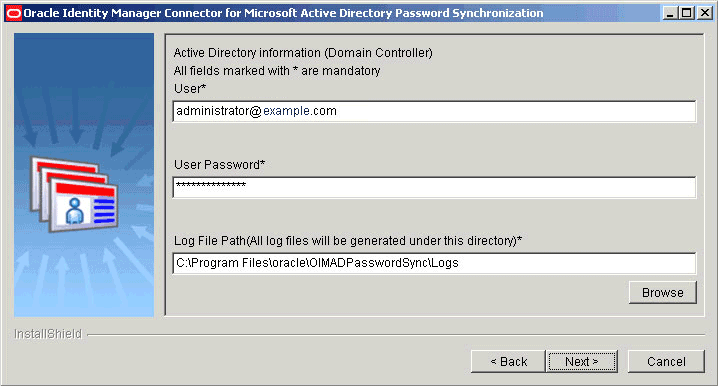
On the second Active Directory Configuration Parameters page, enter values for the following fields:
-
User: Enter the user name of an account that belongs to the Administrators group.
You can use any one of the following formats to enter the user name:
-
USER_LOGIN@DOMAIN.COM
-
cn=USER_LOGIN,cn=USERS,dc=DOMAIN,dc=com
Sample values:
john_doe@example.comcn=admin,cn=Users,dc=example,dc=com -
-
User Password: Enter the password of the account that you entered in the User field.
-
Log File Path: Enter the path to the directory where the log files must be generated.
Default value:
INSTALLATION_DIRECTORY\LogsINSTALLATION_DIRECTORY is the directory that you specify in Step 4.
See "Enabling and Disabling Logging" for information about logging.
Figure 2-3 shows the Microsoft Active Directory Information page on which sample values have been specified.
Figure 2-3 Second Active Directory Configuration Parameters Page (Installation)
Description of "Figure 2-3 Second Active Directory Configuration Parameters Page (Installation)" -
-
Click Next to proceed with installation.
-
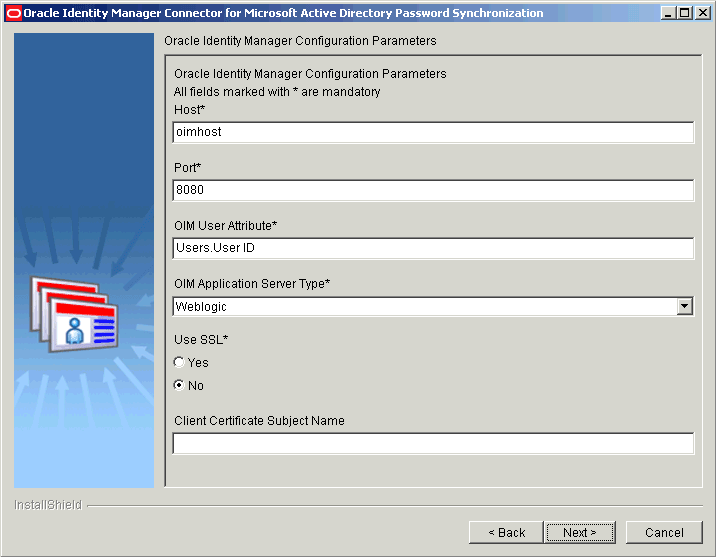
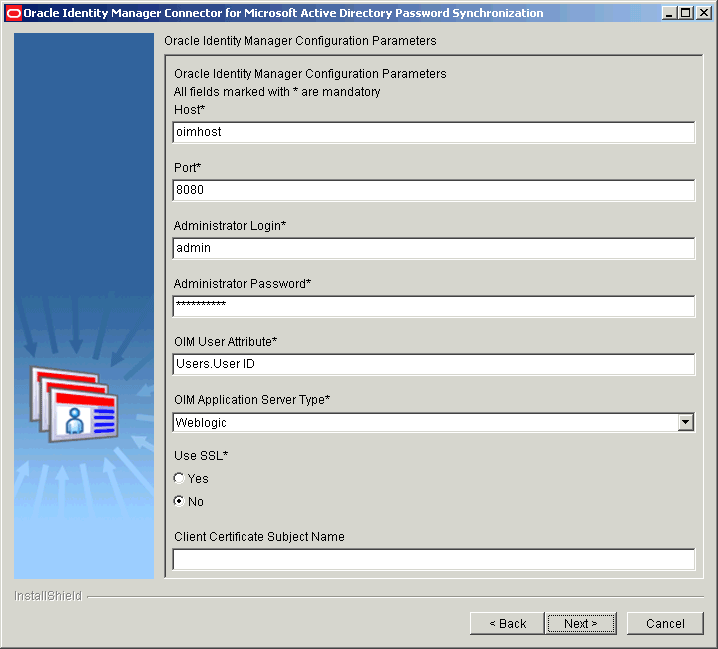
On the Oracle Identity Manager Configuration Parameters page, specify values for the configuration parameters of Oracle Identity Manager.
Figure 2-4 displays the Oracle Identity Manager Configuration Parameters page on which sample values have been specified.
Figure 2-4 Oracle Identity Manager Configuration Parameters Page (Installation)
Description of "Figure 2-4 Oracle Identity Manager Configuration Parameters Page (Installation)"See Oracle Identity Manager Configuration Parameters for information about the Oracle Identity manager configuration parameters.
-
Click Next.
-
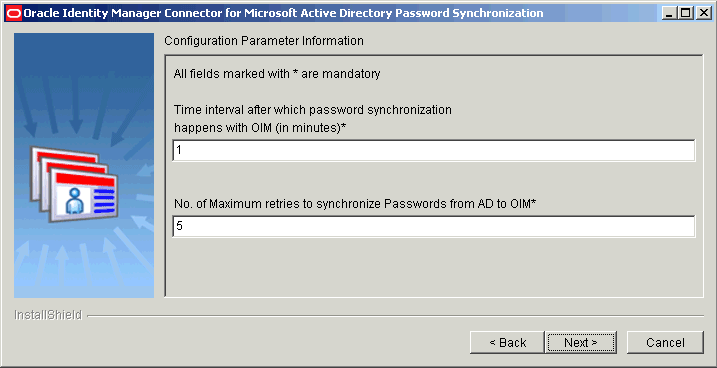
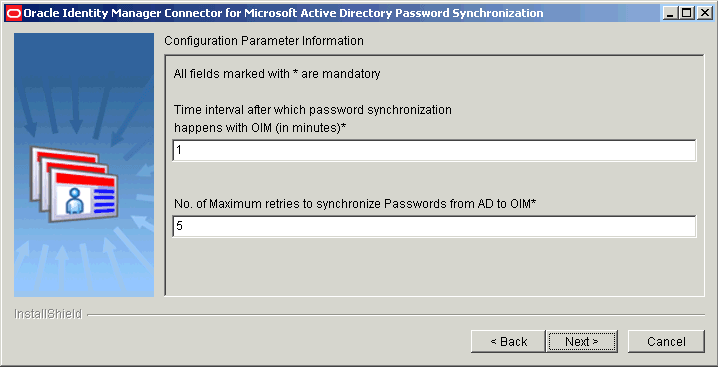
On the Configuration Parameter Information page, enter values for the following fields:
-
Time interval after which password synchronization happens with OIM (in Seconds): Enter an integer value in this field. This value represents the number of seconds the connector sleeps between processing password change events. The connector goes into the sleep mode after processing all the change events from the in-memory and persistent queues.
Default value:
1 -
No. of maximum retries to synchronize passwords from AD to OIM: Enter an integer value. This value represents the number of times the connector tries to propagate the password before removing the password change record from the persistent queue.
Default value:
5
Figure 2-5 is a screenshot of the Connector Configuration Parameters page on which sample values have been specified.
Figure 2-5 Configuration Parameters Page (Installation)
Description of "Figure 2-5 Configuration Parameters Page (Installation)" -
-
Click Next.
-
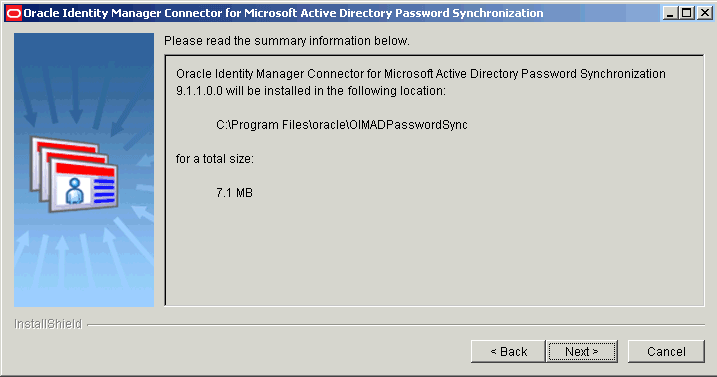
On the Summary Page, verify that the installation directory for the connector is displayed correctly and then click Next to install the connector.
Note:
-
If you are installing the connector on a 64-bit Microsoft Windows operating system, then before you proceed to the next step, copy the oimadpwdsync10.dll and orclmessages.dll files from the Windows\SysWOW64 directory to the WINDOWS\system32 directory.
-
If you want to change the installation directory, then click Back until you reach the Installation Directory page, make the required changes, and then proceed through the installation sequence again.
Figure 2-6 shows the Summary page.
Note:
A dummy Active Directory user named oidtmpuser gets created and deleted immediately in the Active Directory server during installation to verify if the actual Active Directory Password Synchronization administrative user has required administration privileges or not.
-
-
On the next page, click Next to restart your computer.
Clicking Next will force a restart. The restart is required to initialize the oimadpwdsync10.dll file. If the oimadpwdsync10.dll file is not initialized, then the connector is not ready for propagating passwords changes from target system to Oracle Identity Manager.
2.2.1.2 Microsoft Active Directory Configuration Parameters
Table 2-1 describes each configuration parameter of Microsoft Active Directory.
Table 2-1 Microsoft Active Directory Configuration Parameters
| Parameter | Description |
|---|---|
|
Domain |
Enter the domain name for the Microsoft Active Directory domain controller on which the connector is being installed. This value is typically the DNS domain name. Sample value: |
|
BaseDN |
Enter the base DN of Microsoft Active Directory. This is the container where the connector searches for entries with changed passwords. The persistent queue, which is an organizationUnit, will be created within this container. Therefore, the base DN that you specify must be capable of holding Sample value: |
|
Port |
Enter the port number at which LDAP for Microsoft Active Directory host computer is enabled. Default value: |
|
Host |
Enter the IP address or the host name of the Microsoft Active Directory host computer. Sample value: |
|
Persistent Store |
Enter the Distinguished Name of the Organizational Unit where the Persistent Store Container has to be created. Sample value: |
2.2.1.3 Oracle Identity Manager Configuration Parameters
Table 2-2 describes each configuration parameter of Oracle Identity Manager.
Table 2-2 Oracle Identity Manager Configuration Parameters
| Parameter | Description |
|---|---|
|
Host |
Enter the IP address (not the host name) of the Microsoft Active Directory host computer. Note: The host name must be accessible from the Microsoft Active Directory host computer. Sample value: |
|
Port |
Enter the number of the port at which the Oracle Identity Manager SPML Web service is listening. Sample value: |
|
Administrator Login |
Enter the user name of the account that will be used by the connector to login to Oracle Identity Manager during a password synchronization operation. This account must have the permissions required to change the password of OIM Users. |
|
Administrator Password |
Enter the password of the account that will be used by the connector to login to Oracle Identity Manager during a password synchronization operation. |
|
OIM User Attribute |
Enter the Metadata Column Code of the column in the USR table that you want to use to match OIM Users with users in the target system. Note that the corresponding column in the USR table on the Oracle Identity Manager Database must be unique. During password synchronization, the sAMAccountName value of the user whose password is changed is compared against values in this column. Sample value (for predefined OIMUser fields): For user-defined OIMUser fields, you can use the USR_UDF_FIELD_NAME format. Sample Value: See the "Metadata Column Codes" appendix in Oracle Identity Manager API Usage Guide for information about the mapping between the physical column names and metadata column codes. |
|
OIM Application Server Type |
Select the name of the application server that hosts Oracle Identity Manager. Sample value: |
|
Use SSL |
Select Yes, if you are going to configure SSL communication between Microsoft Active Directory and Oracle Identity Manager. Otherwise, select Default value: Note: It is recommended that you configure SSL to secure the transfer of SOAP messages from the target system to Oracle Identity Manager. See "Configuring SSL" for information about enabling SSL. |
|
Client Certificate Subject Name |
Enter a value for this parameter only if Enter a string that identifies the client certificate that must be used for SSL. Sample value: Here, TQL17 is the Issued To value in the certificate. |
2.2.1.4 Ensuring that the Connector is Ready for Propagating Passwords
In order to ensure that the connector is ready for propagating password changes from target system to Oracle Identity Manager, you must check if the oimadpwdsync10.dll file has been initialized.
To verify whether the oimadpwdsync10.dll file is initialized:
2.2.2 Reconfiguring the Connector
During connector installation, you specify a set of values for the configuration parameters of Microsoft Active Directory, Oracle Identity Manager, and the connector. After connector installation, if you want to change the values for any of the configuration parameters, then you must perform the procedure described in this section.
To reconfigure the connector:
2.3 Postinstallation
You must perform the following steps after you install the connector:
2.3.1 Enabling and Disabling Logging
Log files contain information about events that occur during password synchronization. You can use the log files to determine the cause of any errors that may occur during password synchronization events.
This section contains the following topics:
2.3.1.1 Log Files
This connector provides three log files. Each log file name is prefixed with TIME_STAMP, which represents the time at which the log file was created.
The following is the list of log files for this connector and their description:
Note:
You cannot rename the log files. In addition, you cannot specify or change the log level for log files. The default log level is DEBUG.
-
TIME_STAMP_PasswordChange.log
This file stores information about whether the connector is enabled. In the TIME_STAMP_PasswordChange.log file name, TIME_STAMP represents the time at which the log file was created in the
YearMonthDayHourMinuteSecondMillisecondformat.Sample value:
200931801311828_PasswordChange.logThe TIME_STAMP_PasswordChange.log file is generated every time the oimadpwdsync10.dll file is initialized. The oimadpwdsync10.dll file is initialized when you restart the computer hosting the connector.
-
TIME_STAMPOIMMain.log
This file stores information about events that occur while the password change records stored in the in-memory queue and persistent queue are being processed. In the TIME_STAMPOIMMain.log file name, TIME_STAMP represents the time at which the log file was created in the
YearMonthDayformat.Sample value:
2009318OIMMain.logThe TIME_STAMPOIMMain.log file is generated every time the password update thread is created.
-
TIME_STAMP_adsi_debug.log
This file stores information about the events that occur from the time the password is changed in Microsoft Active Directory till the time the password change is saved to the in-memory queue. In the TIME_STAMP_adsi_debug.log file name, TIME_STAMP represents the time at which the log file was created in the
YearMonthDayHourMinuteSecondMillisecondformat.Sample value:
2009318212319187_adsi_debug.logThe TIME_STAMP_adsi_debug.log file is generated every time a password change event occurs.
2.3.1.2 Enabling or Disabling Logging
By default, logging is disabled for the password synchronization connector. After connector installation, if you want to enable logging, or disable logging after it has been enabled, then perform the procedure described in this section.
To enable or disable logging:
Note:
The procedure described in this section must be performed on the target system host computer.
-
From the Start menu, click Run.
-
In the Run dialog box, type
regedit. -
In the Registry Editor window, on the left navigation pane:
-
If you want to enable or disable logging of events to the TIME_STAMP_PasswordChange.log file, then:
-
Navigate to the following key:
HKEY_LOCAL_MACHINE\SYSTEM\CurrentControlSet\Control\Lsa\oimpwdsync\ADConfig -
On the right pane, double-click the Log value.
-
-
If you want to enable or disable logging of events to the TIME_STAMPOIMMain.log file, then:
-
Navigate to the following key:
HKEY_LOCAL_MACHINE\SYSTEM\CurrentControlSet\Control\Lsa\oimpwdsync\OIMConfig -
On the right pane, double-click the OIMLog value.
-
-
If you want to enable or disable logging of events to the TIME_STAMP_adsi_debug.log file, then:
-
Navigate to the following key:
HKEY_LOCAL_MACHINE\SYSTEM\CurrentControlSet\Control\Lsa\oimpwdsync\ADConfig -
On the right pane, double-click the Log value.
-
-
-
In the Edit String dialog box:
-
If you want to disable logging, then in the Value data field, enter
N. -
If you want to enable logging, then in the Value data field, enter
Y.
-
-
Click OK.
-
If you have enabled or disabled logging of events to the TIME_STAMP_PasswordChange.log file, then restart the computer for the changes to take effect.
2.3.2 Configuring the IT Resource for the Target System
Note:
If you have installed a user management connector release that is earlier than release 9.1.1 (for example, release 9.1.0), then you must set the value of the AD Sync installed parameter to no.
The ADITResource IT resource is created in Oracle Identity Manager when you install the user management connector. The Allow Password Provisioning parameter is a parameter of the user management connector.
Note:
This procedure is not applicable if you are using release 11.1.1.x or 12.2.1.3.x of the Microsoft Active Directory User Management connector.
If you want to use the target system as the trusted source for passwords, then set the Allow Password Provisioning parameter to no. When you set the value of this parameter to no, the user management connector does not propagate password changes from Oracle Identity Manager to the target system.
If you set the Allow Password Provisioning parameter to yes, then:
-
When a Microsoft Active Directory resource is provisioned to an OIM User:
-
An account is created on Microsoft Active Directory.
-
The password of the account is detected by the connector and sent to Oracle Identity Manager.
-
On Oracle Identity Manager, the password is compared with the current password of the Active Directory resource. Because both passwords are the same, no further action is taken.
-
If password history policy is set, then an exception for the SPML request (sent by the password synchronization connector) is encountered. You can ignore this exception.
-
-
When the password of the Microsoft Active Directory resource is changed on Oracle Identity Manager:
-
The password is sent to Microsoft Active Directory by the user management connector.
-
The updated password is detected by the connector and sent to Oracle Identity Manager.
-
On Oracle Identity Manager, the password is compared with the current password of the Active Directory resource. Because both passwords are the same, no further action is taken.
-
If password history policy is set, then an exception for the SPML request (sent by the password synchronization connector) is encountered. You can ignore this exception.
-
-
When the password is changed on Microsoft Active Directory:
-
The updated password is detected by the connector and sent to Oracle Identity Manager.
-
On Oracle Identity Manager, the password is compared with the current password of the Active Directory resource. Because both passwords are different, the password of the Microsoft Active resource on Oracle Identity Manager is updated.
-
The updated password is detected by the user management connector and sent to Microsoft Active Directory.
-
The password of the Microsoft Active Directory is modified, even though this is the same password that was set by the user.
-
The password of the account is detected by the password synchronization connector and sent to Oracle Identity Manager.
-
On Oracle Identity Manager, the password is compared with the current password of the Active Directory resource. Because both passwords are the same, no further action is taken.
-
If password history policy is set on Oracle Identity Manager, then an exception for the SPML request (sent by the password synchronization connector) is encountered. You can ignore this exception.
-
2.3.3 Specifying a Value for the Allow Password Provisioning Parameter
Note:
-
Perform the procedure described in this section only if the user management connector is installed.
-
This procedure is not applicable if you are using release 11.1.1.x or 12.2.1.3.x of the Microsoft Active Directory User Management connector.
You can specify a value for the Allow Password Provisioning parameter as follows:
-
Depending on the Oracle Identity Manager release you are using, perform one of the following steps:
-
For Oracle Identity Manager release 9.1.0.x:
-
Log in to the Oracle Identity System Administration.
-
Expand Resource Management, and then click Manage IT Resource.
-
-
For Oracle Identity Manager release 11.1.1:
-
Log in to the Oracle Identity System Administration.
-
On the Welcome to Oracle Identity Manager Self Service page, click Advanced in the upper-right corner of the page.
-
On the Welcome to Oracle Identity Manager Advanced Administration page, in the Configuration region, click Manage IT Resource.
-
-
For Oracle Identity Manager release 11.1.2.x:
-
Log in to Oracle Identity System Administration.
-
In the left pane, under Configuration, click IT Resource.
-
-
-
In the IT Resource Name field on the Manage IT Resource page, enter ADITResource and then click Search.
-
Click the edit icon for the IT resource.
-
From the list at the top of the page, select Details and Parameters.
-
Depending on how you want the user management connector and password synchronization connector to function, enter a value of either
yes, ornofor the Allow Password Provisioning parameter. -
If you have installed a user management connector release that is earlier than release 9.1.1, then you must set the value of the AD Sync installed parameter to
no.
2.3.4 Enabling the Strong Password Authentication (Password Complexity) Feature of Microsoft Active Directory
Note:
You must use an administrator account to perform the procedures described in this section.
Microsoft Active Directory provides the Strong Password Authentication feature through the implementation of a password filter. To use this password filter along with the connector, follow the instructions for enabling the "Passwords must meet complexity requirements" policy setting by visiting the Microsoft Web site at
http://www.microsoft.com/technet/
After you enable this policy setting, password changes in Microsoft Active Directory are checked against the Strong Password Authentication requirements before they are passed on to the connector.
2.3.5 Configuring SSL
Note:
-
It is strongly recommended that you configure SSL communication between the connector and Oracle Identity Manager in your production environment.
However, the configuration of secure client operation (using SSL at the server) affects all clients. This means that if you use SSL to secure Oracle Identity Manager communication with the connector, then the Oracle Identity Manager Design Console and any other custom clients must also communicate with Oracle Identity Manager using SSL.
-
If Microsoft Active Directory is running on Windows Server 2008 R2, then you must install all available Windows updates and apply the Easy fix provided on the Microsoft Support page for enabling TLS 1.2 at
https://support.microsoft.com/en-us/help/3140245/update-to-enable-tls-1-1-and-tls-1-2-as-a-default-secure-protocols-in.If you do not do so, then Transport Layer Security (TLS) 1.2 connection is not enabled for SSL with Oracle Identity Governance 12c (12.2.1.3.0) Server and password sync fails due to SSL handshake issues.
To secure the propagation of passwords from Microsoft Active Directory to Oracle Identity Manager, you must configure SSL. The procedure that you must follow depends on the application server on which Oracle Identity Manager is running:
See Also:
The "Configuring SSL" section of Oracle Identity Manager Connector Guide for Microsoft Active Directory User Management for information about configuring SSL to secure data transfer from Oracle Identity Manager to Microsoft Active Directory
2.3.5.1 Configuring SSL on IBM WebSphere Application Server
The following sections provide information about enabling SSL communication when Oracle Identity Manager is running on IBM WebSphere Application Server:
2.3.5.1.1 Exporting the Certificate
Note:
The procedure described in this section must be performed on the IBM WebSphere Application Server host computer.
To export the IBM WebSphere Application Server certificate:
2.3.5.1.2 Importing the Certificate
Note:
The procedure described in this section must be performed on the Microsoft Active Directory host computer.
To import the application server certificate:
2.3.5.1.3 Additional Configuration Steps
Note:
The procedure described in this section must be performed on the IBM WebSphere Client host computer.
You must extract and copy the xlDataObjectBeans.jar file located in the OIM_DC_HOME\xlclient\ext directory to the WEBSPHERE_HOME\profiles\PROFILE_NAME\installedApps\NODE_NAME\OIM-xell-WS.ear\spmlws.war\WEB-INF\lib directory.
Here:
-
OIM_DC_HOME is the directory in which you install the Oracle Identity Manager Design Console
-
WEBSPHERE_HOME is the home directory of WebSphere
-
PROFILE_NAME is the name of the application server profile being used
-
NODE_NAME is the name of the node which the application server profile uses
2.3.5.2 Configuring SSL on JBoss Application Server
The following sections provide information about enabling SSL communication when Oracle Identity Manager is running on JBoss application server:
-
Note:
The procedure described in the preceding sections must be performed on the JBoss Application Server host computer.
-
Note:
The procedure described in the preceding section must be performed on the Microsoft Active Directory host computer.
-
Configuring the server.xml File
Note:
The procedure described in the preceding sections must be performed on the JBoss Application Server host computer.
2.3.5.2.1 Generating Keys
Generate keys by using the keytool command. The following keytool command generates an identity keystore. jbossserver.jks:
keytool -genkey -alias PRIVATE_KEY_ALIAS -keyalg RSA -keysize 1024 -dname DN_VALUE -keypass PRIVATE_KEY_PASSWORD -keystore IDENTITY_STORE_FILE -storepass IDENTITY_STORE_FILE_PASSWORD -storetype jks
In this command:
-
PRIVATE_KEY_ALIAS is the alias that you want to use for the private key.
-
PRIVATE_KEY_PASSWORD is the password that you want to use for the private key.
-
DN_VALUE is the distinguished name (DN) for your organization.
The common name (CN) value in the DN must be the host name of the Oracle Identity Manager server.
-
IDENTITY_STORE_FILE is the identity store that you want to use.
-
IDENTITY_STORE_FILE_PASSWORD is the password of the identity store that you want to use.
The following is a sample command:
keytool -genkey -alias serverjboss -keyalg RSA -keysize 1024 -dname "CN=myhost" -keypass welcome -keystore E:\jboss-4.0.3SP1\server\jbossserver.jks -storepass welcome -storetype jks
2.3.5.2.2 Signing the Certificate
Use the following keytool command to sign the certificate that you created:
keytool -selfcert -alias PRIVATE_KEY_ALIAS -sigalg MD5withRSA -validity 2000 -keypass PRIVATE_KEY_PASSWORD -keystore IDENTITY_STORE_FILE -storepass IDENITTY_STORE_FILE_PASSWORD
Note:
It is recommended that you use trusted certificate authorities, for example, VeriSign or Thawte, for signing certificates.
The following is a sample command:
keytool -selfcert -alias serverjboss -sigalg MD5withRSA -validity 2000 -keypass welcome -keystore E:\jboss-4.0.3SP1\server\jbossserver.jks -storepass welcome
2.3.5.2.3 Exporting the Certificate
Use the following keytool command to export the certificate from the identity keystore to a file:
keytool -export -alias PRIVATE_KEY_ALIAS -file CERT_FILE_NAME -keypass PRIVATE_KEY_PASSWORD -keystore IDENITTY_STORE_FILE -storepass IDENTITY_STORE_FILE_PASSWORD -storetype jks -provider sun.security.provider.Sun
In this command, replace CERT_FILE_NAME with the name that you want to use for the certificate file.
The following is a sample command:
keytool -export -alias serverjboss -file E:\jboss-4.0.3SP1\server\jbossserver.cert -keypass welcome -keystore E:\jboss-4.0.3SP1\server\jbossserver.jks -storepass welcome -storetype jks -provider sun.security.provider.Sun
2.3.5.2.5 Configuring the server.xml File
Copy the following entry to the server.xml file located in the OIM_HOME\jboss-4.0.3SP1\server\default\deploy\jbossweb-tomcat55.sar directory:
<Connector port="8443" address="${jboss.bind.address}"
           maxThreads="100" strategy="ms" maxHttpHeaderSize="8192"
           emptySessionPath="true"
           scheme="https" secure="true" clientAuth="false"
              sslProtocol="TLS"
           keystoreFile="E:\jboss-4.0.3SP1\server\jbossserver.jks"
           keystorePass="welcome"
           truststoreFile="E:\jboss-4.0.3SP1\server\jbossserver.jks"
           truststorePass="welcome"/>
After you have performed the preceding steps, restart the server for the changes to take effect.
2.3.5.3 Configuring SSL on Oracle Application Server
The following sections provide information about enabling SSL communication when Oracle Identity Manager is running on Oracle Application Server.
2.3.5.3.1 Enabling SSL for HTTP Communication to Oracle HTTP Server
By default, the Oracle HTTP Server is configured with SSL and the SSL certificate store is located at ORACLE_HOME\Apache\Apache\conf\ssl.wlt\default\. The listen parameter in the ORACLE_HOME\Apache\Apache\conf\ssl.conf file points to the SSL port being used by the Oracle HTTP Server.
A custom wallet and certificate should be created for the Oracle HTTP Server.
Perform the following steps to create a custom wallet and certificate for Oracle HTTP Server:
-
To create a custom wallet, run the following command:
orapki wallet create -wallet WALLET_LOCATION -auto_loginIn this command, WALLET_LOCATION is the path to the directory where the wallet is created.
-
To add a self-signed certificate to the wallet, run the following command:
orapki wallet add -wallet WALLET_LOCATION -dn CN=HOSt_NAME -keysize 2048 -self_signed -validity 3650
When prompted, enter the Wallet password.
This creates a self-signed certificate with a validity of 3650 days. The distinguished name of the subject is CN=HOST_NAME. Here HOST_NAME is the host name of the machine. The key size for the certificate is 2048 bits.
Note:
Ensure that you obtain the certificate from an appropriate Certificate Authority.
-
To export the self-signed certificate, run the following command:
orapki wallet export -wallet WALLET_LOCATION -dn 'CN=HOST_NAME' -cert WALLET_LOCATION/b64certificate.txt
In this command, the value of HOST_NAME must be same as the value of HOST_NAME specified in Step 2.
-
Edit the ssl.conf file located in the ORACLE_HOME/Apache/Apache/conf/ as follows:
-
In a text editor, open the ssl.conf file and find the following entry:
SSLWallet file:
-
Enter WALLET_LOCATION (specified in Step 1) as the value of the
SSLWallet file:entry.The following is a sample value of the
SSLWallet file:entry:SSLWallet file:/home/testoc4j/OIM9102/product/10.1.3.1/OracleAS_1/Apache/Apache/conf/ssl.wlt/default
-
Save and close the updated ssl.conf file.
-
-
Restart Oracle Application Server.
2.3.5.3.2 Exporting the Certificate
To export the application server certificate from the WALLET_LOCATION directory that you specified in Step 1 of Enabling SSL for HTTP Communication to Oracle HTTP Server, perform the following steps after you have started Oracle Wallet Manager:
Note:
The default Oracle wallet directory is ORACLE_HOME\Apache\Apache\conf\ssl.wlt\default\ewallet.p12
2.3.5.4 Configuring SSL on Oracle WebLogic Server
The following sections provide information about enabling SSL communication when Oracle Identity Manager is running on Oracle WebLogic Server:
-
Configuring Custom Identity Keystore in Oracle WebLogic Server
Note:
The procedure described in the preceding sections must be performed on the Oracle WebLogic Server host computer.
-
Note:
The procedure described in the preceding section must be performed on the Microsoft Active Directory host computer.
2.3.5.4.1 Generating Keys
Generate private/public certificate pairs by using the keytool command provided. The following command creates an identity keystore:
keytool –genkey -alias PRIVATE_KEY_ALIAS -keyalg RSA -keysize 1024 -dname DN_VALUE -keypass PRIVATE_KEY_PASSWORD -keystore IDENTITY_STORE_FILE -storepass IDENTITY_STORE_FILE_PASSWORD -storetype jks
In this command:
-
PRIVATE_KEY_ALIAS is the alias that you want to use for the private key.
-
PRIVATE_KEY_PASSWORD is the password that you want to use for the private key.
-
DN_VALUE is the distinguished name (DN) for your organization.
The common name (CN) value in the DN must be the host name of the Oracle Identity Manager server.
-
IDENTITY_STORE_FILE is the identity store that you want to use.
-
IDENTITY_STORE_FILE_PASSWORD is the password of the identity store that you want to use.
The following is a sample command that creates an identity key store (support.jks):
keytool –genkey -alias support -keyalg RSA -keysize 1024 -dname "CN=oimserver" -keypass weblogic -keystore C:\bea\user_projects\domains\oim\support.jks -storepass support -storetype jks
2.3.5.4.2 Signing the Certificate
The procedure to sign a certificate and import the self-signed certificate as a trusted entry in the Java standard store is as follows:
2.3.5.4.3 Exporting the Certificate
Use the following command to export the certificate from the identity keystore to a file:
keytool -export -alias PRIVATE_KEY_ALIAS -file CERT_FILE_NAME -keypass PRIVATE_KEY_PASSWORD -keystore IDENITTY_STORE_FILE -storepass IDENTITY_STORE_FILE_PASSWORD -storetype jks -provider sun.security.provider.Sun
In this command, replace CERT_FILE_NAME with the complete path and name of the certificate file.
The following is a sample command:
keytool -export -alias support -file C:\bea\user_projects\domains\oim\supportcert.pem -keypass weblogic -keystore C:\bea\user_projects\domains\oim\support.jks -storepass support -storetype jks -provider sun.security.provider.Sun
2.3.5.4.4 Configuring Custom Identity Keystore in Oracle WebLogic Server
To configure the custom identity keystore:
-
In the WebLogic Server Administration Console, click Servers, Configuration, and then click General.
-
Select SSL listen port enabled. The default port is 7002.
Note:
If Oracle WebLogic Server is deployed on Oracle Identity Manager release 11.1.1 or 11.1.2.x, then the default port is 14001.
-
In the Administrative Console, click Servers.
-
On the Configuration tab, click the server name in the Name column of the table.
-
On the Keystores tab:
-
In the Change Center region, click Lock & Edit to enable modification to the settings on the page.
-
From the Keystores box, perform one of the following steps:
-
If Oracle WebLogic Server is deployed on Oracle Identity Manager release 9.1.0.x, then select Custom Identity and Custom Trust, and then click Continue.
-
If Oracle WebLogic Server is deployed on Oracle Identity Manager release 11.1.1 or 11.1.2.x, then select Custom Identity and Custom Trust or Custom Identity and Java Standard Trust, and then click Continue.
-
-
In the Custom Identity Keystore and Custom Trust Keystore fields, enter
C:\bea\user_projects\domains\oim\support.jksas the custom identity keystore file name. -
In the Custom Identity Keystore Type field, enter
JKS. -
In the Custom Identity Keystore Passphrase and Confirm Custom Identity Keystore Passphrase fields, enter the password of the custom identity keystore.
-
-
On the SSL tab:
-
In the Change Center region, click Lock & Edit to enable modification to the settings on the page.
-
From the Identity and Trust Location box, select Keystores.
-
In the Private Key Alias field, enter
supportas the private key alias. -
In the Private Key Passphrase and Confirm Private Key Passphrase fields, enter the password, for example,
support.
-
-
Click the Advanced Properties tab, and select Client Certs not Requested from the dropdown list, and save the changes.
-
Restart the server for the changes to take effect.
Note:
For a clustered installation, repeat all the steps on each node of the cluster. Then, restart each node.
2.3.6 Excluding Users for Password Synchronization
Note:
You can perform this procedure only if you are using the latest 9.1.1.5.x patch for the connector.
By default, the connector captures all passwords changed on the target system and propagates them to Oracle Identity Manager. If you do not want the connector to propagate the password changes to Oracle Identity Manager for certain users, then you must configure the connector to use the ADUsrExclusionFilter config parameter. In other words, by using the AD UsrExclusionFilter config parameter, you can configure the connector to filter AD users whose password changes must not be propagated to Oracle Identity Manager.
To configure the ADUsrExclusionFilter config parameter to exclude AD Users for password synchronization with Oracle Identity Manager:
