Creating Accessible Oracle JET Pages
Content generated by Oracle JET is designed to conform to the WCAG 2.0 AA standards. However, many standards are not under the complete control of Oracle JET, such as overall UI consistency, the use of color, the quality of on-screen text and instructions, and so on.
A complete product development plan that addresses accessibility should include proper UI design, coding, and testing with an array of tools, assistive technology, and disabled users.
Note:
In most cases, end-user documentation for your application must describe information about accessibility, such as example keystrokes needed to operate certain components.
Topics:
Configuring WAI-ARIA Landmarks
WAI-ARIA landmarks provide navigational information to assistive technology users. Landmark roles identify the purpose of a page region and allow the user to navigate directly to a desired region. Without landmarks, assistive technology users must use the TAB key to navigate through a page.
The Oracle JET team recommends the use of WAI-ARIA landmarks to ensure page accessibility and provides examples you can use in the Oracle JET Starter Template collection. The following figure shows the run-time view of the Oracle JET Web Nav Drawer Starter Template. In this example, the page is organized into regions compatible with WAI-ARIA landmark regions, including regions for the banner, navigation, main, and contentinfo landmarks.

The highlighted code in the following example shows the landmarks for the Web Nav Drawer Starter Template. Each landmark is placed on the HTML element that defines the landmark region: div for the navigation regions, header for the banner region, oj-module for the main region, and footer for the contentinfo region.
<!DOCTYPE html>
<html lang="en-us">

  <head>
    <title>Oracle JET Starter Template - Web Nav Drawer</title>
    ...contents omitted
  </head>

  <body class="oj-web-applayout-body">
    ...contents omitted

    <div id="globalBody" class="oj-offcanvas-outer-wrapper oj-offcanvas-page">
      <div id="navDrawer" role="navigation" class="oj-contrast-marker oj-web-applayout-offcanvas oj-offcanvas-start">
        <oj-navigation-list data="[[navDataSource]]"
                            edge="start"
                            item.renderer="[[oj.KnockoutTemplateUtils.getRenderer('navTemplate', true)]]"
                            on-click="[[toggleDrawer]]"
                            selection="{{router.stateId}}">
        </oj-navigation-list>
      </div>

      <div id="pageContent" class="oj-web-applayout-page">

        <header role="banner" class="oj-web-applayout-header">
          <div class="oj-web-applayout-max-width oj-flex-bar oj-sm-align-items-center">
            ...contents omitted
          </div>
          <div role="navigation" class="oj-web-applayout-max-width oj-web-applayout-navbar">
            <oj-navigation-list class="oj-sm-only-hide oj-md-condense oj-md-justify-content-flex-end"
                                data="[[navDataSource]]"
                                edge="top"
                                item.renderer="[[oj.KnockoutTemplateUtils.getRenderer('navTemplate', true)]]"
                                selection="{{router.stateId}}">
            </oj-navigation-list>
          </div>
        </header>

        <oj-module role="main" class="oj-web-applayout-max-width oj-web-applayout-content" config="[[moduleConfig]]">
        </oj-module>

        <footer class="oj-web-applayout-footer" role="contentinfo">
          ...contents omitted
        </footer>

      </div>
    </div>

    <script type="text/javascript" src="js/libs/require/require.js"></script>
    <script type="text/javascript" src="js/main.js"></script>

  </body>
</html>
If your application includes a complementary region, add role="complementary" to the HTML div element:
<div role="complementary"></div>For information about downloading the Oracle JET Starter Templates, see Downloading Oracle JET with a Starter Template. For details about working with the Oracle JET Starter Templates, see Create a Web Application Using the Oracle JET Starter Templates.
For additional information about WAI-ARIA landmark roles, see landmark_roles.
Configuring High Contrast Mode
High contrast mode is for people who require a very high level of contrast in order to distinguish components on the page. Operating systems such as Microsoft Windows and MacOS provide methods for users to run in high contrast mode.
The graphic below shows the effect of changing to high contrast mode on Oracle JET icon font images.
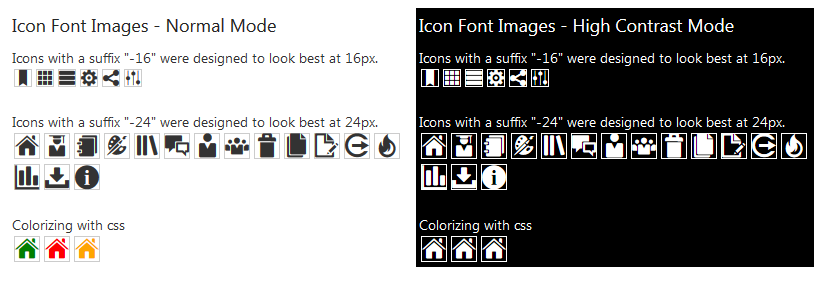
Oracle JET provides the oj-hicontrast class that you can use to configure high contrast mode in your application.
Topics:
Understanding Color and Background Image Limitations in High Contrast Mode
There are color and background image limitations in high contrast mode that your application may need to work around.
In high contrast mode the colors in the CSS may be ignored or overridden, including background, border, and text colors. Therefore, in high contrast mode you may need to find an alternative way to show state. For example, you might need to add or change the border to show that something is selected.
Also, your application may need to show alternate high contrast images that work on dark or light background color. Some operating systems, like Microsoft Windows 7, offer multiple display profiles for high contrast mode, including a black-on-white and white-on-black mode.
Consider providing an image that includes a background, so either black on a white background or white on a black background. That way it won’t matter what the background color is on the page since the contrast is in the image itself.
Finally, on Windows, background images don't appear in high contrast mode. Therefore, you cannot use background images to communicate anything informative. You can use a background image to make something look nice, but don't use it to communicate information like the status of a process or whether something is required.
Adding High Contrast Mode to Your Oracle JET Application
In most cases, you do not need to do anything to enable high contrast mode in your Oracle JET application. If you're using RequireJS to load Oracle JET component modules, Oracle JET will load a script that attempts to detect if a user is running in high contrast mode. If the script succeeds at detection, it will place the oj-hicontrast class on the body element.
There is a serious limitation to this method, however. There is no standard way to detect high contrast mode, and we can't guarantee that the script works in all cases on all browsers. For example, on Windows, the script does detect high contrast mode on Internet Explorer, Microsoft Edge, and Firefox browsers, but it does not detect high contrast mode on Chrome.
To be guaranteed that the .oj-hicontrast styles are applied, add a user preference setting for high contrast to your application and configure the application to add the oj-hicontrast class to the body element when the preference is set.
When the class is added, the .oj-hicontrast CSS styles are applied to the page where defined. The code below shows an excerpt from the Alta CSS which changes the outline-width to 3 on the ojButton component when the button has focus.
.oj-hicontrast .oj-button.oj-focus {
  outline-width: 3px; }
Note:
For disabled content, JET supports an accessible luminosity contrast ratio, as specified in WCAG 2.0 - Section 1.4.3 Contrast (Minimum), in the themes that are accessible.
Section 1.4.3 says that text or images of text that are part of an inactive user interface component have no contrast requirement. Because disabled content may not meet the minimum contrast ratio required of enabled content, it cannot be used to convey meaningful information. For example, a checkbox may still appear checked in disabled mode, but since the colors may not pass contrast ratio, you cannot rely on all users being able to see that it's checked. If the information is needed to interact with the page correctly, you must convey it using a different method, for example as plain text.
Adding High Contrast Images or Icon Fonts
To support high contrast image files, Oracle JET provides Sass mixins that you can use to generate the correct CSS in high contrast mode to:
-
Use an alternate image.
-
Use images without using background images.
The Oracle JET cookbook provides examples that you can use at: CSS Images.
You can also use icon fonts instead of image files to support high contrast mode. The limitation is that icon fonts use a single color. Since these icons are text, they will be guaranteed to contrast against the background color on systems that ignore colors in the CSS. However, if you use color to show state (for example, changing an icon to blue when selected), the colors may be ignored in high contrast modes. You may need to find an alternative like setting a border instead. The Oracle JET cookbook provides icon font demos at: Icon Fonts.
Testing High Contrast Mode
The recommended way to test high contrast mode in Oracle JET applications is to set high contrast mode at the operating system level on a Microsoft Windows platform. The Windows platform is recommended because Windows turns off background colors and images in high contrast mode. Also, the Google Chrome browser does not remove background images in high contrast mode, and unless this is the only browser you plan to support, you should test high contrast with Microsoft Internet Explorer or Firefox.
To turn high contrast mode on and off in Microsoft Windows, use the following key combination: Left Alt+Left Shift+PrtScn. You may need to refresh your browser to see the new mode.
Hiding Screen Reader Content
Sometimes you want to have some text on the page that is read to the screen reader user, but the sighted user doesn't see. Oracle JET provides the oj-helper-hidden-accessible class that you can use to hide content.
You can find the .oj-helper-hidden-accessible style defaults in the Oracle JET CSS file. For the Alta theme, the CSS file is: css/libs/oj/vxxx/alta/oj-alta.css. For additional information about theming and Oracle JET, see Theming Applications.
Using ARIA Live Region
An ARIA live region is a simple mechanism for notifying assistive technologies when a web page content is updated.
When using a single page application, if there are any changes to the page or the page region, the user using assistive technologies like screen readers are not notified about the changes in the page content since the URL of the application has not changed. To help provide a notification to the screen readers when a page or segments of a page change, an ARIA live region can be used to announce the dynamic changes within a web page. When the update takes place within an ARIA live region, a screen reader is automatically notified, wherever its focus is at the time, and it announces the updated content to the user. This can be achieved by using the aria-live attribute.
The aria-live attribute identifies an element as a live region. It takes three possible values:
-
off: No notification -
polite: Screen reader notifies user once the current task is complete -
assertive: Screen reader interrupts the current task to notify user
If the value of the aria-live attribute defined for an element is set to polite, your screen reader will not be interrupted and will announce the changes in the ARIA live region when the user has no activity on the screen. If the value is set to assertive, the new information has high priority and should be notified or announced to the user immediately.
You can also use some of the advanced ARIA live region attributes to intimate information of the entire live region or only a portion of the live region to assistive technologies. Some of the advanced live region attributes to use are:
-
aria-atomic: Thearia-atomicattribute is used along witharia-liveattribute when the page contains live regions. This attribute is used to set whether the assistive technologies should present the entire live region as a single unit or to only announce the regions that have been changed. The possible values aretrueorfalse. The default value isfalse. -
aria-relevant: This attribute is used in conjunction with thearia-liveattribute to describe the types of changes that have occurred within a given live region that should be announced to the user. The possible settings areadditions,removals,text, andall. The default setting isadditions text.
The below example shows a sample of the ARIA live region defined in the index.html file of an application. In this example, the aria-live attribute is set to assertive and the aria-atomic attribute is set to true:
<div id="globalBody" class="oj-offcanvas-outer-wrapper oj-offcanvas-page">
		<!-- Region for announcing messages to Screen Readers -->
		<div id="announce" class="sendOffScreen" data-bind="attr:{'aria-live': manner() ? manner() : 'assertive', 'aria-atomic':true}, text: message"></div>
		<div id="navDrawer" role="navigation" class="oj-contrast-marker oj-web-applayout-offcanvas oj-offcanvas-start">
			<oj-navigation-list data="[[navDataSource]]" edge="start" item.renderer="[[oj.KnockoutTemplateUtils.getRenderer('navTemplate', true)]]"
        on-click="[[toggleDrawer]]" selection="{{router.stateId}}">
			<\oj-navigation-list>
		<\div>
		<div id="pageContent" class="oj-web-applayout-page">
		... contents omitted
The following example shows how to set up the observables and event listeners in the appController.js file of the application.
define(['ojs/ojcore', 'knockout', 'ojs/ojrouter', 'ojs/ojknockout', 'ojs/ojarraytabledatasource',
  'ojs/ojoffcanvas'],
  function (oj, ko, Signals) {
    function ControllerViewModel() {
      var self = this;

      self.manner = ko.observable('assertive');
      self.message = ko.observable();

      document.getElementById('globalBody').addEventListener('announce', announcementHandler, false);

      function announcementHandler(event) {
        self.message(event.detail.message);
        self.manner(event.detail.manner);
      };

      var smQuery = oj.ResponsiveUtils.getFrameworkQuery(oj.ResponsiveUtils.FRAMEWORK_QUERY_KEY.SM_ONLY);
      self.smScreen = oj.ResponsiveKnockoutUtils.createMediaQueryObservable(smQuery);
      var mdQuery = oj.ResponsiveUtils.getFrameworkQuery(oj.ResponsiveUtils.FRAMEWORK_QUERY_KEY.MD_UP);
      self.mdScreen = oj.ResponsiveKnockoutUtils.createMediaQueryObservable(mdQuery);

      self.router = oj.Router.rootInstance;
      self.router.configure({
        'dashboard': {
          label: 'Dashboard', enter: function () {
           }, isDefault: true
        },
        'incidents': {
          label: 'Incidents', enter: function () {
          }
        },
        'customers': {
          label: 'Customers', enter: function () {
          }
        },
        'about': {
          label: 'About', enter: function () {
          }
        }
      });
      oj.Router.defaults['urlAdapter'] = new oj.Router.urlParamAdapter();
	... contents omitted
To send the announcement, you can use a dispatcher that can be defined within the page viewModel files or in the router enter method. The following example shows a page viewModel file that fires a dispatch in the self.handleBindingsApplied lifecycle method.
define(['ojs/ojcore', 'knockout', 'jquery', 'ojs/ojpopup'],
  function (oj, ko, $) {

    function DashboardViewModel() {
      var self = this;

      self.handleBindingsApplied = function (info) {
        var message = "Loaded Dashboard page"
        var params = {
          'bubbles': true,
          'detail': { 'message': message, 'manner': 'assertive' }
        };
        document.getElementById('globalBody').dispatchEvent(new CustomEvent('announce', params));
      };
For more information on using an ARIA live region, see ARIA Live Regions.