Getting Started with Oracle JET Web Application Development
Oracle JET includes several options for downloading, installing, and creating web applications. Depending upon your application requirements, you can:
-
Use the Oracle JET command-line interface package (
ojet-cli) to scaffold a web application containing either a blank template or a complete pre-configured sample application that you can modify as needed.With this method, you can use
ojet-clito build the application, serve it in a local web browser, and create a package ready for deployment. This is the preferred approach and recommended if you also plan on creating hybrid mobile applications.Note:
For additional information about creating hybrid mobile applications, see Getting Started with Oracle JET Hybrid Mobile Application Development. -
Download Oracle JET with a Starter Template ready to run and display in your local browser.
With this method, you can get up and running quickly, but it will be up to you to package and deploy your application, using whatever method is appropriate for your use case.
-
Download the Oracle JET zip distribution which contains the Oracle JET and third-party libraries, CSS and SCSS files, and a RequireJS bootstrap file.
With this method, you must manually create the
index.htmlor main application file and pull in the appropriate libraries and CSS as needed. This method is best if you want to use your own application design pattern instead of the templates included with the tooling or Oracle JET Starter collection. -
Add Oracle JET to an existing JavaScript application.
With this method, you overlay the pieces of Oracle JET that you need to your existing JavaScript application and modify your main application file and scripts as needed.
Whichever method you use to get started creating your web application, you must not use more than one version of Oracle JET to add components to the same HTML document of your web application. Oracle JET does not support running multiple versions of Oracle JET components in the same web page.
Topics:
Create a Web Application Using the Oracle JET Command-Line Interface
Use the Oracle JET command-line interface (CLI) to create, build, and serve web applications that run in desktop and mobile browsers.
Before you can create your first Oracle JET web application using the CLI, you must also install the prerequisite packages if you haven’t already done so. For details, see Install the Prerequisite Packages.
Topics
Note:
You can also use the tooling to create hybrid mobile applications. For additional information, see Getting Started with Oracle JET Hybrid Mobile Application DevelopmentScaffold a Web Application with the Oracle JET CLI
Use the Oracle JET command-line interface (CLI) to scaffold an application that contains a blank template or one pre-configured with a basic layout, navigation bar, or navigation drawer. Each pre-configured template is optimized for responsive web or hybrid mobile applications. After scaffolding, you can modify the application as needed.
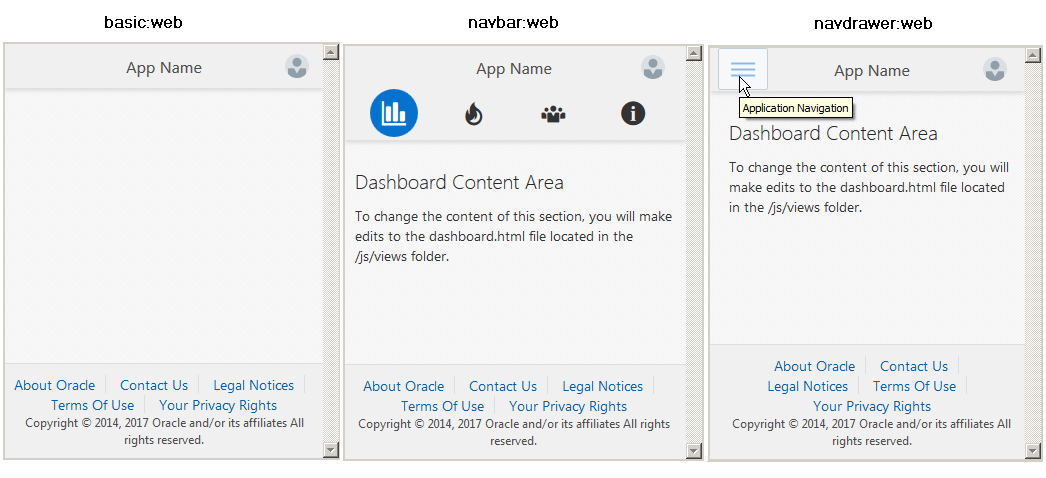
The following image shows the differences between the pre-configured templates. The blank template contains an index.html but no UI features and is not shown. The basic:web template is similar to the blank template but adds responsive styling that will adjust the display when the screen size changes. The navbar:web and navdrawer:web templates contain sample content and follow best practices for layout, navigation, and styling that you can also modify as needed.
Note:
Do not confuse the basic template which contains no content with the Oracle JET QuickStart Basic application available in NetBeans 8.2 examples. The NetBeans application uses thenavdrawer:web layout shown above and contains the same sample content.
If you want your web application to look more like a mobile application, you can scaffold your web application with a hybrid mobile version of the basic, navbar, or navdrawer template: basic:hybrid, navbar:hybrid, or navdrawer:hybrid.

- At a command prompt, enter
ojet createwith optional arguments to create the Oracle JET application and scaffolding.ojet create [directory] [--template={template-name:[web|hybrid]|template-url|template-file}] [--help]The following table describes the available options and provides examples for their use.
Tip:
You can also enterojet helpat a terminal prompt to get additional help with the Oracle JET CLI.Option Description directoryApplication location. If not specified, the application is created in the current directory. The directory will be created during scaffolding if it doesn’t already exist.
templateTemplate to use for the application. Specify one of the following:
-
template-namePredefined template. You can enter
blank,basic,navbarornavdrawer. Defaults toblankif not specified.Optionally, add
:webor:hybridto the template name to specify web or hybrid mobile styling. By default template will use the web styling, but you can add:hybridto change the styling to hybrid mobile, typicallybasic:hybrid,navbar:hybridornavdrawer:hybrid. -
template-URLURL to zip file containing the name of a zipped application:
http://path-to-app/app-name.zip. -
template-filePath to zip file on your local file system containing the name of a zipped application:"path-to-app/app-name.zip". For example:--template="C:\Users\SomeUser\app.zip" --template="/home/users/SomeUser/app.zip" --template="~/projects/app.zip"
helpDisplays a man page for the
ojet createcommand, including usage and options:ojet create --help.For example, the following command will create a web application in the
web-app-navbardirectory using the web version of thenavbartemplate:ojet create web-app-navbar --template=navbarTo scaffold the web application with the hybrid mobile version of the navbar template, enter the following command:
ojet create web-app-navbar --template=navbar:hybridThe scaffolding will take some time to complete. When successful, the terminal will display:
Oracle JET: Your app is ready! Change to your new app directory web-app-navbar and try ojet build and serve...The new application will have a directory structure similar to the one shown in the following image.
The application folders contain the application and configuration files that you will modify as needed for your own application.
Directory or File Description node_modulesContains the Node.js modules used by the tooling.
scriptsContains the
oraclejet-build.jsandoraclejet-serve.jsfiles that you can modify to customize standard Oracle JET build and serve steps for your application. See Customize the Web Application’s Build Steps and Customize the Web Application’s Serve Steps.Also contains template hook scripts that you can modify to define new build and serve steps for your application. See Customize the Web Application Tooling Workflow Using Hook Points
srcSite root for your application. Contains the application files that you can modify as needed for your own application and should be committed to source control.
The content will vary, depending upon your choice of template. Each template, even the blank one, will contain an
index.htmlfile and amain.jsRequireJS bootstrap file.Other templates may contain view templates and viewModel scripts pre-populated with content. For example, if you specified the navbar template during creation, the
js/viewsandjs/viewModelsfolders will contain the templates and scripts for a web application that uses a nav bar for navigation..gitignoreDefines rules for application folders to ignore when using a GIT repository to check in application source. Users who do not use a GIT repository can use
ojet stripto avoid checking in content that Oracle JET always regenerates. Note this file must not be deleted since theojet stripcommand depends on it.Gruntfile.jsTask configuration file for Grunt based tasks. This file is not used by the Oracle JET command-line interface (CLI) and the direct use of Grunt has been deprecated since Oracle JET release 5.0.0. The tooling workflow now relies on native build and serve scripts and tasks no longer require Grunt to run.
oraclejetconfig.jsonContains the default source and staging file paths that you can modify if you need to change your application's file structure.
package.jsonDefines npm dependencies and project metadata.
-

After scaffolding, you can perform the following optional tasks to customize your application:
Modify the Web Application’s File Structure
You can modify your scaffolded application’s file structure if the default structure doesn’t meet your needs.
The oraclejetconfig.json file in your application’s top level directory contains the default source and staging file paths that you can modify.
{
  "paths": {
    "source": {
      "common": "src",
      "web": "src-web",
      "hybrid": "src-hybrid",
      "javascript": "js",
      "styles": "css",
      "themes": "themes"
    },
    "staging": {
      "web": "web",
      "hybrid": "hybrid",
      "themes": "themes"
    }
  },
  "generatorVersion": "5.2.0"
}
To change the web application’s file structure:
Add Hybrid Mobile Features to Web Applications
Add Cordova hybrid mobile platforms to your web application using the ojet add hybrid command. When you run this command, the tooling creates a Cordova project and new hybrid-src and web-src directories, enabling you to create both web and hybrid mobile applications from the same source.
Since mobile applications typically provide a very different user experience to web applications, taking this approach typically works best if your web application has been designed to suit a mobile device user experience.
To add hybrid mobile platforms to your web application:
If needed, install the mobile tooling packages as described in Getting Started with Oracle JET Hybrid Mobile Application Development.
Build a Web Application with the Oracle JET CLI
Use the Oracle JET command-line interface (CLI) to build a development version of your web application before serving it to a browser. This step is optional.
Change to the application’s root directory and use the ojet build command to build your application.
ojet build [--theme=themename[:android|ios|web|windows] --themes=theme1,theme2,...
            --sass]
The following table describes the available options and provides examples for their use.
Tip:
You can also enterojet help at a terminal prompt to get help for specific Oracle JET CLI options.
| Option | Description |
|---|---|
|
|
Theme to use for the application. The theme defaults to You can also enter a different |
|
|
Themes to include in the application, separated by commas. If you don’t specify the |
|
|
Manages Sass compilation. If you add Sass and specify the If you add Sass and do not specify a theme option, Sass compilation will not occur by default, and you must specify |
Done.
The command will also create a web folder in your application’s root to contain the built content.
Note:
You can also use theojet build command with the --release option to build a release-ready version of your application. For information, see Packaging and Deploying Web Applications.
Customize the Web Application’s Build Steps
Edit oraclejet-build.js to modify default build behavior. For example, you can add additional libraries to your application or change the default markers used to inject links into the application’s index.html during build time.
The Oracle JET tooling defines default build and serve behavior in node_modules/@oracle/oraclejet-tooling/lib/defaultconfig.js. The first part of the file contains the default build configuration, including entries for application paths and other options used during the build process. To modify defaults or add your own, edit oraclejet-build.js and remove comments from the options that you want to configure. The file contains detailed instructions for each configurable option.
Oracle JET will merge the options with the default configuration during the build. However, be aware that fileList options will completely replace the corresponding option in the default configuration and will not be merged.
To customize build behavior:
Serve a Web Application with the Oracle JET CLI
Use ojet serve to run your web application in a local web server for testing and debugging. By default, a live reload option is enabled which lets you make changes to your application code that are immediately reflected in the browser.
Note:
You can also use theojet serve command with the --release option to serve a release-ready version of your application. For information, see Packaging and Deploying Web Applications.
Customize the Web Application’s Serve Steps
Edit oraclejet-serve.js to modify default serve behavior. For example, you can specify your own watch tasks or specify actions specific to web or hybrid applications.
The Oracle JET tooling defines default build and serve behavior in node_modules/@oracle/oraclejet-tooling/lib/defaultconfig.js. The second half of the file contains the default serve configuration, including entries for application paths and other options used during the serve process. To modify defaults or add your own, edit scripts/config/oraclejet-serve.js and remove comments from the options that you want to configure. The file contains detailed instructions for each configurable option.
Oracle JET will merge the options with the default configuration during the build. However, be aware that rewriting the three default watch targets (sourceFiles, sass, and themes) can result in unpredictable behavior.
To customize serve behavior:
node --version and npm --version commands and reload the page.
Customize the Web Application Tooling Workflow Using Hook Points
Hook points that Oracle JET tooling defines let you customize the behavior of the JET build and serve processes when you want to define new steps to execute during the tooling workflow using script code that you write.
When you create an application, Oracle JET tooling generates script templates in the /scripts/hooks application subfolder. To customize the Oracle JET tooling workflow you can edit the generated templates with the script code that you want the tooling to execute for specific hook points during the build and serve processes. If you do not create a custom hook point script, Oracle JET tooling ignores the script templates and follows the default workflow for the build and serve processes.
To customize the workflow for the build or serve processes, you edit the generated script template file named for a specific hook point. For example, to trigger a script at the start of the tooling's build process, you would edit the before_build.js script named for the hook point triggered before the build begins. That hook point is named before_build.
Therefore, customization of the build and serve processes that you enforce on Oracle JET tooling workflow requires that you know the following details before you can write a customization script.
-
The type of application that you created: either a web application or a hybrid mobile application.
-
The Oracle JET build or serve mode that you want to customize:
-
Debug — The default mode when you build or serve your application, which produces the source code in the built application.
-
Release — The mode when you build the application with the
--releaseoption, which produces minified and bundled code in a release-ready application.
-
-
The appropriate hook point to trigger the customization.
-
The location of the default hook script template to customize.
Note:
By default, the hooks system locates the scripts in the hooks subfolder using a generated configuration file that specifies the script paths. If you change the default location of the hooks subfolder, you must edit the configuration file to specify the new directory path. For details, see Create a Web Application Build or Serve Hook Script for Web Applications.
Create a Web Application Build or Serve Hook Script for Web Applications
You can create a hook point script that defines a new build or serve process step by editing the script template associated with a specific hook point in the tooling build and serve workflow.
The Oracle JET hooks system defines various script trigger points, also called hook points, that allow you to customize the build and serve workflow across the various build and serve modes. Customization relies on script files and the script code that you want to trigger for a particular hook point. Note that the generated script templates that you modify with your script code are named for their corresponding hook point.
To customize the workflow for the build or serve processes, you edit the generated script template file named for a specific hook point. For example, to trigger a script at the start of the tooling's build process, you would edit the before_build.js script named for the hook point triggered before the build begins. That hook point is named before_build.
The following example illustrates a build customization using the after_build hook. This hook script is an example of adding a customize task after the build finishes.
'use strict’;

const fs = require('fs');
const archiver = require('archiver');

module.exports = function (configObj) {
  return new Promise((resolve, reject) => {
   console.log("Running after_build hook.");

    const output = fs.createWriteStream('my-archive.war');
    const archive = archiver('zip');

    output.on('close', () => {
      console.log('Files were successfully archived.');
      resolve();
    });

    archive.on('warning', (error) => {
      console.warn(error);
    });

    archive.on('error', (error) => {
      reject(error);
    });

    archive.pipe(output);
    archive.directory('web', false);
    archive.finalize();
  });
};
In this example, assume the script templates reside in the default folder generated when you created the application. The goal is to package the application into a ZIP file. Because packaging occurs after the application build process completes, this script is triggered for the after_build hook point. For this hook point, the modified script template after_build.js will contain the script code to zip the application, and because the .js file resides in the default location, no hooks system configuration changes are required.
/scripts/config application subfolders:
-
<myApp_Home>/scripts/config/oraclejet-build.js- Specifies the location and hook type of build process scripts. -
<myApp_Home>/scripts/config/oraclejet-serve.js- Specifies the location and hook type of serve process scripts.
Note:
If your development effort requires you to relocate hook scripts to a common location, for example to support team development, you can update the path attributes in the hook system configuration file to specify the new target path for the scripts. When you edit the configuration file do not change the type attributes. The hook system relies on type attribute to execute the script for a specific build/serve hook point.
The following table identifies the hook points and the workflow customizations they support in the Oracle JET build and serve processes.
| Hook Point | Supported Build or Serve Mode | Description |
|---|---|---|
before_build |
Debug / Release | This hook point triggers the script with the default name before_build.js immediately before the tooling initiates the build process. A script for this hook point can be used with a web application or a hybrid mobile application.
|
before_release_build |
Release only | This hook point triggers the script with the default name before_release_build.js before the uglify step and the requirejs bundling step occur. A script for this hook point can be used with a web application or a hybrid mobile application.
|
before_hybrid_build |
Debug / Release | This hook point triggers the script with the default name before_hybrid_build.js before the cordovaPrepare and CordovaCompile build steps occur. A script for this hook point can be used only with a hybrid mobile application.
|
after_build |
Debug / Release | This hook point triggers the script with the default name after_build.js immediately after the tooling concludes the build process. A script for this hook point can be used with a web application or a hybrid mobile application.
|
before_serve |
Debug / Release | This hook point triggers the script with the default name before_serve.js before the web serve process connects to and watches the application. In the case of hybrid builds, it also precedes the cordovaClean and cordovaServe step. A script for this hook point can be used with a web application or a hybrid mobile application.
|
after_serve |
Debug / Release | This hook point triggers the script with the default name after_serve.js after all build process steps complete and the tooling serves the application. A script for this hook point can be used with a web application or a hybrid mobile application.
|
Tip:
OJET tooling reports when hook points are executed in the message log for the build and serve process. You can examine the log in the console to understand the tooling workflow and determine exactly when the tooling triggers a hook point script.
Create a Web Application Using the oraclejet.zip Download
You can create a new Oracle JET application in your favorite IDE or text editor using files extracted from oraclejet.zip. After you create your application, you can modify it to include references to Oracle JET CSS and libraries.
Topics
Download the Oracle JET Zip File
You can download Oracle JET from the Oracle Technology Network (OTN) as a single zip file. The zip file contain the libraries, scripts, styles, and files needed to develop applications using Oracle JET.
To download Oracle JET from the Oracle Technology Network (OTN):
-
Navigate to the Oracle JET download location at: Oracle JET Downloads.
-
Choose Accept License Agreement.
-
Download Oracle JavaScript Extension Toolkit: Base Distribution.
Include References to CSS Files in Your Oracle JET Application
Specify the reference to the CSS files directly in your application’s main page, typically index.html.
If needed, download Oracle JET as described in Download the Oracle JET Zip File.
Use RequireJS to Manage Library, Link, and Script References
RequireJS is a JavaScript file and module loader that makes it easier to manage library references and is designed to improve the speed and quality of your code.
Oracle JET uses RequireJS by default for the Oracle JET Starter Templates and is required if you plan to use Oracle JET's internationalization, data visualization components, or the oj.OAuth plugin in your application.
To use RequireJS to manage references:
If needed, download Oracle JET as described in Download the Oracle JET Zip File.
For more information about RequireJS, see http://requirejs.org.
Create a Web Application Using the Oracle JET Starter Templates
You can download Oracle JET with a starter template that contains a pre-configured application ready to run or modify as needed for your environment.
Topics:
Downloading Oracle JET with a Starter Template
You can download any of the applications in the Oracle JET Starter Template collection to get Oracle JET. The Web Nav Drawer Starter Template contains the Oracle JET bundle, an index.html file already configured for Oracle JET and is a good choice for getting started with Oracle JET.
Tip:
If you use the Oracle JET CLI to scaffold a web application with a navdrawer template as described in Scaffold a Web Application with the Oracle JET CLI, then you already have a Starter Template and can skip this step.
Also, if you use NetBeans IDE version 8.2, it includes the Oracle JET QuickStart Basic project which contains the same content as the Web Nav Drawer Starter Template.
To download Oracle JET with a Starter Template:
-
Navigate to the Oracle JET download location at: Oracle JET Downloads.
-
Choose Accept License Agreement.
-
Download the desired template.
For example, to download the Web Nav Drawer template, select Web Nav Drawer Starter Template with Oracle JavaScript Extension Toolkit Pre-configured.
Loading the Oracle JET Starter Templates
The Oracle JET Starter Templates include all of the Oracle JET libraries and an index.html file already configured for your use. To use the Oracle JET Starter Templates, extract the zip files and open the index.html file in your favorite browser.
You can also load the Oracle JET Starter Templates in the NetBeans IDE or the development environment of your choice.
Create an Application in the NetBeans IDE with a Site Template
You can create a new Oracle JET application in the NetBeans IDE using files extracted from oraclejet.zip or any of the Oracle JET Starter Templates. NetBeans 8.1 and higher includes support for Oracle JET applications using the Oracle JET zip files as site templates in the NetBeans IDE.
To create an Oracle JET application in the NetBeans IDE using a site template:
-
If needed, download and install NetBeans. Select a download bundle that includes support for HTML5. For additional detail, see https://netbeans.org/downloads/index.html
-
In the NetBeans IDE, click New Project.
-
In the New Project dialog, create a new HTML5 application.
-
In the Categories area, click HTML5/JavaScript.
-
In the Projects area, click HTML5/JS Application.
In this example, the
HTML5 & PHPdownload bundle is used for the initial NetBeans 8.2 download, and the categories are limited to HTML5 and PHP. If you downloaded a different NetBeans download bundle or are using a different version, the dialog may include additional or different categories. -
Click Next.
-
-
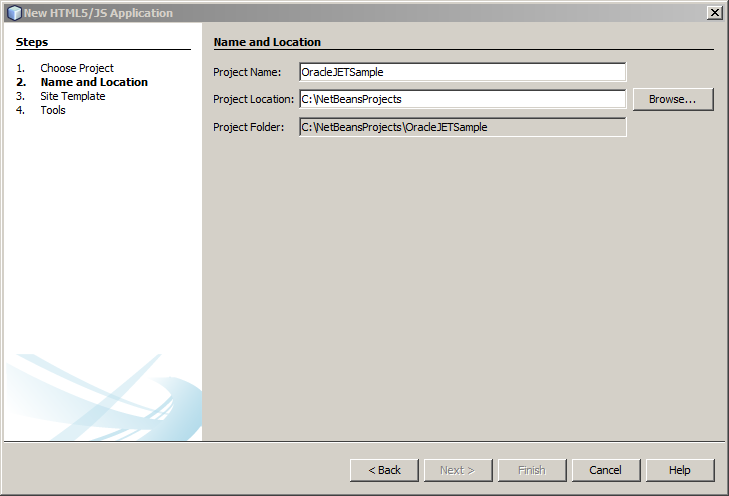
In the New HTML5/JS Application dialog, configure the project name and project location.
-
In the Project Name field, enter a name for your project.
-
In the Project Location field, enter a location to store the project files.
In this example, the project is named
OracleJETSample, and the project files will be stored in theC:\NetBeansProjectdirectory. -
Click Next.
-
-
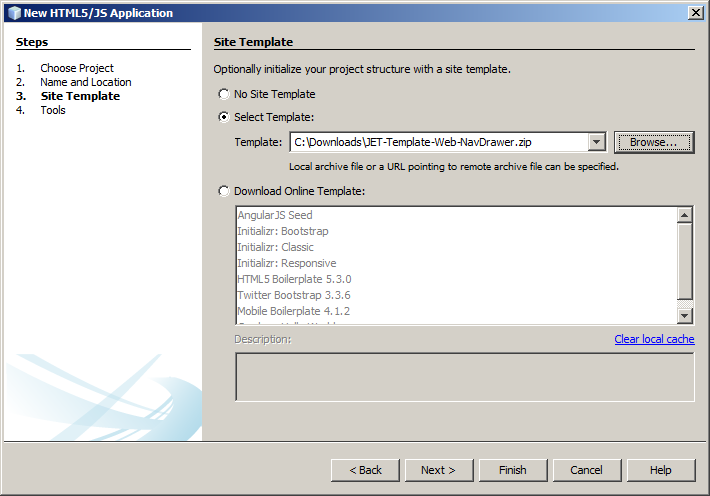
In the New HTML5/JS Application dialog, specify the name of the site template.
-
Choose Select Template.
-
In the Template field, choose Browse and select the location containing the download bundle.
In this example, the completed HTML5 Application dialog specifies
C:\Downloadsas the location for theJET-Template-Web-NavDrawer.zipfile. -
Click Next.
-
-
Optionally, in the New HTML5 Application Dialog, remove the check mark from any tools your application won’t need. By default, all tools are checked.
Tip:
If you decide you want to use one of the tools after you create your application, you can add it in the NetBeans IDE. Choose Tools, then Options, and HTML/JS. Select the tab containing the tool you wish to add, and select the option to install the package. -
Click Finish to create your application.
When you click Finish, NetBeans creates the project and adds an
index.htmlfile to your project. This figure shows the project files andindex.htmlfile that NetBeans 8.2 generated for a project namedOracleJETSamplewith no optional tools installed.


Run the Oracle JET Starter Templates in NetBeans
To run the Oracle JET Starter Templates in the NetBeans IDE:
In the Projects panel, right-click the index.html file and choose Run File to display the page in your browser.
Note:
To take full advantage of the NetBeans integrated tools, the NetBeans team recommends that you install the NetBeans Connector extension for the Chrome browser. For additional info, see https://netbeans.org/kb/docs/webclient/html5-gettingstarted.html.
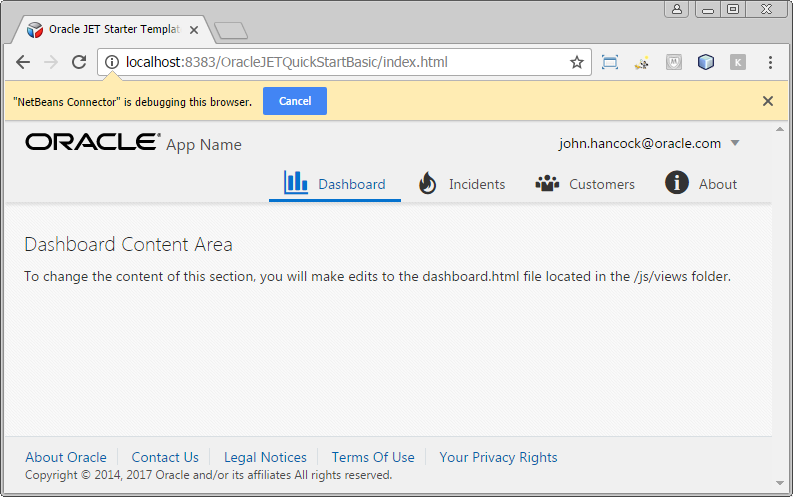
The graphic below shows the Oracle JET Web Nav Drawer Starter Template displayed in the Chrome browser at run time. In this example, the NetBeans Connector is enabled.
Add Oracle JET to an Existing JavaScript Application
You can add Oracle JET to your existing JavaScript application by extracting the oraclejet.zip file into the site root of your application and including references to the Oracle JET libraries and CSS as needed.
If needed, download oraclejet.zip as described in Download the Oracle JET Zip File.
- Extract
oraclejet.zipinto the site root of your application.For example, if your application's site root is
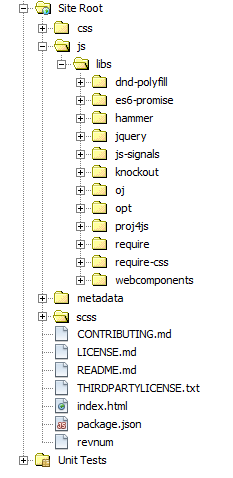
Site Root, extractoraclejet.zipintoSite Root. After extraction, your site root folder will contain the following Oracle JET files and folders as shown in the NetBeans IDE.The
cssfolder contains the themes included with Oracle JET, and thescssfolder contains the SASS source files for the Oracle JET themes. For additional information about Oracle JET theming, see Theming Applications.The
jsfolder contains the Oracle JET libraries and third party libraries, and thebuildnumandrevnumfiles identify the Oracle JET build number and version. For additional information about the libraries included in Oracle JET, see What's Included in Oracle JET.