Getting Started with Oracle JET Hybrid Mobile Application Development
Oracle JET includes support for hybrid mobile application development using Cordova. The toolkit provides iOS, Android, and Windows Alta themes and UI behavior on Oracle JET components, starter applications, design patterns, and tooling support.
Before you can create your first hybrid mobile application, you should become familiar with the Oracle JET mobile features and third-party technologies. You must also install the prerequisite packages and Oracle JET mobile tools.
Topics
Once you have created a hybrid mobile application, added Cordova plugins, and familiarized yourself with Oracle JET’s mobile features, refer to the following information for details about other tasks that you need to do to complete your hybrid mobile application.
Tip:
If you’re strictly interested in developing web applications that run in desktop and mobile browsers, you don’t need to install the mobile tooling. For information on developing web applications, see Getting Started with Oracle JET Web Application DevelopmentInstall the Mobile Tooling
To create Oracle JET hybrid mobile applications, you must first install Cordova on your development machine. To develop hybrid mobile applications for Android, iOS, or Windows, you must also install the Android, iOS, or Windows development tools.
If needed, install the tooling prerequisites as described in Install the Prerequisite Packages.
- Install Apache Cordova
- (Optional) Install Android Development Tools
- (Optional) Install iOS Development Tools
- (Optional) Install Windows Development Tools
Install Apache Cordova
Install Apache Cordova on your development machine.
Oracle JET uses plugins developed with the Apache Cordova framework to access the capabilities of the devices on which your JET mobile application is installed such as, for example, camera and GPS. JET also uses Cordova to build and serve hybrid mobile applications by invoking the Cordova command-line interface that you install with Cordova.
For additional information about Cordova, see Overview in Cordova’s documentation.
Install Android Development Tools
Install the Android SDK to deploy a JET hybrid mobile application to Android devices.
The Android SDK provides the tools that build and package your application into an .APK file (the file type that installs applications on Android devices), an emulator to create Android Virtual Devices (AVD) where you can test your application if you do not have access to a physical Android device, and an OEM USB driver to connect your development machine to a physical Android device through a USB cable if you do have a device. This last option enables you to deploy an application from your development machine to the Android device.
Android Studio, Google’s IDE for Android development, includes the Android SDK in its installation and provides wizard options that simplify the management of the SDK platforms and tools that you need.
Install Android Studio, and the Android SDK that it includes, by downloading the installation file from https://developer.android.com/studio/index.html. The Android Developer’s website provides installation instructions for Windows, Mac, and Linux. See https://developer.android.com/studio/install.html.
Once you have installed Android Studio, perform the tasks described in the following topics:
-
Set Up Your Android Device to Install an App from Your Development Machine
-
Configure Environment Variables to Reference JDK and Android SDK Installations
Android requires that all .APK files be digitally signed with a certificate before they can be installed. For apps in development, the Android SDK automatically creates a debug keystore and certificate and sets the keystore and key passwords the first time that you build an .APK file. On macOs and Unix, it creates these resources in $HOME/.android/debug.keystore. On Windows, they are in the directory referenced by the %USERPROFILE% variable (for example, C:\Users\JDOE\.android).
When you have completed development and want to sign and package the Android app for distribution, see Packaging a Hybrid Mobile App on Android.
Install an Emulator Accelerator
You can accelerate the performance of the emulator on Intel x86–based development machines by installing an emulator accelerator.
The emulator accelerator speeds up the performance of the emulator and the AVDs that it emulates by allocating additional resources from your development machine. Once installed, the accelerator appears in the SDK Tools list of the SDK Manager, as shown in the image below. Use Android Studio’s Tools and SDK Manager menu options to open the SDK Manager or the icon that appears on the Android Studio toolbar.
If this is the first time that you use Android Studio, click the Start a new Android Studio project link on the Welcome screen of Android Studio. Once you create the project, you’ll have access to the aforementioned menu options.
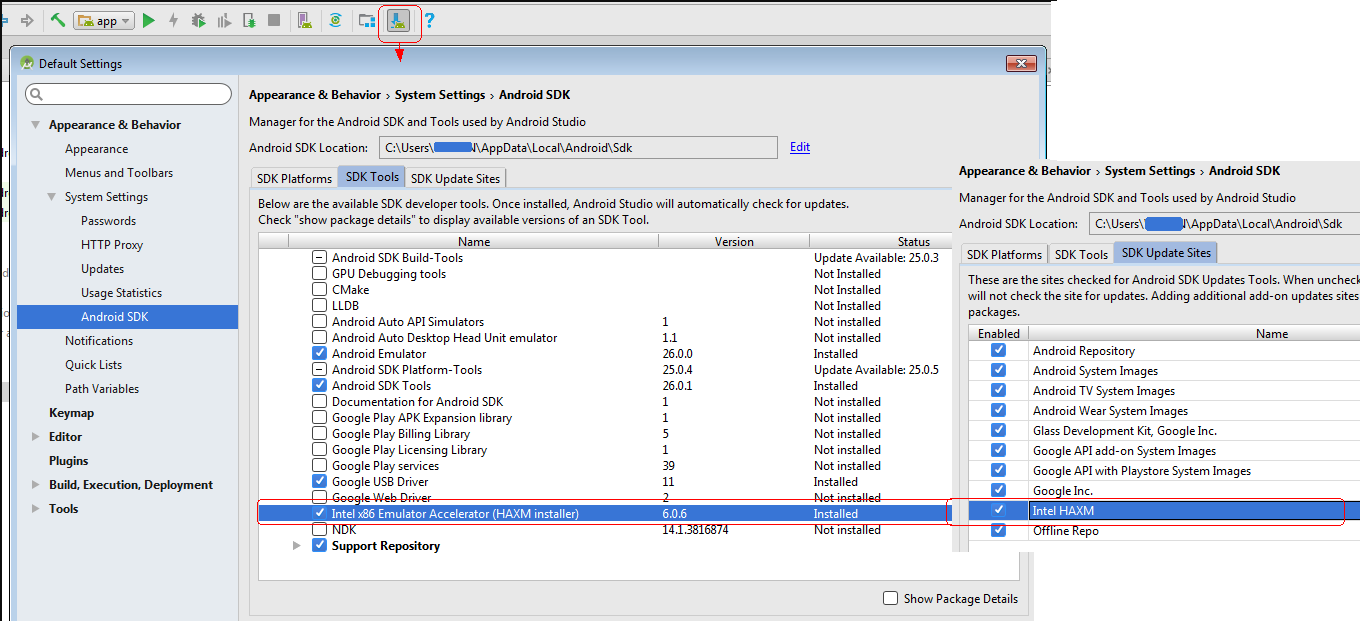
Make sure that the update site for the emulator accelerator that you want to download is selected in the SDK Update Sites tab as shown. Once downloaded, execute the installer. See https://developer.android.com/studio/run/emulator-acceleration.html#accel-vm.
Create an Android Virtual Device
An Android Virtual Device (AVD) replicates an Android device on your development computer. It is a useful option for testing, especially if you only have access to one or a limited range of physical Android devices.
The AVD Manager that you launch from Android Studio by clicking Tools and AVD Manager has a range of ready-to-use virtual devices, mostly of those devices developed by Google itself, such as the Nexus and Pixel XL range. Other Android device vendors, such as Samsung, provide specifications on their websites that you can use to create the AVD yourself.
Google maintains documentation describing how to manage AVDs. See https://developer.android.com/studio/run/managing-avds.html.
If this is the first time that you use Android Studio, click the Start a new Android Studio project link on the Welcome screen. Once you create the project, you’ll have access to the Android Studio menu options described in the following procedure.
To create an AVD:
-
In Android Studio, launch the Android Virtual Device Manager by selecting Tools > AVD Manager.
-
In the Your Virtual Devices screen, click Create Virtual Device.
-
In the Select Hardware screen, select a phone device, such as Pixel, and then click Next.
-
In the System Image screen, click Download for one of the recommended system images. Agree to the terms to complete the download.
-
After the download completes, select the system image from the list and click Next.
-
On the next screen, leave all the configuration settings unchanged and click Finish.
-
In the Your Virtual Devices screen, select the device you just created and click Launch this AVD in the emulator.
Set Up Your Android Device to Install an App from Your Development Machine
You can install your app directly from your development machine to your Android device by configuring the Android device and connecting it to your development machine using a USB cable.
To set up your Android device:
-
Connect your device to your development machine with a USB cable. If you are developing on Windows, you might need to install the appropriate USB driver for your device. For help installing drivers, see the OEM USB Drivers document.
-
Enable USB debugging on your device by going to Settings > Developer options.
Note:
On Android 4.2 and newer, Developer options is hidden by default. To make it available, go to Settings > About phone and tap Build number seven times. Return to the previous screen to find Developer options.
Install Gradle and Configure Gradle Proxy Settings
Gradle is the tool that the Android SDK invokes to build the apps that you deploy to your AVD or Android device.
Prior to the release of cordova-android@6.4.0, you could use the instance of Gradle that Android Studio installed to build the apps you deploy. With the cordova-android@6.4.0 release (and later), you must install Gradle separately from Android Studio. For information about how to do this, see Gradle's documentation.
Once you have installed Gradle, you must configure proxy settings if you work inside a corporate network. To do this, create a gradle.properties file in your ~/.gradle directory that includes the following properties so that you can successfully serve your app to the AVD or physical device.
systemProp.http.proxyHost=www-proxy.server.url.com
systemProp.http.proxyPort=proxy-port-number
systemProp.https.proxyHost=www-proxy.server.url.com
systemProp.https.proxyPort=proxy-port-number
If you are a Windows user, you locate your ~/.gradle directory by navigating to %USERPROFILE%\.gradle. If you are a macOS or Linux user, navigate to ~/.grade.
Configure Environment Variables to Reference JDK and Android SDK Installations
To function correctly, the Cordova CLI that the Oracle JET CLI communicates with requires that you configure certain environment variables.
The Cordova CLI attempts to set these environment variables for you, but in certain cases you may need to set them manually. In any event, it is a good idea to review and confirm the values of the following environment variables before you start development:
-
Set
JAVA_HOMEto the location of your JDK installationFor example, on Windows, set
JAVA_HOMEto a value similar toC:\Program Files\Java\jdk1.8.0_171. -
Set
ANDROID_HOMEto the location of your Android SDK installationFor example, on Windows set
ANDROID_HOMEto a value similar toC:\Users\John\AppData\Local\Android\Sdk. You can obtain the Android SDK location from the Android SDK page of the Default Settings dialog that you access by selecting Tools > SDK Manager in Android Studio.
We also recommend that you add the Android SDK's tools, tools/bin, and platform-tools directories to your PATH environment variable.
The process to set the environment variables depends upon your development environment:
-
Windows
Set the variables permanently in Control Panel > System and Security > System > Advanced System Settings > Environment Variables.
For example, to include the Android SDK's tools and platform-tools directories in your
PATHenvironment variable, modify the entry that the Environment Variables dialog displays to include entries similar to the following:Path=C:\Users\JET\AppData\Local\Android\sdk\tools;C:\Users\JET\AppData\Local\Android\sdk\platform-tools;C:\Users\JET\AppData\Roaming\npmTo set the
JAVA_HOMEandANDROID_HOMEenvironment variables, click New in the Environment Variables dialog and set the values of the variables to the location of the JDK and Android SDK locations, as shown in the following image.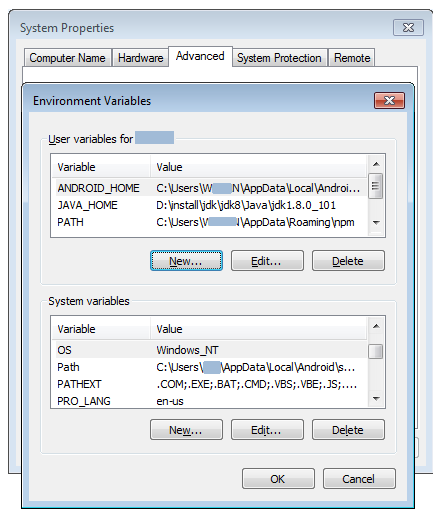
Description of the illustration env_var.pngIf you have opened a command window, close it and open a new one for the change to take effect.
-
Macintosh and Linux
On Mac and Linux systems, the settings depend upon your default shell. For example, on a Mac system using the Bash shell, add the following lines in
~/.bash_profile:export JAVA_HOME=/Development/jdkInstallDir/ export ANDROID_HOME=/Development/android-sdk/
To update your PATH environment variable, add a line resembling the following where you substitute the paths with your local Android SDK installation's location:
export PATH=${PATH}:/Development/android-sdk/platform-tools:/Development/android-sdk/toolsReload your terminal to see this change reflected or run the following command:
$ source ~/.bash_profile
On a Linux system using C Shell, you would use the following format:
setenv JAVA_HOME=/Development/jdkInstallDir/
setenv ANDROID_HOME=/Development/android-sdk/
Reload your terminal to see this change reflected or run the following command:
~/.cshrc
Install iOS Development Tools
To develop applications for the iOS platform, you must install the Xcode development environment from the App Store which is only available on macOS.
After installing Xcode, execute the following command in a terminal window to install the Xcode command line tools:
xcode-select –install
These steps are sufficient for developing iOS applications and testing on iOS simulators. If, however, you want to use an actual iOS device for testing or to publish your application to the App Store, you must join the Apple iOS Developer program and create an appropriate provisioning profile. For additional information, see Manage profiles in Apple’s documentation. For details about using the Oracle JET tooling to package and deploy your hybrid mobile application, see Packaging a Hybrid Mobile App on iOS.
In addition you must install a tool that is used by the Oracle JET CLI to deploy apps to iOS devices by executing the following command in a terminal window:
sudo npm install -g ios-deploy --unsafe-perm=true --allow-root
Once you have installed the iOS development tools, you can create a hybrid mobile application, as described in Create a Hybrid Mobile Application.
Install Windows Development Tools
JET hybrid mobile apps for Windows devices must be developed on computers that run the Windows 10 operating system.
JET supports the creation of hybrid mobile apps that are Universal Windows Platform (UWP) apps. UWP is the platform for Windows 10. For more information, see What's a Universal Windows Platform (UWP) app? in Microsoft’s documentation.
Enable Developer Mode on Windows 10
Developer mode allows you to install any signed and trusted apps to your Windows development machine, whereas the default Windows 10 setting only permits the installation of apps from the Windows Store.
- From the For developers settings dialog, choose Developer mode.
- Read the disclaimer in the dialog that appears and click Yes to accept the change.
Note:
If your device is owned by an organization, some options might be disabled by your organization. Contact your system administrator to ensure you have the options enabled that you require.
For information about Developer mode, and other settings that configure development on Windows 10 computers, see https://docs.microsoft.com/en-us/windows/uwp/get-started/enable-your-device-for-development.
Install Visual Studio
Install Visual Studio as it includes the Windows 10 SDK and the Universal Windows App Development Tools that you require to develop and deploy a JET hybrid mobile application on your computer.
Microsoft offers a number of editions of Visual Studio. The Visual Studio Community edition is a free, fully-featured IDE for students, open-source and individual developers. Visual Studio can be downloaded from https://www.visualstudio.com/vs/. During download and installation, select the Universal Windows Platform development workload and the latest version of the Windows 10 SDK that appears under the Optional list of items that you can install with the workload, as shown in the following image.

Run Visual Studio after you install it to execute any required setup tasks. This prompts you to enable Developer mode, if you have not already enabled this mode on your computer.
Install a Personal Information Exchange File in Your Computer’s Certificate Store
Install a personal information exchange file (.PFX) in certificate stores on your Windows 10 computer. The PFX file packages a private key file and a certificate file that you use to sign your app.
This is a one-time task that, once complete, enables you to build and serve JET hybrid mobile applications in debug mode on your Windows 10 computer. You also require a PFX file to sign your JET hybrid mobile application when you complete development and want to distribute it.
The following procedure describes how to create PVK and CER files without password protection that you package into a PVK file that is also without password protection. For more information about the switches and arguments supported by the Microsoft tools that you use to create and package a PFX file, see the following Microsoft documentation:
For more information about packaging a completed JET hybrid app for Windows, see Packaging a Hybrid Mobile App on Windows.
To create and install a PFX file:
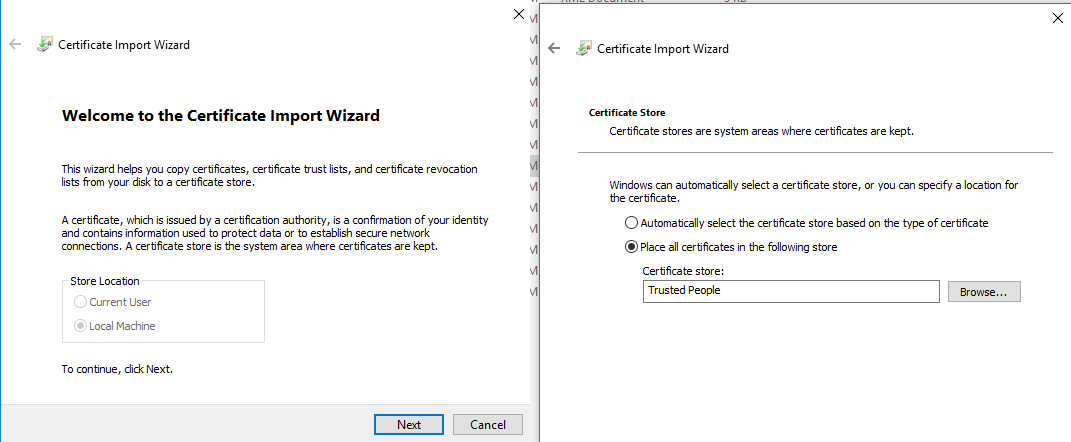
- To do this, double-click the PFX file to invoke the Certificate Import Wizard, choose the appropriate store location (for example, Current User) and click Next to proceed to the page where you choose the Certificate Store, as shown by the following figure where the Trusted People certificate store is selected.
Note:
The file created in our previous example is not password-protected, so leave the Password input field blank in the Private key protection page of the wizard.
Create a Hybrid Mobile Application
Use the Oracle JET mobile tooling commands to create, build, run, and customize hybrid mobile applications for Android, iOS, and Windows mobile devices. You can create an application that contains a blank template or one pre-configured with layouts and styling for the desired platform.
- Scaffold a Hybrid Mobile Application with the Oracle JET CLI
- (Optional) Build a Hybrid Mobile Application with the Oracle JET CLI
- Serve a Hybrid Mobile Application with the Oracle JET CLI
- Review Your Application Settings in the config.xml File
- Change the Splash Screen and App Launcher Icon
Note:
You can add hybrid platforms (Android, iOS, and Windows) to an existing web application. See Add Hybrid Mobile Features to Web Applications.Scaffold a Hybrid Mobile Application with the Oracle JET CLI
Use the Oracle JET CLI to scaffold a hybrid mobile application for iOS, Android, and Windows mobile devices. You can scaffold the application to contain a blank template or one pre-configured with layout styles, a navigation bar, or a navigation drawer. After scaffolding, you can modify the app as desired.
The following image shows the differences between the templates as shown on an Android Nexus 4 emulator using the Android Alta theme. The blank template contains index.html but no UI features, and is not shown in the image that follows. The basic template adds styling but no sample content, and can be used as the basis for your app if you have no navigational requirements or if you want to design the entire app yourself. The navbar and navdrawer templates contain sample content and best practices for layouts and styling that you can also modify as needed. The same app will run on any Android, iOS, or Windows emulator or device, using the appropriate Alta theme for the platform.
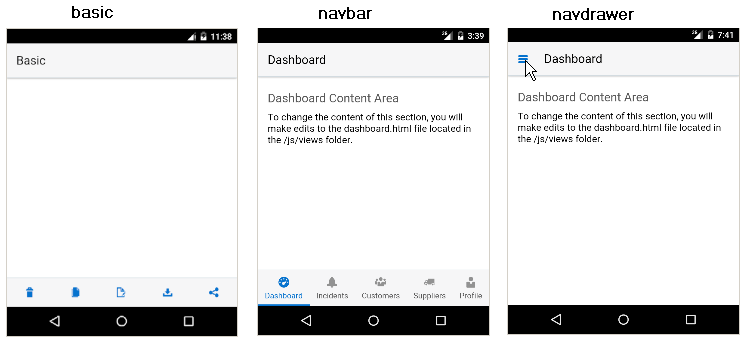
The scaffolding will take some time to complete. When successful, the terminal will display: Your app is ready! Change to your new app directory MySampleApp...
The new application will have a directory structure similar to the one shown in the following image.
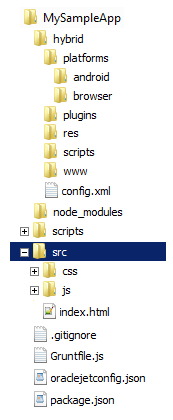
The application folders contain the application and configuration files that you will modify as needed for your own application. See Hybrid Mobile Directory Structure.
Hybrid Mobile Directory Structure
The Oracle JET scaffolding process creates files and folders that you modify as needed for your application.
| Directory or File | Description |
|---|---|
|
|
Contains platform-specific files that are merged in with a copy of the application files at build time. Most of the files in this directory are staging files that you should not commit to your source control system. One exception is the |
|
|
Contains the Cordova global configuration settings. You can edit the For example, the following entry sets the application’s orientation to landscape-only on all platforms. Commit the |
|
|
Contains the Also contains template hook scripts that you can modify to define new build and serve steps for your application. See Customize the Hybrid Mobile Application Tooling Workflow Using Hook Points. |
|
|
Contains the Node.js modules used by the tooling. |
|
|
Site root for your application. Contains the application files that you can modify as needed for your own application and should be committed to source control. The content will vary, depending upon your choice of template. Each template, even the blank one, will contain an Other templates may contain view templates and viewModel scripts pre-populated with content. For example, if you specified the navbar template during creation, the |
|
|
Defines rules for application folders to ignore when using a GIT repository to check in application source. Users who do not use a GIT repository can use |
|
|
Task configuration file for Grunt based tasks. This file is not used by the Oracle JET command-line interface (CLI) and the direct use of Grunt has been deprecated since Oracle JET release 5.0.0. The tooling workflow now relies on native build and serve scripts and tasks no longer require Grunt to run. |
|
|
Contains the default source and staging file paths that you can modify if you need to change your application's file structure. |
|
|
Defines npm dependencies and project metadata. |
Modify the Hybrid Mobile Application’s File Structure
You can modify your scaffolded application’s file structure if the default structure doesn’t meet your needs.
The oraclejetconfig.json file in your application’s top level directory contains the default source and staging file paths that you can modify.
{
  "paths": {
    "source": {
      "common": "src",
      "web": "src-web",
      "hybrid": "src-hybrid",
      "javascript": "js",
      "styles": "css",
      "themes": "themes"
    },
    "staging": {
      "web": "web",
      "hybrid": "hybrid",
      "themes": "themes"
    }
  },
"serveToBrowser": "chrome",
"generatorVersion": "5.2.0"
}
To change the hybrid mobile application’s file structure:
Build a Hybrid Mobile Application with the Oracle JET CLI
Use Oracle JET CLI to build your Android, iOS, or Windows hybrid mobile application for testing and debugging.
Change to the application’s root directory and use the ojet build command for each platform that your hybrid mobile application will support.
ojet build [android|ios|windows]
           [--build-config=path/buildConfig.json --destination=device|emulator
            --theme=themename[:android|ios|web|windows] --themes=theme1,theme2,...
            --sass
            --platform-options="string"]
The following table describes the commonly-used options and provides examples for their use.
Tip:
You can also enterojet help at a terminal prompt to get help for specific Oracle JET CLI options.
| Option | Description |
|---|---|
|
|
Desired platform. Enter |
|
|
Path to You do not need this file when building a debug version of your app for Android or Windows, or if you are building your app for deployment to an iOS simulator. However, you must configure one for testing on an iOS device and when you’re ready to release your Android, iOS, or Windows application. For additional information, see Packaging and Publishing Hybrid Mobile Applications. |
|
|
Required for iOS applications. Specify one of the following:
|
|
|
Equivalent to |
|
|
Equivalent to |
|
|
Theme to use for the application. The theme defaults to |
|
|
Themes to include in the application, separated by commas without spaces. If you don’t specify the |
|
|
Manages Sass compilation. If you add Sass and specify the |
|
|
Platform-specific options that will pass verbatim to the Cordova CLI. This option is typically required for Windows device deployments or if a Cordova plugin contains multiple static libraries for different CPUs. If the value passed contains a quoted string, the quotation marks must be escaped. For example, you can use platform-options to specify Windows architectures. By default, the architecture defaults to To specify a single architecture, use the
--arch option and specify arm, x86, x64, or anycpu.To specify multiple architectures, use the
--archs option with a space-separated list passed in as a quoted string. Note that you must escape the quotation marks as shown below. |
For example, the following command will build the sample Android application shown in Scaffold a Hybrid Mobile Application with the Oracle JET CLI
ojet build androidThe command will take some time to complete. If it’s successful, you’ll see the following message: Done. The command will also output the name and location of the built application in hybrid/platforms/android , hybrid/platforms/ios, or hybrid/platforms/windows.
By default ojet build creates a debug version of your application. You can also use the ojet build command with the –-release option to build a release-ready version of your application. For information, see Packaging and Publishing Hybrid Mobile Applications.
WARNING:
If you use a proxy server and specify the Android platform, the build command will fail the first time you issue it. To resolve this, create agradle.properties file in your HOME/.gradle directory and rerun the build command. The file should contain the following:systemProp.http.proxyHost=proxy-server-URL
systemProp.http.proxyPort=80
systemProp.https.proxyHost=proxy-server-URL
systemProp.https.proxyPort=80Customize the Hybrid Mobile Application’s Build Steps
Edit oraclejet-build.js to modify default build behavior. For example, you can add additional libraries to your application or change the default markers used to inject links into the application’s index.html during build time.
The Oracle JET tooling defines default build and serve behavior in node_modules/@oracle/oraclejet-tooling/lib/defaultconfig.js. The first part of the file contains the default build configuration, including entries for application paths and other options used during the build process. To modify defaults or add your own, edit oraclejet-build.js and remove comments from the options that you want to configure. The file contains detailed instructions for each configurable option.
Oracle JET will merge the options with the default configuration during the build. However, be aware that fileList options will completely replace the corresponding option in the default configuration and will not be merged.
To customize build behavior:
Customize the Hybrid Mobile Application Tooling Workflow Using Hook Points
Hook points that Oracle JET tooling defines let you customize the behavior of the build and serve processes when you want to define new steps to execute during the tooling workflow using script code that you write.
When you create a hybrid mobile application, Oracle JET tooling generates script templates in the /scripts/hooks application subfolder. To customize the Oracle JET tooling workflow you can edit the generated templates with the script code that you want the tooling to execute for specific hook points during the build and serve processes. If you do not create a custom hook point script, Oracle JET tooling ignores the script templates and follows the default workflow for the build and serve processes.
To customize the workflow for the build or serve processes, you edit the generated script template file named for a specific hook point. For example, to trigger a script at the start of the tooling's build process, you would edit the before_hybrid_build.js script named for the hook point triggered before the build begins. That hook point is named before_hybrid_build.
Therefore, customization of the build and serve processes that you enforce on Oracle JET tooling workflow requires that you know the following details before you can write a customization script.
-
The type of application that you created: either a web application or a hybrid mobile application.
- The Oracle JET build or serve mode that you want to customize:
-
Debug — The default mode when you build or serve your application, which produces the source code in the built application.
-
Release — The mode when you build the application with the
--releaseoption, which produces minified and bundled code in a release-ready application.
-
-
The appropriate hook point to trigger the customization.
-
The location of the default hook script template to customize.
Note:
By default, the hooks system locates the scripts in the hooks subfolder using a generated configuration file that specifies the script paths. If you change the default location of the hooks subfolder, you must edit the configuration file to specify the new directory path. For details, see Create a Web Application Build or Serve Hook Script for Hybrid Mobile Applications.
Create a Web Application Build or Serve Hook Script for Hybrid Mobile Applications
You can create a hook point script that defines a new build or serve process step by editing the script template associated with a specific hook point in the tooling build and serve workflow.
The Oracle JET hooks system defines various script trigger points, also called hook points, that allow you to customize the build and serve workflow across the various build and serve modes. Customization relies on script files and the script code that you want to trigger for a particular hook point. Note that the generated script templates that you modify with your script code are named for their corresponding hook point.
To customize the workflow for the build or serve processes, you edit the generated script template file named for a specific hook point. For example, to trigger a script at the start of the tooling's build process, you would edit the before_hybrid_build.js script named for the hook point triggered before the build begins. That hook point is named before_hybrid_build.
The following example illustrates a build customization using the after_build hook. This hook script is an example of adding a customize task after the build finishes.
'use strict’;

const fs = require('fs');
const archiver = require('archiver');

module.exports = function (configObj) {
  return new Promise((resolve, reject) => {
   console.log("Running after_build hook.");

    const output = fs.createWriteStream('my-archive.war');
    const archive = archiver('zip');

    output.on('close', () => {
      console.log('Files were successfully archived.');
      resolve();
    });

    archive.on('warning', (error) => {
      console.warn(error);
    });

    archive.on('error', (error) => {
      reject(error);
    });

    archive.pipe(output);
    archive.directory('web', false);
    archive.finalize();
  });
};
In this example, assume the script templates reside in the default folder generated when you created the application. The goal is to package the application into a ZIP file. Because packaging occurs after the application build process completes, this script is triggered for the after_build hook point. For this hook point, the modified script template after_build.js will contain the script code to zip the application, and because the .js file resides in the default location, no hooks system configuration changes are required.
/scripts/config application subfolders:
-
<myApp_Home>/scripts/config/oraclejet-build.js- Specifies the location and hook type of build process scripts. -
<myApp_Home>/scripts/config/oraclejet-serve.js- Specifies the location and hook type of serve process scripts.
Note:
If your development effort requires you to relocate hook scripts to a common location, for example to support team development, you can update the path attributes in the hook system configuration file to specify the new target path for the scripts. When you edit the configuration file do not change the type attributes. The hook system relies on type attribute to execute the script for a specific build/serve hook point.
The following table identifies the hook points and the workflow customizations they support in Oracle JET build and serve processes.
| Hook Point | Supported Build or Serve Mode | Description |
|---|---|---|
before_build |
Debug / Release | This hook point triggers the script with the default name before_build.js immediately before the tooling initiates the build process. A script for this hook point can be used with a web application or a hybrid mobile application.
|
before_release_build |
Release only | This hook point triggers the script with the default name before_release_build.js before the uglify step and the requirejs bundling step occur. A script for this hook point can be used with a web application or a hybrid mobile application.
|
before_hybrid_build |
Debug / Release | This hook point triggers the script with the default name before_hybrid_build.js before the cordovaPrepare and CordovaCompile build steps occur. A script for this hook point can be used only with a hybrid mobile application.
|
after_build |
Debug / Release | This hook point triggers the script with the default name after_build.js immediately after the tooling concludes the build process. A script for this hook point can be used with a web application or a hybrid mobile application.
|
before_serve |
Debug / Release | This hook point triggers the script with the default name before_serve.js before the web serve process connects to and watches the application. In the case of hybrid builds, it also precedes the cordovaClean and cordovaServe step. A script for this hook point can be used with a web application or a hybrid mobile application.
|
after_serve |
Debug / Release | This hook point triggers the script with the default name after_serve.js after all build process steps complete and the tooling serves the application. A script for this hook point can be used with a web application or a hybrid mobile application.
|
Tip:
OJET tooling reports when hook points are executed in the message log for the build and serve process. You can examine the log in the console to understand the tooling workflow and determine exactly when the tooling triggers a hook point script.
Serve a Hybrid Mobile Application with the Oracle JET CLI
Use Oracle JET CLI to launch your hybrid mobile application in a browser, simulator, or mobile device for testing and debugging. When you serve your application to a browser or emulator, a live reload option is enabled, and changes you make to the code are immediately reflected in the running application.
At a command prompt, change to the application’s top level directory and use the ojet serve command with options to launch the application.
ojet serve [ios|android|windows]
           [--build-config=path/buildConfig.json
            --server-port=server-port-number --livereload-port=live-reload-port-number
            --destination=emulator[:emulator-name]|browser[:browser-name]|device[:device-name]|server-only
            --livereload --build
            --theme=themename[:android|ios|windows|web]] --themes=theme1,theme2,...
            --sass
            --platform-options="string"]
The following table describes the commonly-used options and provides examples for their use.
Tip:
You can also enterojet help at a terminal prompt to get help for specific Oracle JET CLI commands.
| Option | Description |
|---|---|
|
|
Desired platform. Enter |
|
|
Specify the path to You do not need this file when building a debug version of your application for Android or Windows, or if you are building your app for deployment to an iOS simulator. However, you must configure one for testing on an iOS device and for pre-release testing of your Android, iOS or Windows application. For additional information, see Packaging and Publishing Hybrid Mobile Applications. |
|
|
Server port number. If not specified, defaults to 8000. |
|
|
Live reload port number. If not specified, defaults to 35729. |
|
|
Specify one of the following:
|
|
|
Equivalent to |
|
|
Equivalent to |
|
|
Equivalent to |
|
|
Equivalent to |
|
|
Enable the live reload feature. Live reload is enabled by default ( Use Disabling live reload can be helpful if you’re working in NetBeans or another IDE and want to use that IDE’s mechanism for loading updated applications. |
|
|
Build the app before you serve it. By default, an app is built before you serve it ( Use |
|
|
Theme to use for the application. The theme defaults to |
|
|
Themes to use for the application, separated by commas. If you don’t specify the |
|
|
Manages Sass compilation. If you add Sass and specify the Note: The option that you choose controls both Sass compilation in the build step and Sass watch in the serve step. |
|
|
Platform-specific options that will pass verbatim to the Cordova CLI. This option is typically required for Windows device deployments or if a Cordova plugin contains multiple static libraries for different CPUs. If the value passed contains a quoted string, the quotation marks must be escaped. For example, you can use platform-options to specify Windows architectures. By default, the architecture defaults to To specify a single architecture, use the
--arch option and specify arm, x86, x64, or anycpu. |
The application will launch in a local browser, emulator/simulator, or device depending upon the options you specify. The following table shows examples.
| Command | Description |
|---|---|
|
|
Launches a Windows version of the application in the Firefox browser. |
|
|
Launches the application in the iOS Simulator using the Alta iOS theme. |
|
|
Launches the application in the Android emulator using the AVD named “MyEmulator”. The emulator name is case-sensitive. |
|
|
Launches the application on the attached Android mobile device. |
The terminal will also output the names of the files as they are loaded. If your application contains multiple views, the output will reflect the names of the views and associated files as you navigate through the application.
WARNING:
If you specify the Android platform, use a proxy server and skipped theojet build step, the serve command will fail the first time you issue it. To resolve this, create a gradle.properties file in your HOME/.gradle directory and rerun the serve command. The file should contain the following:systemProp.http.proxyHost=proxy-server-URL
systemProp.http.proxyPort=80
systemProp.https.proxyHost=proxy-server-URL
systemProp.https.proxyPort=80Behavior of Live Reload When Enabled
If you left live reload enabled, the terminal window updates to reflect that the code has changed. For example, if you save a change to dashboard.html in an application scaffolded with the navbar or navdrawer template, the terminal window outputs the name of the changed file, and the browser or emulator/simulator updates with the change. Live reload is disabled when you serve an application to a device.
To terminate the batch job when using live reload, press Ctrl+C in the command window and then enter y if prompted to terminate the batch job.
Note:
You can also use theojet serve command with the –-release option to serve a release-ready version of your application. For information, see Packaging and Publishing Hybrid Mobile Applications.
Customize the Hybrid Mobile Application’s Serve Steps
Edit oraclejet-serve.js to modify default serve behavior. For example, you can specify your own watch tasks or specify actions specific to web or hybrid applications.
Oracle JET tooling defines default build and serve behavior in node_modules/oraclejet-tooling/lib/defaultconfig.js. The second half of the file contains the default serve configuration, including entries for application paths and other options used during the serve process. To modify defaults or add your own, edit oraclejet-serve.js and remove comments from the options that you want to configure. The file contains detailed instructions for each configurable option.
Oracle JET will merge the options with the default configuration during the build. However, be aware that rewriting the three default watch targets (sourceFiles, sass, and themes) can result in unpredictable behavior.
To customize serve behavior:
node --version and npm --version commands and reload the page.
Review Your Application Settings in the config.xml File
The AppRootDir/hybrid/config.xml file contains a number of default settings that you may want to review and modify before you package and publish your app for distribution to end users.
You can configure entries that affect the behavior of your app across all platforms and entries that are applied only to a specific platform.
Examples of entries for all platforms that you may want to modify in your file before you publish your app include the following:
-
Attribute values of the
widgetelement. Specifically, the values for theidandversionattributes.The value of the
idattribute determines the unique identifier for this app. By default, JET apps use a combination of reverse domain notation with theoraclejet.orgdomain name as input and the app’s short name. Change this to use, for example, the reverse of your company’s domain name. -
The value of the
versionattribute identifies the version number of your app to end users. It appears, for example, on the App Info screen on Android devices. Change it to an appropriate value. -
Value for the
nameelement. This is the name of the app displayed on the springboard of your user's mobile device and in the app stores.
Apart from these generic settings that affect your app irrespective of the platform where it is deployed (Android, iOS, or Windows), you can configure a range of other entries in the config.xml file that set preferences for your app on specific platforms.
The following example AppRootDir/hybrid/config.xml file displays a number of illustrative examples.
<?xml version='1.0' encoding='utf-8'?>
<widget id="org.oraclejet.docexample" version="1.0.0" xmlns="http://www.w3.org/ns/widgets"
        xmlns:cdv="http://cordova.apache.org/ns/1.0">
  <name>docexample</name>
  <description>A sample Oracle JavaScript Extension Toolkit (JET) mobile app based on Cordova</description>
  <author email="undefined" href="http://www.oraclejet.org">Oracle Jet Team</author>
  <content src="index.html"/>
  <plugin name="cordova-plugin-whitelist" spec="1"/>
  <access origin="*"/>
  <allow-intent href="http://*/*"/>
  ...
  <allow-intent href="geo:*"/>
  <platform name="windows">
    <preference name="windows-target-version" value="10.0"/>
    <icon src="res/icon/windows/Square30x30Logo.scale-100.png" width="30" height="30"/>
    ...
    <splash src="res/screen/windows/SplashScreenPhone.scale-240.png" width="1152" height="1920"/>
  </platform>
  <platform name="android">
    <allow-intent href="market:*"/>
    <preference name="DisallowOverscroll" value="true"/>
<!-- The following entry displays your app using the full screen of the Android device and thus hides the Android
                                                                    device’s status bar and menu button.-->
<preference name="Fullscreen" value="true" />
    <icon src="res/icon/android/icon-ldpi.png" width="36" height="36"/>
    ...
    <splash src="res/screen/android/splash-port-xxxhdpi.9.png" density="port-xxxhdpi"/>
  </platform>
  <platform name="ios">
    <allow-intent href="itms:*"/>
    <allow-intent href="itms-apps:*"/>
    <preference name="Orientation" value="all"/>
    <icon src="res/icon/ios/icon-small.png" width="29" height="29"/>
    ...
    <splash src="res/screen/ios/Default-Portrait~ipad.png" width="768" height="1024"/>
  </platform>
  ...
</widget>
For more information about the AppRootDir/hybrid/config.xml file, see https://cordova.apache.org/docs/en/latest/config_ref/.
Change the Splash Screen and App Launcher Icon
Replace the JET-provided images with those that you want your app to use as a splash screen or an app launcher icon.
The default splash screen behavior of your app depends on the platform where you run the app. On Android, for example, the default behavior is to display a white screen. JET provides a set of splash screen images for each platform that can be used in your app. These images are stored in the following sub-directories of your app’s hybrid directory.
AppRootDirectory/hybrid/res/screen
+---android
|       splash-land-hdpi.9.png
|	  ...
|       splash-port-xxxhdpi.9.png
|
+---ios
|       Default-568h@2x~iphone.png
|	  ...
|       Default~iphone.png
|
\---windows
        SplashScreen.scale-100.png
        SplashScreenPhone.scale-240.png
To use these splash screens, install the cordova-plugin-splashscreen plugin by executing the following command:
ojet add plugin cordova-plugin-splashscreen
You can replace the JET-provided splash screen images with your own images, matching the names and sizes. You can change the behavior of the splash screen by configuring your app’s AppRootDir/hybrid/config.xml file. The following example shows how you display the splash screen for 4000 milliseconds.
<preference name="SplashScreenDelay" value="4000" />
For more information about the plugin, including how to configure its behavior plus platform-specific information, see https://cordova.apache.org/docs/en/latest/reference/cordova-plugin-splashscreen/.
JET provides a set of app launcher icons for each platform that can be used in your app. To use an alternative app launcher icon to the JET-provided icons, replace the images in the following directories.
AppRootDir/hybrid/res/icon
+---android
|       icon-hdpi.png
|       ...
|       icon-xxxhdpi.png
|
+---ios
|       icon-40.png
|       ...
|       icon@2x.png
|
\---windows
        Square150x150Logo.scale-100.png
        ...
        Wide310x150Logo.scale-240.png
Both the splash screen and app launcher icons that your app uses are referenced from your app’s AppRootDir/hybrid/config.xml file, as shown by the following example excerpts.
<platform name="windows">
	...
	<icon src="res/icon/windows/Square30x30Logo.scale-100.png" width="30" height="30"/>
	...
	<splash src="res/screen/windows/SplashScreen.scale-100.png" width="620" height="300"/>

<platform name="android">
	...
	<icon src="res/icon/android/icon-ldpi.png" width="36" height="36"/>
	...
	<splash src="res/screen/android/splash-land-ldpi.9.png" density="land-ldpi"/>
	...
<platform name="ios">
	...
	<icon src="res/icon/ios/icon-small.png" width="29" height="29"/>
	...
	<splash src="res/screen/ios/Default@2x~iphone.png" width="640" height="960"/>
	...
For more information about icons and their entries in the config.xml file, see https://cordova.apache.org/docs/en/latest/config_ref/images.html.
Accessing Mobile Device Services Using Cordova Plugins
You can enable user access to device features, such as camera, geolocation and the local file system, by including Cordova plugins into your JET app.
About Apache Cordova and Cordova Plugins
JET uses plugins developed with the Apache Cordova framework to access the capabilities of the devices on which your hybrid mobile application is installed.
Apache Cordova is an open-source cross-platform development framework that enables application developers to use standard web technologies (HTML, CSS, and JavaScript) to develop hybrid mobile applications. A hybrid mobile application refers to mobile applications that are native applications which are installed onto mobile devices in the usual manner, but which use a web view to render the UI rather than using the platform's native UI components. For additional information about Apache Cordova, see the Overview page at http://cordova.apache.org/docs/en/latest/guide/overview/index.html.
Since a hybrid mobile application is developed using standard web technologies, the same code can be reused across the supported platforms (such as Android, iOS and Windows). Apache Cordova provides tools that enable you to add support for the platforms that the application will run on independent of this code.
JET uses Apache Cordova to develop web technology-based applications for some of the mobile platforms supported by Apache Cordova. So, one could say that the JET hybrid mobile application that you develop is an Apache Cordova application where JET provides features such as components and themes that determine the look and feel of your application.
A plugin is a package of code that allows the Cordova web view within which your application renders to communicate with the native platform on which it runs. The plugin does this by providing a JavaScript interface to native components that allows your application to use native device capabilities, such as camera, geolocation, and so on.
So, assume for example, that you want your application to use a camera. In that case, you look for an existing plugin to provide access to the camera on the platform(s) where your application will be installed as there is a good possibility that someone has already developed a plugin to address this requirement.
If you cannot find a plugin that meets your requirements, you can develop your own plugin. Although this blog post makes reference to another mobile development framework (MAF), it provides a suitable introduction to creating a Cordova plugin that could be used in a JET application or any Cordova-based application.
To find a plugin to use in your application, go to the Plugins page at https://cordova.apache.org/plugins/ that provides a registry of core and third-party Cordova plugins. Core plugins are plugins provided by Apache Cordova while third-party plugins are those developed by independent developers. Core plugins display a blue vertical strip to the left of the card that describes the plugin, as shown in the following figure, where two core plugins (cordova-plugin-media and cordova-plugin-contacts) appear after a third-party plugin named cordova-plugin-ble-peripheral.
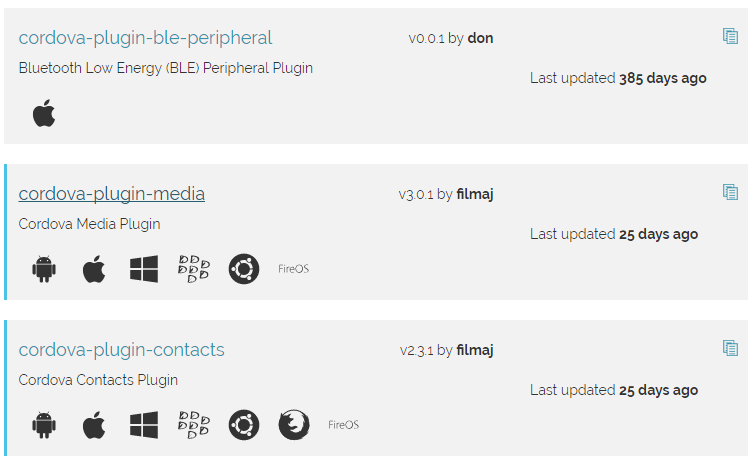
Description of the illustration core_cordovaplugin.png
The Plugins page categorizes plugins according to the platform on which the plugins will run. Some plugins run on a wide variety of mobile platforms (Android, iOS, Windows, and so on) while other plugins may only support one platform. Ensure that the plugins you install in your application support the platforms where your application will run.
Each entry generally provides information such as a brief description of the plugin’s functionality, the platforms it supports, and the number of days since it was updated. It then links to a web page where you can access more detail, such as how to install the plugin in your application and use it once installed.
Using a Plugin in Your App
You add the plugin and then write code that invokes the plugin’s JavaScript interface to access the device APIs.
To add a plugin to your app, change to the application’s root directory and use the ojet add plugin command. The following example illustrates how you install the phonegap-plugin-barcodescanner plugin.
ojet add plugin phonegap-plugin-barcodescanner
Once you have added the plugin to your app, you need to write code in your app to use the plugin. The following code excerpts illustrate how you might use the phonegap-plugin-barcodescanner plugin by exposing a button in the appRootDir/src/js/views/incidents.html page of a JET app built using the navbar template that invokes the barcode scanner on the device.
...
<oj-button id='b1Scan' on-oj-action='{{buttonClick}}' label='Scan'></oj-button>
...
The following code excerpt shows the entries to add to the appRootDir/src/js/viewModels/incidents.js file which invokes the barcode scanner when an end user clicks the button that the incidents.html page renders.
self.buttonClick = function(data, event){
      cordova.plugins.barcodeScanner.scan(
          function (result) {
              alert("We got a barcode\n" +
                    "Result: " + result.text + "\n" +
                    "Format: " + result.format + "\n" +
                    "Cancelled: " + result.cancelled);
          },
          function (error) {
              alert("Scanning failed: " + error);
          }
      );
    }
Cordova Plugins Recommended by Oracle JET
JET recommends a number of Cordova plugins that you can use in your app to provide native device functionality.
The Cordova Plugins page on the Oracle JET web site lists a number of plugins that have been successfully used in the verification testing of JET sample or demo apps. Although Oracle JET recommends these plugins, it does not support them.
Using a Different Web View in your JET Hybrid Mobile App
JET hybrid mobile apps use the default web view supplied by each mobile operating system.
On the Android platform, this is the Android platform’s WebView. A number of Cordova plugins exist that enable you to use a different web view in your hybrid mobile app. One example for the Android platform is the cordova-plugin-crosswalk-webview plugin that configures your app to use the Crosswalk web view to bring performance improvements and compatibility improvements across older Android versions. Install this plugin in your app using the following command:
ojet add plugin cordova-plugin-crosswalk-webview
For more information about the cordova-plugin-crosswalk-webview plugin, read its documentation.
For apps that run on the iOS platform, consider adding the cordova-plugin-wkwebview-file-xhr plugin to your app so that your app uses the more performant WKWebView instead of the default UIWebView used on iOS devices.
ojet add plugin cordova-plugin-wkwebview-file-xhr
For more information about the cordova-plugin-wkwebview-file-xhr plugin, read its documentation.
Using the Native Platform’s Date Picker UI in your JET Hybrid Mobile App
Include the cordova-plugin-datepicker plugin in your JET hybrid mobile app if you want to present end users with the date picker UI of the underlying platform (Android, iOS, or Windows) when your app renders JET date or time components such as oj-input-date or oj-input-date-time.
JET hybrid mobile apps that do not include the cordova-plugin-datepicker plugin render the aforementioned JET components using the default UI provided by Oracle JET.
Install the cordova-plugin-datepicker plugin in your app using the following command:
ojet add plugin cordova-plugin-datepicker
For more information about the cordova-plugin-datepicker plugin, read its documentation.