Creating a CRUD Application Using Oracle JET

Use Knockout and the Oracle JET Common Model API to create applications that perform CRUD (Create, Read, Update, Delete) operations on data returned from a REST Service API.

Topics:

Note:

The application shown in this section also includes code for defining and displaying header and footer detail. You can download the complete sample application here: OracleJET-CommonModel-CRUD.zip.

Defining the ViewModel

Identify the data source for your application and create the ViewModel.

  1. Identify your data source and examine the data. For data originating from a REST service, identify the service URL and navigate to it in a browser.

    The following example shows a portion of the output of a REST service that returns department data for a fictitious organization from a REST server named MockRESTServer.

    {
      "Departments" : [ {
        "DepartmentId" : 10,
        "DepartmentName" : "Administration",
        "ManagerId" : null,
        "LocationId" : null,
        "version" : "ACED00057...contents truncated",
        "links" : {
          "self" : {
            "rel" : "self",
            "href" : "http://mockrest/stable/rest/Departments/10"
          },
          "canonical" : {
            "rel" : "canonical",
            "href" : "http://mockrest/stable/rest/Departments/10"
          },
          "Employees" : {
            "rel" : "child",
            "href" : "http://mockrest/stable/rest/Departments/10/Employees"
          }
        }
      }, {
        "DepartmentId" : 20,
        "DepartmentName" : "Retail Marketing",
        "ManagerId" : null,
        "LocationId" : null,
        "version" : "ACED00057...contents truncated",
        "links" : {
          "self" : {
            "rel" : "self",
            "href" : "http://mockrest/stable/rest/Departments/20"
          },
          "canonical" : {
            "rel" : "canonical",
            "href" : "http://mockrest/stable/rest/Departments/20"
          },
          "Employees" : {
            "rel" : "child",
            "href" : "http://mockrest/stable/rest/Departments/20/Employees"
          }
        }
      }, {
      ... contents omitted
      } ],
      "links" : {
        "self" : {
          "rel" : "self",
          "href" : "http://mockrest/stable/rest/Departments"
        }
      },
      "_contextInfo" : {
        "limit" : 25,
        "offset" : 0
      }
    }
    

    In this example, each department is identified by its DepartmentId and contains information about its name (DepartmentName), manager (ManagerId), and location (LocationId). Each department also contains employees (Employees) which are children of each department.

    Tip:

    The Oracle JET Common Model CRUD sample application uses JSON data returned from a mock rest service. You can find the mock rest service scripts in the public_html/js/rest folder. You can find the sample JSON data in the departments.json file located in the public_html/js folder.
  2. Determine the data you will need for your collection.

    For example, the following figure shows a simple Oracle JET table that uses the DepartmentId, DepartmentName, LocationId, and ManagerId returned from the REST service identified in the previous step to display a table of department IDs, names, location IDs, and manager IDs. The table element is defined as an oj-table element, which is included in the Oracle JET UI component library.

  3. Add a JavaScript function to your application that will contain your ViewModel.

    The following code shows a skeleton function that defines the ViewModel in the Oracle JET Common Model CRUD application. In this example, the function is stored in a file named app.js. The code to complete the ViewModel will be defined in upcoming steps.

    define(['ojs/ojcore', 'knockout', 'ojs/ojmodel', 'MockRESTServer'],
            function(oj, ko)
            {
                function viewModel() {
                // To be defined
                };
                return {'deptVM': viewModel};
            }
    )
    

    Note:

    This example uses RequireJS for modular development. The RequireJS bootstrap file will be shown in a later step. For additional information about using RequireJS, see Using RequireJS for Modular Development.

  4. Add a JavaScript function to the function you defined in the previous step that defines the data model using oj.Model.extend().

    The highlighted code in the example below defines the data model for the application shown in the preceding figure. The Department variable represents a single record in the database and is displayed as a row in the table. Department is declared using the oj.Model.extend function call and instantiated in the declaration for myDept. The urlRoot property defines the data source, which in this case is the REST service URL.

    define(['ojs/ojcore', 'knockout', 'ojs/ojmodel', 'MockRESTServer'],
           function(oj, ko)
           {
               function viewModel() {
                   var self = this;
                   self.serviceURL = 'http://mockrest/stable/rest/Departments';;
    
               function parseDept(response) {
                   if (response['Departments']) {
                       var innerResponse = response['Departments'][0];
                       if (innerResponse.links.Employees == undefined) {
                           var empHref = '';
                       } else {
                           empHref = innerResponse.links.Employees.href;
                       }
                       return {DepartmentId: innerResponse['DepartmentId'],
                               DepartmentName: innerResponse['DepartmentName'],
                               links: {Employees: {rel: 'child', href: empHref}}};
                   }
                   return {DepartmentId: response['DepartmentId'],
                           DepartmentName: response['DepartmentName'],
                           LocationId:response['LocationId'],
                           ManagerId:response['ManagerId'],
                           links: {Employees: {rel: 'child', href: response['links']['Employees'].href}}};
               }
    
               // Think of this as a single database record or a single table row.
                   var Department = oj.Model.extend({
                       urlRoot: self.serviceURL,
                       parse: parseDept,
                       idAttribute: 'DepartmentId'
                   });
        
                   var myDept = new Department();
               };
    
               return {'deptVM': viewModel};
           };
    }
    

    The parse property is an optional user callback function to allow parsing of JSON record objects as they are returned from the data service. In this example, parseDept is the callback function and simply maps the DepartmentId and DepartmentName returned from the REST service to DepartmentId and DepartmentName. If the LocationId or ManagerId records contain data, parseDept maps the attributes to LocationId and ManagerId.

    The parse callback can be useful for mapping database attribute names to names that may make more sense. For example, if your database uses Id and Name as the attributes that represent the department ID and department name, you could replace the return call in the parseDept function with:

    return {DepartmentId: response['Id'], DepartmentName: response['Name']};
    

    For a complete list of oj.Model properties and functions, see the oj.Model API documentation.

  5. Define the collection that will hold the data model object you defined in the previous step using oj.Collection.extend().

    The highlighted code in the example below defines the collection object for the Department model object. The DeptCollection variable is declared in the viewModel() function using the oj.Collection.extend function and instantiated in the declaration for self.DeptCol. The url property defines the data source, which in this case is the REST service URL, and limits the collection to 50 records.

    define(['ojs/ojcore', 'knockout', 'ojs/ojmodel', 'MockRESTServer'],
        function(oj, ko){
            function viewModel() {
                var self = this;
                self.serviceURL = 'http://mockrest/stable/rest/Departments';
                self.Departments = ko.observableArray([]);
                self.DeptCol = ko.observable();
                self.datasource = ko.observable();
    
                var parseDept = function(response) {
                ... contents omitted
                };
    
                var Department = oj.Model.extend({
                    urlRoot: self.serviceURL,
                    parse: parseDept,
                    idAttribute: 'DepartmentId'
                });
    
                var myDept = new Department();
    
                // this defines our collection and what models it will hold
                    var DeptCollection = oj.Collection.extend({
                        url: self.serviceURL + "?limit=50",
                        model: myDept
                    });
    
                    self.DeptCol(new DeptCollection());
                    self.datasource(new oj.CollectionTableDataSource(self.DeptCol()));
    
                }
                return {'deptVM': viewModel};
            }
    );
    

    Both the DeptCol and datasource objects are defined as Knockout observables so that changes to the data collection can be handled. The datasource object will contain the column data needed by the oj-table element and is passed the DeptCol observable as a parameter to oj.CollectionTableDataSource().

    The Departments object is defined as a Knockout observable array and will be populated in a later step.

    For a complete list of oj.Collection properties and functions, see the oj.Collection API documentation.

  6. Populate the collection with data by calling oj.Collection.fetch() to read the data from the data service URL.

    The highlighted code in the code sample below calls oj.collection.fetch() to add data to the DeptCol data collection and complete the ViewModel.

    define(['ojs/ojcore', 'knockout', 'ojs/ojmodel', 'MockRESTServer'],
             function(oj, ko){
                function viewModel() {
                    var self = this;
                    self.serviceURL = 'http://mockrest/stable/rest/Departments';
                    self.Departments = ko.observableArray([]);
                    self.DeptCol = ko.observable();
                    self.datasource = ko.observable();
                    self.fetch = function(successCallBack) {
                        // populate the collection by calling fetch()
                        self.DeptCol().fetch({
                            success: successCallBack,
                            error: function(jqXHR, textStatus, errorThrown){
                                console.log('Error in fetch: ' + textStatus);
                            }
                        });
                    };
    
                    var parseDept = function(response) {
                       ... contents omitted
                    };
    
                    var Department = oj.Model.extend({
                        urlRoot: self.serviceURL,
                        parse: parseDept,
                        idAttribute: 'DepartmentId'
                    });
    
                    var myDept = new Department();
    
                    var DeptCollection = oj.Collection.extend({
                        url: self.serviceURL + "?limit=50",
                        model: myDept
                    });
    
                    self.DeptCol(new DeptCollection());
                    self.datasource(new oj.CollectionTableDataSource(self.DeptCol()));
    
                }
                return {'deptVM': viewModel};
            }
    );
    

    The fetch() function also defines an error callback that will log a message to the console if the fetch() call fails.

  7. Add the ViewModel or the file containing the name of your ViewModel to your RequireJS bootstrap file, typically main.js.

    If you created your Oracle JET application using an Oracle JET Starter template or modified your Oracle JET download as described in Use RequireJS to Manage Library, Link, and Script References, you should already have a main.js file. Locate the line that defines the require modules and add your file to the list.

    For example, the code below lists the modules defined for the Common Model Sample. The application stores its ViewModel in the app.js file. The reference to the app.js file is highlighted in bold.

    require(['ojs/ojcore',
            'knockout', 
            'jquery', 
            'app', 
            'footer',
            'MockRESTServer'
            'ojs/ojmodel', 
            'ojs/ojknockout', 
            'ojs/ojknockout-model', 
            'ojs/ojdialog',
            'ojs/ojinputtext',
            'ojs/ojinputnumber',
            'ojs/ojbutton',
            'ojs/ojtable',
            'ojs/ojcollectiontabledatasource'], 
    

    You must also add the app reference in the callback definition as shown in the following example.

    // this callback gets executed when all required modules are loaded
    function(ko, $, oj, app, footer, MockRESTServer)
    {
        ...
    }
    
  8. Update your RequireJS bootstrap file to instantiate the ViewModel, create the Knockout bindings, and display the content on the page.

    The highlighted code in the code sample below creates a Knockout observable for each element in the deptData collection and assigns the resulting array to the Departments Knockout observable array you defined in a previous step.

    require(['ojs/ojcore',
            'knockout', 
            'jquery', 
            'app', 
            'footer',
            'MockRESTServer'
            'ojs/ojmodel', 
            'ojs/ojknockout', 
            'ojs/ojknockout-model', 
            'ojs/ojdialog',
            'ojs/ojinputtext',
            'ojs/ojinputnumber',
            'ojs/ojbutton',
            'ojs/ojtable',
            'ojs/ojcollectiontabledatasource'], 
            function(ko, $, oj, app, footer, MockRESTServer) // this callback gets executed when all required modules are loaded
            {
              var fvm = new footer.footerVM();
              $(document).ready(function(){
                	$.getJSON("js/departments.json",
                            function (data) {
                        new MockRESTServer(data, {id:"DepartmentId", 
                            url:/^http:\/\/mockrest\/stable\/rest\/Departments(\?limit=([\d]*))?$/i,
                            idUrl:/^http:\/\/mockrest\/stable\/rest\/Departments\/([\d]+)$/i});
    
                var vm = new app.deptVM();
                ko.applyBindings(fvm, document.getElementById('footerContent'));
                vm.fetch(
                    function(collection, response, options){
                      var deptData = collection;
                      // This will create a ko.observable() for each element
                      // in the deptData response and assign the resulting array
                      // to the Departments ko observeableArray.
                      vm.Departments = oj.KnockoutUtils.map(deptData, null, true);
                      //perform a Knockout applyBindings() call binding this
                      // viewModel with the current DOM
                      ko.applyBindings(vm, document.getElementById('mainContent'));
                      //Show the content div after the REST call is completed.
                      $('#mainContent').show();
                });
    	          });
    					});
            }
    );
    

Reading Records

To read the records, define the Oracle JET elements that will read the records in your main HTML5 page.

The following sample code shows a portion of the index.html file that displays a table of records using the ViewModel defined in the previous steps and the oj-table element. In this example, the mainContent div includes the table definition that creates Department Id, Department Name, Location Id, and Manager Id as the table header text and defines the content for each row.

<div id="mainContent" class="oj-md-12 oj-flex-item page-padding" style="display: none;">
    <div class="page-padding">
        <oj-table id="table" data="[[datasource]]"
              columns='[{"headerText": "Department Id",
                         "field": "DepartmentId", "sortable": "enabled"},
                        {"headerText": "Department Name",
                         "field": "DepartmentName", "sortable": "enabled"},
                        {"headerText": "Location Id",
                         "field": "LocationId"},
                        {"headerText": "Manager Id",
                         "field": "ManagerId"}]'>
        </oj-table>
    </div>
</div>

The data attribute reads the variable datasource from the REST service and binds it to the oj-table element.

Creating Records

To add the ability to create new records, add elements to your HTML5 page that accept input from the user and create a function that sends the new record to the REST server.

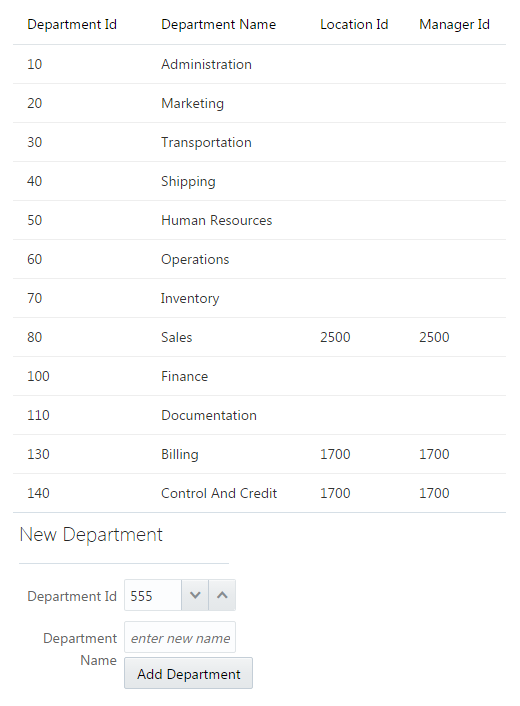
The figure below shows the result of adding a form using oj-input-* elements to the Oracle JET Common Model sample application. The user can enter a new department number in the provided field or use the side arrows to increment or decrement the value. The user then enters the name and clicks Add.
To add the ability to create new records to the application's ViewModel and HTML5 page:

  1. Add elements to the application's main page that accept input from the user.

    The highlighted code in the example below adds oj-input-* elements to the index.html page shown in the previous task.

    <div id="mainContent" class="oj-md-12 oj-flex-item page-padding" style="display: none;">
        <div class="page-padding">
            <div id="deptList" class="oj-md-9 oj-flex-item">
                <oj-table id="table" summary="Demo Table"
                    ... contents omitted
                </oj-table>
                <br/>
                <div id="addDept" class="oj-flex-item oj-md-3 oj-sm-12 right">
                  <div id="quickUpdate" class="frame">
                    <div id="newDeptForm">
                      <div class="oj-form oj-sm-odd-cols-12 oj-md-odd-cols-6 oj-md-labels-inline">
                        <h3>New Department</h3><hr/>
                        <div class="oj-flex">
                          <div class="oj-flex-item">
                            <oj-label for="newDepartId">Department Id</oj-label>
                          </div>
                          <div class="oj-flex-item">
                            <oj-input-number id="newDepartId" value= "555"></oj-input-number>
                          </div>
                        </div>
                        <div class="oj-flex">
                          <div class="oj-flex-item">
                            <oj-label for="newDepartName">Department Name</oj-label>
                          </div>
                          <div class="oj-flex-item">
                            <oj-input-text id="newDepartName" maxlength='30' placeholder="enter new name"></oj-input-text>
                            <oj-button id="saveBtn" on-oj-action="[[addDepartment]]" label='Add Department'></oj-button>
                          </div>
                        </div>
                      </div>
                    </div>
                   </div>
                  </div>
                </div>
        </div>
    </div>

    The form is defined to contain two input fields: an oj-input-number for the department ID, and an oj-input-text for the department name. The oj-button component is used for the form's button.

    The oj-button's on-oj-action attribute is bound to the addDepartment function which is defined in the next step.

  2. Add code to the ViewModel to add the user's input as a new record (model) in the data collection.

    The highlighted code in the example below shows the addDepartment() function that adds the new department number and department name to the DeptCol data collection. In this example, the function calls the oj.Collection.create() method which creates the new model instance, adds it to the data collection, and saves the new DepartmentId and DepartmentName to the data service.

    define(['ojs/ojcore', 'knockout', 'ojs/ojmodel'],
             function(oj, ko)        {
                function viewModel() {
                    var self = this;
                    self.serviceURL = 'http://RESTServerIP:Port/stable/rest/Departments';
                    self.Departments = ko.observableArray([]);
                    self.DeptCol = ko.observable();
                    self.datasource = ko.observable();
                    self.fetch = function(successCallBack) {
                        ... contents omitted
                    };
    
                    function parseDept(response){
                        ... contents omitted
                    };
    
                    var Department = oj.Model.extend({
                        urlRoot: self.serviceURL,
                        parse: parseDept,
                        parseSave:parseSaveDept,
                        idAttribute: 'DepartmentId'
                    });
    
                    var myDept = new Department();
    
                    var DeptCollection = oj.Collection.extend({
                        url: self.serviceURL + "?limit=50",
                        model: myDept
                        comparator: 'DepartmentId'
                    });
    
                    self.DeptCol(new DeptCollection());
                    self.datasource(new oj.CollectionTableDataSource(self.DeptCol()));
    
                function parseSaveDept(response){
                    return {DepartmentId: response['DepartmentId'],
                            DepartmentName: response['DepartmentName'],
                            LocationId: response['LocationId'],
                            ManagerId: response['ManagerId'],
                            links: {Employees: {rel: 'child', href: response['links']['Employees'].href}}};
                    };
    
                self.addDepartment = function (formElement, event) {
                    var id = $("#newDepartId").val();
                    var recordAttrs = {DepartmentId: id,
                            DepartmentName: $("#newDepartName").val(),
                            ManagerId: "", LocationId: "",
                            links: {Employees: {rel: 'child', href: self.serviceURL + '/' + id + '/Employees'}}};
                    this.DeptCol().create(recordAttrs,{
                        'contentType': 'application/vnd.oracle.adf.resource+json',
                        success: function (response) {
                            console.log('Success in Create');
                        },
                        error: function(jqXHR, textStatus, errorThrown){
                            console.log('Error in Create: ' + textStatus);
                            }
                        });
                    }
                }
                return {'deptVM': viewModel};
            }
    );
    

    The oj.Collection.create() function accepts options to control the record save. In this example, simple error checking is added. In addition, the create() function sends a contentType to the REST server. Depending upon the REST service you are using, this option may not be required or may need modification.

Updating Records

To add the ability to update records, add elements to your HTML5 page that accept input from the user and create a function that sends the updated record to the REST server.

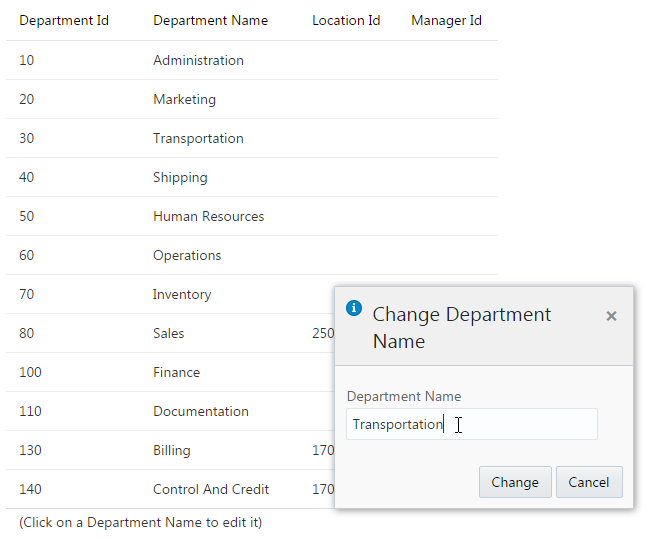
The figure below shows the Oracle JET Common Model sample application configured to allow updates to the department name. When the user moves the focus over a department name, a tooltip appears that prompts the user to click to edit. department name, a tooltip prompts the user to click to edit. If the user clicks the department name, a dialog appears that enables the user to change the name. The user can type in a new department name and click Change to update the record or Cancel to keep the existing department name.
To add the ability to update records to the application's ViewModel and HTML5 page:

  1. Add elements to the application's main page that identifies updatable elements and enables the user to perform an action to update them.

    The highlighted code in the example below adds the oj-dialog element to the page and provides the prompt to the user to click to edit the page.

    <div id="mainContent" class="oj-flex-item oj-sm-12 oj-md-12 demo-page-content-area page-padding" style="display: none;">
        <div class="page-padding">
              <div id="deptList" class="oj-flex-item oj-md-9 oj-sm-12">
                <oj-table id="table" data="[[datasource]]"
                  columns='[{"headerText": "Remove", "id": "column1", "sortable": "disabled"},
                            {"headerText": "Department Id",
                             "field": "DepartmentId", "sortable": "enabled"},
                            {"headerText": "Department Name",
                             "field": "DepartmentName", "sortable": "enabled"},
                            {"headerText": "Location Id", 
                             "field": "LocationId"},
                            {"headerText": "Manager Id", 
                             "field": "ManagerId"}]'
                  selectionMode='{"row": "none", "column": "none"}'
                  row-renderer='[[oj.KnockoutTemplateUtils.getRenderer("row_tmpl", true)]]'>
                </oj-table>
        </div>
        <oj-dialog id="editDialog" style="display:none" title="Change Department Name" dragAffordance="title-bar" modality="modeless" resize-behavior="none">
                  <div class="oj-form oj-sm-odd-cols-12">
                    <!-- Example of custom dialog header. Setting the class "oj-dialog-header" will tell the dialog
                         to use the contents of that <div> as the header content. Leaving this out will cause the
                         default header to be used, which uses the title attribute as the header content value. -->
                    <div class="oj-dialog-header oj-helper-clearfix" aria-labelledby="dialog-title-id">
                      <div>
                        <span id="infoIcon" class="oj-message-status-icon oj-message-info-icon" style="float:left; margin-right: 10px"></span>
                        <span id="dialog-title-id" class="oj-dialog-title">Change Department Name</span>
                      </div>
                    </div>
                    <div class="oj-dialog-body">
                      <div class="oj-md-odd-cols-4">
                        <oj-label class="oj-label oj-label-inline" for="newName">Department Name</oj-label>
                        <oj-input-text id="newName" value="{{currentDeptName}}"></oj-input-text>
                      </div>
                    </div>
                    <div class="oj-dialog-footer">
                      <oj-button id="submitBtn" on-oj-action="[[updateDeptName]]" label="Change"></oj-button>
                      <oj-button id="resetBtn" on-oj-action="[[cancelDialog]]" label="Cancel"></oj-button>
                    </div>
                  </div>
                </oj-dialog>                         
              </div>
            </div>
          </div>
        </div>
    <script type="text/html" id="row_tmpl">
          <tr>
            <td><div id='deptId' data-bind="text: DepartmentId"></div></td>
            <td><div id="deptName" data-bind="text: DepartmentName, click: function(data, event){$root.showChangeNameDialog(DepartmentId,data,event)}"></div></td>
            <td><div id="locId" data-bind="text: LocationId"></div></td>
            <td><div id="mgrId" data-bind="text: ManagerId"></div></td>
          </tr>
        </script>

    The oj-dialog element includes the oj-dialog-header, oj-dialog-body, and oj-dialog-footer formatting classes. The oj-dialog-header class is optional and is used in this example to format the Info icon and title.

    The oj-dialog-body class formats the dialog body which includes the oj-label for Department Name and an oj-input-text element to capture the user's input. The oj-dialog-footer defines two oj-button components which add the Change and Cancel buttons to the dialog. When the user clicks Change, the updateDepartmentName() function handles the updates to the record.

    The original table is also modified to define the row-renderer attribute which specifies the row_tmpl template to use for the row display. The template script calls the showChangeNameDialog() function to display the dialog.

    The updateDepartmentName() and showChangeNameDialog() functions are defined in the next step. For additional information about the oj-dialog component, see the oj-dialog API documentation.

  2. Add code to the ViewModel to update the record.

    The highlighted code in the example below shows the updateDepartment() and showChangeNameDialog() functions.

    define(['ojs/ojcore', 'knockout', 'ojs/ojmodel', 'MockRESTServer'],
             function(oj, ko)        {
                function viewModel() {
                    var self = this;
                    self.serviceURL = 'http://mockrest/stable/rest/Departments';
                    self.Departments = ko.observableArray([]);
                    self.currentDeptName = ko.observable('default');
                    self.workingId = ko.observable('');
                    self.DeptCol = ko.observable();
                    self.datasource = ko.observable();
                    self.fetch = function(successCallBack) {
                        ... contents omitted
                    };
    
                    function parseDept(response){
                        ... contents omitted
                    }
    
                    function parseSaveDept(response){
                        ... contents omitted
                    }
    
                    var Department = oj.Model.extend({
                        urlRoot: self.serviceURL,
                        parse: parseDept,
                        parseSave:parseSaveDept,
                        idAttribute: 'DepartmentId'
                    });
    
                    var myDept = new Department();
    
                    var DeptCollection = oj.Collection.extend({
                        url: self.serviceURL + "?limit=50",
                        model: myDept
                        comparator: 'DepartmentId'
                    });
    
                    self.DeptCol(new DeptCollection());
                    self.datasource(new oj.CollectionTableDataSource(self.DeptCol()));
    
                    self.showChangeNameDialog = function(deptId, data, event) {
                        var currName = data.DepartmentName;
                        self.workingId(deptId);
                        self.currentDeptName(currName);
                        document.getElementById("editDialog").open();
                    }
     
                    self.updateDeptName = function(formData, event) {
                        var currentId = self.workingId();
                        var myCollection = self.DeptCol();
                        var myModel = myCollection.get(currentId);
                        var newName = self.currentDeptName();
                        if (newName != myModel.get('DepartmentName') && newName != '') {
                            myModel.save({'DepartmentName': newName}, {
                                success: function(myModel, response, options) {
                                  document.getElementById("editDialog").close();
                                },
                                error: function(jqXHR, textStatus, errorThrown) {
                                    alert("Update failed with: " + textStatus);
                                    document.getElementById("editDialog").close();
                                }
                            });
                        } else {
                            alert('Department Name is not different or the new name is not valid');
                            document.getElementById("editDialog").close();
                        }
                    };
                return {'deptVM': viewModel};
            }
    );
    

    The showChangeNameDialog() function stores the selected department detail and opens the dialog with the existing department name shown in the oj-input-text field.

    The updateDepartment() function calls the oj.Model.save() method to save the current Model object to the data source. The function also defines success and error callbacks to close the dialog upon success or issue an error message if the record was not updated.

Deleting Records

To add the ability to delete records, add elements to your HTML5 page that accept input from the user and create a function that sends the new record for deletion to the REST server.

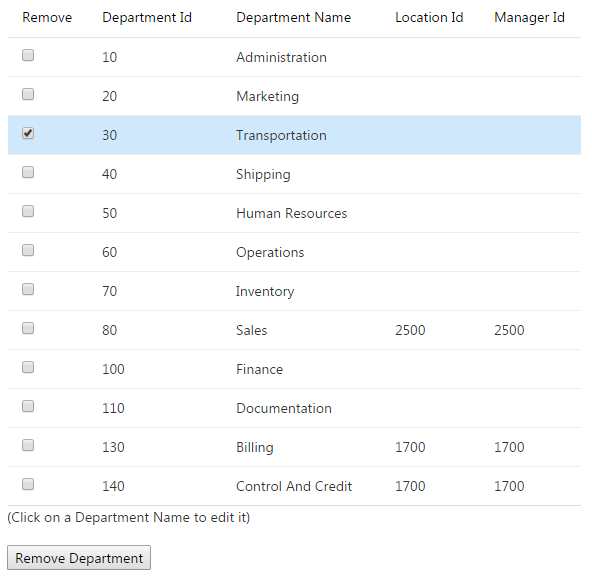
The figure below shows the Oracle JET Common Model CRUD application configured to allow record deletion. The user can check one or more departments in the list and click Remove Department to delete the record or records.
To add the ability to delete records to the application's ViewModel and HTML5 page:

  1. Add elements to the application's main page that identifies records marked for deletion and enables the user to perform an action to delete them.

    The highlighted code in the example below adds the Remove column with a check box to the department list and adds the Remove Department button below the list.

    <div id="mainContent" class="oj-flex-item oj-sm-12 oj-md-12 demo-page-content-area page-padding" style="display: none;">
            <div class="page-padding">
              <div id="deptList" class="oj-flex-item oj-md-9 oj-sm-12">
                <oj-table id="table" data="[[datasource]]"
                  columns='[{"headerText": "Remove", "id": "column1", "sortable": "disabled"},
                            {"headerText": "Department Id",
                             "field": "DepartmentId", "sortable": "enabled"},
                            {"headerText": "Department Name",
                             "field": "DepartmentName", "sortable": "enabled"},
                            {"headerText": "Location Id", 
                             "field": "LocationId"},
                            {"headerText": "Manager Id", 
                             "field": "ManagerId"}]'
                  selectionMode='{"row": "none", "column": "none"}'
                  row-renderer='[[oj.KnockoutTemplateUtils.getRenderer("row_tmpl", true)]]'>
                </oj-table>
                <br/>
                <button id="deleteDept_btn" data-bind="enable: somethingChecked, click: deleteDepartment">Remove Department</button>
              </div>
            </div>
          </div>
    
    <script type="text/html" id="row_tmpl">
     <tr>
      <td><input type="checkbox" data-bind="attr: {id: DepartmentId}, click: $root.enableDelete"/></td>
      <td><div id='deptId' data-bind="text: DepartmentId"></div></td>
      <td><div id="deptName" data-bind="text: DepartmentName, click: function(data, event){$root.showChangeNameDialog(DepartmentId,data,event)}"></div></td>
      <td><div id="locId" data-bind="text: LocationId"></div></td>
      <td><div id="mgrId" data-bind="text: ManagerId"></div></td>
     </tr>
    </script>

    The original table is modified to include the Remove column. The row-renderer attribute specifies the row_tmpl template to use for the row display. The template script adds the checkbox input element to the first column and the value of DepartmentId, DepartmentName, and LocationId to the remaining columns.

    The button's click action is bound to the deleteDepartment function which is created in the next step.

  2. Add code to the ViewModel to delete the record or records submitted by the user.

    The highlighted code in the example below shows the deleteDepartment() function. In this example, the function calls the oj.Collection.remove() method which removes the model or models from the data collection. To delete the record from the data source, the function calls the oj.Model.destroy() method.

    define(['ojs/ojcore', 'knockout', 'ojs/ojmodel', 'MockRESTServer'],
             function(oj, ko)         {
                 function viewModel() {
                    var self = this;
                    self.serviceURL = 'http://mockrest/stable/rest/Departments';
                    self.Departments = ko.observableArray([]);
                    self.DeptCol = ko.observable();
                    self.datasource = ko.observable();
                    self.somethingChecked = ko.observable(false);
                    self.fetch = function(successCallBack) {
                        ... contents omitted
                    }
    
                    var Department = oj.Model.extend({
                        urlRoot: self.serviceURL,
                        idAttribute: 'DepartmentId'
                    });
    
                    var myDept = new Department();
    
                    var DeptCollection = oj.Collection.extend({
                        url: self.serviceURL + "?limit=50",
                        model: myDept
                        comparator: 'DepartmentId'
                    });
    
                    self.DeptCol(new DeptCollection());
                    self.datasource(new oj.CollectionTableDataSource(self.DeptCol()));
    
                    self.enableDelete = function() {
                        if (!$('input[type=checkbox]:checked').length) {
                            self.somethingChecked(false);
                        } else {
                            self.somethingChecked(true);
                        }
                        return true;
                    }
     
                    self.deleteDepartment = function(data, event) {
                        var deptIds = [];
                        deptIds = self.findDeptIds();
                        var collection = data.DeptCol();
                        deptIds.forEach(function(value, index, arr) {
                            var model = collection.get(parseInt(value));
                            if (model) {
                                collection.remove(model);
                                model.destroy();
                            }
                        });
                        self.enableDelete();
                        $('#table').ojTable('refresh');
                    }
     
                    self.findDeptIds = function() {
                        var selectedIdsArray = [];
                        $("input:checkbox").each(function() {
                            var cb = $(this);
                            if (cb.is(":checked")) {
                                selectedIdsArray.push(cb.attr("id"));
                            }
                        });
                        return selectedIdsArray;
                    }
                }
                return {'deptVM': viewModel};
            }
    );
    

    The deleteDepartment() function calls the findDeptIds() function which returns the list of selected departments marked for deletion. The enableDelete() function resets the check box after the department list is deleted.