45 Sharing Data Using the Metadata Services Repository
When using JDeveloper, you can leverage a common Metadata Services (MDS) repository to store and share the artifacts generated for Service Bus and SOA Suite applications. Use this repository to create a backup of the artifacts you create and to share deployed artifacts across multiple servers, instances, applications, and products.
This chapter includes the following sections:
For more information about the MDS Repository, see "Managing Shared Data with the Design-Time MDS Repository" in Developing SOA Applications with Oracle SOA Suite.
You can also share artifacts using UDDI registries. For more information, see Working with UDDI Registries.
45.1 Service Bus and the MDS Repository
An MDS Repository stores information about Oracle Fusion Middleware components. The repository can be either file-based or database-based, but several design-time activities can only be performed against a file-based repository.
For complete information about repository types, see Managing the Metadata Repository in Administering Oracle Fusion Middleware.
A file-based, design-time MDS Repository and connection is automatically included when you create a Service Bus application in JDeveloper. You can modify this connection to point to a different existing repository, or you can create new connections to point to different repositories. Sharing operations are done against the design-time repository, and cannot be done against a database-backed MDS Repository.
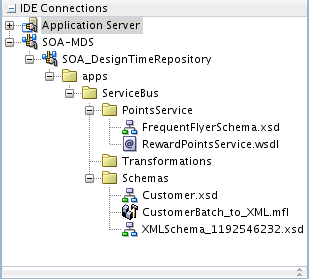
The Resources window in JDeveloper lets you browse the folders and artifacts stored in the MDS Repository. You can also create and delete folders; add, import, and delete Service Bus and SOA Suite artifacts, and generate Service Bus business services from WSDL files stored in the repository. The Resources window lets you export artifacts from the repository and import artifacts into the repository, both in the form of JAR files. The following figure shows Service Bus components in the MDS Repository in the Resources window.
Figure 45-1 Service Bus Artifacts in the MDS Repository
Description of "Figure 45-1 Service Bus Artifacts in the MDS Repository"
For more information about the MDS repository, see Introduction to Design-Time MDS Repository Managementin Developing SOA Applications with Oracle SOA Suite.
45.2 Managing the MDS Repository
You can perform general management tasks on the MDS Repository, including seeding the repository with source data, transferring the contents of one repository to another, creating and deleting folders, and importing and exporting artifacts.
The following topics in Developing SOA Applications with Oracle SOA Suite provide information to help you manage the repository:
45.3 Sharing Artifacts Using the MDS Repository
You can share the following Service Bus artifact types with the design-time MDS Repository: WSDL, WADL, JCA, JAR, cross-reference, domain value map, WS policy, XSD, XML, XSLT, MFL, and XQuery files.
These files can then be shared with other Service Bus applications and, for many of these artifact types, with SOA Suite applications.
45.3.1 How to Publish Service Bus Artifacts to the MDS Repository
Project components are published to the MDS repository using the SOA-MDS Transfer wizard, accessed by right-clicking any component that can be shared. These component can then be shared with other Service Bus and SOA Suite applications.
Before You Begin
Before you can work with artifacts in the MDS repository, you need to create a connection to the repository from JDeveloper. For instructions, see How to Create a SOA-MDS Connection.
To publish Service Bus artifacts to the MDS Repository:
-
Make sure the component to import is not open in any JDeveloper editors. Also close any files on which the component depends, such as XML schema files.
-
In the JDeveloper Application Navigator, display the component you want to publish to the MDS Repository.
-
Right-click the component, point to Service Bus, and select Publish to SOA Designtime Repository.
The SOA-MDS Transfer wizard appears, listing the component to be published.
-
Click Next.
-
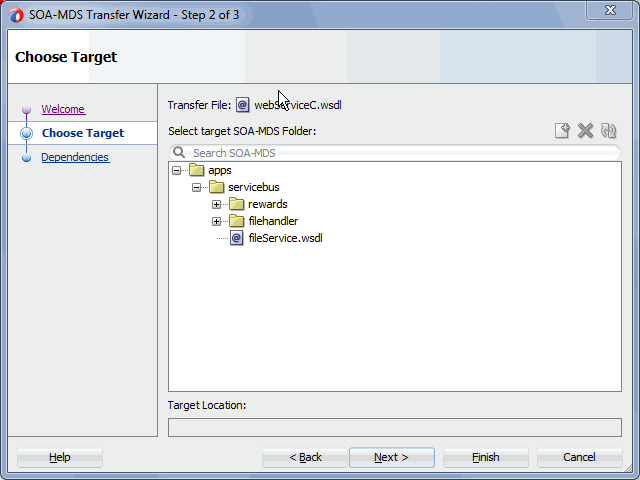
On the Choose Target window, expand the folders to the location where you want to publish the Service Bus component.
Figure 45-2 SOA-MDS Transfer Wizard - Choose Target Window
Description of "Figure 45-2 SOA-MDS Transfer Wizard - Choose Target Window" -
To add a new folder, do the following:
-
Select the folder in which you want to create the new folder.
-
Click the Create Folder icon.
-
Enter a name for the new folder and click OK.
The new folder appears in the tree.
-
-
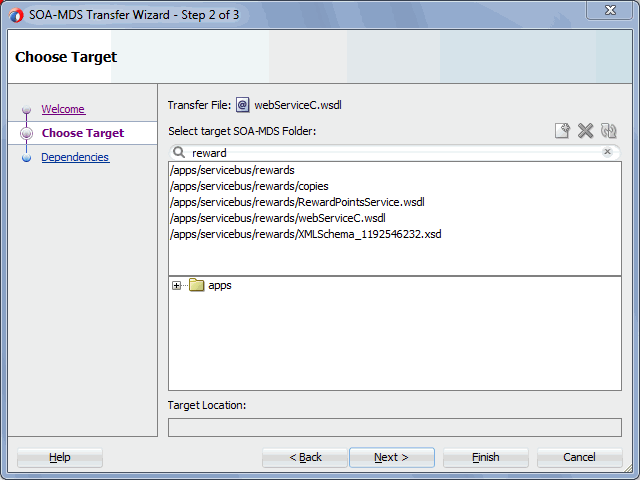
To search for a component or folder that exists in the MDS Repository, enter the full or partial name in the search field. The results appear below your input.
Figure 45-3 SOA-MDS Transfer Wizard - Search Targets
Description of "Figure 45-3 SOA-MDS Transfer Wizard - Search Targets" -
Select the folder to which you want to publish the selected component, and click Next.
-
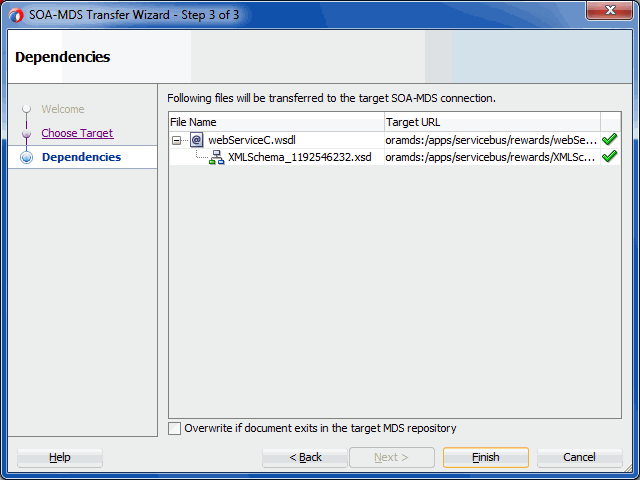
On the Dependencies window, verify the files to copy to the MDS Repository.
This window displays the file you selected to copy along with any files on which that file depends.
Figure 45-4 SOA-MDS Transfer Wizard - Dependencies Window
Description of "Figure 45-4 SOA-MDS Transfer Wizard - Dependencies Window" -
To overwrite existing files in the MDS Repository, select Overwrite if document exists in the target MDS repository.
-
Click Finish.
-
On the confirmation dialog, click OK.
You can now view the files you copied in the SOA-MDS connection in the JDeveloper Resources window.
45.4 Consuming Artifacts Stored in the MDS Repository
When a Service Bus application consumes an artifact stored in the MDS Repository, it does not refer to the files in the repository like a SOA Suite applications does. Instead, the files are imported into the Service Bus application.
You can consume artifacts stored in the MDS Repository directly from the Resources window in JDeveloper or by adding an artifact (such as a WSDL file) using the Select dialog. The Select dialog is accessed from the wizards and editors you use to create and configure components, such as business and proxy services.
45.4.1 How to Consume MDS Repository Artifacts Using the Resource Browser
The Resource Browser is most commonly launched in Service Bus when you are selecting a WSDL file on which to base a pipeline, split-jon, proxy service, or business service. It also appears when you import a WSDL or XML file on the Type Chooser dialog, or when you import an XSLT or XQuery map into a pipeline action.
Before You Begin
Before you can work with artifacts in the MDS repository, you need to create a connection to the repository from JDeveloper. For instructions, see How to Create a SOA-MDS Connection.
To consume artifacts using the Resource Browser:
45.4.2 How to Add MDS Repository Artifacts to a Service Bus Project
Service Bus can only consume supported resource types from the MDS Repository. Any resource recognized as a Service Bus resource can be imported to a Service Bus project. When you import an artifact, Service Bus launches the Import Service Bus Resources wizard to add the resources to the selected project.
Before You Begin
Before you can work with artifacts in the MDS repository, you need to create a connection to the repository from JDeveloper. For instructions, see How to Create a SOA-MDS Connection.
To add repository artifacts to a Service Bus project:
45.4.3 How to Create a Business Service from a WSDL File in the MDS Repository
You can generate a Service Bus business service from a WSDL document in the MDS Repository. When you select this option, the Create Business Service wizard appears so you can further define the business service. When the business service is generated, the WSDL file is imported to the Service Bus project, along with any dependencies like XML schema files.
Before You Begin
Before you can work with artifacts in the MDS repository, you need to create a connection to the repository from JDeveloper. For instructions, see How to Create a SOA-MDS Connection.
To create a business service from a WSDL file in the MDS Repository:
45.4.4 How to Create a Business Service from a WADL File in the MDS Repository
You can generate a Service Bus business service from a WADL document in the MDS Repository. When you select this option, the Create REST Binding wizard appears so you can configure the REST service. The business service and WSDL file are generated, and the WADL file is imported to the Service Bus project, along with any dependencies, such as XML schema files.
Before You Begin
Before you can work with artifacts in the MDS repository, you need to create a connection to the repository from JDeveloper. For instructions, see How to Create a SOA-MDS Connection.
To create a business service from a WADL file in the MDS Repository:
45.4.5 How to Expose a WSDL File in the MDS Repository as a REST Service
You can generate REST business and proxy services from a WSDL document in the MDS Repository. When you select this option, the Create Business Service wizard appears, followed by the Create REST Binding wizard. The Service Bus services are generated, and the WSDL and WADL files are imported to the Service Bus project, along with any dependencies, such as XML schema files.
Before You Begin
Before you can work with artifacts in the MDS repository, you need to create a connection to the repository from JDeveloper. For instructions, see How to Create a SOA-MDS Connection.
To expose a WSDL file in the MDS Repository as a REST service:
45.4.6 Opening the Project Overview File Through a SOA-MDS Connection
If you create a SOA-MDS connection in JDeveloper, expand the connection, and attempt to open the servicebus.sboverview file of a Service Bus project or the overview.xml files of a SOA composite application from the Resources window, the file may not load correctly. Only open a these files from the Application Navigator.
For information about the Oracle MDS Repository, see Administering Oracle Fusion Middleware.

