26 Managing Human Workflow Service Components and Engines
-
Managing the URI of the Human Workflow Service Component Task Details Application
-
Managing Outgoing Notifications and Incoming Email Notifications
-
Moving Human Workflow Data from a Test to a Production Environment
Note:
Human workflow service components are also known as human task service components in Oracle Enterprise Manager Fusion Middleware Control.
For more information, see the following sections:
Managing Human Workflow Service Component Policies
You can attach and detach security policies to and from human workflow service components of currently deployed SOA composite applications. Policies apply security to the delivery of messages. Oracle Fusion Middleware uses a policy-based model to manage web services.
Note:
Human tasks have a port that is protected by default using the SAML policy oracle/wss10_saml_token_service_policy. Oracle recommends that you not use this policy in a production environment.
To manage human workflow service component policies:
-
Access the human workflow service component's home page through one of the following options:
From the SOA Infrastructure Menu... From the SOA Folder in the Navigator... Select Service Engines > Human Workflow.
-
Select soa-infra.
-
Right-click and select Service Engines > Human Workflow.
-
-
Go to the Composites column of the View table and select a specific SOA composite application to access its home page.
-
Click Policies.
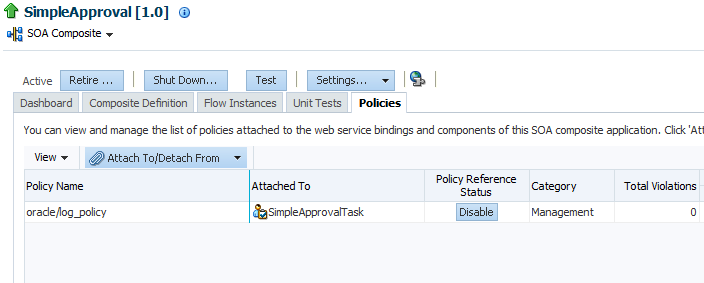
The Policies page enables you to attach and detach security policies to and from a human workflow service component. The policies table displays the attached policy name, the policy reference status (enabled or disabled) that you can toggle, the category (Management, Reliable Messaging, MTOM Attachment, Security, or WS Addressing), the total violations, and the authentication, authorization, confidentiality, and integrity failures since the SOA Infrastructure was last restarted.
-
Click Attach/Detach From.
If multiple components are available, you are prompted to select the service or component for which to perform the attachment or detachment.
-
Select the service or component to which to attach or detach a policy.
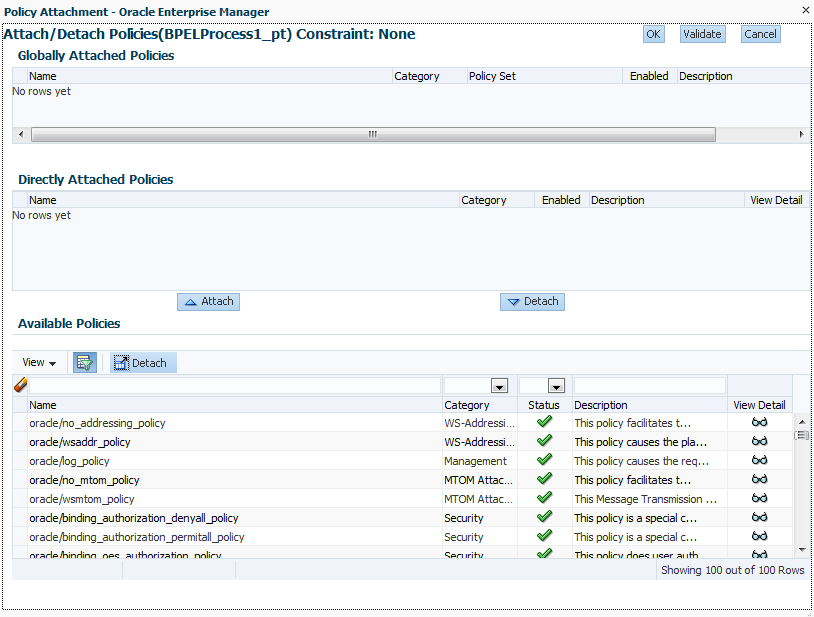
This invokes a dialog for attaching or detaching policies.
Policies currently attached appear in the Globally Attached Policies or Directly Attached Policies section. Additional policies available for attachment appear in the Available Policies section.
-
Select to attach policies appropriate to your environment.
-
Click Attach.
-
When you are finished attaching policies, click Validate.
-
If an error message appears, make the necessary corrections until you no longer have any validation errors.
-
Click OK.
The attached policy is displayed in the policies table.
For more information, see the following documentation:
-
Managing SOA Composite Application Policies for the dialogs that are displayed during policy attachment
Managing the URI of the Human Workflow Service Component Task Details Application
You can add or remove the URIs of the task details application used in human workflow.
To manage the URIs of the human workflow service component task details application:
-
Access this page using one of the following options:
From the SOA Infrastructure Menu... From the SOA Folder in the Navigator... Select Service Engines > Human Workflow.
-
Select soa-infra.
-
Right-click and select Service Engines > Human Workflow.
-
-
Go to the Composites column of the View table and select a specific SOA composite application to access its home page.
-
Select a component from the list of components.
-
Click Administration.
The Administration page shows the URI for the task details application.
Note:
If the SOA server is SSL enabled or disabled, then you must manually enable or disable SSL for any already deployed workflow task detail applications. Change the workflow task display URL to use the correct protocol and port number. To enable the use of the SSL (HTTPS) URL, ensure that the HTTP port setting is left blank.
-
Click the Add icon to specify the following details for the URI:
-
Application name
-
Hostname
-
HTTP port
-
HTTPS port (optional)
-
URI
-
-
Click OK and then click Apply.
Managing Outgoing Notifications and Incoming Email Notifications
You can manage incoming and outgoing notifications through email in human workflow, including testing messages, resending messages, and identifying messages as spam.
Incoming and outgoing notifications are sent to and from human workflow. Incoming notifications are responses to actionable notifications. For example, an outgoing notification is sent to the manager of an employee requesting vacation leave. The manager approves the request by clicking the Approve link in the actionable notification email. This action sends an incoming notification to human workflow for possible additional processing.
To manage outgoing notifications and incoming email notifications:
-
Access the Human Workflow Engine page using one of the following options:
From the SOA Infrastructure Menu... From the SOA Folder in the Navigator... -
Select Service Engines > Human Workflow.
-
Right-click soa-infra.
-
Select Service Engines > Human Workflow.
-
-
In the the Human Workflow Engine, click the Notification Management tab.
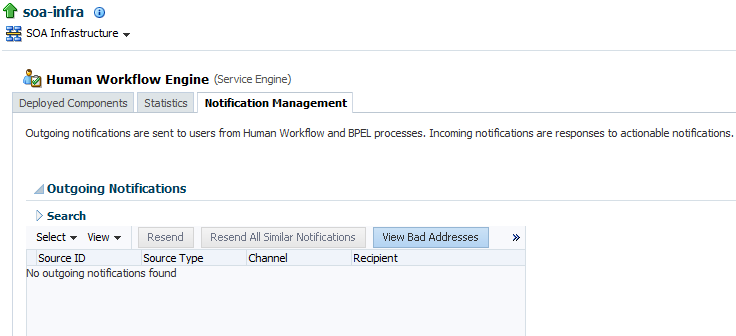
The upper part of the Notification Management page displays the following details:
-
A utility for searching for a specific message by specifying criteria and clicking Search. You must expand the Search icon to display this utility.
-
Outgoing notifications, including the source ID, the source type (for example, if a notification is sent by a BPEL service component, the type is BPEL), the channel used (for example, email, SMS, or instant message), the address of the message recipient, the message status (for example, error, send, retry, sent), and the time at which the message was sent.
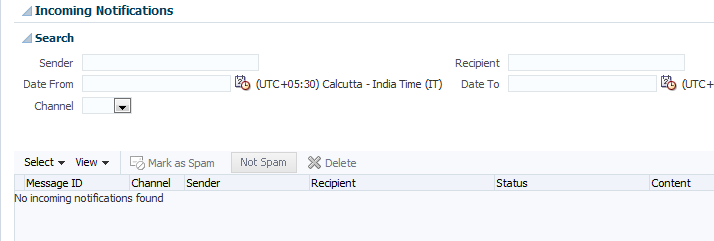
The lower part of the Notification Management page displays the following details:
-
A utility for searching for a specific message by specifying criteria and clicking Search. You must expand the Search icon to display this utility.
-
Incoming notifications, including the message ID, the channel used (same types as for outgoing notifications), the address of the message sender, the address of the message recipient, the message status (replied email notification, unsolicited email, unknown email content, response not processed, and response processed), a link to the content of the message, and the time at which the message was received.
-
-
Perform the following actions on outgoing notifications:
Action Description Send Test Notification
Test that outgoing messages are arriving at the correct destination. This ensures that the destination is reachable and messages are arriving. Selecting this option invokes a dialog for specifying the following destination details:
-
Destination address
-
Delivery channel (for example, email)
-
Message subject and content
Note: You cannot send test notification messages with the messaging extension driver because it requires the following:
-
Specific data to be manually entered into the test page (such as the URI of the task details)
-
URI-specific headers (such as time, user, and so on)
Resend
Select specific outgoing notification messages in the table and click Resend to resend. Use this option if you believe that messages are not arriving at their correct destination. For example, you may have incorrectly configured a recipient address. After correcting the address, click Resend to test the delivery.
Resend All Similar Notifications
Resend all error notification messages having the same recipient address as the selected one.
View Bad Addresses
Click to display a list of bad or invalid addresses. The addresses are automatically removed from the bad address list after one hour. If you do not want to wait an hour, you can explicitly select and delete them.
Delete icon
Click to delete a selected message.
If outgoing notifications are sent to an incorrect address of a message recipient, they are displayed as errors in the Recipient column. You can correct the recipient's address and resend the notification.
-
-
In the Recipient column, click the email address and correct the address.
-
Perform the following actions on incoming notifications:
Action Description Mark as Spam
Mark the message sender's address of the selected notification as spam. This action prevents incoming notifications from the same sender address from being delivered again.
No Spam
Mark incoming messages as not being spam. This action enables new messages from the sender's address to be delivered again.
Delete icon
Click to delete a selected message.
For more information about notifications, see Developing SOA Applications with Oracle SOA Suite.
Moving Human Workflow Data from a Test to a Production Environment
You can migrate Human Workflow user metadata, such as views, mapped attribute (previously known as flex field) mappings, and vacation rules, from a test environment to a production environment using the Human Workflow User Config Data Migrator.
The Data Migrator is available as an ant target that can be executed at the command line. You specify the input parameters for the migration of data in a properties file, migration.properties.
For example, assume you have two SOA servers installed:
-
SOAServer_A
A test server that includes human workflow user-configurable data (user views, standard views, user rules, group rules, attribute labels, and task payload mapped attribute mappings).
-
SOAServer_B
A production server to which you want to move the data on SOAServer_A.
Since you have a significant amount of data on SOAServer_A, it can be time consuming to manually migrate all of the data to SOAServer_B.You can use the Data Migrator to move the data from the test server to the production server. You run the ant target at the command line of SOAServer_A to migrate data to SOAServer_B.Migration is always performed through an XML file. The Data Migrator supports the following operations:
-
Export operation: Stores all the human workflow user-configurable data from the source SOA server to the XML file.
-
Import operation: Creates all the human workflow user-configurable data in the target SOA server by reading from the XML file.
The Data Migrator consists of the following files:
-
migration.properties: Contains all required input properties in terms ofkey-valuepairs for migration operations. -
build.xml: Contains theanttargetrunHwfMigratorthat executes the Data Migrator.
Moving Human Workflow Data from Test to Production Environments
Perform the following steps to move data from a test to a production environment.
To move human workflow data from test to production environments:
migration.properties File Syntax
The migration.properties file specifies the input parameters for data migration. The template for this file is located in the following directory:
The migration.properties file contains the following input parameters:
operationType = {EXPORT | IMPORT}
objectType = {VIEW | RULE | TASK_PAYLOAD_FLEX_FIELD_MAPPING}
name = name of VIEW or TASK_PAYLOAD_FLEX_FIELD_MAPPING
user = username of VIEW or RULE
group = groupname for RULE
grantPermission = {true | false}
migrateAttributeLabel = {true | false}
override = {true | false}
skip = {true | false}
migrateToActiveVersion = {true | false}
| Argument | Definition |
|---|---|
|
|
Specify to perform one of the following actions:
|
|
|
Specify the type of object to migrate:
|
|
|
Specify the object name if you specified
Specify |
|
|
Specify the user name only if you specified the |
|
|
Specify this property only if you specified the |
|
|
Specify this property only if you specified the
|
|
|
Specify one of the following values:
|
|
|
Specify whether to override the data on the target SOA server:
|
|
|
Specify error handling details.
|
|
|
Specify a value for mapping task definition IDs.
|
Migration Property File Examples
This section provides examples how to configure the migration.properties file.
Exporting All Attribute Labels
The following example exports all attribute labels.
operationType = EXPORT
objectType = TASK_PAYLOAD_FLEX_FIELD_MAPPING
name = ALL
user = jcooper
group =
grantPermission = true
migrateAttributeLabel = true
override = true
skip = true
migrateToActiveVersion = true
Importing All Attribute Labels
The following example imports all attribute labels.
operationType = IMPORT
objectType = TASK_PAYLOAD_FLEX_FIELD_MAPPING
name = ALL
user = jcooper
group =
grantPermission = true
migrateAttributeLabel = true
override = true
skip = true
migrateToActiveVersion = true
Exporting Specific Attribute Labels
The following example exports specific attribute labels.
operationType = EXPORT
objectType = TASK_PAYLOAD_FLEX_FIELD_MAPPING
name = cb801c91-4605-4e96-a234-aeb8441f0388
user = jcooper
group =
grantPermission = true
migrateAttributeLabel = true
override = true
skip = true
migrateToActiveVersion = true
Importing Specific Attribute Labels
The following example imports specific attribute labels.
operationType = IMPORT
objectType = TASK_PAYLOAD_FLEX_FIELD_MAPPING
name = cb801c91-4605-4e96-a234-aeb8441f0388
user = jcooper
group =
grantPermission = true
migrateAttributeLabel = true
override = true
skip = true
migrateToActiveVersion = true
Exporting Task Payload Mapped Attribute Mappings for All Task Definition IDs
The following example exports task payload mapped attribute mappings for all task definition IDs.
operationType = EXPORT
objectType = TASK_PAYLOAD_FLEX_FIELD_MAPPING
name = ALL
user = jcooper
group =
grantPermission = true
migrateAttributeLabel = false
override = true
skip = true
migrateToActiveVersion = true
Importing Task Payload Mapped Attribute Mappings for All Task Definition IDs
The following example imports task payload mapped attribute mappings for all task definition IDs. Task payload mapped attribute mappings use attribute labels. As a prerequisite, find out the attribute labels involved in the task payload mapped attribute mappings to import. These attribute labels must be available in the target SOA server before the import of task payload mapped attribute mappings into the target SOA server.
The recommended steps are as follows:
-
Import the attribute labels into the target SOA server.
-
Import the task payload mapped attribute mappings into the target SOA server.
operationType = IMPORT
objectType = TASK_PAYLOAD_FLEX_FIELD_MAPPING
name = ALL
user = jcooper
group =
grantPermission = true
migrateAttributeLabel = false
override = true
skip = true
migrateToActiveVersion = true
Exporting Task Payload Mapped Attribute Mappings for a Specific Task Definition ID
The following example exports task payload mapped attribute mappings for a specific task definition ID.
operationType = EXPORT
objectType = TASK_PAYLOAD_FLEX_FIELD_MAPPING
name = default/HelpDeskRequestComposite!1.0*c9856b8b-bc9e-46a4-8aef-698e539ba1d7/HelpDesk
RequestHumanTask
user = jcooper
group =
grantPermission = true
migrateAttributeLabel = false
override = true
skip = true
migrateToActiveVersion = true
Importing Task Payload Mapped Attribute Mappings for a Specific Task Definition ID
The following example imports task payload mapped attribute mappings for a specific task definition ID. Task payload mapped attribute mappings make use of attribute labels. As a prerequisite, find out the attribute labels that are involved in the task payload mapped attribute mappings to import. These attribute labels must be available in the target SOA server before the import of task payload mapped attribute mappings into the target SOA server.
The recommended steps are as follows:
-
Import the attribute labels into the target SOA server.
-
Import the task payload mapped attribute mappings into the target SOA server.
operationType = IMPORT
objectType = TASK_PAYLOAD_FLEX_FIELD_MAPPING
name = default/HelpDeskRequestComposite!1.0*c9856b8b-bc9e-46a4-8aef-698e539ba1d7/HelpDesk
RequestHumanTask
user = jcooper
group =
grantPermission = true
migrateAttributeLabel = false
override = true
skip = true
migrateToActiveVersion = true
Exporting All Rules for a Specific User
This example exports all rules for a specific user. The group property is left blank when you export rules for a specific user.
operationType = EXPORT
objectType = RULE
name = ALL
user = jcooper
group =
grantPermission = true
migrateAttributeLabel = false
override = true
skip = true
migrateToActiveVersion = false
Importing All Rules for a Specific User
This example imports all rules for a specific user. The group property is left blank when you import rules for a specific user.
operationType = IMPORT
objectType = RULE
name = ALL
user = jcooper
group =
grantPermission = true
migrateAttributeLabel = false
override = true
skip = true
migrateToActiveVersion = false
Exporting All Rules for a Specific Group
This example exports all rules for a specific group. The user property is left blank when you export rules for a specific group.
operationType = EXPORT
objectType = RULE
name = ALL
user =
group = LoanAgentGroup
grantPermission = true
migrateAttributeLabel = false
override = true
skip = true
migrateToActiveVersion = false
Importing All Rules for a Specific Group
This example imports all rules for a specific group. The user property is left blank when you import rules for a specific group.
operationType = IMPORT
objectType = RULE
name = ALL
user =
group = LoanAgentGroup
grantPermission = true
migrateAttributeLabel = false
override = true
skip = true
migrateToActiveVersion = false
Exporting All User Views
This example exports all user views.
operationType = EXPORT
objectType = VIEW
name = ALL
user = jcooper
group =
grantPermission = true
migrateAttributeLabel = false
override = true
skip = true
migrateToActiveVersion = false
Importing All User Views
This example imports all user views.
operationType = IMPORT
objectType = VIEW
name = ALL
user = jcooper
group =
grantPermission = true
migrateAttributeLabel = false
override = true
skip = true
migrateToActiveVersion = false
Exporting a Specific User View
This example exports a specific user view.
operationType = EXPORT
objectType = VIEW
name = jcooperUserView1
user = jcooper
group =
grantPermission = true
migrateAttributeLabel = false
override = true
skip = true
migrateToActiveVersion = false
Importing a Specific User View
This example imports a specific user view.
operationType = IMPORT
objectType = VIEW
name = jcooperUserView1
user = jcooper
group =
grantPermission = true
migrateAttributeLabel = false
override = true
skip = true
migrateToActiveVersion = false
Export All Standard Views
This example exports all standard views.
operationType = EXPORT
objectType = VIEW
name = ALL
user =
group = LoanAgentGroup
grantPermission = true
migrateAttributeLabel = false
override = true
skip = true
migrateToActiveVersion = false
Importing All Standard Views
This example imports all standard views.
operationType = IMPORT
objectType = VIEW
name = ALL
user =
group = LoanAgentGroup
grantPermission = true
migrateAttributeLabel = false
override = true
skip = true
migrateToActiveVersion = false
Exporting a Specific Standard View
This example exports a specific standard view.
operationType = EXPORT
objectType = VIEW
name = MyStandardView1
user =
group = LoanAgentGroup
grantPermission = true
migrateAttributeLabel = false
override = true
skip = true
migrateToActiveVersion = false
ant Script Data Migration Syntax
Use the ant script for data migration. The script is located in the following directory:
ORACLE_HOME/bin/ant-t2p-worklist.xml
The script uses the following format to migrate human workflow configurable data from one SOA server to another:
ant -f ant-t2p-worklist.xml
-Dbea.home=BEA_HOME
-Dsoa.home=SOA_HOME
-Dmigration.properties.file=MIGRATION_PROPERTY_FILE_PATH
-Dsoa.hostname=SOA_HOSTNAME
-Dsoa.rmi.port=SOA_RMI_PORT
-Dsoa.admin.user=SOA_ADMIN_USER
-Dsoa.admin.password=SOA_ADMIN_PASSWORD
-Drealm=REALM -Dmigration.file=MIGRATION_FILE
-Dmigration.file=<MIGRATION_FILE>
-Dmap.file=MAP_FILE
-Dhwf.t2p.config.file=
| Argument | Definition |
|---|---|
|
|
The absolute path of the installation directory for Oracle WebLogic Server. |
|
|
The absolute path of the Oracle SOA Suite home directory. |
|
|
The absolute path to the |
|
|
The hostname of the SOA server instance. Note: You must specify the complete domain name, such as |
|
|
The remote method invocation (RMI) port of the SOA server instance. |
|
|
The Admin user name to connect to the SOA server instance. |
|
|
The Admin user password to connect to the SOA server instance. |
|
|
The realm of the SOA server instance. |
|
|
The complete path location of the migration file in which all user-configurable data from the SOA server is exported to or imported from. |
|
|
The full path location of the map file in which all the |
hwf.t2p.config.file |
The location of the configuration file. |
Note:
The configuration file specified must be of type .properties (for example, config.properties) and include an entry for soa.admin.password (for example, soa.admin.password=****).
When calling ant-t2p-worklist.xml, set the argument soa.admin.password to the correct password, or to an empty value. For example:
-Dsoa.admin.password=*** or -Dsoa.admin.password=
If soa.admin.password is set to an empty value, provide the password configuration file location by setting the hwf.t2p.config.file argument to the file location. If both hwf.t2p.config.file and soa.admin.password are set, the soa.admin.password value is read from the configuration file.
For example:
ant -f ant-t2p-worklist.xml
-Dbea.home=/net/myhost/jsmith/fmwhome
-Dsoa.home=/net/myhost/jsmith/fmwhome/AS11gR1SOA
-Dmigration.properties.file=migration.properties
-Dsoa.hostname=myhost.us.example.com -Dsoa.rmi.port=7001
-Dsoa.admin.user=weblogic
-Drealm=jazn.com
-Dmigration.file=/tmp/export_all_userRules.xml
-Dmap.file=/tmp/export_all_userRules_mapper.xml
-Dhwf.t2p.config.file=


