5 Integrating WebLogic Cluster and Helidon Applications for Single Sign-On on OCI Using IDCS

The Oracle WebLogic Server (WebLogic Server) and Helidon integration enables you to use the single sign-on (SSO) authentication mechanism for applications deployed on WebLogic Server and Helidon by using OpenID Connect (OIDC) with Oracle Identity Cloud Service (IDCS) in a Kubernetes environment. Using SSO between WebLogic Server applications and Helidon microservices simplifies security within a modernized application by sharing authentication while ensuring secure services. You can implement SSO in different ways. A common approach is to use a token-based authentication protocol such as OAuth or OIDC.
The WebLogic Server and Helidon integration in a Kubernetes cluster enables SSO authentication to:
  • Access the IDCS configured client application deployed in the WebLogic cluster.
  • Access the Helidon REST endpoints configured with IDCS.
  • Access the WebLogic Server application endpoints from the Helidon REST endpoints.

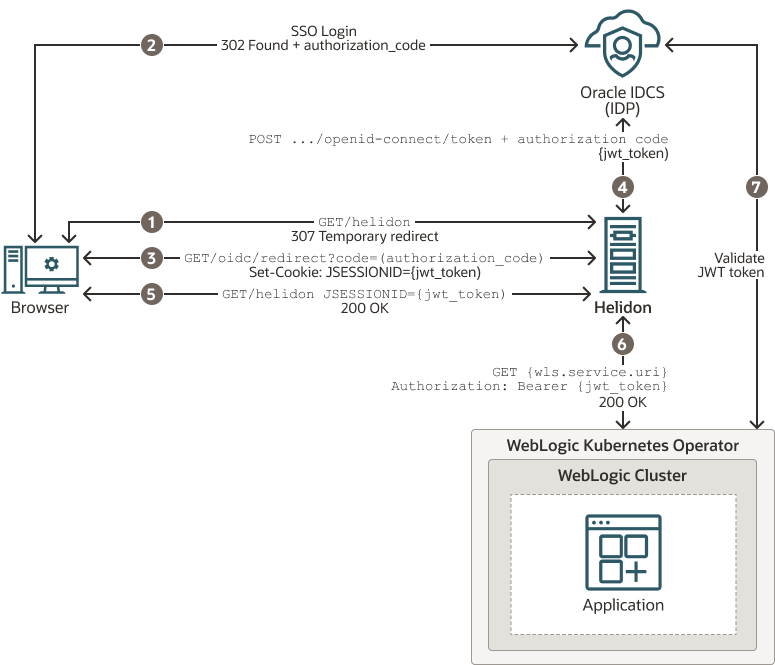
The following graphic illustrates the integration between WebLogic Server and Helidon for SSO using IDCS in an Oracle Cloud Infrastructure (OCI) environment:

Figure 5-1 WebLogic Cluster and Helidon Integration for SSO


The description of the steps in the illustration:

  1. The client uses a browser to call the protected Helidon resource without bearer token and gets redirected to the IDCS SSO login page.
  2. The client is redirected back to the Helidon application with an authorization code after a successful sign-in on the login page.
  3. When Helidon receives the authorization code, the JWT token is requested from IDCS, returned and saved as a JSESSIONID cookie.
  4. The JWT token is requested with a new authorization code, client id, and client secret.
  5. The last redirect leads back to the originally called resource, Helidon; this time with a valid bearer token in JSESSIONID.
  6. The bearer token is propagated to the client call for the WebLogic Server application resource.
  7. The WebLogic Server application resource is also secured with OIDC and validates the token against IDCS.

This chapter includes the following topics:

Prerequisites

The prerequisites are based on WebLogic Server and Helidon integration in a Kubernetes cluster. The list may vary if you use any other supported platforms. See Preparing the Kubernetes Cluster for WebLogic Server and Helidon Integration.
Ensure that you have the following:
  • A local machine with kubectl setup to access the Kubernetes cluster. For more information about this setup, see Set Up the kubeconfig File for the Cluster and Verify kubectl and Kubernetes Dashboard Access to the Cluster in the Create a Cluster with Oracle Cloud Infrastructure Container Engine for Kubernetes Tutorial.
  • A WebLogic Kubernetes Operator (Operator) setup. See Operator Quick Start.
  • An OCI load balancer with a public IP and the load balancer rules applied according to the WebLogic Server and Helidon application URL pattern. The following example shows the application of rules:
    ---
    apiVersion: traefik.containo.us/v1alpha1
    kind: IngressRoute
    metadata:
      name: cquotes
      namespace: sample-domain1-ns
    spec:
      routes:
      - kind: Rule
        match: PathPrefix(`/<WLS application url>)
        services:
        - kind: Service
          name: sample-domain1-cluster-cluster-1
          port: 8001
          sticky:
            cookie:
              httpOnly: true
              name: cookie
              secure: false
              sameSite: none
    ---
    apiVersion: traefik.containo.us/v1alpha1
    kind: IngressRoute
    metadata:
      name: helidon-quickstart-mp
      namespace: default
    spec:
      routes:
      - kind: Rule
        match: PathPrefix(`/<helidon rest url>`)
        services:
        - kind: Service
          name: helidon-quickstart-mp
          port: 8080
    ---
    apiVersion: traefik.containo.us/v1alpha1
    kind: IngressRoute
    metadata:
      name: helidon-oidc
      namespace: default
    spec:
      routes:
      - kind: Rule
        match: PathPrefix(`/oidc`)
        services:
        - kind: Service
          name: helidon-quickstart-mp
          port: 8080
  • Access to IDCS with privileges to register applications. For instructions to create a user, see Create User Accounts in Administering Oracle Identity Cloud Service.
  • Supported JDK (for example JDK 8 or later) and Maven (if required) to build the WebLogic cluster client applications.
  • For deploying Helidon, see:
  • A basic understanding of OpenID Connect (OIDC). See OpenID.

Setting Up the WebLogic Cluster Integration with Helidon for Single Sign-On

To facilitate the integration between WebLogic cluster and Helidon, WebLogic Server is deployed using the WebLogic Server Kubernetes Operator (Operator), in a Kubernetes cluster. The Helidon container is also deployed within the same Kubernetes cluster. The default OCI load balancer with a public IP is used to access the WebLogic Server Administration Console, the client applications (deployed in the WebLogic cluster), and the Helidon REST endpoints (exposed by the Helidon microservice application). The Helidon microservice application communicates with the WebLogic cluster applications through the REST endpoints that are integrated with Oracle Identity Cloud Service for authentication and authorization using SSO.
To set up the integration:
  1. Integrate the WebLogic cluster applications with Oracle Identity Cloud Service.
    1. Register the application on Oracle Identity Cloud Service.

      The following client configuration details are important because you will use the values of these parameters in the source code of the client application to enable the Oracle Identity Cloud Service to communicate securely with the client application.

      • Allowed Grant Types: The grant type that the client application is allowed to use when it requests validation from Oracle Identity Cloud Service.
      • Redirect URL: The absolute URL of the client application where a user will be redirected to after successful authentication in Oracle Identity Cloud Service.
      • Logout URL: The URL that is called by Oracle Identity Cloud Service after a user logs out of the client application.
      • Post Logout Redirect URL: The URL where a user will be redirected to after logging out of Oracle Identity Cloud Service.

      After you finish registering and activating the client application, make a note of the Client ID and Client Secret. The client application will use the Client ID and Client Secret (similar to a login credential such as user ID and password) to communicate with Oracle Identity Cloud Service.

      For more information about registering an application, see Add a Confidential Application in Administering Oracle Identity Cloud Service.

    2. Integrate the client application with Oracle Identity Cloud Service.

      In this step, you have to configure the client application to connect with Oracle Identity Cloud Service during authentication. Update the CLIENT_ID, CLIENT_SECRET (you will use the Client ID and Client Secret generated at the time of registering the client application in IDCS), and the IDCS_URL in the client application source code, as shown in the following example:

      //YOUR IDENTITY DOMAIN AND APPLICATION CREDENTIALS
      public static final String CLIENT_ID = "<your client id>";
      public static final String CLIENT_SECRET = "<your client secret>";
      public static final String IDCS_URL = "https://example.identity.oraclecloud.com";

      Note:

      The Client ID and Client Secret are used to obtain the access token for SSO authentication.
    3. Build and deploy the client application in the WebLogic cluster.

      Build the client application using the WebLogic Server supported JDK, and then deploy the application in the WebLogic cluster. After a successful deployment, the client application will be displayed with an Active status in the Deployments section of the WebLogic Server Administration Console.

    4. Verify the WebLogic Server application for SSO.

      Access the client application URL http://{OCI LB_IP}/<wls app> using a browser. Here, OCI LB_IP is the public IP of the load balancer and wls app is the name of the WebLogic cluster application. The SSO endpoints should redirect to the IDCS login page for authentication.

      After successful authentication, you should be able to view the application contents.

    For an example of integrating an application with Oracle Identity Cloud Service, see Integrating Customer Quotes and Oracle Identity Cloud Service.
  2. Integrate the Helidon application with Oracle Identity Cloud Service.
    1. Register the Helidon MP client application on Oracle Identity Cloud Service.

      The following parameters are important:

      • Redirect URL: <LB IP>/oidc/redirect
      • Logout URL: <LB IP>/oidc/logout
      • Post Logout Redirect URL: <Logout URL>
      • Primary Audience: <LB IP>/ as per the Helidon application REST endpoints
      • Secondary Audience: <IDCS URI> as per the IDCS tenancy

      After you finish registering and activating the Helidon application, make a note of the Client ID and Client Secret.

    2. Set up the Helidon application.

      Create the Helidon MP sample application using Maven , as shown in the following example:

      mvn -U archetype:generate -DinteractiveMode=false \
          -DarchetypeGroupId=io.helidon.archetypes \
          -DarchetypeArtifactId=helidon-quickstart-mp \
          -DarchetypeVersion=3.2.0 \
          -DgroupId=io.helidon.examples \
          -DartifactId=helidon-quickstart-mp \
          -Dpackage=io.helidon.examples.quickstart.mp

      See Set up Helidon in the Helidon MP OIDC Security Provider Guide.

    3. Configuring the OIDC dependencies for the Helidon application.
      The project will be built and run from the helidon-quickstart-mp directory. Navigate to the directory:
      cd helidon-quickstart-mp
      1. Add the Maven dependency to the pom.xml file, as shown in the following example:
        <dependency>
          <groupId>io.helidon.microprofile</groupId>
           <artifactId>helidon-microprofile-security</artifactId>
        </dependency>
        <dependency>
          <groupId>io.helidon.microprofile</groupId>
          <artifactId>helidon-microprofile-oidc</artifactId>
        </dependency>
        <dependency>
          <groupId>io.helidon.microprofile.jwt</groupId>
          <artifactId>helidon-microprofile-jwt-auth</artifactId>
        </dependency> 
      2. Update the application.yaml file according to your requirements and the IDCS configuration, as shown in the following example:
        # These values should be as per IDCS configured application values
        security:
          config.require-encryption: false
          properties:
             # Oracle IDCS instance uri. Following URI may change depending on IDCS instance.
             idcs-uri: "${idcs-uri}"
             # IDCS Registered application client-id and secret
             # Register Confidential application for Helidon at IDCS and provide the client id and secret below.
             idcs-client-id: "${helidon-idcs-client-id}"
             idcs-client-secret: "${helidon-idcs-client-secret}"
             # Configure proxy if required.
             proxy-host: ""
             # Helidon application listening at port
             port: 8080
          providers:
            - abac:
            - oidc:
                client-id: "${security.properties.idcs-client-id}"
                # See [EncryptionFilter](https://helidon.io/docs/latest/apidocs/io.helidon.config.encryption/io/helidon/config/encryption/EncryptionFilter.html for details about encrypting passwords in configuration files.
                client-secret: "${security.properties.idcs-client-secret}"
                identity-uri: "${security.properties.idcs-uri}"
                # This redirect URI which should match at IDCS registered application Redirect URL
                # Redirect URL at IDCS follows http://<hostname:8080 or Load Balancer>/oidc/redirect
                redirect-uri: "/oidc/redirect"
                # scope-audience should match with IDCS Primary Audience , except adding "/" trailing character. 
                # At IDCS it will be http://<hostname:8080 or Load Balancer>/<REST endpoint>/. 
                # Mismatch in scope-audience causes failure in generating access token 
                scope-audience: "http://${load-balancer-ip}/<helidon REST endpoint>"
                # Mismatch in audience  causes failure in generating access token 
                audience: "${IDCS_URI}"
                # Front end host , it should be either hostname:8080 or load balancer ip
                frontend-uri: "http://${load-balancer-ip}"
                server-type: "idcs"
                logout-enabled: true
                # Configured IDCS Logout URL "http://<LB|HOSTNAME:PORT>/oidc/logout
                # Configured IDCS Post Logout Redirect URL "http://<LB|HOSTNAME:PORT>/loggedout"
                # Post logout Helidon REST endpoint or URI
                post-logout-uri: "/${logout url}"
                propagate: true
                outbound:
                   - name: "propagate-token"
                     hosts: [ "${load-balancer-ip}" ]
                redirect: true
                cookie-use: true
                header-use: true
      3. Configure the Helidon REST endpoints for SSO.

        You can SSO secure the Helidon REST endpoints by adding the @Authenticated annotation. See Section "Usage" in Adding Security.

        The @Authenticated annotation is used to specify server resources with enforced authentication. The following is an example of using this annotation:
        
        @Authenticated
        @GET
        @Produces(MediaType.APPLICATION_JSON)
          public JsonObject getDefaultMessage() {
              return createResponse("World");
          }
    4. Deploy the Helidon MP application in the same Kubernetes cluster.
      1. Build the Docker image using the following command:
        docker build -t helidon-quickstart-mp .
      2. Update the app.yaml file for image reference, based on the Helidon docker image created and hosted at the container registry:
        kind: Service
        apiVersion: v1
        metadata:
          name: helidon-quickstart-mp
          labels:
            app: helidon-quickstart-mp
        spec:
          type: NodePort
          selector:
            app: helidon-quickstart-mp
          ports:
          - port: 8080
            targetPort: 8080
            name: http
        ---
        kind: Deployment
        apiVersion: apps/v1
        metadata:
          name: helidon-quickstart-mp
        spec:
          replicas: 1
          selector:
            matchLabels:
              app: helidon-quickstart-mp
          template:
            metadata:
              labels:
                app: helidon-quickstart-mp
                version: v1
            spec:
              containers:
              - name: helidon-quickstart-mp
                image: ${docker image repo}/helidon-quickstart-mp
                imagePullPolicy: Always
                ports:
                - containerPort: 8080
      3. Deploy the Helidon application in the same Kubernetes cluster.
        Run the following kubectl command on a local machine to deploy the Helidon application in the Kubernetes cluster:
        kubectl create -f app.yaml
      4. Verify whether the Helidon deployment is successful by running the following kubectl commands:
        kubectl get pods
        kubectl get service helidon-quickstart-mp

      For more information about the quickstart, see Helidon MP Quickstart.

    5. Verify the Helidon application for SSO.

      Access REST endpoint URL http://{LB IP}/<SSO configured REST endpoint> using a browser. Here, LB_IP is the public IP of the load balancer and SSO configured REST endpoint is the Helidon REST endpoint.

      Upon successful SSO authentication at IDCS, you will receive a response from the REST endpoint.

  3. Integrate the Helidon application and the WebLogic cluster applications for SSO.
    1. Access the WebLogic cluster application SSO endpoints from the Helidon SSO REST endpoints. Helidon obtains the JWT token after the Helidon SSO endpoints are authenticated. You can use the token manually for calling other services or have the token propagated automatically with the JAX-RS client. You may use the following example for reference:
      @Path("/helidon")
      @ApplicationScoped
      @Authenticated
      public class HelidonResource {
      
          @Inject
          @ConfigProperty(name = "wls.service.url")
          private URI wlsServiceUri;
      
          @Inject
          private JsonWebToken jwt;
      
          @Authenticated
          @GET
          @RolesAllowed({"secret_role"})
          @Produces(MediaType.APPLICATION_JSON)
          public JsonObject getDefaultMessage(@Context SecurityContext secCtx) {
              var user = secCtx.userName();
              var isInRole = secCtx.isUserInRole("secret_role");
      
              // Manually access the raw bearer token
              var bearerToken = jwt.getRawToken();
      
              // Bearer token is propagated automatically with the OIDC outbound propagation, 
              // no manual action is needed with the JAX-RS client
              JsonObject response = ClientBuilder.newClient()
                      .target(wlsServiceUri)
                      .request()
                      .buildGet()
                      .invoke(JsonObject.class);
      
              return Json.createObjectBuilder()
                      .add("user", user)
                      .add("is_secret_role", isInRole)
                      .add("wls-response", response)
                      .build();
          }
      }
    2. Access the Helidon SSO REST endpoint to verify the integration between Helidon application and the WebLogic cluster application.

      After a successful SSO authentication at the Helidon REST endpoint, you will be able to get access to the WebLogic cluster application.