10 Configuring Elasticsearch in WebCenter Portal

Configure Elasticsearch to index and search objects in WebCenter Portal.

If you have upgraded from a prior release, WebCenter Portal may be configured to use Oracle SES, described in Configuring Search with Oracle SES in WebCenter Portal. Oracle recommends that you use Elasticsearch in WebCenter Portal, as described in this chapter.

Permissions:

To perform the tasks in this chapter, you must be granted the WebLogic Server Admin role through the Oracle WebLogic Server Administration Console and the Administrator role granted through WebCenter Portal Administration.

For more information about roles and permissions, see Understanding Administrative Operations, Roles, and Tools.

Understanding Search with Elasticsearch

Elasticsearch is a highly scalable search engine. It allows you to store, search, and analyze big volumes of data quickly and provides a distributed, multitenant-capable full-text search engine with an HTTP web interface and schema-free JSON documents.

Advantages of Elasticsearch

  • Elasticsearch provides full-text search capabilities as it is built on Lucene.

  • Elasticsearch is document-oriented. It stores data as structured JSON documents and indexes all fields by default, with a higher performance result.

  • Elasticsearch is API driven; actions can be performed using a simple Restful API.

  • Elasticsearch retrieves search results fast because it searches an index instead of searching the text directly.

You can configure Elasticsearch to search the following resources in WebCenter Portal:

  • Documents, including wikis and blogs

  • Portals, page metadata, lists, and people resources

  • Announcements and Discussions (available only for portals upgraded from prior releases)

Configuration Roadmap for Elasticsearch in WebCenter Portal

Table 10-1 Roadmap - Setting Up Elasticsearch in WebCenter Portal

Actor Task

Administrator

Creating a Crawl Admin User in WebCenter Portal

Administrator

Installing Elasticsearch and Plugins

Administrator

Configuring WebCenter Content for Search

Administrator

Configuring Search Crawlers

Administrator

Customizing Search Settings in WebCenter Portal Administration

Administrator

(Optional) Configuring Search Custom Attributes for Elasticsearch

Administrator

(Optional) Modifying Elasticsearch Global Attributes

Prerequisites for Configuring Elasticsearch

Ensure the following requirements:

Creating a Crawl Admin User in WebCenter Portal

You can designate an existing user as crawl admin or create a crawl admin user (for example, mycrawladmin) in WebCenter Portal and in your back-end identity management server to search using Elasticsearch. You must create a crawl admin user only once.

Note:

See your identity management system documentation for information on creating users.

The following example uses Oracle Directory Services Manager to create the mycrawladmin user:

  1. On the Data Browser tab, navigate to the target cn and click Create.

    This example navigates to "dc=com,dc=oracle,dc=us,cn=Users".

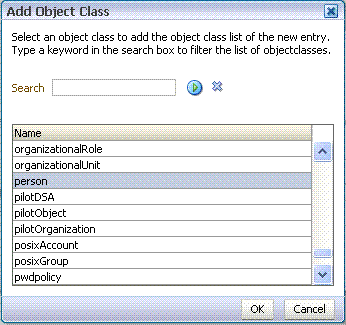
  2. In the Add Object Class dialog, select the appropriate object class, and click OK.

    Figure 10-1 Oracle Directory Services Manager - Add Object Class

    Description of Figure 10-1 follows
    Description of "Figure 10-1 Oracle Directory Services Manager - Add Object Class"
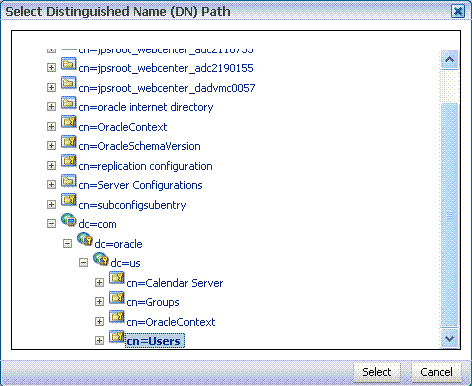
  3. Find the distinguished name (DN) path, and click Select.

    This example selects "dc=com,dc=oracle,dc=us,cn=Users".

    Description of wcadm_selectdn1.gif follows
    Description of the illustration wcadm_selectdn1.gif
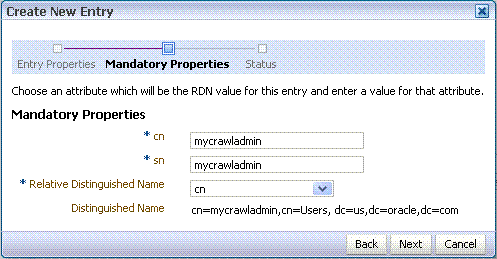
  4. In the Create New Entry dialog, enter properties, and click Next.

    Figure 10-2 Oracle Directory Services Manager - Create New Entry

    Description of Figure 10-2 follows
    Description of "Figure 10-2 Oracle Directory Services Manager - Create New Entry"
  5. When you see that the new entry was created successfully, click Finish.

    Figure 10-3 Oracle Directory Services Manager - Status

    Description of Figure 10-3 follows
    Description of "Figure 10-3 Oracle Directory Services Manager - Status"

Installing Elasticsearch and Plugins

To install Elasticsearch and plugins:
  1. Navigate to your Oracle home directory and edit the installES.properties file:

    Edit ORACLE_HOME/wcportal/es/installES.properties

    Specify the required values.

    The following is the example of the installES.properties file:

    # A valid ORACLE_HOME. This must contain elasticsearch binaries at $ORACLE_HOME/wcportal/es
    ORACLE_HOME=/home/Oracle/product
    # A valid Admin Server host which contains WebCenter Portal
    ADMIN_SERVER_HOST_NAME=host.example.com
    # Admin server port
    ADMIN_SERVER_PORT=7001
    # A valid user name of Admin Server
    WLS_ADMIN_USER=weblogic
    # A valid user name of the search application
    SEARCH_APP_USER=mycrawladmin
    # This will typically be $WEBCENTER_PORTAL_DOMAIN_HOME/config/fmwconfig
    # If $WEBCENTER_PORTAL_DOMAIN_HOME is not accessible from this host,
    # copy the directory $WEBCENTER_PORTAL_DOMAIN_HOME/config/fmwconfig
    # from WebCenter Portal domain host to this host and provide that location
    WCP_FMW_CONFIG_LOCATION=/weblogic/admin/webcenter/aserver/webcenter/config/fmwconfig
    # CURRENT_HOST_NAME is default value of ELASTIC_SEARCH_CLUSTER_NAME
    # If you provide the same then it will be replaced with current hostname
    # If required, you can change the value of ELASTIC_SEARCH_CLUSTER_NAME
    # Make sure that you don't reuse the same cluster names in different environments, otherwise 
    you might end up with nodes joining the wrong cluster. For instance you could use logging-dev, logging-stage, and
    # logging-prod for the development, staging, and production clusters
    ELASTIC_SEARCH_CLUSTER_NAME=CURRENT_HOST_NAME
    # 9200 is default port of elastic search
    # you can change ELASTIC_SEARCH_PORT value also if needed
    ELASTIC_SEARCH_PORT=9200
  2. Enter the following command to install Elasticsearch and plugins:

    ORACLE_HOME/oracle_common/common/bin/wlst.sh ORACLE_HOME/wcportal/es/installES.py ORACLE_HOME/wcportal/es/installES.properties

    The following is the sample output for the successful installation:
    .
    .
    .
    Successfully connected to Admin Server "AdminServer" that belongs to domain "wc_domain".
    
    
    Unziping /Oracle_Home/wcportal/es/elasticsearch.tar.gz...
    ...done
    -> Downloading file:////Oracle_Home/wcportal/es/webcenter-search-es-auth-plugin.zip
    [=================================================] 100%  
    -> Installed orcl-wcp-es-auth-plugin
    -> Downloading file:////sOracle_Home/wcportal/es/webcenter-search-es-crawl-ucm-plugin.zip
    [=================================================] 100%  
    -> Installed orcl-wcp-es-crawl-ucm-plugin
    Executing /Oracle_Home/esHome/startElasticsearch.sh
    Jul 26, 2017 3:50:41 AM oracle.security.jps.JpsStartup startWithRetry
    INFO: Jps initializing.
    Executing /Oracle_Home/esHome/stopElasticsearch.sh
    Executing Oracle_Home/esHome/startElasticsearch.sh
    Jul 26, 2017 3:51:36 AM oracle.security.jps.JpsStartup startWithRetry
    INFO: Jps initializing.
    Elasticsearch server started. Elasticsearch home is at /home/Oracle/product/esHome


    Note:

    If the number of documents associated with the WebCenter Portal is more than 100,000, you can set the value of ES_JAVA_OPTS in startElasticsearch.sh to a higher number. For example, 4g or 8g depending on the number of documents.

  3. After the successful installation, verify that the Elasticsearch is configured properly.
    1. Access the URL http://host:9200 using the Mozilla Firefox browser.

      A basic authentication dialog is displayed to enter the user name and password.

    2. Enter your crawl user name and password that you created in WebCenter Portal. See Creating a Crawl Admin User in WebCenter Portal.

      Successful login confirms that Elasticsearch Server is configured properly.

      Note:

      If you are unable to login or if Elasticsearch installation fails, check the logs in the following location:

      /home/Oracle/product/esHome/esNode/logs

Modifying the Default Connection Settings for Document Content Crawl Plugin in Elasticsearch Server

After installing Elasticsearch, you can modify the default connection settings for document content crawl plugin using the configuration file.

You can specify the following attributes in the configuration file:

  • es.wcc.connection.timeout is the connection time-out interval, in seconds. This is the amount of time Elasticsearch server will wait to establish the connection to the WebCenter Content server. The default value is 30 seconds.

  • es.wcc.read.timeout is the read time-out interval, in seconds. Once Elasticsearch server is connected to the WebCenter Content server, this attribute specifies the amount of time allowed for the WebCenter Content server to respond in a given request. The default value is 30 seconds.

  • es.wcc.max.connection.attempts is the maximum number of connection attempts to access the WebCenter Content server. The default value is 3.

To modify the default connection settings:
  1. In Elasticsearch server, navigate to the /home/Oracle/product/esHome/esNode/config directory and create the webcenter.properties file
  2. In the webcenter.properties file, add the following attributes and specify the required value.
    • es.wcc.connection.timeout

    • es.wcc.read.timeout

    • es.wcc.max.connection.attempts

    For example,
    es.wcc.connection.timeout=60
    es.wcc.read.timeout=60
    es.wcc.max.connection.attempts=5
  3. Save the file and restart Elasticsearch server.

Configuring WebCenter Content for Search

This topic describes how to configure WebCenter Content for search.

Note:

The following topics are applicable only if WebCenter Content is configured.

Creating a Crawl User in WebCenter Content

This procedure describes how to create a new crawl user in WebCenter Content.

If you want users with the admin role to crawl, then use an admin user account as the crawl user. If you want non-admin users to crawl, then create a new crawl user.

To create a crawl user in WebCenter Content:
  1. Log on to WebCenter Content as an Administrator.
  2. To create a role sescrawlerrole, do the following:
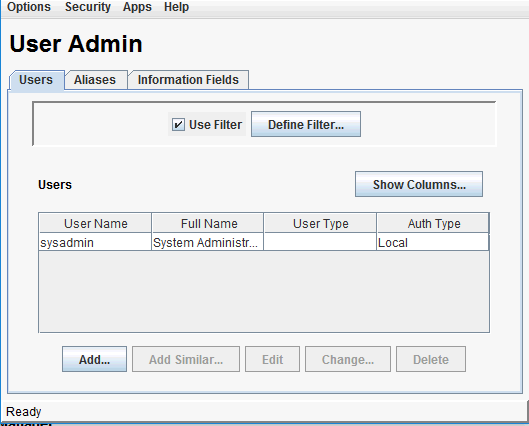
    1. On the WebCenter Content home page, select Admin Applets from the Administration menu.
    2. Select User Admin.
      The User Admin dialog opens.
    3. In the User Admin dialog, select Security tab, then Permissions by Role.
    4. In the Permissions By Role dialog, click Add New Role.
    5. In the Add New Role dialog, specify Role Name and Role Display Name as sescrawlerrole.
    6. Click OK.
  3. To create a user sescrawler, and assign the sescrawlerrole role to the user, do the following:
    1. On the WebCenter Content home page, select Admin Applets from the Administration menu.
    2. Select User Admin.
      The User Admin dialog opens.
    3. On the Users tab, click Add.
    4. Choose the Authentication Type as Local and click OK.
    5. In the Add User dialog, enter the name as sescrawler and specify password.
    6. On the Roles tab, click Add Role and select sescrawlerrole to assign the role to the user.
    7. Click OK.
    8. Close the User Admin dialog.
  4. On the WebCenter Content home page, expand Administration, then Admin Server. Select General Configuration and append the sceCrawlerRole=sescrawlerrole entry in the Additional Configuration Variables section.
  5. Restart WebCenter Content.

Configuring the SESCrawlerExport Component

Before you begin, verify that the SESCrawlerExport component is enabled. If not, enable the component (see Enabling the WebCenterConfigure Component) and restart the WebCenter Content server.

To configure the SESCrawlerExportcomponent for admin and non-admin users:
  1. Log on to WebCenter Content as a system administrator.
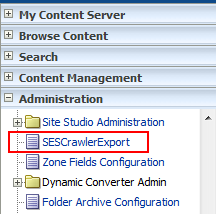
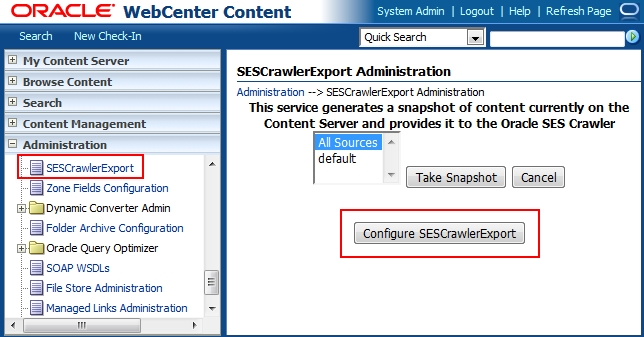
  2. On the WebCenter Content home page, expand Administration and select SESCrawlerExport.

    Figure 10-5 WebCenter Content Server Administration Menu

    This image shows the Administration Menu with the SESCrawlerExport component.
  3. On the SESCrawlerExport Administration page, click Configure SESCrawlerExport.

    Figure 10-6 SESCrawlerExport Administration Page

    This image shows the SESCrawlerExport Administration page with Configure SESCrawlerExport button.
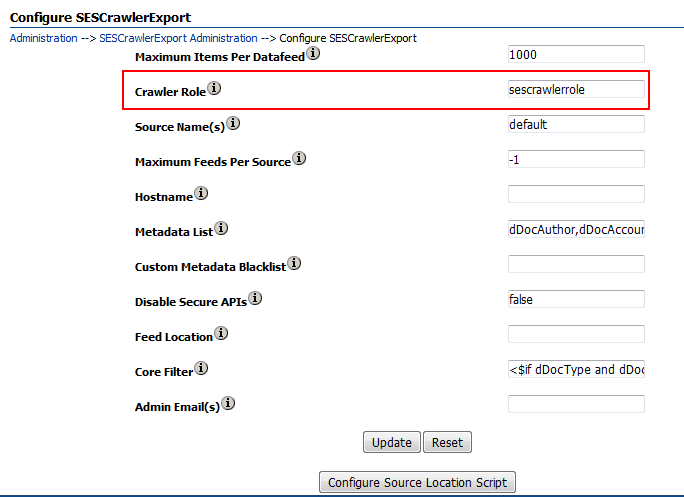
  4. On the Configure SESCrawlerExport page, set the value for Crawler Role.
    • If you want to configure SESCrawlerExport for an admin user, set the value for the Crawler Role as admin.
    • If you want to configure SESCrawlerExport for a non-admin user, set the value for the Crawler Role as sescrawlerrole.
    The following figure shows the Configure SESCrawlerExport page, where Crawler Role is set as sescrawlerrole for a non-admin user.

    Figure 10-7 Configure SESCrawlerExport Page

    This image shows the configure SESCrawlerExport page parameters and Update and Reset button.

  5. Click Update.
  6. Restart WebCenter Content.

Configuring WebCenter Portal for Search

To configure WebCenter Portal for search, you need to configure the connection between WebCenter Portal and Elasticsearch and grant the crawl application role to the crawl admin user. Finally, you have to configure the WebCenter Content crawl user in Elasticsearch.

Note:

Only one search connection can exist. Before running createSearchConnection WLST command, ensure that you delete any existing search connection.

To configure WebCenter Portal for search:
  1. Navigate to your Oracle home directory and invoke the WLST script.
  2. Connect to the Oracle WebCenter Portal domain (WC_Portal ) server.

  3. At the WLST command prompt, run the createSearchConnection WLST command to configure a connection between WebCenter Portal and Elasticsearch:
    createSearchConnection(appName, name, url, indexAliasName, appUser, appPassword)

    where

    • appName is the name of the application, for WebCenter Portal, the value is webcenter.

    • name is the connection name. The name must be unique within the application. For example dev-es.

    • url is the location of the Elasticsearch server. For example, http://host:9200.

    • indexAliasName is the name of the index alias in the Elasticsearch server. For example, webcenter_portal.

      The indices will be created using the alias as the prefix, as shown in the following example:

      • <indexAliasName>_portals For example, webcenter_portal_portals

      • <indexAliasName>_documents For example, webcenter_portal_documents

      Note: The name must be in lowercase alphanumeric characters and unique across all portal servers.

    • appUser is the crawl admin user name. For example, mycrawladmin.

    • appPassword is the crawl admin user password.

    The following example creates a connection between WebCenter Portal (webcenter) and Elasticsearch located at 'http://host:9200':

    createSearchConnection (appName='webcenter',name='dev-es', url='http://host:9200', indexAliasName='webcenter_portal', appUser='mycrawladmin', appPassword='welcome1')

  4. At the WLST command prompt, run the grantAppRole WLST command to grant the crawl application role to the crawl admin user created in WebCenter Portal. See Creating a Crawl Admin User in WebCenter Portal.
    grantAppRole(appStripe="webcenter", appRoleName="webcenter#-#defaultcrawl", principalClass="weblogic.security.principal.WLSUserImpl", principalName=“appUser”)

    where

    • appUser is the crawl admin user name created in WebCenter Portal. For example, mycrawladmin.

    The following example shows how to grant the crawl application role to the crawl admin user (mycrawladmin):

    grantAppRole(appStripe="webcenter", appRoleName="webcenter#-#defaultcrawl", principalClass="weblogic.security.principal.WLSUserImpl", principalName="mycrawladmin")

  5. At the WLST command prompt, run the createCred WLST command to configure the WebCenter Content crawl user in Elasticsearch.
    createCred(map="oracle.es.security", key="content.crawl.credentials", user='wcc-crawl-user', password='wcc-crawl-password', desc="UCM Crawl User")

    where,

    • wcc-crawl-user is the WebCenter Content crawl user. See Creating a Crawl User in WebCenter Content

    • wcc-crawl-password is the password of the WebCenter Content crawl user.

    • desc is the description of the WebCenter Content crawl user.

    The following example shows how to configure the WebCenter Content crawl user:

    createCred(map="oracle.es.security", key="content.crawl.credentials", user='sescrawler', password='welcome1', desc="UCM Crawl User")

Synchronizing Users in WebCenter Portal

Before performing a portal full crawl, we recommend you to run the LDAP synchronization WLST command to ensure that all users are available in portal.

To synchronize users in WebCenter Portal:
  1. Navigate to your Oracle home directory and invoke the WLST script.
  2. Connect to the Oracle WebCenter Portal domain (WC_Portal ) server.
  3. At the WLST command prompt, run the startSyncProfiles WLST command to synchronize profile information.
    startSyncProfiles(appName='webcenter')

    Note:

    Synchronizing profile information may take some time depending on the number of users.

  4. Run the isSyncProfilesRunning command to verify that the user synchronization is complete.
    isSyncProfilesRunning(appName='webcenter')

Configuring Search Crawlers

You can configure the following types of crawlers to index WebCenter Portal resources:

  • Portal Crawler: This uses the Portal crawl source to crawl certain objects, such as lists, page metadata, portals, and profiles.

  • Documents Crawler: This uses the Documents crawl source to crawl documents, including wikis and blogs.

  • Discussions Crawler: This uses the Discussions crawl source to crawl discussion forums and announcements. This option is available only for portals upgraded from prior releases that include Discussions.

The following topics describe how to create different crawl sources using Scheduler UI in WebCenter Portal Administration:

Creating a Portal Crawl Source

To create a crawl source to crawl objects such as lists, page metadata, portals, and profiles:
  1. On the Settings page (see Accessing the Settings Pages in WebCenter Portal Administration), click Tools and Services.

    You can also enter the following URL in your browser to navigate directly to the Tools and Services pages:

    http://host:port/webcenter/portal/admin/settings/tools
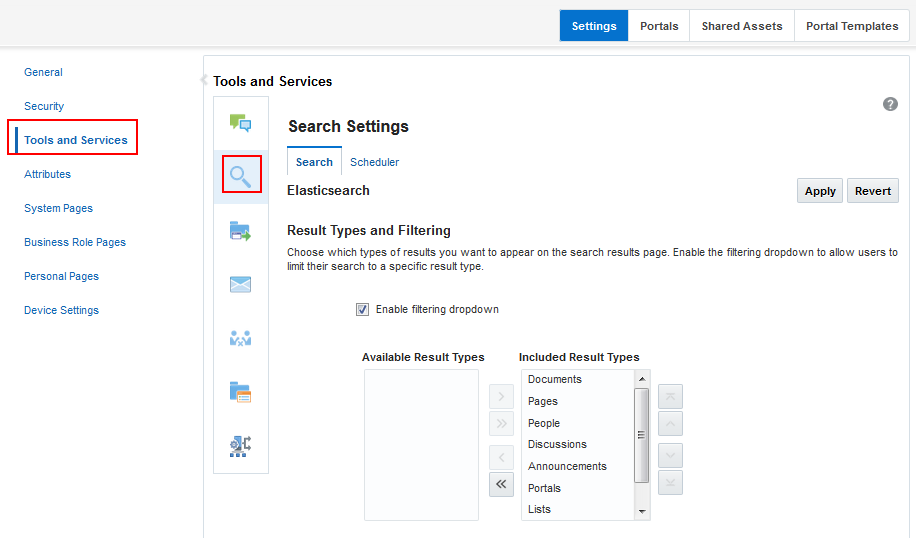
  2. Click the icon for Search to open the Search Settings page.

    Figure 10-8 Elasticsearch Settings

    The figure shows the search setting options in the Search Setting page, such as search scope, custom attributes.
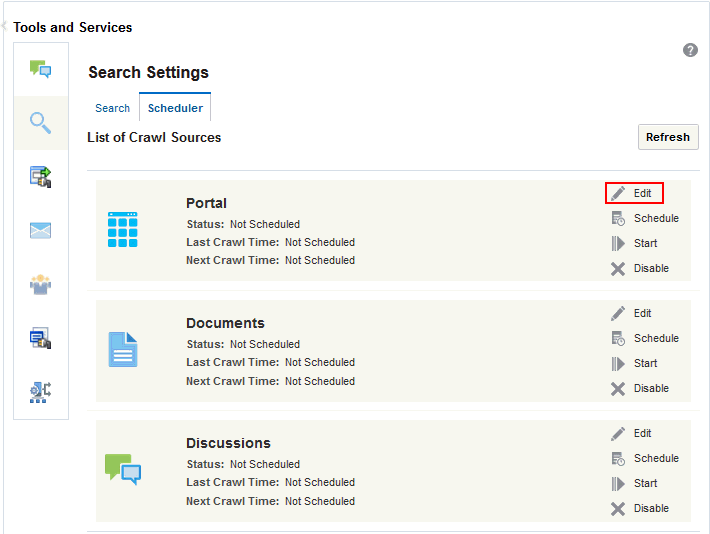
  3. On the Scheduler tab, select the Portal crawl source and click Edit.

    Figure 10-9 Elastic Search Setting Scheduler

    This image shows the Search Settings page.
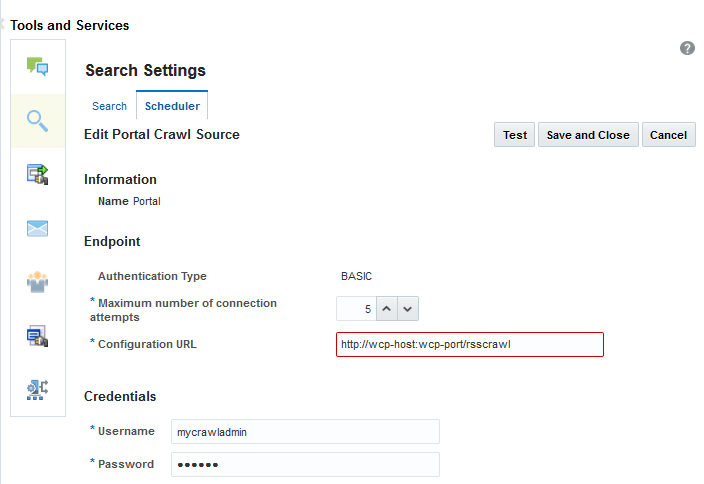
  4. On the Edit Portal Crawl Source page, modify the following source parameters as desired:
    • Maximum number of connection attempts: Maximum number of connection attempts to access the configuration URL. Choose number from 2 to 10.

    • Configuration URL: URL of the RSS crawl servlet. For example: http://wcp-host:wcp-port/rsscrawl

    Figure 10-10 Elastic Search Edit Portal Crawl Source

    This image shows the Edit Portal Crawl Source page.
  5. Enter the WebCenter Portal crawl admin user credentials.
  6. Click Test to test the connection.
  7. Click Save and Close to save the changes.

Creating a Documents Crawl Source

If you have configured WebCenter Content, you can create a crawl source for documents, including wikis and blogs:
  1. On the Settings page (see Accessing the Settings Pages in WebCenter Portal Administration), click Tools and Services.

    You can also enter the following URL in your browser to navigate directly to the Tools and Services pages:

    http://host:port/webcenter/portal/admin/settings/tools
  2. Click the icon for Search to open the Search Settings page.
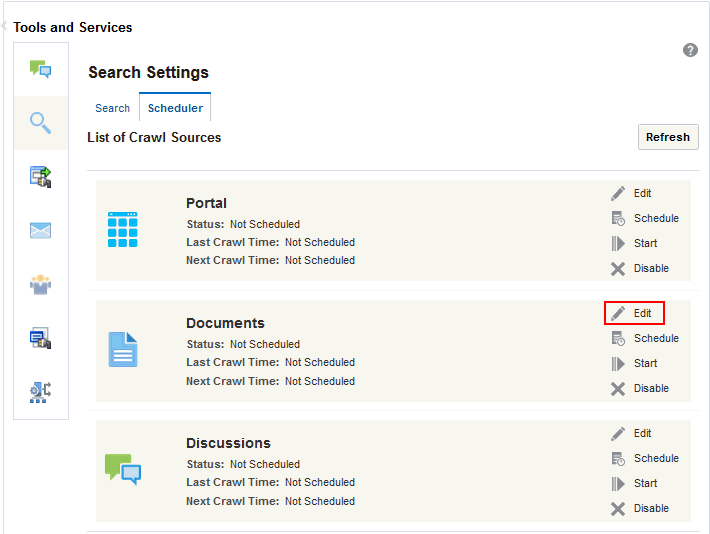
  3. On the Scheduler tab, select the Documents crawl source and click Edit.

    Figure 10-11 Elastic Search Setting Scheduler

    This image shows the Search Settings page.
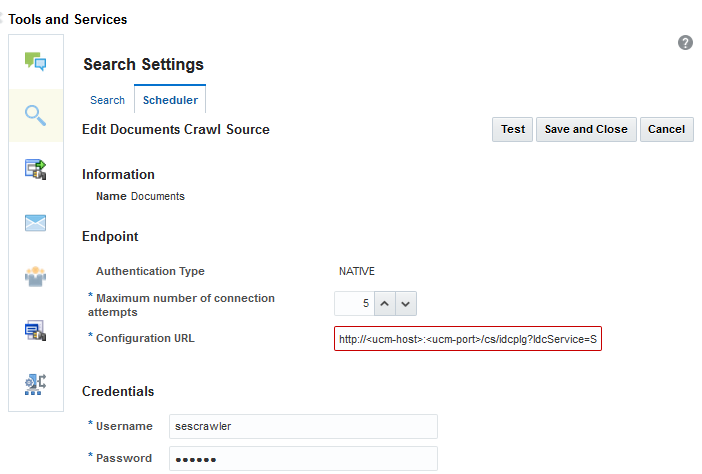
  4. On the Edit Document Crawl Source page, modify the following source parameters as desired:
    • Maximum number of connection attempts: Maximum number of connection attempts to access the configuration URL. Choose number from 2 to 10.

    • Configuration URL: URL of the Webcenter Content SESCrawlerExport component.

      For example: http://wcc-host:wcc-port/cs/idcplg?IdcService=SES_CRAWLER_DOWNLOAD_CONFIG&source=source_name

      The source_name must be one of the strings used in the WebCenter Content SESCrawlerExport component Source Name (sceSourceName) parameter. 

      For more information on SESCrawlerExport parameters, see Configuring SESCrawlerExport Parameters in Administering Oracle WebCenter Content.

      For example: http://host.example.con:port/cs/idcplg?IdcService=SES_CRAWLER_DOWNLOAD_CONFIG&source=esDS

    Figure 10-12 Elastic Search Edit Document Crawl Source

    This image shows the Edit Documents Crawl Source page.
  5. Enter the WebCenter Content crawl admin user login credentials.
  6. Click Test to test the connection.
  7. Click Save and Close to save the changes.

Taking a Snapshot of the Content

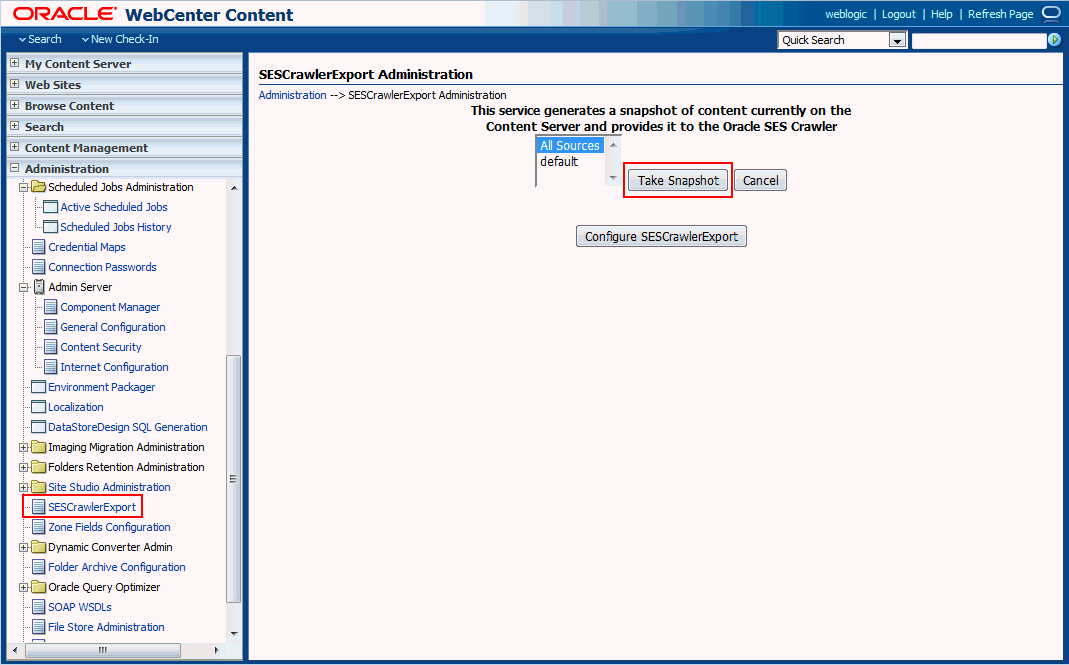
The snapshot generates a configFile.xml file at the location specified by the SESCrawlerExport component FeedLoc parameter. XML feeds are created in the subdirectory with the source name; for example, wikis. Performing a snapshot can take some time depending on the number of items you have stored on the Content Server instance and how many sources you are generating.

Note:

It is important to take a snapshot before the first crawl or any subsequent full crawl of the source.

To take a snapshot of the content:
  1. Log on to WebCenter Content as a system administrator.
  2. From the Administration drop-down list, select SESCrawlerExport.
  3. Select All sources, and click Take Snapshot.

Creating a Discussions Crawl Source

This option is available only for portals upgraded from prior releases that use Discussions. To create a crawl source to crawl discussion forums and announcements:
  1. On the Settings page (see Accessing the Settings Pages in WebCenter Portal Administration), click Tools and Services.

    You can also enter the following URL in your browser to navigate directly to the Tools and Services pages:

    http://host:port/webcenter/portal/admin/settings/tools
  2. Click the icon for Search to open the Search Settings page.
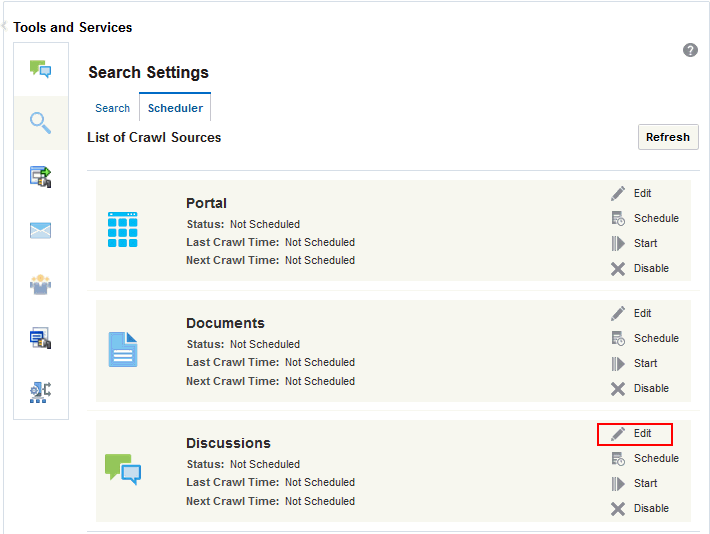
  3. On the Scheduler tab, select the Discussions crawl source and click Edit.

    Figure 10-13 Elasticsearch Setting Scheduler

    This image shows the Elasticsearch Setting Scheduler.
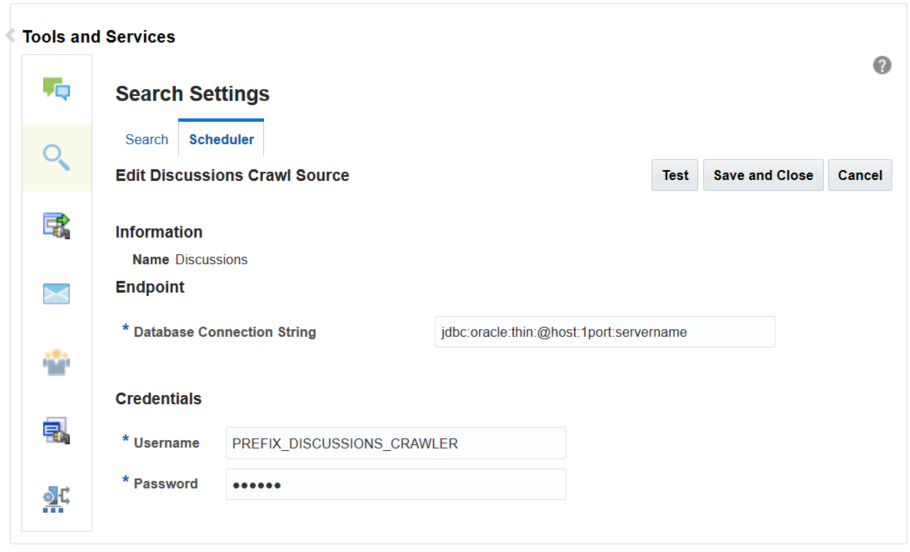
  4. On the Edit Discussions Crawl Source page, modify the following source parameter as desired:
    • Database Connection String: jdbc url of the Discussions schema. The format of the string is jdbc:oracle:thin@host:port:servername.

    Figure 10-14 Elastic Search Edit Document Crawl Source

    Thus image shows the Edit Discussions Crawl Source page.
  5. Enter the Discussions crawler schema user name (for example, Prefix_Discussions_Crawler) and password.
  6. Click Test to test the connection.
  7. Click Save and Close to save the changes.

Modifying Elasticsearch Global Attributes

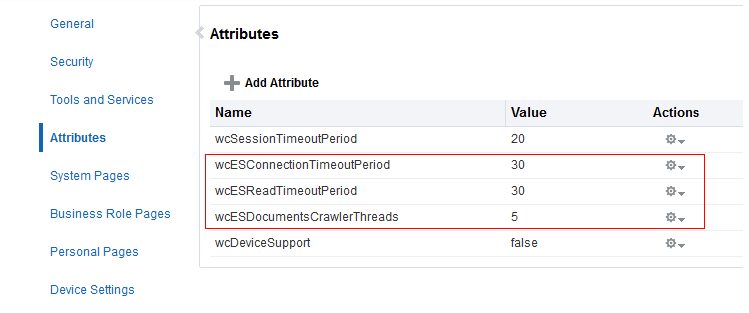
WebCenter Portal uses Elasticsearch to index and search the objects. The attributes wcESConnectionTimeoutPeriod and wcESReadTimeoutPeriodare used to configure the interaction between WebCenter Portal and Elasticsearch. The wcESDocumentsCrawlerThreads attribute is used to configure the number of threads required to process the crawling of documents.

The following are the attributes:

  • wcESConnectionTimeoutPeriod is the connection timeout interval, in seconds. This is the amount of time WebCenter Portal will wait to establish the connection to the Elasticsearch server. The default value is 30 seconds.

  • wcESReadTimeoutPeriod is the read timeout interval, in seconds. Once WebCenter Portal is connected to the Elasticsearch server, this specifies the amount of time allowed for the Elasticsearch server to respond in a given request. The default value is 30 seconds.

  • wcESDocumentsCrawlerThreads: The tasks for crawling the documents for search are handled in threads. This is done by creating a thread pool with a fixed number of threads, where each thread handles the crawl for the documents. The attribute wcESDocumentsCrawlerThreads can be used to specify the number of threads used to create a thread pool. The default value is 10. If a thread is not available for a crawl task, the task is in queue, waiting for other task to complete.

You can modify the default value of the attributes in Attributes page in WebCenter Portal administration. After you modify the value, you must restart the WebCenter Portal server for the changes to take effect.

To modify the default value:
  1. On the Settings page, click Attributes.

    Figure 10-15 Attributes for Elasticsearch Settings

    This screenshot shows the Attributes page.
  2. On the Attributes page, click the Actions icon for the attribute and select Edit Attribute.
  3. In the Edit Attribute dialog, modify the attribute Value.
  4. Click OK.
  5. Restart WebCenter Portal.

Configuring Search Custom Attributes for Elasticsearch

When you search using WebCenter Portal, only certain predefined attributes show up in the search results. WebCenter Portal allows you to see additional attributes in your search results. This can be achieved from the Search Setting page in portal administration, where the Custom Attributes section lets you select which custom search attributes should appear in search results and the order in which they appear. This list in the Search Setting page is driven by search-service-attributes.xml. It contains list of all attributes that we crawl for each service. Types in elastic search index is defined by this metadata. You can add a new custom attribute or modify the existing one in the search-service-attributes.xml file.

The following procedure describes how to add a new search custom attribute using Document service as an example.

To add a new search custom attribute:
  1. Update the metadata list on Oracle WebCenter Content SESCrawlerExport component:
    1. Log on to Oracle WebCenter Content as a system administrator.
    2. On the WebCenter Content home page, expand Administration and select SESCrawlerExport.

      Figure 10-16 WebCenter Content Server Administration Menu

      This image shows the Administration Menu with the SESCrawlerExport component.

    3. On the SESCrawlerExport Administration page, click Configure SESCrawlerExport.

      Figure 10-17 SESCrawlerExport Administration Page

      This image shows the SESCrawlerExport Administration page with Configure SESCrawlerExport button.

    4. On the Configure SESCrawlerExport page, append the Metadata list with the new custom attribute.

      In this example, Web Site Object Type custom attribute (xWebsiteObjectType) content is added to the metadata.

      List.dDocAuthor,dDocAccount,dDocCreatedDate,dDocCreator,dDocFunction,dDocLastModifiedDate,dDocLastModifier,dDocName,
      dID,dDocType,dFileSize,dFormat,dOriginalName,dOutDate,dRevLabel,dSecurityGroup,fParentGUID,sceHostname,xClbraRoleList,
      xClbraUserList,xComments,xIdcProfile,xLibraryGUID,xWCTags,xWCWorkflowApproverUserList,xWCWorkflowAssignment,
      xAnnotationDetails,dDocTitle,xRegionDefinition, xWebsiteObjectType
  2. Add a new custom attribute to the search-service-attributes.xml file:
    1. At the WLST command prompt, run the exportMetadata WLST command to export the latest search-service-attributes.xml file from MDS repository:
      exportMetadata('webcenter', 'WC_Portal', toLocation='/tmp/es', docs='/oracle/webcenter/search/scopedMD/
      s8bba98ff_4cbb_40b8_beee_296c916a23ed/search-service-attributes.xml')
    2. Add the new custom attribute to the search-service-attributes.xml file.

      In this example, Web Site Object Type is added to the search-service-attributes.xml file under the oracle.webcenter.doclib service ID:

      <service id="oracle.webcenter.doclib">
          <attribute name="author" displayNameKey="WC_AUTHOR" displayName="Author" type="keyword"/>
          <attribute name="doc_author" displayNameKey="WC_DOC_AUTHOR" displayName="Author" type="keyword" backendAttribute="dDocAuthor"/>
             … 
             …
             …
             …
         <attribute name="wcsecattr" displayNameKey="WC_SECATTR" displayName="Security Attributes" type="keyword" hidden="true"/>
         <attribute name="wcsecattr_deny" displayNameKey="WC_SECATTRDENY" displayName="Security Deny Attributes" type="keyword" hidden="true"/>
         <attribute name="xWebsiteObjectType" displayNameKey="WC_xWebsiteObjectType" displayName="Web Site Object Type" 
      type="keyword" backendAttribute="xWebsiteObjectType"/>
      </service>
    3. Save and import the updated search-service-attributes.xml file to the MDS repository using the importMetada WLST command:
       
      importMetadata('webcenter', 'WC_Portal', fromLocation='/tmp/es', docs='/oracle/webcenter/search/scopedMD/
      s8bba98ff_4cbb_40b8_beee_296c916a23ed/search-service-attributes.xml')
  3.  Start a full crawl for the new custom attribute to appear in the Search Settings page. See Manually Starting a Full Crawl.
  4. Access the Search Settings page in portal administration and verify if the new attribute is appearing in the Available Attributes under Custom Attributes section.

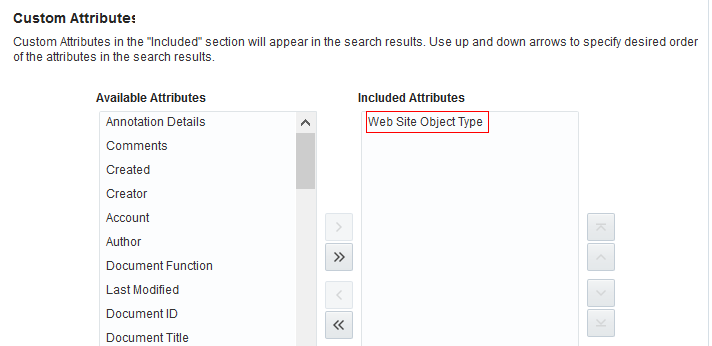
    In this example, Web Site Object is the newly added custom attribute.

    Figure 10-18 Verifying the Newly Added Custom Attribute

    Description of Figure 10-18 follows
    Description of "Figure 10-18 Verifying the Newly Added Custom Attribute"
  5. Select the newly added custom attribute from the list of Available Attributes and move it to the Included Attributes column so that they appear in search results.
  6. Click Apply.
  7. Navigate to your portal and enter a search term in the global search field and click the search icon.

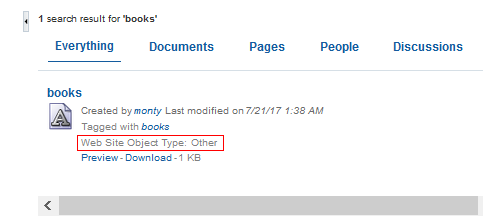
    The following figure shows search results that include the newly created custom attributes, Web Site Object :

    Figure 10-19 Search Results with the Created Custom Attribute

    Description of Figure 10-19 follows
    Description of "Figure 10-19 Search Results with the Created Custom Attribute"

Scheduling a Crawl

You can schedule an incremental search crawl or manually start a full crawl. The topics in this section describe how to schedule a crawl and how to start, enable, or disable a crawl.

Scheduling an Incremental Crawl

By default, the crawler is set to manual, but you can specify a different frequency, such as hourly or daily:
  1. On the Settings page (see Accessing the Settings Pages in WebCenter Portal Administration), click Tools and Services.

    You can also enter the following URL in your browser to navigate directly to the Tools and Services pages:

    http://host:port/webcenter/portal/admin/settings/tools
  2. Click the icon for Search to open the Search Settings page.
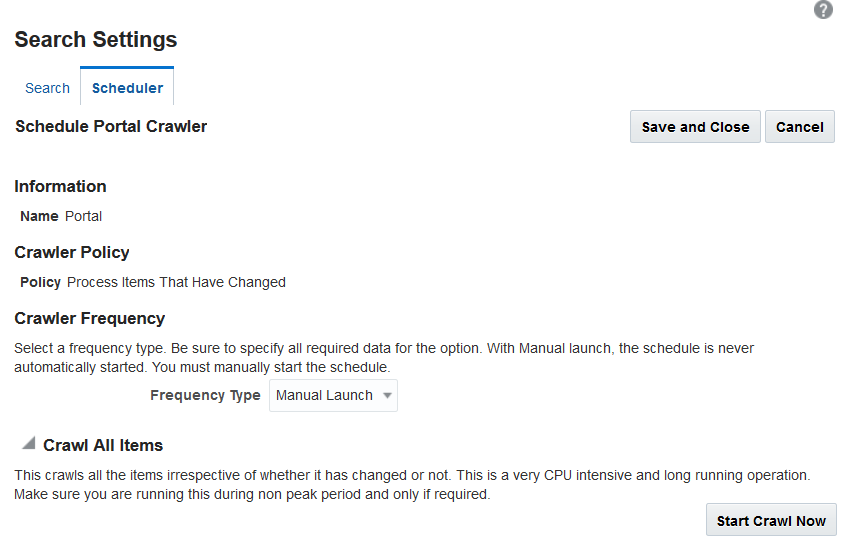
  3. On the Scheduler tab, select the Portal crawl source and click Schedule to open the Schedule Portal Crawler page.

    Figure 10-20 Elastic Search Schedule Portal Crawler

    This image shows the Schedule Portal Crawler page.
  4. From the Frequency Type list, select the required frequency type.
    Option Description

    Manual Launch

    This is the default crawler frequency type.

    Hourly

    Select the following option:

    • Time Between Launches in hours

    Daily

    Select the following options:

    • Time Between Launches in days

    • Schedule Launching Time

    Weekly

    Select the following options:

    • Time Between Launches in weeks

    • Schedule Launching Time: Select the day of the week and the time from 1 to 12 AM and PM

  5. Click Save and Close.

Enabling and Disabling a Scheduled Crawl

When a crawl is in progress, you cannot disable it. To enable and disable the schedule defined for a crawl:
  1. On the Settings page (see Accessing the Settings Pages in WebCenter Portal Administration), click Tools and Services.

    You can also enter the following URL in your browser to navigate directly to the Tools and Services pages:

    http://host:port/webcenter/portal/admin/settings/tools
  2. Click the icon for Search to open the Search Settings page.
  3. On the Scheduler tab, select the crawl source that you want to modify and click Enable to activate the schedule defined for the crawl or click Disable to stop the crawl schedule.

Manually Starting a Full Crawl

You can manually start a full crawl to crawl all items in WebCenter Portal. Start a full crawl only during non-peak times as it is time-consuming. A full crawl must be manually started and cannot be scheduled to run automatically.

To start a full crawl:

  1. On the Settings page (see Accessing the Settings Pages in WebCenter Portal Administration), click Tools and Services.

    You can also enter the following URL in your browser to navigate directly to the Tools and Services pages:

    http://host:port/webcenter/portal/admin/settings/tools
  2. Click the icon for Search to open the Search Settings page.
  3. On the Scheduler tab, select the crawl source and click Schedule to open the Schedule Portal Crawler page.

    Figure 10-21 Elastic Search Schedule Portal Crawler

    This image shows the Schedule Portal Crawler page.
  4. Click Start Crawl Now.
  5. Click Save and Close to save the changes.

Manually Starting an Incremental Crawl

To start an incremental crawl:
  1. On the Settings page (see Accessing the Settings Pages in WebCenter Portal Administration), click Tools and Services.

    You can also enter the following URL in your browser to navigate directly to the Tools and Services pages:

    http://host:port/webcenter/portal/admin/settings/tools
  2. Click the icon for Search to open the Search Settings page.
  3. On the Scheduler tab, select the crawl source and click Start.

    WebCenter Portal immediately starts an incremental crawl for the selected crawl source.

Customizing Search Settings in WebCenter Portal Administration

You can customize Result Types and Filtering, Search Scope, Facets, and Custom Attributes on the Search Settings page in WebCenter Portal Administration. Portal managers can reset only the search scope for the portals that they manage.

To customize search settings for Elasticsearch:
  1. On the Settings page (see Accessing the Settings Pages in WebCenter Portal Administration), click Tools and Services.

    You can also enter the following URL in your browser to navigate directly to the Tools and Services pages:

    http://host:port/webcenter/portal/admin/settings/tools
  2. Click the icon for Search to open the Search Settings page.

    Figure 10-22 Elasticsearch Settings

    The figure shows the search setting options in the Search Setting page, such as search scope, custom attributes.
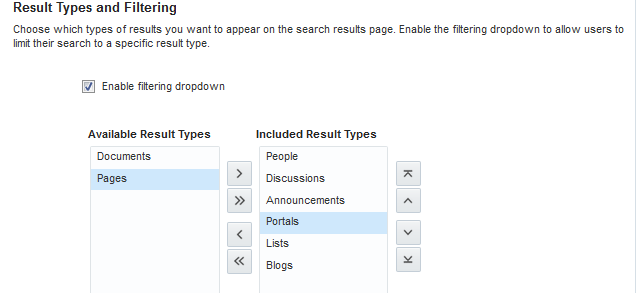
  3. On the Search tab, select Enable filtering dropdown to enable filtering the search results based on selected services.

    Figure 10-23 Elastic Search Settings-Result Types and Filtering

    This figure shows the result types available in WebCenter Portal and Enable filtering dropdown is selected.
  4. Select the types of results to be included in the search result by moving them between the Available Result Types and Included Result Types.
  5. Set the search scope to include search results for the Home portal only or all portals (including the Home portal).

    Figure 10-24 Elasticsearch Settings - Search Scope

    This figure shows the available search scope. In this example, All Portals option is selected.
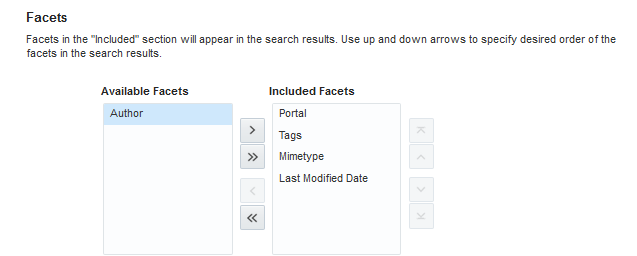
  6. Select which facets to display with search results and the order in which they appear by moving them between the Available Facets and Included Facets lists.

    Figure 10-25 Elasticsearch Settings - Facets

    This figure shows the available facets. There are two section, Available and Included.
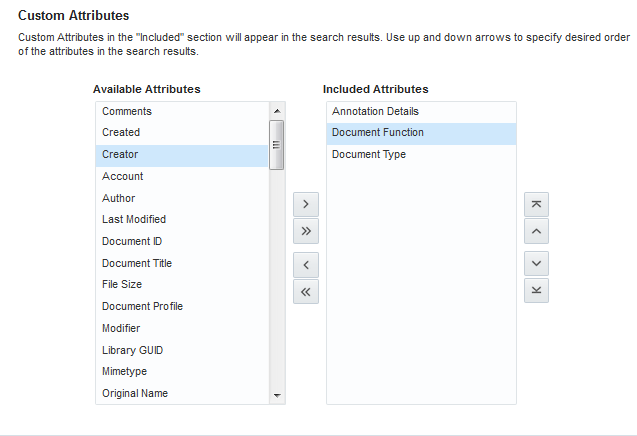
  7. In the Custom Attributes section, select which custom search attributes should appear in search results and the order in which they appear by moving the attributes to the Included Attributes section.

    Figure 10-26 Elasticsearch Settings - Custom Attributes

    This figure shows the available Custom Attributes. There are two section, Available Attributes and Included.
  8. Click Apply.