3 Working with Portal Templates

Portal templates provide a consistent look and feel for new portals. You can use the built-in portal template or create new custom portal templates to meet your portal requirements.

Permissions:

To perform the tasks in this chapter, you must have the default permissions of the Authenticated-User role, or the application-level permission Portal Templates: Create Portal Templates. Note that the Portal Creator role does not have this permission by default. Users with this permission can create, rename, set access to, and delete their own portal templates on the Portal Templates page in either the Home portal or WebCenter Portal administration. This permission does not allow users to import, export, or publish portal templates.

With the default permissions of the Application Specialist role, or the Portal Templates: Manage All permission, you can manage all portal templates in WebCenter Portal on the Portal Templates page in WebCenter Portal administration. Create, rename, set access to, delete, publish, hide, and import or export portal templates. See Managing All Portal Templates.

About Portal Templates

When you create a portal, you can base it on the built-in portal template, your own custom portal template, or a published portal template created by others. Portal templates provide a consistent look and feel and an efficient way to get started in creating a portal that is configured as required by an organization.

Use the Portal Templates page in either the Home portal or WebCenter Portal administration to manage the portal templates available to you. With the Portal Templates: Create Portal Templates permission can create, rename, set access to, and delete your own portal templates. This permission does not allow you to import, export, or publish portal templates.

With the default permissions of the Application Specialist role, or the Portal Templates: Manage All permission, you can create, rename, set access to, delete, publish, hide, and import or export portal templates.

A portal template may include custom attributes that can be set as needed during the creation of a new portal. For example, a portal template for product development team portals may provide an attribute that can be set to a specific product ID to populate the portal appropriately when it is created.

After you create a portal based on a particular portal template, you can modify the portal as desired, such as changing the page template and skin used by the portal, which affects the look and feel of the portal. In this way, your portal may evolve to look very different to the original portal template design. You can subsequently save such a portal as a new custom portal template if you wish to use it as the basis for new portals.

About the Built-In Portal Template

WebCenter Portal provides a single built-in portal template that you can select when creating a new portal.

  • Portal—Generic template for building a new portal, designed to accommodate the latest features of WebCenter Portal.

About Custom Portal Templates

You can create a custom portal template to allow for quickly creating new portals with a required design, or designed to solve a business process need.

A custom portal template may be simple, or may include robust functionality such as:

  • Preseeded data, such as documents, lists, member information (including roles), pages, or assets. When you select such a template to build a new portal, the new portal includes all the preseeded data.

  • Permissions, either simple permissions or advanced permissions, if advanced permissions are specified in the base portal from which the template is created.

  • Limited available page styles and resource catalogs in order to create a safe environment for users to build portals with little support. Such a portal template could even include necessary custom documentation and references.

  • If custom page permissions are specified for roles or individual users in a portal that is used to create a new portal template, then only the custom page permissions specified for the roles (not users) are included in the portal template (and subsequently in a portal that is created using the portal template).

  • Custom Java code that executes when you select the template for a new portal. For example, custom code may include logic to automatically create a mailing list for a new portal. See Developing Shared Libraries in Developing for Oracle WebCenter Portal.

About the Built-In Portal Template

WebCenter Portal provides a single built-in portal template that you can select when creating a new (see Creating a New Portal):

  • Portal—Generic template for building a new portal, designed to accommodate the latest features of WebCenter Portal.

About Custom Portal Templates

You can create a custom portal template to allow users to quickly create new portals designed to solve a business process need.

A custom portal template may be simple, or may include robust functionality such as:

  • Preseeded data, such as discussions, documents, lists, member information (including roles), pages, or assets. When you select such a template to build a new portal, the new portal includes all the preseeded data.

  • Permissions, either simple permissions or advanced permissions, if advanced permissions are specified in the base portal from which the template is created.

  • Limited available page styles and resource catalogs in order to create a safe environment for users to build portals with little support. Such a portal template could even include necessary custom documentation and references.

  • If custom page permissions are specified for roles or individual users in a portal that is used to create a new portal template, then only the custom page permissions specified for the roles (not users) are included in the portal template (and subsequently in a portal that is created using the portal template).

  • Custom java code that executes when you select the template for a new portal. For example, custom code may include logic to automatically create a mailing list for a new portal. For more information, see Developing Shared Libraries in Developing for Oracle WebCenter Portal.

Viewing Available Portal Templates

To see a list of the portal templates available to you, click the Portal Templates tab in the Home portal.

If the Portal Templates tab is not exposed in the Home portal, open the Personalize Pages page and select the Show Page check box for the Portal Templates page.

Tip:

The way you access the Personalize Pages page depends on the page template in use. For example, you may access it through an Actions Actions icon menu.

Figure 3-1 Portal Templates Page in Home Portal

Description of Figure 3-1 follows
Description of "Figure 3-1 Portal Templates Page in Home Portal"

Creating a New Portal Template

You cannot modify the built-in portal template, but any user with Portal Templates: Create Portal Templates permission can create new portal templates for use by all users to create portals. This permission is granted to the Authenticated User role by default.

To create a new portal template, you start by creating a portal based on an existing template, and customize it according to your requirements. Then, you can create a new portal template based on the customized portal that you have developed. During the creation of a portal template, you can select to inherit the documents, lists, member information, roles, or pages from the source portal. The security settings, including Advanced Permissions (if applicable), for the source portal are also copied by the template.

Users with the default permissions of the Application Specialist role (or any user with Portal Templates: Manage All permission) can publish any portal template for others to use; otherwise, it remains private and hidden from others.

Note:

The Portal Creator role does not have default permissions to create or manage portal templates.

To create a portal template:

  1. Go to the Portal Templates page in either the Home portal or WebCenter Portal administration:
    • In the Home portal, click the Portal Templates tab. If this tab is not showing, click the Actions icon and select Personalize Pages, where you can select Show Page.

    • From the Portals menu, select Administration, then click the Portal Templates tab.

  2. Click Create to open the Create dialog.

    Note:

    There must be at least one portal available to use as the basis for the new portal template. Otherwise, Create is not active.

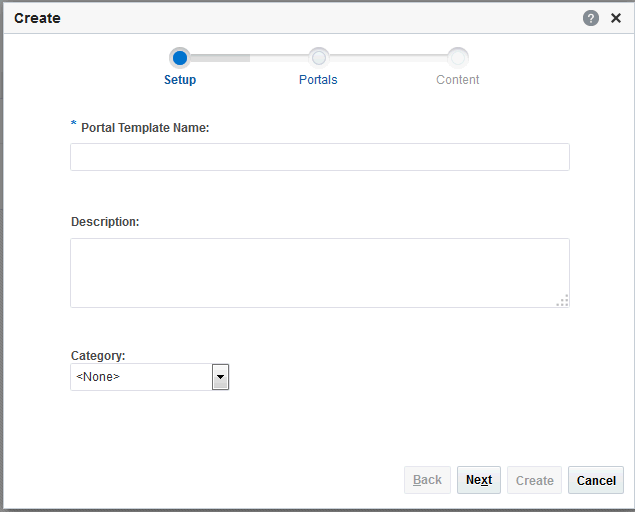
    Figure 3-2 Create a Portal Template Dialog: Setup Step

    Description of Figure 3-2 follows
    Description of "Figure 3-2 Create a Portal Template Dialog: Setup Step"
  3. In the Setup step, enter a suitable Portal Template Name and (optionally) Description. Enter a name that describes the portal template and other WebCenter Portal users will recognize. You can later rename the template as desired.

    Portal template names can contain only alphanumeric characters and underscores (spaces and special characters, such as & and #, are not allowed). The maximum allowable length is 200 characters. The following reserved keywords are not allowed as the full portal template name in either upper or lower case, or a combination of both—admin, builder, group, groups, home, last, page, pages, my portals, my spaces, portal, portals, space, spaces, system, webcenter, webcenter administration, WebCenter Portal, webcenter portals, webcenter space, webcenter spaces. These reserved words are allowable as part of a longer name (for example, Sales Group).

    Note:

    WebCenter Portal removes any unsupported special characters (such as -) and character spaces in the display name specified here to derive the initial internal name for the portal template. For example, a display name My Mega-Template generates the internal name MyMegaTemplate.

  4. From the Category list, select a category under which to list the portal template when creating a portal, or leave as <None> if no category is suitable, then click Next.

    In the portal creation wizard, the portal template will be listed under the selected category heading, or under More... if you do not select a category.

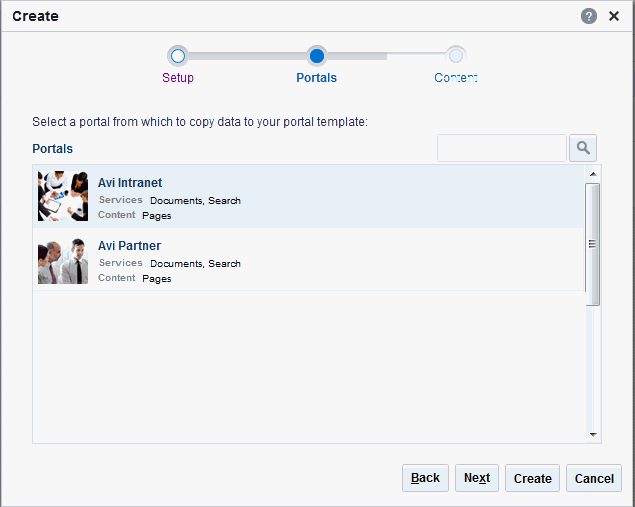
  5. In the Portals step, select a portal from the list (which displays portals that you created or have permissions to manage) to use as the basis for your new portal template, then click Next.

    Figure 3-3 Create a Portal Template Dialog: Portals Step

    Description of Figure 3-3 follows
    Description of "Figure 3-3 Create a Portal Template Dialog: Portals Step"
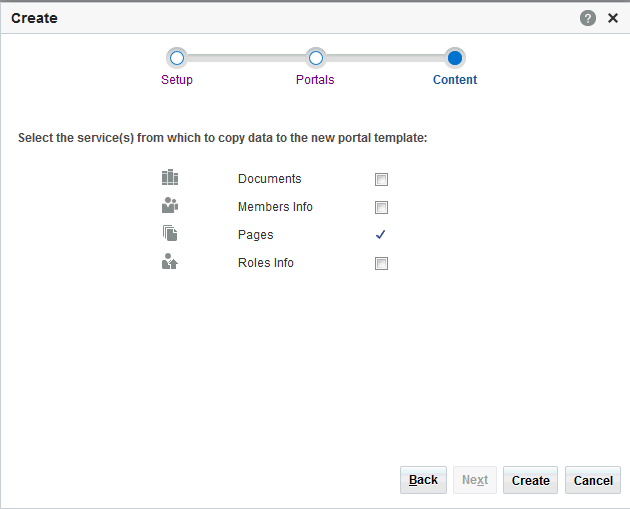
  6. In the Content step, select the services that contain data that you want the portal template to inherit from the parent portal.

    Note:

    • The security settings of all pages in the new portal template default to Inherit Parent Security so that the pages in all portals created from the portal template initially inherit access settings from the permissions established for the portal.

    • List definitions are always copied; checking Lists in this step specifies that you want to copy the list data, too.

    • By default, all portal assets are copied. If you do not want your template to inherit all portal assets, you can later edit the portal template to remove individual assets (such as task flows or data controls) that you do not want to include.

    • If you select Members Info, the Roles Info option is also selected. By selecting Members Info, you are copying the portal members and custom roles from the portal you selected as the basis for the new template into the new template that you are creating.

    • If you select Roles Info and do not select Members Info, you are copying only the roles into your new template. Only the custom roles that are included in the portal you selected as the basis for the new template are copied into the new template.

    • If Advanced Permissions has been specified in the portal that is used to create a new portal template and you select both Members Info (and by default Roles Info) or only Roles Info when creating the portal template, then the specified advanced permissions are included in the portal template (and subsequently in a portal that is created using the template).

    • If custom page permissions are specified for roles or individual users in a portal that is later used to create a new portal template, then only the custom page permissions specified for the roles (not individual users) are included in the portal template (and subsequently in a portal that is created using the portal template).

    Figure 3-4 Create a Portal Template Dialog: Content Step

    Description of Figure 3-4 follows
    Description of "Figure 3-4 Create a Portal Template Dialog: Content Step"
  7. Click Create.
    • The new portal template displays on your Portal Templates page in the Home portal and on the Portal Templates page in WebCenter Portal administration.

    • By default, the template is private, which means that other users will not see it on their Portal Templates page in the Home portal, and it is not available for selection when they create a new portal.

    • Users granted the Portal Templates: Manage All permission can manage all portal templates and make them public.

Viewing Information About a Portal Template

Note:

The Portal Creator role does not have default permissions to view or manage portal templates.

To view information about a portal template:

  1. Go to the Portal Templates page in either the Home portal or WebCenter Portal administration:
    • In the Home portal, click the Portal Templates tab. If this tab is not showing, click the Actions icon and select Personalize Pages, where you can select Show Page.

    • From the Portals menu, select Administration, then click the Portal Templates tab.

  2. Click in the row of the portal template that you want to learn about, then from the Actions menu, select About Portal Template.

    The About Portal Template dialog opens.

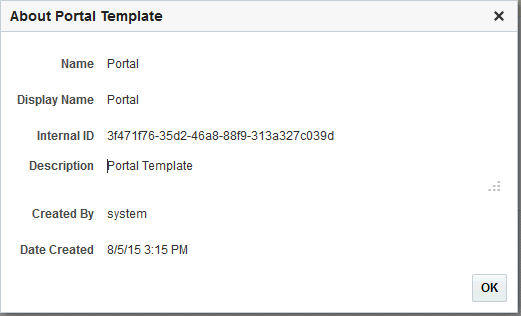
    Figure 3-5 About Portal Template Dialog

    Description of Figure 3-5 follows
    Description of "Figure 3-5 About Portal Template Dialog"
  3. Explore the information in the About Portal Template dialog:
    • Name: Internal name of the portal template displayed in the portal URL. You cannot change the internal name of a portal template.

    • Display Name: Display name of the portal template. This name displays in places where the templates are available for selection, such as the Create a Portal dialog and the Portal Templates page. You cannot change the display name of an out-of-the-box portal template. To change the display name of a custom portal template that you create, see Renaming a Portal Template.

    • Internal ID: ID of the portal template, which other applications may use to reference this portal template.

    • Description: A description of the portal template, specified when creating the portal template. You cannot modify the description of a portal template, unless you rename the template, where you can enter a new description in the Rename dialog, as described in Renaming a Portal Template.

    • Created By: User name of the portal template creator.

    • Date Created: Date and time that the portal template was created.

Searching for a Portal Template

Global search does not search portal assets, such as portal templates, page templates, resource catalogs, and so on. The Filter field on the Portal Templates page is useful for searching for portal template names or descriptions when your application includes a large number of portal templates.

Note:

The Portal Creator role does not have default permissions to view or search for portal templates.

To search for a portal template by a string in the Name or Description:

  1. Go to the Portal Templates page in either the Home portal or WebCenter Portal administration:
    • In the Home portal, click the Portal Templates tab. If this tab is not showing, click the Actions icon and select Personalize Pages, where you can select Show Page.

    • From the Portals menu, select Administration, then click the Portal Templates tab.

  2. In the Filter field, enter a search string and click the Filter icon.

    Figure 3-6 Filter Icon

    Filter Icon

    The Portal Templates page displays portal templates where the search string is found in the Name or Description.

  3. To clear the current search string and display all portal templates, click the Clear Filter icon.

    Figure 3-7 Clear Filter Icon

    Clear Filter Icon

Renaming a Portal Template

To rename a portal template:

  1. Go to the Portal Templates page in either the Home portal or WebCenter Portal administration:
    • In the Home portal, click the Portal Templates tab. If this tab is not showing, click the Actions icon and select Personalize Pages, where you can select Show Page.

    • From the Portals menu, select Administration, then click the Portal Templates tab.

  2. Click in the row of the portal template.
  3. From the Actions menu, select Rename Portal Template Display Name to open the Rename Portal Template Display Name dialog.
  4. In the Display Name field, enter a new name for the portal template.
  5. Optionally, enter a Description.
  6. Click OK.

Setting Up Access to a Portal Template

You can grant specific users and groups read-only or manage access to a portal template that you have permissions to manage.

To set up access to a portal template:

  1. Go to the Portal Templates page in either the Home portal or WebCenter Portal administration:
    • In the Home portal, click the Portal Templates tab. If this tab is not showing, click the Actions icon and select Personalize Pages, where you can select Show Page.

    • From the Portals menu, select Administration, then click the Portal Templates tab.

  2. Click in the row of the portal template.
  3. From the Actions menu, select Set Template Access to open the .Set Template Access dialog

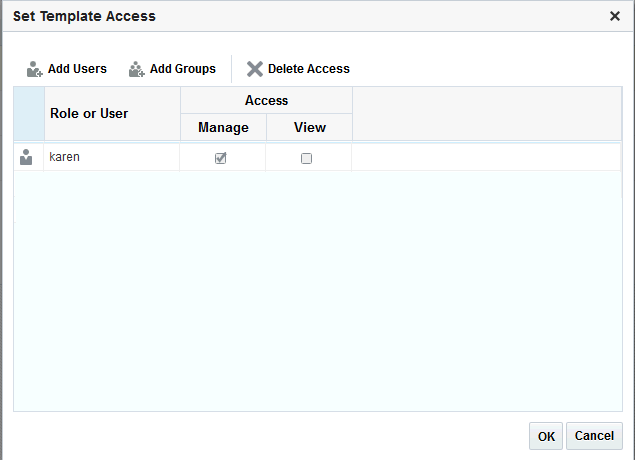
    Figure 3-8 Set Template Access Dialog

    Description of Figure 3-8 follows
    Description of "Figure 3-8 Set Template Access Dialog"
  4. In the Set Template Access dialog:
    • Click Add Users to open the Search Users dialog where you can select from a list of users or search for a user name.

    • Click Add Groups to open the Search Groups dialog where you can search for a user group.

    For tips on searching for a user or group in the identity store, see Searching for a User or Group in the Identity Store.

  5. For each user or user group listed in the Set Template Access dialog, specify which level of access to grant (one permission per user or user group):
    • Select the View check box to grant read-only access to the portal template.

    • Select the Manage check box to grant full access to rename, set access to, delete publish or hide the portal template.

  6. Click OK.

Publishing or Hiding a Portal Template

When you create a portal template, it is private by default. This means that only you as the template creator can see the template on your personal Portal Templates page in the Home portal. To make the template available to users, you must publish it.

Note:

To publish or hide a portal template, you need the default permissions of the Application Specialist role, or the Portal Templates: Manage All permission. Note that the Portal Creator role does not have this permission by default. Users with the Portal Templates: Create Portal Templates permission can create, rename, set access to, and delete their own portal templates, but cannot publish a template.

To publish or hide portal templates:

  1. Go to the Portal Templates page in either the Home portal or WebCenter Portal administration:
    • In the Home portal, click the Portal Templates tab. If this tab is not showing, click the Actions icon and select Personalize Pages, where you can select Show Page.

    • From the Portals menu, select Administration, then click the Portal Templates tab.

  2. Click in the row of the portal template to publish or hide.
  3. From the Actions menu, select:
    • Make Public to publish the template to all WebCenter Portal users.

    • Remove Public Access to remove the template from the portal templates list in the Home portal for all users, except for the template creator and those users who have specifically been granted View or Manage access in the Set Template Access dialog.

  4. In the confirmation prompt, confirm your selection.

    Note:

    If another user is in the process of creating a new portal, and you remove public access from the portal template selected for the portal before the user has completed creating the portal, the template becomes invalid for the portal and the user receives an error.

Deleting a Portal Template

Deleting a portal template does not affect the portals that were created using the portal template.

Note:

The built-in portal template cannot be deleted. However, users with the default permissions of the Application Specialist role, or the Portal Templates: Manage All permission, can hide the built-in portal template from everyone's view .

Deleting a portal template does not affect the portals that were created using the portal template.

To delete a portal template when it is no longer required:
  1. Go to the Portal Templates page in either the Home portal or WebCenter Portal administration:
    • In the Home portal, click the Portal Templates tab. If this tab is not showing, click the Actions icon and select Personalize Pages, where you can select Show Page.

    • From the Portals menu, select Administration, then click the Portal Templates tab.

  2. Click in the row of the portal template.
  3. From the Actions menu, select Delete Portal Template.
  4. In the confirmation prompt, click Delete.