25 Managing Users and Application Roles
You can grant WebCenter Portal Administrator role to a user and add users to application roles.
In WebCenter Portal, by default the policy and credential store is configured to use a database. A file-based or an LDAP-based policy store is no longer supported. When migrating from a WebCenter Portal 11g release if your 11g instance is configured to use a file-based or an LDAP-based policy store, you must migrate to a database policy store. A database policy store is supported for both single and high availability (HA) environments.
For information about configuring an Oracle database as the policy and credential store, see Using a Database-Based Security Store and Reassociating the Security Store in Securing Applications with Oracle Platform Security Services. For troubleshooting information, see Reassociation Failure in Securing Applications with Oracle Platform Security Services. Migrating a file-based or an LDAP-based policy store to a database-based policy store is a pre-upgrade task as described in Performing the Oracle WebCenter Pre-Upgrade Tasks in Upgrading Oracle WebCenter.
Permissions:
To perform the tasks in this chapter, you must be granted the WebLogic Server Admin role through the Oracle WebLogic Server Administration Console. Users with the Monitor or Operator roles can view security information but cannot make changes.
See also Understanding Administrative Operations, Roles, and Tools.
Topics:
Parent topic:Administering Security
Granting the WebCenter Portal Administrator Role
WebCenter Portal only recognizes users in the identity store that is mapped by the first authenticator. Since the WebCenter Portal Administrator account is initially created only in the embedded LDAP server, if an external LDAP such as Oracle Internet Directory is configured as the primary authenticator for WebCenter Portal, you must also create a user in that LDAP and grant that user the WebCenter Portal Administrator role.
You can grant a user the WebCenter Portal Administrator role using Fusion Middleware Control or WLST as shown below in the sections on:
Granting the WebCenter Portal Administrator Role Using Fusion Middleware Control
This section describes how to grant the WebCenter Portal administrator role to a user account other than the default “weblogic” account.
To grant the WebCenter Portal Administrator role using Fusion Middleware Control:
-
Log into Fusion Middleware Control and navigate to the WebCenter Portal home page.
-
From the WebCenter Portal menu, select Security and then Application Roles.
The Application Roles page opens (see Figure 1).

-
Search for the WebCenter Portal Administrator role:
-
In the Role Name field, enter the following internal identifier for the Administrator role, and then click the Search (arrow) icon:
s8bba98ff_4cbb_40b8_beee_296c916a23ed#-#Administrator
The search should return
s8bba98ff_4cbb_40b8_beee_296c916a23ed#-#Administrator, which is the administrator role identifier. -
-
Click the administrator role identifier from the search results and click Edit.
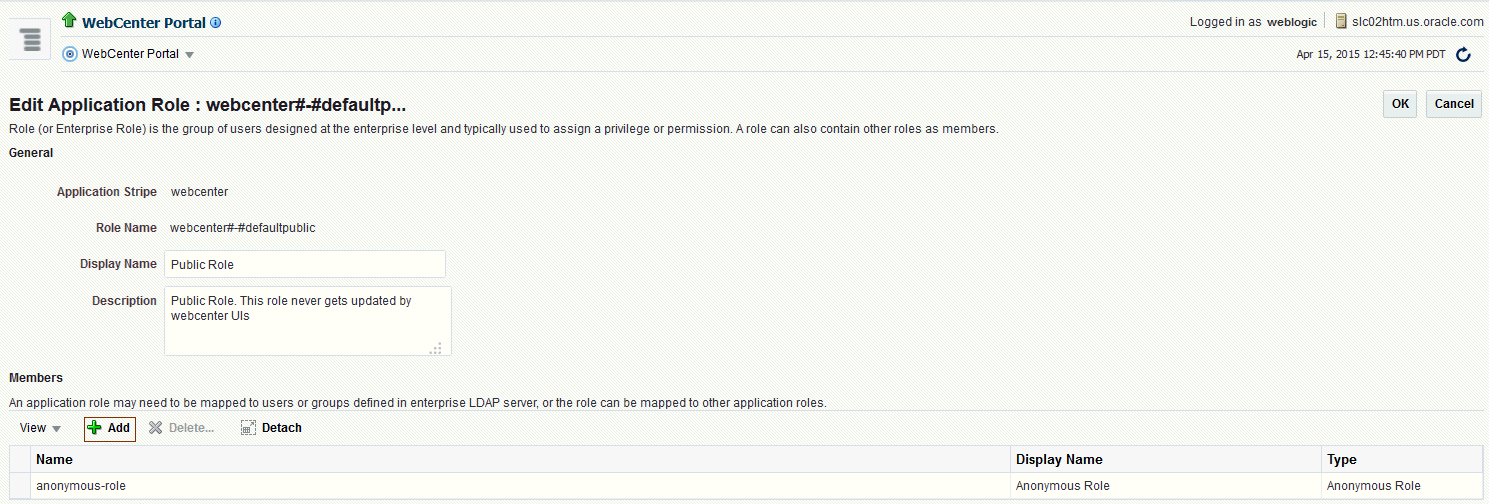
The Edit Application Role page opens (see Figure 2).

-
Click Add from the Members section.
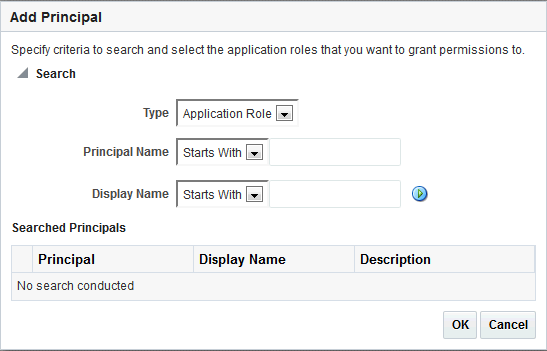
The Add Principal dialog opens (see Figure 3).

-
Search for the user to assign the Administrator role to.
-
From the Type drop-down, select User.
-
Enter search criteria in the Principal Name and/or Display Name fields to either include part of the user name and/or the initial characters of the user name.
-
Optionally, when you select User, select theCheck to enter principal name here option from the Advanced Option section, enter your search criteria in the Principal Name and/orDisplay Name fields.
-
Click OK.
The Add Principal dialog closes and the user name is added to the list of members.
-
-
To remove the
weblogicrole from the Edit Application Role page, select the role and click Delete, then click Yes on the confirmation dialog. -
On the Edit Application Role page, click OK.
Granting the WebCenter Portal Administrator Role Using WLST
To grant the WebCenter Portal Administrator role to another user using WLST:
-
Start WLST as described in Running Oracle WebLogic Scripting Tool (WLST) Commands.
-
Connect to the WebCenter Portal Administration Server for the target domain with the following command:
connect('user_name','password, 'host_id:port')Where:
-
user_nameis the name of the user account with which to access the Administration Server (for example,weblogic) -
passwordis the password with which to access the Administration Server -
host_idis the host ID of the Administration Server -
portis the port number of the Administration Server (for example,7001).
-
-
Grant the WebCenter Portal administrator application role to the user in Oracle Internet Directory using the grantAppRole command as shown below:
grantAppRole(appStripe="webcenter", appRoleName="s8bba98ff_4cbb_40b8_beee_296c916a23ed#-#Administrator",
principalClass="weblogic.security.principal.WLSUserImpl", principalName="wc_admin")
Where
wc_adminis the name of the administrator account to create. -
To test the new account, log into WebCenter Portal using the new account name.
The Administration link should appear, and you should be able to perform all administrator operations.
-
After granting the WebCenter Portal Administrator role to new accounts, remove this role from accounts that no longer need or require it using the WLSTrevokeAppRole command. For example, if WebCenter Portal was installed with a different administrator user name than
weblogic, the administrator role should be given to that user and should be revoked from the defaultweblogic.revokeAppRole(appStripe="webcenter", appRoleName="s8bba98ff_4cbb_40b8_beee_296c916a23ed#-#Administrator", principalClass="weblogic.security.principal.WLSUserImpl", principalName="weblogic")
Granting Application Roles
This section describes how to add users to application roles using Fusion Middleware Control and WLST commands.
This section contains the following topics:
Granting Application Roles Using Fusion Middleware Control
This section describes how to grant an application role to users using Fusion Middleware Control.
-
Log in to Fusion Middleware Control and navigate to the home page for WebCenter Portal.
-
From the WebCenter Portal menu, select Security and then Application Roles.
The Application Roles page opens.

-
In theRole Name field, enter
webcenterto search for all application roles in WebCenter Portal, or enter the name of the role (for example,appConnectionManager), and then click the Search (arrow) icon: .If you are not sure of the name, enter a partial search term or leave the field blank to display all the application roles.
The Application Roles page opens.

-
Select the role you want to add the user to, then click Edit.
For example, to add a user to the Public Role, select the row Public Role.

-
In the Edit Application page that opens for the selected role, click Add .

-
In the Add Principal dialog that opens, search for the user.
-
From the Type drop-down, select User.
-
Enter search criteria in the Principal Name and/or Display Name fields to either include part of the user name and/or the initial characters of the user name.
-
Select the user name from the Searched Principals table, then click OK.
The Add Principal dialog closes and the user name is added to the list of members for the application role on the Edit Application Role page.

-
-
On the Edit Application Role page, click OK.
-
Restart the WebCenter Portal (
WC_Portal) managed server.
Granting Application Roles Using WLST
Use the grantAppRole command to grant an application role to a user. For syntax and usage information, see grantAppRole in WLST Command Reference for WebLogic Server.
Using the Runtime Administration Pages
WebCenter Portal provides a Security tab from which an administrator can define application roles and grant application roles to users defined in the identity store. See About WebCenter Portal Security.
CAUTION:
The “Allow Password Change” property, which specifies whether users can change their passwords within WebCenter Portal, should be carefully controlled for corporate identity stores. WebCenter Portal administrators can set this property from the Profile Management Settings page in WebCenter Portal. For more information, see Configuring Profile.
Configuring Self-Registration By Invitation in WebCenter Portal
WebCenter Portal supports self-registration by invitation, as described in Enabling Self-Registration By Invitation-Only. The self-registration ‘by-invitation’ feature requires that the WebCenter Portal domain credential store contain the following password credentials:
-
map name = o.webcenter.security.selfreg -
key= o.webcenter.security.selfreg.hmackey -
user name = o.webcenter.security.selfreg.hmackey
To enable Allow Self-Registration Through Invitations in WebCenter Portal Administration, use Fusion Middleware Control or the WLST command createCred to create the password credentials detailed above. For example:
createCred(map="o.webcenter.security.selfreg", key="o.webcenter.security.selfreg.hmackey", type="PC",
user="o.webcenter.security.selfreg.hmackey", password="<password>", url="<url>", port="<port>", [desc="<description>"])
For more information, see “Managing Credentials with WLST Commands in Securing Applications with Oracle Platform Security Services.