Adding Mail to a Portal
Add Mail to a portal to allow portal members to access business mail, or simply send mail, from within a portal.
You can configure the Mail and Send Mail feature. The Send Mail feature does not require the mail service. That is, even if the mail service has not been configured in your portal, you can use the Send Mail feature with WebCenter Portal’s Mail Service option, if that option is selected for WebCenter Portal and for the portal in which you are using mail.
Permissions: To perform the tasks in this chapter, you must be a portal manager or a portal member with the portal-level permissions
Manage Security and ConfigurationorManage Configuration.
At a minimum, you must have the following permissions:
-
Edit Pages(to add the Mail task flows to a page) -
Edit Task Flows(to modify the task flow, if necessary)
For more information about permissions, see About Roles and Permissions for a Portal.
Topics
Prerequisites for the Mail Service
For the Mail service to work, the system administrator needs to perform the following tasks for WebCenter Portal:
-
Install and configure the Mail service components for WebCenter Portal and make sure that the connection between the two applications is active. For more information, see Managing Mail in Administering Oracle WebCenter Portal.
-
Enable the Send Mail feature for WebCenter Portal, as described in Configuring Send Mail Notifications for WebCenter Portal in Administering Oracle WebCenter Portal.
See Also: Troubleshooting Issues with Mail in Administering Oracle WebCenter Portal
To make the Mail service available in a portal, the portal manager or anyone with Manage Security and Configuration or Manage Configuration permission must perform the following tasks:
-
Optionally, update the mail distribution list, as described in Configuring the Mail Distribution List for a Portal. Note that the default distribution list is created when the portal is created.
-
Add the mail task flow to a page in the portal, as described in Adding the Mail Task Flow to a Page.
Note: For information about the Send Mail feature and how to use mail, see Sending and Viewing Mail in Using Portals in Oracle WebCenter Portal.
Configuring the Mail Distribution List for a Portal
Mail distribution lists provide an efficient mechanism for portal communication.
For more information, see Managing Mail in Administering Oracle WebCenter Portal.
Note:
With some browsers, Send Mail notifications are garbled for many non-English languages. When multibyte characters are encoded (required for the "mailto:" protocol), the URL length exceeds the browser limit. As a workaround, configure the Send Mail feature to use WebCenter Portal's Mail service instead of the local mail client. For more information, see Configuring Send Mail Notifications in Administering Oracle WebCenter Portal.
The system administrator maintains the connection between the WebCenter Portal and the mail server. If you are experiencing issues with this connection, report the problem to the system administrator. See the Registering Mail Servers in Administering Oracle WebCenter Portal.
Note that mail is enabled upon portal creation and the default distribution list is created. If the portal name is not unique, the default distribution list creation fails, and in such cases, you need to select a default distribution list.
For each portal, a distribution list is created in the configured mail server (that is, the Exchange Server) which will contain mail addresses of the members of that portal. So when you send a mail to the distribution list, all the members of that portal will receive the mail. Portal members can be users and also groups. In such cases, the mail will be sent to the members of that group as well. These groups might not have mail ids associated with them. In the Send Mail options, you can specify who should be included when mail is sent to the members.
The default distribution list is named portal_name@mail_domain. For example, the default distribution list for a portal named Finance Project is FinanceProject@mail_domain, where mail_domain is derived from the LDAP Domain setting in the Edit Mail Server Connection screen (accessed through Oracle Enterprise Manager).
If the Mail service is disconnected, WebCenter Portal deletes the default distribution list that was automatically created for the portal and attempts to send mail to all members of the portal (see Sending Mail to Portal Members or Managers in Using Portals in Oracle WebCenter Portal). The Mail Compose window opens with the To field blank instead of prepopulated with the mail distribution list.
Instead of using the default distribution list, you can modify the distribution list for portal mail, as follows:
-
On the Tools and Services page, select Mail.
You can also enter the following URL in your browser to navigate directly to the Tools and Services page:
http://host:port/webcenter/portal/portalName/admin/servicesSee Also: WebCenter Portal Pretty URLs
Figure: Configuring the Mail Distribution List for aPortal
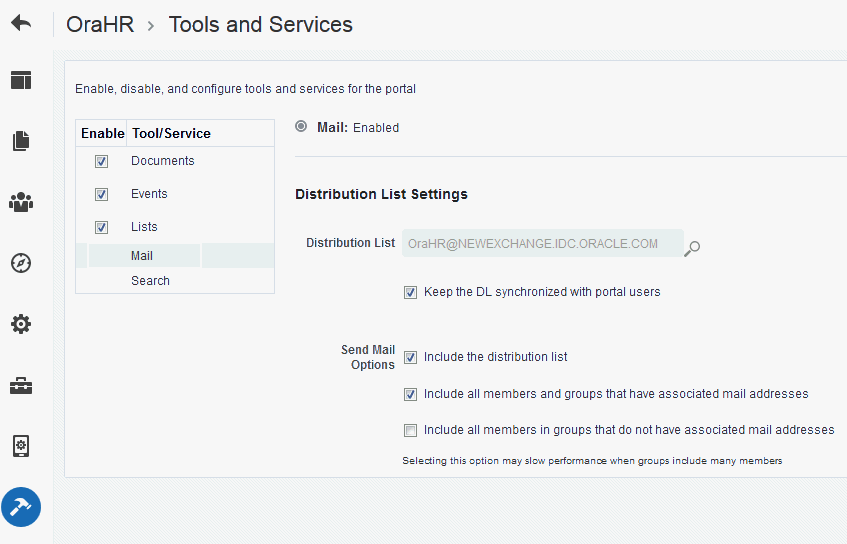
Description of the illustration mail_distriblist.gif
-
(Optional) To change the current portal mail distribution list:
- Click the Search for Distribution Lists icon to search and select the name of the new Distribution List.
If the Distribution List field is left blank, the compose mail dialog will not include a distribution list in the To field.
-
Select Keep the DL synchronized with portal users to synchronize the specified distribution list with the portal membership.
Selecting this option automatically updates the custom distribution list by deleting mail addresses of members who cancel membership in the portal, and adding mail addresses of new members.
- For Send Mail Options, select any combination of the check boxes:
-
Select Include the distribution list to populate the To field of the compose mail dialog with the value specified in Distribution List (either the default portal mail distribution list, or a custom distribution list you specify).
-
Select Include all members and groups that have associated mail addresses to populate the To field of the compose mail dialog with the mail addresses of all portal members and groups that have associated mail addresses.
-
When groups defined for the portal do not have associated mail addresses, select Include all members in groups that do not have associated mail addresses to populate the To field of the compose mail dialog with the mail addresses of all portal members with an associated mail address from every group in the portal (without an associated mail address).
Note: This selection can potentially generate an extremely large distribution list, and create performance issues or mail server errors. Your system administrator can use the WLST
setMailServicePropertycommandmail.recipient.limitproperty to restrict the number of recipients to a message, as described insetMailServicePropertyin WebCenter WLST Command Reference Reference.
-
- Click Save.
Configuring a Shared Mail Connection for a Portal
When a portal is configured to use a shared mail connection, users do not have to specify credentials when sending mail using the WebCenter Portal Mail Service.
To configure a shared mail connection for a portal:
-
Confirm that WebCenter Portal is using the WebCenter Portal Mail service to send mail.
See Enabling Shared Mail Connections for Send Mail Notifications in Administering Oracle WebCenter Portal.
-
Ask your Fusion Middleware administrator to set up a mail connection that uses an external application configured with the shared credentials you require, and then record the name of that mail connection.
For details, see Setting Up a Shared Mail Connection in Administering Oracle WebCenter Portal.
-
In the portal administration (see Accessing Portal Administration), click Settings.
-
On the Settings page, scroll down to the Attributes section, then click Add Attribute.
-
In the Add Attribute dialog, enter the custom attributes listed in Table 45-1 (and as shown in Figure 45-2), then click Add:
Table 1: Custom Attributes for Shared Mail Connections
Name Value collab.mail.compose.sharedConnectionNameName of the shared mail connection. For example: MySharedMailConnectionnotifications.use.mail.composerMust be set to true.The attributes are added to the portal’s settings.
Figure: Setting Shared Mail Connection Attributes for aPortal
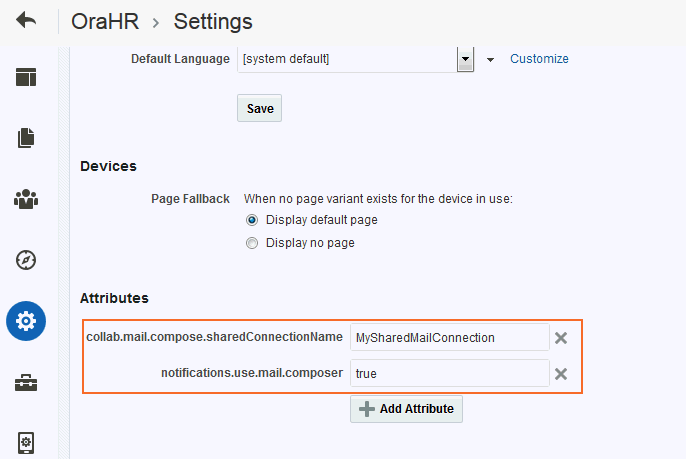
Description of the illustration mail_attribute.gif
-
(Optional) By default, Send Mail notifications are disabled for public/anonymous users. To enable them in a portal, add the following portal custom attribute:
notifications.anonymous.enabled = true
Configuring the Send Mail Feature
The Send Mail feature does not require WebCenter Portal’s Mail component. That is, even if Mail has not been configured in WebCenter Portal, the Send Mail feature is available using the WebCenter Portal’s Mail Service option.
Your system administrator determines the mail client that the Send Mail feature uses: either WebCenter Portal’s Mail Service component or a local mail client. The default value is a local mail client. If your system administrator enabled users to override this mail client setting, then you can choose to use a different mail client on the Mail Preferences page (Figure 45-3).
Figure: Mail Preferences for Send Mail
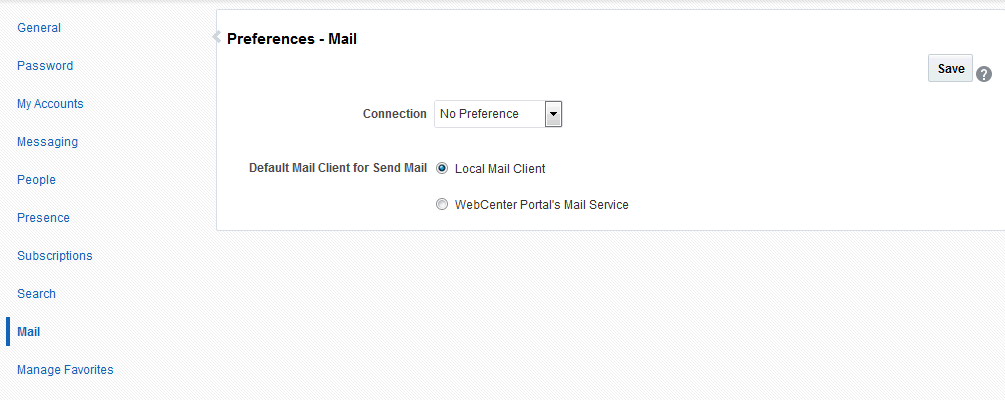
Description of the illustration mail_prefs.gif
Selecting Your Preferred Mail Connection
When WebCenter Portal provides access to multiple mail connections, it also provides a way for you to choose which connection to use. See Selecting Your Preferred Mail Connection in Using Portals in Oracle WebCenter Portal.
About the Mail Task Flow
The Mail task flow conveniently exposes familiar mail functionality in your portal. It works with the same mail server that provides your regular business mail, and the mail messages exposed in your portal are the same messages you would see in your mail inbox. Many of the same actions are also supported. For example, you can send messages with attachments, forward messages, and so on. This does not replace your company mail, but rather enhances it by making it accessible within WebCenter Portal.
The Mail task flow enables users to perform simple mail functions, such as view, read, create and create with attachments, reply, forward, and delete. All mail is stored in your inbox and can be accessed from there through a link.
Note: For information about how to use the mail feature, see Sending and Viewing Mail in Using Portals in Oracle WebCenter Portal.
The Mail task flow fetches mail messages from the inbox folder only. It does not support fetching mail from other folders or moving messages.
All mail servers based on IMAP4 and SMTP protocols are supported. WebCenter Portal provides access to multiple mail connections. You can use a different mail connection by selecting it in the portal’s Preferences settings. For more information, see Selecting Your Preferred Mail Connection in Using Portals in Oracle WebCenter Portal.
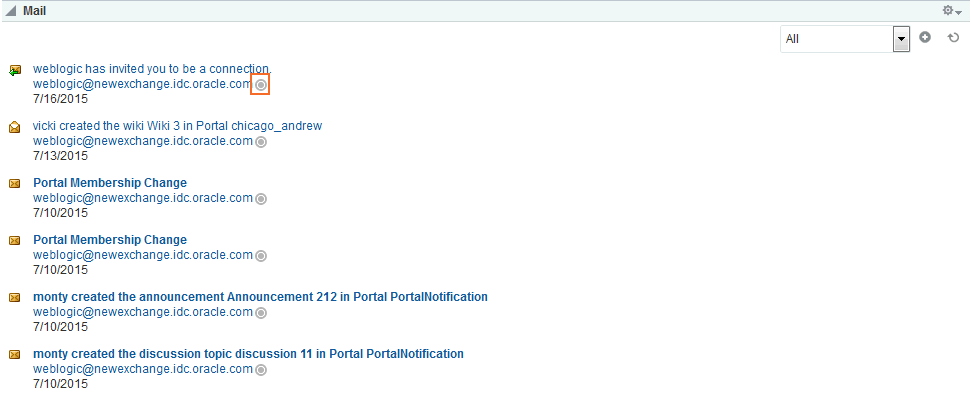
The Mail task flow exposes features from your mail server (Figure 45-4). Note that the Mail task flow does not render embedded images. If an email contains inline images, they are shown as attachments, and not within the message body.
Figure: Mail Task Flow
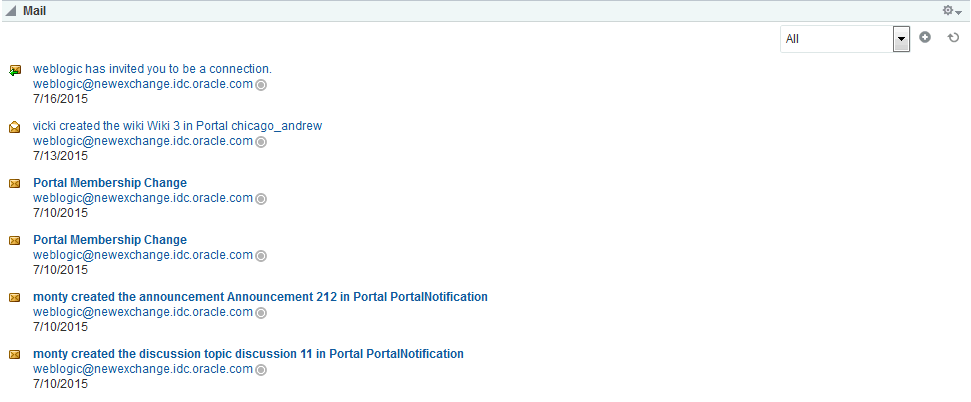
Description of the illustration mail_taskflow.gif
The Mail task flow presents the following features:
-
A menu for specifying which messages to display
-
A Compose icon for starting the process of creating a new message
-
A Refresh icon for updating the task flow with new messages
The default mail distribution list that contains the mailing list of all portal members is created automatically when the portal is created. A portal manager can configure a different distribution list. After configuring, as members are added to or deleted from the portal, the mailing list is updated automatically. For more information, see Configuring the Mail Distribution List for a Portal.
Users can mail other portal users or any user recognized by the back-end server that supports the Mail component.
Figure: User Name and Status Icon
Description of the illustration mail_im.gif
Users with page edit privileges can access the task flow’s region parameter through the page editor. For more information about setting the Mail task flow properties, see Working with Mail Service Task Flow Properties.
Logging in to a Mail Task Flow
To log in to a Mail task flow:
Note: By default, the 50 most recent mail messages from your mail server inbox folder are displayed. However, if required, your system administrator can configure this to a higher value, if your server supports the increase in memory cache that fetching additional mail requires. Care should be taken to have a value suitable to your environment. This value impacts all users. That is, if the Mail service is configured to read 200 recent mail messages, then it reads 200 recent mail messages for all users.
Adding the Mail Task Flow to a Page
The Mail task flow exposes your company’s mail server features within the context of your portal. Use the Mail task flow to view, respond to, and manage your personal mail.
For the steps to add a Mail task flow to a page, see Adding a Component to a Page.
Tip: The presence or location of the Mail task flow in the resource catalog depends on how the resource catalog is configured. For example, in the Default Home Portal Catalog, the Mail task flow is included under the Social and Communication folder.
For information about the Mail task flow, see About the Mail Task Flow.
Working with Mail Service Task Flow Properties
The Mail task flow has associated properties, which users with sufficient privileges can access through the task flow’s View Actions menu. For example, select Parameters to display the Parameters dialog (Figure 45-8).
Figure: Mail Task Flow Component Properties
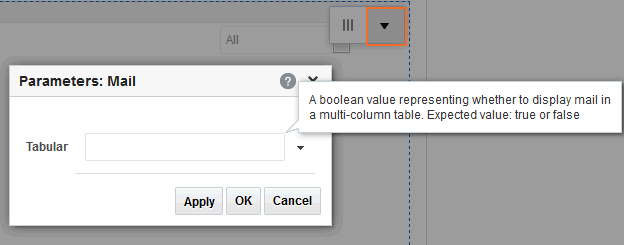
Description of the illustration mail_compdb.gif
See Also: Setting Properties on a Component
The following sections provide information about properties of the Mail task flow and describe the task flow parameter.
Setting Mail Task Flow Properties
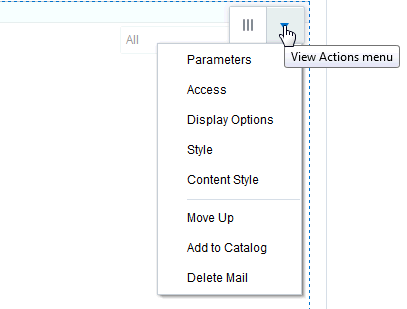
In the page editor, selecting any component exposes a View Actions menu (Figure 45-9), which provides access to the component’s properties: Parameters, Access, Display Options, Style, and Content Style.
Figure: View Actions Menu on a Mail Task Flow
To set Mail Service task flow properties:
Mail Task Flow Parameters
The Mail task flow has one associated region parameter: Tabular. Using the EL value type, enter a value of true to display the information associated with a mail message, such as its subject, sender, and, date sent, in a tabular format. Figure 45-10 illustrates a tabular format Mail task flow.
Figure: A Mail Task Flow where the Parameter Tabular Is Set to True
