Administering a Portal
Administer a portal by setting security, managing assets, enabling tools and services, deploying the portal, and more.
Permissions: To perform the tasks in this chapter, you must be a portal manager or member with
Administration: Manage Security and ConfigurationorAdministration: Manage Configurationpermission in the portal.
Any user who accesses administration settings for a portal and does not have Manage permission will see only the settings available to their role and permissions.
Note that a user with a role that grants them permissions to create, edit, or publish a portal page, or even manage a portal, is not automatically allowed to view the portal. To view a portal, a user must be explicitly granted the portal-level permission Basic Services: View Pages and Content (standard permissions) or Pages: View Pages (advanced permissions).
For more information about permissions, see About Roles and Permissions for a Portal.
Topics
Accessing Portal Administration
The administration pages for a portal are available through the icons. Users will see only those portal administration icons available to their role and permissions. In general, you can administer a portal only if you are the portal manager or member with Manage Security and Configuration or Manage Configuration permission.
Figure: PortalAdministration Page Icons
Description of the illustration wcpaa_portadm.gif
The following table describes the portal administration pages accessed by each icon.
Table 6-1 Accessing Portal Administration
| Icon | Description |
|---|---|
|
|
Set security on the portal, such as access level, defining roles and permissions, and managing membership. See Administering Security in a Portal. |
|
|
Modify general settings for the portal, such as the title (name) and description, and to perform general actions on the portal, such as closing the portal, adding RSS feeds, or deleting the portal. See Administering General Settings and Actions for a Portal. |
|
|
Specify settings that define the look and feel of the portal. See Administering Look and Feel Settings for a Portal. |
|
|
Manage the assets for the portal, such as page templates, resource catalogs, skins, and more. SeeAdministering All Assets in a Portal. |
|
|
Use this page to manage devices and device groups in a device-enabled portal. See Viewing Device Groups for a Portal. |
|
|
Enable and disable tools and services operating in the portal, such as Documents, Events, and Lists. See Administering Tools and Services in a Portal. |
|
|
Use this page to deploy, redeploy, and propagate a portal to a target server. Note that you will only see this icon if you have a role that has |
 Security
Access to portal administration is available through several paths, all of which display the General page and icons to access other administration pages. You can access portal administration in the following ways:
-
From the portal browser. Open the portal browser in any of the following ways:
-
In the Home portal, click the Portals tab.
-
From the Portals menu, select Portal Browser.
-
From the portal editor or portal administration, click the Back to Portals icon at the top left of the screen.
Figure: PortalEditor: Back to Portals Icon
Locate the portal you want to administer, then click Flip icon to display the portal actions menu and select Administer **, then select **General.
Figure: AccessingPortalAdministration fromPortalBrowser
-
Description of the illustration wcpaa_port_admacc1.gif
-
From the portal editor. In the portal editor, the portal administration icons are immediately available in the left navigation pane. Click an icon in the left pane to access the administration settings associated with that icon.
-
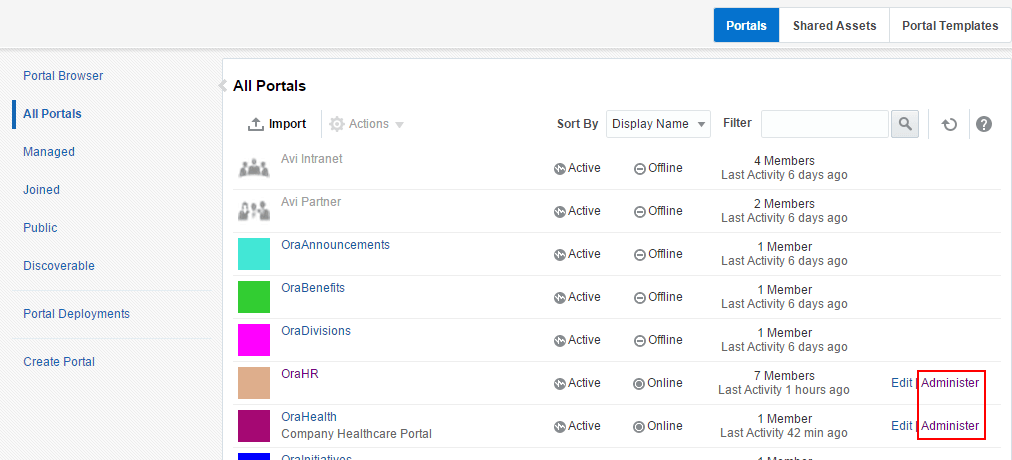
From the Portals page inWebCenter Portaladministration. From the Portals menu, select Administration, then click the Portals tab. Locate the portal you want to administer, then click the Administer link for the portal. This link is shown only if you are the portal manager or member with
Manage Security and ConfigurationorManage Configurationpermission in the portal.Figure: AccessingPortalAdministration
Description of the illustration wcpaa_port_admacc2.png
-
From theportalviewer. When viewing a portal, select Manage, then All Settings. This menu item is shown only if you are the portal manager or member with
Manage Security and ConfigurationorManage Configurationpermission in the portal.Tip: The location of the Manage action depends on the page template in use. For example, you may access it through an Actions Actions icon menu.
Figure: AccessingPortalAdministration When ViewingPortal
Description of the illustration wcpaa_port_admacc4.gif
Administering Security in a Portal
Note:
To administer security in a portal, you must be a portal manager or have a custom role that includes both of the following permissions in the portal:
Manage Security and Configuration
Manage MembershipA portal manager has these permissions by default.
The Security page in portal administration allows you to set security on the portal, such as access level, defining roles and permissions, and managing membership. The following sections describe the Security page tasks:
Accessing Security Administration for a Portal
To access the security administration for a portal, click the Security icon.
You can also enter the following URL in your browser to navigate directly to the Security page, where you can click the Access, Roles, and Members tabs:
http://host:port/webcenter/portal/portalName/admin/security
Figure: PortalAdministration: Security
Description of the illustration wcpaa_prtedit_mem.gif
Changing the Access to a Portal
Access to a portal is defined when the portal is created. This access can be changed to make the portal more visible or less visible.
To change the access to a portal:
-
On the Security page, click the Access subtab and select how you want the portal to be exposed: Figure: Security Page for a Portal: Access Subpage
Description of the illustration wcpaa_portadm_secacc.gif
- **Public**: Anyone can visit the portal, whether they are a registered WebCenter Portal user or not. When this setting is selected, the `Public-User` role in the portal is automatically granted `View Pages and Content` permission in the portal, which allows public users to view pages, lists, events, links, and notes. To allow public users to view documents, you need to grant these permissions. Public users do not have edit, create, or manage permissions in the portal.

- **Private**: To access the portal, membership is required (either through invitation or self-registration if enabled). The portal will be shown in the list of available portals in the portal browser and will appear in search results.

  > **Note:** The `Administrator` role provides a user with administrative permissions in a private portal (such as managing membership), but does not allow access to a private portal's page contents.

- **Hidden**: To access the portal, membership is required (through invitation). The portal will *not* be shown in the list of available portals in the portal browser and will *not* appear in search results. Members can access the portal through direct URL.

  > **Note:** Hidden portals can be viewed through WebCenter Portal administration on the **All Portals** page by users with the permission `Portal Server-Manage Configuration` or `Portals-Manage Security and Configuration`, such as a system administrator. While these users can manage the portal (change settings and membership), they cannot see the portal pages and content unless they are a portal member. 2.  Click **Save**.
Managing Roles and Permissions in a Portal
To manage the roles for assigning permissions in a portal:
- On the Security page (see Accessing Security Administration for a Portal), click the Roles subtab.
- To work with portal roles, refer to Managing Roles and Permissions for a Portal.
Managing Members in a Portal
To manage the membership in a portal:
- On the Security page (see Accessing Security Administration for a Portal), click the Members subtab.
- To work with portal membership, refer to Managing Members and Assigning Roles in a Portal.
Administering General Settings and Actions for a Portal
The General page in portal administration allows you to modify general settings for a portal, such as the title (display name) and description, the internal name, and to perform general actions on a portal, such as closing an inactive portal, taking a portal offline to perform maintenance tasks, adding RSS feeds, or deleting the portal. The following sections describe the General page tasks:
Accessing the General Settings and Actions for aPortal
To access the overview settings and actions for a portal, click the General icon.
You can also enter the following URL in your browser to navigate directly to the General page:
http://host:port/webcenter/portal/portalName/admin/overview
Figure: PortalAdministration: General Settings
Description of the illustration wcpaa_prtedit_oview.gif
Changing the Title of aPortal
A portal title displays at the top of the portal and other places where portals are available for selection, such as the Portals page. In prior releases, the title was referred to as the display name.
Note:
Changing the title does not affect the internal name and URL for the portal.
To change the internal name of a portal (and consequently the URL that directly accesses the portal), see Changing the Internal Name (and URL) of a Portal.
To change the title (display name) of a portal:
-
From the portal browser. Open the portal browser in any of the following ways:
-
In the Home portal, click the Portals tab.
-
From the Portals menu, select Portal Browser.
-
From the portal editor or portal administration, click the Back to Portals icon at the top left of the screen.
Figure: PortalEditor: Back to Portals Icon
Locate the portal you want to administer, then click Flip icon to display the portal actions menu and select Administer **, then select **General.
Figure: AccessingPortalAdministration fromPortalBrowser
-
Description of the illustration wcpaa_port_admacc1.gif
-
From the portal editor. In the portal editor, the portal administration icons are immediately available in the left navigation pane. Click an icon in the left pane to access the administration settings associated with that icon.
-
From the Portals page inWebCenter Portaladministration. From the Portals menu, select Administration, then click the Portals tab. Locate the portal you want to administer, then click the Administer link for the portal. This link is shown only if you are the portal manager or member with
Manage Security and ConfigurationorManage Configurationpermission in the portal.Figure: AccessingPortalAdministration
Description of the illustration wcpaa_port_admacc2.png
-
From theportalviewer. When viewing a portal, select Manage, then All Settings. This menu item is shown only if you are the portal manager or member with
Manage Security and ConfigurationorManage Configurationpermission in the portal.Tip: The location of the Manage action depends on the page template in use. For example, you may access it through an Actions Actions icon menu.
Figure: AccessingPortalAdministration When ViewingPortal
0
Description of the illustration wcpaa_port_admacc4.gif
Modifying the Acronym for a Portal
When a portal displays as a color tile in the portal browser, it is overlaid with a portal acronym, which is useful to quickly identify a portal in the portal browser, in combination its tile color and name.
Figure: Default Display ofPortalinPortalBrowser

Description of the illustration wcpaa_prt_new.gif
When a portal is created, WebCenter Portal generates an acronym for the portal as follows:
-
From the portal browser. Open the portal browser in any of the following ways:
-
In the Home portal, click the Portals tab.
-
From the Portals menu, select Portal Browser.
-
From the portal editor or portal administration, click the Back to Portals icon at the top left of the screen.
Figure: PortalEditor: Back to Portals Icon
Locate the portal you want to administer, then click Flip icon to display the portal actions menu and select Administer **, then select **General.
Figure: AccessingPortalAdministration fromPortalBrowser
-
Description of the illustration wcpaa_port_admacc1.gif
-
From the portal editor. In the portal editor, the portal administration icons are immediately available in the left navigation pane. Click an icon in the left pane to access the administration settings associated with that icon.
-
From the Portals page inWebCenter Portaladministration. From the Portals menu, select Administration, then click the Portals tab. Locate the portal you want to administer, then click the Administer link for the portal. This link is shown only if you are the portal manager or member with
Manage Security and ConfigurationorManage Configurationpermission in the portal.Figure: AccessingPortalAdministration
Description of the illustration wcpaa_port_admacc2.png
-
From theportalviewer. When viewing a portal, select Manage, then All Settings. This menu item is shown only if you are the portal manager or member with
Manage Security and ConfigurationorManage Configurationpermission in the portal.Tip: The location of the Manage action depends on the page template in use. For example, you may access it through an Actions Actions icon menu.
Figure: AccessingPortalAdministration When ViewingPortal
1
Description of the illustration wcpaa_port_admacc4.gif
The acronym is shown only when the portal displays as a color tile in the portal browser. If the portal displays a logo instead of a color tile, the acronym is not shown.
Note:
For information about changing the default color or logo, see:
-
From the portal browser. Open the portal browser in any of the following ways:
-
In the Home portal, click the Portals tab.
-
From the Portals menu, select Portal Browser.
-
From the portal editor or portal administration, click the Back to Portals icon at the top left of the screen.
Figure: PortalEditor: Back to Portals Icon
Locate the portal you want to administer, then click Flip icon to display the portal actions menu and select Administer **, then select **General.
Figure: AccessingPortalAdministration fromPortalBrowser
-
Description of the illustration wcpaa_port_admacc1.gif
-
From the portal editor. In the portal editor, the portal administration icons are immediately available in the left navigation pane. Click an icon in the left pane to access the administration settings associated with that icon.
-
From the Portals page inWebCenter Portaladministration. From the Portals menu, select Administration, then click the Portals tab. Locate the portal you want to administer, then click the Administer link for the portal. This link is shown only if you are the portal manager or member with
Manage Security and ConfigurationorManage Configurationpermission in the portal.Figure: AccessingPortalAdministration
Description of the illustration wcpaa_port_admacc2.png
-
From theportalviewer. When viewing a portal, select Manage, then All Settings. This menu item is shown only if you are the portal manager or member with
Manage Security and ConfigurationorManage Configurationpermission in the portal.Tip: The location of the Manage action depends on the page template in use. For example, you may access it through an Actions Actions icon menu.
Figure: AccessingPortalAdministration When ViewingPortal
2
Description of the illustration wcpaa_port_admacc4.gif
To change the acronym for a portal:
-
From the portal browser. Open the portal browser in any of the following ways:
-
In the Home portal, click the Portals tab.
-
From the Portals menu, select Portal Browser.
-
From the portal editor or portal administration, click the Back to Portals icon at the top left of the screen.
Figure: PortalEditor: Back to Portals Icon
Locate the portal you want to administer, then click Flip icon to display the portal actions menu and select Administer **, then select **General.
Figure: AccessingPortalAdministration fromPortalBrowser
-
Description of the illustration wcpaa_port_admacc1.gif
-
From the portal editor. In the portal editor, the portal administration icons are immediately available in the left navigation pane. Click an icon in the left pane to access the administration settings associated with that icon.
-
From the Portals page inWebCenter Portaladministration. From the Portals menu, select Administration, then click the Portals tab. Locate the portal you want to administer, then click the Administer link for the portal. This link is shown only if you are the portal manager or member with
Manage Security and ConfigurationorManage Configurationpermission in the portal.Figure: AccessingPortalAdministration
Description of the illustration wcpaa_port_admacc2.png
-
From theportalviewer. When viewing a portal, select Manage, then All Settings. This menu item is shown only if you are the portal manager or member with
Manage Security and ConfigurationorManage Configurationpermission in the portal.Tip: The location of the Manage action depends on the page template in use. For example, you may access it through an Actions Actions icon menu.
Figure: AccessingPortalAdministration When ViewingPortal
3
Description of the illustration wcpaa_port_admacc4.gif
Modifying the Description for aPortal
A portal description appears in the listing of the portal on the Portals page.
To change the description for a portal:
-
From the portal browser. Open the portal browser in any of the following ways:
-
In the Home portal, click the Portals tab.
-
From the Portals menu, select Portal Browser.
-
From the portal editor or portal administration, click the Back to Portals icon at the top left of the screen.
Figure: PortalEditor: Back to Portals Icon
Locate the portal you want to administer, then click Flip icon to display the portal actions menu and select Administer **, then select **General.
Figure: AccessingPortalAdministration fromPortalBrowser
-
Description of the illustration wcpaa_port_admacc1.gif
-
From the portal editor. In the portal editor, the portal administration icons are immediately available in the left navigation pane. Click an icon in the left pane to access the administration settings associated with that icon.
-
From the Portals page inWebCenter Portaladministration. From the Portals menu, select Administration, then click the Portals tab. Locate the portal you want to administer, then click the Administer link for the portal. This link is shown only if you are the portal manager or member with
Manage Security and ConfigurationorManage Configurationpermission in the portal.Figure: AccessingPortalAdministration
Description of the illustration wcpaa_port_admacc2.png
-
From theportalviewer. When viewing a portal, select Manage, then All Settings. This menu item is shown only if you are the portal manager or member with
Manage Security and ConfigurationorManage Configurationpermission in the portal.Tip: The location of the Manage action depends on the page template in use. For example, you may access it through an Actions Actions icon menu.
Figure: AccessingPortalAdministration When ViewingPortal
5
Description of the illustration wcpaa_port_admacc4.gif
Modifying the Color for a Portal
By default, a portal is shown in the portal browser as a color tile, overlaid with an acronym and portal name.
Figure: Default Display of Portal in Portal Browser

Description of the illustration wcpaa_prt_new.gif
The default color is inherited from the portal template selected during portal creation. On the portal administration Settings page, you can specify whether the portal tile should display a color or logo in the portal browser.
To change the color used to display a portal in the portal browser:
-
From the portal browser. Open the portal browser in any of the following ways:
-
In the Home portal, click the Portals tab.
-
From the Portals menu, select Portal Browser.
-
From the portal editor or portal administration, click the Back to Portals icon at the top left of the screen.
Figure: PortalEditor: Back to Portals Icon
Locate the portal you want to administer, then click Flip icon to display the portal actions menu and select Administer **, then select **General.
Figure: AccessingPortalAdministration fromPortalBrowser
-
Description of the illustration wcpaa_port_admacc1.gif
-
From the portal editor. In the portal editor, the portal administration icons are immediately available in the left navigation pane. Click an icon in the left pane to access the administration settings associated with that icon.
-
From the Portals page inWebCenter Portaladministration. From the Portals menu, select Administration, then click the Portals tab. Locate the portal you want to administer, then click the Administer link for the portal. This link is shown only if you are the portal manager or member with
Manage Security and ConfigurationorManage Configurationpermission in the portal.Figure: AccessingPortalAdministration
Description of the illustration wcpaa_port_admacc2.png
-
From theportalviewer. When viewing a portal, select Manage, then All Settings. This menu item is shown only if you are the portal manager or member with
Manage Security and ConfigurationorManage Configurationpermission in the portal.Tip: The location of the Manage action depends on the page template in use. For example, you may access it through an Actions Actions icon menu.
Figure: AccessingPortalAdministration When ViewingPortal
6
Description of the illustration wcpaa_port_admacc4.gif
Modifying the Keywords for aPortal
Keywords are useful to make a portal more easily discoverable in search results. You can specify keywords for a portal when you create the portal or add, change, and delete them later, as described in this section.
To add, change, or delete keywords for a portal:
-
From the portal browser. Open the portal browser in any of the following ways:
-
In the Home portal, click the Portals tab.
-
From the Portals menu, select Portal Browser.
-
From the portal editor or portal administration, click the Back to Portals icon at the top left of the screen.
Figure: PortalEditor: Back to Portals Icon
Locate the portal you want to administer, then click Flip icon to display the portal actions menu and select Administer **, then select **General.
Figure: AccessingPortalAdministration fromPortalBrowser
-
Description of the illustration wcpaa_port_admacc1.gif
-
From the portal editor. In the portal editor, the portal administration icons are immediately available in the left navigation pane. Click an icon in the left pane to access the administration settings associated with that icon.
-
From the Portals page inWebCenter Portaladministration. From the Portals menu, select Administration, then click the Portals tab. Locate the portal you want to administer, then click the Administer link for the portal. This link is shown only if you are the portal manager or member with
Manage Security and ConfigurationorManage Configurationpermission in the portal.Figure: AccessingPortalAdministration
Description of the illustration wcpaa_port_admacc2.png
-
From theportalviewer. When viewing a portal, select Manage, then All Settings. This menu item is shown only if you are the portal manager or member with
Manage Security and ConfigurationorManage Configurationpermission in the portal.Tip: The location of the Manage action depends on the page template in use. For example, you may access it through an Actions Actions icon menu.
Figure: AccessingPortalAdministration When ViewingPortal
7
Description of the illustration wcpaa_port_admacc4.gif
Changing the Internal Name (and URL) of aPortal
If necessary for some purpose, you can change the internal name of a portal. It is important to note that when you change the internal name, you are also changing the pretty URL that other people use to navigate to the portal. The format of a portal pretty URL is as follows:
http://host:port/webcenter/portal/portalName
For example: http://mycompany:8888/webcenter/portal/philatelists.
This means that when you change the internal name of a portal, existing bookmarks to the portal URL will no longer work. You can change the portal title; that is, the display name for the portal.
To change the internal name of a portal:
-
From the portal browser. Open the portal browser in any of the following ways:
-
In the Home portal, click the Portals tab.
-
From the Portals menu, select Portal Browser.
-
From the portal editor or portal administration, click the Back to Portals icon at the top left of the screen.
Figure: PortalEditor: Back to Portals Icon
Locate the portal you want to administer, then click Flip icon to display the portal actions menu and select Administer **, then select **General.
Figure: AccessingPortalAdministration fromPortalBrowser
-
Description of the illustration wcpaa_port_admacc1.gif
-
From the portal editor. In the portal editor, the portal administration icons are immediately available in the left navigation pane. Click an icon in the left pane to access the administration settings associated with that icon.
-
From the Portals page inWebCenter Portaladministration. From the Portals menu, select Administration, then click the Portals tab. Locate the portal you want to administer, then click the Administer link for the portal. This link is shown only if you are the portal manager or member with
Manage Security and ConfigurationorManage Configurationpermission in the portal.Figure: AccessingPortalAdministration
Description of the illustration wcpaa_port_admacc2.png
-
From theportalviewer. When viewing a portal, select Manage, then All Settings. This menu item is shown only if you are the portal manager or member with
Manage Security and ConfigurationorManage Configurationpermission in the portal.Tip: The location of the Manage action depends on the page template in use. For example, you may access it through an Actions Actions icon menu.
Figure: AccessingPortalAdministration When ViewingPortal
8
Description of the illustration wcpaa_port_admacc4.gif
Closing or Activating aPortal
By default, a portal is active. You can close a portal that is no longer being actively used. Closing a portal archives its content. When you close a portal, it is removed from everyone’s Portals menu and displays in the portal browser only when a user selects Closed from the Show list.
Figure: Show Menu inPortalBrowser
Description of the illustration wcpaa_port_closed.gif
The content of a closed portal remains accessible and searchable to those who still want to reference it and portal members can continue working in the portal either by displaying closed portals on the Portals page, or by pretty URL (http://host:port/webcenter/portal/closedPortalName).
When a portal is closed, any activities performed in the portal are no longer reflected in the Activity Stream in the Home portal. Only the Home page of the closed portal shows activity in the portal.
To close down a portal temporarily, take the portal offline instead.
To close a portal, on the General page in portal administration, under Status, deselect the Active check box.
Figure: Closing or Activating aPortal
Description of the illustration wcpaa_portadm_statact.gif
To reactivate the portal, select the Active check box.
An alternate way to close and reactivate a portal is: - From the portal browser. Open the portal browser in any of the following ways:
-
In the Home portal, click the Portals tab.
-
From the Portals menu, select Portal Browser.
-
From the portal editor or portal administration, click the Back to Portals icon at the top left of the screen.
Figure: PortalEditor: Back to Portals Icon
Locate the portal you want to administer, then click Flip icon to display the portal actions menu and select Administer **, then select **General.
Figure: AccessingPortalAdministration fromPortalBrowser
-
From the portal editor. In the portal editor, the portal administration icons are immediately available in the left navigation pane. Click an icon in the left pane to access the administration settings associated with that icon.
-
From the Portals page inWebCenter Portaladministration. From the Portals menu, select Administration, then click the Portals tab. Locate the portal you want to administer, then click the Administer link for the portal. This link is shown only if you are the portal manager or member with
Manage Security and ConfigurationorManage Configurationpermission in the portal.Figure: AccessingPortalAdministration
Description of the illustration wcpaa_port_admacc2.png
-
From theportalviewer. When viewing a portal, select Manage, then All Settings. This menu item is shown only if you are the portal manager or member with
Manage Security and ConfigurationorManage Configurationpermission in the portal.Tip: The location of the Manage action depends on the page template in use. For example, you may access it through an Actions Actions icon menu.
Figure: AccessingPortalAdministration When ViewingPortal
9
Description of the illustration wcpaa_port_admacc4.gif
Taking a Portal Offline or Online
By default, a portal is online. You can take a portal temporarily offline for maintenance. For example, if you notice inappropriate content, you can take a portal offline to modify its content, then bring it back online. Only the system administrator or portal members with Manage Configuration permission can access a portal that is offline, or bring it back online. Other members see the Portal Unavailable page.
To take a portal offline:
-
In the Home portal, click the Portals tab.
-
From the Portals menu, select Portal Browser.
-
From the portal editor or portal administration, click the Back to Portals icon at the top left of the screen.
Figure: PortalEditor: Back to Portals Icon
0
To bring the portal back online, select the Online check box.
An alternate way to take a portal offline or bring it back online is: - In the Home portal, click the Portals tab.
-
From the Portals menu, select Portal Browser.
-
From the portal editor or portal administration, click the Back to Portals icon at the top left of the screen.
Figure: PortalEditor: Back to Portals Icon
1
Enabling or Disabling RSS News Feeds for aPortal
Portal members can find out what is happening in a portal through RSS news feeds. By default, RSS news feeds are disabled. When you enable RSS news feeds within the context of a portal, members can watch for revisions to lists.
For more information about publishing RSS new feeds, see Adding RSS Feeds to a Portal.
To allow members access to portal information through RSS feeds:
-
In the Home portal, click the Portals tab.
-
From the Portals menu, select Portal Browser.
-
From the portal editor or portal administration, click the Back to Portals icon at the top left of the screen.
Figure: PortalEditor: Back to Portals Icon
2
To disable RSS feeds for this portal, deselect the Publish RSS check box.
Deleting a Portal
When a portal has been closed or inactive for some time and is no longer needed, you can remove it permanently from WebCenter Portal. A portal manager or member with Manage Security and Configuration permission can delete the portal. Deleting a portal is permanent; it cannot be restored after it is deleted.
When you delete a portal:
-
In the Home portal, click the Portals tab.
-
From the Portals menu, select Portal Browser.
-
From the portal editor or portal administration, click the Back to Portals icon at the top left of the screen.
Figure: PortalEditor: Back to Portals Icon
3
To delete a portal:
-
In the Home portal, click the Portals tab.
-
From the Portals menu, select Portal Browser.
-
From the portal editor or portal administration, click the Back to Portals icon at the top left of the screen.
Figure: PortalEditor: Back to Portals Icon
4
If the delete process fails for any reason, the portal is not removed from your Portals tab. This sometimes happens when a back-end server cannot be contacted. If you click Delete again, the portal is removed.
Administering Look and Feel Settings for a Portal
The Settings page in portal administration allows you to change the appearance of your portal and its pages through setting the page template, skin, footer, copyright and privacy statements, language, attributes, icon, and logo. This page also allows you to define the resource catalogs that contain the components you can add to pages, page templates, page styles, and task flow assets. You also use this page to specify the behavior when the page is displayed on another device.
The following sections describe the Settings page tasks:
-
In the Home portal, click the Portals tab.
-
From the Portals menu, select Portal Browser.
-
From the portal editor or portal administration, click the Back to Portals icon at the top left of the screen.
Figure: PortalEditor: Back to Portals Icon
6
Accessing Look and Feel Settings for aPortal
-
In the Home portal, click the Portals tab.
-
From the Portals menu, select Portal Browser.
-
From the portal editor or portal administration, click the Back to Portals icon at the top left of the screen.
Figure: PortalEditor: Back to Portals Icon
7
You can also enter the following URL in your browser to navigate directly to the Settings page:
http://host:port/webcenter/portal/portalName/admin/settings
Figure: PortalAdministration: Look and Feel Settings
Description of the illustration wcpaa_prtedit_sett.gif
Disabling and Enabling Page Drafts in a Portal
When portal members edit portal pages, the portal administration settings specify whether changes are applied pages immediately, or applied to a page draft that must be published to allow others to view the changes. By default, page drafts are enabled. For more information, see About Page Drafts.
To enable or disable page drafts in a portal:
-
In the Home portal, click the Portals tab.
-
From the Portals menu, select Portal Browser.
-
From the portal editor or portal administration, click the Back to Portals icon at the top left of the screen.
Figure: PortalEditor: Back to Portals Icon
8
Changing the Page Template for a Portal
A page template defines how individual pages and groups of pages display on a user’s screen. For more information, see Working with Page Templates.
To change the page template for a portal, on the Settings page in portal administration under Assets, select a new Page Template.
The page templates that are listed are those that are made available to the portal on the Shared Assets or Assets page (see Showing and Hiding Assets). The [system default] selection applies the page template specified as the default for all portals by the system administrator.
You can add custom page templates for the portal to this list by copying an existing page template into a new page template, completely separate from the original.
An Expression Editor is available for entering custom values using Expression Language (EL) expression, allowing page template to be determined dynamically based on certain criteria. Click the  icon next to the Page Template drop-down list, then select Expression Builder to open the editor. If you need EL assistance, an application developer can provide an EL expression; see Expression Language Expressions in Developing for Oracle WebCenter Portal.
Changing the Skin for aPortal
A skin defines the appearance and look and feel of a portal. For more information, see Working with Skins.
-
Manage Security and Configuration -
Manage Membership0
Changing the Resource Catalogs in a Portal
When you edit a page or page template in a portal, the resource catalog lists items that you can select to add to the page or page template. For more information about resource catalogs, see Working with Resource Catalogs.
To change the resource catalogs used in a portal:
-
Manage Security and Configuration -
Manage Membership1
The [system default] selection applies the resource catalogs specified as the default for all portals by the system administrator.
You can add custom resource catalogs for the portal to this list by creating a new resource catalog from scratch or by copying an existing resource catalog into a new resource catalog.
An Expression Editor is available for entering custom values using Expression Language (EL) expression, allowing the resource catalog to be determined dynamically based on certain criteria. Click the icon next to the Resource Catalog drop-down list, then select Expression Builder to open the editor. If you need EL assistance, an application developer can provide an EL expression; see Expression Language Expressions in Developing for Oracle WebCenter Portal.
Displaying or Hiding a Page Footer in aPortal
A page footer can display copyright details for the portal and a link to its Privacy Statement.
To display or hide a page footer for a portal:
-
Manage Security and Configuration -
Manage Membership3
Customizing the Copyright Statement and Privacy URL in aPortal
When enabled, the copyright statements and URL to the privacy statement specific to the portal display in the page footer of the portal:
Figure: WebCenter PortalCopyright Statement

Description of the illustration wcsug_gs_copyright.gif
Figure: WebCenter PortalPrivacy URL in Page Footer

Description of the illustration wcsug_gs_privacy.gif
To customize the copyright statement and privacy URL for a portal:
-
Manage Security and Configuration -
Manage Membership4
Setting aPortalDisplay Language
You can optionally set a portal display language to control the language in which the user interface (UI) elements of a particular portal render in WebCenter Portal. UI elements include button and field labels, application links, screen text, and so on.
For more information about working with languages in WebCenter Portal, and the different levels at which a display language can be set, see Translating Portals into Other Languages.
Within the scope of viewing a portal, the portal display language setting is given precedence over all other language settings. For example, if a portal named Sales Team has its display language set to English, and Monica (a member of Sales Team) has set her personal user preference language to Dutch, assuming no other language settings are in effect:
-
Manage Security and Configuration -
Manage Membership5
Note:
If you create a portal based on a portal template that is defined to use a specific language, that language setting is not inherited by the portal. Instead, the initial language setting for a new portal is based on the order of precedence.
To set a portal display language:
-
Manage Security and Configuration -
Manage Membership6
Setting the Page Behavior for aPortalWhen No Page Variant Exists
Page variants are alternative views of an existing page for specific device groups to target specific device size and characteristics. The base page and the page variant have the same URL, security, parameters, and so on.
When using a device (such as smart phones, tablets, and desktop browsers) in a device group that does not have a page variant defined, and the device group is not the default device group for the portal, the page fallback setting determines how to render the page when it is viewed on that device. As the portal manager, you can set the page fallback behavior for all pages in the portal.
This setting is honored based on the following rules:
-
Manage Security and Configuration -
Manage Membership7
Note:
At the application-level, your system administrator performs the following tasks described in Administering Oracle WebCenter Portal:
-
Manage Security and Configuration -
Manage Membership9
To set the fallback behavior for all pages in the portal when displayed on a device in a device group that does not have a page variant defined, and the device group is not the default device group for the portal:
Note:
A portal member with the
Basic Services: Edit Page Access, Structure, and Contentpermission can override the default setting by changing the fallback behavior for the individual page.
Working with Portal Attributes
Every portal includes built-in attributes such as name, description, date created, icon, and so on. In addition to these built-in attributes, you can add custom attributes that are unique to the portal and its characteristics to specify additional portal information (metadata). Custom attributes are propagated throughout the portal.
In addition to portal-specific attributes, system administrators can add and manage global attributes in WebCenter Portal Administration. Global attributes are available for use by any portal.
Custom attributes of a private portal are internal and cannot be accessed by a user who does not have access to the portal. For custom attributes to be accessible either the portal should be public or the user must have access to the private portal. Otherwise, you can include global attributes in your portal that are available for use by any portal.
A custom attribute is simply a name value pair (such as customerId=400, orderId=11, or userName=Smith).
For example, if you build a portal for customer analysis purposes, it might contain several custom task flows that take the parameter customerId as an input: task flows such as Customer Sales History, Customer Satisfaction Rating, Future Sales Prospects, or Customer Contact Information. With a custom attribute defined named customerId with an appropriate value, all the task flows that can accept a customerId can display information specific to that customer.
A custom attribute can also be retrieved using Expression Language (EL) expressions. For example, an EL expression may read a value that is passed in through the URL that displays a portal (for example, customerid=10). Any portal pages, task flows, or portlets that deliver customized content based on parameter values can accept global custom attribute values and display content accordingly using the following Expression Language (EL) syntax to access the global custom attribute value:
For more information, see Passing Parameter Values Through the Page URL. If you need EL assistance, an application developer can provide an EL expression; see Expression Language Expressions in Developing for Oracle WebCenter Portal.
When you create a new portal that is based on a portal template that includes custom attributes, the new portal inherits the template’s custom attributes and their values. You can enter new values for the attributes when you create the new portal.
To work with custom attributes for a portal:
Changing the Portal Icon
The portal icon displays alongside the portal display name in menus and smaller areas. For example, it may display on the Portals menu at the top of the portal, or on the Portals administration page.
Figure: Portal Icon in Portals Menu
![]()
Description of the illustration wcsug_gs_icon_menu.gif
Figure: Portal Icon at Top of Portal
![]()
Description of the illustration wcsug_gs_icon_top.gif
Figure: Portal Icon on Portals Administration Page
Description of the illustration wcpaa_port_pblogo.gif
A default icon is provided by the portal template used when you create the portal, but you can assign a different icon if desired.
To change the portal icon:
Changing thePortalLogo
By default, a new portal is shown in the portal browser as a color tile, overlaid with an acronym and portal name.
Figure: Default Display ofPortalinPortalBrowser
Description of the illustration wcpaa_prt_new.gif
The default color is randomly assigned during portal creation.
If you select Show portal logo instead of color tile in the steps below, then the portal tile displays its logo instead of a color in the portal browser, and the portal name is shown beneath the logo. The default logo is inherited from the portal template, but you can upload any logo image for the portal.
To change the portal logo:
Changing the Portal Preview Image
When you create a new portal template from the current portal, the portal preview image is used to represent a preview of a new portal created with the portal template. This image is exposed in the portal creation wizard on the portal specification page.
Figure: Portal Specification Screen
Description of the illustration wcpaa_port_crt2.gif
In other words, this image applies only if the current portal is used as the basis for new portal template. For example, if you create a portal for a retail site, and want to use the portal to create a portal template for portals for other retail sites, you may wish to change the portal preview image to represent such a portal, such as an image of a product selection page in the portal.
A default preview image is provided by the portal template used when you create the portal, but you can assign a different preview image if desired.
To change the portal preview image:
-
On the Security page, click the Access subtab and select how you want the portal to be exposed:
Figure: Security Page for a Portal: Access Subpage
Description of the illustration wcpaa_portadm_secacc.gif
- **Public**: Anyone can visit the portal, whether they are a registered WebCenter Portal user or not. When this setting is selected, the `Public-User` role in the portal is automatically granted `View Pages and Content` permission in the portal, which allows public users to view pages, lists, events, links, and notes. To allow public users to view documents, you need to grant these permissions. Public users do not have edit, create, or manage permissions in the portal.

- **Private**: To access the portal, membership is required (either through invitation or self-registration if enabled). The portal will be shown in the list of available portals in the portal browser and will appear in search results.

  > **Note:** The `Administrator` role provides a user with administrative permissions in a private portal (such as managing membership), but does not allow access to a private portal's page contents.

- **Hidden**: To access the portal, membership is required (through invitation). The portal will *not* be shown in the list of available portals in the portal browser and will *not* appear in search results. Members can access the portal through direct URL.

  > **Note:** Hidden portals can be viewed through WebCenter Portal administration on the **All Portals** page by users with the permission `Portal Server-Manage Configuration` or `Portals-Manage Security and Configuration`, such as a system administrator. While these users can manage the portal (change settings and membership), they cannot see the portal pages and content unless they are a portal member. 2.  Click **Save**.0
Administering All Assets in a Portal
The Assets page in portal administration allows you to manage the assets for the portal, such as page templates, resource catalogs, and skins. The following sections describe the Assets page tasks:
Accessing Assets Administration for a Portal
To access the assets administration for a portal, click the Assets icon.
You can also enter the following URL in your browser to navigate directly to the Assets page:
http://host:port/webcenter/portal/portalName/admin/assets
See Also: WebCenter Portal Pretty URLs
Figure: PortalAdministration: Assets
Description of the illustration wcpaa_portadm_assets.gif
Working with Portal Assets
To work with the assets for a portal, see Working with Portal Assets.
Viewing Device Groups for a Portal
The Device Settings page in portal administration allows you to view the various device groups available for use in the portal. The following sections describe the Device Settings page tasks:
-
On the Security page, click the Access subtab and select how you want the portal to be exposed
Figure: Security Page for a Portal: Access Subpage
Description of the illustration wcpaa_portadm_secacc.gif
- **Public**: Anyone can visit the portal, whether they are a registered WebCenter Portal user or not. When this setting is selected, the `Public-User` role in the portal is automatically granted `View Pages and Content` permission in the portal, which allows public users to view pages, lists, events, links, and notes. To allow public users to view documents, you need to grant these permissions. Public users do not have edit, create, or manage permissions in the portal.

- **Private**: To access the portal, membership is required (either through invitation or self-registration if enabled). The portal will be shown in the list of available portals in the portal browser and will appear in search results.

  > **Note:** The `Administrator` role provides a user with administrative permissions in a private portal (such as managing membership), but does not allow access to a private portal's page contents.

- **Hidden**: To access the portal, membership is required (through invitation). The portal will *not* be shown in the list of available portals in the portal browser and will *not* appear in search results. Members can access the portal through direct URL.

  > **Note:** Hidden portals can be viewed through WebCenter Portal administration on the **All Portals** page by users with the permission `Portal Server-Manage Configuration` or `Portals-Manage Security and Configuration`, such as a system administrator. While these users can manage the portal (change settings and membership), they cannot see the portal pages and content unless they are a portal member. 2.  Click **Save**.2
About Device Settings
Enterprise portal users access portals from a range of devices, from smart phones to tablets to desktop browsers. Device settings and related features control exactly how your portal pages render on different devices. Device settings can be configured only at the application level and not at the portal level. Application-level device settings apply to all portals. As a portal manager, you can view the device settings that apply to your portal.
System administrators can add support for a new type of device or device group or change the way portal pages render on certain devices.
Note:
If your portal pages use a non-responsive page template, the display on different devices may exhibit formatting issues, such as overlapping text.
Accessing Device Settings for a Portal
To access the device settings administration for a portal, click the Device Settings icon.
You can also enter the following URL in your browser to navigate directly to the Device Settings page:
http://host:port/webcenter/portal/admin/portals/admin/portalName/device
Figure: PortalAdministration: Device Settings
Description of the illustration wcpaa_portadm_device.gif
Filtering Device Groups
The Filter field on the Device Settings page lets you filter the list of device groups shown in the device group table. You can filter searches based on device group names, display names, and descriptions.
To filter the device groups for a portal:
-
On the Security page, click the Access subtab and select how you want the portal to be exposed:
Figure: Security Page for a Portal: Access Subpage
Description of the illustration wcpaa_portadm_secacc.gif
- **Public**: Anyone can visit the portal, whether they are a registered WebCenter Portal user or not. When this setting is selected, the `Public-User` role in the portal is automatically granted `View Pages and Content` permission in the portal, which allows public users to view pages, lists, events, links, and notes. To allow public users to view documents, you need to grant these permissions. Public users do not have edit, create, or manage permissions in the portal.

- **Private**: To access the portal, membership is required (either through invitation or self-registration if enabled). The portal will be shown in the list of available portals in the portal browser and will appear in search results.

  > **Note:** The `Administrator` role provides a user with administrative permissions in a private portal (such as managing membership), but does not allow access to a private portal's page contents.

- **Hidden**: To access the portal, membership is required (through invitation). The portal will *not* be shown in the list of available portals in the portal browser and will *not* appear in search results. Members can access the portal through direct URL.

  > **Note:** Hidden portals can be viewed through WebCenter Portal administration on the **All Portals** page by users with the permission `Portal Server-Manage Configuration` or `Portals-Manage Security and Configuration`, such as a system administrator. While these users can manage the portal (change settings and membership), they cannot see the portal pages and content unless they are a portal member. 2.  Click **Save**.3
Administering Tools and Services in a Portal
The Tools and Services page in portal administration allows you to enable and disable tools and services operating in the portal, such as Documents, Events, and Lists. The following sections describe the Tools and Services page tasks:
-
On the Security page, click the Access subtab and select how you want the portal to be exposed:
Figure: Security Page for a Portal: Access Subpage
Description of the illustration wcpaa_portadm_secacc.gif
- **Public**: Anyone can visit the portal, whether they are a registered WebCenter Portal user or not. When this setting is selected, the `Public-User` role in the portal is automatically granted `View Pages and Content` permission in the portal, which allows public users to view pages, lists, events, links, and notes. To allow public users to view documents, you need to grant these permissions. Public users do not have edit, create, or manage permissions in the portal.

- **Private**: To access the portal, membership is required (either through invitation or self-registration if enabled). The portal will be shown in the list of available portals in the portal browser and will appear in search results.

  > **Note:** The `Administrator` role provides a user with administrative permissions in a private portal (such as managing membership), but does not allow access to a private portal's page contents.

- **Hidden**: To access the portal, membership is required (through invitation). The portal will *not* be shown in the list of available portals in the portal browser and will *not* appear in search results. Members can access the portal through direct URL.

  > **Note:** Hidden portals can be viewed through WebCenter Portal administration on the **All Portals** page by users with the permission `Portal Server-Manage Configuration` or `Portals-Manage Security and Configuration`, such as a system administrator. While these users can manage the portal (change settings and membership), they cannot see the portal pages and content unless they are a portal member. 2.  Click **Save**.4
Accessing Tools and Services Administration for a Portal
To access the tools and services administration for a portal:
-
On the Security page, click the Access subtab and select how you want the portal to be exposed:
Figure: Security Page for a Portal: Access Subpage
Description of the illustration wcpaa_portadm_secacc.gif
- **Public**: Anyone can visit the portal, whether they are a registered WebCenter Portal user or not. When this setting is selected, the `Public-User` role in the portal is automatically granted `View Pages and Content` permission in the portal, which allows public users to view pages, lists, events, links, and notes. To allow public users to view documents, you need to grant these permissions. Public users do not have edit, create, or manage permissions in the portal.

- **Private**: To access the portal, membership is required (either through invitation or self-registration if enabled). The portal will be shown in the list of available portals in the portal browser and will appear in search results.

  > **Note:** The `Administrator` role provides a user with administrative permissions in a private portal (such as managing membership), but does not allow access to a private portal's page contents.

- **Hidden**: To access the portal, membership is required (through invitation). The portal will *not* be shown in the list of available portals in the portal browser and will *not* appear in search results. Members can access the portal through direct URL.

  > **Note:** Hidden portals can be viewed through WebCenter Portal administration on the **All Portals** page by users with the permission `Portal Server-Manage Configuration` or `Portals-Manage Security and Configuration`, such as a system administrator. While these users can manage the portal (change settings and membership), they cannot see the portal pages and content unless they are a portal member. 2.  Click **Save**.5
You can also enter the following URL in your browser to navigate directly to the Tools and Services page:
http://host:port/webcenter/portal/portalName/admin/services
Figure: PortalAdministration: Tools and Services
Description of the illustration wcpaa_portadm_tools.gif
Working with Tools and Services
Most tools and services configuration is the responsibility of the system administrator, who configures and maintains connections to make the tools and services available in WebCenter Portal.
You can check the** Tools and Services** page for a portal to see which tools and services are available, and enable or disable as required. If not shown on the Tools and Services page, then the system administrator has not configured that tool or service connection. When you enable a tool or service in a portal, you are automatically granted Manage permissions on that tool or service.
To work with the tools and service for a portal, see Working with WebCenter Portal Tools and Services
Deploying and Propagating a Portal
When you deploy a portal to another portal server, you make a copy of the source portal on the target server and you can include all or some of the source portal’s data.
Deploying a new portal on the target server and redeploying an existing portal are exactly the same. When you deploy a portal that already exists on the target, it is simply deleted and recreated as a new portal.
To deploy a portal:
-
On the Security page, click the Access subtab and select how you want the portal to be exposed:
Figure: Security Page for a Portal: Access Subpage
Description of the illustration wcpaa_portadm_secacc.gif
- **Public**: Anyone can visit the portal, whether they are a registered WebCenter Portal user or not. When this setting is selected, the `Public-User` role in the portal is automatically granted `View Pages and Content` permission in the portal, which allows public users to view pages, lists, events, links, and notes. To allow public users to view documents, you need to grant these permissions. Public users do not have edit, create, or manage permissions in the portal.

- **Private**: To access the portal, membership is required (either through invitation or self-registration if enabled). The portal will be shown in the list of available portals in the portal browser and will appear in search results.

  > **Note:** The `Administrator` role provides a user with administrative permissions in a private portal (such as managing membership), but does not allow access to a private portal's page contents.

- **Hidden**: To access the portal, membership is required (through invitation). The portal will *not* be shown in the list of available portals in the portal browser and will *not* appear in search results. Members can access the portal through direct URL.

  > **Note:** Hidden portals can be viewed through WebCenter Portal administration on the **All Portals** page by users with the permission `Portal Server-Manage Configuration` or `Portals-Manage Security and Configuration`, such as a system administrator. While these users can manage the portal (change settings and membership), they cannot see the portal pages and content unless they are a portal member. 2.  Click **Save**.6
For more information about deploying and propagating a portal, see Deploying Portals, Templates, Assets, and Extensions in Administering Oracle WebCenter Portal.
To deploy a portal:
-
On the Security page, click the Access subtab and select how you want the portal to be exposed:
Figure: Security Page for a Portal: Access Subpage
Description of the illustration wcpaa_portadm_secacc.gif
- **Public**: Anyone can visit the portal, whether they are a registered WebCenter Portal user or not. When this setting is selected, the `Public-User` role in the portal is automatically granted `View Pages and Content` permission in the portal, which allows public users to view pages, lists, events, links, and notes. To allow public users to view documents, you need to grant these permissions. Public users do not have edit, create, or manage permissions in the portal.

- **Private**: To access the portal, membership is required (either through invitation or self-registration if enabled). The portal will be shown in the list of available portals in the portal browser and will appear in search results.

  > **Note:** The `Administrator` role provides a user with administrative permissions in a private portal (such as managing membership), but does not allow access to a private portal's page contents.

- **Hidden**: To access the portal, membership is required (through invitation). The portal will *not* be shown in the list of available portals in the portal browser and will *not* appear in search results. Members can access the portal through direct URL.

  > **Note:** Hidden portals can be viewed through WebCenter Portal administration on the **All Portals** page by users with the permission `Portal Server-Manage Configuration` or `Portals-Manage Security and Configuration`, such as a system administrator. While these users can manage the portal (change settings and membership), they cannot see the portal pages and content unless they are a portal member. 2.  Click **Save**.7
Exporting and Importing a Portal
Exporting and importing a portal is primarily done by the system administrator. However, the default permissions of the Portal Manager allow portal managers to perform these tasks.
Note:
For detailed information about portal permissions and exporting and importing a portal, see Permissions Required to Perform WebCenter Portal Life Cycle Operations and Exporting and Importing a Portal in Administering Oracle WebCenter Portal.
This section includes the following topics:
-
On the Security page, click the Access subtab and select how you want the portal to be exposed:
Figure: Security Page for a Portal: Access Subpage
Description of the illustration wcpaa_portadm_secacc.gif
- **Public**: Anyone can visit the portal, whether they are a registered WebCenter Portal user or not. When this setting is selected, the `Public-User` role in the portal is automatically granted `View Pages and Content` permission in the portal, which allows public users to view pages, lists, events, links, and notes. To allow public users to view documents, you need to grant these permissions. Public users do not have edit, create, or manage permissions in the portal.

- **Private**: To access the portal, membership is required (either through invitation or self-registration if enabled). The portal will be shown in the list of available portals in the portal browser and will appear in search results.

  > **Note:** The `Administrator` role provides a user with administrative permissions in a private portal (such as managing membership), but does not allow access to a private portal's page contents.

- **Hidden**: To access the portal, membership is required (through invitation). The portal will *not* be shown in the list of available portals in the portal browser and will *not* appear in search results. Members can access the portal through direct URL.

  > **Note:** Hidden portals can be viewed through WebCenter Portal administration on the **All Portals** page by users with the permission `Portal Server-Manage Configuration` or `Portals-Manage Security and Configuration`, such as a system administrator. While these users can manage the portal (change settings and membership), they cannot see the portal pages and content unless they are a portal member.
- Click Save.8
Exporting a Portal
Exporting a portal is primarily a system administrator task. However, portal managers can also export portals.
For more information about exporting a portal, see Exporting Portals to an Archive in Administering Oracle WebCenter Portal
To export a portal:
-
On the Security page, click the Access subtab and select how you want the portal to be exposed:
Figure: Security Page for a Portal: Access Subpage
Description of the illustration wcpaa_portadm_secacc.gif
- **Public**: Anyone can visit the portal, whether they are a registered WebCenter Portal user or not. When this setting is selected, the `Public-User` role in the portal is automatically granted `View Pages and Content` permission in the portal, which allows public users to view pages, lists, events, links, and notes. To allow public users to view documents, you need to grant these permissions. Public users do not have edit, create, or manage permissions in the portal.

- **Private**: To access the portal, membership is required (either through invitation or self-registration if enabled). The portal will be shown in the list of available portals in the portal browser and will appear in search results.

  > **Note:** The `Administrator` role provides a user with administrative permissions in a private portal (such as managing membership), but does not allow access to a private portal's page contents.

- **Hidden**: To access the portal, membership is required (through invitation). The portal will *not* be shown in the list of available portals in the portal browser and will *not* appear in search results. Members can access the portal through direct URL.

  > **Note:** Hidden portals can be viewed through WebCenter Portal administration on the **All Portals** page by users with the permission `Portal Server-Manage Configuration` or `Portals-Manage Security and Configuration`, such as a system administrator. While these users can manage the portal (change settings and membership), they cannot see the portal pages and content unless they are a portal member. 2.  Click **Save**.9
Importing a Portal
Importing a portal is primarily done by the system administrator. However, users with Create Portals permissions can import a portal. This permission is granted by default to the Authenticated-User role.
Note:
To re-import a portal that already exists in your instance of WebCenter Portal (for example, if you have made any changes to it in another application such as JDeveloper), you must have
Portals: Manage Security and ConfigurationandCreate Portalspermissions.
To import a portal:
-
Public: Anyone can visit the portal, whether they are a registered WebCenter Portal user or not. When this setting is selected, the
Public-Userrole in the portal is automatically grantedView Pages and Contentpermission in the portal, which allows public users to view pages, lists, events, links, and notes. To allow public users to view documents, you need to grant these permissions. Public users do not have edit, create, or manage permissions in the portal. -
Private: To access the portal, membership is required (either through invitation or self-registration if enabled). The portal will be shown in the list of available portals in the portal browser and will appear in search results.
Note: The
Administratorrole provides a user with administrative permissions in a private portal (such as managing membership), but does not allow access to a private portal’s page contents. -
Hidden: To access the portal, membership is required (through invitation). The portal will not be shown in the list of available portals in the portal browser and will not appear in search results. Members can access the portal through direct URL.
Note: Hidden portals can be viewed through WebCenter Portal administration on the All Portals page by users with the permission
Portal Server-Manage ConfigurationorPortals-Manage Security and Configuration, such as a system administrator. While these users can manage the portal (change settings and membership), they cannot see the portal pages and content unless they are a portal member.1