10 Controlling and Configuring Client Systems
WARNING:
The software described in this documentation is supported for a limited period under Extended Support. Oracle Linux 7 is now in Extended Support. See Oracle Linux Extended Support and Oracle Open Source Support Policies for more information.
Consider using OS Management Hub to manage operating system infrastructure. See OS Management Hub for more information.
This chapter describes how you can configure Oracle Linux Manager to run command scripts on remote client systems. You can set up configuration channels, subscribe client systems to these channels, and customize client systems by using the channels to deploy configuration files.
To run commands and perform tasks described in this chapter, the Oracle Linux Manager server must be permitted to run remote commands on client systems. See Configuring Client Systems for Remote Management.
Running Command Scripts on Remote Clients
Use either the web interface or the spacecmd command to enable you to run commands and scripts remotely on client systems.
Using the Oracle Linux Manager Web Interface
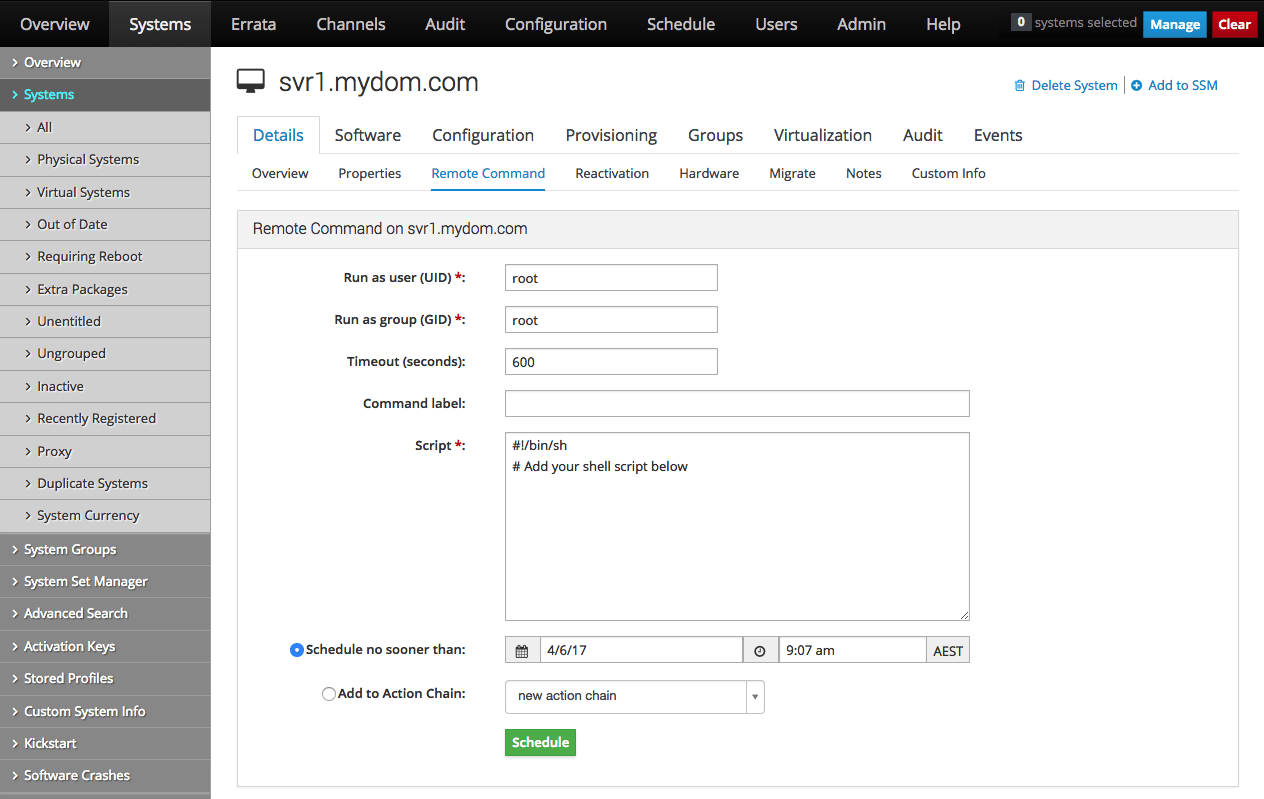
Figure 10-1 Remote Command Page

Log in to Oracle Linux Manager server at
https://olmsvr-FQDN
and do the following:
-
Go to Systems and select the client system from the list.
-
Select Details and then select the Remote Command tab.
-
If required, change the user and group ID of the user that should run the command, the command timeout, and a command label of up to 10 characters.
-
In the Script text box, enter the command script that you want to run. The following example runs the who command:
#!/bin/sh
who
-
If required, change the schedule for the command.
-
Click Schedule to commit the command script to run according to the schedule that you specify.
If you have not edited the schedule and you have enabled the OSA daemon on the client, the OSA daemon usually runs the command immediately.
-
Select Events and then select the Pending or History tab to view scheduled or completed actions. Click the summary name to display the details of the script and any output if it has already run on the client.
Using the system_runscript Command
To run a command on client systems, use the command syntax as follows. Ensure that you confirm the command as prompted.
system_runscript group:group-name -s start-time -t timeout -f path-to-script
The -s option specifies the date and time ,
YYYYMMDD[hhmm]
format, when an event should start. If you do not specify a
start time, Oracle Linux Manager assumes 0000
(midnight).
The -t option defines a timeout for a client
to confirm that it has run a command. After this time has
elapsed, Oracle Linux Manager assumes that the command has failed.
The following example illustrates use of the command and the output that is displayed:
spacecmd {SSM:0}> system_runscript group:group3 -s 20150617T0130 -t 60 -f /root/myscriptUser: root
Group: root
Timeout: 60 seconds
Start Time: 20150617T01:30:00
Script Contents
---------------
#!/bin/sh
yum update
Systems
-------
svr2.mydom.com
svr3.mydom.com
Is this ok [y/N]: y
INFO: Action ID: 343
INFO: Scheduled: 2 system(s)Working With Scheduled Events
To display a list of completed, failed, and pending events, use this command:
schedule_list
For example, running the command might display the following information:
spacecmd {SSM:0}> schedule_listID Date C F P Action -- ---- --- --- --- ------ ... 343 20150617T01:30:00 0 0 2 Run an arbitrary script ...
The C, F, and
P columns show the number of systems on which
the event has completed, failed, or is pending. To display only
completed, failed, or pending events, use the
schedule_listcompleted,
schedule_listfailed, or
schedule_listpending commands.
The following commands apply actions to schedule related events:
-
Display a pending event.
spacecmd {SSM:0}> schedule_details ID -
Cancel a pending event.
spacecmd {SSM:0}> schedule_cancel ID -
Reschedule a failed event.
spacecmd {SSM:0}> schedule_reschedule ID
Working With Configuration Channels
Configuration channels contain files for configuring client systems, for example, configuration information for services, applications, or users.
Creating Customer Information Keys
Custom information keys enable you to extract configuration
information from clients. For example, you could define a custom
information key named uptrack-uname to store
the value of the Ksplice effective kernel version.
Note:
For information about activation keys, see Working With Activation Keys in Oracle Linux Manager.
Using the Oracle Linux Manager Web Interface
To define a custom information key and assign it to a system, follow these steps:
-
Go to Systems and select Custom System Info.
-
Click + Create New Key.
-
On the Create Custom Info Key page, enter a key label (for example,
asset_tag) and description, and then click Create Key. -
Go to Systems and click the name of the system for which you want to assign a value to the key.
-
Select the Custom Info tab.
-
On the Custom System Information page, click + Create New Value.
-
On the Edit Custom Info Key page, select the key to which you want to assign a value.
The page updates to display information about the key and a Value text box.
-
Enter the key value in the Value text box and click Update Key.
The Custom System Information page displays the key-value pairs that are associated with a system. You can modify a value by selecting the associated Edit this value link.
Note:
You can also define custom information keys for a system by using the Custom Info tab of a system's Kickstart profile.
You can define as many key-value pairs for a system as you require.
Using the custominfo_createkey Command
To create a custom information key, use the custominfo_createkey command as follows:
spacecmd {SSM:0}> custominfo_createkey admin_user "Email of admin contact"To list the available custom information keys, use the custominfo_listkeys command:
spacecmd {SSM:0}> custominfo_listkeysTo assign a custom information key to a system or system group, use the system_addcustomvalue:
spacecmd {SSM:0}> system_addcustomvalue asset_tag "fc01568a" svr3.mydom.com
spacecmd {SSM:0}> system_addcustomvalue admin_user "an.admin@mydom.com" group:group3
To list the custom information keys for a system or system group, use the system_listcustomvalues command:
spacecmd {SSM:0}> system_listcustomvalues system-namespacecmd {SSM:0}> system_listcustomvalues group:groupApplying Custom Information Keys
To apply a custom information key, follow these steps:
-
Install the
rhn-custom-infopackage on each client with which you want to use the key. -
Use the rhn-custom-info command to make the value of the key available in Oracle Linux Manager:
sudo rhn-custom-info uptrack-uname `uptrack-uname -r`
This command makes the value returned by
uptrack-uname -ravailable as the value of theuptrack-unamekey. You can then use the macrorhn.system.custom_info(uptrack-uname)to extract the value ofuptrack-namewithin a configuration file.
Setting Up Configuration Channels
Use either the web interface or the spacecmd command to work with configuration channels.
Using the Oracle Linux Manager Web Interface
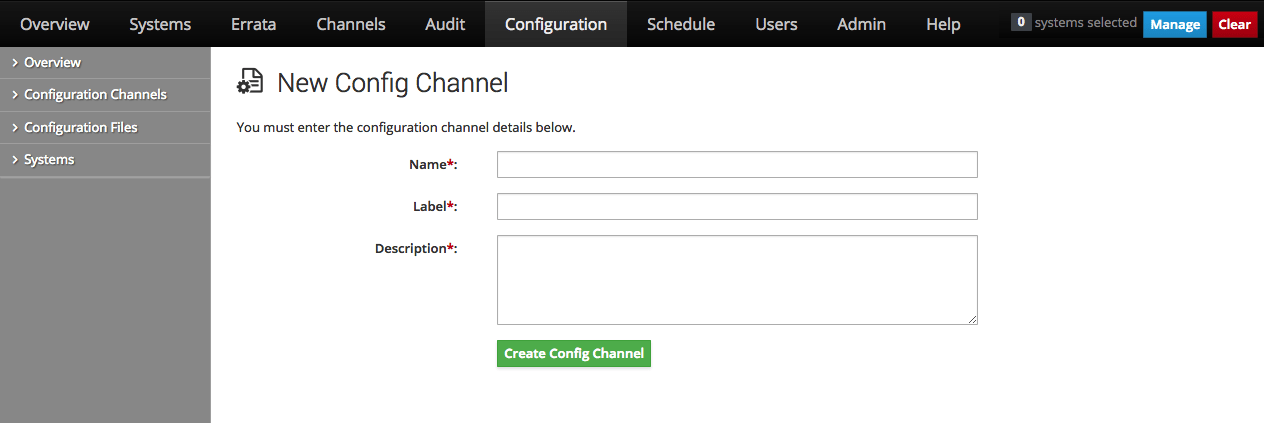
Figure 10-2 New Config Channel Page

To create a configuration channel:
-
Go to Configuration and select Configuration Channels
-
On the Centrally Managed Configuration Channels page, click + Create New Config channel.
-
Enter a name, label, and description for the channel. The label should be a short representation of the target operating system, architecture (if appropriate), and the purpose of the channel, for example,
ol6_generic_configuration. -
Click Create Config Channel.
-
To add files to the configuration channel, on the New Channel page, select the Add Files tab.
-
To create a text file, directory, or symbolic link:
-
Select the Create File tab.
-
On the Create New Configuration File page, create a text file, directory, or symbolic link.
For example, to set up a message-of-the-day file that contains configuration information about the client, you might enter the following details:
- File Type
-
Select Text file.
- Filename/Path
-
Enter
/etc/motd. - Ownership
-
Enter
rootfor both the user name and group. (These are the default entries.) - File Permissions Mode
-
Enter 644. (This is the default mode.)
- File Contents
-
Select the file type as Shell from the drop-down list, and enter the file contents in the text field.
For example, the following file uses macros that Oracle Linux Manager replaces with the appropriate values for the system on which the file is deployed:
System Information
==================
Client system: {|rhn.system.hostname|}
Oracle Linux
  Manager SID: {|rhn.system.sid|}
Asset tag:     {|rhn.system.custom_info(asset_tag) = 'Asset tag missing'|}
Profile:       {|rhn.system.profile_name|}
Description:   {|rhn.system.description|}
IP address:    {|rhn.system.ip_address(eth0)|}
MAC address:   {|rhn.system.net_interface.hardware_address(eth0)|}
The custom macro
rhn.system.custom_infosubstitutes the value of the custom system information key namedasset_tagas assigned on the Custom Info tab for the system. Otherwise, it inserts the valueAsset tag missing. -
After entering the details of the file, click Create Configuration File.
-
-
To import files:
-
Select the Import Files tab.
On the Import Configuration File(s) from Another Channel page, you can import configuration files from other configuration channels.
-
Select the check boxes of the configuration files that you want to import.
-
Click Import Configuration File(s).
-
-
To upload files:
-
Select the Upload File tab.
-
On the Upload New Configuration File page, click Browse... and select the path of the file to upload.
-
Select the file type: Text file or Binary file.
-
Enter other details for the file, such as ownership and permissions, as required.
-
Click Upload Configuration File.
-
-
Using the configchannel_create Command
To create a configuration channel, use the configchannel_create command as shown in the following example. You would need to provide specific information, which is shown in bold.
spacecmd {SSM:0}> configchannel_createName: Oracle Linux 6 Server Configuration Label: ol6-server-config Description: Generic configuration channel for Oracle Linux 6 servers
To add a configuration file to a channel, use the configchannel_addfile confg0file command. The command requires user input during the process, as shown in bold in the following example:
spacecmd {SSM:0}> configchannel_addfile ol6-server-configPath: /etc/motd Symlink [y/N]: N Directory [y/N]: N Owner [root]: [Enter] Group [root]: [Enter] Mode [0644]: [Enter] SELinux Context [None]: [Enter] Revision [next]: [Enter] Read an existing file [y/N]: y File: /var/config_file_templates/ol6-server/etc/motd Path: /etc/motd Directory: False Owner: root Group: root Mode: 0644 SELinux Context: Contents -------- System Information ================== Client system: {|rhn.system.hostname|} Oracle Linux Manager SID: {|rhn.system.sid|} Asset tag: {|rhn.system.custom_info(asset_tag) = 'Asset tag missing'|} Profile: {|rhn.system.profile_name|} Description: {|rhn.system.description|} IP address: {|rhn.system.ip_address(eth0)|} MAC address: {|rhn.system.net_interface.hardware_address(eth0)|} Is this ok [y/N]: y
The custom macro rhn.system.custom_info
substitutes the value of the custom system information key
named asset_tag as assigned on the Custom
Info tab for the system. Otherwise, it inserts the value
Asset tag
                      missing
.
See Using the custominfo_createkey Command.
See Configuration File Macros.
To display the details of a configuration channel, use the configchannel_details command:
spacecmd {SSM:0}> configchannel_details ol6-server-configSubscribing Client Systems to Configuration Channels
Use either the web interface or the spacecmd command to subscribe client systems to configuration channels.
Using the Oracle Linux Manager Web Interface
-
Go to Systems and click the system name.
-
Select the Configuration tab, then the Manage Configuration Channels tab, and finally the Subscribe to Channels tab.
-
For Step 1: Select Channels for Subscription page, select the check boxes for the channels to which you want to subscribe the system and click Continue.
-
For Step 2: Rank Channels for Subscription page, you can optionally change the order of the configuration channels according to priority. Higher-rank entries override lower-rank entries if several entries can modify the same files or directories.
-
To save your changes, click Update Channel Rankings.
Using the system_addconfigchannels Command
In a spacecmd session, list the available configuration channels as follows:
spacecmd {SSM:0}> configchannel_listTo subscribe a system or system group to a configuration channel, use the system_addconfigchannels command syntax:
spacecmd {SSM:0}> system_addconfigchannels svr3.mydom.com ol6-nfs-server-config -t
spacecmd {SSM:0}> system_addconfigchannels group:group3 ol6-server-config -b
To list the configuration channels to which a system or system group is subscribed, use the system_listconfigchannels command:
spacecmd {SSM:0}> system_listconfigchannels group:group3To edit the configuration channels for a system, you can use the system_setconfigchannelorder command. The command lists the available channels for the system, and then enables you to select a channel to which you can specify a new rank, as shown in bold in the following example:
spacecmd {SSM:0}> system_setconfigchannelorder svr1.mydom.comCurrent Selections ------------------ 1. ol6-server-config a[dd], r[emove], c[lear], d[one]: a Available Configuration Channels -------------------------------- ol6-dns-server-config ol6-http-server-config ol6-nfs-server-config ol6-server-config Channel: ol6-dns-server-config New Rank: 1 Current Selections ------------------ 1. ol6-dns-server-config 2. ol6-server-config a[dd], r[emove], c[lear], d[one]: d
To unsubscribe a system from a configuration channel, use the system_removeconfigchannels channel-name command.
Deploying Configuration Files on Client Systems
Use either the web interface or the spacecmd command to deploy configuration files.
Using the Oracle Linux Manager Web Interface
Note:
You must have previously subscribed the system to the appropriate configuration channel for the configuration files that you want to deploy. See Using the Oracle Linux Manager Web Interface.
The first deployment to a client system can fail if the
/var/log/rhncfg-actions log file does not
exist on the client. If the deployment fails, the log file
is created automatically, and you can reschedule the
deployment event. Alternatively, run the following command
on the client system before deploying any files to it:
sudo touch /var/log/rhncfg-actions
Oracle recommends using configuration files to deploy SSL and GPG certificates to Oracle Linux Manager clients that were not previously provisioned by Oracle Linux Manager server.
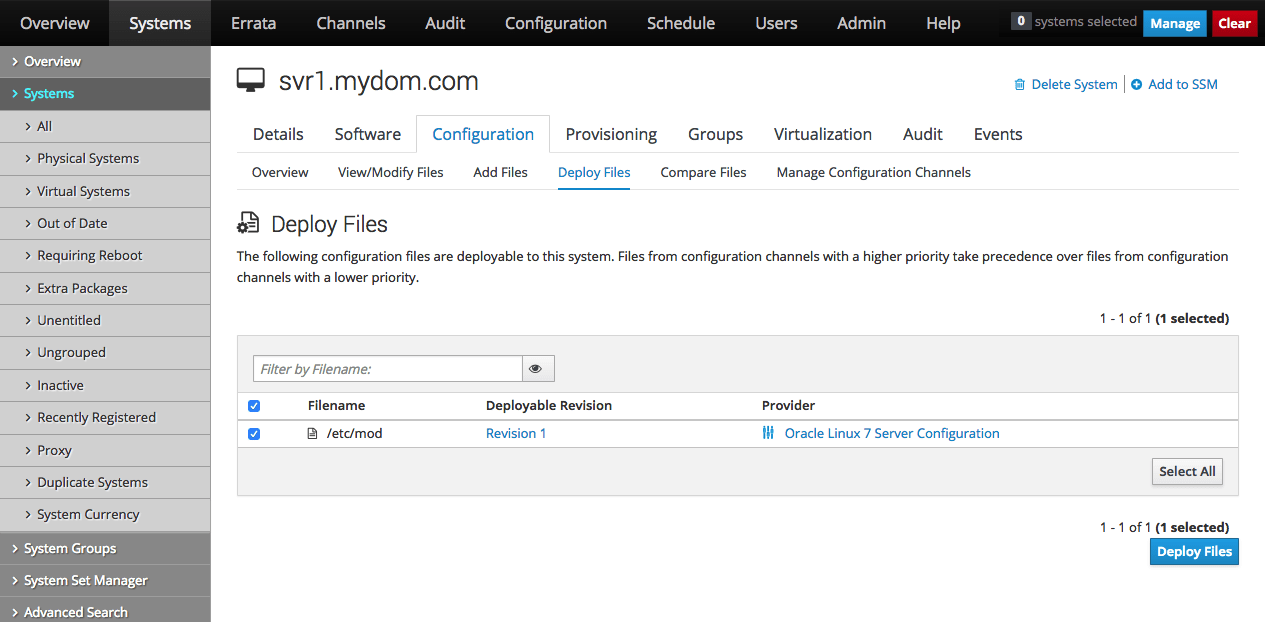
Figure 10-3 Deploy Files Page

-
Go to Systems and click the system name.
-
Select the Configuration tab and then the Deploy Files tab.
-
On the Deploy Files page, select the check boxes for the files that you want to deploy, and click Deploy Files.
-
On the Confirm Deploy Files page, change the schedule if required, and click Schedule Deploy.
-
Select Events and then select the Pending or History tab to view scheduled or completed actions. Click the summary name to display the details of the deployment event.
Using the system_deployconfigfiles Command
Note:
You must have previously subscribed the system to the appropriate configuration channel for the configuration files that you want to deploy. See Using the system_addconfigchannels Command.
The first deployment to a client system can fail if the
/var/log/rhncfg-actions log file does not
exist on the client. If the deployment fails, the log file
is created automatically, and you can reschedule the
deployment event. Alternatively, run the following command
on the client system before deploying any files to it:
sudo touch /var/log/rhncfg-actions
In a spacecmd session, to deploy all configuration files to a system or system group, use the system_deployconfigfiles command: Ensure that you confirm the command, as shown in bold in the following example:
spacecmd {SSM:0}> system_deployconfigfiles group:group3Systems
-------
svr3.mydom.com
svr4.mydom.com
Deploy ALL configuration files to these systems [y/N]: y
INFO: Scheduled deployment for 2 system(s)To display the details of a pending deployment event, use the schedule_details command.