9 Configuring Storage Devices for Operating System Installation

This section provides instructions for preparing Oracle Server X9-2 or Oracle Server X9-2L storage devices for operating system (OS) installation. If applicable, prepare storage drives and configure RAID.

Section Description Links

Supported Storage Devices

Lists devices, including hard disk drives (HDDs) and solid state drives (SSDs) that are supported on Oracle Server X9-2 or Oracle Server X9-2L. Provides links to procedures for configuring RAID on HDD and SSD devices.

Updated device support information is available in the Oracle Server X9-2 Product Notes and Oracle Server X9-2L Product Notes.

To learn more about HDDs and SSDs, refer to Oracle Storage Drives Documentation Library (https://docs.oracle.com/cd/F24175_01/index.html).

RAID Overview

Overview of RAID levels, Hardware RAID and Software RAID differences, drive requirements, and operating systems.

Host Bus Adapter (HBA) Documentation

Configure RAID on Oracle Storage 12 Gb SAS PCIe RAID Host Bus Adapter, Internal 16 Port

Information and procedures to configure RAID on Oracle Server X9-2L Host Bus Adapters (HBAs). Storage devices can connect to HBAs.

You can use a BIOS utility to combine storage drives into RAID arrays. The Oracle Storage 12 Gb SAS PCIe RAID Host Bus Adapter, Internal 16 Port controls the HDDs and SSD drives, which are shipped with RAID 0 volumes.

Oracle Storage 12 Gb SAS PCIe RAID HBA, Internal: 16 Port and 2 GB Memory Documentation

3.84 TB U.2 NVMe SSDs

6.8 TB U.2 NVMe SSD

You can install an operating system on an 3.84 and 6.8 TB U.2 NVMe SSDs without any additional configuration. Or, you can use the BIOS Setup Utility to configure these SSDs before installing an operating system.

To learn more about 3.84 and 6.8 TB U.2 NVMe SSDs, refer to Oracle Flash Accelerator F640 PCIe Card and NVMe SSD Documentation.

Configure SATA RAID Using VROC

240 GB M.2 SATA SSD

You can install an operating system on an M.2 SATA SSD without any additional configuration. Or, you can use the BIOS Setup Utility to configure these SSDs with Intel Virtual RAID On CPU (VROC) before installing an operating system.

To learn more about 240 GB M.2 SATA SSDs, refer to 240 Gbyte, M.2 SATA, Solid State Drive Specification, 6 Gbps SATA-3 Interface Documentation .

Identifying Installed Oracle Flash Accelerator F640 PCIe Cards in BIOS Setup Utility

Oracle Flash Accelerator F640 PCIe Cards should be ready to install an OS without any additional configuration. You can use the BIOS Setup Utility to see a list of installed Oracle Flash Accelerator F640 PCIe Cards.

To learn more about Oracle Flash Accelerator F640 PCIe Card v3, refer to Oracle Flash Accelerator F640 PCIe Card and NVMe SSD Documentation

Installing an Operating System

After you have configured storage drives, you can install an operating system on them.

Refer to operating system support information in Oracle Server X9-2 Product Notes and Oracle Server X9-2L Product Notes.

Supported Storage Devices

Note:

Updated supported drive information is available in the server product notes.

Your server might be equipped with one of the following storage devices:

Device Description Links

Combination of U.2 small form factor (SFF) hard disk drives (HDDs) and solid state drives (SSDs) controlled by internal Host Bus Adapter (HBA) PCIe card.

Oracle Storage 12 Gb SAS PCIe RAID Host Bus Adapter, Internal 16 Port manages the server's SSDs and HDDs.

Instructions to configure RAID on the internal HBA: Configure RAID on Oracle Storage 12 Gb SAS PCIe RAID Host Bus Adapter, Internal 16 Port.

6.8 TB U.2 NVMe SSDs

3.84 TB U.2 NVMe SSDs

You can install an operating system on 6.8 TB and 3.84 TB NVMe SSDs without any additional configuration.

6.8 TB and 3.84 TB small form factor (SFF) NVMe solid state drive (SSD) boot devices do not support hardware RAID.

U.2 NVMe SSD Documentation: Oracle Flash Accelerator F640 PCIe Card and NVMe SSD Documentation.

240 GB M.2 SATA SSDs

The 240 GB M.2 SATA SSD supports software RAID.

Instructions to configure RAID on M.2 SATA SSDs: Configure SATA RAID Using VROC.

Oracle Flash Accelerator F640 PCIe Cards

You can install an operating system on Oracle Flash Accelerator F640 PCIe Card v3: 6.4 TB, NVMe SSDs without any additional configuration.

Instructions to identify Oracle Flash Accelerator F640 PCIe Cards: Identifying Installed Oracle Flash Accelerator F640 PCIe Cards in BIOS Setup Utility.

RAID Overview

RAID (redundant array of independent disks) configures drives into logical units called "volumes." RAID configuration types are distinguished as numerical RAID levels (RAID 0, RAID 1, RAID 5, and so forth). Each supported RAID level requires a specified number of storage devices to complete the array.

The following table lists drive quantity requirements for each supported RAID level.

RAID Level Number of Drives Required

0

1

1

2 (SATA VROC)

5

3

6

3

10

4

50

6

60

6

RAID types are Hardware RAID and Software RAID:

  • Hardware RAID - A Host Bus Adapter (HBA) manages the array and presents the volumes to the OS as simple disks. Hardware RAID unburdens the operating system, and is more robust than software RAID.

    Oracle Storage 12 Gb SAS PCIe RAID Host Bus Adapter, Internal 16 Port HBA on your server supports hardware RAID. For instructions, see Configure RAID on Oracle Storage 12 Gb SAS PCIe RAID Host Bus Adapter, Internal 16 Port. To learn more about this HBA, refer to the Oracle Storage 12 Gb/s SAS PCIe RAID HBA, Internal Installation Guide.

    Tip:

    You can use Oracle Hardware Management Pack raidconfig CLI commands to view and configure RAID storage (hardware RAID controllers only). Before using raidconfig to create volumes (which will overwrite any existing data), use operating system tools to take an inventory of attached disks, their enumeration, and whether they contain data that you want to preserve.

  • Software RAID - The operating system manages the array, which is created and configured using an OS or utility. In a typical use case, you boot an OS on one device to create a software RAID volume on a different device. For details, refer to the instructions in your operating system documentation. See Installing an Operating System.

    See Configure SATA RAID Using VROC.

Note the following conditions:

  • Your server might have other storage devices where you can install an operating system as well. These might or might not support or require RAID; however, if you do configure a RAID volume on these devices, you must do so before installing an OS. For instructions, refer to the documentation for the device, and Installing an Operating System.

  • The UEFI BIOS utility in your server does not display items in the boot list until after an operating system is installed on the storage device and then the server is booted. This is unlike older BIOS utilities that display devices where you can install an OS. To see devices where you can install an OS, you have to use an OS installation program.

Configure RAID on Oracle Storage 12 Gb SAS PCIe RAID Host Bus Adapter, Internal 16 Port

Some devices, including Oracle Storage 12 Gb SAS PCIe RAID Host Bus Adapter, Internal 16 Port, must include a RAID volume before they can present a valid target for operating system installation programs.

The server is shipped with Oracle Storage 12 Gb SAS PCIe RAID Host Bus Adapter, Internal 16 Port configured as RAID 0 volumes, meaning that each volume includes a single disk drive. Other volumes combine multiple disks into arrays, which can increase performance and provide redundancy.

Oracle Storage 12 Gb SAS PCIe RAID Host Bus Adapter, Internal 16 Port manages the HDDs and SSDs in your system. When the system is shipped, the HDD and SSD drives are configured into RAID 0 volumes. Use this procedure to reconfigure these drives into RAID volumes according to your performance and redundancy needs.

  1. Back up any data on the drives.

    Create the volume before installing an operating system on a drive.

    Altering RAID configuration might destroy any data or OS image on the affected drive.

  2. Configure the server for a one-time boot to BIOS.
    1. Access the Oracle ILOM web interface.
    2. Navigate to Host Management → Host Control.
    3. Select BIOS from the drop-down list, and select Save.

      This causes the server to boot to BIOS on the next boot.

  3. Access a system console.

    For more information, see Redirect Host Server Desktop or Storage Devices and refer to Oracle X9 Series Servers Administration Guide at https://www.oracle.com/goto/x86admindiag/docs .

  4. Power on or reset the server.

    For example, to reset the server:

    • From Oracle ILOM CLI, type: reset /System.

    • From Oracle ILOM web interface, select Host Management → Power Control, and in the Select Action list box, select Power On, Reset, or Graceful Reset. Click Save, and then click OK.

    • From the local server, press the On/Standby button on the front panel of the server for approximately 1 second to power off the server, and then press the On/Standby button again to power on the server.

    For more details, see Controlling System Power.

    The system boots to the BIOS Setup Utility.

    Note:

    The steps and screens in this procedure are examples. What you actually see might differ depending on your system's equipment and configuration.

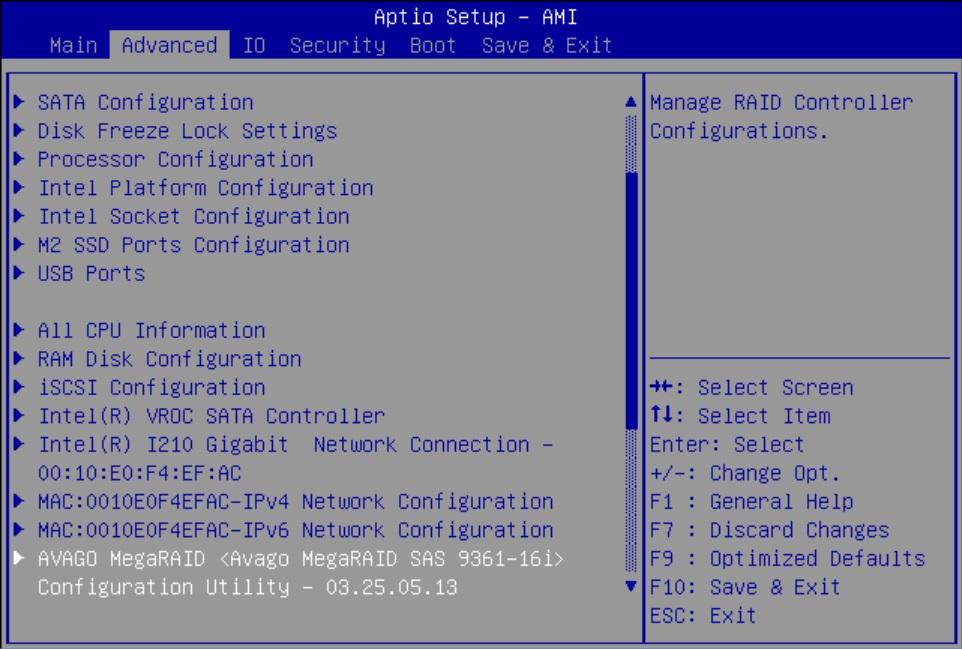
  5. On the BIOS Setup Utility screen, select the Advanced tab, select Broadcom MegaRAID Configuration Utility, and press Enter.

    Image showing the Advanced menu with MegaRAID Configuration Utility selected.
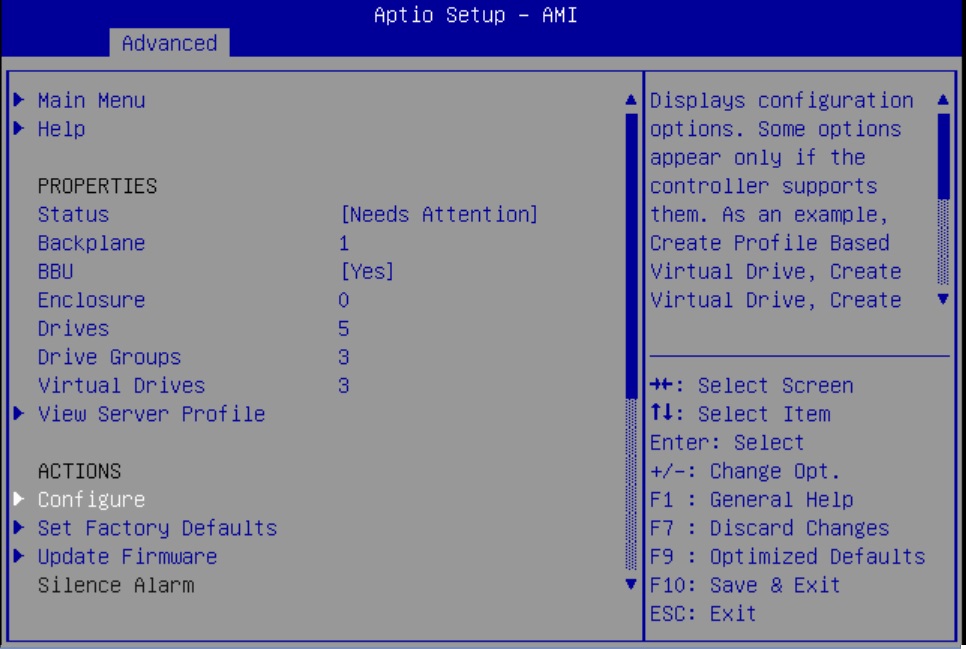
  6. From the ACTIONS menu, select Configure and press Enter.

    Image showing the Advanced menu with Configure selected.
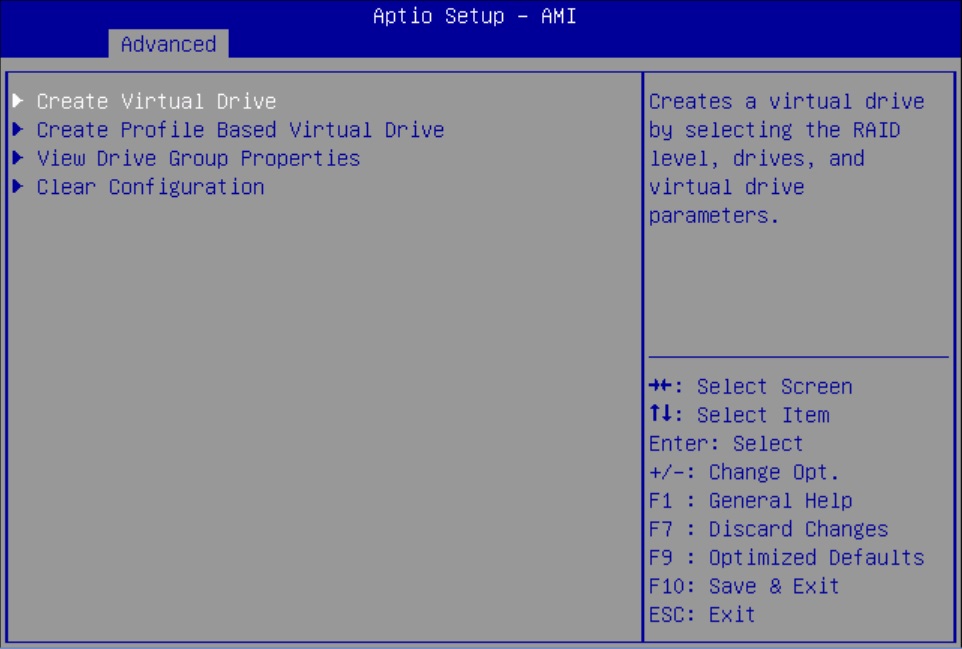
  7. Select Create Virtual Drive and press Enter.

    Image showing the Advanced menu with Create Virtual Drive option selected.

    The Create Virtual Drive menu appears.

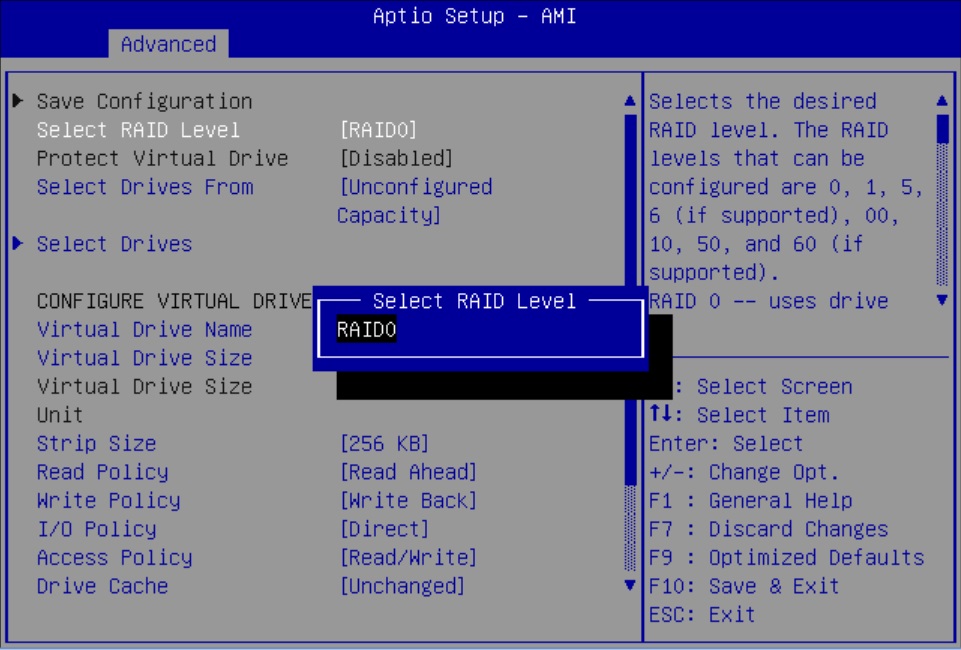
  8. Set the RAID level.

    Choose Select RAID level, specify the supported RAID level, and press Enter.


    Image showing the Virtual Drive Management menu options with RAID level pop up.
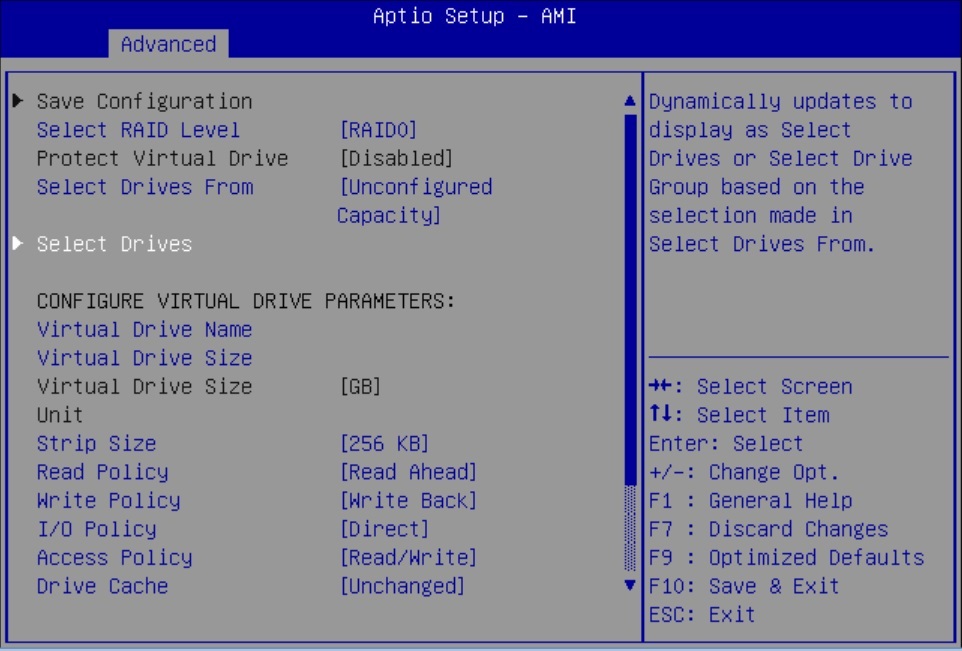
  9. Navigate to Select Drives and press Enter.

    Image showing the Virtual Drive Management menu options with Select Drives highlighted.
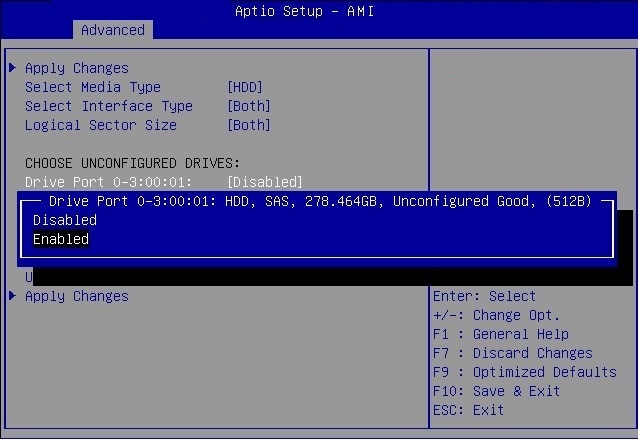
  10. For each drive that you want to include in the RAID volume, do the following:
    1. Use the arrow keys to navigate to the drive.
    2. Use the arrow keys to navigate to the Enabled or Disabled field associated with the drive, and press Enter.
    3. In the pop-up window, select Enabled, and press Enter.

      The drive is now listed as Enabled.

    4. Press ESC to close the pop up.

    Image showing RAID Enable Drive pop up.
  11. Select Apply Changes, and press Enter.

    The RAID volume is created with the drives you specified, and the Confirmation page is displayed.

    For more information on performing this procedure, refer to 12Gb/s MegaRAID SAS Software User Guide at https://docs.broadcom.com/docs/pub-005110 .

  12. To return to the Create Virtual Drive Advanced menu, press ESC.
  13. Select Save Configuration.
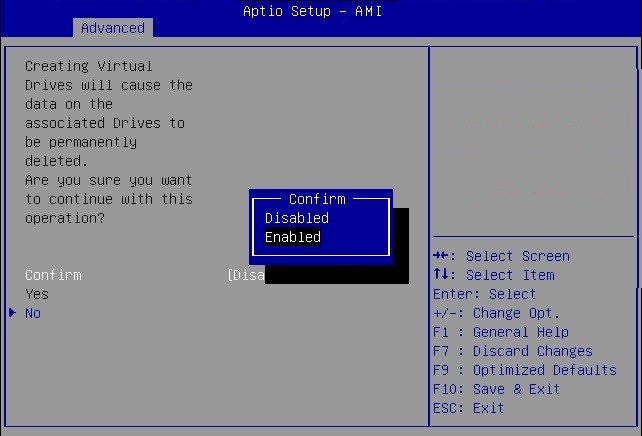
  14. Select Confirm, select Enabled, and press Enter.

    Image showing the Enable Confirm pop up.
  15. To save your new boot configuration, select Yes.
  16. To verify that the RAID volume was created:
    1. Press ESC to exit from the Broadcom MegaRAID Configuration Utility and to return to the Configuration Utility menu.
    2. Navigate to the View Drive Group Properties menu, and press Enter.
    3. Review the logical drive information on the page that is displayed.
    4. Press ESC to return to the Main menu of the BIOS Setup Utility.
    5. Navigate to the Save & Exit menu, select Save Changes and Exit, and press Enter.

    This completes the RAID configuration. You can now install an OS on the logical drive. See Installing an Operating System.

Configure SATA RAID Using VROC

This procedure configures a RAID volume so that you can install an operating system. You can create and manage RAID arrays on Oracle Server X9-2 and Oracle Server X9-2L SATA M.2 SSDs using Intel Virtual RAID On CPU (VROC), which provides the following benefits:

  • Use SATA drives to their full potential

  • Fewer hardware queues

  • Bootable RAID

  • Hot Insert/Surprise removal

Note:

This procedure applies only to Oracle Server X9-2 and Oracle Server X9-2L with Oracle Linux and installed SATA M.2 SSD boot devices. Microsoft Windows, VMware ESXi, and Oracle Solaris do not support VROC on Oracle Server X9-2 and Oracle Server X9-2L.

Intel VROC (SATA RAID) provides an enterprise RAID solution for SATA devices connected to the Intel Platform Control Hub (PCH) configured for RAID mode. Virtual RAID on CPU (Intel VROC) is an enterprise, hybrid RAID solution, specifically designed for SATA SSDs connected directly to the CPU. Intel VROC is made possible by the new CPU feature Intel Volume Management Device, Intel VMD, a new hardware architecture on Intel Xeon Scalable Processors.

  1. Access the host console locally or through Oracle ILOM.

    For instructions, see Accessing Oracle ILOM.

  2. Reset or power on the server.

    For example, to reset the server:

    • From Oracle ILOM CLI, type: reset /System.

    • From Oracle ILOM web interface, select Host Management → Power Control, and in the Select Action list box, select Graceful Reset, Reset, or Power On. Click Save, and then click OK.

    • From the local server, press the On/Standby button on the front panel of the server for approximately 1 second to power off the server, and then press the On/Standby button again to power on the server.

    For more details, see Controlling System Power.

    The power-on self-test (POST) sequence begins. The system boots to the BIOS Setup Utility.

  3. When prompted in the BIOS screen, press F2 (Ctrl+E from a serial connection) to launch the BIOS Setup Utility.

    Note:

    The steps and screens in this procedure are examples. What you actually see might differ depending on your system equipment and configuration.

  4. On the BIOS Setup Utility screen, select the Advanced tab, select Intel Platform Configuration, and press Enter.

    Image showing the Intel Platform Configuration SATA configuration selected on Advanced tab.
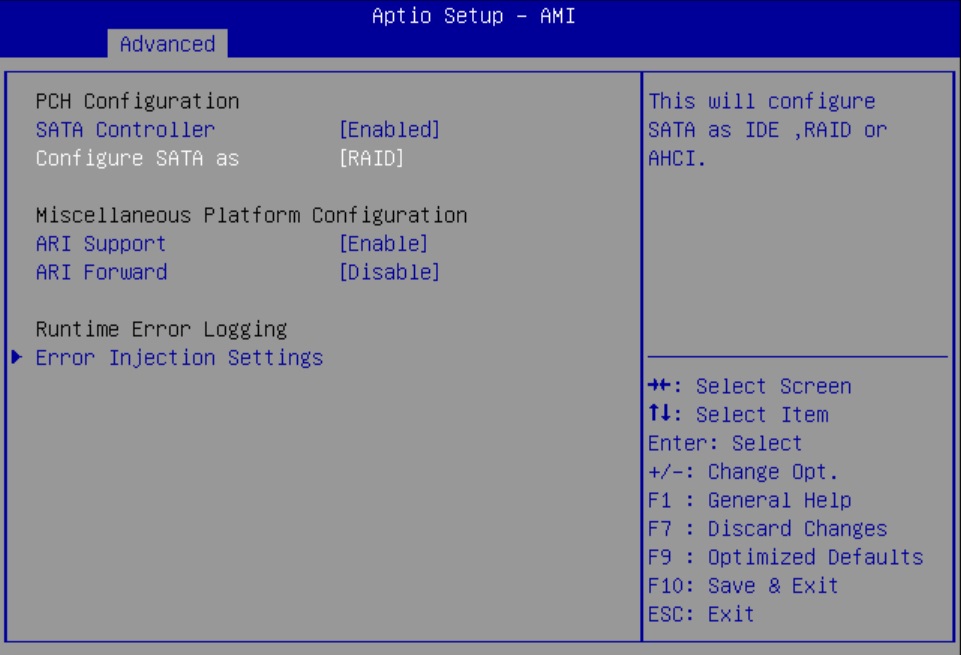
  5. On the PCH (Platform Control Hub) Configuration screen, select Configure SATA as.

    Image showing "Configure SATA as" selected on Advanced tab.
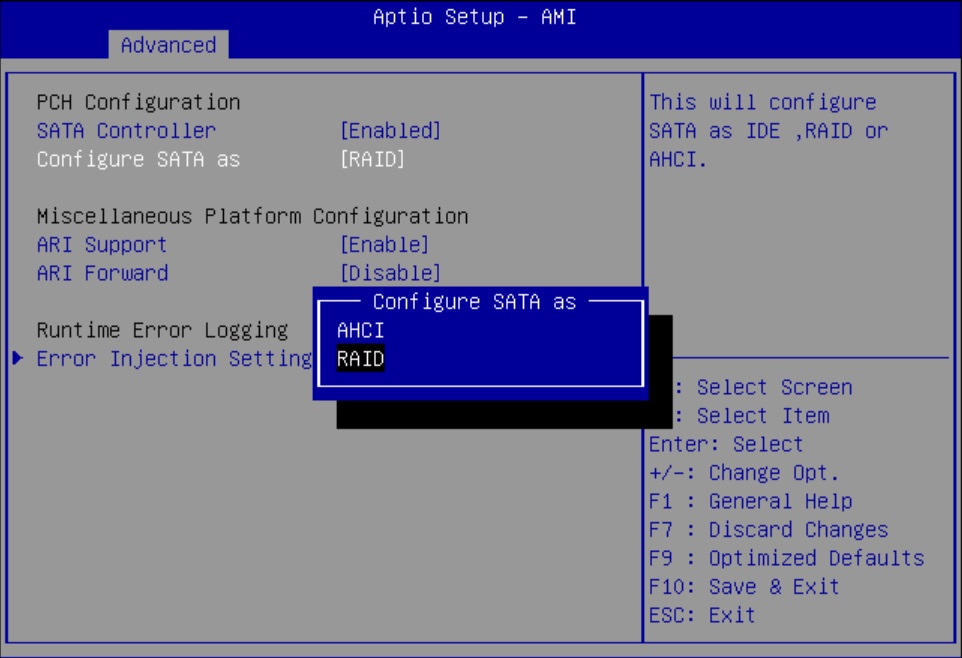
  6. In the Configure SATA as pop up, select RAID and press Enter.

    Image showing the Configure SATA as RAID pop up on Advanced tab.
  7. In the Save & Exit menu, select Save Changes and Exit and press Enter.
  8. Reset or power on the server.

    For example, to reset the server:

    • From Oracle ILOM CLI, type: reset /System.

    • From Oracle ILOM web interface, select Host Management → Power Control, and in the Select Action list box, select Graceful Reset, Reset, or Power On. Click Save, and then click OK.

    • From the local server, press the On/Standby button on the front panel of the server for approximately 1 second to power off the server, and then press the On/Standby button again to power on the server.

    For more details, see Controlling System Power.

  9. When prompted in the BIOS screen, press F2 (Ctrl+E from a serial connection) to launch the BIOS Setup Utility.

    Note:

    The steps and screens in this procedure are examples. What you actually see might differ depending on your system equipment and configuration.

    The power-on self-test (POST) sequence begins. The system boots to the BIOS Setup Utility.

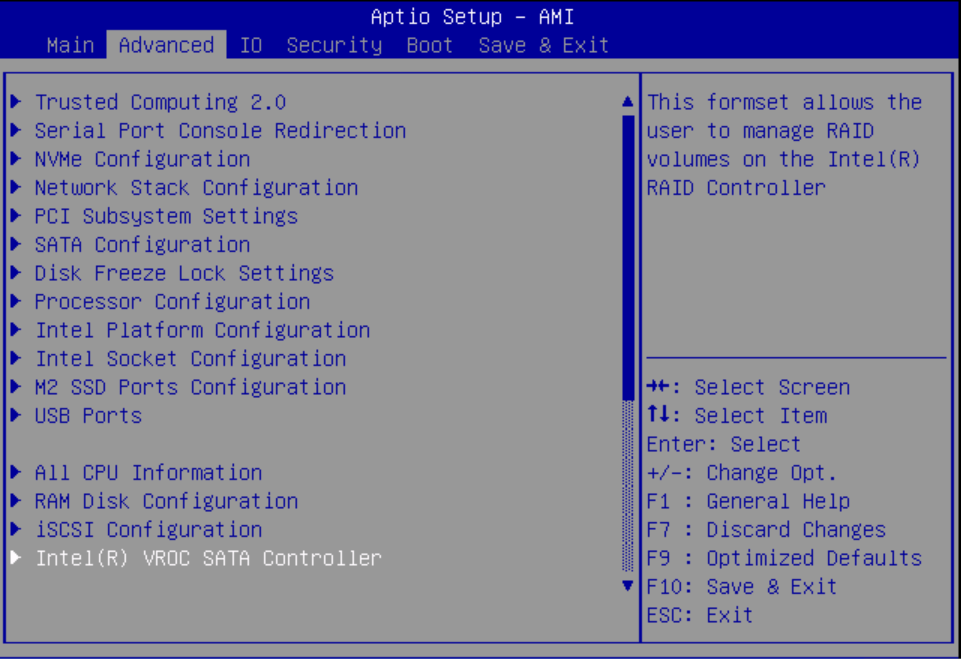
  10. Return to the Advanced menu and press Enter to select the Intel VROC SATA Controller option.

    Image showing the Advanced tab with Intel VROC SATA Controller selected.
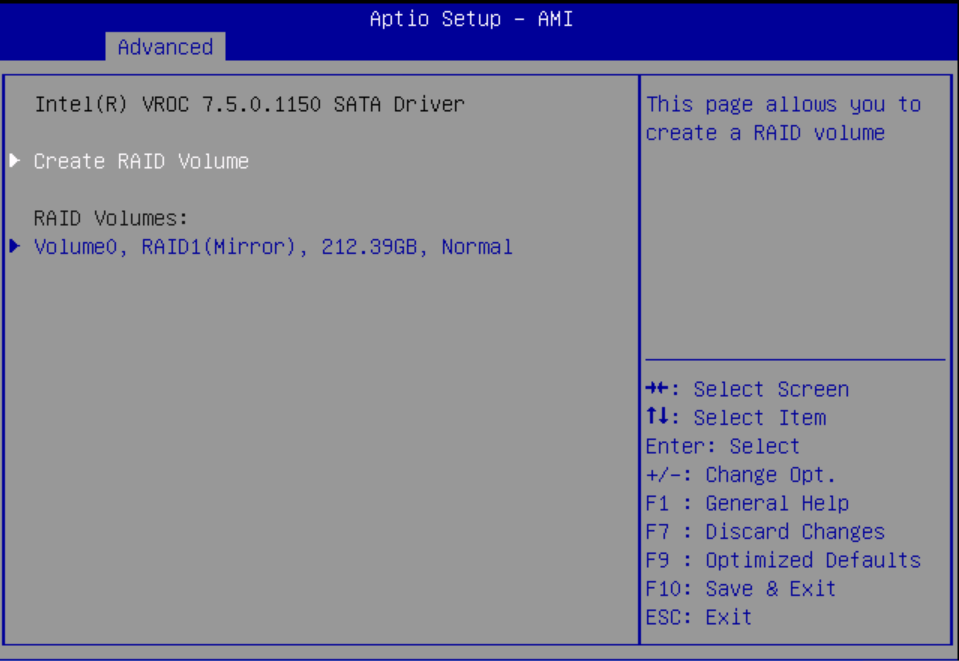
  11. Select Create RAID Volume and press Enter.

    Image showing the VROC Create RAID Volume selection.
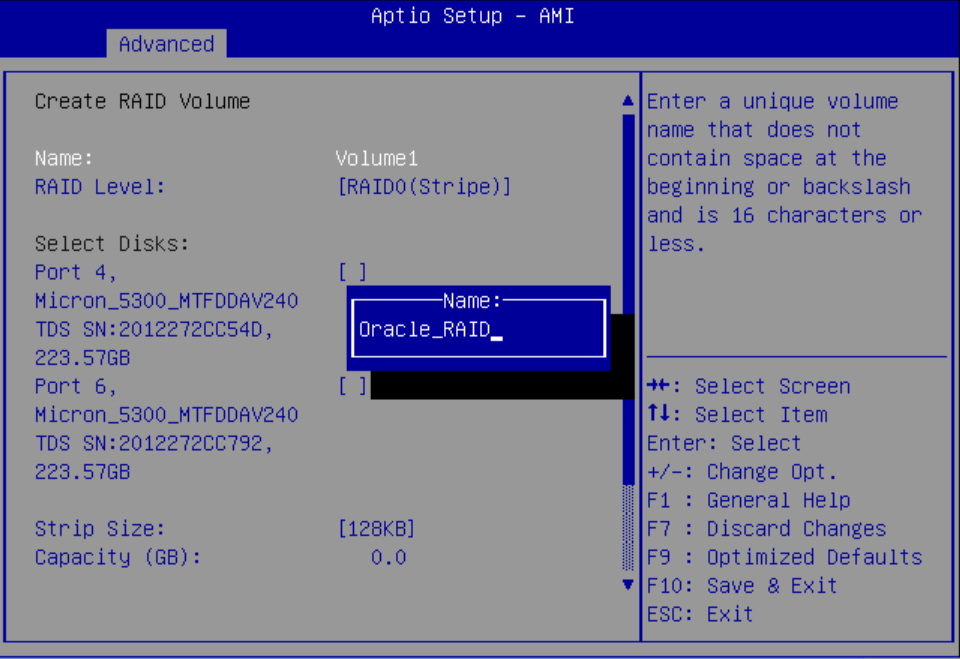
  12. On the Create RAID Volume Screen, select Name, and press Enter.

    You can assign an optional name to the RAID volume.


    Image showing the VROC RAID Volume Name pop up, with an example name provided.
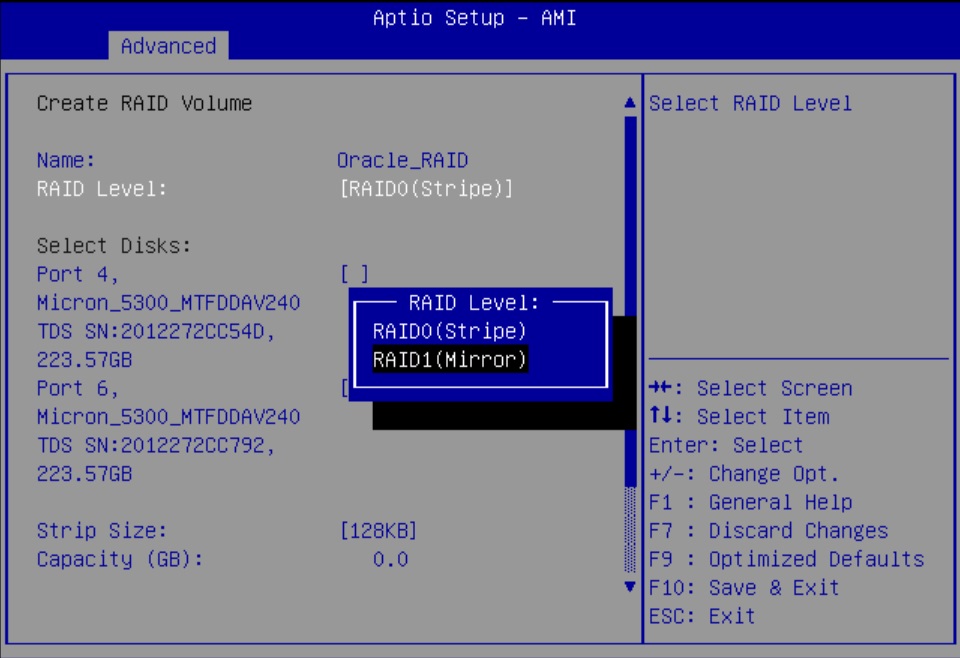
  13. Select RAID Level and press Enter to set the RAID level.

    Image showing the RAID1(Mirror) selected.
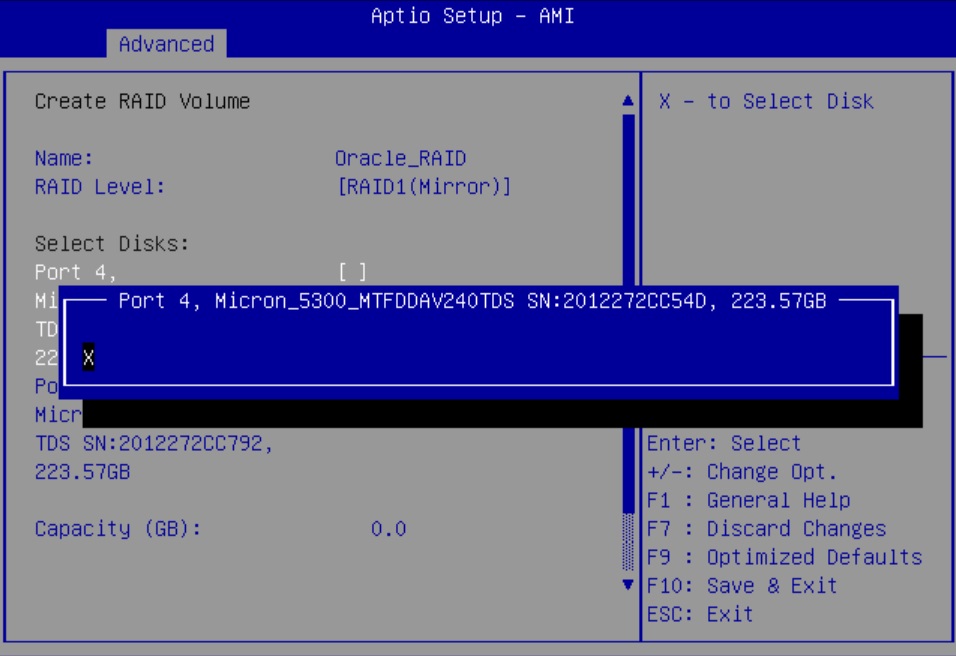
  14. Select the drive you are configuring for RAID.

    Select the SATA M.2 devices. For each drive that you want to include in the RAID volume, do the following:

    1. Use the arrow keys to navigate to the drive, and press Enter.
    2. In the pop-up window, add an X to select the drives, and press Enter.
    3. Press ESC to close the pop up.

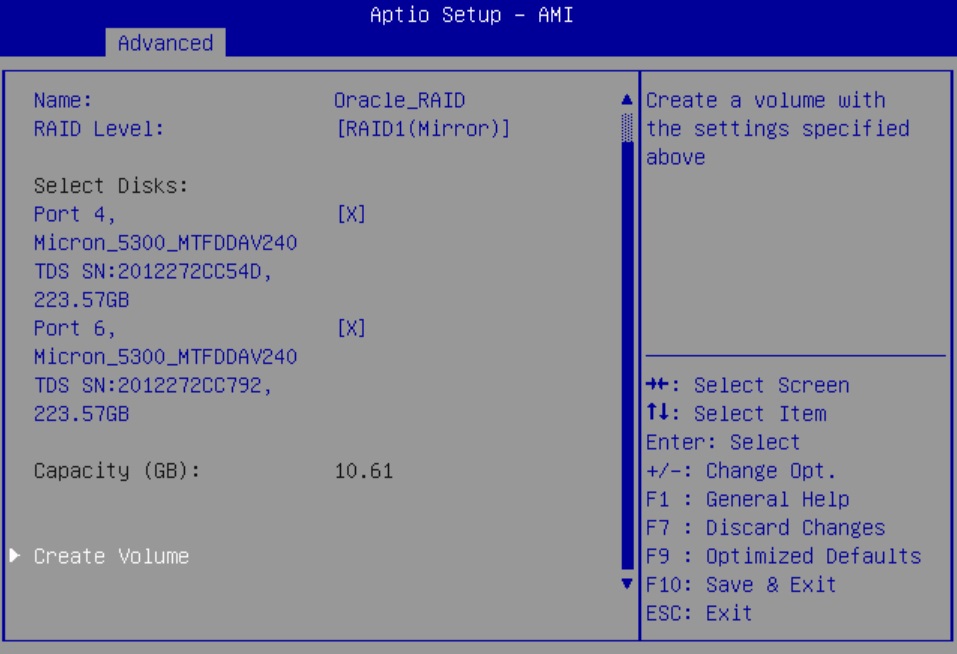
    Image showing the selected disk being configured for RAID.
  15. Scroll to the bottom of the Create RAID Volume screen and select Create Volume. Press Enter.

    Image showing the Create RAID Volume screen with Create Volume highlighted.
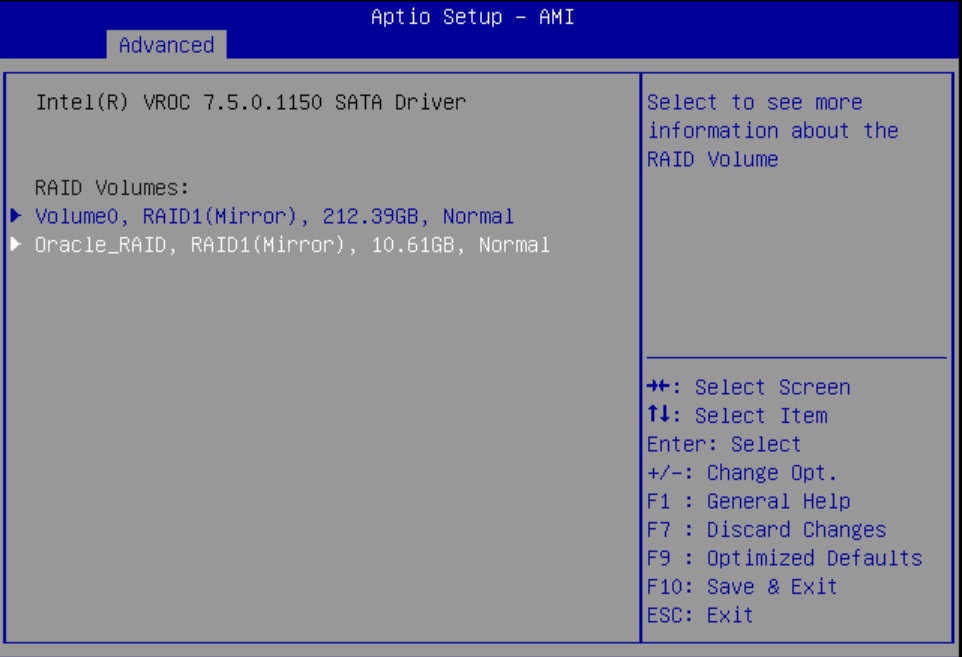
  16. The volume appears under RAID volumes.

    Image showing the created SATA RAID volumes.

    Press ESC to return to the BIOS Setup Utility Main menu.

  17. In the Save & Exit menu, select Save Changes and Exit and press Enter.
  18. Reset or power on the server.

    For example, to reset the server:

    • From Oracle ILOM CLI, type: reset /System.

    • From Oracle ILOM web interface, select Host Management → Power Control, and in the Select Action list box, select Graceful Reset, Reset, or Power On. Click Save, and then click OK.

    • From the local server, press the On/Standby button on the front panel of the server for approximately 1 second to power off the server, and then press the On/Standby button again to power on the server.

    For more details, see Controlling System Power.

    The power-on self-test (POST) sequence begins.

  19. This completes the RAID configuration.

    You can now install an operating system on the volume that you created. See Installing an Operating System.

Identifying Installed Oracle Flash Accelerator F640 PCIe Cards in BIOS Setup Utility

You can install an operating system on an Oracle Flash Accelerator F640 PCIe Cards without any additional configuration. All installed Oracle Flash Accelerator F640 PCIe Card controllers (two per card) are visible to an OS installer program.

This task uses the BIOS Setup Utility to list all installed Oracle Flash Accelerator F640 PCIe Cards.

Note:

Each Oracle Flash Accelerator F640 PCIe Card supports two 3.2TB drives, each with its own controller. These appear in the BIOS Setup Utility, and in OS installation programs as two separate 3.2TB drives.
  1. Configure the server for a one-time boot to BIOS.
    1. Access the Oracle ILOM web interface.
    2. Navigate to Host Management → Host Control.
    3. Select BIOS from the drop-down list, and select Save.

      This causes the server to boot to BIOS on the next boot.

  2. Access a system console.

    For more information, see Redirect Host Server Desktop or Storage Devices and refer to Oracle X9 Series Servers Administration Guide at https://www.oracle.com/goto/x86admindiag/docs .

  3. Power on or reset the server.

    For example, to reset the server:

    • From Oracle ILOM CLI, type: reset /System.

    • From Oracle ILOM web interface, select Host Management → Power Control, and in the Select Action list box, select Graceful Reset, Reset, or Power On. Click Save, and then click OK.

    • From the local server, press the On/Standby button on the front panel of the server for approximately 1 second to power off the server, and then press the On/Standby button again to power on the server.

    For more details, see Controlling System Power.

    The power-on self-test (POST) sequence begins. The system boots to the BIOS Setup Utility.

  4. When prompted in the BIOS screen, press F2 (Ctrl+E from a serial connection) to launch the BIOS Setup Utility.

    Note:

    The steps and screens in this procedure are examples. What you actually see might differ depending on your system equipment and configuration.

  5. Navigate to the Advanced page.
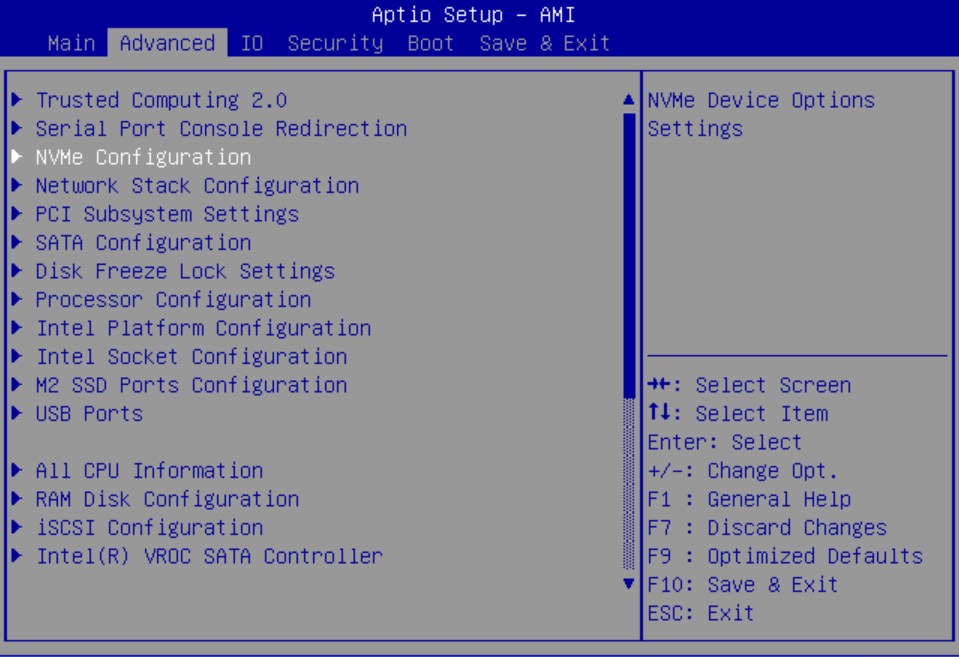
  6. Select NVMe Configuration.

    Image showing the BIOS Setup Advanced - NVMe screen.

    A list of installed Oracle Flash Accelerator F640 PCIe Cards appears.

  7. You can now install an OS on the logical drive.