7 Using Oracle Integrated Lights Out Manager (ILOM)
Oracle Server X9-2 and Oracle Server X9-2L are shipped with the latest version of Oracle Integrated Lights Out Manager (ILOM). Oracle ILOM is system management firmware embedded on the service processor (SP). The SP provides management and monitoring capabilities for the server.
Refer to Oracle Integrated Lights Out Management (ILOM) 5.1 documentation at: Servers Documentation Systems Management
This section describes how to access and get started using Oracle ILOM for your server.
Connecting to Oracle ILOM
You can connect to Oracle ILOM using one of these methods:
-
Serial connection to SER MGT port (CLI only) – See Log In to Oracle ILOM Using a Local Serial Connection.
-
Dedicated remote network management connection – See Log In to Oracle ILOM Using a Remote Ethernet Connection.
-
Sideband network management connection – Refer to "Sideband Network Management Connection" in Oracle ILOM Administrator's Guide for Configuration and Maintenance at Servers Documentation Systems Management.
-
Host-to-ILOM interconnect – Refer to "Dedicated Interconnect SP Management" in Oracle ILOM Administrator's Guide for Configuration and Maintenance, at Servers Documentation Systems Management.
For more information, refer to product information. Refer to Oracle Integrated Lights Out Manager (ILOM) 5.1 Documentation at: Servers Documentation Systems Management
Related Topics
Oracle ILOM Hardware and Interfaces
The following table lists the major components and interfaces of Oracle ILOM.
| Component | Function |
|---|---|
|
Hardware |
|
|
Interfaces |
|
Related Topics
Accessing Oracle ILOM
You can log in to the Oracle ILOM command-line interface (CLI) locally using the RJ-45 serial management port (SER MGT). You also can log in to the Oracle ILOM web interface or CLI remotely using one of the network ports on the server.
To log in to Oracle ILOM, follow these procedures:
To log out of Oracle ILOM, follow this procedure:
Log In to Oracle ILOM Using a Local Serial Connection
Note:
To enable first time login and access to Oracle ILOM, a default Administrator account and its password are provided with the system. To build a secure environment, change the default password (changeme) for the default Administrator account (root) after your initial login. If this default Administrator account has since been changed, contact your system administrator for an Oracle ILOM user account with Administrator privileges.
To prevent unauthorized access to Oracle ILOM, create user accounts for each user.
For procedures to change the root password and create user accounts, refer to Oracle Integrated Lights Out Manager (ILOM) Documentation at Servers Documentation Systems Management.
Related Topics
Log In to Oracle ILOM Using a Remote Ethernet Connection
You can log in to the Oracle ILOM web interface or CLI remotely using one of the network ports on the server.
You need to know the IP address or host name of the service processor (SP) to log in to Oracle ILOM remotely. If you do not know the IP address of the SP, see Troubleshooting Oracle ILOM.
Note:
To enable first time login and access to Oracle ILOM, a default
Administrator account and its password are provided with the system. To build a
secure environment, change the default password (changeme) for the default Administrator account (root) after your initial login. If this default Administrator account
has since been changed, contact your system administrator for an Oracle ILOM user
account with Administrator privileges.
To prevent unauthorized access to Oracle ILOM, create user accounts for each user.
For procedures to change the root password and create user accounts, refer to Oracle Integrated Lights Out Manager (ILOM) Documentation at Servers Documentation Systems Management.
To improve response times, disable the web browser proxy server (if one is enabled).
Modifying Network Settings
This section provides information about the default network settings on the service processor (SP), and procedures for viewing and modifying those settings in Oracle ILOM:
The servers support dual-stack IPv4 and IPv6 settings, which enable Oracle ILOM to fully operate in an IPv4 or IPv6 network environment.
-
IPv4 configurations – DHCP is enabled by default, allowing a DCHP server on the network to automatically assign network settings to the service processor.
-
IPv6 configurations – IPv6 stateless auto-configuration is enabled by default, allowing an IPv6 router on the network to assign the network settings.
In a typical configuration, you accept the default settings. However, if you want to modify the service processor network settings, use the following procedures.
Modify Network Settings
When you use Oracle ILOM to deploy or manage the server, you can optionally modify the default network settings provided for the service processor (SP).
This procedure provides web interface and CLI instructions for viewing and modifying the network settings that are assigned to the SP.
Test the IPv4 or IPv6 Network Configuration
-
Use either the Oracle ILOM web interface or CLI to test the IPv4 or IPv6 network configuration.
-
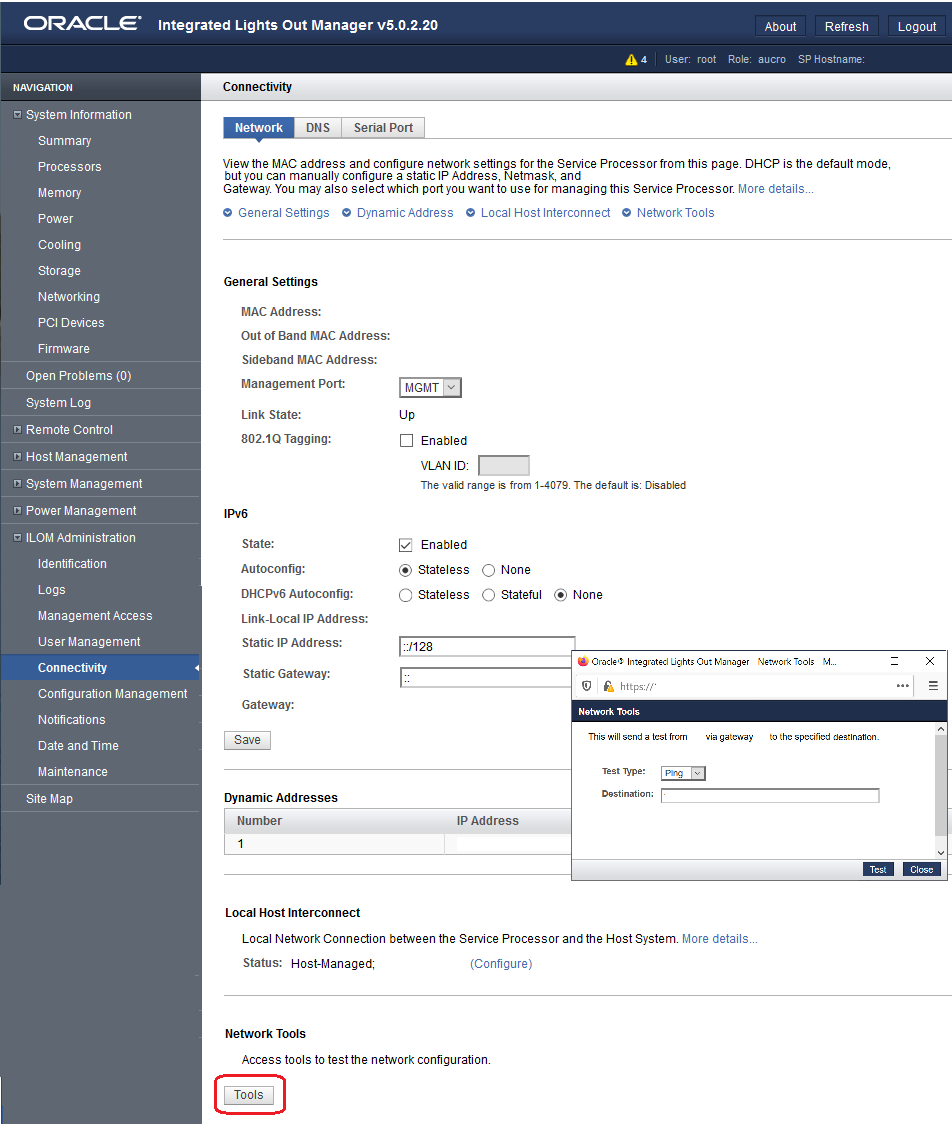
From the Oracle ILOM web interface:
-
Click
ILOM Administration → Connectivity → Network. -
On the Connectivity page, click the Tools button. The Network Tools dialog box appears.

-
In the Network Tools dialog box, in the Test Type list box, select
Ping(for an IPv4 configuration) orPing6(for an IPv6 network configuration).If the test was successful, the message Ping of ip_address succeeded message appears below the Destination field in the Network Configuration Test screen.
-
Type the IPv4 or IPv6 test destination address in the Destination field and click
Test.
-
-
From the Oracle ILOM CLI:
-
At the CLI prompt, type the show command to view the network
testtargets and properties.For example, the following output shows the test target properties:
->show/SP/network/test Targets: Properties: ping = (Cannot show property) ping6 = (Cannot show property) Commands: cd set show -
Use the
set pingorping6command to send a network test from the device to a network destination specified in the following table.Property Set Property Value Description pingset ping=<IPv4_address>Type the
set ping=command at the command prompt followed by the IPv4 test destination IPv4 address. For example:-> set ping=192.168.10.106Ping of 192.168.10.106 succeededpingset ping6=<IPv6_address>Type the
set ping6=command at the command prompt followed by the IPv6 test destination IPv6 address. For example:-> set ping6=2001::db8:5dff:febe:5000Ping of 2001::db8:5dff:febe:5000 succeeded
-
-
Redirecting the Host Console Using Oracle ILOM
Use Oracle ILOM Remote System Console Plus to remotely redirect a host server desktop or a host server storage device.
Connecting to the host console through Oracle ILOM enables you to perform actions as if you were at the host. Connect to the host to perform the following tasks:
-
Access the server BIOS Setup Utility remotely
-
Install an operating system on the server
-
Configure an operating system on the server
-
Configure or install other software on the server
Oracle ILOM Remote System Console Plus supports a full-control console video session for a primary user and view-only console video sessions for all other signed-in users. By default, a maximum of four video redirection sessions can be launched from the Oracle ILOM web interface. To prevent other signed-in video session users on the SP from viewing confidential data, you can set the Maximum Client Session Count property to 1 on the KVMS page in the Oracle ILOM web interface.
For instructions, see the following sections:
Set the Mouse Mode
In Oracle ILOM, you can set the Mouse Mode property to optimize mouse movement in the Oracle ILOM Remote System Console Plus. The mouse mode can be set to either Absolute or Relative and must be set according to the requirements of the operating system that you are using to connect to Oracle ILOM.
Read the following guidelines to determine the appropriate mouse mode for your system.
| Operating Systems | Mouse Mode |
|---|---|
|
Windows Server |
Absolute |
|
Oracle Linux |
Absolute |
|
Oracle VM |
Not applicable |
|
VMware ESXi Software |
Not applicable |
For more information about selecting a mouse mode, refer to Oracle Integrated Lights Out Manager (ILOM) Documentation at Servers Documentation Systems Management Oracle ILOM Administrator's Guide for Configuration and Maintenance.
To set the mouse mode, perform the following steps:
Redirect Host Server Desktop or Storage Devices
Before you begin, ensure that the following requirements are met:
-
The following user credentials are required:
-
Console (c) user role privileges are required to use Oracle ILOM Remote System Console Plus.
-
A user account on the host server is required to log in to the redirected host desktop.
-
To exclusively control the storage media from the Oracle ILOM System Remote Console Plus application, you must have root privileges on a Linux client or root administrator privileges on a Windows client.
-
-
The mouse mode is set correctly (see Set the Mouse Mode).
-
Java Runtime Environment (JRE) 7, 1.3.1 or later is installed. For IPv4 networks, a 32-bit or 64-bit JDK is required. For IPv6 networks, a 32-bit or 64-bit Java Development Kit (JDK) 170636 or higher is required.
-
The remote management client is connected to a network that has access to one of the Ethernet management ports on the server.
To launch the Oracle ILOM Remote System Console Plus application, follow these steps:
Access Serial Remote Host Console
Before you access the host console, you can configure properties in Oracle ILOM to make the serial host console easier to view and to enable logging. Refer to the Oracle ILOM Administrator's Guide for Configuration and Maintenance at https://www.oracle.com/goto/ilom/docs .
This procedure describes how to access the host console remotely. To connect to the host console locally, see Log In to Oracle ILOM Using a Local Serial Connection.
Troubleshooting Oracle ILOM
This section addresses two issues that might occur on the Oracle ILOM service processor (SP):
-
You need to reset the Oracle ILOM SP to complete an upgrade or to clear an error.
Resetting the server SP automatically disconnects any current Oracle ILOM sessions and renders the SP unmanageable until the reset process is complete.
-
As the system administrator, you forgot the
rootaccount password and need to recover it.
Note:
x86 Delay BIOS Firmware Option can cause a longer reset and multiple reboots during server BIOS upgrades. If the server has a pending BIOS upgrade, a routine reset will take longer to complete. The pending BIOS upgrade will cause the server to power cycle and reboot several times. This is expected behavior. If the upgrade includes an FPGA update, the process can take as long as 26 minutes to complete.
A pending BIOS upgrade exists when both of these conditions are true: You updated the BIOS and SP firmware using Oracle ILOM. During the Oracle ILOM firmware update process, you selected Delay BIOS Upgrade.
For instructions to address each issue, see the following sections:
Reset the Service Processor From the Server Back Panel
If the Oracle ILOM SP stops running and you cannot reset it using the Oracle ILOM web interface or the Oracle ILOM CLI, use the following procedure to reset the SP from the server back panel.
Recover the Root Account Password
System administrators can recover the preconfigured Oracle ILOM local root account or the password for the local root account by using the preconfigured Oracle ILOM default password.
To recover the root account password, you need a local serial management port (SER MGT) connection to Oracle ILOM. If the Physical Presence State is enabled (default) in Oracle ILOM, you must prove that you are physically present at the server.
To recover the root account password, perform these steps:


